Plastic windows protect from street noise and provide comfortable temperature air of an apartment, private house. However, after installation they require . Adjustment of the locking mechanisms is necessary every off-season - only then will the double-glazed windows perform their intended task. Today’s article will tell you how to switch windows to winter mode, why this is needed, and when such actions are performed. Along the way, it is worth understanding the features of locking mechanisms, the design, and some of the nuances of operation. Photo and video instructions will help us, explaining in detail the algorithm of the actions performed.
Let us immediately make a reservation that if you lack knowledge and experience, our editors recommend turning to professionals in your field. Specialists from specialized companies will advise on all possible issues and offer the most profitable options problem solution. Well, for those who still want to tackle this issue on their own, here is a little information.
Modern plastic windows adjustable according to the pressing force of the sashes in three modes:
- summer– the window sash is pressed weakly. This ensures air circulation in the room, realizing. The wear of the rubber seals is minimal;
- winter mode on plastic windows provides a tight clamp. There is no air circulation, which ensures heat retention in the home. The load on the sealing rubber bands is maximum;
- standard– average position of the eccentrics (trunnions). More often than not, installers leave the locking mechanisms in this position. The only difference is that professionals who value their reputation show the owner how to convert double-glazed windows to winter or summer mode, and the careless ones (which, unfortunately, are the majority) do not bother themselves with explanations. The standard mode is intended for off-season use.

Why switch the modes of plastic windows
It is enough not to switch the “winter-summer” mode on plastic windows for 2-3 years, so that after, even with correct adjustments started to blow from under the window sill or balcony door. Let's look at the problems that arise with incorrect settings.
The first is a violation of the microclimate of the room. Excessive condensation contributes to the formation of condensation on frames, double-glazed windows and walls, which leads to mold. “Summer” settings in winter lead to heat loss, the need arises. The result is higher gas bills or...

Important! Using the winter position of plastic windows in the warm season will lead to rapid wear of the seals. The result is the futility of any subsequent adjustments. The solution is to replace the rubber seals, which are not cheap.
Switching modes of plastic windows: advantages and disadvantages
Disadvantages in window adjustment can only occur if done incorrectly home handyman. If everything is done correctly, switching modes will only bring benefits. Let's figure out in what cases it is justified.

Timely switching will extend the life of the windows, even if these actions have not been performed for some time. Drafts in winter or dust ingress in summer for some reason are treated by switching the fittings to winter mode. Maybe not for long, but it will be delayed for a year or two. Sagging loops are eliminated in the same way. Replacing fittings is a last resort measure.
Good to know! Incorrectly set modes can cause a window or door to jam separately in the ventilation position or together with opening.
Determining the possibility of changing the seasonal regimes of plastic windows
Not all models of plastic windows have the ability to change modes. To understand whether it is present on your double-glazed windows, you need to look at shut-off valves. The eccentric located in the middle can be oval or have a hole in the center for an asterisk or hexagon. This indicates the presence of winter mode on plastic windows. The photos below will help the reader understand this issue.


The algorithm for adjusting windows with different trunnions is identical, but their position may differ. Let's try to understand in detail the types of eccentrics.
Forms of eccentrics and nuances of mode transfer
The oval trunnion after installation is often located diagonally - this is the standard position, average between winter and summer. The horizontal position indicates winter mode, and the vertical position indicates summer mode.
If the shut-off valve eccentric is round (hexagonal), then its positions are as follows. Pushed towards the street - winter, located in the center - standard, recessed towards the apartment - summer.
The third option is a round hexagon pin that does not move when turning. In this case, there is a mark on it, which indicates the correct position. To make it easier to understand, we offer pictures for viewing on how to switch windows to winter mode.


How to switch windows to winter mode: preparing double-glazed windows
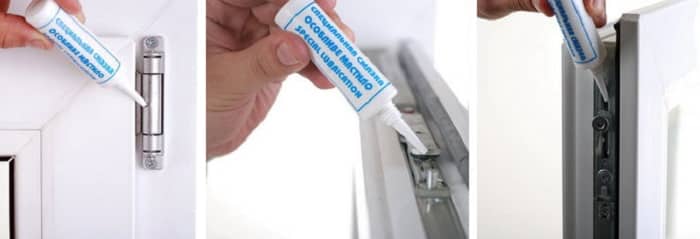
Before, you should make preparatory work. The first thing to do is to remove the lubricant from the locking mechanism components with a rag, so that when adjusting, dirt and dust do not get inside with it. After all the work done, the mechanism is lubricated again.

Very important! The rubber frame seal should be treated before cold weather. You can do this with a lubricant (silicone or glycerin based), but it is better to use silicone spray, which is sold in all hardware and automotive stores.
How and when are plastic windows switched to winter mode?
Experts recommend switching locking mechanisms from summer to winter only in extreme cases, when drafts become sensitive. However, this is only suitable for warm weather climatic zones Russia. It is optimal to switch at the beginning of the heating season.
A fogged glass unit or a slight appearance of ice on it from the inside may also indicate the need for adjustment.

Helpful information! Before switching the windows to winter mode, you should carefully inspect the rubber seal. Perhaps the sash fittings are adjusted correctly, but the seal is cracked or torn. In this case, you must definitely replace it. You can buy cheap seals for one winter, but they don’t last more than a season.
Other adjustment options for plastic window frames
Having figured out how to switch the windows to winter mode using a hexagon, screwdriver or pliers, you can move on to the rest. After all, over time, the frame may move, and one side will fit tighter than the other, which is unacceptable. This creates a load on the window fittings and contributes to the appearance of drafts.

The sash is adjusted vertically and horizontally from the bottom hinge. We remove the protective plastic cover and find a screw with a hexagon hole located on top. When you turn the screw clockwise, the frame will begin to rise. Turning counterclockwise, lower the glass unit. In order to move the sash away from the frame or, conversely, to install it closer, we use a screw located on the side at the bottom of the hinge.
Important! If all adjustments are made correctly, and draft problems have not disappeared, this indicates wear of the seals, a factory defect in the frame, or improper installation of the sashes. We check the rubber seals, and if they are normal, we file a complaint with the installer. That is why it is important to perform adjustments in the first year of operation - the possibility of warranty repairs and sometimes replacement remains.
Article
Adjusting windows for winter is a very important aspect. But often people don’t know about this or simply forget. If you do not maintain windows, even the most expensive ones can break or lose their properties. Windows must be handled with care, otherwise consequences such as drafts, cold and noise coming from the street may occur.

This manipulation should be carried out before the onset of frost, while the air temperature outside is above zero.
Why is it necessary?
Probably many people know that plastic windows have two modes: summer and winter. Each of these modes plays its own important role. When purchasing and installing windows, you should be instructed on how to properly set up and use plastic windows. Thanks to this, you can avoid many problems. However, most often no one knows how to configure it correctly, so they use the services of specialists. But to customize the windows, you won’t need much effort, because there is nothing complicated about it.


The initial adjustment is made immediately after installing the window. Of course, this makes life easier, but it will not help you in the future when the seasons change.
Many craftsmen say that adjustment is very important for windows; this is the main test of how the windows will behave in cold weather. By adjusting the windows, the temperature in your room will remain within normal limits, you will be able to avoid drafts and significantly improve the tightness of the windows. If adjustments are neglected or performed incorrectly, this may cause excessive moisture, and very coldy Frost may form on the windows. If your window is not the first year old, then the tightness of the window is already much lower than at the beginning of its operation; there are quite a few reasons for this problem.


To avoid unexpected damage, windows should be adjusted before each change of season. If you don't change the modes from summer to winter, you will allow cold air to penetrate into your home. As a result, the air temperature in the house decreases significantly and more energy is spent to maintain heat. The first window adjustment should be made when the window is initially installed. Also try to carry out technical inspections at least once every 2 years. Often during inspections, specialists find any deviations in the design. The wizard will help you figure out this problem.


When adjusting structures, do not forget that weak pressure corresponds to summer season, and strong, respectively, winter.
Adjust yourself PVC double glazing making your own for the winter is not at all difficult. Our instructions will help you.

Tools
You may need special tools to adjust windows. Try to stock up on tools such as pliers, hex keys, Phillips and flathead screwdrivers, and it's a good idea to have a set of screwdriver bits on hand.
To lubricate the structure, you can use regular machine oil or a special spray.


Identifying areas that need adjustment
In order to determine the places that need to be adjusted, you first need to find out whether the sash pressure needs to be adjusted. To do this, you need to set the position of the trunnions, which are located near the handle, on the edge of the window. The pressure is determined using dots or small strips that are located on the circular section of the trunnions. If the stripes point to the top position, this means that this moment The window clamp is in the middle or normal position. Usually this is the position that the specialist set for you when installing the window.


If you see that the stripes look inside the room, then this indicates that the design is currently set up for the winter season. And if the stripes look in the opposite direction, then, accordingly, for the summer season. In addition to the above, it would be useful to check the frame for sagging. Windows that were installed a long time ago are more likely to sag.
The sagging of the frame (sash) can be determined even by sound. When the sash sags, it rubs against the bottom of the frame, of course, this is accompanied by a specific sound.

Common Problems
The most common problems with plastic windows are:
- condensate;
- mold;
- depressurization;
- breakdown of fittings;
- freezing in winter time years and other problems.
Condensation and mold– very unpleasant aspects plastic structures. In principle, the very presence of condensation is the norm, but there should be very little of it, and it is allowed only at the edges. If the window sweats completely, it is most likely due to high humidity indoors or due to a large temperature difference (outdoors and indoors).
The most economical and, of course, simplest solution is simple ventilation several times a day for 10-15 minutes.
But you can also install a special shutter on the window, which allows micro-ventilation. However, this service costs little money. You can make a ventilation system in the room. However, this is not cheap, and it will take a lot of effort.


Mold- This is a consequence of condensation. The cause of mold can be improperly made slopes. They can be plastered or made of plasterboard. The problem with plastered slopes is that they quickly freeze, which leads to the development of fungus. Slopes finished with plasterboard are not such a bad option, especially if they are insulated mineral wool. In this case they have excellent thermal insulation properties. But it is worth considering that such slopes can be made in rooms with low humidity.


Perfect option- These are plastic slopes. They are easy to clean, do not need to be painted and, when insulated with mineral wool, retain heat well.
If the rubber band (seal) deteriorates, this may cause poor sealing. The easiest way is to replace the rubber band. However, remember that the elastic will last longer with proper care. The seal should be lubricated with silicone grease twice a year. Dust and dirt can accumulate there over time, causing the elastic to lose elasticity and crack. To avoid this, simply clean the rubber from dust and dirt before lubricating it. Do this at least twice a year.

Another common problem is hardware failure. This can be caused by dirt, dust and improper care. The first sign may be a clicking sound when turning the handle. Within a year the mechanism will most likely be broken. To extend the life of your window, lubricate and clean it at least 2 times a year.


Peculiarities
Before working with a window in the winter, you first need to set the value to neutral (standard) and check for the fact that the window is blowing. It is not recommended to press the rubber immediately after installing the window, as they can shrink and become deformed in a new state.
If you have a high-quality seal, then most often they give a guarantee, but this is subject to proper care. If you immediately set the pressure to strong, it will quickly become unusable, and as a result, when the next winter comes, you will find that it is blowing from the windows even when switching the modes from summer to winter, and the rubber has dried out and is all cracked. In this case, the seal should be replaced.

There are cases that even after adjusting the windows to the correct mode, in winter there is still a draft from the window, and even replacing new insulation didn't help. This usually happens if the house “sits”, then the window also sags. When you turn the window handle, the trunnion should go behind the plate and press firmly against the window. If this does not happen, then the window settings should be different.
How to install?
- Before starting work, you need to find out which of the journals do not reach the plate. To do this, inspect the window sash and remember all the protrusions. After this you need to close the window.
- Further grab the frame where the trunnions are installed, and pull it towards you. If the pin goes behind the protrusions, then the window will be immovable; if it doesn’t go, then, accordingly, the window can be moved. Thus, check all the places where there are trunnions and determine which places do not press tightly. Determine in which direction you need to move the sash. This can be done by adjusting the top and bottom loops.
- If the window does not close well at the bottom, then you need to adjust the lower hinge. At the very bottom of the hinge there is an adjustment hole; it can be for a hex key or for an asterisk. To adjust, turn the key clockwise or counterclockwise. Accordingly, as it moves, the window moves closer to the hinge, and against it, it moves away. If you unscrew everything all the way, but there are no changes, return everything to its original position, most likely the matter is different.


- There is another adjustment screw at the bottom of the hinge, but to get to it, you need to put the window on for ventilation and remove the protective cap. There will be no problems with removal; it is done very easily. After this, you will see a recess, insert the hexagon there and twist it clockwise or counterclockwise. When turned clockwise, the sash rises, and when turned counterclockwise, it lowers.
- If this problem occurs at the top of the window, open it 90 degrees. There is also a hinge at the top of the window, but it is not the same in design as the bottom. But there is also a hole for a hex screwdriver. Next, make adjustments by turning the key in the desired direction. However, do not forget that you need to leave a distance of just a few centimeters between the sash and the hinge. This is necessary so that the tilt and turn mechanism has the opportunity to go there. Every time you turn the key, check how your window closes and opens.
Typically, adjusting the pressure means changing the mode for different seasons. In winter the pressure needs to be strengthened, and in summer it needs to be loosened.


First, make sure that you really need the adjustment. The easiest way is to hold about closed window have a match or lighter near the door. The flame will show whether the window needs adjustment, whether it is blowing out of it or not. Open the window and take a close look at the inside of the sash. There you will see three pins, they are the ones that regulate the window pressure. Using a hex screwdriver you can adjust the window.
The introduction of plastic window systems has made life much more comfortable - they are much warmer and more beautiful than the old ones wooden products, and they require much less time for maintenance. To maximize the service life of a plastic window, some care is still required. The best time for this is the change of season.
As the system operates, the factory lubrication becomes contaminated with street dust and dirt, which gradually leads to deterioration in the opening and closing of the window. This usually manifests itself in the appearance of crunching and grinding sounds: if these signals are ignored, everything can end in serious damage. In addition, factory lubricant has a certain validity period, after which the metal parts of the window mechanism begin to wear off. As a result, along with street dust, metal deposits accumulate inside the frame. All this leads to heavier movement of the handle, loose closing of the window and noticeable heat loss.
Lubrication of plastic window fittings is carried out in the following sequence:
- Cleaning. The window must be opened and all internal end surfaces wiped clean using soft cloth. Particular attention is required to areas where movable sashes are attached to the frame. Most often, this is where most of the old grease and dirt accumulate. A stiff brush is suitable for cleaning moving parts of fittings. A vacuum cleaner is very convenient in this regard, allowing you to avoid dirt getting into the depths of the mechanism.
- Lubrication. After cleaning the window fittings, you need to lubricate them. roller mechanism using silicone oil. It is recommended to add 1-2 drops of the substance to each element of the system. During this procedure, it is recommended to turn the control knob, which will allow the lubricant to be evenly distributed inside the mechanism.
- Seals. Due to shrinkage of seals, approximately 80% of all failures of plastic windows occur. Sometimes they become so outdated that they require replacement: changing them is quite easy: the main thing is not to forget to lubricate the new rubber band and seat with silicone oil

The whole process: cleaning, lubricating the plastic window and replacing the seal
Lubrication of fittings and seals can be carried out by any machine oil: both synthetic and mineral substances are suitable for these purposes (the second variety thickens greatly when the temperature drops, so it is better not to use it in winter). As for silicone oil, it is better to give preference to Western brands, which have optimal thickness and service life. A good domestic alternative to such material is high-quality solid oil.
After the internal mechanisms and window seals have been cleaned and lubricated, you can perform a general window cleaning. Despite its apparent simplicity, mistakes are sometimes made at this stage that lead to serious consequences.
What follows avoid when washing a plastic window:
- Do not use aggressive means. They should not contain abrasives that scratch glass surfaces and plastic profile(the ban also applies to hard sponges). You should also avoid using gasoline, alcohol and acidic solvents, as this causes yellowing.
- Do not pick off window dirt with sharp tools. and – knives, chisels or screwdrivers. This can result in scratches on the surface of the frame and glass.
- Follow safety precautions when washing a window, without leaning out far or stepping on the outer edge of the window sill. If work is carried out on the upper floors, it is advisable to have a second person for backup.
To wash a plastic window, one of two options is usually used:
- Spray, soft cloth, paper. This method is suitable for cleaning a small, slightly dirty double-glazed window. Any container is filled with clean warm water. Then, putting gloves on your hands, clean window frame from dust and dirt. A soft rag or sponge that does not leave scratches is suitable as a tool. It is recommended to squeeze it well after each rinse. Next, using chaotic movements, apply glass cleaning agent to the window. The glass cleaning itself is carried out cotton fabric or a soft sponge. First they wash outer surface, and then internal. After wiping the washed glass dry, they are polished using paper or newspaper.

- Special solution, screed on a long handle. This makes it convenient to clean large windows located at a considerable height from the floor. The cleaning solution is prepared independently by adding a small amount of starch, ammonia, ammonia, bleach (optional) to the water. You can also use special means(like “Mr. Muscle”, etc.) by adding a few drops to clean warm water. At the first stage, the external and internal surfaces frames, Special attention paying attention to the corners and edges of the window.

Next, the rubber edge of the screed goes through the entire area of the glass, moving from top to bottom, leaving an untouched area of 20-50 mm below. From time to time the instrument needs to be dipped in water. When the window is completely washed, use a screed to remove moisture from the lower area of the window. To clean hard-to-reach areas (edges, corners) and the window sill, use a clean rag or paper napkin. The best option fabrics for rags - artificial suede and microfiber, because there is no lint left behind.
As plastic windows operate, along with lubrication and cleaning, sometimes there is a need to adjust them. The reasons why they do this may be loosening individual parts structures, violation of operating techniques, deformation of fasteners or shrinkage of the premises. In such cases, you can try to correct the situation yourself, armed with the necessary recommendations.
Window settings are possible at five points:
- Lower canopy. The vertical position of the sash is adjusted.
- Near the lower canopy. To adjust the lower horizontal angle.
- In the area of the upper canopy. Horizontal adjustment of the top of the sash.
- Eccentric locking pin. Changing the window pressing density.
- Lower locking pin. Function similar to the previous one.

Horizontal adjustment
To move the frame or correct a slight bevel, horizontal calibration will be required. For these purposes, the lower and upper hinges are equipped with hexagonal holes. At the bottom, adjustment can be made with the window open and closed: if you turn the key clockwise, the sash and hinge will tighten. As a result, this will provoke the rise of the opposite bottom of the sash. If you twist in the opposite direction, the reverse process will occur. A similar adjustment can be made on the top hinge, with the window closed. The limit for moving the sash in this way is no more than 2 mm.

Horizontal window adjustment
Vertical adjustment
Vertical calibration of the system is carried out using the lower canopy. Before this, it is freed from the plug, under which there is a hexagon. To raise the sash, the hexagon should be rotated clockwise; to lower it, apply reverse rotation (the shift limit here is also limited to 2 mm).

Vertical window adjustment
Setting the degree of pressing of the shutters
To determine whether the window closes securely, you need to bring a lit match to the area where the sash and frame meet: the vibration of the flame will indicate the presence of a small gap. To calibrate here you will need pliers or a hex wrench. With their help, eccentrics are rotated, which are responsible for the tightness of the valves: they can have different appearance, located around the perimeter. As a rule, the pressure is increased in winter and weakened in summer.

Adjusting the degree of pressing of the shutters
Tilt and turn sashes use a top hinge to further adjust the fit. An adjusting bolt specially designed for this purpose is located on the top hinge fittings: it is best viewed in the top ventilation mode. To increase the pressure on the sash, the regulator is rotated clockwise, to loosen it, counterclockwise. This adjustment can be made in the range of 1-2 mm: as a rule, weakening or strengthening of the pressure is seasonal.
Window awning calibration
You can increase the level of functionality of a folding plastic window using a pair of hinges. There is a horizontal screw on the bottom element for adjustment. Calibration of the upper canopy is carried out in ventilation mode, with only the upper flap open. During this procedure, the sash needs additional support by hand, since only the lower hinge will hold it. By calibrating the canopies, you can regulate the level of air supply into the room: with increased pressure on the window and hinge, a decrease in the air flow penetrating inside will be observed.

Adjusting the clamping canopies
Although plastic windows are considered much more reliable than wooden ones, under certain circumstances they also need insulation:
- The walls of a new house shrink, which leads to the appearance of cracks where the sash and frame meet.
- Seal wear. Over time, rubber loses its elasticity and becomes cracked, causing cold air begins to enter the room. This happens most quickly in situations where the window is constantly closed or open.
- It blows from the area between the frame and the window opening. The reason here could be both shrinkage of the house and poorly executed slopes.
To resolve the above problems, the following methods are used:
- Calibrating the sashes with a hex wrench. When the walls of a room shrink, this causes the window sashes to warp: as a result, they can no longer ensure the tightness of the system in the closed position. It is quite possible to eliminate this problem on your own, using one of the previously mentioned adjustment methods. window fittings(the choice of method directly depends on the nature of the gap formed). It should be said that the mechanism can become loose on its own, without any external factors: therefore, it needs to be checked from time to time and, if necessary, tightened.

Leaf calibration
- Installing a new rubber seal. If the reason for cold air entering the room in winter is the wear of window seals, they need to be replaced with new ones. Since there are several varieties of such gaskets, it is recommended to take the old rubber band with you before going to the hardware store (it can be removed very simply, using a straight screwdriver). Experts recommend using black sealants, which are of better quality due to the absence of dyes. You can also install a new gasket yourself by carefully inserting it into the seat.

Installing a new seal
- Repair of slopes. If the place of blowing in winter is felt in the area between window frame and the opening, you will have to redo the slope. This is easiest to do if it was made of plastic. To do this, you need to carefully dismantle the panels and the old foam, and then blow in the new one. After drying, the foam is trimmed on both sides of the window, making small niche for laying a protective solution: this creates a barrier for the sealant from direct contact with air, which significantly extends its service life. Before putting the panels back, it is advisable to lay a layer of insulation (the outside of the slope can simply be plastered).

Repair of slopes for window insulation
There are also additional methods for insulating plastic windows for the winter:
- Electric heating. It involves installing special circuits similar to car window heating.

Heated glass unit
- Heat-saving film. It is used to reduce heat loss in plastic window systems with one or two chambers. The procedure for gluing the film to glass will require considerable care: no wrinkles or swelling are allowed. Before applying the protection, the surface of the window is thoroughly washed and degreased. It should be noted that the film material is heat-shrinkable, so after its application the surface is blown with a hairdryer.

Heat-saving film for windows
The standard set for caring for a plastic window when the season changes includes washing the glass, profiles, cleaning and lubricating the fittings and rubber seals. The specifics of winter maintenance of the system are its transfer to winter mode. This is done using pressure rollers located on the end part of the sashes. There is a special mark on the regulators: the winter mode ensures that it is directed inside the home. To change the position of the roller, it must first be pulled out of seat, turn it in the right direction, and push it back. All other regulators should be reconfigured in a similar manner.

Adjusting the modes of plastic windows
The decision to install plastic windows is justified from both an aesthetic and economic perspective. Caring for these systems is much easier than their wooden counterparts: as a rule, this consists of washing the glass, cleaning and lubricating moving mechanism and sealing rubber bands. It is recommended to carry out a similar procedure twice a year, when the season changes. A specific feature of winter maintenance of a plastic window is its transfer to a heat-saving mode of operation by increasing the pressing density of the sashes.
How to prepare plastic windows for winter: washing, adjustment, insulation
The craze for plastic windows is not accompanied by a corresponding increase in knowledge among owners in servicing window mechanisms. Even such a simple question: is it necessary to adjust plastic windows for the winter, is unexpected for 95% of respondents. And only a few people know that you can adjust plastic windows with your own hands.
In reality, the process is very simple. It is important to know where, why and how to twist. Let's try to understand the instructions together using photo and video materials.
Difference between summer and winter mode
For the first few years after installing plastic windows, customers experience complete euphoria in the winter: warm, cozy, no drafts anywhere. However, over time, in severe cold weather, a barely noticeable flow of cold air begins to be felt near the closed sash. Every year it gets stronger. Immediately there is a desire, like in the good old days, to cover all the cracks with a paper strip. Some people do this out of ignorance.
But window manufacturers foresaw this situation and provided for the adjustment of windows for “winter-summer”, when the force with which the sash and frame are pressed against each other changes. In the first few years after installation, carrying out such work is not only unnecessary, but harmful. Firstly, the sealing rubber perfectly maintains tightness even in a neutral position, and secondly, strong compression of the rubber leads to the fact that its elasticity is lost at negative temperatures.
Over time, the seal wears out and begins to let cold winter air into the apartment. The professionals who install windows do not explain what needs to be done about the appearance of drafts, but offer paid annual maintenance, which most customers refuse, which, by the way, in our opinion, is correct.
It is not necessary to call professionals to adjust plastic windows for the summer (winter). Apartment owners can do the work themselves.
Adjustment Tools
Adjusting plastic windows yourself is impossible without a few simple tools:
- Furniture key No. 4 - always included with a screwdriver. If you don’t have such a tool at home, you can purchase it in stores that sell furniture fittings(costs from 70 rub.);
- Several screwdrivers with a Phillips head (you need crosses of the shape and size TX and T);
- Slotted screwdrivers 4-5 mm wide;
- Pliers or pliers;
- Star-shaped keys are not needed for all types of windows.
Instructions for regulating PVC windows
Before installing windows, window manufacturers carry out full cycle work on adjusting the locking and clamping mechanisms. However, over time, parts wear out, changing the original settings, which requires adjustments to the operation of window mechanisms.
Preventative work may be required in the following cases:
- difficult movement of the sash when opening or closing - it touches the frame from below or from the side;
- penetration of cold air from the street in winter (drafts);
- the handle does not fix the sash in the “Closed” position - it does not turn;
- loose fittings (most often a handle);
- transition from summer to winter;
- sagging window sash(balcony door).
Sash pressure
Let's start with the simplest thing: adjusting the sash pressure for winter mode. When installing windows, installers use the standard pressing force of the sash against the sealing rubber of the frame. However, in winter, due to a not tightly closed window, cold comes in from the street. You can fix the problem with a simple twist locking pin - the window will close very tightly.
The trunnion is located at the end of the opening sash and has three types (see photo):
- a locking pin that regulates the clamping force - the first one (on the left) in the photo;
- anti-burglary locking pin with adjustable clamping force - middle in the photo;
- locking anti-burglary pin with adjustment for pressure and height - third in the photo.
Attention: carefully inspect the opening doors from above, below and from reverse side. In some models, the clamping eccentric may also be there. Also, a number of companies put 2-3 pins per sash. In this case, you need to adjust all the eccentrics at once, otherwise the window will warp.
The window trunnion can occupy three positions:
- standard, also called neutral, with medium pressure;
- summer - the pressure is weak;
- winter - the maximum possible pressure.
You can determine for what period of the year the window is adjusted by the location of the eccentric. If it is an oval, then the vertical position indicates weak pressure (summer mode), at an angle - standard, horizontal - strong pressure ( winter option). The round pin has a notch. If she looks outside - summer option clamp, into the apartment - winter, up - standard.
You can change the position of the eccentric using pliers or a furniture key. Sometimes, to turn a trunnion, you need to pull it towards you.
Pliers will be required for accessories from Maso, where the pins are oval. It may be useful here wrench— they can also turn the eccentric. The Torx eccentrics should be moved from one position to another using a hex wrench or a flat-head screwdriver. Roto locking mechanisms must be adjusted using a furniture key.
We emphasize once again: it is necessary to increase the pressing force of the sash to the frame only if the tightness is lost. You can check this in several ways:
- light a match or lighter and bring it to the closed door. Flame deflection indicates a draft. In this case, adjustment for “winter-summer” is mandatory;
- insert a sheet of paper between the frame and the open sash and close the window. If after this the sheet can be easily pulled out, the fit must also be adjusted.
Important: adjustment of plastic windows “winter-summer” is not carried out just installed windows— in winter mode, the new sealing rubber may lose its elasticity due to strong pressure.
With the departure of frost, the clamping force should be weakened. This solves two problems at once:
- the elasticity of the seal is maintained;
- ventilation of the room is ensured through a loosely closed sash.
Preparing for the summer season is easy for any family member:
- select a tool for the trunnion;
- open the window and determine the location of the eccentrics;
- turn all the trunnions counterclockwise (oval - to a vertical position, round - to the "outside" position).
As often happens, when the condition is too advanced, the patient has several diseases at once. Same thing at the window. It may turn out that after adjusting the trunnions, drafts still circulate near the sashes (the result of long-term operation without preventive maintenance).
Then further adjustment of the window mechanisms, or more precisely, the upper and lower hinges, will be required. To do this, you need to know how to adjust plastic windows yourself for the winter if there is a need to adjust the position of the upper and lower hinges.
Top loop
When a window closes poorly, catches on the frame, or fits unevenly to the seals (skewed), there is always an influx of air from the street. In this case, the hinges are subject to adjustment. Here it is possible to change the position of the sashes in two planes: up and down, left and right, as a result of which they can be perfectly aligned with the frame. By tightening the bolt on the scissors at the tilt-and-turn window, you can tighten the upper corner of the sash to the frame.
U different manufacturers, for example, “Rehau” and “Veka”, the appearance of the hinge may be different, as well as the tools used to adjust them. But the principles are the same, as can be clearly seen in Fig. below.
Adjusting the top hinge allows you to move the sash in a horizontal plane - left or right. Such manipulation is necessary if the window sash has sagged and it begins to cling to the impost. The adjusting screw is located in the loop. To access it, the window must be opened at least 90 o (a smaller angle is also allowed, but working in such a situation is extremely inconvenient).
Rotate the adjusting screw carefully so as not to damage the locking mechanism when closing the window. Experts advise closing the shutter after each half-turn of the screw and checking how the bolt bar hooks fit into the strike plate. At the same time, you can see how the sagging corner fits to the frame.
By rotating the key counterclockwise, the lower opposite edge of the sash rises. In this case, it is necessary to monitor the trunnions (hooks) - they can rest against the striker. In order to maintain balance: raise the angle and ensure normal entry of the hooks into the striker, sometimes you have to rearrange the striker (in the language of specialists, the striker).
Accordingly, turning the adjusting screw counterclockwise lowers the lower opposite corner.
Attention: many works erroneously indicate that when the top hinge adjusting screw is rotated clockwise, the sash moves away from the frame. We especially note that it is not the clamping force that is regulated, but the position of the sash in relation to the frame. In this case, the upper corner of the sash in the hinge area does not move away from the frame, but, on the contrary, is attracted to it.
Often, adjusting the top hinge does not produce results - the corner in the hinge area does not adhere tightly to the frame. In this case, it is necessary to adjust the tilt and turn mechanism, and specifically, tighten the bolt on the scissors. To access it, the sash must be opened simultaneously in two planes.
To do this, first open the window in the usual way - turning it. Then, pressing the blocker to the sash, move the handle to the “ventilation” position. After this, the window is loosely covered and tilted back. The sash hangs on bottom loop.
On one of the plates there is a bolt with a hex head. By turning it clockwise, the pressing force of the sash profile to the frame increases. Accordingly, by rotating the bolt in the opposite direction, the fit of the corner to the frame is weakened.
Bottom loop
The bottom hinge has two adjustment screws. One of them is responsible for moving the sash horizontally (left-right), like the top hinge - located at the bottom. By tightening this screw, you can raise or lower the upper opposite corner of the sash.
The second type of adjustment (vertical) can be found on top of the hinge - to do this, you need to open the sash to the tilt position and remove the decorative trims. By tightening the screw, the sash can be raised (clockwise) or lowered (in the opposite direction). For example, horizontal adjustment did not allow us to eliminate the touching of the lower corner of the sash from the side of the handle to the frame profile from below. Raising the entire sash solves the problem.
Pen
The handle of a plastic window has only one function - using the hooks on the locking bar, pull the sash to the frame or, vice versa, release the clamps to open the window. Therefore, it does not have any adjustments either for the degree of pressure or for changing the position of the sash in the frame. However, this does not mean that the window handle does not have problems. She can:
- break;
- to become loose;
- jam;
- turn tight.
All of these problems can be easily corrected yourself.
The handle is broken. To replace the handle, simply pull the decorative strip covering the trim towards you and turn it 90 o (see photo). Use a Phillips screwdriver to unscrew the screws and remove the broken handle. The new handle is placed in the same position as the old one. Fastening is done in the reverse order.
She became loose. It’s even simpler here: move the cover and tighten the screws.
Jammed. The most unpleasant situation when the handle does not turn is jamming. This happens due to careless opening of the sash: the position of the handle was changed too sharply, as a result of which the locking mechanism did not work.
A lock is installed on each window to protect the locking mechanism from accidental turning of the handle. open position- leads to inevitable damage to the fittings. Blockers are installed at the end of the sash, immediately under the handle (there are modifications of the fittings where the blocker is located at the bottom of the sash). They are different for different hardware manufacturers, which is clearly visible in the photo.
You can disable the lock when the sash is open. On Maco fittings, you need to press the locking tongue and move it to the “parallel to the sash” position, then change the position of the handle. With other types of locking mechanisms, it is enough to press the locking latch against the sash and turn the handle.
It's hard to turn. The handle turns tightly if there is no lubrication in the bolt mechanism. The problem is eliminated after performing preventive maintenance of the fittings, during which all metal parts are cleaned of dirt and lubricated (lubrication of PVC windows is discussed in detail in the work: “”).
Attention: if the handle turns tightly in the final part of the “closed” position, you need to adjust the trunnions - the sash is pressed tightly against the frame. Loosening the pressure will weaken the movement of the handle (it will also save the seals from premature wear).
What to do if the window does not close
Often it is not possible to close the window tightly (sometimes it does not close at all, i.e. it is pressed against the frame, but is not fixed with a handle in the closed position) after all the adjustments. Here the reason is the deformation of the sash profile inward or the frame outward (opposite deformation options are possible, but they do not create problems), as a result of which the hooks of the bolt bar (trunnion) simply do not reach the counter bar. There are two ways to fix the problem:
- align the sash profile;
- compensate for the bending of the frame profile with a lining under the strike plate.
Deforming towards the glass unit, the sash profile pulls the shutter bar behind it. There is a gap between it and the counter plate that needs to be eliminated. This work is performed step by step in the following sequence:
- The side bead is removed from the sash (one is enough, on the hinge side). How to remove them correctly and put them in place, see the article: “”;
- The amount of deformation is determined: a level or any long, even object is applied to the side of the sash and the amount of the gap is measured;
- A gasket is selected between the sash and the glass unit - its thickness should compensate for the size of the gap;
- Using a smooth and thin plastic or wooden (not metal) object, the sash profile is carefully pressed from the glass unit just below the installation location of the gasket;
- A gasket is placed in the resulting gap;
- The bead returns to its place.
Aligning the frame profile is much more difficult. Therefore, here experts take a different route: they install linings under the striker, as a result of which it moves towards the sash. Use plastic 3 mm thick (this is enough). Under the bar you need to cut 2 linings: narrow and wide. To install them, the counter strips are removed from the frame and then installed with a gasket. This process can be seen in the video.
Is there a difference with adjusting PVC balcony doors?
The principle of operation of the fittings for a metal-plastic door leading to the balcony is the same as for a PVC window. Therefore, the adjustments are almost identical:
- Horizontal door movement to the right or left carried out by tightening the adjusting screw located in each loop under decorative overlay. If the door leaf clings to the doorway along its entire length from the handle side, you need to tighten the screw 1-2 turns clockwise in each hinge (top, middle, bottom). If the door at the corner farthest from the hinges catches the threshold, the screws are adjusted at the top and in the middle;
- Vertical adjustment changes the position of the door in relation to the opening in height. To do this, tighten the vertical adjusting screw in the lower loop. Turning the furniture key counterclockwise moves the door down, clockwise moves it up. Unlike the window, you need a “furniture key” with a diameter of 5 mm. After lifting the door two full turns, it is necessary to lift all the strikers on the sides of the door frame (you need a “furniture key” with a diameter of 2.5 mm). After this, you will have to lift the main and additional locking bars;
- Front adjustment is responsible for the force of pressing the door against the door frame. For these purposes, the trunnions are rotated, as in a plastic window. However, there are also differences. In some types of fittings, the clamping force is changed by the strike plate - for this, an adjustable screw with a hexagon head is placed under it (option “A” in the photo “Types of strike plates”).
In order for windows to serve for a long time without losing their characteristics, before the start of the new season they must be:
- Thoroughly remove dust and dirt and then wash. First, remove dirt from the drainage channel with a toothpick, and with a hard-bristled brush from the fittings. Then the slopes, profiles, double-glazed windows and window sill are washed. The glass unit and profiles are washed from both sides: from the street and indoors. Detergents without abrasive materials and aggressive chemicals (alkali, weak acid solution, etc.) can be dissolved in water. Glass requires special removers. Wipe plastic with a soft sponge, and glass with paper or a rubber scraper;
- After drying, lubricate the shut-off valves and window seals. The work “” shows where, with what and how PVC windows are lubricated;
- Adjust the trunnions for the coming season.
The fittings for plastic windows from different manufacturers are almost identical, and therefore the preparation for the start of the season is the same. If any difficulties arise in preventive maintenance or adjustment, you can always look at the manufacturer’s instructions, which describe how to properly handle and adjust their products.
Conclusion
Manufacturers of plastic windows and doors are well aware of the problems that arise during the operation of their products. To solve them, various adjustments are provided in the window fittings.
- The degree of pressing of the sash to the frame is regulated by trunnions. Wherein proper care maintenance of fittings at the beginning of each new summer or winter season extends the service life of both the window as a whole and the seals.
- The horizontal adjustment of the sash, when it sag, is carried out by tightening special screws in the upper and lower hinges.
- You can raise the sash without changing the position of the corners in relation to the frame using the adjusting screw located inside the lower hinge.
- Deformation of the sash profile is eliminated by placing a spacer between it and the glass unit. The bending of the frame towards the wall can be compensated by using a spacer under the striker plate.
Some types of fittings built into the frame allow you to set the modes for summer and winter. They are called a trunnion or an eccentric. The demand for plastic windows with adjustable devices is increasing every year.
Adjustment modes
The ability to adjust the air flow into the room by changing the position of the trunnion. The adjustment is made in accordance with the marked marks. Against each there is an inscription containing the following information::
- Average(standard) – created natural ventilation with the window closed.
- Summer– the smallest seal between the sash and the frame.
- Winter mode– tight pressing to the frame.
How to define functionality?
When choosing a design, inspect the end side of the sash, from the side of the lock handle. It should have built-in fittings in the form of a convex hexagon, roundness or oval. This is a trunnion or eccentric. It is used to transfer from one mode to another.
Note:When purchasing a product, pay attention to the presence of an auxiliary tool for adjustment; this is a wrench with a tip that matches the shape of the eccentric. It should be included in the kit.
Window technical characteristics

At high temperatures the elastic seal begins to expand. If you do not change the winter mode, the material will fail. Seasonal adjustments reduce wear on fasteners and the window lock.
The axle is installed in the edge of the sash. The requirements for the device are high. The metal is subjected to mechanical stress during adjustment, and should not change the dimensions specified by the manufacturer during the entire service life. Products, made from high strength of stainless steel, make them durable and hardy, they are more expensive, but retain technical characteristics for a long time. That's why PVC manufacturers they are installed.
The tightness of the rubber layer depends on the quality of the fittings. Correct setting prevents friction between the profiles.
Mid-range trunnions are cheaper. High-quality steel is not used for their manufacture, which leads to rapid wear of the metal.
The advantage of eccentrics
Modern plastic windows retain heat and prevent drafts. The room is ventilated regardless of the time of year. With high-quality fittings, the service life of the window is extended without repair.
Types and forms
The modification depends on the manufacturer and technical specifications for manufacturing. The appearance of the eccentric is influenced by the requirements of the customer producing structures with a rotation mechanism.

All installed fittings vary according to the following type:
- Budget.
- Standard.
- Highest category. These products are distinguished by their functionality, quality and service life.
The trunnion is made different models, and has the following form:
- Oval.
- Rounded.
- Hexagon.
It is installed in the side plane, from the side of the lock. Improved manufacturing technology and high quality steel b, allows us to produce high-class products. They are more expensive, but the costs for them will be justified.
Transferring the device to another mode
Air entering through the side edges creates discomfort. Move the trunnions to the position corresponding to the time of year, namely:
- "Winter". The seal moves out, pressing the window sash to the frame. In this position, it wears out more intensely.
- "Summer". The seal, returning to its original position, creates a gap for air to pass through.

How to properly adjust the window?
Reasons why it is recommended to make adjustments:
- The window sash is sagging.
- Doesn't open or close well.
- Dust enters the room.
- Cold air blows into the cracks of the openings.
- The lock handle turns with great hand effort.
- The house has shrunk.
Translation of accessories
The method of adjustment, namely:
- The hexagon is turned with a special key included in the product kit, putting it on top of the device.
- Oval - by turning the pliers.
- Round - with a sacral screwdriver, placing it in the center.
The number of eccentrics depends on the height of the window. The standard requires placing five pieces on one vertical line. Two of them are installed close to horizontal planes, the other three are evenly distributed over the entire height.
If fogging of the glass occurs from inside the room, it is advised to leave a gap for natural condensation by setting the arrow to the “medium” mode.
Step-by-step instruction
- Open the doors, clean the fittings with a stiff-bristled brush and wipe with a damp cloth.
- Remove old grease from seals, and apply a thin layer of fresh silicone compound.
- On cleaned surfaces It will be possible to discern the risks “winter”, “medium” and “summer”.
- Check the setting. To change the position, the plastic roller of the sash is pulled towards you.
- Changes rotate to the specified elevation using auxiliary tool. To switch to the “winter” position, the end of the long radius is directed towards the inscription. The cut should line up with the tip of the arrow.
- When set to "summer", or "medium", change the position of the short radius. The arrow is turned to the mark.
- Trunnion turning clockwise, minimizes the distance between the sash and the frame by changing the position of the seal.
- Having completed the adjustment process, it is buried in the holes, giving the original position. In the operating condition of the double-glazed window, metal elements should not come into contact with the plastic structure.
- Check density using writing paper. They insert it into the opening between the frame and pull it out. If it doesn't work, then everything was done correctly.
Note:
On the round axle, a line pointing towards the street means that the frame is set for winter. For oval there is a different type of mark. It must be horizontal.
On a round device, a dash directed towards the room means that the frame is set for summer. For an oval trunnion, the mark takes a vertical position.
Adjustment when squeaking from friction occurs
Similar deviations occur in a new house, when the foundation or its walls shrink. If you find areas of friction or leakage, make adjustments.
Vertically
The adjustment is made on the bottom loop. IN There is an adjusting screw on the top. It is removed from the profile by mechanical tension towards itself, and the following turns are made:
- Clockwise, lifting the sash.
- Against her, lowering her down.
Horizontally
The adjustment is made on the lower hinge, at the location of the adjusting screw. When turning the arrow, the plane is shifted to the left or right.
The adjustment will create free play between the sash and the frame, ensuring uniform density of the horizontal and vertical planes. This will have a beneficial effect on the room climate and eliminate drafts.

What to pay attention to
- Translation of the mechanism is carried out strictly according to the instructions. Failure to follow the adjustment rules leads to mechanical defects in individual elements and the entire set as a whole.
- Constant contact metal parts has wear and tear. To maintain the operating parameters specified by the manufacturer, the fittings are lubricated and adjusted.
- It is not advisable to leave the frame in “winter” mode for the whole year. This leads to rubber wear.
- If the “summer” mode does not create drafts, and the room has good heating, it is not recommended to change it. This will have a positive effect on maintaining the functionality of the mechanisms over a long period of operation.
Once you have completed switching to winter mode, trace the outline of the window sash on the frame with chalk. Open it and measure the distance between the edge and the mark. Standard parameters are from 6 to 8 millimeters. If they differ, make additional adjustments. The indicator along the entire length must match. A different value may cause:
- The passage of cold air into the room through the seal.
- In places of excessive contact, friction and compression of the material will be created.
- It will become more difficult to turn the lock handle. This will lead to wear of the core and mechanical damage to the insulation.
- When purchasing a new PVC window with adjustment for modes such as summer and winter, do not change the position of the seal on it in the first year. Rubber is resistant to density; increasing the load on it will damage all metal fasteners and the lock.
Conclusion
A custom-made product will fit tightly into the prepared window opening, and there will be no horizontal or vertical loads after the installation work is completed. Entrust the work from start to finish to one contractor, and receive a guarantee for the operation of the structure. Order products with high-quality fittings; they can be adjusted without involving a specialist.


