At the final stage of construction of the bathhouse complex, the roof of the bathhouse is erected with your own hands. If you build a roof for a bathhouse with your own hands, then before carrying out all the work you should study in detail the technology and nuances of installing roofing structures. After completing the construction of the bathhouse roof with your own hands, you can begin finishing the building both outside and inside.
To ensure that the bathhouse ceiling does not leak and retains heat well in the room, the process of installing the roof on the building should be given Special attention. If you comply with all the requirements of the instructions for constructing a bathhouse roof with your own hands, it will allow you to operate the structure for a long time without resorting to repair work.
In order to properly build a bathhouse roof with your own hands, you must comply with all building codes and regulations. Such a roof must have high-quality steam, heat and waterproofing.
Before carrying out installation work, you should study the installation process in detail. This will allow you to avoid errors and make it possible to reduce the cost of building a bathhouse complex, since you will not have to involve a construction specialist to install the roof.
The roof of a bathhouse complex is quite easy to install yourself; for this purpose, a person must have some level of knowledge in the field of construction and have skills in handling plumbing and carpentry tools.

Today, the most popular options for building a bathhouse are the use of timber, logs and frame structures. Each of these types of buildings has features during the installation process roofing structure.
Bathhouse roof installation
In order to construct it correctly, you should study in detail the design options for this building element. The roof of any building, including the building of a bathhouse complex, consists, depending on the type, of certain standard structural elements.

The structure of any roof includes the following structural elements:
- rafter system;
- sheathing;
- heat, steam and vapor barrier systems;
- roofing covering.
Depending on the design features The following types of roofs are distinguished:
- single-pitched;
- gable;
- hip;
- tent;
- multi-pincer;
- attic.
In addition, any type of roof structure may have its own characteristics, determined by the preferences and desires of the building owner.
Most often used in the construction of baths. Experts recommend erecting this type of roof when building baths, since it is the most convenient option. Availability free space under the roof being built allows you to equip a small attic. In this case, the attic space can be used to store bathhouse and other equipment.
Advantage gable roof is the absence of accumulations of atmospheric precipitation that can accumulate on other types of roofing in winter period of the year. On a gable roof, snow slides off the surface under its own weight.
The single-pitched type of roofing is used very rarely in construction. bath complexes.
Installation of a gable roof of a bathhouse complex
Since the gable roof is the most popular, we should consider in more detail how to build a gable roof for a bathhouse with your own hands.

Today there are 2 gable roof installation systems:
- Hanging rafter system. This type of rafter system is fastened with one side to the body of the building, and the second side is fixed between two opposite rafter sections.
- Sloping rafters. This type of construction is more stable, since the structural elements are additionally supported by a stand located in the center.
A gable roof is the most preferred option for creating a roof with your own hands for frame bath, since the design ensures self-cleaning of the surface of the roof slopes from accumulated precipitation, which significantly reduces the pressure exerted on the building. This effect is achieved due to the fact that the gable roof has a large angle of inclination of the roofing planes.
By its design, a gable roof consists of several isosceles triangles of the same size and shape, which are evenly spaced along the entire building. The top of the structure is called the ridge. The cross beam to which the top of the rafters is secured is called a crossbar. The crossbar gives strength to the structure and fastens the individual rafters into a single structure. The strength of the entire structure depends on the pitch between the rafters.

The rafters are fastened to the top of the building walls after the installation of the ceiling beams is completed.
Installation load-bearing structures roofing consists of the following stages:
- fastening the Mauerlat to the wall of the building;
- roof truss assembly;
- installation of two trusses at different ends of the building;
- installation of the remaining trusses along a specially tensioned cord.
After completing the installation work on installing the load-bearing structures of the roof, they begin to fasten the sheathing and install layers of steam, hydro- and heat-insulating materials. Upon completion of this work, the roofing material is installed.
Installation of sheathing
After completion of the installation work roof rafters The sheathing installation operation is carried out.

When installing this structural element, you should pay attention to a number of requirements that must be met during the work process. These requirements are as follows:
- The boards that make up the sheathing are filled, starting from the ridge, and gradually move to the lower part of the structure.
- The sheathing can be solid or with gaps. The choice of type of construction depends on the roofing material used.
- The ends of the boards being filled should protrude beyond the ends of the trusses that form the basis of the pediments by approximately 18-20 cm. This protrusion of the roof beyond the pediments protects the pediment from the adverse effects of atmospheric factors and is called a pediment cornice.
Solid sheathing is best used when using roofing materials roll type. Solid sheathing is also recommended for use when covering the roof with metal tiles and slate. Gaps in such sheathing should not exceed 10 mm.
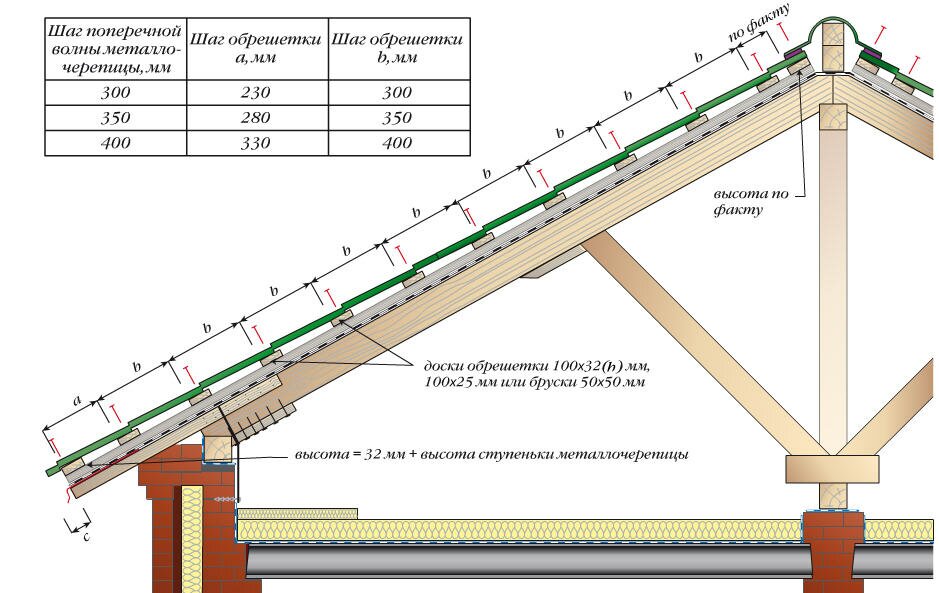
When using sheet iron, asbestos-cement slate or bitumen sheet as roofing material, the distance between the lathing boards can be 18-25 cm.
After securing the sheathing to the supporting structure of the roof, they proceed to the installation of steam, hydro and thermal insulation.
Installation of vapor and waterproofing insulation
Before erecting a roof, many owners think about questions about how to do it correctly and what building materials are best to use. For installation roofing Roofing felt and membrane film can be used as a vapor and waterproofing material. Ruberoid is mounted on the rafters in 2 layers, this provides a high degree of protection of load-bearing structures from the effects of negative atmospheric factors.

If a membrane film is used, it can serve as both a waterproofing and thermal insulation material, since it has a low heat transfer rate.
For the installed material to function properly, the film must be laid on the rafter structure and secured with construction tape.
The new strip should be laid over the previous strip with an overlap. It is forbidden to stretch the film over rafter structures. Tension of the film can contribute to the occurrence of damage when the lumber from which the rafter structures are assembled is deformed. Deformation of structures is possible when the rafter system heats up or cools down.
In the process of insulating the roof of a bathhouse with your own hands, you should pay attention to some important nuances of the process.
Such nuances are the following:
- It is recommended to insulate the roof of a building using mineral wool. This material is durable, non-flammable and retains heat well.
- When insulating the roof, it is not recommended to use polystyrene foam. This building material is capable of releasing harmful volatile chemical compounds.
- The thickness of the insulation used must be at least 100 mm.
- A layer of waterproofing is laid on top of the insulation layer.
The last layer laid on roofing pie, is a finishing material. The choice of building material for finishing the attic depends on the financial condition of the homeowner and his preferences.
After the installation of heat, steam and waterproofing is completed, the roofing material is installed directly.
To install the roof, you can use any roofing building material. The choice of roofing material depends entirely on the financial condition of the bathhouse owner and the availability of this or that material for free sale.
Carrying out finishing of gables
After completing the installation work on installing roofing building materials, you can begin finishing the roof gables. Load-bearing frame the gables are the outermost trusses. To finish the plane of the gables, wood blocks with dimensions of 50x50 or 40x40 mm are stuffed onto the roof trusses. These bars form the gable sheathing.

The gable plane is closed using finishing material. As a building material for finishing works clapboard can serve. The cladding of the frontal plane should be carried out with a margin, which ensures that the finishing material protrudes beyond the plane of the pediment by a distance of 20-25 mm.
Depending on the wishes of the bathhouse owner, the gables can be sewn up with finishing building materials in both horizontal and vertical directions. The pediment is covered with clapboard using self-tapping screws or nails.
Using clapboards made from wood provides several benefits to the homeowner. The fact is that wood is environmentally friendly pure material, and when used, no toxic chemical compounds are released into the environment.

However, it should be remembered that before using this material, it should be treated with special chemical compounds that prevent fire and deterioration of the material under the influence of negative atmospheric factors.
Being natural material, the lining may suffer from excess moisture, therefore, in order to prevent destruction of the building material used for finishing, it is necessary to treat the pediment after installation with a paint and varnish composition that has water repellent properties. Compositions used to create protective coating on the surface of the lining are unstable, which requires regular treatment of the pediment surface. The frequency of treatment should be once every 2 years.
Carrying out regular processing increases the cost of operating the facility. The service life of a pediment made from lining that has not been treated is about 5 years, in contrast to a pediment treated with antiseptic, fire retardant and paint, the normal service life of which can be 15-20 years. In addition to lining, siding can be used for finishing work.
Warning: Use of undefined constant WPLANG - assumed "WPLANG" (this will throw an Error in a future version of PHP) in /var/www/krysha-expert..php on line 2580
Warning: count(): Parameter must be an array or an object that implements Countable in /var/www/krysha-expert..php on line 1802
A bathhouse is an indispensable addition to country houses. Not even the most modern bathtubs or showers can replace a bathhouse; these are not only rooms for taking water procedures and improved health, but also a place for mental relaxation.

The algorithm for fastening rafters is largely determined by the type of rafter system. In the vast majority of cases, the bathhouse is small in size. Such parameters, on the one hand, simplify and reduce the cost of the rafter system, and on the other hand, limit the choice various options its arrangement. Currently, the following types of roofs and rafter systems are most often used for baths.

Table. Types of rafter systems for baths.
| Type of rafter system | Brief performance indicators |
|---|---|
| Such roofs are mounted on bathhouses with a length of no more than 6 m; if the dimensions exceed these parameters, then rafter legs has to be increased, and this has a negative impact on the strength and reliability of the system. The angle of inclination of the slopes is approximately 25°, it is possible to equip a fairly spacious attic space. The truss is assembled from two rafter legs. |
| The simplest rafter system, the length of the bathhouse does not exceed 4 m. One end of the rafter rests directly on the wall or mauerlat, and the other on a specially constructed frame. The slope angle is at least 12°. Flaw pitched roof– minimum volume of attic space. |


There are quite a few ways to fasten rafters; each craftsman decides on the spot, taking into account the peculiarities of the structure, the wishes of the developers and the qualifications of the contractor. But the most important factor influencing the final decision is that the chosen method of fixing the rafter system should be as reliable as possible.


Methods of fastening rafters on a gable roof of a bathhouse
Such a roof is a little more complicated than a pent roof, but has undeniable advantages; therefore, gable options are used most often. The rafter system can be hanging (the ends of the legs rest against the beams ceiling) or layered (rafter legs rest against the upper crown of the frame or mauerlat). In bathhouses built from foam concrete blocks or other masonry materials, for a layered rafter system it is necessary to make a reinforcing belt around the perimeter and install a mauerlat. This greatly complicates the construction process; the method is used quite rarely. How are the rafters attached at the main nodes?


Professional builders in all cases recommend strengthening the structures of rafter systems with the help of additional supports and braces.


What and how many reinforcing elements to use when fixing the rafters is chosen by a professional on the spot. As an example, let's look at several options for attaching rafters to a bathhouse.
Prices for various types of fasteners for rafters
Rafter fasteners
Video - Knots of the rafter system
Fixing rafter legs on a bathhouse made of foam blocks
The rafter legs in such baths are attached to a mauerlat mounted on a reinforcing belt. Accordingly, you need to start work by pouring the reinforcing belt and installing the Mauerlat.
- Install formwork on the walls along the entire perimeter of the room for pouring concrete. Can be used for formwork edged boards approximately 20 mm thick, the boards are fixed to the foam blocks with ordinary nails. The concrete force is insignificant; there should be no deformation of the formwork. Align the top edges of the formwork horizontally.
Important. Before pouring concrete, drill holes in the blocks and install pins in them to secure the Mauerlat. The distance between the studs is approximately 1.5–2 meters, make sure that the holes do not fall into the masonry joints.

- Pull a thread between the outer pins under the level; with its help it is much easier to control the horizontalness of the upper plane of the solution.
- Fill in prepared cement-sand mortar or concrete into the formwork and constantly level it with a trowel. Use thread to control.
Practical advice. When checking the position of the solution, you do not need to lift the thread up; it will stick to the mass and show the incorrect position. The thread should be pulled to the side and released like a string. It is much easier to work not with a rope, but with a thick fishing line.
After the screed has completely hardened, install the Mauerlat on it and tighten it firmly with nuts. Do not forget to put waterproofing between the Mauerlat and the screed. It is better to use two layers of ordinary roofing felt, it is cheap and reliable. For the Mauerlat, a board with a thickness of at least 50 mm and a width of 200–250 mm is used. Next, you should begin installing the ceiling beams; it is to them that the lower legs of the rafters will be attached.


Step 1. Install the first soffit board. Its length should be approximately 80 cm greater than the width of the room, 40 cm is required for the overhang on each side. This method of installing rafters is recommended for low baths. Due to the fact that the rafter system is supported by floor beams, the height of the bathhouse visually increases. If the overhang is made from rafter legs, then they fall significantly below the level of the Mauerlat and visually reduce the height of the already small façade walls. In addition, attaching the rafter legs to the floor beams is much simpler; there is no need to make complex cuts on the heels. Preparing heels requires not only quite a lot of time, but also a lot of practical experience.

Step 2. Calculate the number and size of rafters. The distance between them should be approximately 60 cm; the following factors influence the specific value:
- sizes of lumber used;
- climatic zone of the bathhouse location;
- characteristics of roofing coverings;
- dimensions of the building;
- the presence or absence of additional struts of the rafter system.

The length of the rafters depends on the angle of the roof, but practical builders use a simplified calculation method - they multiply the width of the bathhouse by 2/3. For example, if the roof width is 6 m, then the length of one rafter leg is 6 × 2/3 = 4 meters. This length provides a roof angle of 30°, which is quite enough for everyone climatic zones our country, regardless of the maximum level of snow cover.
The roof is the final structure of a bathhouse building, performing the function of protection against atmospheric attacks and playing the role of an important aesthetic indicator. Ornate roofs with numerous gables and other delights are rarely erected over hygienic structures. Often these are the simplest options, the construction of which can be done with your own hands. Owners who want their bathhouse roof to be built beautifully and firmly with their own hands should carefully follow building regulations. The roofs are simple and the rules are not too complicated, but an independent builder must know them.
Construction standards for pitched roofs
The design of a bathhouse roof in general terms
In a simplified way, the design of a bathhouse roof includes two elements: a load-bearing rafter system and the flooring itself with the sheathing and waterproofing layer necessary for its installation. The number of structural elements includes another significant component - attic floor. But its presence is not a prerequisite, since almost flat roofs with a slight angle of inclination of the slopes are built without it.
Regardless of the presence of an attic floor or the absence of this element, roofs over bathhouses are erected with one or two slopes. Among the owners of country baths there are not too many adherents of the four pitched roofs and structures with multiple fractures.
Two ramps or one?
- A pitched roof for a bathhouse is constructed when the bathhouse building adjoins country house or if the owner wishes to reduce the construction budget. The height of a roof with one slope is not regulated by any requirements. True, mostly it's almost flat roofs, erected above small summer bath buildings. Their advantages are low cost, simplicity and efficiency of construction.
- Roofs with two slopes are the most common type with a configuration traditional for log bathhouses. If the height of the slopes is sufficient and there is a ceiling in the space under the roof, you can arrange a household or living space. The height of the ridge, that is, the steepness of the gable roof, is determined by the aesthetic requirements of the owner and his desire to find practical use for the space under the roof, as well as the climatic features of the region.
Rules for determining the angle of inclination of slopes
The angle can vary from 2.5º to 60º. The larger it is, the better precipitation will roll off inclined planes roofs. However, too high design not acceptable in regions with regular gusty winds. In steppes blown from all sides with little winter precipitation, it is best to make the roof flat. In northern snowy regions, a roof with an optimal angle of 45º will work perfectly. Variations up and down work just as well.
Note. At the same time as the roof slope decreases, material consumption, labor costs and, of course, cost are reduced.
Support for roof structure
The roofing system with two slopes rests on the beams of the upper floor or on a firmly attached top harness Mauerlat. Mauerlat is installed on both sides, mainly on the walls of brick, aerated concrete or foam concrete structures. For installing roof beams above wooden baths nests are made in the upper crown at one level, strictly checking the horizontality of the recesses for laying the supporting elements.
Note. Beams can be extended beyond the walls of the bathhouse. There is a condition: if the length of the beam behind the wall is more than half a meter, it will require an external support pillar.
Methods for installing rafter legs
A rafter leg or simply a rafter is a component of a rafter truss, resting on a mauerlat or on the upper crown of walls built from timber or logs. Legs work truss structure, both compression and bending. To make a roof truss, you can purchase factory-made rafters or use:
- logs with a diameter of 12 cm or more;
- square or rectangular timber with a cross-sectional area of 60 cm² or more;
- boards with minimum side dimensions in cross-section of 4 cm and 15 cm or more.
It will be easier to build farms from factory elements, from timber or boards, connected to each other with self-tapping screws, screws or simple nails using lumber overlays. In such cases, cuts are made only at support points.
Rafters can be hanging or layered.
- Hanging. Rafter legs of this type rest against each other at the highest point through which the ridge line passes, and rest only on the supports located along the edges of the roof contour. A hanging leg truss is characterized by the generation of significant horizontal pressure. In order to extinguish the thrust, a tightening is constructed - a lower belt, which in geometric terms represents the base of an isosceles triangle. To make the knots of hanging rafters, you can use crossbars, or you can do without them. If the owner decides to lighten the roof structure and constructs a bathhouse roof from lumber with a minimum cross-section, then the strength of the structure must be increased with the help of purlins.
Attention. All connections of a rafter truss with hanging legs must be extremely rigid due to the significant loads created during operation. To protect against wind loads, the rafter structure with hanging elements is also equipped with diagonal braces in each plane of the roof slope.
- Layered. This type Most often used in the construction of a pitched roof. No tightening is required for laying layered rafters. They are installed along a single slope, supported by a mauerlat fixed on opposite load-bearing walls. They are attached to the walls through the Mauerlat beam with steel studs, cap screws or thick wire.
The cross-section of the rafter legs is determined by the design load, which is the sum of the weight of winter precipitation and the roof. The calculations take into account the installation pitch of the rafters and the designed angle of inclination of the slopes.
Rafter system for a gable roof
The structure consists of a number of trusses installed in series with equal geometric parameters. It serves as the basis for the subsequent installation of roofing material with accompanying insulation elements, as well as hydro and vapor barriers.
For those who want to figure out how to make a bathhouse roof with two congruent, not too high slopes, the ready-to-install truss will resemble an isosceles triangle. Depending on the structural complexity and the distance between spans, a simple isosceles triangle is supplemented with overlays, struts, tie-downs, supporting vertical beams and other details. Listed additional elements necessary for the formation of rigid connections. 
The assembly of roof trusses can be done without climbing to the top floor. Those who decide how to build a bathhouse roof should understand that it is more convenient and safer to put together the components of the rafter structure on the ground. True, then they will need to be lifted upward with the help of a team of workers or a crane, for the use of which you need to pay. The owner decides to comfortably leave money or safety as a priority.
Experienced builders advise first making a template, the shape of which will be exactly repeated by all the roof trusses. To make a template, the upper ends of the two rafter legs are connected with a single nail. Then the opposite ends of the rafters are installed at the point of future support and the position is fixed with a crossbar - a crossbar. Usually the crossbar is cut into half a tree or fixed with screws.
Note. The vertical installation of trusses must be controlled by plumb lines. In case of deviations, pieces of boards are placed under the rafters and the excess is trimmed off.
The rafter system for the roof of the baths is assembled at the installation site. They begin with the installation of two frontal trusses, between which a kind of landmark is pulled - a mounting cord running along the line of the ridge. The optimal installation step is 1.2 m with options to decrease or increase.
Read more about the gable roof option on the Roofing Guide website.
Rafter structure for a pitched roof
If the distance between the supports of the pitched roof being erected is less than 4.5 m, you can do without additional support posts. The recommended step for laying the base elements for insulating the bathhouse roof and under the roofing is 0.6 m. Grooves are cut out in the top beam and in the mauerlat under the rafters, the size of which is calculated for tight contact. Strengthening gasket connections cannot be used. The rafters extend beyond the contour of the building to a distance of 30 cm to 50 cm, due to which protective cornices are formed.
Timber, boards, and poles are suitable for the construction of sheathing. The cross-section of lumber and installation pitch are selected in accordance with the type of roofing. For a soft roof, the sheathing is made from boards, leaving 1 cm gaps between them. For laying sheet material, the sheathing is built from timber with a cross-sectional side of 5 cm or more; a distance of 15 to 50 cm can be left between the elements of the sheathing.
The fastening of boards or beams of sheathing begins from the ridge, moving to the eaves, fixing the elements with screws or self-tapping screws. Along the ridge line, the board is mounted on the edge.
After installing the sheathing, you need to learn how to insulate the roof of a bathhouse from the corresponding article. WITH inside insulate it and lay a vapor barrier layer, then finish it. And cover the outside with roll waterproofing, on top of which the slats of the next sheathing are stuffed, necessary to ensure ventilation.
Two simplest methods are described, according to which the roof for a bathhouse is most often built with your own hands. They are popular not only among home craftsmen, but also among professional builders due to the ease and speed of production. By following the rules, the owner will provide the bathhouse with an excellent, durable roof that will bring pleasure not only from impeccable work, but also from its beautiful shape.
An important stage in the construction of a private bathhouse is the construction of a roof structure that can provide reliable protection from negative impact precipitation and perform an aesthetic function.
In order for a roof for a bathhouse to serve for many years, you will need the correct choice of design configuration, calculation of the angle of inclination and length of the overhang. Of course, you can turn to professionals to carry out the work, but constructing the roof yourself will significantly save money.
Types of bath roof designs
The modern bathhouse roof is a functional and reliable structure, which comes in two types.
Shed roof
This type of roofing is the most accessible and cost-effective for installation. The design involves installing rafters with emphasis on opposite walls. It is important to correctly calculate suitable angle slope of the slope to protect the roof from possible damage and deformations.
A lean-to type of structure should be erected in an area with high wind loads to prevent stagnation of rainwater and snow cover on the surface.
Gable roof
Such a roof has a number of advantages: reliability, durability, heat capacity, and the possibility of arranging an attic space. In addition, precipitation does not linger on it, but its cost is much higher than that of its lean-to counterpart.
The gable roof option is made in one of two ways:
- Sloping rafters.
- Hanging rafters.
The angle between the installed rafters determines the slope of the slopes: the smaller it is, the steeper the slopes.
Most often, gable roofs are:
- Attic. Roofing structures that provide for the presence of free space between two slopes and load-bearing beams for arrangement utility room. Required condition– the presence of a ceiling separating the lower floors from the roof.
- Heartless. Structures in which the space under the roof is not separated from the main ones functional premises baths with ceilings. The difference lies in the height of the ridge, which is much smaller than that of attic structures.
How the roof structure works
In order to competently build a roof on a bathhouse with your own hands, you need to study its structure in detail, which includes the following functional elements:
- Rafters and purlins.
- Lathing.
- Steam and waterproofing.
- Roofing covering.
Rafter structure
It is designed to properly distribute loads over the entire roof surface. The rafters on the bathhouse are mounted using crossbars, ties and spacers to ensure the strength of the finished structure.
The rafter system can be assembled on a finished building or on the ground with subsequent installation on the bathhouse. Rafter supports must be securely fixed to load-bearing walls and supports to prevent deformation or collapse of the roof when exposed to strong air masses.
Wooden sheathing
The sheathing can be assembled with a solid panel or a cellular base of wooden beams. Choice suitable option lathing depends on the type of roofing material. Rolled roofing felt requires a continuous sheathing, while corrugated sheeting requires a cellular sheathing.
Vapor barrier and waterproofing protection
An obligatory stage of arranging the roof of a bathhouse is to provide protection against the penetration of moisture and steam. To create a waterproofing layer, tiles or slate sheets are used, for a vapor barrier layer - roofing material or parchment paper.
Roof coating
Practical and safe materials are used as roofing: rolled roofing felt, metal tiles, ondulin, asbestos-cement or bitumen slate, roofing steel.
Construction standards for pitched roofs
The roof for a bathhouse is an enclosing structure that is designed to protect the building from negative atmospheric exposure, and also to maintain comfortable conditions stay in the premises. Therefore, modern roofs must meet a number of requirements:
- High weather resistance.
- Waterproof.
- Thermal efficiency.
- Wear resistance and increased strength.
- Fire safety.
- Resistance to biological effects.
- Environmental friendliness.
- Durability.
When constructing pitched roofs, it is important to comply with certain standards and regulations. If the bathhouse building is adjacent to a residential building, then it is rational to install a pitched roof - a more accessible and cheaper option. In this case, the height of the roof can be arbitrary, but taking into account the height of the residential building.
For full-fledged bath complexes or private baths equipped attic space, the best option are gable roofs. At the right approach Due to thermal and waterproofing, such a structure can be used for living. When organizing a gable structure, it is important to choose the correct location for the ridge and calculate its height.
Selection of roofing material
The modern construction market offers a wide range of reliable and durable roofing materials. The following materials are suitable for covering a sauna roof.
Corrugated sheet
For the production of corrugated sheets, non-ferrous metals (zinc, aluminum, titanium alloy) or galvanized steel are used. The main difference between the material is the thickness of the metal base. Corrugated sheeting is characterized by high strength, wear resistance, low weight and affordable cost.
Metal tiles
Suitable for organization gable roof subject to an inclination angle of 35 degrees. Metal tiles are resistant to corrosion, provide good sound absorption, have a long service life (over 45 years) and an attractive appearance.
Soft tiles
Roofing material based on ceramic and bitumen is suitable for creating single- and gable structures, easy to use, practical and durable. Roofs from soft tiles look aesthetically pleasing and attractive.
Ruberoid
The available roofing material is inexpensive, easy to install and has a short service life (no more than 15 years). Roofing felt is laid while maintaining an inclination angle of 5 degrees. This is the most budget option for roofing material.
Slate and Euroslate
Regular slate sheets are an affordable and cheap material used for roofing. It has a long service life (up to 40 years) and does not require special care. Laying sheets is easy and quick. The disadvantages of the material include high moisture absorption and fragility.
Euroslate is a more expensive and practical roofing material that is attractive appearance, good performance characteristics and high cost.
Ondulin
A popular material with high ductility, strength, wear resistance and durability. It is ideal for covering curved roofs. In addition, ondulin is easy to install and affordable.
Technology for constructing a roof with one slope
The most popular is the bathhouse with a pitched roof. A roof structure with one slope can be easily erected with your own hands from available materials. One of the load-bearing walls must be several rows higher than the others to create desired inclination slope - from 20 to 45 degrees.
For construction work Tools and materials required:
- Beam with a section of 6×8 cm.
- Support beams for the floor.
- Boards 25x3 cm.
- Membrane for waterproofing.
- Thermal insulation material.
- Roof covering.
- Fasteners (screws, nails).
- Hammer.
- Primer with antiseptic properties.
- Level.
- Hacksaw.
According to work instructions, a pitched roof for a bathhouse is built in stages:
Stage 1. Installation of the load-bearing beam (mauerlat)
The supporting beam is laid along the perimeter of the external walls and is intended for installation of the rafter system. In log houses, the mauerlat is the top row; in brick and block buildings it is equipped additionally. The beams are fixed with wire, anchor bolts or studs.
Studs are inserted into the upper wall rows to a depth of 40 cm in increments of 65 cm between each other so that the upper part of the thread rises 3.5 cm above the load-bearing beams.
Rolled roofing felt is laid on top and pinned onto the studs at the places where they are installed. Next, the beam is laid on the tip and hammered in to make small notches. Holes are made along the notches, after which the beam is installed on studs, on top of which the nuts are screwed.
Stage 2. Installation of beams for the ceiling
IN load-bearing beams grooves are made for the ceiling in increments of 65 cm. After installing the ceiling beams at the ends, they must have a space of 32 cm beyond the load-bearing walls. Ceilings serve as rafters, so they are fixed to the Mauerlat using nails or wire. After installation is completed, all elements are treated with an antiseptic primer.
Stage 3. Hydro- and thermal insulation
The lower part of the ceiling structure is hemmed with boards. An overlapping film is laid over the installed rafters, and the joints are taped. Next, the thermal insulation material is installed - roll or slab. The gaps are filled polyurethane foam, an overlapping membrane is installed on top with the joints secured with construction tape.
Stage 4. Roof installation
The beams are placed on the rafters through a film for waterproofing, after which the finished frame is sheathed with boards. The width between the beams can be from 1.5 to 14 cm, depending on the type of roofing material. A finishing coating is installed on the finished sheathing - slate, metal tiles, ondulin or corrugated sheets. Sheet roofing is fixed with self-tapping screws and gaskets to prevent moisture from penetrating through the inlet holes.
Technology for constructing a roof with two slopes
For a large bathhouse, it is better to equip a gable roof with an attic space for storing bath accessories and equipment. The assembly of the rafter system is carried out in stages.
To assemble the roof structure you will need:
- Beams with a section of 10×8 cm.
- Beam with a section of 5×5 and 5×10 cm.
- Board.
- Level and plumb.
- Iron nails and screws.
- Hammer.
- Electric drill.
- Primer composition.
Step by step construction guide gable roof includes the following steps:
Stage 1. Installation of beams for the ceiling
Grooves are made in the supporting beams of the building for the installation of beams for the ceiling. The pitch between the grooves is 100 cm, the depth is up to 8 cm. The beams are pre-treated with an antiseptic compound, dried and mounted edgewise into the grooves. Additional fixation with nails.
Stage 2. Assembling the truss structure
A gable roof consists of triangular trusses - trusses, each of which is made of identical bars - legs, bases and lintels. The elements are fixed to each other using screws.
For the legs, 5x10 cm boards are used, the length of which is 2.8 m. The edges of the boards are cut at an angle of 45 degrees, holes are made for screws, after which the elements are securely connected to each other. A 50 cm indentation is made from the joint of the rafter structure for a groove for the lintel. Slices are cut at the ends of the jumper rectangular shape, thanks to which it is mounted in the rafters. Screws are screwed in at the junction of the lintel and rafters. Other trusses are assembled in a similar way.
Two trusses located on top of the side walls are sheathed. For this, 5x5 bars are used, installed in a horizontal position in increments of 35 cm. To strengthen the structure, additional bars are installed in the diagonal direction.
Stage 3. Installation of rafters
Finished structures must be placed on ceiling beams. Fixation with spacers in compliance with the geometry of the structure. The edge trusses are installed first. For additional strengthening installed structure jibs are used - beams placed between the load-bearing beam of the wall and the rafters at the level of the lintels.
Next, the remaining rafters are installed while maintaining the vertical level. The technological distance between individual rafters should be 100 cm. All elements of the rafter system are connected by a canopy of two boards nailed to the upper beams on both sides of the roof.
Stage 4. Installation of sheathing
For the sheathing, a board is used that is long enough to cover the roof and extend beyond the rafter system by 25 cm. Technological gaps between individual boards can range from 2 to 48 cm, depending on the type of roofing material.
At the exit point of the chimney pipe, a hole of the required size is made with installation continuous sheathing along the perimeter.
Stage 5. Installation of the finishing coating
A counter-lattice made of 5x5 cm bars with pre-treatment with an antiseptic composition is installed on the waterproofing. The selected finishing coating from the edge of the cornice. A hole is made under the chimney, and after installing the pipe, the joints are carefully sealed bitumen impregnation or adhesive mixture, covered with a protective apron.
Stage 6. Roof insulation
At the final stage, the roof structure is insulated. The insulation is installed from the inside between the beams with minimal gaps. The joints between the insulation are filled with polyurethane foam. The gables are insulated separately. On the inside, they are upholstered with waterproofing material, then the sheathing is fixed, after which insulation and vapor barrier are installed.
For internal lining For the insulated roof surface, you can use clapboard, board or plywood.
Only compliance with construction technology and application quality materials will allow you to build a reliable and durable roof for a bathhouse, capable of withstanding wind loads and various natural conditions.
The construction of a bathhouse begins with the construction of a foundation, then it needs to be done, and only after that it is time to build the roof of the bathhouse. The roof protects the room from precipitation and also gives it a finished look.
Bathhouse roof: features, design
The main feature of the bathhouse roof is simplicity. If roofs of a complex design are often erected for a house, then for a bathhouse - the simpler the better.
The roof consists of several elements: a frame (rafter system), sheathing and decking (roofing and waterproofing materials). If you plan to add an attic, you will need an additional attic floor. It is worth doing if you have a budget and you often go to the bathhouse. If it is used only in the summer, then it is better to limit yourself to a simple bathhouse without an attic - it is simpler to construct and costs less.
The roof angle can be different - from 2 to 60 degrees. The higher it is, the more efficiently and quickly precipitation will roll off. But making a roof that is too high is not recommended in regions with strong winds.
Please note that the higher the roof, the greater the consumption of materials, and, therefore, the more expensive the structure. Therefore, too large a roof angle is not relevant even if you want to save money and build a budget sauna.

Types of roofs for baths, their advantages and disadvantages
The design of a bathhouse roof usually includes one or two slopes.
A bathhouse with a pitched roof is a simple and budget option. Usually this type of roof is chosen for summer or. The main advantage of a pitched roof is the low cost of construction.

A gable roof is the most common type of roof. It is chosen if the bath area is more than 12 square meters. This roof looks more aesthetically pleasing and has high functionality.

If the bathhouse is an extension to the house, then the best choice- This is a pitched roof. If you want to make a spacious attic or additional living space, then choose a gable roof.
Below are photos of bathhouse roof projects:


Building a bathhouse roof with your own hands
This process includes several stages: first you need to build a frame, then make waterproofing and install the roof.
Stage 1. Installation of support for the roof structure
The roofing system will rest on the mauerlat - a load-bearing beam laid on top of the walls along the entire perimeter of the bathhouse. If you are building wooden sauna, then there is no need to install a mauerlat, its role will be played by the top row of the log house, but if you are building from aerated concrete, then you need to secure the beams to the wall using steel wire, anchor bolts or construction pins.

Stage 2. Installation of ceiling beams
To install them in the Mauerlat, special seats, which are needed so that the ceiling lies strictly perpendicular to the walls. The distance between the grooves should be about 0.6-0.7 m. Next, you need to lay beams in them, which should protrude beyond the walls of the bathhouse by 0.3 m. If they protrude by more than 0.5 m, then you need to install additional external support post.
Placed on the ceiling waterproofing material.

Stage 3. Construction of the truss structure
To install a roof truss, it is permissible to use logs with a diameter of at least 12 cm, timber with a cross-section of 0.6 square meters or boards 40x150 mm. The simplest option is trusses made of glued or edged timber.
A rafter truss consists of rafter legs resting on a mauerlat. According to the method of fastening, construction legs are of two types:
- Hanging. In this case, there is no central support, and the rafters rest with their lower end on the wall, and their upper end on the opposing rafters. Metal plates or slotted tenons are used to fasten parts. This type The rafter system is chosen if the length of the roof exceeds 7 m, since the entire load of the structure falls on the load-bearing walls; to reduce it, a tie is used - a lower belt made of metal and timber that connects the structural elements.
- Layered. Unlike hanging ones, they have internal support. The advantage of this design is the ability to transfer the load only in bending, in addition, its installation requires less materials. Layered rafters are usually chosen for the construction of a pitched roof. To install them, no tightening is needed; it is enough to mount them along the slope with support on the Mauerlat and fix them on walls parallel to each other with screws or thick wire.
It is possible to use two types of rafters if you are making a common roof over several spans.

Rafter system it is not necessary to build by climbing onto a building. It will be safer, easier and faster to assemble a roof truss on the ground. But keep in mind that in this case it will be more difficult to lift it - this will require the help of several people or a crane.
First you need to build the side rafters, and then the front ones.
If you plan to build an attic, then you need to prepare in one of the front rafters window frame, and in the other make a doorway.

Stage 4. Insulation and waterproofing of the roof
The purpose of the roof is to protect the room from external influences, so this stage has great importance. To ensure waterproofing, a vapor barrier film must be overlapped on the rafters and the joints must be connected with tape.
The most popular material for thermal insulation is mineral wool- it is fire-resistant, durable and has high thermal insulation properties. You can use roll and slab insulation, the latter is more convenient. Insulation material must be tightly laid between the rafters and all gaps must be sealed with foam. It is also recommended to overlap it and cover the seams with foam.
But try not to squeeze or bend the edges of the material too much. Any deformation significantly reduces the properties of the insulation.

Stage 5. Installation of the rafter system sheathing
It is permissible to use for construction different materials: beams, boards, etc. The lathing can be in the form of a solid board or with gaps between the beams - it all depends on what roofing material you choose. If you are planning to install a soft roof, then the sheathing is best made from boards with gaps of 1 cm.
If sheet material is used for the roof, then the sheathing should be made of timber with a cross-section of 5 cm or more and leave a gap of 0.15-0.5 m between the beams.
Attaching the sheathing should begin from the ridge, gradually moving towards the eaves. The elements can be fastened with screws or self-tapping screws.

Stage 6. Installation of roofing
The final stage is the installation of the roof covering. Exist different variants roofs:
- Ruberoid - cheap material, which is lightweight, has high waterproofing properties, and is easy to install. But roofing felt has low strength and is a fire hazard. The average service life of roofing felt is 8 years.
- Metal roofing. It can be using galvanized steel or non-ferrous metals. Such a roof can withstand high loads, is cheap and easy to install. The disadvantages of the material are susceptibility to corrosion, low heat and noise insulation.
- Tile roof. This type of roof is classic and is divided into several subtypes: ceramic tiles, bitumen tiles and metal tiles. Ceramic tiles durable, easy to install and repair, has good noise insulation properties, but it has a high price. Bituminous shingles suitable for roofing different types, it has a wide selection of colors and shapes, but this coating is quite expensive and heavy, so special requirements are placed on the frame. Metal tiles can withstand temperature changes, can have different shades, and withstand environmental influences well. The disadvantages are the high price, low level sound insulation and high thermal conductivity. The service life of a metal roof is 40 years.
- Ondulin is currently the most popular option. It is easy to install, suitable for roofs with curved shapes, resistant to ultraviolet radiation and temperature changes, and has a low price.

Video - do-it-yourself bathhouse roof:


