Electrification of a home is one of the main stages in creating ideal conditions for accommodation. But connecting electricity does not mean that everything will be reliable. A lot depends on how the socket boxes are installed in concrete wall, or in drywall. They are also called installation boxes. Without socket boxes it is impossible to make normal sockets that will hold up even under heavy loads. Let's talk about what work needs to be done and what is required to install these items.
What are socket boxes and their types
Socket boxes are special boxes made of certain materials (plastic, metal, etc.). These elements are used when installing electrical points (sockets) on the walls. The main purpose of socket boxes is to refine the hole in the wall and at the same time they make it suitable for further installation of sockets or switches.
Additionally, socket boxes are also used when lowering or moving sockets as a distribution box. This makes it possible to carry out all the work as conveniently as possible, without making additional drilling of holes in the wall and without removing old wiring. Socket boxes can now be found on store shelves in round, square, rectangular and with rounded edges.
Various socket boxes
Previously, all socket boxes were made of metal. They were called sleeves and were used everywhere. Today, metal socket boxes are used only in wooden houses, where it is necessary to comply with the conditions fire safety. Among the disadvantages of such sleeves are:
- very weak fastening of sockets and switches;
- the sleeves do not adhere well to the solution, which leads to the socket falling out;
- there is also a high probability of damaging the wires with sharp edges.
When to install?
To be honest, there are practically no time restrictions for installing socket boxes. They can be installed both before the start of work and after it is completed. The only exception is walls that have not yet been plastered. It is also not recommended to install socket boxes in a concrete wall after covering it with wallpaper; there is a high probability of damaging the coating itself.
Some electricians decide to save their time and find out the thickness of the plaster layer in advance. To be honest, this method is quite dubious, since no one can say the exact values and subsequently there is a high probability that the socket will stick out strongly from the wall, or vice versa - it will be recessed into it.
According to the rules, socket boxes, like distribution boxes, must be mounted flush with the wall, or go into it no more than 2 mm.
 Using socket holes
Marking
The route marking includes designation of the locations of sockets. They are determined by checking with the project or installation diagram.
The socket box is mounted in concrete only after a hole has been formed using a crown or a hammer drill with a lance. Fixation is done using construction mixture(alabaster, putty, etc.). The locations of the sockets are marked as follows:
- From the very beginning, you need to mark the required vertical distance from the floor on the wall. If we take the standards, then all sockets should be located no higher than 40 cm, and switches should be approximately at a height of 90 cm.
- Next, apply the socket box and outline it with a marker or pencil.
- A crown is selected according to the size of the socket box and a hole is drilled.
Drilling process
There are several ways to make a hole. The choice of tools depends entirely on the wall material. The easiest way to make recesses is in foam concrete and other porous concrete. One of the most difficult materials is ordinary monolithic concrete.
Holes for socket outlets can be made in three ways:
- Using a special crown;
- Using a drill (the wall is drilled around the perimeter and then broken out);
- Using a hammer and chisel.
 Creating a hole for sockets
As already mentioned, making holes in concrete with your own hands is the hardest thing to do. For this reason, we will consider this method in as much detail as possible.
To make recesses, they use different types of crowns that can be used to work on porous concrete and drywall. This requires a heavy-duty diamond-coated tip. This guarantees its strength. Additionally, high-alloy metal is used as a base. Although such crowns are effective, their cost is quite high. So not everyone can afford such a thing.
Additionally, it is worth noting that making indentations using this technique takes a lot of time. The instrument itself gets very hot and needs to be allowed to rest. For these reasons, making 30-40 holes can take 2-3 days, which is quite a long time. To save time, it is much better to use a drill along the contour of the hole and then knock out the concrete with a chisel yourself.
Installation and sealing of socket boxes
The process of installing socket boxes is carried out in a certain sequence. By following it, you can carry out the work efficiently and without further alterations. So, the working method is as follows:

Then just wait about an hour and you can use the socket box for its intended purpose. This instruction will allow you to carry out the installation as correctly as possible and will take a minimum of time to complete. Even with independent work There shouldn't be any difficulties.
What to remember
The very first thing you need to remember is that the consistency of the mixture plays a very important role when sealing. It should be moderately thick, otherwise it will simply not flow into all the holes and will not create the necessary adhesion. A very liquid consistency will also not allow it to work fully, as it will simply flow out of the hole.
Do not install using hammers. There is a high probability of damage to the box. And this will have little effect. It is best to use plaster to seal the hole. You can also use gypsum plaster, but its application requires knowledge of some rules.
The first thing is good adhesion to the spatula, which requires frequent wetting. Gypsum does not have such properties and is much easier to spread on the socket. The second is uneven hardening. So, if the top has already dried, then there is a high probability of material flowing inside. This leads to the fact that when leveling the socket box, you can deform the surface, which is already flat.
Drywall installation method
Installation of socket boxes in a concrete wall is slightly different from the sequence of work on a surface exposed with plasterboard. The fact is that the element will be located in the space between the wall and the sheets, where there is no place to catch on. The installation sequence is carried out as follows:
- From the very beginning, you need to determine where the wires go and drill a hole with a crown.
- We bring the wires out and insulate them.
- Next, we pull the ends of the wires through the socket box and screw it to the drywall. At the same time, the adjusting screws allow the special claws to diverge, and the sleeve is tightly attached.
If the hypocardboard is attached to the wall using a building mixture, then this also has its own nuances. Although this is rarely done, there are times when this method is the only option. So, first you need to prepare two crowns: for drywall and concrete. First, take the first one and cut through the sheet. Next, we change it to a diamond bit and make a hole in the concrete. It is worth considering that in this case the socket boxes must be shallow to minimize the expenditure of force. After drilling, you need to knock out everything that remains in the recess and then seal it in exactly the same way as in a regular concrete wall.
As a rule, installation of socket boxes does not take much time and is not difficult. For this reason, they can be performed independently, without involving specialists. Be sure to stock up on several power tools in the form of a hammer drill or drill. This will make it possible to solve the cooling issue, since while the first “unit” is working, the second will be resting, and so on in turn.
 Socket box is a plastic cylinder that is mounted into the wall for subsequent installation of sockets or switches in it. There are stacked socket boxes (as in the picture) and double, triple, quadruple, etc.
Installation of socket boxes in concrete walls
The socket boxes also differ in the type of installation: for monolithic foundations and for sheet materials. Standard dimensions of the socket box: diameter 60 mm, depth 40 mm.
Let's consider fixing the socket box to a monolithic base.
First of all, you need to decide where the socket box will be located, decide how many pieces you need and choose the height from the floor.
If you are making socket boxes for sockets, then the recommended height is 25-50 cm from the floor, if you are making socket boxes for switches, then the height is 90-120 cm from the floor.
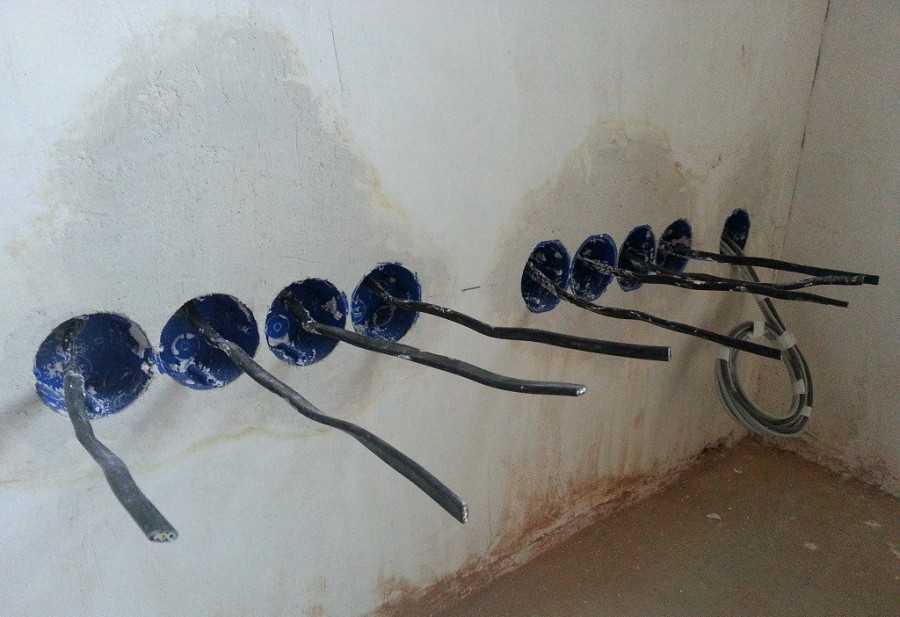
It is also necessary to think about which side the electrical wire will be supplied from in order to correctly make the holes in the socket box.
In the example, the wire is fed into one socket box from above.
Then you need to knock out a recess in the wall according to the size of the socket boxes, so that they are flush with the wall. It is best to knock out with a hammer drill with a lance attachment.
You can also use a grinder with a diamond blade to cut along the contour, and then knock out the middle with a hammer drill. In this case, you will get a smooth, neat depression, but there will be a lot of dust from this method.
To glue the socket boxes, putty or tile adhesive is suitable. If you want to immediately start installing wiring, I recommend using alabaster ( building gypsum), its setting time is about 5 minutes.
In our example, putty is used.
We dilute it with water and apply it into the recess with a spatula.

We take the socket boxes and insert them into the recess, but not too deep.

Using a level, we recess the socket boxes flush with the wall.
We press the level horizontally and vertically to each socket.

Align the socket boxes horizontally. We use the holes for the screws on the body of the socket box as a guide, apply a level and level it. If you have more than three socket boxes, then you also need to make sure that they do not bend; all the holes for the screws must be on the same straight line.
Having exposed, we cover the edges, leaving a small unsealed area on top for laying the wire.

After laying the wires, you can cover them completely.

In the same way, you can install any number of socket boxes.

Installation of socket boxes in hollow structures.
Let's look at an example of attaching a socket box to a ventilation unit.
The wall thickness of this block is about 3 cm, which is unlikely to allow installing the socket box on putty, but, as you know, hopeless situations can not be.
We cut out a hole with a grinder with a diamond blade according to the size of the socket boxes.

Using pebbles, pieces of drywall and all sorts of crap, we set the socket boxes to the level.

Now carefully foam the edges using polyurethane foam.

We stretch the wire and foam it to the end.
After the foam has completely hardened, trim off the excess.

And the last thing I haven’t mentioned yet is attaching the socket boxes to drywall or other sheet materials.
 This will require a crown required diameter, as well as special socket boxes.
They can be identified by their appearance; they have two additional hooks along the edges.
In order to install them, it is enough to drill a hole equal to the outer diameter of the socket box, insert it, and then tighten two screws along the edges until the socket box is completely pressed against the surface.
That's all.
Happy installation :)
How to install a socket in a concrete wall
 When it is renovated, it's time to start understanding where we will have the furniture, what space there will be for the TV or refrigerator... And it often turns out that a new place for some devices that are not equipped with an outlet leads to the next one not being worn or stretched.
“In general, why do you need these housing transfers?” Think.
Then the order appears - install the socket. But the wall is made of strong Soviet concrete: hitting a chisel will not work here, it is not brick. But it does not matter! Armed hammer drill, and today we will participate in a competition where a specific fortress will compete with the ingenuity of the Russian man!
What do we need
We should not ignore these items as some of them depend on your health.
- perforator;
- More angles with 8mm diameter;
- Top for gating;
- Caps PPE;
- Construction glasses (required subject);
- pencil;
- Brush and water;
- Gypsum plaster, blade and all solutions for preparing the mortar;
- Copper triple cable;
- coatings;
- Installation of wires;
- Rosetta;
- Screwdriver.
So let's go to work
- Find a place in the apartment where you can connect your future.
Perhaps it will be an old socket on the same wall. You don't need it and you don't usually use it. Well, a good reason to get rid of it, because it took so long, tired of you, I thought you decided to take it apart and connect it with a cable from the new connector it will need;
- Take the socket and connect it to the place in the wall where the next socket should be installed, circle this space;
- If you want to drill a hole you can take a beaver crown here if you don't then take a punch and start drilling holes for the drilling length.
Now turn the other hole in the middle;
- Align the socket to the point where the connector is inserted and drill holes every 30cm to secure the built-in wire;
- Wait for the brewer to cool and transfer to the top;
- Using a pike, start punching through the concrete from the hole that forms it.
The procedure is lengthy, so be patient. Also, don't forget that you will need to continue to widen the hole that was created at the bottom while trying to engage the brush;
- Now that the bulk of the work is done, try again on the sub - it should be fully inserted into the hole, and the seat in it is definitely not protruding from any part of it.
This is important for correct and smooth installation of the socket;
- Take a brush, soak it in water and thoroughly clean the hole and the trick under the wire;
- Attach the wire in the rod to the clamps and make sure that it does not stand out longer;
- Now we prepare the solution so that its consistency is pure;
- Include a putty knife in the hole and insert the plaster with the shields, pull the wire into it, line it up and let it harden the plaster;
- Leave the plaster with the remaining plaster and let it freeze;
- Once the solution has solidified, you can proceed directly to installing the socket.
Remove the socket and connect the red (white) and blue insulated to the phase connections (L) and neutral (N). The yellow wire is responsible for the ground, and if you don't have one in your home, you can't clean it. Then insert this unit into the podrozetnik so as not to interfere with its separating lepeski (rest) and the ears of the screws were placed on the screws themselves, which are screwed into the podrozetnik;
- Tighten the screws in the jars and make sure that the socket is installed on all sides as close to the wall as possible.
Also, make sure it is positioned horizontally inside the subcontractor without any curvature;
- The penultimate phase. Remove the plastic housing from the socket and insert it into place;


Connecting the socket

Everything is almost ready, and the time has come important point— connecting the socket. Now you must go to the ground and turn off the apartment.
If you don't know where the cars from your home are located, check with your neighbors about the location of their cars and, by extension, yours if you operate with an exception. Now turn off the one that is responsible for the electricity supply on the right side of the living room.
Instructions for installing sockets in concrete walls
If you don't know, turn everything off.
Well, now you can safely participate in the connection. Pull the wires out of the new plug with the old ones and tighten the PPE caps on top. That's all, we hope this article helped you!
Guide to installing sockets in a concrete wall
Every builder and owner of a home or home ownership works throughout their life with such an important task as replacing electrical wiring.

Replacement of electrical installations is a responsible process that requires close attention and attention.
Sufficient time and attention must be given to ensure the quality of the wiring to prevent this issue from occurring in the near future.
Wiring types
Wiring is carried out in two versions: internal wiring and external wiring.
Older houses often have external electrical appliances.
Installation of subplants in a concrete wall
This is inappropriate and dangerous. To replace an old socket with a new one (or switch), the old one must be disassembled. Before starting electrical installation electrical voltage must be disabled using input machines.
Tools
To start the installation, you need to have a set of tools:
- drilling or drilling, crown or drill;
- plastic bag (very popular and easy to install);
- socket kit.

First mark the installation location and then rotate the circle to the required size.
Completing the installation and securing the juniper will help building materials: a mixture of gypsum, alabaster or already prepared quick-drying mixtures.
Installation should begin by marking the location of the sub-frames in the concrete wall (mark the circle with a pencil or marker).
Then, using a hammer drill or drill, turn the circle until the right size. We're trying to incorporate a piece into it. If there are irregularities in the niche, remove them using a chisel, screwdriver and hammer.
On the side where the wires come in, remove the plug and place it in the hole.
Correct installation of sockets in a concrete wall does not work without Strublen channels for covering electrical wires. For these works you will need:
- corner Grinder(Bulgarian);
- discs for concrete.
Finishing work

The mounting screw in the wall is made using alabaster or mortar.
Go back to the installation screen in the concrete wall: it needs to be leveled with a water scale, it should not go down on the wall because it is impossible to mount the socket and they stick to it, this was not necessary because
It's ugly and dangerous.
Block the cabinet in the wall with alabaster, plaster. Before using the fastening solution, it is necessary to drill drilled hole. A trowel or structural trowel will then need to fill the hollow hole and cover the resulting mixture and self-teach the outside. Insert box of extra mixture to fill empty molds.
Alabaster and cold freeze for 5-10 minutes and then we will continue until we begin installing the socket.
Continue straight from installing the socket, loosen the connectors, secure the wires and terminals in them. Attach the screws along the edges that are used to secure the socket to the back box. Then attach the fork to the center screw. The installation has stopped.
Making holes in a concrete wall presents many difficulties. The material is hard and needs  in a specialized tool.
The task of installing a hidden socket, which requires an appropriate recess, is considered especially difficult.
An additional difficulty lies in the need to make not a through hole, but a recess of certain dimensions.
Solving the problem will require skills, experience, and certain knowledge.
The question is not very difficult, but requires detailed consideration.
The better to drill
Drilling a hole in concrete is a test for strong-willed people. Builders try to use tools that are appropriate for the material being processed. 
They often try to make holes in concrete with pobeddite (carbide) drills and the result remains unsatisfactory.
The hardness and abrasive qualities of concrete quickly damage cutting edge drill.
The most successful tool that can cope with concrete is a hammer drill, which uses its own technique that is different from drilling.
Some more difficult to manufacture nests using a grinder. You will need to install a diamond cutting disc, but you won’t be able to complete the task entirely; you will have to complete the result using a hammer drill or electric drill.
Work performed with hard types of concrete in load-bearing walls panel houses, require use appropriate tool. You should not waste time trying to operate with inappropriate devices; you must immediately use specialized devices.
Using a hammer drill
Drilling into concrete is useless.
The hammer drill copes with the task quite confidently, since a different principle is used - not cutting, but chipping away small particles of concrete. The process is called rotary impact drilling. 
Making holes is possible using two methods:
- Consecutive contouring of a pre-marked circle with a diameter of 2-3 mm larger size socket box.
- Using a special crown with diamond or pobedite teeth.
The work is not difficult, but it will require following the sequence of actions:
- The hole for the socket box is marked with a necessarily designated center.
- The direction of the groove is outlined - the recess for the cable channel.
- The depth of the socket is measured and marked on the drill with an allowance of about 3-5 mm using a strip of electrical tape.
- The central hole is drilled.
- Holes are drilled sequentially along the contour of the circle.
The distances between them should be kept as small as possible.
- The central part of the socket is knocked out with a chisel and hammer.
Cutting the grooves is done with a hammer drill with a special blade-shaped attachment that forms a neat groove.
The process is quite lengthy, noisy, but effective.
Crown for socket boxes
Using a crown makes it possible to form a neat circle around the socket. Usually a crown with a diameter of 65 mm is used, corresponding standard size socket box. 
Using a crown makes marking easier - just mark the center of the hole and drill a hole with a diameter of 7-8 mm.
The crown goes deep into the wall to a sufficient distance with a small margin (3-5 mm).
The nest is removed using a chisel. Dense, stubborn concrete is not easy to knock out; several additional holes in the center will help ease the effort. Sometimes you have to almost completely drill out the central part.
The process is noisy, slow, but quite effective.
Regular drill
Using a drill will not create the desired effect. A drill with a carbide tip is much stronger than a regular drill, but working with concrete is too difficult for it. 
The exception is soft materials used for the manufacture of interior partitions:
- Foam concrete;
- Brickwork;
- Slag or gypsum blocks.
The carbide drill is capable of working with soft types of concrete.
Installation of socket boxes: installation rules
Procedure:
- Marking;
- Outlining nests;
- Knockout central parts chisel
Instead of a crown, various attachments with circular saws of suitable diameter can be used.
The production of grooves is done by creating multiple entries to a shallow depth (1.5-2 cm), located on the axis of the future wire.
The entries are connected to each other by pulling a rotating drill at an angle along the channel line. It is more convenient to make two narrow strips, passed at a distance of about 1 cm from each other, and then remove the jumper between them.
A plastic cable channel is installed inside the grooves, or wires are laid in double insulation.
Both options are equally possible, choose the one that is convenient for you.
Sawing with a grinder
Using an angle grinder, colloquially called an angle grinder, is not the best the best option, but if there are no other options, it will do. 
The technique for making a socket is significantly different from the methods used when working with a hammer drill or electric drill.
The grinder does not allow you to make a neat hole round shape the required diameter.
We have to work with more rough, approximate methods. But making grooves for the socket box is easier, since the grinder makes straight grooves perfectly. Procedure:
- Marking the wall;
- Drilling grooves;
- Outlining a square with a side 2-3 mm larger than the outer diameter of the socket box;
- Removing the center of the square, the inner strip of the groove;
- Installation of socket box and cable duct;
- Filling up extra space sand-cement mortar, plaster, alabaster mixture.
Safety
Working with concrete is accompanied by education large quantity dust, small fragments of stone.
The sharp edges of the particles are dangerous to the eyes and respiratory system, so you must use safety glasses and a respirator (gauze mask). Working with power tools requires compliance with specific safety rules. 
Do not use faulty tools that have damaged power cords.
When operating with a hammer and chisel, you must ensure that the hammer is firmly attached to the handle.
Keep the chisel perpendicular to the surface being worked. The riveted ends of the chisel must be removed.
Important points
Dust formation is a serious problem that arises during work. Using a vacuum cleaner can significantly reduce the volume of dust and small particles.
It is recommended to moisten hard, dense grades of concrete (on load-bearing walls) with water during work. The material generates less dust and becomes more pliable.
Watch the detailed video:
Drilling of holes must be carried out at full confidence that there is no danger of damage to the electrical cable.
If there are thick reinforcing bars in the walls, it is recommended to use a diamond-coated drill bit. It slowly but reliably overcomes the reinforcement.
Let's do
When installing modern sockets or switches indoor installation their mechanisms must be placed in a special plastic box - a socket box. Today, almost all electrical fittings are made in such a way that it allows you to install several sockets or switches in one row.
Agree that one socket in the kitchen is no longer enough, and sockets installed at different ends of the wall are not always convenient to use.
Therefore, electrical equipment is often designed in such a way that several connection points are located in one place household appliances. It is very practical and functional.
Some craftsmen, out of ignorance, do not assemble for one multi-post frame, but install separate sockets nearby. This design does not create the impression of a single whole device, because of this, such installation does not look very nice.
When installing a socket block, professionals always use a decorative frame for two, three or four windows.
But sometimes it happens that at the final stage of installation it is difficult to install the sockets in the boxes, due to the fact that they overlap each other.

In this case, the decorative frame also does not fall into place.
This is due to the fact that when installing the socket boxes, the distance between their centers was not maintained. Ideally, the distance between the centers of the socket boxes should be 71 mm. And when installing a large number of boxes, they begin to move relative to each other or become deformed under the action of the putty mixture.
Good afternoon dear friends!
I am again pleased to welcome you to the Electrician in the House website. In this article we will talk about one simple and, at the same time, useful thing for installation of socket boxes in brick walls, concrete and gas blocks. Those people who are professional electrical installers know how difficult it is sometimes to evenly install a block of five sockets.
Using a simple device, which will be discussed in this article, you can install socket boxes with millimeter accuracy.
Stuff like this isn't made industrial enterprises, so the craftsmen independently make homemade products suitable for them. In electrician slang this device is called template for installing socket boxes. There are also names such as conductor or layout, but they all perform the same function.
Strip for installing socket boxes
Most plastic boxes for mounting sockets have dimensions of 68 mm in diameter and a depth of about 45 mm.
Boxes different manufacturers may differ slightly in size and characteristics, but all have the same functionality - when assembled into a block, they provide a center-to-center distance of the installed mechanisms of 71 millimeters.

To prevent the boxes from dancing relative to each other during installation, they must be firmly fixed to each other.
How are the boxes assembled into a block? Let's consider socket boxes from Schneider Electric for indoor installation. If you look closely at the front there are special latches for joining several boxes.

You can also join the boxes using special connectors - plugs.

At first glance, the matter seems simple - after collecting the boxes into a block, the required center-to-center dimensions are automatically obtained.
Why is some kind of template needed for installing socket boxes? Everything fits together perfectly.

However, it should be taken into account that in order to secure the socket box, the entire space between the walls of the hole in the wall and the socket box itself must be filled with mortar.
Therefore, the solution is placed in excess in the nest. And when you begin to press the box into place, the solution will begin to come out of all the cracks, filling the voids, resulting in a very strong fixation of the socket box.
But when pressing the box, it is necessary to apply a fair amount of force, under the influence of which the plastic socket box can simply burst or change shape (become oval), and a block of several boxes will necessarily spread out in different directions.
At the final stage of installing the mechanisms of sockets and switches, it is impossible to compensate for all these shortcomings with calipers.
Moreover, during installation, the boxes must be clearly leveled so that the ends do not stick out or are recessed, but are flush with the wall. When installing a socket box with bare hands This can be done, but it takes a lot of time and effort.
It was to solve such problems that I made myself such a device as a template for installing socket boxes, which saves not only time, but also nerves.
How to make a template for installing socket boxes with your own hands
Let's proceed directly to the manufacture of our device.
To do this, I took an aluminum corner measuring 40x40 mm. The length of the corner depends on the number of socket boxes installed in the block, plus the necessary indents from each edge for attaching the corner to the wall (approximately 10 - 15 cm on each side). I decided to make a layout for five socket boxes, so I took a corner 60 cm long.

By the way, it is not at all necessary to make a template from a corner, much less from aluminum.
You can take any rigid material of arbitrary shape, whoever has what, for example, a pipe profile. The convenience of an aluminum template is its lightness. By the way, the idea arose to make a model from a DIN rail, there is no need to drill holes.
Now you need to mark a line in the center of the rib where the boxes will be attached. Using a tape measure, find the center on both sides of the corner and mark a line with a pencil.

Along the marked line we will drill holes for fastening the socket boxes using self-tapping screws.
Our template for installing socket boxes almost ready. Let's start drilling the holes. To do this, we can use a screwdriver and a 3 mm metal drill.

We retreat 12 cm from the edge of the corner and drill the first hole.
To prevent the drill from slipping from the intended drilling site, I recommend that it be centered.
Then we measure the distance between the centers of the socket box screws and transfer it to our template. I got 60 mm. This will be the point for drilling the second hole. Similarly, we drill holes for all socket boxes in the block.


Trying the box on the bar


We retreat 5 cm along the edges of the corner and drill two more holes.
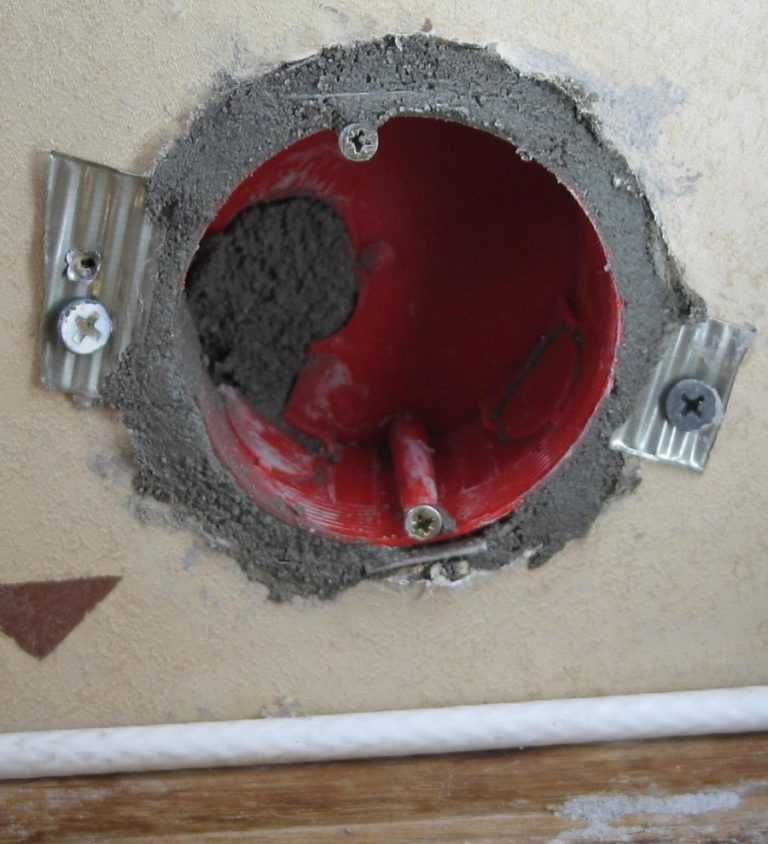
How to fix a socket box in a concrete wall
During installation, this will help press the entire structure against the wall.
Now let's fix it to finished layout all the sockets, it turns out smooth design, which can be inserted into the wall without distortions or bends.


Let's see what distance we have between the centers of the boxes relative to the drilled holes:

To install a block of socket boxes, using a template, pour a little mortar into the hole in the wall, insert the wires into the socket boxes and attach the template to the wall.
First you need to drill holes in the wall. We fix the corner to the wall with dowels.

The convenience of this design is that all boxes are installed with an exact distance relative to each other, and there is no need to constantly check and adjust each box to completely dry solution. Deformation of the boxes is also eliminated, and all of them are placed flush with the wall.
You can make sharpenings along the edges to make it convenient align the template horizontally.
I hope, dear friends, the article was interesting for you, and this device will help you make installation easier and faster.
Who has any opinions? Maybe someone is already using this design or has opinions on how to improve it. Let's share our experience.
A socket is not only a mandatory functional element of electrical wiring, used to connect electrical household appliances, but also a significant interior detail.
Trouble-free operation of the outlet, as well as its neat appearance to a large extent depend on how competently the installation was performed, right? To do correct installation, it is necessary to take into account a number of nuances that are present in this work, one of which is correct installation socket boxes.
Have you never installed a socket box and are afraid of making mistakes? We will help you understand all the features - the article discusses in detail the types of installation boxes and the intricacies of installing each of them.
Attention is also paid to the installation of socket boxes in common types of bases - concrete, plasterboard, tiled wall. Material added clear photos and useful videos.
Modern sockets, both in appearance and in the installation method, differ significantly from those installed in Soviet-era houses.
If previously they were simply embedded in the wall without the possibility of replacement, today installing them, and if necessary, is not particularly difficult.
And all this thanks to the socket box, which, in fact, is a box that securely holds the socket in its depths and at the same time ensures its fire safety.
There are socket boxes different shapes and sizes, differ in materials of manufacture and installation method, so before you buy, you need to understand their types.
Image gallery
Installation of a socket box in a concrete base
If you have already decided where you will have sockets, you can start installation work, which consist of several stages.
Before installing the socket box in concrete, markings are made, then a hole is made in the wall and a gypsum solution is prepared.
Image gallery
The installation of not a single new point in the electrical network- this plastic or metal box, a wooden plank acts as an intermediate link in the wiring and is responsible for reliable fastening socket or light switch.
This electrical element is irreplaceable, so it is important to know everything about installing a socket box into a wall with your own hands, so that when planning a new line or replacing an old device, you do not waste time and money calling an electrician.

Below we will discuss the main types and sizes of mounting boxes offered by stores, as well as step-by-step instructions for installing them.

Understanding the types and types
Socket boxes are classified according to many criteria, but the main one is their division according to the material of manufacture. So, the following models are found:
Plastic, which are the most convenient and practical, since the base is made of non-flammable material, which increases the safety of the wiring and makes it possible to use it on wooden surfaces.


Metal boxes are more durable, but due to their ability to heat up and conduct electricity, fade into the background, giving way to safer and practical options. However, these models have not been discontinued, since the installation of hidden sockets in wooden houses is only possible with a metal socket box.

Wooden pads were previously often used when setting up wiring open type, being a convenient intermediate base for attaching the socket directly to the wall. Nowadays they practically never occur, only when installing homemade wiring in bathhouses, garages and other outbuildings.
The products also differ in their shape: round (universal), square (more spacious) and oval (or “double” socket boxes for installing a double socket or a set with a switch).

Models also differ in design features:
- The presence or absence of fixing tabs (in hollow plaster walls they are necessary, and socket boxes for plasterboard, concrete, brick and aerated concrete are secured with a layer of alabaster).
- Open or hidden.
- Single and composite (composite ones have special fastenings that allow you to assemble up to five glasses into one block).
- Standard and advanced.


The sizes of socket boxes may also vary. Considered standard round model with a diameter of 65 cm and a depth of 40 cm, however there are narrow options 25 mm high or 80 mm deep. The dimensions of square boxes are most often 70 by 70 mm, but there are also deviations from the standards.

We mount the socket box
Installation of this product does not differ in complex manipulations, however, for wood, concrete, brick and plasterboard wall the algorithm of actions will change slightly. Below are step by step instructions how to install a socket box with your own hands in each indicated case with detailed description and photo.


Preparation
On preparatory stage it is necessary to choose the right type of socket box depending on the required functionality and wall material. Also common to all cases will be a set of tools and consumables:
- Hammer or drill;
- Suitable attachment for wall slitting;
- Building level;
- Meter;
- Pencil;
- Chisel;
- Hammer;
- Putty knife;
- Putty.

Installation of a socket box
At this stage, the procedure and technology of actions for each type of wall will differ.
When installing in concrete and brick, the following must be taken:
- Mark the outline of the future wiring on the wall surface in accordance with the previously planned diagram.
- Determine the location of the outlet or switch, mark the area with a cross.
- Attach the purchased socket box to the “cross” (so that the mark is strictly in the center) and trace the outline.
- Drill a groove, where the drilling depth for the socket box will be the sum of the height of the glass and a margin of 5 mm.
- Clean the resulting hole and try on the socket box.
- Bring the wires inside the drilled circle, also make a hole in the back wall of the socket box and pull the wires through it.
- Moisten the hole and apply thin layer putty and carefully place the glass.
- Level the surface, remove excess, wait until dry.

It is somewhat easier to install a socket box in drywall:
- Apply markings and mark the outline of the socket box.
- Cut a hole of appropriate size.
- Make a hole in the glass for the wires and pull them out.
- Insert the socket box into the groove.
- Tighten the screws located on the sides of the housing until the glass sits tightly.

Installing a socket box in a wooden wall is considered unsafe even with the use of metal protection. If you still decide to do hidden wiring, then drill suitable sized grooves, bring the wiring out and install metal cups.

It is important to act absolutely precisely, as with drywall, since it will be problematic to disguise unevenness or extra centimeters. However, it is still recommended to install exposed wiring on wooden surfaces.

When installing a socket box, it is a good idea to follow some tips that will significantly save effort, time and money.

Install mounting box after applying plaster to the wall, but always before finishing with putty and gluing wallpaper. This procedure will eliminate errors, will not spoil the interior, and will help hide errors in local repairs.

Check that the markings are correct with a level so that you don’t end up with sockets placed at an angle. This is especially true for installing socket blocks.

It is not necessary to use the old holes when replacing sockets and switches - it is enough to cover up the old entrance.

If the wall is too thin for a standard-sized socket box, it is recommended to install surface-mount sockets. As a last resort, it is allowed to independently trim the height of the mounting cup.

It is not advisable to use polyurethane foam for fastening, as it is a fire hazard.


Given step by step photos installation of the socket box clearly demonstrate that its installation is not difficult even for a beginner in electrical engineering. If there is a need for such repairs, then feel free to get to work, armed with the instructions, tips and recommendations described above.


Photo of socket boxes


Electrical wiring in the house begins with installation in special wall sockets plastic containers– installation boxes. Those that are inserted into concrete or other rigid fences, such as bricks, are called socket boxes.
They are hollow glasses, smooth on the inside, and on the outside they have small protrusions and teeth for reliable fixation. On the back wall of the case there are punched hatches for cable passage various diameters. And on the front there are holes for fastening electrical products with screws. Their use guarantees the functional safety of electrical points.
Types of socket boxes
Basic electrical products are standardized. There is no special nomenclature, but they are classified:
- By internal diameters, the sizes of which vary from 60 to 68 mm.
- According to installation depth. The minimum landing starts from 25 mm, the maximum – from 80. The most popular ones are 40-45 mm deep.
- For single and block models, the body of which has plastic partitions that separate the connection points by a distance of at least 7.1 cm.
- According to the material of manufacture. Mainly made from polypropylene. But there are also metal ones, made of silumin or galvanized, which must be installed in wooden houses in accordance with fire safety standards.
A plastic socket box for concrete is characterized by:
- high strength and durability of the material;
- low electrical conductivity;
- ease of installation;
- good adhesion to concrete;
- reliable fastening.

Installation step by step
Wall placement begins with preparation necessary tools and materials. For this we use:
- Hammer and diamond bit with a diameter of 70 mm, slightly larger than standard size socket box. Or a drill with a Pobedit drill, or, in extreme cases, a grinder with a grinding wheel.
- Hammer and chisel.
- Narrow spatula.
- Level.
- A composition based on gypsum, or alabaster, or putty.
- Container for solution.
Installation is performed in the following sequence:
1. Marking of the installation of the electrical product is made. The planned hole is marked on the wall. Either as specified in the project, or according to the standards adopted by electricians.

The data is not strictly regulated. Sometimes switches are located according to the arm's length rule, especially in own home. At the level of the middle of the palm, plus or minus 5 cm, you can install a socket box that will be convenient for everyone. If installation is planned next to the door, then you need to step back 15-20 cm from the edge of the opening, not counting the frame.
2. The hole is made with any of the above tools. If the work is carried out using a crown, then first its guide drill enters the intended center of the marking, then the entire hollow cylinder cuts into the surface.
If you use it, you must first mark the outline and its center on the wall. Starting from the last and along the entire perimeter, drill holes (the closer to each other, the better) to the full depth installation box. Using a hammer and chisel or a hammer drill with an impact bit, bring the seat to the desired size.
The use of a small angle grinder, which in everyday life is called a “grinder” or angle grinder, does not immediately provide the required depth. Usually the disc enters at a lower level in the thickness of the concrete than necessary, so after the angle grinder you should still work with a chisel. This method is the fastest, but also the dustiest.

3. Install the structure into the finished cavity for fitting. The depth of the seat should be 0.4-0.5 cm greater than the product. This is necessary for further filling of the fixation solution and the wire entry.
For further ease of installation, it is better to trim the edges of the hole made with a knife. This will allow the body of the shrink box to adhere more tightly to the wall, while its “skirt” can be installed flush with concrete surface. If this is not done, the frame may move 1-2 mm away from the wall.
4. Next, using a hammer with a chisel or a hammer drill with an impact bit, a groove is made in the upper part of the mounting socket for laying the wire. On the back side of the container we push or cut out a hatch of the required diameter for cable entry and pull it into the body of the product. We insert the socket box with the cable into the socket so that there is still 2-3 mm left in the depth for the gypsum mortar.
5. Let's start preparing the fixing composition. To do this, mix the powder and water, remembering that hardening occurs quite quickly. It is necessary to clean the finished hole in the concrete wall, and then moisten it generously with water until completely absorbed. Use a spatula to fill its bottom with the mixture and insert the socket box with the wire so that the solution not only covers back wall, but also squeezed out of the slots a little. Sometimes, for better fastening, the container body itself is coated with a fixing frame.
6. The glass should either fit into the nest flush with the concrete wall, or “sink” 0.1-.15 cm deeper than its surface. Correctness, namely vertical installation, is checked by level. This requirement must be observed for further trouble-free installation of the inserted electrical product.
7. Use a spatula to place the fixing compound into the gaps between the wall and the body. At the same time, we align the glass so that the mounting screws are parallel to the floor. After the solution has completely dried, remove the excess from the wall.

Since the work of an electrician involves life-threatening factors, it is necessary to adhere to the labor protection rules regulated for this activity. The installation of socket boxes in a concrete wall presented above was described for installation in a new building not connected to the electrical grid. If everything is done where there is already voltage, for example, in the case of replacing an old outlet with a new one, then its presence must first be checked using a multimeter. And only after making sure that the circuit breaker, which is located in the metering and distribution panel, is turned off, can you proceed.
Working with a grinder is fraught not only with a dusty curtain, but also with flying small pieces of concrete that threaten to cause wounds on the face. Therefore, they use means personal protection such as safety glasses, a mask or a respirator.
The gypsum mixture must be worked out within 5-7 minutes, and the alabaster mixture in 4-5. This is not always convenient, especially if a person does not have much experience in installing electrical products and working with these compounds.
If the installation was performed poorly and there was a need to adjust it, then you will have to destroy everything and start over. Therefore, it is better for non-professionals to use gypsum putty Knauf Fugen (Fugenfüller) or Rotband plaster, containing gypsum. Their hardening begins after 30-40 minutes and proceeds evenly, while domestic gypsum mixtures do not have such regular hardening, but are distinguished by good adhesion with a spatula, which interferes with work. When using our solutions, it must be constantly moistened.
They were installed in the wall without the possibility of replacement, that is, simply put, they were built in. In the event of a malfunction, it was impossible to replace such an outlet - it was necessary to pick out the wall and get out the old product. Now almost every owner knows what installing socket boxes is - after all, it is thanks to them that replacing failed switches, sockets and devices has become much easier and simpler. However, not everyone knows how to install a socket box correctly and evenly, so let’s look at this issue in more detail.
How to choose a socket box

Some useful tips will help you install socket boxes exactly as needed:
- When buying a socket box, immediately purchase sockets and switches along with it. Immediately in the store, make sure that the socket fits freely into the socket box; it can be secured with screws and a supply of wires can be placed inside the socket box. There is no need to be embarrassed to ask the seller for another socket box - without doing this, then you may have to go and buy new ones.
- Using these tips, you can install a socket box in almost any wall, even without much experience. The main thing is to follow all the recommendations given in this article.
Video
This video describes in detail the installation of socket boxes:


