Finishing materials for the ceiling are presented in a wide variety, so choosing the preferred option is easy. To do this, be guided by your own preferences, interior style and requirements for quality and reliability indicators. One of the popular options is PVC panels.
They are distinguished by their versatility and ease of use, including for wall surfaces. The installation process is simple, so everyone can do it with their own hands, starting with creating the frame. The main thing is to create a durable sheathing for the structure made of PVC panels. It will guarantee that ceiling structure it will be reliable and durable.
Attention! Pay attention to all the details when creating a structure that acts as a frame, strictly following the instructions on the video, which will show the stages of the process.
What is sheathing or frame?
The sheathing is the basis of the structure. It implies the ability to mount panels on the ceiling and walls of rooms. Frames are made from various materials, including plastic.
Among the advantages of this option are the following:
- Resistant to temperature changes.
- Easy to install on any surface, including walls.
- Resistance to moisture.
- Possibility to use repeatedly, saving money.
- Resistant to deformation.
Frames are also made from other materials. Among them are metal profiles or wooden slats. Wood is not resistant to moisture and temperature changes, which will negatively affect the operation of the sheathing for walls and ceilings. The result is visible deformation. Metal structure not always suitable for PVC, as it becomes too heavy an option.

When compared to these materials, PVC frame has advantages. Among them are the simplicity and efficiency of installation, including for wall surfaces. The panels are easily attached to each other, eliminating the formation of gaps or cracks. Additionally, clips are used to ensure a secure fit to the wall or surface.
Another one positive trait– resistance to mold and mildew. Plastic structures are fireproof and easily tolerate moisture and dampness, which cannot be said about their wooden or metal counterparts. If required, a plastic frame is used as a cable for organizing wiring.
What will be useful during the creation process?
You can create it yourself. This process is simple, and everyone probably has the tools needed for this at home. If desired, you can call the command experienced craftsmen who will quickly cope with the task assigned to them. But self-execution will give you a reason to be proud of your own successes.

Prepare the following tools:
- Screwdriver.
- Drill.
- Tape measure or ruler.
- Building level, optimal choice– water option.
- Hacksaw.
This is enough to create a PVC frame. Despite the fact that the cost will be more expensive than a wooden one, the result will pleasantly surprise you. There is no need to use antiseptics, and the installation itself is based on the use of special clip-fasteners, which facilitates the process.
Remember that decorative elements attached to plastic frame in a perpendicular position relative to the structural elements. Compliance with this simple recommendation guarantees the quality of the fastening and the absence of problems later.
Stages of installation of the structure
To ensure successful installation of PVC lathing, follow the recommendations of professionals. The first thing people pay attention to is the distance between the slats. This is true for both ceilings and walls. The optimal distance is a step of 30 cm. The PVC slats themselves are placed in a perpendicular position to the panels. In other words, if the panels are mounted in a vertical position, the slats are fastened horizontally and in the reverse order.

An important point is the marking. It is carried out at the initial stage. Without this, it will not be possible to create a high-quality frame for the ceiling or walls. If you find it difficult to mark yourself, watch the video. It will introduce you to the details of the marking process for the ceiling and walls.
The frame is attached around the perimeter of the room; to do this, measure the length of the walls, finding the longest low angle, from him they conduct horizontal line, along which they begin to mount the frame. Panels made of PVC material are joined together using a hacksaw and a miter box. These tools will allow you to get on your panels nice cut With minimal dimensions. The material is fastened every 25-30 cm.
If desired, you can make this process easier. To do this, pull the fishing line along the marking line. This makes installation easier and reduces the likelihood of errors.

If you have been able to appreciate the advantages of PVC lathing and lining the ceiling and walls with plastic panels, carefully prepare for the installation process. To perform the steps correctly, watch the video. It will allow you to understand the intricacies of the process of creating a ceiling, and avoid typical mistakes. Video is the best assistant that guarantees that the cladding is done correctly.
A lot of materials for interior decoration, which are presented in assortment construction stores, involve their installation on a pre-prepared sheathing. If you don't want to invite construction team, then do the lathing yourself. It's not really difficult process However, a couple of significant points should be taken into account for any type of lathing, without which the final result of the cladding will be of poor quality or short-lived.
Exists whole line possible constructions of the sheathing and options for how to make it for walls, ceilings and floors. First, we will discuss the materials used to form the sheathing, and then we will consider various ways its construction with indications of all the nuances.
Selecting material for interior sheathing

wood and metal sheathing
According to the type of material it can be formed:
- Wooden sheathing;
- Made from galvanized profile;
- Plastic sheathing.
Metal
IN modern construction as the main material for forming the sheathing for interior work Most often, a galvanized profile is used, which was originally invented for attaching drywall. In this case, a U-shaped profile with various sizes and shape for various target placements. A UD profile is used to form the perimeter. The end of the CD profile is inserted into it, from which the sheathing actually consists.
Several other types of profiles are used mainly for forming partitions and walls, so sheathing is not useful in the arrangement. In addition, there is a whole range of fasteners and accessories for mounting profiles and connecting them, which greatly facilitates the assembly of sheathing of any complexity and shape.
Tree
A time-tested material is, of course, wood, especially since the average cost of lathing made of wood is significantly lower than the same one made of galvanized profile. Timber and boards with dimensions varying within 25-50 mm are used. For interior work, it is best to choose the minimum acceptable size that will allow you to securely fasten the cladding material and will not deform under the influence of its weight or the external environment.
Wood is a fairly pliable material from which you can construct a sheathing for a variety of purposes. However, there are a number of limitations and features that somewhat reduce its value as a material for sheathing. First of all, this is exposure to moisture, as well as its low fire safety. These shortcomings can be significantly reduced by using special impregnations. However, risks cannot be completely eliminated.

wooden sheathing using ordinary construction foam
Plastic
In most cases, plastic profiles for sheathing are made for a specific type of sheathing, and the methods for installing them can vary dramatically. The specifics of their installation should be clarified in the manufacturer's instructions.
General structure of the lathing
To create lathing in the general case it is necessary to mount the frame around the perimeter of each sheathed surface. It is brought to the required level. After this, the intermediate elements are placed at a distance necessary to secure the sheathing elements. This is very important point, in which errors are not allowed.
To secure plasterboard sheets the distance of the sheathing elements should be half the width of the sheet. In this case, the distance itself is calculated from the middle of one crossbar to the middle of the other. Only in this case will it be possible to properly fasten the sheets end to end.
For sheathing with PVC, aluminum or wood panels you can limit yourself to distance equal to length elements or place one or two more in the middle between them supporting elements battens. For the ceiling, it is better to take a smaller distance between the beams or profiles (450-600 mm) so that the cladding elements do not sag.
In case it happens, the distance between the sheathing bars is sufficient to accommodate it. For example, when using strips or slabs mineral wool the distance should be 1-2 cm less than the dimensions of the insulator. This will allow you to pack it tightly without gaps.

Taking into account these construction features, you can already decide on the required amount of base material and determine how much the sheathing costs.
If necessary, at the stage of forming the sheathing, distribution is carried out hidden wiring, various communications and elements additional equipment, such as warm floors, insulation, etc. In the case of forming a sheathing with a counter-lattice, the frame around the perimeter should be made at a certain height for both layers of timber.
Choosing the direction of the sheathing
There are several types of lathing:
- vertical
- horizontal
- with counter-lattice
Choose suitable option of the first two is possible only by deciding on the location of the elements finishing material. The counter-lattice is formed, firstly, to ensure normal ventilation of the space under the cladding, and secondly, to position the thermal insulation layer. It is applicable only when wooden sheathing is installed.
For plasterboard sheets, the lathing should be placed vertically, with the condition of the same direction for the drywall sheets themselves. The rule here is that the sheet must be fastened evenly along its entire length. Otherwise, when using transverse lathing, you will have to fill it too thickly, which will significantly affect the cost of the entire structure.
For mounting various types materials consisting of individual panels or strips, such as PVC panels, lining or wooden slats, aluminum panels etc., used transverse lathing. This means that when the material elements are arranged horizontally, the sheathing is performed vertically and vice versa.
If necessary, form counter-lattice The outer layer of the sheathing is mounted according to the rules already described, and the bottom layer, which is directly attached to the base, is positioned perpendicularly.

Horizontal (transverse) lathing and counter lathing using the example of a roof. When working indoors, a counter-lattice is rarely required.
Type 1: wooden beam sheathing
Wooden beams and boards are indispensable in the case of, and are also suitable for lathing walls.
The following tools will be required for the work:
- saw;
- jigsaw (preferably);
- hammer drill;
- screwdriver, screwdriver;
- chisel;
- mallet, hammer;
- tape measure, level, plumb lines, construction corner.
- The materials required are directly the timber from which the sheathing is installed, a board for making substrates, a board for the frame, screws and dowels for mounting the timber to the base.
First of all, it is necessary to mark the place for installing the outer elements of the sheathing (frame). This is especially important in cases where only part of the surface will be occupied for finishing. The location of the beams or boards along the perimeter is especially carefully measured using a level and plumb lines, because subsequent elements can be oriented along the frame.
If the surface on which the sheathing is made is uneven, you will have to use backings for some of the beams or parts thereof so that the outer edges of the sheathing form a single plane in the level. For example, you can sharpen the beams or comb the base. The choice of option depends on the nature of the irregularities. If they are present throughout the wall or floor, then it is better to use substrates. To determine the distance at which the beams will be separated from the wall, you should determine the highest point on the surface and from there calculate the position of the frame beams. In this case, it is best to take another 2-3 mm margin for unevenness of the beams themselves, which will be used in the sheathing.
Having determined the direction of the first beam of the frame, and calculated required size substrates that are necessary, you can secure it with dowels and screws. The timber is secured with screws every 20-25 cm.
After the first beam, the rest are installed, which will form the perimeter of the sheathing. Everything is done with the derivation of a common plane and level. Window and door openings, as well as protruding parts of the walls, are lined around the perimeter with beams in order to securely fasten the edges of the cladding elements along their border.
Scheme of sheathing a wall on a balcony for cladding with clapboard or panels
After this, you can begin to install the intermediate beams. There is no need to rigidly connect the intermediate beams to the frame elements, especially if you are not sure that the wood is properly dried. In the case of rigid fastening, due to thermal deformation or due to changes in humidity, the position of the sheathing elements may be lost, which will also affect appearance, and on the strength of the entire structure.
When using backings, you should secure the edges of the timber, checking the indications building level and plumb lines, and after that begin to secure in the middle, combing out the substrate of the required thickness or laying required amount prepared pieces.
All wood used in the manufacture of sheathing should be treated protective compounds with antiseptics and fire retardants. This will protect the material from rotting, fungi, absorption of excess moisture and reduce the risk of fire.
Video: example of installing wooden sheathing under plastic panels
Type 2: metal lathing (made of galvanized profile)
The following tools will be required:
- metal scissors;
- screwdriver;
- level, plumb;
- tape measure, construction corner;
- hammer drill.
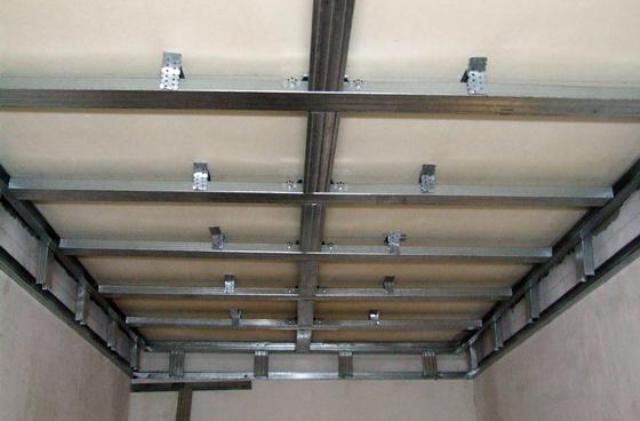
Most often, a galvanized profile is used when making sheathing for plasterboard, but it is also perfect for other sheathing materials. With the help of such a profile and all kinds of auxiliary fastenings, it is possible to sheath any surface. A galvanized profile is not suitable for forming sheathing on the floor; it is not strong enough for this. But the lathing on the ceiling is best and easiest to assemble from a profile, and not from a wooden beam.
In any case, all work begins with the installation of UD support profiles. They are fixed on the extreme sides perpendicular to the placement of the sheathing elements. All intermediate elements will be inserted with their ends inside this profile and attached to them. In addition to the two main guides, additional ones are installed parallel to the edges of the window and doorways, as well as along the perimeter of protruding elements that will not be sheathed.
The supporting metal profiles must be securely held to the base. To do this, fastening dowels are placed every 15-25 cm. As in the case of wooden sheathing, underlays may be needed if the surface of the base is uneven. It is extremely important to correctly determine the height of the substrates, because if you make a mistake or miscalculate, then when fixing the profile it will bend. After this it is no longer possible to level it.
Method of metal wall lathing based on CD60 profile
The main profiles of the sheathing are inserted into the guides with their ends at the edges and secured with screws. Special screws for galvanized profiles with a drill tip are best suited for this purpose. To add rigidity to the profile and the entire structure, you can additionally use mounting hangers. They are mainly used to secure profiles to the ceiling, but they are also suitable for walls. The edges of the hangers are bent at 90 degrees and secured in the places where the profile is installed. After installing the profile itself and securing it to the guides, the bent wings of the suspensions are screwed to it, cutting off their excess part, which protrudes above the profile. Before screwing, be sure to check the level of the entire profile, because the profile itself, although strong, still bends a little.


A bathroom is a room with high humidity and frequent temperature changes, therefore, not everyone the material is suitable for its finishing. There is enough a large number of bathroom design options. One of the cheapest materials are PVC panel. A PVC frame for a bathroom is quite easy to make, and the material itself is relatively inexpensive.
PVC is made from synthetic material, formed by chemical mixing of carbon, chlorine and hydrogen, as well as lead. However, lead is present in high-quality panels in such small quantities that it is not released even when PVC burns, so this material is safe to use (if it is made in accordance with the standards).
It is important to pay attention to the quality of this material, as unscrupulous manufacturers can add phthalates to it in large quantities, which can cause serious harm to health.
Advantages and disadvantages of PVC panels
The ceiling in the bathroom made of PVC panels has all the characteristics necessary for this room. Affordable price and ease of installation makes this material almost ideal for rooms with high humidity.
Of course, the main disadvantage of low-quality PVC elements is their harmful effect on human health and environment, however, if you buy materials for home finishing only in trusted places, such problems will not arise.

Disadvantages of PVC panels:
- This material is quite fragile, so it is easy to damage during installation.
- If the surface on which the PVC frame is attached is uneven, then part of the room space will be hidden under the panels.
- Low-quality materials emit a specific unpleasant odor.
Advantages of PVC panels:
- A large selection of shades makes this material suitable for any interior style.
- Due to their low sensitivity to high humidity and synthetic origin, PVC panels are resistant to fungal and mold damage.
- You can install PVC panels on the ceiling in the bathroom yourself, having a minimum set of tools and knowledge in the construction industry.
- A ceiling made of such material is easy to repair because, if necessary, you can remove one of the parts without disassembling the entire structure.
- Under plastic panels you can hide electrical communications and materials used to increase thermal insulation and sound insulation.
- PVC panels can be washed with a solution of water and ordinary detergents.
- Ceiling finishing PVC materials will cost you much less than, for example, installing a stretch or suspended ceiling.
- PVC have enough long term service (10-15 years).
- Good panels have high fire resistance.
Thanks to all the advantages described above, PVC ceilings are enjoying ever-increasing excitement.
Selection of PVC panels
When purchasing such materials, you must Special attention focus on their quality as PVC ceiling assembled from defective components will look untidy and may also release substances hazardous to health.
In order not to purchase a counterfeit made at home, you need to ask the seller for a certificate for the product. You should also inspect the panels for unevenness, foreign inclusions and snags.

The thickness of high-quality material should be 8-10 mm, the length usually reaches 3 meters, but if necessary, longer copies can be ordered.
In any case, it is almost impossible to distinguish by eye quality material from low-quality, so it is best to purchase PVC panels in trusted specialized stores.
Do I need to level the walls before installing the frame?
PVC panels can be installed in two ways: framed and frameless with glue nails. One of the advantages of the frame method is that it hides all surface irregularities of the base surface, so in most cases pre-finishing will not need.
However, if the ceiling has very large irregularities, and fastening the frame at the same level is not possible, you will have to work on such a surface, eliminating particularly obvious defects.
PVC elements that are installed with glue nails have less ability to hide ceiling imperfections, so frame method is more popular.
At the stage preparatory work need to get rid of old decoration, in the event that it crumbles, and also treat the ceiling with a special antiseptic, eliminating traces of mold and mildew. All existing cracks and holes must be sealed with plaster. cement based, otherwise ceiling particles may begin to crumble onto the finished plastic construction, which sooner or later will lead to the need to replace some panels.

Tools and materials for installing frames for PVC panels
The frame for the ceiling panels in the bathroom can be made of metal or wood. Certainly, metal carcass more suitable for rooms with high humidity, but you can also install wooden sheathing, if before installation the slats are treated with special compounds, for example, drying oil heated in a water bath. Wooden slats need to be processed after the frame is assembled.
Metal profiles initially have all the properties that are necessary for a long service life of the frame in the bathroom, so they do not require any pre-treatment.
What tools and materials will be required to install the frame in addition to profiles:
- perforator;
- screwdriver;
- jigsaw or hacksaw for metal;
- construction stapler.
- building level;
- roulette;
Self-assembly of the frame

Even a person inexperienced in the construction craft can assemble a frame for PVC panels; the main thing is to take accurate measurements and accurately calculate the required amount of material.
Assembling the frame:
- Using a level, we find the point on the ceiling that is closest to the floor.
- We retreat from the identified point 5 cm down the wall.
- At this level we make a mark around the entire perimeter of the room using a water or laser level and beating thread.
- Using self-tapping screws, we screw the UD profile guides at the level of these lines, directly to the wall tiles. If the crosses that were used when installing the tiles had a width of 2 - 2.5 mm, then the screws can be screwed into the seam between the tiles.
- We make transverse markings on the ceiling, with a step between lines of 40 cm (the markings should run across the direction of the PVC panels).
- Now, we attach straight suspensions to the ceiling, bending them into a U-shape, the step between them should be 40 - 50 cm.
- We attach wide LED profiles to the hangers, placing their ends into the guides attached to the walls.
- We bend the free sections of the suspension to the sides.
- If the surface on which the frame is installed is perfectly flat, then the profiles can be attached directly to the ceiling without hangers.
- In places where the lamps are planned to be located, it is necessary to attach additional profiles to the sheathing.
The ceiling frame made of PVC panels in the bathroom is installed quite simply and quickly, this is another reason why this design is popular.
Attaching PVC panels to the frame

When the frame is installed on the ceiling, you can proceed to the installation of PVC elements. It is important to follow the sequence of installation of plastic components, and special attention should be paid to closing the gap between the wall and the ceiling. Can be matted around the perimeter of the room being finished ceiling plinth or a special L-shaped profile for PVC panels.
Attach PVC panels to the frame:
- We install an L-shaped profile for PVC along the perimeter of the bathroom ceiling.
- We measure the width of the ceiling across the previously installed profiles and cut them in accordance with the received PVC measurements panels.
- You need to remove the chamfer from the first panel to better fit into the groove of the L-shaped profile.
- Now we install the remaining PVC panels one by one using self-tapping screws with a press washer or construction stapler, in this case it is necessary to ensure that the chamfer of one panel falls into the groove of the other.
- As the panels are installed, we mount lighting, making small holes in the plastic elements at the places where the lamps are attached using a drill with a special attachment or a drill and a sharp knife.
- We pass wires for lighting fixtures through the same holes.
- Before installing the last panel, measure the distance from the penultimate element to the starting profile.
- We cut the last panel lengthwise in accordance with the obtained dimensions.
- We attach the last component plastic ceiling to the frame, bringing its edge into the starting profile using a narrow spatula or a blunt wide knife.
- We seal the gaps between the L-shaped profile and the bathroom wall with white silicone.
- The installation of the PVC ceiling is complete, all that remains is to wipe its surface from dust that has accumulated during the installation process.
Install a ceiling made of PVC panels in the bathroom - perfect solution, because this material fits perfectly into rooms with high humidity. The only condition for rooms decorated with such material is the mandatory presence ventilation system just like the one formed during switching on hot water the couple needs a way out.
Remember that high-quality installation of the frame is the key to the durability of the structure.
Choosing the least expensive and at the same time quite simple finishing method, many opt for plastic panels. They are easy to install on our own, do not require any special equipment or tools, and after finishing there is not a lot of debris left behind.
The variety of colors and textures only adds to their positive qualities.
But there is one nuance - not everyone knows how to make a sheathing under plastic panels. There seems to be nothing complicated about this, but many are put off by the need to assemble such a frame, and they choose other finishing options.
In fact, everything is extremely simple and no special tools or skills are required to assemble the base for finishing. Anyone who knows how to hold a drill, hacksaw and screwdriver can mount the frame.
What to make from
The choice of material for the manufacture of the frame is an important stage. Here you should take into account the features of the room where the finishing will be done.
Very often, simply wooden blocks are used. They are perfect for rooms with normal humidity and slight temperature fluctuations.

In damp rooms it is better to avoid wood. Over time, the wood may swell due to humidity and the block will “lead”, and with it the finishing elements.
Aluminum profiles are a great choice. They are universal and can be used not only for installing drywall.
They are easy to attach and different sizes and types, will allow you to assemble a base of absolutely any configuration.
It’s convenient to work with them, and you can fasten all parts of the structure using self-tapping screws and a screwdriver, which speeds up the assembly process.
Plastic is also used for these purposes. Basically, elements made of plastic are used for mounting panels on walls, but sometimes they are also used for ceiling mounting.


Due to the peculiarities of their design, they are very easily attached to surfaces.
Installation process
In order to install a frame from any selected material, you will first need to apply markings to the wall or ceiling. To do this, a diagram is often drawn on paper, and then, in accordance with the drawing, markings are made on the surfaces where the base elements will be attached.
For example, a diagram for finishing a balcony will look like this, with minor variations.

The principles of drawing up a diagram and subsequent assembly of the entire frame remain the same, regardless of the room and location of attachment.
Having a drawing will allow you to calculate the materials in advance and the amount of necessary fastening fittings.
It is easier to fasten the structure along the marked marking lines so that each part is in its place. This will not only make the base more beautiful, as many people think, but also helps to accurately fit into the pre-calculated amount of material.
After marking, you can begin to assemble all the structural elements together and mount them on the surface. All parts are attached using dowels and screws.
When working with plastic sheathing, one point must be taken into account.
To fix the decorative strips, special clips - locks - are used here. In order for them all to snap tightly and securely, you need to position the frame elements strictly perpendicular to the future location of the covering strips. Otherwise, the clips will not be able to securely fix the panels.

Having secured the last part of the frame, you can begin to install the plastic panels.
For ceilings, the lathing for plastic panels is assembled from parts that will be fixed to the walls around the perimeter of the room, and transverse components.
The parts of the structure located around the perimeter are fixed first. They must be positioned strictly horizontally, as this ensures the horizontality of the future ceiling.

The principles of working with wooden blocks are no different from the methods of assembling a base from any other material. They are fixed to the surface in exactly the same way, according to the scheme, using dowels and screws.

Plastic panels are attached to the resulting base. Wooden blocks provide several benefits when used for sheathing.
Firstly, you can attach all other elements to them using a construction stapler. This will greatly speed up the further installation process.
Well, their second advantage will be the price. The slats are inexpensive, you just need to choose ones whose humidity does not go beyond 18%. Then they will not deform when drying.
Conclusion
Assembling the sheathing is not as complicated as it might seem at first glance. If you approach the installation responsibly, the whole process will not take much time, and you can do everything on your own.
Anyone who can handle a drill and a regular hacksaw can assemble such a structure, and there is no need to involve someone else for these purposes.
Mounting plastic panels on the surface of a wall or ceiling is quite simple. You just need to know how to make a sheathing for plastic panels. Lathing is a structure made of wooden slats, metal or plastic profiles. It is attached to the surface using dowels or nails. You can level the walls and fill the voids with soundproofing material and insulation by installing sheathing.
How the sheathing is made
To install the cladding and panels, you need to prepare certain tools and materials:
- smooth wooden slats without knots;
- instead of slats, you can use metal or plastic profiles;
- antiseptic for treating slats;
- roulette;
- ruler;
- drill with drills;
- dowels or nails;
- level;
- screwdriver;
- jigsaw or hacksaw for metal;
- sharp knife;
- square;
- miter box;
- stapler with staples;
- hammer;
- pliers;
- stepladder.
First you need to install slats around the perimeter of the surface to be treated. Use a level to control the horizontality and verticality of the bars. Fill the middle of the rectangle with other slats, placing them at intervals of 30-50 cm. The result should be an even and durable structure. The slats are attached to the wall or ceiling with dowels.

In the same way, you can make an auxiliary structure for fastening plastic products using metal and plastic guides. Panels are attached to such a sheathing. Designs from metal parts much stronger than wood and plastic, but are expensive. The plastic cladding products themselves can be purchased in any color. Their standard length— 270-300 cm. They saw and cut well ordinary tools. This allows you to create coatings of various profiles and purposes. Behind them you can hide sewer and water pipes, wires and other elements.
Installation of panels on the frame

To work, you need to purchase finishing and accessories for it. All products must lie indoors for 2 days in winter and 12 hours in summer time. If necessary, they can be cut. The cut panel should be 5-10 mm smaller than required. You need to cut crosswise from the part that has a thickening. It is better to cut moldings using a miter box.
Installation of panels may have various schemes: vertical, horizontal, diagonal. The location of the base structural elements on the wall - the lathing - completely depends on this. It is customary to start by installing the starting molding in the corner between the wall and the ceiling, the wall and the floor, and adjacent walls. The panel is then inserted into the groove and leveled. You will need a level for leveling. After alignment, the free edge of the product is secured with a stapler. The further quality of installation depends on the correctness of its installation. The last panel is not attached to the sheathing. It is simply fixed with the previous part in the lock. It can be cut to width with a sharp knife.
PVC products are good because of what you can get excellent results, complete all installation work quickly and without unnecessary dirt and dust. All that remains is to install the baseboards and wipe the resulting surface with a clean soft cloth. The panels are not afraid of moisture; they can be used to cover walls and ceilings in the bathroom and toilet, in the sauna and boiler room.
In a room with absolutely smooth walls, it is not necessary to do lathing. In this case, the panels are attached directly to the wall using glue.
The lathing on the ceiling should be some distance from its surface. This is due to the fact that all wiring must be hidden behind the cladding. Lamps are often inserted into the cladding various designs. Then the distance between the sheathing elements and the ceiling will be 10-15 cm. You need to cut holes in the plastic panels for installing lighting fixture bases and insert them. Next, the starting profiles and the panels themselves are installed. When installing, certain rules must be followed.
The ceiling should always be absolutely horizontal. To achieve this, you need:
- find the lowest corner in the room;
- Using a level, draw a line around the perimeter of the room;
- install the outermost elements of the sheathing, beams or profiles along the line using dowels;
- stretch a fishing line between them, which will assist in installing the following parts of the sheathing under the plastic panels.

The remaining slats are installed so that the panels are located along the flow of light.
The distance between the slats is left 30 cm so that there is no sagging of the PVC later.
- It is recommended to rotate them when drilling and cutting panels front side up. You can cut with a jigsaw, hacksaw, or knife. It is better to wear safety glasses when cutting.
- When working without lathing, glue is applied to the wall. The mesh is applied without gaps. The best glue for this job is liquid nails.
- When nailing panels, try not to hit the front side.
- When caring for a tiled surface, you can use detergents without abrasives and solvents.
Installing sheathing under plastic panels is a feasible task even for beginners.
Related posts:


