Hello, dear site visitors! We continue the series of articles from our readers. In this article, the author shares his personal experience in building a log bathhouse with his own hands. The construction is not finished yet, so we wish him success! If you have recommendations or questions for the author, you are welcome to comment.
Part 1. Foundation
To build the bathhouse, I chose a relatively flat area with a slope of 20 cm on a six-meter section. First of all, after preliminary marking, I cut off the fertile layer over the entire area of the future foundation. This is required to avoid rotting processes plant residues and other organic matter in the basement.

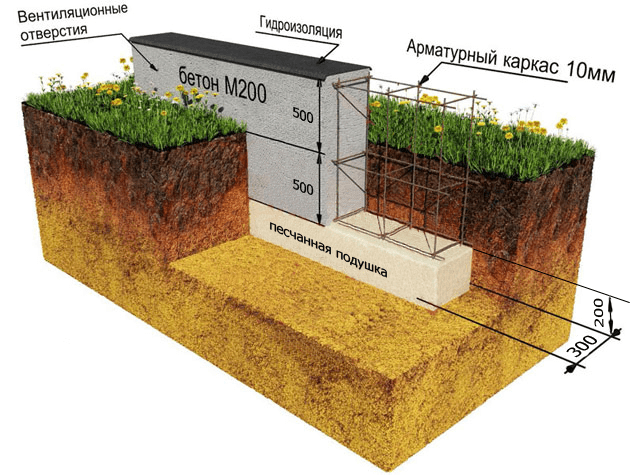
Sandy soil predominates on the site, so the best option would be a height of 50 cm from the base and a width of 40 cm. The contour of the foundation is marked with ropes, which are attached to the improvised corners of the internal and external perimeter. To mark the perimeter, I took scraps of boards about 70 cm long and drove them into the ground, and screwed horizontal shelves on top with self-tapping screws with protruding screws for attaching the rope. It is better to choose a rope that is not prone to stretching; it will be easier to work with.
In addition to the lengths of the sides of the future foundation, the diagonals between the corners must be verified, which must be equal to each other with a tolerance of plus/minus 3-4 cm. You can read more about the methods of marking the foundation in this article. We continue to remove the fertile layer and dig a trench to create a sand cushion.

As a result, we get a fully prepared “pit”, where the bottom of the trenches is almost horizontal (we check building level). The depth of the trenches is 20 cm, from the soil level in the highest place of the site 40 cm, in the lowest - 30 cm.
The dimensions of the foundation are determined by the center of the intersection of the logs. This will be the center line. If the diameter of the logs is about 20-22 cm, then we retreat 15-20 cm in both directions from the center line. This will be required to obtain “shelves” for attaching floor joists and rain tides. In addition, the mistake is practically eliminated when logs, due to miscalculations in the foundation, fall outward or inward, “hanging” in the air.

The bathhouse is connected to the strip foundation to eliminate multidirectional shifts of the bathhouse and stove. The size of the oven platform was chosen as 120*120 cm, as the average size for installation metal furnaces under brick lining.

We begin laying sand in the trenches. At the same time, we moisten the sand and compact it. We pour water until puddles appear, after the moisture is absorbed, we begin to tamp. The process is repeated 3-4 times until your shoes leave no marks on the compacted surface of the sand.

A day later, after finishing the work, we once again go through the entire base under the foundation with a tamper. Of course, you can use a simpler option and connect a tamping machine to the work; this will speed up the process slightly. I have the simplest option: a 100 mm beam, a 20x20 mm sole and a handle. The appearance of the finished base and manual tamper is shown below.

We pour a sand cushion on top of the prepared site under the foundation to level the horizon and raise the site above the level of the site to prevent water from getting under the foundation.
If you hire a concrete truck, take care to additionally strengthen the formwork with diagonal stops outside and inside the proposed foundation. The pressure that is created when supplying the mixture can demolish an insufficiently strong structure. The same applies to pouring the mixture from a concrete mixer. Only in this case you need to strengthen the place where you will drain or simply move the concrete mixer around the perimeter.

It is better to pour the entire volume of concrete at one time, so as not to get the effect of a layered pie. We cover the top of the foundation with a film that keeps our foundation moist to avoid cracks in the concrete. We periodically water the foundation with water, not allowing it to dry out.

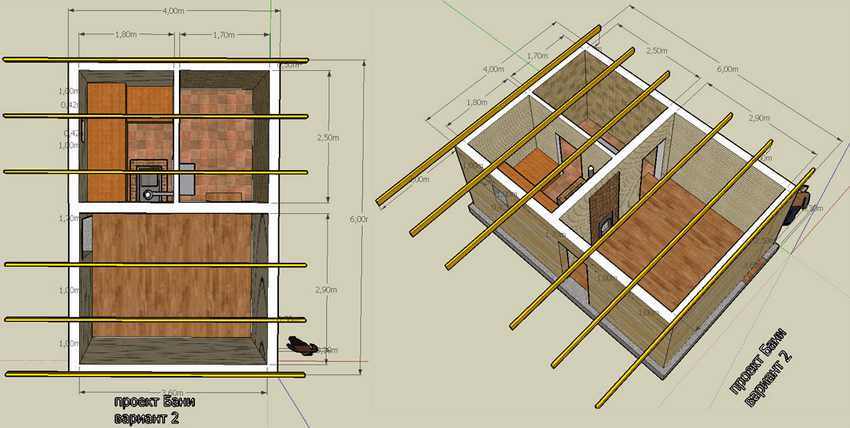
After 7-10 days, we remove the formwork, unscrewing the screws, which will also be used in subsequent stages. The finished foundation looks like this. Layout: 2x6 meters – veranda; 4x4 meters – rest room; 2x2 meters – washing room; 2x2 meters - steam room. The location of the ventilation holes is approximately 20 cm from the ground level; if necessary, you can buy plugs to close the holes in winter period.

The approximate quantity and price of materials used in the construction of the foundation are indicated in the table below.
Part 2. Installation of log house and roof
To bandage a 6x4 meter log house and a chopped veranda you will need 25 bags of moss. When purchasing, make sure that the bag of compacted moss weighs approximately 20 kg. The moss must be elastic, that is, have optimal humidity.

We use “cuckoo flax,” which we collect in late autumn, when all living creatures go to “winter” in the soil and there is no risk of catching a snake with a bunch of moss. A small amount of sphagnum moss is allowed, which is shorter and crumbles when dry. If you completely use only sphagnum, then after a while it will simply fall out of the grooves.

The length of the moss strands should be at least 30 cm, so that when caulking, you can curl the ends and ensure sealing of the grooves. When drying, we sort the material, selecting twigs, foreign plants and cones. By the way, if a cone falls into a groove, then at a certain humidity it opens with such force, which is enough to lift the log and create a “cold bridge”. This is what log installers did in the old days, and even now this situation is not uncommon if the owner “offends” with money.


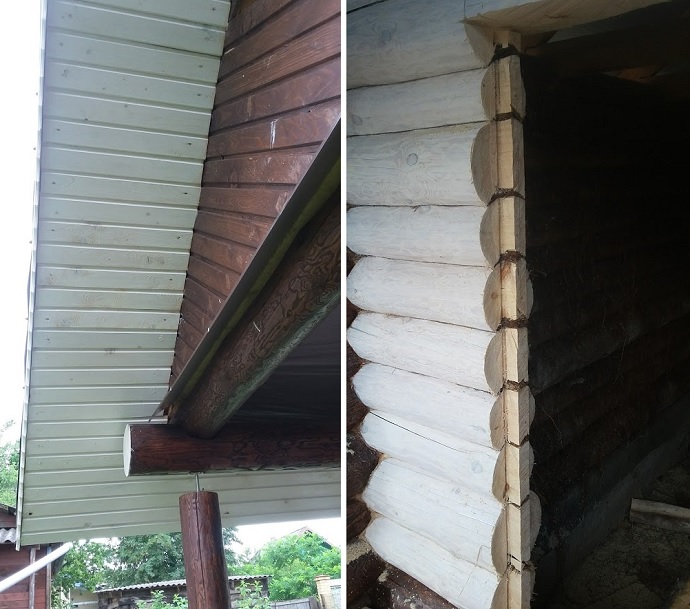
We install rolling logs. I have a small gap between the foundation and the log house, so I used half a log on one side and a 100 mm beam on the other.

We break through the place where the log comes into contact with the roofing felt with moss.


Mistakes were discovered that were caused by the reluctance of the hewers to do their work efficiently. The grooves were cut using a chainsaw, which made the gaps in the logs very large. Look, the edges of the grooves fit tightly to the body of the log, but in fact there is emptiness inside. Because of this, the amount of moss that will be used for caulking increases greatly. And this is if you do the caulking yourself, and the “shabashniks” only do the external treatment, no one will pierce the insides.

| Material | Volume/quantity | Price |
|---|---|---|
| Edged fence board “inch” for sheathing, 300 mm | 1 m 3 | 4500 rubles |
| Wood screws 50 mm | 2 kg | 300 rubles |
| Moss | 25 bags | 6250 rubles |
| Log house | 1 piece | 72,000 rubles |
| Board 50*150 six-meter | 14 pieces | 3600 rubles |
| Metal tiles, thickness 0.5 mm, length 4.2 meters (additionally ridge and wind protection) | 12 sheets | 31,000 rubles |
| Steam-Wind insulation | 1 roll | 800 rubles |
| Tongue board 20 mm | 1 m 3 | 8500 rubles |
| "Belinka" base | 2.5 liters | 400 rubles |
| "Belinka" glaze composition | 2.5 liters | 600 rubles |
| Total: | 127950 rubles | |
Part 3. Caulking of a log house
The simplest, but tedious job of caulking a log house. We use a mallet, iron and wooden caulking. The iron one has a blade thickness of 3 mm and a width of 50 mm, the wooden one is made from hard wood (I have dry birch) and is a consumable material.

Initial view of the groove.
We tuck the moss into the groove with a construction trowel. Previously I used a spatula, but it quickly failed and was not so elastic. Feel free to hammer the groove completely. There is an opinion among ordinary people that there is no need to make the seams tight and uniform, they say, the temperature in the bathhouse is enough to compensate for the losses. But judge for yourself, drafts in the steam room and washing room will not add comfort and the consumption of firewood will be 2-3 times higher.

We hammer the resulting roller with wooden caulk.

If necessary, if the groove is not tight enough, we make another roller of moss and punch it until we feel the hardness of the wood when struck with iron caulk.

Final view of the caulked groove.

To prevent birds from dragging moss and for aesthetics, we close the groove with a 100 mm wide jute tape, which will subsequently be treated with impregnation and a glazing compound to match the color of the log. Special “craftsmen” place logs only on jute or flax, but this is unacceptable for a bathhouse. If we have constant humidity in our house, then steam generation is encouraged in the bathhouse. Flax and jute absorb moisture, but do not dry out for a long time, the grooves rot and mold.

We receive logs prepared for grinding.

We caulk the corners especially carefully to prevent cold air from entering the bathhouse. Work, if you don’t hire specialists, will be in vain. When attracting "shabashniks" - from 70 to 150 rubles per linear meter.
Part 4. Sanding logs
So, the caulking is completed, the moss is tucked in and compacted in the grooves, we begin to prepare the log house for painting. Currently, the logs look very unpresentable - plane marks, chips and pulled out chips. In addition, the logs are heavily “tanned” in the sun and under the influence of slanting rains, and some of the knots require removal and sealing with mastic.

The ends of logs that were damaged during storage and transportation also require processing. Here the wood is the loosest, and therefore there is a high probability of rotting and further destruction of the log.

Tools for grinding logs:
- Bulgarian;
- flap sanding wheel;
- soft mop brush;
- putty knife.
The grinder used was the cheapest - 1200 rubles, made in China. It is worth noting that it passed all the tests with honor and remained operational even after passing 70 square meters of walls (we add to this the semicircular profile of the log). The only inconvenience is cleaning the stator, rotor and the inside of the angle grinder from wood dust. Of course, you can put a stocking on the instrument, but the incoming air is not enough for cooling. By the way, the work is very dusty and immediately stock up on glasses, closed on all sides, and respiratory protection - a respirator is enough. Working with an angle grinder requires utmost attention. High speeds and a removed protection cover can play a cruel joke on you. All you have to do is lose your vigilance and approach the grinding wheel too quickly, and you are guaranteed to get injured. I walked over the same place on my hand twice - the glove was in shreds and the skin was torn to the flesh.
The grinding wheel was used with 80 grit. After testing and selection, I settled on this value - 60 grit leaves too noticeable marks, and 100 grit clogs very quickly. The approximate consumption of petal circles is 1 piece per 3 square meters. You can continue to use the circle, but the pace of work will slow down and you will simply get tired.
Attention, bonus! I accidentally discovered that if a circle clogged with dust and resin is walked over the concrete of the foundation, the sandpaper is cleaned and the circle is ready for work again.
If you don't have the skill and work with caution, you can sand 6-10 squares of wall in a day. The prices of the “shabashniks” fluctuate between 400-500 rubles per square and plus they do not stand on ceremony with spending circles. Pay attention to the resin pockets. If you expose such an area, then treat it with a solvent, otherwise this resin will then appear even through a layer of paint.
I started working from the smallest wall, the logs are transformed before my eyes. I encountered a problem that when processing grooves, the edge of the grinding wheel leaves cuts on the bottom log. But with further processing, the cuts are ground off well and no marks remain.
There is especially a lot of fuss with the corners, the high speed of the grinder and the tightness slow down the process. Where the circle is not enough, you will have to switch to a slower processing method - a chisel.

When the grinding wheel has almost sat down, we pass the ends of the logs. It is irrational to use a new circle for the ends - you will have to throw it over a dozen logs.

We seal the ends with wood mastic. At first I used the color “pine”, but then I realized that it was more economical to use White color, since it will be painted under it.

After sanding, the interesting structure of the wood appears, with intricate patterns running throughout the log. Knots and unevenness of the log add a certain fundamentality to the log bathhouse, and I was even glad when I came across particularly knotty specimens.


To get an idea of what the wall would look like after painting, I stopped and prepped the logs. Based on all the combined criteria (quality and price), I chose the composition under the Belinka brand. I pre-treated it with Base, which had a drying time of 24 hours, and passed over the polished surface with the first layer of glaze composition No. 24 (rosewood). Agree, enchanting beauty! If you want to get a surface that is smooth to the touch, then after the first layer of the composition and it has dried, go over the log manually with sandpaper. This is true on the railings and on the front part of the bathhouse, where guests love to run their hands along the wall and evaluate the work of the master.

The drying time for the first layer is 12 hours; to be sure, I left it for a day and covered it with a second layer. A dark, noble matte shine appeared. Another trick is that after using the glazing composition, a little pigment remains at the bottom of the jar. We dilute it with a solvent until it looks very pale and go over the second layer of the dried coating. You can do the procedure at any time after coating. As a result, we get a surface that resembles a log additionally impregnated with wax. Very pretty.

Along the way, the ends were treated with glazing compound No. 11 (white), which favorably highlights the work already done.

I was completely satisfied with the result, so we continue the grinding we started. Since you will do all the work yourself, the quality will be at the highest level. If hired workers can ignore flaws, then the master himself will torment himself for even the smallest mistake. For example, knowing that somewhere at the bottom of the log I missed a cut, like a criminal returning to the scene of a crime, I examined my “jamb” again and again. Until he fixed it.
The log house is becoming more and more beautiful. Don’t forget to clean the logs from dust with a brush after work.

The following photo shows logs treated with Base and the ends sealed with white mastic.

Having appreciated the color and texture of the painted logs, I realized that inside the veranda it would look somewhat dark, and I conducted an experiment by painting the log with composition No. 11 (white).


White paint preserves the texture of sanded logs, and I decided to completely paint the veranda. Through the first layer, a slight yellowness of the pine appears, and there is no shine. Very similar to just bleached wood. But the second layer works wonders. Shine and a certain completeness appear. By the way, buy “Belinka Lazur”, since the white “Belinka Top Lazur” is intended for window frames and costs much more.


Now the bathhouse, with the exception of one wall, is covered in one layer and looks like a house with a negative Khokhloma painting. The top cross beam is pleasing - it is a knotty fir tree, which gives the structure the appearance of matching the natural style.


We continue the construction of the bathhouse and move on to the stage of laying floors on the veranda. There is a roof over the room, but the absence of a pediment (for the airiness of the structure) does not prevent drops of slanting rain from entering. In winter, it is possible that snow will blow in and then melt during the thaw. Therefore, we will pay special attention to preserving the boards and joists, as well as giving the floor surface water-repellent properties along with a good appearance.
Part 5. Veranda floor
The logs will be 50*150 boards placed on edge. By universal formula the thickness of the board is multiplied by a factor of 20, and we get the step between the logs in my case 1000 mm. But I decided to strengthen the structure somewhat and placed the logs in 600 mm increments. It turned out like this.

For the veranda (conditionally 2 meters by 6 meters) I purchased 16 six-meter boards, taking into account the joists and a reserve of one board. It cost me 4300 rubles and 500 rubles delivery. Blue stains and mold appeared on some boards, which can be easily removed by sanding and bleaching. Worst of all, several boards are infested with wood-boring beetles. Its larvae made several through holes, which I then sealed with mastic. Upon inspection, I didn’t find any more living creatures, and that’s where I calmed down - after drying, the wood doesn’t attract them much, and treatment with an antiseptic and biocide will discourage the beetle from any desire to approach my veranda. I laid a vapor-permeable film on the ground inside the foundation so that no plant had a chance to germinate inside the veranda. The boards were marked and sawed according to their location.

Afterwards, I removed the boards, numbering them by location, and began processing the joists. I used a powerful antiseptic made in Yaroslavl. I am a little familiar with the preparation of antiseptics and the composition of the purchased products inspired confidence in me. Wood preservation is declared for 45 years, subject to impregnation technology. It is required to use 500 grams of solution per square meter, i.e. Apply the first layer, and after 1-2 hours the second. The antiseptic is yellow, so the coating is clearly visible. When dry it becomes dark brown.

Next came the turn of processing the boards. First, I passed over the surface located below and on the sides of the boards with a flap emery wheel attached to a grinder to remove the lint. This way we ensure better absorption of the antiseptic. Then we grind the front surface with a wheel with 100 grit. I also used my long-suffering grinder of the lowest price category. If you are afraid of making ruts and holes, then try sanding part of the board with a hammered wheel to gain a little experience. Don't forget to chamfer the edges of the board.

Attention, bonus! To ensure that the floor surface is ideal to the touch and pleasant to the feet, walk over the sanded board with a mild soap solution. Apply with a brush or roller. When dry, the raised residual pile will become hard and can be easily knocked off with sandpaper even in manual mode.
We lay the boards on the logs with a gap of 4 mm. As a “standard” we take an ordinary nail, which we place vertically between the boards.

Since my boards have natural humidity, maybe a little drier, there is a possibility of them warping during the drying process. That is why I decided to use screw nails rather than self-tapping screws for fastening. A self-tapping screw is a weaker fastener for lateral loads and can simply burst. To prevent rust from spreading to the boards, cover the head of the nail with wood mastic.

Do you see the nail? And he is here!

In the process of laying the boards, I begin to process them. I had the choice of using Alpina outdoor terrace oil or Belinka glazing compound as a coating. I liked the second option better. Firstly, both oil and Belinka Base penetrate deeply into the wood and protect it from moisture. Secondly, the tinting of oil and Belinka No. 24 are almost similar. Thirdly, oil and glaze composition, which do not have high abrasion resistance, should be renewed every two years. And fourthly, Belinka is cheaper. A large flow of visitors is not planned on the veranda and the maximum load is walking in slippers or barefoot.

After the first layer of Base has dried (24 hours), apply the second layer and give it another day to dry. And the culminating moment comes - coating with Belinka No. 24 glazing compound. If you want more effect and shine of the floor, then purchase Top Azure.


–––––– Six months have passed ––––––
It’s been a long time since my last story, and the construction of the bathhouse has gradually moved forward. Little by little, because you have to do everything yourself. I don't trust covens. I contacted them twice (assembling the frame and installing the roof) and was very dissatisfied with the result.
I looked at the bathhouse from the side and decided that another pediment was needed to protect the veranda space from rain. I placed the clapboard in different directions, leaving something like a window. There will be a stained glass window - polycarbonate with a pattern applied with special stained glass paints.


The fit of the boards to the gable turned out to be quite tight, so I will do without an additional plinth and leave it as is.
The pediment was painted the same color as the bathhouse, and a side board with pretend carvings was installed. The cost of the work was: lining - 2500 rubles; self-tapping screws – 200 rubles; paint - 200 rubles; wind carved board - 800 rubles. I think it’s quite inexpensive for such a result.
Last year I didn’t have time to paint the roof lining, I just covered it with base, and the temperatures started to drop below zero. Just the other day, having chosen a period without rain, I walked with two layers of white Belinka. I liked the result, but I’m thinking of securing it with a third layer.
So, new season construction of the bathhouse opened. In the fall, I managed to capture several fine days with positive temperatures, which allowed me to finally make a window and a door. The technology for preparing openings is standard. We mark and cut out to form a spike on the log. For the window opening I used 100*200 timber, and for the door frame I used 100*250 timber. At the sawmill they met me halfway and made two six-meter blanks to special order. They charged ridiculous amounts of money - about 2,500 rubles including delivery.
On site, the timber was sawn into the required lengths. The window opening turned out to be clean 50*50 centimeters, the door was clean 70*160. So let’s really implement the ancient commandment - bow to the bathhouse when you enter. The upper level of the threshold will be 15 centimeters from the floor to keep warm in winter. I cut a groove on the beam to the size of the tenon on the log, plus a centimeter in width in each direction. Fastened to a tenon roll insulation 20 centimeters wide, I think it’s linen, I don’t remember what I bought. The vertical beam was stretched, and horizontal sections were used as spacers. The gap from the top post to the log is about 3 cm, filled with moss. There is also moss under the threshold and window sill, which, after installing all the components, was compacted to the state of almost a log.

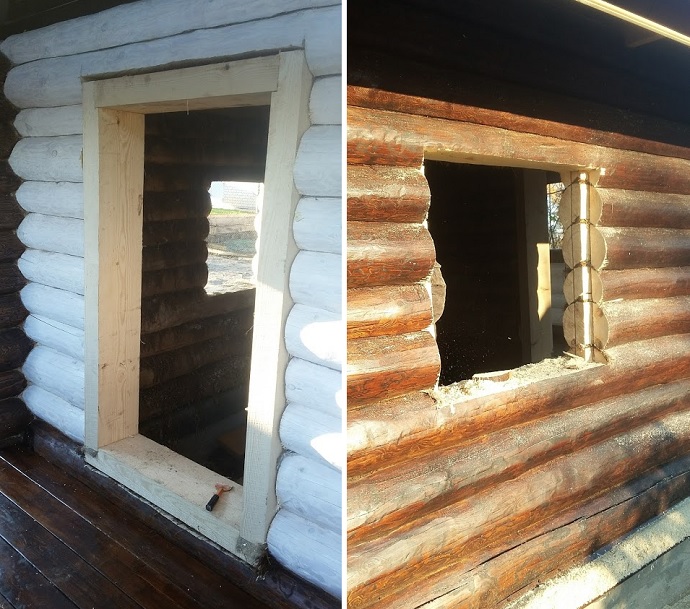
A quarter is selected on the window for ease of installation of plastic. Spacers are installed in the door, since deformation is possible during the natural drying of the timber.

What's planned. The window is plastic with imitation of division into smaller windows. The photo shows my hooliganism, so to speak - instead of a window I inserted polystyrene foam and used insulating tape to mark the future product.

The door is metal with insulation along the leaf and jambs. At the company where the doors are made, the director is a good friend of mine, we discussed all the details and, I hope, we will get a good product. There will be a wooden overlay 1.5 centimeters thick along the door leaf. Using the overlay, I will age the wood, make an imitation of forged hinges and wooden crossbars. But that’s in the future, but now I’m busy landscaping the veranda.
We have one craftsman who makes tables and benches of fairly good quality and very inexpensively. This headset cost me only 7.5 thousand rubles. Following tradition, I covered it with Belinka base, Rosewood glazing compound and deck varnish from the same company.

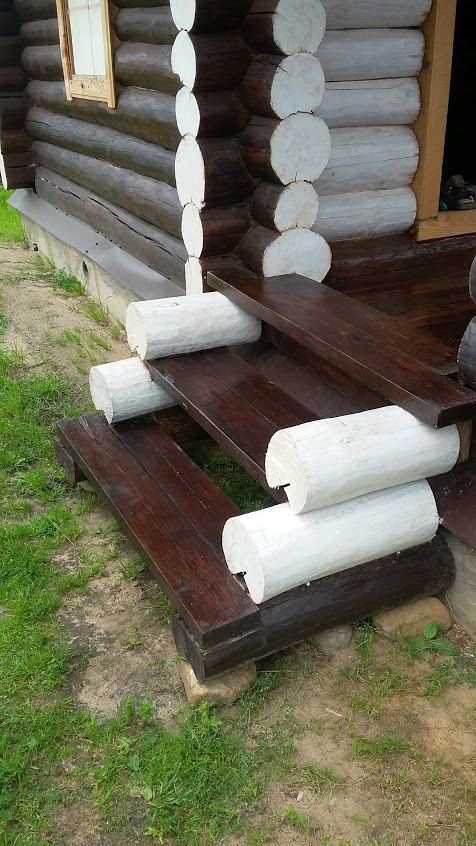
Somewhere on the hundredth or two hundredth jump from the level of the veranda, I realized that I needed a porch. The plans were to make some kind of forged product with wooden steps, but for now I decided to limit myself to a temporary building. Although the temporary hut turned out to be quite nice and will still serve me until I get tired of it. On the sides I used logs that remained from cutting out the openings, and on the steps I used a 50*150 board. He placed stones from a nearby quarry on the base.
And now about the urgent matter. First, I apply caulking inside the log house. The logs have already settled in place. What was possible - dried up, what was needed - led, what wanted - settled in its permanent place. Accordingly, cracks have appeared inside that require careful sealing.

External inspection confirmed good quality caulking. Nothing fell out, the birds didn’t act up, and the moss lay as planned. When I cut out the openings, the moss compacted into one dense and hard strip, it was even difficult to disassemble, but such strips are good for filling cracks. I made another caulk from birch. The spatula turned out to be wider and larger; a two-kilogram sledgehammer fits perfectly with it. Moss flies into the cracks with a whistle, and where the log lies too tightly I use birch wedges. The process is long, but mandatory if you don’t want to steam in felt boots in winter. Secondly, I inspected the foundation. There are slight chips on the outside, but these are sagging during pouring and do not affect the quality. However, if I have free time, I will plaster and cover facade paint. I haven't chosen the manufacturer or color yet. Last year I installed ebb tides, which performed well even with a serious snow load. And thirdly, I will count the snow guards. When last year a crust formed on the roof after an icy rain and 50-60 centimeters of snow fell on it, there was a good surprise in the form of a huge dense snowdrift near the bathhouse after the first thaw.

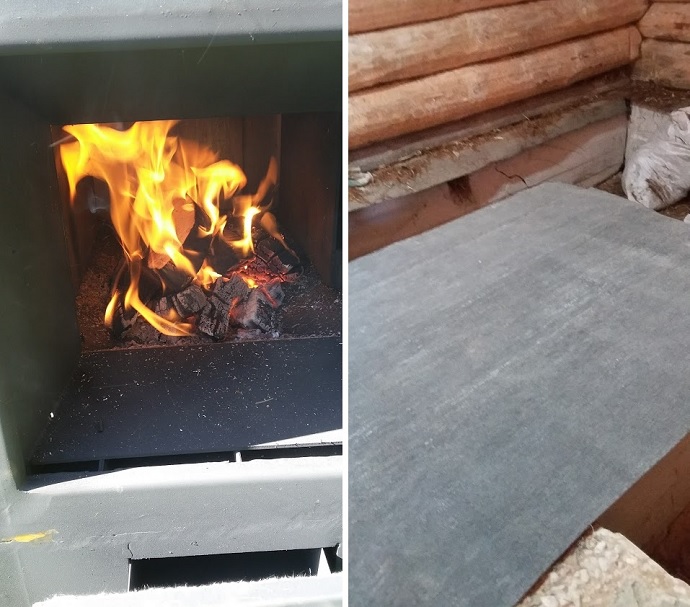
Well, I’ll tell you what I do to keep my bathhouse warm and dry. A month ago I bought a metal stove from the Izistim company for 58,000 rubles. I took a long time to choose, tediously, read all the reviews and realized - this is what I need. Its parameters can be found on the company’s official website, where it is given detailed description. While the stove is standing on the street in front of the bathhouse, I still need to figure out how to carefully drag 130 kg of metal, especially since I don’t have floors yet and there are 600 bricks stacked on the ground. It turned out that these stoves are made literally right next door to me, so I had the honor of communicating directly with the manufacturers, who really helped with advice and recommendations. The pipe is planned to stand next to the stainless sleeve. The structure will be about 5 meters. I ordered a stainless steel pipe with a wall thickness of 1 mm there, from the Izistim company. Literally a week later I received my order. Laser welding, high quality and reasonable price. In terms of money, the pleasure amounted to 11,500 full rubles for a set of pipes of 5 meters. CRAFT company.

The complete set includes a tee, a plug for cleaning the pipe from soot and removing condensation, and a type of adapter with a platform that will allow you to firmly fix the chimney in brick pipe. The structure on the right in the photo is a horizontal section of pipe from the stove to the chimney. Heat-resistant stainless steel, 4 mm thick, was made at EasySteam for 4,300 rubles.

Naturally, I didn’t go shopping and bought convection doors without leaving the checkout. Convenient locks, normal appearance and additional sheets of metal for securing products in brick.

Purchased from Kostroma clay brick grade 150, which is enough for the furnace lining. The geometry of the brick is normal; if necessary, the edges can be rounded to give the products a more interesting shape. If you want a more beautiful brick, then buy Vitebsk brand 200. Each brick cost me 25 rubles apiece.
I didn’t bother with clay, which still needs to be mined somewhere and a solution prepared, since I don’t have any special skills. I purchased the ready-made mixture " Stove House Makarovs" produced in Kostroma, Gzhel colors. They also have a white clay mixture for the aesthetes. It was not possible to find the stove makers - everyone was busy. The cost for craftsmen starts from 40 rubles per brick on the lining and 60 rubles per brick on the pipe. You can calculate the cost of the work yourself. I will do it myself, although the work will take longer.
Part 6. Oven
“And the battle begins again” - we continue the construction of the bathhouse and the improvement of the internal space. The heart of the sauna is the stove. My wishes for the climate of the future steam room and other rooms are extremely simple and unpretentious. Firstly, your feet and ears should be warm even in winter, and not steam with a hard plus in the head area and at the same time wearing felt boots so that your feet don’t freeze. Secondly, the inertia of the sauna stove must be present in order to be able to stop flooding and steam without running around for firewood while constantly maintaining the desired temperature. It is advisable to keep the heat in the bathhouse for two or three days to dry the premises. And thirdly, hot water should not boil in the steam room, but should be located in the washing compartment in the remote tank.
As I already wrote, the Sochi stove from the Izistim company with a mounted heat exchanger for heating water was chosen.

The heat exchanger is equipped with inlet and outlet pipes with a diameter of one inch. The design is intended to be covered with brick, which will simultaneously serve as a screen from hard infrared radiation emanating from the metal and as a heat accumulator. Before installation, you need to heat the stove outside in a gentle mode to burn the factory paint and eliminate the burning smell when used directly in the bathhouse. A heat-resistant cord is laid on the door and ash pan, which is necessary for sealing. This has not happened before, but company managers listen to consumer recommendations through communication on the forum and make the necessary changes.
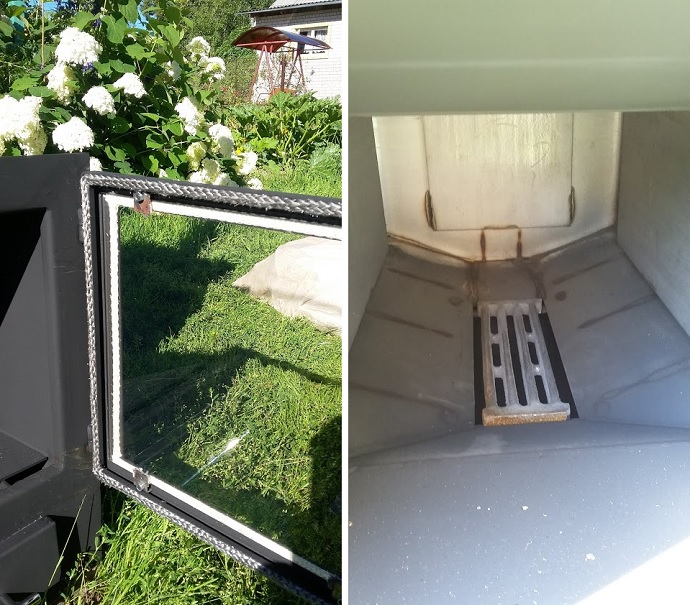
A cast iron grate is installed inside the combustion chamber. Additional sheets of metal are welded on the sides and end of the chamber to reduce the impact of the flame on the furnace walls to avoid deformation.
For relative draft, I installed a meter-long pipe and conducted the first tests of a metal sauna stove. The draft even with such a piece of pipe is quite good, only there is a slight emission of smoke from the door when it is opened and, accordingly, a small amount of soot on the glass.
The foundation for the stove is connected to the foundation of the bathhouse, and reinforcement was carried out during pouring. To begin laying, I leveled the surface with cement mortar so as not to damage the waterproofing. I laid two layers of roofing felt on the pedestal, on which I will begin laying bricks.
To rise above the floor level, and from the foundation it will be about 18-19 centimeters, we lay out the base under the stove three bricks high. There is a little trick. To save mortar and bricks, we lay out a “well”, and inside we simply place the worst brick and fill the remaining space with sand.

The sand will need to be slightly moistened and compacted so that it does not settle, but this is not necessary; the filling will not go anywhere.
Bricks produced in Kostroma, costing 24 rubles per piece. The geometry is normal, there are chips in the corners and edges, so you have to choose front side ovens. It doesn't prick well, it's better to cut it with a grinder. For the solution, the stove mixture "Makarov's Stove House" is used. The solution sets quickly, holds the brick well, and is easy to use. Bags of 25 kg, cost about 400 rubles per piece. One bag is designed for laying 60 bricks. The solution must be mixed with a powerful drill with an attachment; it is unlikely that you will be able to make a homogeneous mass with your hands. The mixture is well dried and you have to add quite a lot of water.
I “sealed” the top row of bricks along the base of the stove with mortar; I wanted to install the structure on metal nickels - the legs of the stove, it seemed to me, would push through the brick. But it turned out that in this case the neck with the door rises and a gap appears. Therefore, I later cleaned off the solution and discarded the lining.

I immediately tried on convection doors that would draw air from the relaxation room into the steam room for exchange. But, as it turned out later, they cannot be installed in this place; the decorative screen around the firebox would interfere.

The most difficult thing was to drag the stove into the bathhouse and not demolish anything along the way. The 130 kg structure was awe-inspiring, and I had to order two stronger loaders. If the first time a loader from the “legs and cap” category helped me drag the stove to the bathhouse, then the craftsmen really arrived. They moved me away and in 10 minutes they installed the “piece of iron” at the place of operation.
I installed a T-bend on the stove to determine the main pipe. The picture shows a view from the rear, where the “lambs” are located for removing the roof and subsequently cleaning the pipe from soot, although the manufacturers assured me that there was no soot.

The main pipe will run to the left of the furnace and will also sit on a foundation connected to a common strip. We continue laying and forming a pipe.
The pipe will be functional only after the T-shaped section enters, so we make its sides one and a half bricks long, and also fill the internal space with sand.
Inside the steam room in the furnace screen we install two more convection doors, but of a large size. This is necessary to quickly warm up the room. We do not cover the top of the stove with bricks, leaving space for stones. When the convection doors are open, air is taken from the floor, passes near the stove body and exits through the stones already heated. The air flow can be adjusted using the damper. The doors are hung from the side that is convenient for you.

I bought the doors from the Izistim company; they modernized the design by adding a stainless steel frame the width of the brick. Now it has become convenient to install the doors, without additional fastening wire. Small gaps are left around the perimeter (except for the bottom) of the doors, which compensate for the thermal expansion of the metal.
The main pipe, so that it passes between the rafters and does not take up much space, is located in line with the “face” of the stove screen. The T-adapter goes a little to the side. Izistim made it for me in abundance. But, as it turned out, the size was the most suitable, as they say, neither decrease nor increase. A 4 mm stainless steel product cost 4,500 rubles.

It's time to hang the heat exchanger. I bought galvanized angles, bends and couplings per inch, attached them to the overall structure, wrapping the threads with flax treated with heat-resistant sealant (red in the photo).
The brickwork reached the top of the firebox. We install a support angle of 50*50 mm with an overlap of 8-10 cm on the brick. There is a thermal gap of about 2 cm around the firebox.

The front side is almost finished, the convection doors are set higher than planned, but for air exchange this is even more convenient; the air coming from the relaxation room into the steam room will not overheat. Contact with the heated oven is minimal.
We slowly cover the heat exchanger with masonry and make pipe outlets to connect to the remote tank. The holes are not very neat and then I will cover them with disks from of stainless steel or other decor that is not afraid of moisture. This is a wall in the washing room; it is planned to lay brick up to the ceiling.

The façade of the stove is finished next row a “mantelpiece” will be used so that the hot air from the firebox, when it is opened, does not go directly to the ceiling, but has some obstacle. Yes, and you can put interior decoration items on the shelf.
The wall in the washing room is finished, the pipe connections are made. All that remains is to buy stainless pipes and make connections to the hanging tank.

It's time to fire the pipe. Tying the masonry from the steam room side. The T-adapter is connected to the sleeve through a tee. A cover is installed at the bottom of the tee to drain condensate and clean the pipe from soot.
From the side of the steam room, the stove looks like this: the T-shaped adapter is covered with a brick screen on top. A 40*40 corner was taken as supports.

I will cover the free cavity above the stove and the adapter with stones for decoration and evaporation of various incense; no other function is provided for these stones. And perhaps I’ll cover the pipe with a sheet of stainless steel iron to avoid harsh thermal radiation from the highly heated metal.
We continue to build the pipe. In the place where the ceiling passes, we form a fluff in order to maintain fire safety distances from the “smoke” to wooden structures. As expected, the front and side walls of the stove reached almost to the future ceiling.

According to calculations, the main pipe should pass in the middle between the ceiling beams. And so it happened. The pipe has “grown” to the roof and it’s time to make an opening.
And the “face” of the stove looks like this. Convection doors are located in one row with pipe cleaning. It’s still stained with clay, but you can already understand what I want.

Next we prepare the roof for the passage of the pipe. From the inside, the roof was drilled into the corners of the future passage with a margin of one centimeter. I used a grinder to cut out metal tiles on the roof. I got a passage almost strictly in the center of the ridge, which is convenient for later closing the hole from rain. And the snow will not put pressure on the brickwork.

First of all, we insert a stainless pipe sleeve into the opening, then we begin laying.

You should not be content with just the level; you will have to run down so that the pipe is visually level. “Otter”, the rain protection is made of almost half a brick. And so the pipe, not yet cleared of clay, takes its proper shape.

The pipe was cleaned of clay and coated with varnish for exterior work on stone and brick in three layers. Each layer hardens in about four parts at a temperature of +200°C. This produces the effect of a wet stone and seals the pores. The temperature at the top of the stove will be approximately the same as the outside air, if only a little warmer, so the varnish is frost-resistant and can withstand sudden temperature changes. The result was the effect of wet stone and sealing of pores on the brick and seams, which will protect the material from washing out.
The pipes were covered around with material that was left over from making the castings. The approach to the brick is about 1 centimeter under the “otter”. The very first rains showed the effectiveness of the design.
Firstly, clean the oven from clay. Do not use water. This way you will only rub the mortar inside the brick and will not be able to get rid of the stains. If you don't want to spoil outer part bricks, then be patient, rags and brushes. You can use fine sandpaper.
Secondly, coat the oven with heat-resistant varnish, it is enough to use the composition up to 1500 ° C, you will not heat the screen any more, even if you want.
And thirdly, place an umbrella on the pipe to prevent precipitation from getting inside.
A little trick: to prepare the solution, take rainwater, thereby avoiding salt stains on the bricks when the clay dries.
And, I will be happy to answer all your questions, since the report from the scene is far from complete and you may be interested in some nuances. We’ll help, take photos, show you.
To be continued! (No ratings yet)
When hiring construction crew the cost of construction will double, so if you have at least basic skills, it is better to start building a bathhouse with your own hands. First of all, you need to decide on the building plan. You can create your own or use ready-made drawings and choose the design that best suits the size.

Registration of a building
No permit is required for the construction of auxiliary premises on private land. However, after completion of construction, the building must be registered with the BTI.

Regulated distance between buildings
Calculation of the quantity of materials
Most often, bathhouses are built from solid or rounded coniferous logs, thick-walled timber, wood concrete or brick. Last years Foam concrete was also used for construction. However, wood is considered the best material for it. Even in the hottest bathhouse, this is environmentally friendly pure material you will breathe easily and freely.


Rounded logs, regular and profiled timber


Construction of a bathhouse from chopped, rounded logs and timber

Building shrinkage
Assemble the building from timber preferably in winter. The fact is that in winter the moisture freezes out more slowly, and the deformation of the material occurs more evenly. By the end of summer, the main subsidence is almost over, and it will be possible to begin finishing.

Construction of the foundation
If groundwater in the selected area are deep enough, it makes sense to use a regular strip foundation. A pile or screw foundation is erected only when water is close to the ground.


Strip and pile foundations for a bathhouse
Laying the first crown
1. The casing (first) crown, which is closest to the ground, needs reliable waterproofing. To do this, 2-3 layers of roofing material or other bitumen-based material are laid between it and the base. Short 15 mm slats, treated with an antiseptic, are placed on top of it in the transverse direction, and only then the logs are laid out.

Direction of laying slats
Corner connections of log houses
The corners between adjacent walls can be connected in log houses in different ways:

Corner connections of log houses
Assembling a log house
1. The logs should fit together as closely as possible. The seams between them are sealed with a sealant: tow or jute. The gap between the casing and the foundation is additionally sealed with brick, polyurethane foam, halves of logs or bars. It is also possible to provide filling multi-level foundation, which will protect against the appearance of cracks.

Foundation with different levels


Jigsaw for windows and grooves in window openings for her
Construction of a bathhouse with your own hands step by step, video, photo
Therefore, if you have at least basic skills, it is better to start building a bathhouse with your own hands
Building a bathhouse with your own hands: step-by-step instructions
Before building a bathhouse, you need to draw up detailed step-by-step instructions for carrying out the work, which should take into account all the nuances of the technology for constructing a bathhouse complex.
The step-by-step instructions used in the construction of a bathhouse may differ significantly depending on the materials used during installation and the characteristics of the soil at the construction site.
During the construction of a bath complex, a wide variety of materials can be used for work. Depending on the type of foundation, for example, metal and asbestos-cement pipes can be used when laying a column foundation, or cement-concrete mortar and metal reinforcement when constructing a strip foundation. The following building materials can be used to build walls:
The most popular material used in the construction of a bathhouse complex is timber. This material is also considered the most practical and convenient to use.
Using timber can significantly save money on foundation construction. In the case of constructing a bath complex from timber, it is allowed to lay a light foundation. The use of timber allows the construction of a building that practically does not shrink, and during the installation process no additional adjustment of structural elements is required.
Building a bath using step-by-step instructions allows you to avoid almost all mistakes during the installation process and build an excellent bath complex with your own hands, without involving outside specialists. Step-by-step instructions for building a bathhouse greatly facilitate the installation process even for those homeowners who have minimal knowledge and skills in the field of construction.
 Choosing a site for the construction of a bath complex
Step-by-step instructions for building a bathhouse at the initial stage involve selecting a place for work and preparing a construction site. The ideal option is to select a location for the construction of a bathhouse at the stage of planning the placement of objects on a private plot of land. Very often, if there is a small area, the bathhouse complex has to be combined with some outbuildings, for example, a toilet and summer cuisine. In some cases, the combination of a bath is carried out with residential building. Bath complexes of this type are quite complex, and their development requires the involvement of professional designers of residential buildings.
When designing a structure and determining the location for its construction, it is necessary to take into account some natural factors that influence both the choice of location of the construction site and the layout of the bathhouse complex:
- groundwater level;
- identification of areas that are flooded during floods;
- location of a natural reservoir;
- prevailing wind direction and precipitation patterns;
The groundwater level is easy to determine on our own. For this purpose, you should dig holes at least a meter deep in the corners of the construction site and, after some time, check whether water has appeared in them or not. The level of groundwater affects the choice of the type of foundation for the construction of a bathhouse complex.
The best option for choosing a site for all construction and installation work is a hill located a short distance from a natural reservoir.
Building on a hill allows you to avoid flooding during floods. The distance to a natural reservoir should not be less than 15 m, and in the absence of an elevated area, the distance to the reservoir should be at least 30 m.
In the process of selecting a site for construction, it should be ensured that the distance to the site boundary from the construction site should not be less than a meter. In addition, the bathhouse construction site should be located at a distance of 15 m from existing buildings.
 Tools and building materials necessary for the construction of a bathhouse
Before building a bathhouse, when developing step-by-step instructions, after choosing a location for the construction of a structure, you should decide on the materials and tools necessary for construction work.
The most popular material is timber. It has a whole range of advantages. The most convenient type of timber to use is profiled timber. This material is resistant to deformation. When building a bathhouse from timber, you will need to prepare the following building materials:
- timber having a cross-section of 15x15 for mounting external walls;
- timber with a section of 15x10 for installation work on the construction of partitions inside the building;
- cement-concrete mortar for the construction of the foundation;
- reinforcement for reinforcing the foundation;
- building materials for waterproofing;
- crushed stone to create a blind area;
- timber for creating floor joists and floors;
- materials for insulation;
- materials for interior decoration;
- materials for creating vapor and thermal insulation;
- materials for roofing installation.
The list of tools required during the work includes a shovel, a hacksaw, an axe, a hand-held electric drill, a hammer, tools for laying inter-crown insulation and a mallet.
Building a bathhouse with your own hands
The next point in the step-by-step construction instructions for the construction of a bathhouse complex is the construction work itself.
The entire range of required construction work can be divided into several stages. The main stages of construction are the following:
- marking the construction site and preparing the site;
- laying the foundation;
- arrangement of the blind area;
- erection of walls of the bath complex;
- ceiling installation;
- assembly of load-bearing roof structures;
- installation of roofing material;
- installation of hydro-, steam- and thermal insulation;
- assembly of communications in premises;
- flooring;
- installation of finishing material.
It should be remembered that after the foundation has been erected, it must be given time to gain maximum strength. When using a strip foundation, the period for gaining maximum strength with a cement-concrete mortar is 28 days.
Before proceeding with the installation of walls, it is necessary to ensure that high-quality waterproofing is laid on the surface of the foundation between it and the first crown of the walls. High-quality waterproofing will significantly extend the service life of the bath complex building without major repairs.
After completing the installation of the building walls, the assembly and installation of load-bearing roof structures is carried out. Features of the load-bearing roof structure depend on the roof configuration.
When the roof is installed, installation of utilities and flooring in the premises begins; at the same stage, steam, hydro and thermal insulation is installed.
 Carrying out interior finishing and insulation of the bath complex
Ceiling insulation small bathhouse can be done in a flat way. For this, hardwood lumber is used. Boards up to 50 mm thick are sewn onto the ceiling, after which a layer of vapor barrier material is fixed to them. Foil material is perfect for this purpose. A layer of insulation is applied and secured on top of the vapor barrier layer. Mineral wool can be used as insulation. After laying the mineral wool, it is covered with a protective layer of foil material. The last stage work with the ceiling will include the installation of finishing materials.
If timber of sufficient thickness was used during the construction of the bathhouse complex, then it is possible to do without installing insulation on the inside walls of the bathhouse complex. In this case, before finishing, a layer of vapor and waterproofing is strengthened on the walls of the bathhouse, on which the finishing material is mounted. If the thickness of the timber is insufficient, then insulation of the walls inside the bathhouse is carried out in the same way as insulation of the ceiling.
Insulation of the floor in a bathhouse can be done using expanded clay.
To decorate the interior of a bathhouse, it is best to use lining made from wood that does not have structural defects. The material is secured using small nails.
Compliance with their sequence during construction work allows you to build a high-quality structure that will delight the owner for a long time.
Available and step-by-step instruction for the construction of a bathhouse
Step-by-step instructions for building a bathhouse. These instructions will help you avoid problems when planning and building a bathhouse on your site.
Building a bathhouse with your own hands
Do you want to build a bathhouse, but don’t know what material is best to use to realize your idea? Then be sure to pay attention to the timber. A bathhouse made from this material will be environmentally friendly, reliable and durable. At the same time, you can handle the construction of such a structure with your own hands.
Building a bathhouse with your own hands
Advantages of timber construction
There is absolutely nothing complicated about building a sauna from timber yourself. This material has many advantages over its closest analogue - rounded logs (logs). Among the main advantages of timber, the following points should be noted:
- all work on the construction and further finishing of a bathhouse made of timber can be completed without the help of third-party specialists;
- timber gives minimal shrinkage compared to all other wood-based materials;
- building a bathhouse from timber will require a much more modest investment compared to most other popular materials;
- Factory-made timber may initially have fastening connections and all you have to do is assemble the individual elements into a structure of the required size, like a construction set.
However, in order for a bathhouse made of timber to fully demonstrate all its advantages and serve for the longest possible period of time, you must approach the choice of building material responsibly and competently.
What timber can be used to build a bathhouse?
The most important operational parameters of the finished steam room directly depend on the quality of the wood. First of all, make sure that the logs are intact. No cracks or other defects are acceptable. Even minor damage can lead to big problems in the future, causing the wood to rot and collapse.
Profiles of logs and beams
Make sure there are no blue spots on the surface of the wood. Such defects indicate the presence of rot inside the material, the development of which in most cases is provoked by a variety of pathogens. Such material cannot be used for the construction of a steam room or any other building.
There should be no noticeable signs of damage from beetles and other pests on the timber.
High-quality timber has a perfectly flat and smooth surface. It is strongly recommended to refrain from purchasing material with distortions or any other damage - when laying the crowns, all deviations will clearly appear.
Guide to building a bathhouse
Pre-compile your own, order or find a bathhouse design in an open source. Calculate the required quantity for the project building materials and start building a bathhouse from timber. Start by laying out the foundation.
The first stage is the foundation
The finished steam room made of wood will have a relatively low weight, which makes it possible to refuse to install monolithic recessed foundation structures. A structure made of timber will feel great on a regular strip or column foundation.
To equip a strip-type foundation, dig a trench around the perimeter and under the walls of the future building, fill the bottom of the hole with a sand-gravel mixture, lay the reinforcing mesh, install the formwork and pour concrete. The optimal foundation depth is 70-100 cm. When choosing a specific depth, be guided by soil freezing indicators for your region.
Strip foundation - construction procedure
Structure of a monolithic strip foundation
The foundation should rise above the ground by at least 50 cm - this will ensure the necessary protection of the lower crowns from excessive dampness.
Place strips of sand and gravel inside the perimeter of the strip base. In the future, you can fill them with concrete or build a wooden floor - choose the specific option at your discretion.
To install a columnar foundation, it is necessary to erect supports made of brick or concreted asbestos pipes around the perimeter, in the corners and under future internal walls baths Under each such support, a concrete “cushion” should first be installed. Place the pillars in 150 cm increments.
Construction of a columnar foundation
Regardless of the type of base chosen, it must be subject to additional reinforcement.
Features of a columnar foundation with a grillage
Varieties of schemes for constructing a columnar foundation
Allow the concrete to gain strength for 3-5 weeks and proceed to further work.
The second stage - waterproofing the foundation
Waterproofing strip foundations with a special compound
Apply molten bitumen to the surface of the base, and a layer of roofing felt on it. Let the bitumen harden and repeat the above steps. As a result, you will receive reliable two-layer moisture protection.
Before proceeding with further work, saturate all wooden elements with an antiseptic. Such processing should be carried out after preparing the notches for fastening the beams, if such notches were not available initially.
The third stage is the first crown
Proceed with laying the first crown of walls. To do this, first lay slats up to 1.5 cm thick, pre-treated with an antiseptic, on a waterproofed base. Lay the slats in increments of about 30 cm.
Laying the first crown of timber
Place the first row of beams on the slats. Thanks to the slats, contact of the timber with the foundation of the bathhouse will be eliminated. This will ensure additional protection from rotting wood and will significantly extend the service life of the material.
Assembly diagram of the first crown of a log house for a house made of timber
Lay the first crown without fastening for now. Make sure it is laid correctly and evenly using a square and level.
If necessary, level the beams lower crown, and then attach them to the foundation. There are several mounting methods. The most optimal and frequently used method involves fixing the timber with anchor bolts.
However, quite often developers refuse to attach the bottom beam to the foundation. In practice, the structure stands perfectly well without fastening the lower crown, held by its own weight. The advantage of this solution is that in the future, if necessary, the lower crown beam can be replaced with much less effort.
Fill the space between the first crown and the base with polyurethane foam.
Do-it-yourself sauna made of timber
The fourth stage - the remaining crowns
A wooden beam with a cross-section of 15x15 cm is perfect for laying out the walls of a bathhouse.
Cover the first crown of the timber with thermal insulation material. Jute or moss are traditionally used for insulation. You can also use tow. If moss or tow is used, the thermal insulation should be laid out with a 10-centimeter overlap at the edges. In the future you will use the raised edges for caulking.
How to build a bathhouse from timber
How to build a bathhouse from timber
Lay the second crown of timber and secure it with wooden dowels. Pre-drill mounting holes of the appropriate diameter. Typically, the length of one dowel is enough to fasten 2-3 rows of timber.
Lay out the walls to the required height. Every 3-4 rows, check the structure with a square and a building level. Place a sealant between the crowns.
How to assemble the walls of a log house
There is no need to secure the top two crowns. The wood will shrink. Ceiling beams can only be installed after wood shrinkage has been completed. To install the beams, the upper crowns will need to be dismantled.
Fifth stage - door and window openings
How to make door and window openings
There are two options for arranging openings for installing doors and installing windows.
In accordance with the first option, the mentioned holes are created after the construction of the timber bath is completed. To do this, you first need to leave small gaps in the crowns where doors and windows are installed. The dimensions of the gaps depend on the dimensions of the products being installed.
Door and window openings
After completing the construction of the bathhouse, you will simply use a chainsaw to make openings for installing doors and windows.
In accordance with the second method, openings for doors and windows must be left during the construction of the bathhouse. This option requires a more significant investment of effort and time. To implement the task, you will need to use special grooves and bars with end notches.
Stage six - caulking
Leave the finished timber box for “wintering” for 6-7 months. During this time, the wood will shrink sufficiently. During the “wintering” period, cover the timber with boards and slate.
If you used tow or moss as an interventional sealant, you can skip this point in the instructions - your log bathhouse most likely will not need additional caulking.
However, experts still recommend studying the condition of the structure. If you find noticeable cracks, be sure to caulk. To do this, twist the tow or moss into a rope and force the material into the gap, followed by compaction.
You can also use jute sealant to fill gaps. In most respects, this material is superior to tow and moss, but costs a little more.
Seventh stage - roof
The roof should become reliable protection your timber bathhouse. Construction of the roof structure can only begin after the wood has shrinked, otherwise the roof will move and become significantly deformed.
First step. Lay down wooden beams over the top frame of the walls.
Second step. Attach rafter legs to the fixed beams in increments of 100 cm. To connect the rafters at the ridge of the roof, cut them at the required angle.
Installation of a gable roof for a bathhouse
Third step. Nail a continuous deck of boards to the rafters (if soft rolled material will be used for finishing) or build a sheathing (if you plan to finish the roof with tiles, slate or other sheet material).
Methods for connecting rafters
Fourth step. Mount the finishing roof covering in accordance with the instructions for the selected material.
How to make a bathhouse roof
Fifth step. Cover the roof ridge with galvanized iron. This will protect it from adverse environmental influences.
Sixth step. Sew up the roof gables with suitable available materials - clapboard, wooden boards or siding. At this point, focus on your individual preferences.
After finishing roofing works start insulation and other insulation work, interior decoration and arranging a steam room in accordance with your project.
Building a bathhouse with your own hands - step by step instructions!
Find out how to build a bathhouse with your own hands. Detailed Guide for the construction of timber structures. Photo + video.
Baths have come to this day from ancient times. Even in the Scythian era, mobile heaters and special tents were very popular. And in our time, even with the advent of the shower and bath, the Russian bath has not become less common. People visit it not only to get satisfaction, but also to cleanse the body of harmful substances and improve general state health and get rid of diseases.
Now there are the most different option s construction of a bathhouse. It is popular to build a bathhouse from foam blocks with your own hands, from timber, frame-panel materials, a log house, or rounded logs.
Before starting work, building a bathhouse may seem like a very difficult task to many, but when a detailed plan is drawn up, it turns out that the step-by-step construction of a bathhouse with your own hands is not anything difficult. There is a lot of work, but if you design the structure correctly and carry out the work one after another (in stages), then over time you will be able to see your dream in reality.
As you know, the bath has enormous benefits for human health. Regular visits to her can significantly increase the tone of the body and improve its health, as well as relieve some diseases. The difficulty of the issue is that if you don’t have your own bathhouse, you have to visit paid establishments. And this involves additional financial costs, you have to adapt to its work schedule, neglect the rules of personal hygiene, because you never know who was steaming in it in front of you and how it was cleaned later. Of course, everything depends on the establishment itself, but still these factors create a certain discomfort among steam room lovers. In this regard, many people have the idea of building their own bathhouse.
Initially, this idea may seem unsuccessful, because a lot of work needs to be invested. But when the first elements begin to be erected, the do-it-yourself bathhouse, the phased construction of which will already be planned, will appear before the eyes of the dreamer in a ready-made image, which will serve as an incentive to continue the path to his goal.
Construction of a frame bath with your own hands
Before you start construction frame bath With your own hands, you should decide on a project that is suitable for carrying out bath procedures, which means that it should ensure heat conservation in the walls of the bath. Then, after constructing the frame, insulation work is carried out.
A bathhouse made of such material has a number of advantages. It heats up quickly and retains heat for a long time if installed sufficient quantity insulation. The cost of frame materials is relatively low. This was the reason for the increasing popularity of this type of bathhouse construction.
Construction of a bathhouse from timber
Many people choose to build a bathhouse from timber with their own hands, since the advantages of this material, to put it mildly, inspire confidence.
The raw materials for the material are ordinary trees, which means it is environmentally friendly. In addition, being in such a bathhouse is very pleasant and useful.
The construction process, provided that the foundation is ready, takes a little time, such a bathhouse will serve for many years.
Construction of a turnkey bathhouse from timber with your own hands in Krasnoyarsk.
As a rule, the building is divided into three sections: a room for the guy, washing and rest.
Construction of a wooden bathhouse from a log house with your own hands
The material for construction is rounded logs, which are pre-processed and ready to arrive at the construction site.
Turnkey log bathhouse
Typically, logs are purchased from manufacturers who number them. The builders' task will be to stack the logs in in the right order. The building can be erected according to either a standard or an individual project.
Bathhouse construction plan
Before starting construction, it is necessary to draw up a plan for the future building and prepare drawings. To do this, you must first decide on the size, which depends on the area of the site allocated for construction. Then you can calculate the dimensions of the rooms.
A full-fledged bathhouse includes a dressing room, rooms for the guy and washing (combined or not).
In order to understand the stages of construction and draw up a plan, you can find materials on this topic online. You just need to enter a request, for example: build a bathhouse with your own hands step by step show construction. After viewing the results, everything will become much clearer.
Main stages of bathhouse construction
Step-by-step construction of a bathhouse with your own hands involves completing each new stage after completing the previous one. In this case, a seemingly complex process will seem labor-intensive, but easy.
The best way to understand how to build a bathhouse with your own hands, step by step, is a video from the Internet. Or you have a familiar builder who can show you and give you some advice. In any case, it is not worth starting work without first seeing what is being done and how.
Preparing materials for building a bathhouse with your own hands
The most popular are baths built of wood. They have many advantages over structures built from other materials.
The joists and several lower rows can be made from oak, which will have a positive effect on the durability of the building. Next, four rows are laid out with logs from larch, and the last rows from linden or white spruce.
To build a bathhouse, you need to use the middle part of the trunk, which must be dry and sanded. As a rule, wood is prepared in winter, due to the fact that it is not as wet as in warm seasons and dries faster.
Preparing the foundation for a bathhouse
When building a bathhouse with your own hands, the foundation deserves special attention.
In order to choose what type of foundation to build, you need to determine the type of soil on the site.
A columnar (pile) foundation is constructed on slightly heaving soils. As a rule, pillars are installed at the joints of walls, both external and internal. If the distance between them is more than 2 meters, then another pillar should be installed in the middle. The installation depth should not be less than 1.5 m and protrude another 30-40 cm from the ground.
The distance between the pillars is laid out with bricks, which go deep about 25 cm into the ground.
A strip foundation is poured on heaving soil. To do this, you need to mark the area and dig a trench. Then add a layer of gravel and sand to the bottom. After this, you need to build the formwork and fill it with concrete.
The depth of the trenches should be at least 40 cm, width - 30 cm. The foundation should protrude approximately 15 cm above the ground. When pouring, be sure to use reinforcement.
Waterproofing the bathhouse foundation
The next stage is the implementation of waterproofing and construction of the base. To do this, use brick, roofing felt, pipe, masonry mesh, masonry mortar and mastic.
Bathroom floor installation
For the floor you can use clay, earth, wood or concrete.
In different rooms of the bathhouse, the floors should be different heights. In the steam room, the floor is 15 cm higher than in the washing room, in which the floors are 3 cm lower than in the dressing room.
The most practical option is to build a concrete floor with a ceramic coating.
How to make a floor in a bathhouse
Sewerage in the bathhouse
For withdrawal waste water From the bathhouse you need to dig a well for it, a pit with a water seal and install pipes. All this must be constructed in accordance with technology to ensure long-term trouble-free operation. The pipes should be plastic, not iron.
Installation of a log house, roof for a bathhouse
If the sauna log was made by professionals, then it must be laid according to the numbers indicated on the logs.
Do-it-yourself construction of a bathhouse roof is done using rafters, which are sheathed with boards and then covered with roofing materials.
How to build a roof on a bathhouse
Caulking for a sauna log house
To seal the cracks between the logs and insulate the walls of the house, you need to apply caulk. To do this you will need hemp hemp, wool felt, flax tow and red moss.
You can also take factory materials, which have their advantages in the form of resistance to fungus and moths.
Installing a stove in a bathhouse
Sauna stoves can be made of brick, cast iron or steel. Depending on the type of heating, they can be wood, electric, gas or liquid fuel.
Heater stoves are equipped with a special chamber in which stones of different weights are placed.
Installation of a stove for a bath, insulation of the ceiling and walls in the bath
Plumbing and electricity in the bathhouse
Water is usually supplied to the bathhouse from a well or borehole.
The electricity supply is practically no different from the supply to a regular house. It is only necessary that the characteristics of the cables and devices comply with fire safety standards and be waterproof, as well as resistant to high humidity.
Interior finishing work in the bathhouse
Partitions in the bathhouse are made of brick or wood.
The ceiling is made in two layers. The first one, which is attached to the joists, is the roughing one, the second one is the finishing one.
The windows in the bathhouse are installed small in size and not very high.
Doors must open outwards. The material for making doors is a tongue and groove board with a thickness of 40-50 mm.
Bath shelves are made of linden, pine, aspen or poplar. There should be no knots, as they become hotter and can cause burns.
If someone is interested in a “do-it-yourself bathhouse building video” that will show how it’s done, you can find it on the Internet without much difficulty and build yourself the kind of building you can only dream of
How to build a bathhouse with your own hands step by step (Video instructions)
A complete step-by-step guide on how to build a frame, wooden or frame bathhouse with your own hands from start to finish. Videos from experts and tips for insulating baths
Almost every owner of a plot of land, sooner or later, thinks about building a bathhouse. After all, the bathhouse is not just a room for washing, but also an important element country holiday. The construction of a turnkey bathhouse can be ordered from professionals for a tidy sum, or you can try to build a bathhouse with your own hands.
After reading this article, you will be able to select a project, find out the sequence of the construction process, get acquainted with boiler models and find best option baths for your dacha.
Before starting construction, it is necessary to develop a bathhouse design. To do this, you don’t have to contact an architect; you can develop a simple project yourself, especially since there are now many computer programs for design.
Think about what size bathhouse will be optimal for your family. What rooms will be located inside the bathhouse? What materials to make the foundation, walls and roof from, do not forget also about finishing the bathhouse. An important point in design is the placement of the boiler and the method of firing it.
Below you can see popular projects baths:

- The design of the bathhouse is 4x4 meters in size.
- Bathhouse design - 4x6 meters.

- Bathhouse design - 5x6 meters.

- Bathhouse design – 6x3 meters.

- Bathhouse design - 3x3 meters.
Once you have decided on the size and materials for the bath, you need to create a cost estimate.
Foundation
To build a bathhouse, several types of foundations are used. Depending on the weight of the walls and soil characteristics, the following types of foundations are made:

- Slab foundation.
- Columnar foundation for light walls.
- Pile foundation.
- Concrete strip foundation.
As practice has shown, the most reliable foundation for almost all types of soil, there is a concrete strip foundation reinforced with reinforcement.
To make a reinforced strip foundation for a bathhouse you will need:
- Cement.
- Sand.
- Gravel.
- Fittings.
- Formwork.
- Ruberoid.
- Wire.
- Shovels.
- Concrete mixer.
- Tourniquet.
- Stakes.
- Tools (pliers, hammer, tape measure and others).
In the location chosen for building the bathhouse, mark a trench for the future foundation. To mark, use a tourniquet stretched between the pegs. The width of the trenches is based on the weight of the wall material. For a one-story bathhouse made of wood or brick, it is enough to make a trench 30-40 centimeters wide. After installing the markup, do the following:
- Using the markings as a guide, dig a trench 50-80 centimeters deep.
- Compact the bottom of the trench and fill it with water to shrink the soil.
- Cover the bottom of the trenches with roofing felt for waterproofing.
- Fill the trench with gravel to a third of its depth.
- Install formwork along the edges of the trench.
- Make a frame reinforcing the foundation from reinforcement bars tied together with wire.
- Install the reinforcement cage into the formwork.
- Using a concrete mixer, make a cement mortar in the proportion: one part cement to one part sand and two parts gravel.
- Pour cement into the formwork, being careful not to allow any air voids.
- After the concrete has dried, remove the formwork.

The foundation for the bathhouse is ready!
Walls
The following materials are used for the construction of walls:
- Wooden beam.
- Logs.
- Boards.
- Brick.
- Blocks from various building mixtures (cinder block, aerated concrete, wood concrete, and so on).
Since the construction of a bathhouse from logs or bricks is already quite widely described on the Internet, let's consider the option of building a frame bathhouse from timber 15x15 and 5x10 centimeters and boards with a section of 2x15 centimeters:

- Make the bottom trim; to do this, take bars with a cross-section of 15x15 cm and install them on the foundation, connecting them together with special metal plates and corners. There is another way to connect bars, by cutting out tenons and grooves at their ends and then fastening them with screws or nails. When making the strapping, do not forget to place waterproofing under the bars.
- Install vertical posts from 5x10 cm timber. The distance between the posts is usually 50-60 centimeters. First of all, determine the position of the window and door openings and install the racks framing them.
- While working, secure the already installed racks with temporary strips so that they do not warp.
- Make the top trim, securing it to the ends of the vertical posts.
- When making the final fastening of the top trim, carefully monitor the position of the vertical posts, checking their evenness with a level.
- Be sure to strengthen everything corner connections diagonal posts, this will help avoid warping of the frame.
- Make the ceiling sheathing.
- After making the frame, make outer skin walls of the bathhouse with a board with a section of 2x15 centimeters. If you do not want gaps to appear between the boards, then make the sheathing - “overlap”, laying the bottom edge of the board on a nailed board. In appearance, this method resembles finishing walls with siding.

- Having covered the bathhouse with outside, proceed to installing the insulation. Sheets of foam or mineral wool are installed along the vertical posts of the frame.
- On top of the insulation, it is necessary to install a layer of vapor barrier, which is attached to the vertical posts using thin slats.
- After installing the vapor barrier, line the interior of the bathhouse with clapboard or slats.
- Insulate the ceiling by laying vapor barrier sheets on the inner lining, then insulation. Sheathe the ceiling from the outside with sheets of plywood.
Please note that the manufacture and insulation of the ceiling can also be done after the roof has been installed.
Roof
There are three types of roof for a bathhouse:
- Single-pitch.
- Gable.
- Complex - consisting of four or more slopes.
Usually the first two options are used for a bath. Let's look at the option of a gable roof covered with metal tiles: 
The manufacture of the roof begins with the installation of the Mauerlat. In case of frame walls, the role of the Mauerlat is performed by the upper outline.
- Place the uprights on the bench.
- Connect the posts using purlins and ties.
- Install the rafter legs by attaching them to the mauerlat, purlin and connecting the upper ends together. The distance between the rafters should be 50-60 centimeters.
- Install sheets of metal tiles.
- Cover the gables with wooden slats or sheet metal.
For a more visual understanding of the roof fastening, here is a drawing: 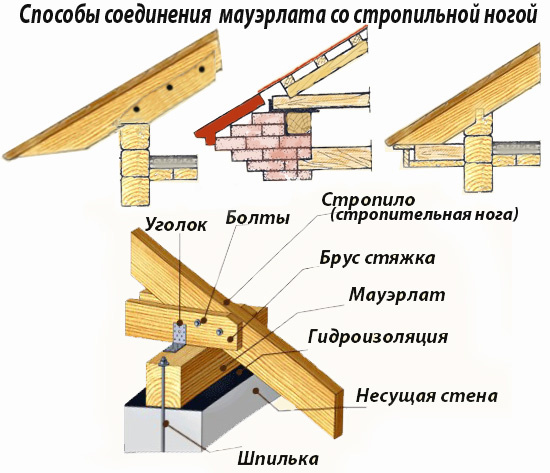
All dimensions of roof elements are given in the list: 
Please note that the less you slope the roof, the more snow load it will bear in winter. Also, a small roof slope can lead to poor water drainage and leaks.
Floors
The design of the floor depends on the type of room. In the recreation room, ordinary wooden floors are made. In the wash and steam rooms, the floors are made of two levels:
- The first level is made of concrete and has a slope towards the drain hole.
- The second level is a finished floor made of boards with gaps for draining water.
If you want to make a porcelain stoneware floor or tiles, then they are simply laid on the first level with a slope towards the drain hole. 
In order to make a concrete floor and drain in a bathhouse you need:
- In the center of the steam room and washing room, install plastic pipes with a diameter of 5-10 centimeters with a socket at the end. The pipes should go out through the foundation to the street and connect to the sewer system.
- Lay down a layer of waterproofing material.
- Spread a layer of gravel 10-15 centimeters thick over the entire area of the rooms.
- Make a cement mortar and pour the floor with a slope towards the hole installed on the drain pipe.
- Install a screen over the drain hole to prevent debris from entering the drain.

At the second stage, wooden floors are made:
- Install wooden logs in all rooms of the bathhouse. Make the distance between the logs 30-40 centimeters. As logs you can use bars with a section of 3x5 cm or 4x6 cm.
- Nail boards with a section of 2x15 cm or 5x20 cm onto the logs.
- In rooms where water is expected to drain, leave gaps of 0.5-1 cm between the boards.
Don't forget before you start installation wooden floors, treat all parts with wood impregnation. When making floors, keep in mind that they should be higher, or at the level of the upper edge of the foundation.
Boiler
The boiler model for a sauna will largely depend on your financial capabilities and the fuel you will use for heating. If you know how to use welding, then you can make a simple boiler yourself from thick sheet iron. If you prefer more advanced colas with gas or electricity, you can purchase them from specialized companies.
The boiler in the steam room is installed in such a way that the combustion chamber is loaded with fuel either from the street or from the rest room (dressing room). The boiler itself, for fire safety purposes, is located 10-15 centimeters from the nearest walls. The walls are as high as the boiler and covered with iron sheets. A good solution would be to line the boiler with bricks, thereby reducing its cooling time and protecting the walls from fire.
When installing a chimney for a boiler, pay special attention to the place where the pipe comes into contact with the ceiling. The opening for the chimney should be insulated with refractory material. Also, pay attention to the place where the chimney pipe exits through the roof. This area is usually prone to leakage, so it should be sealed thoroughly. Below are the options for boilers for baths:

- Homemade boiler made from metal sheets.

- A gas boiler.

- Electric boiler.

- Solid fuel boiler.
Arrangement of the bathhouse
After the bathhouse is built, it is necessary to equip it:

- Connect all available communications to the bathhouse - electricity, sewerage, water supply.

- Place a sink, shower stall, light sources, and furniture for relaxation inside.

- Decorate the walls of the steam room with shaped slats and make stepped shelves.

- Buy wooden tubs, buckets, ladles and brooms.
After arrangement, you can safely invite guests to take a steam bath in your personal bathhouse!
You can also watch the instructions for assembling a mini-sauna for a summer house without a foundation in the video:
Options for beautiful and unusual baths
In addition to traditional materials and design for a bath, there are many alternative solutions. Below we present photographs of the most unusual baths:

- Mobile sauna made of clapboard, built on a car trailer.

- Bath in a huge wine barrel.

- Bathhouse made of plastic bottles.

- The dugout bathhouse was built directly into the ground.

- A sauna housed in an iron container.

- Forest sauna made of untreated logs.
![]()
- A beautiful bathhouse made from a gun carriage.

- Bathhouse made of unedged boards.
At the end of the article, I would like to remind you that heating a bath is associated with fire and high temperatures. Therefore, when building a bathhouse from bricks, logs, cinder blocks or boards, pay great attention to fire safety. This warning also applies to electrical wiring, since the rooms inside the bathhouse have high air humidity and the risk of a short circuit due to condensation is very high. 
We hope that reading our article will encourage you to build a bathhouse yourself!
It’s hard to imagine without an indispensable attribute - a hot bathhouse, which raises vitality with the aromas of birch broom and eucalyptus steam. Bath procedures cure many diseases, relieve stress and provide an opportunity to communicate mentally with loved ones. So, no matter how you look at it, you can’t do without her, my dear. The topic of our research is a do-it-yourself bathhouse. , photos, important nuances and invaluable experience of practitioners - all this is in this material.
Read in the article
What is the basis for choosing the optimal location for building a bathhouse?
Perhaps it will be news to some that the bathhouse cannot be placed in any place. There are many official and practical principles that should be adhered to. Moreover, choosing the wrong location can lead to dire consequences. Let's look at all the rules.
Location of the bathhouse in the summer cottage
There are three main requirements when planning the location of a bathhouse complex on a garden plot:
| Distance from site boundary | The distance from the bath complex to is at least three meters. The building should not obscure the territory of the neighboring plot. This gap will protect the buildings from a possible fire, because the bathhouse is a fire hazard. Another important aspect– water disposal. A three-meter zone, even if your bathhouse has the most primitive drainage system, will not allow dirty water to penetrate into the adjacent area. For reliability, you can lay it along the fence filled with gravel. And a couple more important points: the distance to the neighbors’ residential building should be at least eight meters (six if the bathhouse is brick). When deciding where to build an object, keep in mind that the smoke from the sauna stove should not reach the windows of the neighbor’s house. |
| Distance to the reservoir | On the one hand, the location of the building on the banks of a river or lake is very advantageous. And it’s easier to collect water, and the pleasure of diving into the cool waves after a steam room is guaranteed. On the other hand, you should strictly follow the rules that protect the reservoir from negative influences. To do this, the structure must be located no closer than 15 meters from the shore. This distance will also protect the structures from being washed away during floods. The coastline should be strengthened with your own hands using wooden or concrete frames. |
| Gap to residential building | The Russian one is located on the leeward side of the house at a distance of at least twelve meters. This will prevent smoke from entering the rooms. It is advisable that there are no other easily flammable structures near the building. Experts recommend maintaining a four-meter distance from the barn. |

There are situations when with a purchase summer cottage the bathhouse is inherited, as they say. In this case, of course, it is not always possible to move it to a new place in accordance with the listed rules. But, with the help of competent reconstruction, fire safety standards can be achieved.
How to attach a bathhouse to a house without damaging the main structure
The size of the plot does not always allow meeting all of the above requirements. There is only one way out - to attach a bath complex directly to the house. Let's consider the advantages and disadvantages of this solution:
- saving site area;
- In winter, it is more convenient to use a home bath, since there is no need to go outside;
- you can save significantly on, since one wall will be internal;
- you can use general and .
Advice! When purchasing material, make a small supply. It will come in handy if the part is damaged.
Step-by-step construction of a small bathhouse:

- A columnar or foundation type is suitable for a bathhouse. The base does not require reinforcement. Small wooden sauna does not exert a serious load;

- Considering the high humidity in the bathhouse, it is necessary to protect the foundation with high-quality. It is best to use mastic and two layers of roofing felt;

- Before installation, the crown should be treated with a special compound or regular used machine oil. It is important to set the crown level and prevent bending;

- We make logs from 50x150 per edge. How to make floors we will discuss in detail below;

- There is no need to rack your brains about how to lay timber if you have profiled material at your disposal. Walls from it are assembled simply, like a children's construction set. For additional fastening, dowels made of wood or iron are used. How to build using dowels in the following video:

- doors in a timber bathhouse can simply be cut out after laying and shrinking the walls;

- Before the final shrinkage of the walls, a rough roof is installed. After a year, you can make a regular one on the rafters.
Advice! The most environmentally friendly steam room is made from beams. Drawings and dimensions of structures with different layouts can be found freely available on the Internet.
A short video on how to build a sauna from timber:
Related article:
This technology is used to speed up the construction of not too heavy buildings and other architectural structures. In the article you will find step-by-step instructions for constructing the structure and useful advice from experts.
Frame bathhouse - cheap and cheerful
It may surprise you, but for a frame bath you will not need any drawings or any expensive projects. Everything is quite simple - we start from the dimensions of a standard sheet and assemble the bathhouse, like a construction set, quickly and inexpensively. The foundation you will need is the simplest, columnar or on stilts. The lightweight construction using frame technology does not shrink and can be assembled in a matter of days.
Pros and cons of such construction:
| Advantages | Flaws |
| Light weight of the finished structure | The need for exterior and interior decoration |
| Excellent, in no way inferior to brick and wooden models | Comparative fragility of the design |
| Construction speed exceeds all other construction technologies | |
| Low cost of materials and labor make this design the cheapest | High fire hazard |
| Ease of assembly allows you to build such structures yourself |
How to make a high-quality structure based on ? It is necessary to provide reliable vapor barrier. The humid climate of the bathhouse and exposure to precipitation adversely affect wall material.

Insulation of the bathhouse is another aspect. It doesn't matter if you are building a 3x4 mini sauna or a full 6x6 sauna. From good insulation The comfortable temperature in all rooms depends.

You can use metal or wood for the frame. The first option has virtually no disadvantages. It does not dry out or become deformed. Saunas with a metal frame are easy to repair. The only disadvantages of metal structures are the need for a detailed diagram and qualified personnel. If the choice is made in favor of a wooden frame, make sure that the board and timber are made of larch or linden.
Natural lining is used for interior lining.

The internal structure of frame baths is no different from other options. The only thing worth remembering is that you need high-quality insulation of the wiring and protection of the area around the furnace from accidental fire.
In general, reviews of frame structures are positive. On the Internet you can find detailed photo reports from home craftsmen about the construction. You can find construction plans for baths measuring 2x4, 3x5, 4x6 and larger.
Photo and video story about how to build a frame bathhouse:
We build a bathhouse with our own hands: an overview of the construction stages
Building a bathhouse at your dacha with your own hands begins with a project. You can use a ready-made project or order individual design in one of the companies specializing in such developments. It is not difficult to prepare a construction plan yourself; a simple village bathhouse has a simple layout.

- Where to start construction? Of course, with the construction of the foundation. This is the first stage, which must be approached very responsibly. To build a durable structure, you will need to install a foundation that matches the soil characteristics. In old times wooden baths placed on large stone boulders.

Guided by the experience of our ancestors, small bathhouses should be installed on a hill - on a pile or columnar foundation. Compact panel buildings made of OSB do not require a reinforced base. It's a different matter if construction is planned. In this case, you cannot do without a tape. It, unlike, will cost more and require more time to manufacture. How to properly install a strip reinforced foundation for a bathhouse - in the following video material:
- Next step - . In an ordinary Russian bathhouse, it is preferable to make floors from boards. They are less durable than concrete floors, but you can walk on such floors barefoot, they dry quickly from moisture and do not heat up to extreme temperatures in the steam room. But the logs should be made from asbestos-cement pipes; this little trick was suggested by professional builders. Concrete joists They do not rot, they are strong and durable.
- The walls in the bathhouse complex can be made of logs, beams, and panels. They are , . You can assemble walls from sandwich panels. It all depends on your decision and financial capabilities. It is clear that building a brick sauna from scratch will be more expensive than, for example, frame structure.
- It is easier to assemble the roof rafters for a bathhouse complex on the ground, and then lift it and install it on the walls.

- The last stage is the installation of equipment for the bath. The inside of the walls is usually sheathed with birch or linden clapboard; the outside of the frame structure can be sheathed or an imitation of a log frame can be made from slabs.

This is a brief description of the main stages of construction. It's time to show each of them in more detail. We offer a step-by-step demonstration of the construction of a bathhouse complex and video instructions on how to build a bathhouse.
Do-it-yourself columnar foundation for a bathhouse: step-by-step instructions and video
In principle, a frame bathhouse can be built without, for example, on a backing made of car tires. But keep in mind that within a year or two the structure may become warped. And the lower trim will rot from exposure to flood waters.
The best option is a columnar foundation. It will withstand the lightweight structure perfectly. On it you can build not only a bathhouse, but also a home and others.


Advantages and disadvantages of a columnar foundation:
| pros | Minuses |
| It can be erected with your own hands, without the involvement of special workers. Foundation installation frame structure does not require special skills. | Not suitable for brick and block buildings |
| Suitable for almost any soil (including heaving) | |
| Compensates for differences in height on the site, does not require leveling | |
| Installs in one to two days | Does not provide for the arrangement of the ground floor or basement |
| Doesn't need | |
| Has a long service life | |
| Does not require capital investments |
The installation depth of the bases differs in:
- buried, installed below the soil freezing mark;
- shallow - from 40 to 70 centimeters deep;
- V drain hole
lined with brick or concrete. The pit is located in close proximity to the bathhouse structure and is periodically cleaned using a special machine; The drainage system for the bathhouse is laid at the stage of forming the foundation
It is necessary to dig a trench in advance for sewer pipes and bring them to the drainage point from the steam room and washing room. The pipe should be laid with an inclination of five degrees. To prevent the drain from freezing, you can insulate it yourself using heat-insulating materials.
Step by step guide on the arrangement of a sewage well in the following video and photographic material:
Another significant point is the installation of floors in the steam room and sink. The simplest option is leaking floors. Water simply penetrates through the cracks between the boards. Under them there is a sealed receiving plane with a hole for drainage.

Advice! In non-leaking floors, the drain must have a water seal, otherwise unpleasant odors will spoil the pleasure of bath procedures.
You can also make completely concrete floors and cover them.

But it should be taken into account that it is easy to slip on the tiles, and in the steam room the ceramics heat up quickly, so you cannot enter it barefoot.
It remains to resolve the issue of water supply. In a separate building, it is better to carry out the water supply underground, in a protected enclosure. If your region has severe winters, it is worth considering heating the water supply to prevent emergency situations. Photo reports that are not difficult to find on the Internet will tell you how to install such a system.

Article

Advice! For lightweight design can not be used concrete pipes, but plastic or wooden poles treated with resin to protect them from rotting.
Detailed video material on how to build a foundation for a 4x4 sauna with your own hands
Bathhouse with shower in the country: how to supply and drain water
A well-thought-out drainage system is an important point in the design of a bath complex. Proper drainage in the bathhouse will not only protect the base of the building from mold and rot, but will also save you from problems with neighbors in the area.
Where can you drain the sewer:
We will send the material to you by e-mail
If you have your own plot of land, then one of the objects can be a bathhouse with your own hands. Projects, photos and features of construction work are presented on our website. You can choose any one for construction interesting option or a project from our review.
So, to build a quality building you need to think through the following points:
- choose the ideal project;
- think through each stage of work;
- purchase suitable material;
- plan all communications;
- An important point is the interior decoration.
A beautiful bathhouse on the site can be not only a functional building, but also a luxurious element of landscape design
To make a bathhouse correctly and correctly choose its location, you need to adhere to all SNiP standards. Important attention should be paid to the material for the construction of the building. The choice of location must take into account certain distances in relation to other objects.
Before building a bathhouse, take into account the characteristics of the site: design, climatic conditions and soil characteristics, features of the local landscape area and soil properties. If the territory is uneven, then it is better to carry out construction on an elevated area, since this will ensure optimal water flow. You should not install such a building on sandy soil. In any case, the foundation should be strengthened. The harder the soil layer, the better. Most often, the construction of such buildings is planned on the leeward side of the main buildings. This placement protects from heavy rainfall.


- Budget wood concrete is also often used. At the same time, the building turns out to be warm and durable.

Bathhouse made of timber
How to build such buildings depends on the material options. Projects can be made from the following materials:
- natural wood;
- edged timber;
- glued timber;
- profiled timber;
- rounded logs.
There are several ways to build a sauna with your own hands. A simple option can be seen in the video:
Most often, construction is carried out using rounded logs and timber. A timber bathhouse is a simpler option than rounded logs. is a cheaper material than logs. Construction from timber is carried out using.

When deciding how to make a building from timber, you must follow some rules. This kind of construction refers to lightweight buildings, so you can use a shallow or non-buried foundation.
How and what kind of foundation to make depends on the type of soil. The columnar option is not suitable for clayey and swampy soil. In this case, or are used.

Before deciding how to lay the timber, it is necessary to carry out waterproofing. To do this, a layer is distributed on the surface of the foundation, and a sheet of roofing material is placed on top. Then the second layer is applied. And the boards adjacent to the foundation are treated with antiseptic solutions. This is how we build a bathhouse, no matter how small or large it is. Common option for construction work small sauna from half timber.

When deciding how to build a sauna yourself, you must first choose high-quality wood. The material is most often harvested from December to March. Blanks 150×150 or 100×150 are made from felled trees. At the same time, they must be cleared of bark. It is important to inspect the material before construction work. There should be no signs of rotting or cracks. The wood should be smooth and even. When choosing beams, drawings and dimensions must be prepared in advance. In this case, the purpose of the material is important, for example, a floor made of edged boards. When building it yourself, you need to know how to build step by step and how to connect 3x4 or 4x4 logs.

It is important to know how to install 50x150 boards on edge, as well as options for increasing the length. There are such connection options as in the paw and in the head. For a structure made of profiled timber, the burl method is suitable, in which the connection is made when creating key grooves.
Frame bathhouse in the country
Consider a variety of projects for . The walls are lattice structures. For the walls you will need:

How to build such a structure depends on the main project. Similar technology construction has many advantages. This is a high installation speed and low labor intensity. According to reviews, this is an economical construction. Finished construction characterized by rapid heating of rooms. A mini sauna or even a 4x6 or 6x6 design does not require long-term shrinkage. There is also big choice materials, both for internal and external exterior finishing. You can use different foundation options, for example strip or on piles.

How to make such a design is demonstrated by a photo report, where the photo shows detailed diagram and features of the construction of such buildings. Such structures also have certain disadvantages. First of all, careful thermal insulation of such structures is required. Also, such structures have a short service life. Depending on the projects: 3x4, 2x4 or 3x5, drawings are selected. Ready project must contain working drawings with correct assembly structures, with utilities and specifications of materials.

We build a bathhouse with our own hands: a brief description of the construction stages
Any construction of a bathhouse in a country house requires careful planning. Before construction begins, it is necessary to mark the site. To do this, you will need a project, according to which marks on the ground are made. Where to start marking the dimensions depends on where the corner of the building is located. This place is where reporting is done from scratch. At the same time, a peg is driven in, and the lengths of the sides are measured from it. Then compact pegs are installed and other walls are also measured.

The design of the bathhouse and dimensions are indicated in accordance with the project data. After this, the marking is made depending on. When building a bathhouse with your own hands from stone, brick or blocks, you need to level the foundation. At the same time, roofing material is laid, and then roofing material is placed on top.
How to build a building will depend on what material it will be built from - from boards or from. Specialists can show you the installation features. Useful videos can be found on YouTube.

If brickwork is used, it should be started at the corners. In this case, the first blocks are placed on the cement mortar. They must be located in the same plane. If you don't know how to do it correctly, use string as a guide.
In the video below you can see a step-by-step demonstration of construction work:
After installing the jumpers over the windows or doors, an armored belt is mounted and then made. The foundation bolts are attached to this part. A simple or panel design involves the construction of a frame made of wood. This element is sheathed and insulated with various types of finishing materials. To make the frame, boards made of aspen, linden or larch are used, since these options are characterized by low.

The wooden frame made from timber is made on the foundation. In this case, cuts are made at the ends of the bars and fastened to each other with self-tapping screws. For small bars, metal corners are used.
Let us note the main stages of manufacturing a frame base:
Any sauna is exposed to high humidity, so the steam room is treated with a vapor barrier film. This will protect against moisture accumulation from the inside. Fiberglass or mineral wool. Such options provide an excellent level of sealing. Insulation and wall covering are carried out after the roof is installed. This approach will protect the wood and insulating materials from getting wet.
Particular attention should be paid. Before choosing equipment for a bathhouse, it is necessary to completely complete construction work. The finished building is equipped with furniture and all necessary equipment. A country bath can be made from various materials, but not from slab.

Do-it-yourself bathhouse foundation: step-by-step instructions
How to build a bathhouse depends on the type of foundation used. It is worth noting the following options:
- slab foundations are not performed often. It is suitable for massive and complex buildings. The markings are made according to the dimensions of the building or slightly larger;
- You can make a strip foundation for a 4x4 sauna with your own hands. In this case, the marking is done so that the tape runs along the perimeter of the building;
- columnar is used for the installation of wooden buildings. Depending on the dimensions 3×4, 3×5 or 3×6, markings are made according to the number of supports;
- . The advantage of this option is the ease of installation. With its help, installation on the foundation is possible even with sloping section. Marking is carried out according to the number of piles.

It is even possible to build without a foundation. Shallow strip foundation can be used when the soil is hard and dry and low level groundwater and the buildings are not very heavy. The shallow version is the simplest. Here are the main points to consider:

How to install a screw foundation can be seen in the video below:
Bathhouse with shower in the country: how to supply and drain water
There are different ways to arrange a shower inside a bathhouse with your own hands. There is even a special step-by-step guide. The photo report demonstrates different shower installation options. The easiest option for cooling is to mount a simple wooden bucket on the wall. Water can be poured into it through water pipe with tap. In this case, no special heating is required. In the photo below you can see a shower with hydromassage jets. In this case, it is necessary to consider water heating, as well as pressure using pumping equipment.

A shower does not require a large area; it is enough to allocate a little space in the dressing room. Necessarily . It is necessary to install a drain for the bathhouse. You can also make inside the bathhouse Summer shower. In this case, there is no need to set up a separate cabin in the yard. Even in an already constructed building you can find a corner for a washing room. But this will require constructing a drain in the bathhouse.

Instructions for building a bathhouse roof with your own hands
When building a bathhouse, you need to figure out how to install the roof. The stages of such construction can be seen below:
Options for creating a roof may be different, but in any case you need to think about waterproofing and thermal insulation. Without waterproofing, steam will travel into the attic and settle on the rafters and beams. In this case, condensation may drain onto the insulation, which will affect the durability of the material. It is important to take into account some features of buildings:

Organization of internal equipment of a bathhouse in the country
An important point is the arrangement of the internal environment. A variety of interior photos will help you decide how to design the interior. Any projects should start with installation. This design will reduce the concentration of hot air.

After construction is completed, it is also done outside with your own hands. Another important point is. If there is insufficient ventilation, electric heating will cause a decrease in oxygen levels.
You need to remember to constantly monitor the temperature. Do not install a mercury thermometer. Better buy a bath thermometer. To control humidity, use -.

The interior decoration deserves special attention. The most suitable material is wood. A good solution and an economical option is lining. Wall decoration should be done in pastel colors. It is worth considering the floor in the bathhouse.

Step-by-step instructions include the stages of finishing work, as well as lighting and ventilation planning. must be of high quality. Also think about bath accessories. The step-by-step guide also includes providing good sound insulation.
Article


