The hip (hipped) roof gives the house a sophisticated look. The special design of the roof makes it possible to additionally protect the structure itself and its walls from moisture. Therefore, the construction of a roof with four slopes is optimal for regions with high rainfall and strong winds.
The first stage of building a roof is determining the purpose of the roof (covers the attic floor, attic, etc.), choosing the roofing material (depending on this, the list of materials for construction will be determined), taking into account the atmospheric conditions of the place where the roof will be used (wind, rain , snow).
Choice hip roof will give the structure greater resistance to rain and make it more durable (the rafter system is more reliable). The main difference between this type of roof and the two pitched roof lies in the fact that instead of side gables there are two triangular roof slopes.
When choosing the angle of inclination of the slopes, you should take into account the level of precipitation and wind characteristics of the area. For low and medium annual precipitation, it is recommended to choose an angle within 4-40 degrees. In case of heavy snowfalls and prolonged rains, the recommended optimal angle of inclination of the slopes is within 40-60 degrees.
The roofing material can be: rolled roofing, tiles or metal tiles.
Depending on all the above nuances, the thickness and other parameters of the wooden component of the hipped roof will be selected.
The end result of the first stage is the creation of a diagram of the future roof, on the basis of which construction will be carried out.
We will describe further technology on how to make a hipped roof with your own hands.
The second stage is to build the base for the roof. The base is used to evenly distribute the load from the roof to the load-bearing walls. The construction of a hipped roof requires a base that can be built on your own - a wooden mauerlat and benches. Waterproofing is required under the base to extend the service life of the roof. A mauerlat is placed on the hydraulic barrier along the outer contour of the building (the size of this beam varies, either 100x150 mm, or 50x150 mm).
Lezhni - a beam located in the plane of the base rafter system at the same distance from the two side mauerlats. It serves as a supporting element for struts and racks, so it is laid on load-bearing partitions (see drawings of a hipped roof). Large roof structures may include several roof decks.
The third stage involves the direct installation of the roof frame (base, rafters, sheathing).
Structurally, the construction of a roof in a house with or without existing floors differs (in this case there is no need to lay floor beams on which supports will be installed).
The installation of racks (vertical supports of the roof frame) should be approached with particular care. It is necessary to accurately maintain the installation angle (90 degrees). At the slightest deviation, further deformation of the roof is possible. The installation step of the racks is up to two meters.
The structure of a hipped roof of a house consists of four planes (slopes). Two trapezoidal and two triangular. Trapezoidal slopes will be formed by side rafters, hip (triangular slopes) - by slanted (diagonal) rafters.
The rafters at the top of the frame are supported in the ridge beam (purlin). This timber goes on top of the vertical posts (possibly a groove connection to the posts). The distance between the rafters is from 50 to 150 cm (according to the roof plan). The recommended width of the rafter board is 150 mm.
The frame is fastened using corners and steel plates with self-tapping screws (nails). To strengthen the resulting structure, diagonal supports, struts, and wind beams are used. They allow you to increase permissible load systems.
Waterproofing is laid on top of the rafters. Then a counter-lattice is made (bars that are attached to the rafters on top of the waterproofing). It is needed to create ventilation duct between roofing material, sheathing and waterproofing. This will allow moisture to be removed quickly and effectively. Next, the sheathing is performed - horizontal boards are attached from the bottom to the very top to the counter-lattice (see diagram of the hipped roof structure).
The last stage installation of roofing material follows. Installation is carried out depending on the parameters of the material. Example of installation of metal tiles.
Thus, installing a hipped roof is a rather labor-intensive process that requires a careful approach. For a deeper understanding of the building, you should view photo and video materials.
DIY video of building a hipped roof
Hip hip roof rafter system hip roof  Richten 2
  Building a house from aerated concrete 2. Day 45-46. Hip roof. Rafters. Everything is in your mind
  Building a house from aerated concrete 2. Day 47. How is the roof attached to the SIP ceiling? Everything is in your mind
  Building a house from aerated concrete 2. Day 48-50. Roof, jibs, fillets, insulation. Everything is in your mind
  Building a house from aerated concrete 2. Day 51. Roof. Tyvek membrane installation. Lathing. Everything is in your mind
  We are building a house made of aerated concrete 2. Days 53-57. Installation of metal tiles and gutters. Everything is in your mind
Roofs with four slopes have higher reliability and resistance to loads. This design is much more complex than a conventional gable one, and installation takes longer. And yet, a do-it-yourself hipped roof is a completely doable task if you prepare properly and study in detail the intricacies of its construction.
DIY hipped roof
Roof design
The hip roof has many variations. The simplest design consists of 2 trapezoidal slopes connecting in the center of the roof, and 2 triangular slopes on the side of the gables. Sometimes all four slopes are made triangular, then the ribs of the roof converge at a central point. More complex designs suggest the presence of broken lines, a combination of short slopes with pediments, built-in straight and inclined windows, as well as multi-level slopes.
Hip roof
Without appropriate experience, it is impossible to build a rafter system of such a configuration, so it is better to pay attention to a standard hip roof.
Hip roof project
Hip roof design
The slope of the slopes can have an angle from 5 to 60 degrees. To calculate optimal value slope, the following factors must be taken into account:
- attic functionality;
- view roofing;
- atmospheric loads in this region.
Roof diagram
Gentle slopes are not suitable for arranging an attic, as they take up too much free space. Therefore, if an attic is planned in the house design, the roof slope should be 45 degrees or higher. You can select the angle of inclination depending on the type of roofing using the table.
Atmospheric loads also have great importance. Where there is a lot of snow, you cannot make a slope of less than 30 degrees, otherwise the rafter system will not withstand the loads. If the angle of inclination is more than 60 degrees, the snow load can be ignored. In addition to these factors, you should consider the location of objects such as water tanks or ventilation chambers. They are usually suspended from the rafters and place additional stress on them. After preliminary calculations You can start drawing up a drawing of the rafter system.
Materials for roof installation
Like a gable roof, a hip roof consists of a mauerlat, tie rods, rafters, support posts, ridge beams and sheathing. The difference between the second design is the location of the rafters and their length. For a hipped roof, it is recommended to use lumber from pine or larch, good quality, without defects, with a maximum humidity of 22%.
Attaching the Mauerlat to the wall
The rafters are made from boards with a section of 50x100 mm; if the roof area is very large, it is better to take 50x200 mm boards. For the Mauerlat you need a solid beam with a cross-section of at least 150x150 mm. Additionally, you will need threaded metal studs for fastening the Mauerlat, boards for sheathing and overhead metal plates, which are used to connect wooden elements.
Threaded metal studs for fastening the Mauerlat
Before assembling the roof, lumber must be impregnated with an antiseptic agent.
During the work you will need the following tools:
- hacksaw;
- building level;
- plumb line and tape measure;
- hammer;
- drill;
- screwdriver;
- chisel;
- Circular Saw.
Rafter system installation technology
Laying the Mauerlat
Step 1. Laying the Mauerlat
Laying the Mauerlat
In houses made of timber, the functions of the mauerlat are performed by the last crown of the log house, in which special grooves are cut for the rafters. In brick houses, the Mauerlat is laid on the walls around the perimeter of the box, having previously secured metal studs with threads between the bricks of the last rows. To more accurately mark the holes for fasteners, the timber is lifted and laid on top of the tips of the studs, and then hit with a hammer. After this, clear marks remain on the tree, along which holes are drilled.
Attaching the Mauerlat to the wall
Having removed the timber for drilling, the surface of the walls is covered with one or two layers of waterproofing material, usually roofing felt. It is placed directly on the studs and pressed downwards. Next, lay the Mauerlat, aligning the holes with the studs, align them horizontally and screw the nuts tightly onto the threads. At the corners, the beams are connected with metal plates or brackets. After fastening, the beam should not move even a millimeter, because the reliability of the entire rafter system depends on this.
Attaching the Mauerlat to the wall
Step 2. Installation of racks
If the house does not have a central load-bearing wall, it is necessary to lay the support beam perpendicularly load-bearing beams ceilings Connect two boards with a cross section of 50x200 mm, leaving a gap of 50 mm between them. To do this, short bars 50 mm thick are inserted between the boards and nailed down. The distance between the bars is about 1.5 m; the beams are not fastened at the ends. Having measured the middle of the attic, lay the support beam so that its ends extend beyond the boundaries of the Mauerlat by 10-15 cm.
Now take 3 boards 50x150 mm, cut them to the height of the roof, and install them on the support beam using a plumb line. Each post should rest against the beam where the boards are connected by a block. The racks are temporarily reinforced with beams made from beams. The top of the racks is connected by a ridge beam, for which a 50x200 mm board is used.
Step 3. Attaching the central rafters
Fastening the rafters
They take a rafter board and attach it with one end to the ridge beam and the other to the mauerlat on the front side of the building. Immediately adjust the length of the eaves overhang and cut off the excess. Mark the lines of the cuts with a pencil, after which they cut off the upper end of the board and make a groove in the mauerlat 1/3 of the width of the rafter. The board is nailed to the ridge, the lower edge is inserted into the groove on the Mauerlat and secured with metal plates.
The rest of the rafters are made in the same way and installed in 60 cm increments from the facade of the house. The outer boards should be positioned perpendicular to the ridge beam and attached to its ends. On the opposite side of the building, everything is done in the same way. On the hips there is only one rafter on each side: the board is placed on its edge and attached with the upper end to the ridge beam, and the lower end is inserted between the boards of the support beam and secured with nails.
Step 4. Attaching the corner rafters
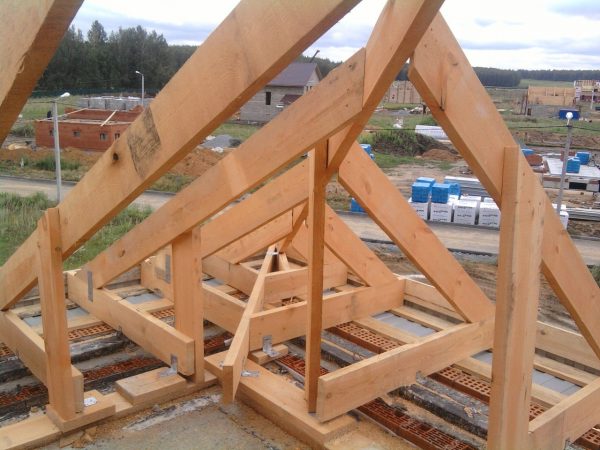
Installation of a hip roof truss system
To make corner rafters, two boards with a section of 50x150 mm are usually connected. In one of upper corners boxes, at the point of connection of the Mauerlat beams, drive a nail and tie a thin cord on it. At the point of connection between the ridge and the central rafter, a nail is also driven in from the hip side, a cord is pulled to it and secured. This is how the line of diagonal, or corner, rafters is designated. Their length must be the same, otherwise the roof will be uneven. The prepared rafter is lifted up, placed along the markings and connected to the ridge beam and mauerlat. The overhang of the rafters is approximately 50-70 cm.
Step 5. Installation of spigots
To secure the diagonal rafters, they use spigots - shortened rafters, the lower end of which rests on the mauerlat and located at right angles to the ridge beam. They are attached in increments of 60 cm, starting from the outermost ordinary rafter. As they approach the diagonal, the narozhniki make everything shorter. Now it is necessary to strengthen the structure with ties and braces, as well as install additional vertical supports.
If the span under the diagonal rafter is more than 7 m, you need to install another support at a distance of a quarter of the span from the corner of the attic. The lower end of the rack should rest on the floor beam. In the case when the beam is located further than the designated place or is completely absent, instead of a vertical post, a sprengel is attached - a horizontal jumper made of timber, the ends of which are nailed to the sprocket.
Step 5. Installation of the sheathing
Sheathing pitch under corrugated sheeting
When all the supports are installed, you can fill the sheathing. For a hipped roof, the sheathing is done in the same way as for a gable roof. First, a waterproofing membrane is attached, on each slope separately. The joints are carefully taped, and then thin slats are placed on top of the membrane to ensure air gap. The boards are laid in increments of up to 40 cm, depending on the type of roof, and always perpendicular to the rafters.
Installation of roof sheathing
At this point, the assembly of the rafter system is considered complete. All that remains is to insulate the structure, lay the roofing, install wind strips and sheathe the overhangs. To make a hipped roof look more stylish, it is recommended to install inclined or straight windows on the slopes.
Video - DIY hipped roof
Friends, we hope that this information will be really interesting and useful to you!!!
People who have started the construction of any structure must have an idea of what is needed for what, what parts the structure consists of, what materials they will need and how much this or that material costs.
Before construction begins, you need to develop a building plan and indicate all the parameters. Let's consider one of the important details of the structure and this will be the roof.
Hip roof design
 There are several types of roofs, the most aesthetically pleasing and durable is the hipped roof.
Such a roof will withstand strong winds, snowfalls and heavy downpours. A hip roof may not be complex in design and has some elements.
A hipped roof differs from a gable roof in appearance and design. The design of the hipped roof is somewhat more complicated, but for small buildings you can build it yourself.
 A standard hip roof has trapezoidal slopes and triangular slopes.
Semi-hip - two trapezoidal slopes, two cut hips. This design makes it possible to equip an attic with large windows in the attic.
A hip roof is different from a hip roof.
A complex hipped roof has attic windows and valleys.
The construction of this roof can only be done by professionals, or take a project with calculations of materials.
A hip roof includes the same parts as a gable roof, but due to some structural complexity, additional frame parts are required for its construction.
Details of the hipped roof:
 Mauerlat is a timber placed on the upper part of the main walls;
Floors are support beams that are located inside and laid on load-bearing walls;
Rafters are diagonal, slanted or side beams;
Sprengels and racks are supports that support the truss structure;
A purlin or ridge beam is a horizontal support for rafters located on top of the roof;
Crossbars and tie rods are horizontal parts that connect the side rafters;
Sprinklers - parts that are placed on diagonal rafters;
 Wind beams and struts are braces that increase the strength of the roof;
Fillers are boards that form the desired roof overhang.
The design of the roof determines what parts can be used during construction, for example, cornices over windows or a porch, sheathing.
Before starting construction, it is necessary to calculate the amount of raw materials, also determine what size and shape the roof will be, then make a drawing.
Construction technology.
To distribute the load of the rafter system and external factors, a mauerlat and planks are laid on the main walls.
For them, timber with a cross section of 100×150 mm or 150×120 mm is used, in some cases reinforced concrete beams are laid.

Installation of rafter group and sheathing
On a regular hip roof, the side rafters are installed in the same way as the extended rafters on a gable roof.
A board with a width identical to the width of the rafter board (150 mm) is applied to the ridge beam in the place where the outer post is located and a template is made from it.

The distance between the rafters should be from 0.5 to 1.5 m.
Diagonal rafters are made from two connected boards, so they carry an increased load. The preparation for diagonal rafters is carried out using the above method.
The cuts on the boards for diagonal rafters must be made at an angle of 45 degrees to the plane of the board, since from below they rest on the corner of the mauerlat, and from above on the rack. Narodniks fill the spans between the diagonal rafters on the hip slopes.

Making the sheathing
 It is possible to cover the hipped roof with any available material.
When covering complex roofs with a soft roof, in this case it is necessary to make a sheathing of plywood.
Roof insulation depends on the layout of the house and other factors and must be carried out according to the rules
Building a hipped roof is not an easy task, but if you have carpentry skills, the necessary skills, tools and a couple of friends who are ready to help you, this task will be up to you.
You can choose a different type of roof for your building, and a hipped roof is ideal for a large house.
But before you start any construction, you will need to get ahead of what exactly you want to build and what the structure should be like, allocate funds and determine the approximate time for construction.
The main thing is to have the strength, desire and means. We wish you good luck and inspiration!
Most often, a hipped roof for a house is chosen because of its visual appeal, without taking into account that this design has other advantages: the ability to withstand high wind loads, increase the level of protection of walls from moisture, and allow the installation of living quarters in the attic space.

Four slopes count the best option for regions with strong winds and large amounts of precipitation. When deciding to build a hipped roof yourself, you must take into account that this design requires accurate drawings and increased attention when measuring and marking.

DIY hipped roof. Photo
Preparatory work
The main difference between a hip roof with four slopes and a structure with two slopes is the absence of the need for side gables. The four-slope structure consists of two trapezoidal and two triangular slopes, the latter replacing the pediments.

Under the roof there can be simply an attic space or a residential attic. The construction of a hipped roof begins with determining its purpose and selecting materials, taking into account climate features. It is important to take into account the amount of precipitation and wind strength when choosing the angles of the slopes, the thickness of materials for wooden components and the type of roof.

Important! The slope of the slopes can vary from 5 to 60°. The stronger the winds and more precipitation, the greater the slope.
The wooden components must be thicker than for gable design. If the slope does not exceed 18°, rolled materials are suitable for the roof. For a slope of 18-30°, it is better to choose metal or ceramic tiles.

Calculation of a hipped roof with your own hands. Photo
Upon completion of the first stage, an accurate roofing diagram. You must know what materials and in what quantities you need to buy.

Stages of building a hipped roof with your own hands
Wood is used to construct a hipped roof coniferous species without defects with humidity 18-22%. First of all, a foundation is arranged that evenly distributes the load on bearing structures. A layer is laid around the perimeter of the building waterproofing and mounted Mauerlat– solid timber 10x15 cm or 15x15 cm. The connections are made into an overlay; metal brackets, plates and corners are used to connect the corners.

The next step in building a hipped roof is installation of beds. This is a beam that serves as a support for the racks and is located on the base. Next, racks (beams 10x10 or 10x15 cm) are mounted on the beams with a rafter pitch (no more than 2 meters), a ridge beam (10x20 cm) is installed, temporarily resting on special racks.

Important! It is necessary to pay special attention to the angle of installation of the racks.

When installing a hipped roof, it is necessary to take into account that it consists of 4 planes. For slopes in the form of trapezoids, lateral rafters, for triangular ones - diagonal (oblique). This is a solid beam 10x15 cm or 10x20 cm, which is mounted in increments of 50-150 cm. If joints are necessary, overlays are mounted and secured in several places.


DIY hipped roof. Photo
At the points where the rafters rest on the base, you need to make cuts and secure the structure with metal elements. From above, the rafters rest against the ridge beam, connected to the racks using grooves. To strengthen the structure, it is recommended to use diagonal supports, struts, and steel connecting elements.

Roof installation
The final stage of building a hipped roof with your own hands is the installation of a waterproofing layer, counter-lattice, sheathing (or solid flooring). Placed on the rafters waterproofing material . Its purpose is to prevent the destruction of the rafter system due to moisture from the attic getting under the roofing material. The film is laid overlapping and secured with adhesive tape for tightness.


The next step is the device counter-lattice. This is a timber or board treated with an antiseptic. Attaches to the rafters, allows you to fix the waterproofing material, creates air cushion between roofing material and insulation.

For lathing, dry boards 4-5 cm wide are used, which are attached to the counter-lattice at a distance of 25-30 cm from each other. If there are no plans to equip living quarters in the attic space, then roofing material is installed next. 
When installing warm attic to the rafters with inside mounted using staplers vapor barrier material(film, foil, glassine), preventing moisture from entering the insulation from a warm room. Installed on vapor barrier thermal insulation material 15-20 cm thick.

Advantages of a hipped roof
The construction of a hipped roof allows you to:
- convert attic space into residential attic, that is, increase the usable area of the house;
- increase the level of resistance to external influences in the form of wind and rain, thereby increasing the strength of the roof and extending its service life;
- do appearance home more attractive.
Despite the fact that the planning and installation process requires a lot of time and money, installing a hipped roof with your own hands is possible if you have basic carpenter skills. The household must have: a gasoline, circular or hand saw, drill, chisels, hammers, level, cord, tape measure. Before starting work, it is advisable to carefully watch the appropriate video content.
When building your own home, a lot of responsibility falls on your shoulders. You have to deal with a lot of issues and participate in the construction process. After all reliable roof overhead will ensure a comfortable life.
Difficulties always attract people. It’s not for nothing that they say: “We are not looking for easy ways.” This happens in construction too. The hipped roof has a complex shape, giving the building a special look. This architecture attracts many. This type especially popular in construction country houses. On cottage a good option would be to build a hipped roof.
In this article
View
The location of 4 slopes on different sides gives your home a solid look. Often stingrays have different shapes: a couple of them are obtained in the shape of a triangle and play the role of a pediment, and some are given the shape of a trapezoid.
Difficulties with a hipped roof during calculations and installation scare off many people who want it, but if you do not doubt your abilities, then you can safely carry out the construction.
Design advantages
A do-it-yourself hipped roof has the following advantages:
- the absence of gables makes the roof more durable and resistant to gusts of wind. This type of roofing is suitable for areas with windy weather conditions;
- the presence of 4 slopes copes more effectively with the drainage of melt and rain water, as well as snow;
- the attic space becomes more spacious, which is ideal for the location of the attic;
- The construction of a 4-pitched roof will cost no more than other types.
Types
When making a hipped roof with your own hands, you can distinguish several of its subtypes:
- hip - is a classic option. It has 2 triangular hips and 2 trapezoid-shaped slopes;
- half-hip - has slightly shortened slopes. Excellent for use in the attic;
- tent - made in the form of a pyramid. Ideal for a square building.
Project
Before proceeding directly to construction, it is necessary to create a roofing project in order to avoid making mistakes in the future. How to build a roof? It will help in this matter step by step instructions. Having familiarized ourselves with the design of the house, we proceed to the following:
- We calculate the slope angle of the slopes based on indicators such as wind load, precipitation in your area, and type of roofing material. In areas with strong gusts of wind, it is advisable to make the angle of inclination less than 30 degrees, thus reducing windage. In areas that are constantly covered by precipitation, the desired roof angle is not lower than 65 degrees to prevent the accumulation of snow and water. In areas with a more or less stable climate, a roof of 40 to 50 degrees is ideal. For each type of material, the manufacturer indicates the most low angle operation;
- We calculate the height of the ridge using a number of simple geometry formulas.
Rafter system design
The rafter system of the hipped roof forms the roof frame. It consists of the following elements:
- Mauerlat - a beam located along the perimeter of the walls and distributing the load on them. The hip roof has 4 beams. If the house is wooden, then the mauerlat will be the blocks of the upper crowns. IN brick house A concrete belt is created on top of the walls, into which special studs are embedded. The Mauerlat is then attached to them;
- the ridge beam, or purlin, is located above all the elements. The upper part of the rafters is attached to it. For a 4-pitched roof it is less than the length of the house;
- rafter legs - boards that create the geometry of the slopes. Their cross section is 50 x 150 mm. For a hipped roof, 3 types of rafters are used: slanted, ordinary, and external. Installation of privates rafter legs carried out on slopes in the form of a trapezoid. Sloping rafters are made from more durable material, since the load on them is greater. The upper part of the mowers rests on the ridge run, and the lower part on the corner of the mauerlat. The hip is formed by external rafters. They focus on the rafter legs diagonally and the support beam;

- lying - timber that lays a supporting wall located inside the building. Functionally, the bench transfers weight and distributes it to the foundation;
- vertical supports are racks, mounting occurs on a lying surface. They serve as a support for the middle of the rafters and purlins;
- rafter leg, or strut. Its installation angle is 45 degrees to the rafters. The emphasis is placed on the rack. It is used to ensure that the rafters do not bend, to transfer part of the weight to the load-bearing wall;
- the sprengel is used to support sloping rafters. This vertical support, similar to a stand. Truss trusses are used most often;
- tightening, or crossbar, are bars in a horizontal position that grip rafter pairs in the upper and lower parts;
- fillies - boards that extend the rafters and protect the walls from dampness, forming a roof overhang.
Installation procedure
A hipped roof begins with the installation of a mauerlat, which we lay around the perimeter of the walls. Its cross-section is 150 x 150 mm. When placing it, it is necessary to control its level. The beam should be located 5–7 cm from the edge of the wall. We fasten using pre-walled studs. The nuts are screwed on top. Such a beam will connect the structure of the rafters and the walls of the house into a single whole.
To install the racks, you need floor beams and beams. The size of the timber of such elements is 100 x 200 mm. Installation of supports is carried out vertically with fastening with plates or angles. When using a hip roof, the racks are placed in 1 row, and a purlin is attached on top. A hip roof involves placing supports diagonally. Equal distances are laid off from the corner. Thus, we get a rectangle on which we lay the purlins. We fasten everything using a corner.
Installation of roof truss system
The next step is to make rafter templates. We install side rafters along them. A thin board is suitable for the workpiece. We apply it to the run and mark the cut. With the second end, which is located at the Mauerlat, we also mark the gash. We make the required number of rafters using a template. After selecting the fastening step, we perform installation. The step can be from 60 cm to 1 m. We make the connection with self-tapping screws.
The angle of inclination of the slope is determined by the slanted rafters. Place them diagonally for additional load. Often double boards are used for them. We also make cuts according to a template. The upper part of the slanted rafters is connected with a crossbar to give strength.
A hip roof connects the slanted rafters near the ridge using tie-rods. Installation occurs at an angle of 90 degrees. Wire clamps connect to the walls.
We attach the frames to the diagonal rafters. Their length can be varied, but they must be parallel to each other. Ordinary and external rafters together form side slopes.
The DIY hipped roof has come to completion. The last stage is its insulation using basalt wool or foam polystyrene. We lay the material between the rafters. A layer of waterproofing will protect from moisture. The sheathing directly depends on the type of roof material.
In this video you can learn more about the construction and design of a hip roof:
A roof made of four slopes - what is it good for? The numerous operational advantages of this type certainly outweigh the disadvantages. Is the rafter system of a hipped roof as simple as many construction beginners think? You will definitely find out soon! Important nuances and features of construction stages hip roof we will describe in this article.
What do you need to know about hip truss systems?
There are two options for hip roofs: hip and hip. The first type has the shape of a rectangular envelope, consisting of two main trapezoidal slopes and a ridge, and two pediment (side) slopes - triangles:
A hipped roof is four identical isosceles triangles connected in one top point(resembles a tent):

Both options provide for the installation of both layered and hanging rafters, which are installed using standard technologies.
How to choose the type of rafter system for a 4-pitched roof?
In the absence of a central roof support, the choice is made in favor of a hanging rafter system. If you can find upper and lower supports for each rafter, then you should choose a layered structure. This option is simpler and more accessible for non-professional craftsmen. You just need to remember two main conditions: when rigidly fastening the bottom and top of the stops, a reinforced Mauerlat is needed, since the thrust is transferred to it; with a hinged fastening or a semi-rigid connection (for example, the top is hinged and the bottom is rigid or vice versa), the Mauerlat does not need to be reinforced:


The choice of one type of hip roof should be determined by the shape of the house itself. For square houses, hip rafters are erected, for rectangular ones - hip rafters. You can also find complex multi-pitched roofs combined type, which contain both hip and tent elements.
Both hip and hipped structures retain the basic functions of a gable roof (for example, the possibility of arranging an attic) and look very aesthetically pleasing:

Why is a hipped roof more popular than a gable roof?
“Why the extra headache and complexity?” you ask: “After all, you can build a simple gable roof much faster and cheaper." Here the masters emphasize some important points in favor of choosing exactly four slopes for the roof:
- High wind resistance. The hipped roof has no gables; all its planes are inclined towards the ridge. This structure minimizes the impact of strong winds and reduces possible destructive consequences to “0”.
- The most successful load distribution. A multi-pitched roof can withstand the maximum amount of precipitation, since the gentle slopes take part of the main load. Therefore, sagging, deformation and destruction of the rafter system, in this case, have a minimal probability.
- Availability of choice of any method of roof insulation. Straight gables require a special approach when choosing the type of roof insulation, since they are located vertically and are subject to wind blowing. The gentle slopes of the hip and tent systems allow you to evenly insulate the roof with any available material.
In addition to the listed “advantages”, a roof with four slopes perfectly conserves heat, can be covered with any roofing material and always has a neat appearance.
Construction of a four-slope rafter system
The four-slope rafter structure consists of the following elements: mauerlat, ridge beam, central and hip rafters, slanted legs, as well as beds, racks, crossbars, struts and other reinforcing parts. Let's look at the most basic elements.
I. Mauerlat
The Mauerlat is the most important part of the structure, since the entire rafter system rests on it. It is a powerful wooden beam 100x200, 100x250, 100x100, 150x250, 200x200 cm. The mauerlat is made from solid quality wood, mainly coniferous species. The rafter system of a hip roof, like any multi-pitched roof, requires thorough fastening of the base beam. The procedure for installing the Mauerlat in this case: formation monolithic foundation at the end of load-bearing walls with the installation of spiers; laying waterproofing; processing and installation of Mauerlat around the perimeter of the entire house; reinforced with anchors and other fastenings for maximum reliability of the base.
The Mauerlat can be laid on the edge of the wall, or in the pocket provided when laying bricks on the inside of the load-bearing walls.
II. Sloping legs
Sloping legs are the four corner rafters that rest on the edges of the ridge and the corners of the mauerlat. They are the longest among all the rafter legs of the system, therefore they must have a cross-section of at least 100x150 mm for maximum rigidity.
III. Ridge beam
Ridge purlin is a horizontal beam that connects all the rafters, the top of the rafter system. The beam must be strengthened with racks and struts. The ridge must be positioned strictly parallel to the plane attic floor and perpendicular to the posts.
IV. Rafters
Rafters for a hipped roof are divided into: central (attached to the mauerlat and ridge); main hip ones (attached to the ridge axis and Mauerlat); intermediate and shortened (installed on sloping legs and Mauerlat, connecting the corners of the slopes).
V. Strengthening elements
Additional reinforcing elements include ridge beam posts, crossbars or floor beams, rafter struts, wind beams, etc.
DIY rafter system for a hipped roof
Let's consider step by step process construction truss structure. For clarity, we have chosen the most popular option - hip roofing. The hip roof rafter system, a diagram of which step by step, is presented to your attention below:

Step I: Create a Project
To depict your version of a hip roof in a drawing, you need to calculate the height, length, slopes of the slopes and roof area. This is necessary for clear and high-quality implementation of the project and selection of the required quantity of consumables:

Calculations should begin by choosing the angle of the roof slopes. The optimal slope is considered to be an angle of 20-450. The magnitude of the slope must correspond to the climatic characteristics of the region. So, in particularly windy areas, the slope should be kept to a minimum, and for areas where there is frequent and heavy rainfall, the steepest slope angle is necessary. In addition to the weather environment, you also need to consider the roofing material you plan to use. For a soft roof the degree of inclination should be less, for a hard roof it should be greater.
And one more small but important nuance on this issue - it is better to make the slope angle the same for all four slopes. So the load will be distributed evenly, and the structure will be as stable as possible, and the aesthetic appeal will remain “at its best.”
Now, knowing the angle of inclination and the width of the house, we can use simple mathematics to calculate the height of the ridge, the length of the rafter legs, racks and other details of the rafter system. When calculating the length of the rafters, do not forget to take into account the eaves overhang (as a rule, its length is 40-50 cm).
The roof area for purchasing the required amount of roofing material is calculated as the sum of the areas of all slopes of the structure.
How to draw a roof drawing correctly?
- We select the scale of the drawing and transfer the dimensions of the house in scale onto a sheet of paper;
- Next, we transfer the selected dimensions of our roof onto the diagram: the height of the ridge, its length, the number and size of rafter legs, struts, racks and all the details, in accordance with the calculations made earlier;
- Now you can count all the necessary materials and start searching for them.
Step II: Preparing for work
For construction roof frame you will need standard tools and equipment: drills, screwdrivers, jigsaws, hammers, chisels, etc. We already know the required amount of materials for the rafter system, so we can purchase them. The lumber for the frame must be solid, free from cracks, wormholes, and light shade, without gray or yellow patina, smell like fresh wood. Wet wood should not be laid on the roof immediately; it must be dried, treated with an antiseptic solution and dried again. Wood humidity should not exceed 20%.
Step III: Mounting the Mauerlat
Mauerlat is the basic part of the entire rafter system. It transfers thrust loads to the load-bearing walls of the house. Installing a Mauerlat for a hipped roof is no different from similar structures with two or one slope. This process is described in as much detail as possible in our previous articles.

The base beam, the parameters of which are described above, is placed on an armored belt and high-quality waterproofing. If it is necessary to connect the Mauerlat, then the bars are cut into half the section and overlapped using strong fasteners.
Step IV: Laying the floor beams or beams
If there are load-bearing walls inside the house, then it is necessary to install beams on their ends - the basis for the support pillars of the roofing system. If load-bearing floors is no longer in the house, then the attic floor is covered with reinforced beams, on which roof supports are subsequently installed, and then the attic floor pie is laid.
Beams must have a cross-section of at least 100x200 mm. The step between them is 60 cm. You can slightly adjust this figure, depending on the characteristics of your home. The distance between the outer beams and the mauerlat should not be less than 90 cm. This distance is used for installing the half-beams of the eaves overhang (extension). The stems are attached to the two outer beams using strong anchors and reinforced metal corners.
Step V: Installation of support posts, purlins and ridge
Racks are an important part for supporting the structure; they redistribute the weight of the rafter system onto the beams or floor beams. The racks are installed strictly perpendicular to the plane of the bed. IN hipped systems the supports are installed under the ridge beam (hip roof) or under the corner rafters (hip roof):

The racks must be securely attached to the base using metal plates and reinforced corners. The purlins are installed as additional support for the racks. IN hip roof the purlins are rectangular in shape, and for the hips they are ordinary ridge purlins.
After we have made sure that the supports are installed correctly (using a meter and a level), we can attach the upper ridge beam. It is mounted on vertical posts and reinforced with reliable metal fasteners (plates, corners, anchors and screws). Now let's take on the corner extensions:

Step VI: Installation of rafters
First, you need to install the side rafters, which rest on the ridge beam and the Mauerlat (or are secured with an extension). To do this, you need to make a template rafter with the appropriate cuts. We apply the rafter leg to the ridge, mark the place of the cut with a pencil, then mark the place of the cut of the rafters for joining with the Mauerlat and make cuts. Attach the rafter to the supports again to make sure that the connection is correct and to correct any imperfections. Now this sample can be used to make all the side rafters. Installation of the rafter legs of the main slopes is carried out according to general rules described in the design of a gable rafter system (see article and video).
Diagonal (corner) rafters are installed next. Their upper edge is installed on the stand and joins the edge of the ridge beam. Before this, measurements are taken and the corresponding cuts of the rafter legs are made. The lower end of the diagonals is fixed in the corners of the Mauerlat:


Since diagonal rafters are longer than all other legs, they require additional support. This function is performed by trusses - support beams that are installed under each diagonal leg, in its lower quarter (this is where the greatest load occurs). Sprengel, like ridge posts, are installed on supporting corner beams located in the plane of the floor beams.

Between the corner ribs the space is filled with auxiliary rafter legs - sprigs. Their lower part rests on the mauerlat, and the upper part rests on the diagonal rafter leg. The step between the frames should be equal to the step between the side rafters (50-150 cm).
Step VII: Sheathing
All that remains is to complete The final stage formation of the roof skeleton - installation of sheathing. These are boards or bars 50x50 mm, which are attached to the rafters parallel to the ridge girder and the mauerlat. The pitch of the sheathing boards is 50-60 cm. This is quite enough for laying the roofing pie. When is it envisaged soft roof, the sheathing is laid in 2 layers (counter-lattice and sheathing).
Finally, a few videos:
So, we described the installation of the rafter system of a hipped roof, its basic principles, and even went a little deeper into some of the nuances. Hip and tent structures are, although not the simplest, but quite feasible options for every novice craftsman. Especially if he has good assistants. We wish you success in your work!
Many people like houses with hipped roofs. Even though they require the most materials, and therefore the most money, they are popular. Firstly, because they give even a simple “box” a more interesting look. Secondly, because they are durable and reliable. And even though the rafter system of a hipped roof is one of the most complex, it can be developed and made with your own hands.
Types of hipped roofs
Hip roofs are the most expensive and difficult to install. But despite this, they were and remain popular. And all because they look more attractive than all other types of roofing, they have a high mechanical strength, resist wind and snow loads well. A house with a hipped roof or even a gazebo looks “more solid” than any other.
Even a simple “box” under a 4-pitch roof looks impressive
There are two main types of 4-pitch roofs: hip and hip. The hip roof is suitable for square buildings, the hip one - for rectangular ones. In a hip roof, all four slopes look like triangles and they all converge at one point - in the center of the square.

The classic hip roof has two slopes in the form of trapezoids that converge at the ridge. These slopes are located along the long side of the rectangle. The other two slopes are triangles that are adjacent to the extreme points of the ridge beam.

Despite the fact that there are four slopes in any case, the design and calculation of these roofs are different. The assembly order is also different.
Half-hip
Hip roofing is much more common - after all, there are much more rectangular buildings than square ones. There are several more varieties of it. For example, half-hip ones - Danish and Dutch.

Half-hip roofs - Danish and Dutch
They are good because they make it possible to install full-fledged windows in the vertical part of the side slopes. This allows you to use the under-roof space as a living space. Of course, compared to a full second floor, there is less living space, but construction costs are also not so high.
Slope angle and roof height
The angle of inclination of a hipped roof is determined based on snow and wind loads in your region. The higher the snow load, the higher the ridge must be raised so that the slope is steeper and the snow does not linger in large volumes. In strong winds, on the contrary, the ridge is lowered lower to reduce the area of the slopes and, consequently, the wind load.
Even when choosing the angle of inclination of the roof slopes, they are guided by aesthetic and practical considerations. With aesthetics, everything is more or less clear - the building should look proportional. And it looks better with fairly high roofs - 0.5-0.8 of the height of the first (or only) floor.

Practical considerations come in two directions. First, if the under-roof space is planned to be used as a living space, pay attention to the area that will be comfortable for use. It is more or less comfortable to be in a room with a ceiling height of 1.9 m. And even then, this is for people of average height. If your height is higher than 175 cm, you will have to raise the bar.
On the other hand, the greater the height of the roof, the more materials will be required for its manufacture. And this is the second practical aspect that needs to be taken into account.
There is one more point that should be taken into account: roofing materials have a minimum and maximum slope angle with which this coating can “work”. If you have certain preferences for the type of roofing material, take this factor into account. This determines the height to which the rafter system of a hipped roof should be raised (relative to the walls).
Hip type hip roof rafter system
If a hip roof is made, it is most often a hip roof. Let's talk about it first. central part rafter system repeats the system one to one. The system can also be with layered or hanging rafters. Hanging rafters are installed “in place” - on the roof; two people are enough for such work. Layered roof trusses, in the form of triangles, can be assembled on the ground, and then, ready, lifted and installed. In this case, there is less work at height, but to lift and install ready-made trusses, you need either equipment (a crane) or a team of four or more people.

The main differences between the rafter system of a hip roof are in those places where the rafters are shortened (rafter half-legs) and a hip is formed - triangular slopes. Here diagonal rafters are installed, which are also called rafters. They rest on the outer or inner corners of the building and are longer than ordinary rafter legs. Diagonal rafters must be addressed Special attention, since they bear one and a half load (when compared with neighboring rafters). Therefore, the corner rafter legs are made reinforced - they are assembled from two boards, joining them in width using nails. Also, to support the diagonal rafter legs, additional racks and slopes are installed, which are called a truss block.

Another rafter system for a hip-type hipped roof is distinguished by the fact that the Mauerlat is laid around the perimeter of the building, and not just along the long sides of the box. This is understandable - the rafters are located along the perimeter, and not just on two sides, as in a gable roof.
Mauerlat- element of the roofing system of a building. It is a beam or log laid on top along the perimeter outer wall. Serves as the extreme lower support for the rafters.
Diagonal rafters
As already mentioned, slanted (corner) rafters carry an increased load: from the shortened rafters of the side slopes and from the hips. In addition, the length of the diagonal rafters of a hip roof usually exceeds the standard length of lumber - it is more than 6 meters, so they are made spliced and doubled (paired). This solves two problems at once: we get a beam required length, increase it bearing capacity. Two paired boards can withstand greater loads than a solid beam of the same section. And one more point: spliced beams for slanted rafters are made of the same material as ordinary rafter legs. It's cheaper, and you don't need to look for special material.

If spliced beams are used, diagonal rafters are usually secured by installing struts and/or trusses (racks).
- If the length of the beam is up to 7.5 m, one strut is sufficient, which rests on the upper part of the beam.
- For lengths from 7.5 m to 9 m, an additional stand or truss is installed. These supports are placed at the bottom, 1/4 of the length of the rafters.
- If the length of the inclined rafter is more than 9 meters, a third one is needed, intermediate support- a stand that supports the middle of the run.
Sprengel- a special system that consists of a beam resting on two adjacent external walls. A stand rests on this beam, supported on both sides by slopes (the slopes are installed if necessary).

A truss truss is usually not considered, but is made from the same materials as the truss system. For the beam itself 150*100 mm, for the racks - 100*100 mm, for the slopes - 50*100 mm. This can be a beam of a suitable cross-section or spliced beams.
Supporting the rafter leg
The upper end of the diagonal rafter legs rests on the ridge beam. The exact execution of this assembly depends on the type of system and the number of runs.
If there is only one purlin, the consoles are made 10-15 cm longer than the rafter frame. If such an outlet is too large, it is then trimmed. But it’s not worth making it shorter - growing it is much more difficult and expensive. The slanted diagonal legs will rest at this point.

The rafters are cut at the desired angle and joined on the console. Fastened with nails. The connection can be strengthened using metal overlay plates.
If there are two ridge spans (done if residential premises are planned mansard type), the connection method depends on the material from which the rafters are made:
- If spliced boards are used, a truss is required, which rests on the outriggers of the ridge girders. Diagonal rafters are trimmed and supported on a truss post.
- If timber is used, a crimp is installed at the point of support - a piece of board at least 50 mm thick. The board is attached with nails to two purlins, and to this board there are already rafter legs that will form a hip.

The lower part of the slanted rafter legs is trimmed horizontally and attached to the mauerlat or trim board. For greater reliability of the unit, you can install an additional oblique beam and fix the corner beam to it (in the figure below).

Fastening - with nails on both sides; if necessary, it can be additionally secured with wire twists or clamps.
How to attach sprigs and half-legs
Shortened rafters of the side slopes (also called half-legs) are attached to the installed diagonal rafter legs on one side, and on the other side - rafters that form a hip. They must be placed in such a way that the joints do not coincide. Sometimes for this you have to change the distance between the external rafters (preferably in the direction of decreasing the pitch).

Typically, shortened rafters are trimmed and secured with 2-3 nails on both sides. This type of fastening is sufficient in most cases. But, if you want to do it “correctly”, under each rafter you need to make a “notch” - a notch no more than half the thickness of the beam. The rafters are trimmed, installed in the desired position, and the desired contour is drawn on the beam (an uneven trapezoid is obtained due to different angles connections). A recess is cut out along the resulting contour, into which the half-leg is inserted, after which it is secured with nails on both sides. This is a complex knot, and it takes a long time to do. But the load-bearing capacity of such a connection is much higher. There is another option, which is much simpler in execution, but differs little in reliability.

The optimal way to attach the spigots and half-legs to the mowing beam can be considered as fastening them to nails with additional installation cranial bars (see picture above). For this, a beam with a cross section of 50*50 mm is used, which is nailed along the lower edge of the beam between the fixed rafters. In this version, the beam becomes an I-beam, which greatly increases its elasticity and increases its load-bearing capacity.
How to fasten the lower ends of the rafters
The method of fastening the lower ends of the rafters depends on what type of rafter system of the hipped roof is chosen - with hanging or layered rafters, and what kind of scheme is used. A system with sliding rafters (usually used for buildings for which thrust loads are contraindicated - wooden, frame, lightweight concrete) is implemented using special metal fasteners. They consist of two parts. One is installed on the embedded board, the second - on the rafters. They are connected to each other movably - using a long slot or plate.

With this device, when the load changes, the roof “plays back” - the rafters move relative to the walls. There are no thrust loads; the entire mass of the roof and precipitation is transferred vertically downwards to the walls. This fastening allows you to compensate for uneven loads that arise with a complex roof structure (with junctions in the form of the letter G or T).
Rigid fastening can be done in different ways - with a cutout for the Mauerlat/tying board or with a hemmed support bar. Fastening is usually done with nails; it can be reinforced with metal plates and corners.

The connection with the cutout is made if the roof has a hipped roof with an outlet - overhangs. Usually the overhangs are quite large and, in order not to buy long beams, they are extended by adding boards that are nailed right through to the bottom of the beams. This allows you to make the overhangs as long as you want without overspending on materials.
Danish half hip roof
The rafter system of a Danish-type hipped roof differs from the classic hip roof. The difference is in the design of the hip - here, at some distance from the ridge, it is stuffed support board at least 5 cm thick. Diagonal double rafters are attached to this board. How low to lower the support board is your choice. But the lower the board is lowered, the smaller the angle this slope will have, and the worse the precipitation will be. If the half-hip area is large, you will have to calculate the load and select the thickness of the rafters.
But the low-lowered support board allows you to place horizontal window sufficient area. This is beneficial if there is a living space under a hipped hip roof.
To prevent the crimp (a board connecting two opposite rafter legs) from bending from downward loads, a short piece is installed - a piece of the same board that is nailed to the post supporting the ridge beam. The same stops are made on the edges of the grooves, securing the short ones well with nails (installation step is staggered every 5-10 cm).

With such a device, it is necessary to strengthen the attachment points of the layered rafters, since the load from them is transferred to the outer pair of rafter legs. Two methods of amplification are used:
- The outer rafters are made double.
- Install struts from double boards. The lower part of the strut rests on the bench or stand. They are fastened with nails, and the joints are reinforced by installing cuttings of boards.
If the house has rectangular shape and the hip is not too wide, you can either install struts or make the outer rafters from double beams. Otherwise, the rafter system of a half-hip Danish type hip roof is assembled in exactly the same way as described above.
Construction of a 4 pitched hipped roof using the example of a gazebo
For a square gazebo 4.5*4.5 meters, we made a hip roof covered soft tiles. The slope angle chosen was “floor material”, taking into account snow and wind loads - 30°. Since the structure is small, it was decided to do simple system(in the picture below). The distance between the rafter legs is 2.25 m. For rafter lengths up to 3.5 m, a board of 40 * 200 mm is needed. A 90*140 mm beam was used for the strapping.

We assembled the rafter system on the ground, secured it to support posts, then installed a continuous flooring made of, then -.
First, we assembled the harness that will be attached to support pillars. Next, we installed rafters that rest on the middle of the frame. The procedure here is as follows: in the middle we place a stand, on top of which the rafter legs will be joined. In this version, this rack is temporary, we only need it for a while - until we connect the first four rafters in the center. In other cases - for larger houses - this rack can remain.

Take the board the required section, lean it against the stand in the place where they will connect (depending on the desired angle of inclination). We mark how it should be cut (at the top, at the joint and where it joins the harness). We cut off everything unnecessary, try it on again, and adjust if necessary. Next, using this blank, we make three more of the same kind.
Now the rafter system is hipped hip roof you can start collecting. The most questions arise about the junction of the rafter legs in the center. The best way- reliable and not too complicated - take a piece of timber of a suitable cross-section, make an octagon out of it - for joining eight rafter legs (four corner and four central).

The size of the edges is according to the cross-section of the rafter legs
Having fixed all four central elements of the rafter system with nails, we perform the same operations with the corner rafters: we take one, try it on, cut it out, make three copies using the template we made, and mount it.

Using the same principle, we make half-legs (shortened rafters). If desired, all connections can be further strengthened with corners or metal plates, then the rafter system of the hipped roof will be more reliable and you will not be afraid even in the heaviest snowfalls.

We install the assembled system on the gazebo posts, fasten it with nails, corners, and secure it with slopes. After this, you can install the sheathing (in this case, solid) and lay the roofing material.
If you need to create a durable and reliable roofing system for a private house, you can create a hipped roof with your own hands. It is important to carefully consider the development of the rafter system project and strictly follow the technology for installing structures.
Design of a hipped roof
Hip or tent hipped roof differs from a gable one in the absence of pediments - instead of them, additional triangular slopes are mounted at the ends. This design is more labor-intensive to construct, but is characterized by increased strength and reliability. At the design stage, it is necessary to correctly calculate the parameters and location of the elements, and during the installation process, they need to be precisely adjusted to the installation locations.
Please note that building a roof with your own hands may require the use of non-standard solutions, if the builders do not have suitable building materials at their disposal.
The project of a hipped roof is developed taking into account all types of loads that it will experience. At the first stage, the angle of inclination of the roof slopes should be determined. This parameter primarily depends on factors such as:
- purpose of the attic;
- choice of roofing material;
- the nature of atmospheric loads in the construction area.
Typically, the angle of inclination of the roof slopes is 5 – 60 degrees. If the region is characterized by low rainfall and strong winds, you can build a roof with small angle tilt In areas with heavy snowfall and frequent rain, it is recommended to build roofs with a slope angle of 45 to 60 degrees.
When choosing a roofing material, you should take into account the features of its installation:
- Flat or wavy slate and rolled materials can be mounted on slopes with an inclination angle of less than 18 degrees;
- if the angle of inclination is less than 30 degrees, it can be used different kinds tiles;
- if the slopes are located at an angle from 14 to 60 degrees, the number suitable materials roofing metal included.

The roof structure diagram must contain detailed information about the locations and sizes of system elements. After determining the optimal angle of inclination of the slopes, it is necessary to calculate the height of the roof ridge (based on the formula of a right triangle).
Rafter system
The installation of a hipped roof includes determining the required cross-section of the elements of the rafter system. It is performed based on an analysis of the loads that the rafter system will experience during operation. It is necessary to take into account the wind load, the maximum mass of snow in winter, and the angle of inclination of the slopes.
It is recommended to select a rafter safety factor of at least 1.4, as well as evaluate their load-bearing capacity and take it into account when calculating the rafter spacing. The type of rafter system is selected based on the building parameters: if there is an internal load-bearing wall or columnar supports, it is more convenient to use a system with layered rafters if it is not possible to create supporting structure, installation of hanging rafters is provided. In some cases, both types of rafters can be used.

During the design process, it is important not only to determine the type of rafter system, but also to determine the need for additional fastening elements, such as braces and tie-downs. They provide rigidity to the entire structure, prevent it from loosening over time, and reduce the load on the rafters.
Load calculation
Considering in detail how to make a hipped roof, it is worth paying special attention to the principles of calculating loads. There are two types of loads:
- permanent (weight of sheathing, insulation, insulation materials, roofing);
- temporary (weight of snow accumulated on the roof, exposure to wind, etc.);
- additional (any structures attached to the rafters).
According to SNiP, when designing a roof, one should proceed from the average snow load, which is 180 kg/m2, but in the event of a snow bag, the load increases to 400 kg/m2 in such an area. Wherein snow load is not taken into account if the angle of inclination of the roof slopes exceeds 60 degrees. It is also necessary to take into account wind loads, but their value is noticeably less - up to 35 kg/m2. If the angle of inclination of the slopes is less than 30 degrees, the wind correction can be neglected.
It is recommended to correct the above averaged load parameters using correction factors, corresponding to the climate in the construction area.
An additional load comes from any suspended objects attached to the roof rafters. These could be vents, a water tank, or other devices installed in the attic. The possibility of their installation should be taken into account at the design stage of a hipped roof.

When designing a rafter system, it is necessary to perform two calculations. The first calculation is aimed at assessing the strength parameters of the structure - it is necessary to make sure that the system will not break under loads. The second calculation makes it possible to assess the degree of deformation of structural elements. For example, rafter deflection mansard roof should not exceed 1/250 of its length.
Special computer calculator programs can significantly simplify the calculations of the design of a hipped roof and avoid possible errors.
After execution necessary calculations a drawing of the rafter structure of the hipped roof is drawn up. The detailed diagram contains information about the dimensions of each element and the method of their fastening.

Materials for the manufacture of the rafter system
A do-it-yourself hipped roof is usually made using lumber from softwood - larch or pine. You should carefully consider the type of wood - the lumber should not have defects that affect its strength and durability.
Wood moisture content should be no more than 18-22%. Otherwise, the boards and timber should be dried before use to avoid deformation of the roofing structure during operation.
To create a rafter system, it is optimal to use a rectangular beam, the cross-section of which is determined by design calculations. As alternative solution a board with a cross section of 50×100 or 50×200 mm can be used. If necessary, double boards are installed.

The strength of a multi-pitched roof structure can be increased by steel elements that hold the rafters and keep their relative positions unchanged. Supports for the most heavily loaded ridge girders can also be made of metal. Combined structures are characterized by increased strength.
Features of the construction of a hip roof
 The support for a roof with four slopes is the Mauerlat, the installation of which is described in detail in the instructions for constructing a gable roof. A feature of the hip roof is that the Mauerlat must be laid on all four external walls building. When figuring out how to make a hipped roof, it should be noted that key feature design is the presence of diagonal rafters connecting the ridge and corners of the building. It is these rafters that take on the maximum load.
It is extremely important to correctly mark the diagonal rafters, ridge girder and supports for it. This makes it possible to ensure absolute symmetry of the structure, which is the key to uniform distribution of loads on the roof of the structure and prevents its deformation.
After installing the Mauerlat, supports are installed for the ridge girder, which must be fixed strictly horizontally at the height specified by the project. Diagonal rafters made of timber or double boards are attached to the ridge girder.
To ensure the required length of the diagonal rafters, in some cases it is necessary to install them in two parts. To relieve the load on the joint, it is recommended to install a support under it. The greatest rigidity of the structure can be achieved if the joint with the support is located at a distance equal to a quarter of the length of the rafter from its upper part, fixed to the ridge. In general, for the installation of diagonal rafters it is most convenient to use prefabricated (glued) rafter legs, which are highly durable and ideal for the construction of complex structures.

After installing the main structure, consisting of a ridge girder and diagonal rafters, rafters are installed for installing the sheathing. The peculiarities of the hip roof include the use of not only full-size rafter legs, which are attached with the upper part to the ridge (central rafters), but also flanges - corner rafters, resting with the upper end against the diagonal rafters. The length of the sprigs decreases as they approach the corner of the triangular or trapezoidal slope. The spacing of the rafter legs is determined at the design stage, and at least three central rafters must be mounted on each slope, regardless of its length.

To ensure the rigidity of the entire structure, supports, tie-downs and braces are installed in the right places. Installation of the sheathing completes the creation of the rafter system. Waterproofing and roofing material are being installed. Insulation and vapor barrier are fixed from the inside. If the space under the roof is intended to be used as a living space, special attention should be paid to thermal insulation and ventilation of the roof. In addition, it is necessary to design and then correctly install roof windows.
Details on how to build a hipped roof on your own can be found in the thematic video.


