Of course, insulating the ceiling in wooden house is extremely necessary, since warm air always rushes up and leaves through the roof. Many owners of private households are interested in options for creating thermal insulation of the ceiling space in wooden buildings. The website contains videos and photos that clearly and clearly demonstrate the process of attaching thermal insulation materials. Initially, a wooden house is a warm home, but it can be additionally insulated; it is only important to understand how to insulate the ceiling in a wooden house correctly.
Features of creating thermal insulation
From the point of view of insulating a wooden structure, one of the most difficult places the ceiling is considered and there are several good reasons:
- Significant weight of the structure being created should not be allowed, since roofing elements additional burden is placed;
- there are restrictions regarding the thickness of the insulation material;
- should be provided with outside reliable waterproofing;
- It is extremely inconvenient to work on the ceiling.
Experts advise thinking about thermal insulation of the ceiling of a wooden house at the design stage. But what if the structure has already been erected?
Cold attic
When there is an empty attic above the living space and a plank floor is laid on the floor beams, there are several options for how to insulate the ceilings in a wooden house.
Option #1 . Most in an accessible way Creating thermal insulation is the use of bulk insulation - for example, expanded clay or wood sawdust. To prevent them from falling on your head, the floor of the attic is lined with plastic film, which will simultaneously serve as a vapor barrier. For centuries, the role of insulation in attics has been assigned to straw and hay, and today owners of private houses often use such a cheap option (read also: ""). For thermal insulation to be effective, it is believed that its layer should be about 10 centimeters.


When you plan to walk in the attic in the future, even sometimes, you need to put boards or boards on top. It is advisable that they do not rely on thermal insulation - the insulation should not be compressed.
Attic for the summer
True, to implement this option, it is necessary to cover the thermal insulation with a hard coating, which should lie on the joists.

Lack of space above the ceiling
Often in wooden houses there is no access to the space located above the ceiling. Let's assume that the goal is to achieve maximum thermal insulation if a ceiling made of materials such as plywood, boards or OSB is hemmed underneath the floor beams. Of course, the height of the ceiling will then decrease, since thermal insulation must be created inside the building.

The order of work is as follows:
- mounting rails are installed through the vapor barrier layer; for this purpose, holes are drilled in them for self-tapping screws and they are tightened with a screwdriver;
- It doesn’t always make sense to attach slats in the form of gratings. If the ceiling is covered with PVC panels, then it is enough to install the slats in parallel at a distance of about 50 centimeters;
- Next comes a layer of thermal insulation. Insulating the ceiling of a wooden house with polystyrene foam is not difficult to do (see). Its slabs are tightly inserted between padded slats. If mineral wool is used, it is fixed with a thin rope, which is attached to nails nailed to the side of the slats;
- the third layer, which plays the role of a vapor barrier, is attached to the slats in the same way as the first. Even if the thermal insulation sags somewhere, then decorative ceiling will correct mistakes;
 Often, owners of private houses prefer to hem the ceiling with a material such as plasterboard, but to install it they use a profile made of galvanized iron, which is screwed to the ceiling with self-tapping screws. Otherwise, the structure, under the weight of its own weight, will certainly collapse downwards and well, if not on the heads of the household. The thing is that drywall is heavier than PVC panels, so its installation must be approached responsibly.
If a wooden structure is built in an area with warm climatic conditions, then a thin layer of thermal insulation, for example, isolon, on which clapboard is sewn on top, will be sufficient.
Exist various ways insulation of ceilings in a wooden house. So foam tiles for finishing the ceiling it is good thermal insulation.
Property owners should be interested not only in how to insulate the ceiling in a wooden house, since heat loss occurs quite intensively if window openings are not sealed and entrance doors. First, you need to pay attention to the condition of the roof insulation. When it is not in order, then, first of all, it is advisable to solve this problem.
Houses built from wood are initially warm. Wood has low thermal conductivity, so an insulated wooden house retains heat even in the most severe frosts. Doors, windows, walls, floors, roofing and ceilings need insulation. Especially ceilings, because warm air, according to the laws of physics, rises and goes out through an uninsulated roof. It is estimated that up to 45% of heat is lost in this way, so insulating the ceiling in a wooden house is a top priority.
Thermal insulation of ceilings
The ceiling of a wooden house consists of logs, beams or beams installed at the same distance. Boards are nailed to them on both sides, between which a space is formed, filled with heat-insulating materials.
Popular insulation for ceilings
To protect a private home from the cold, they are used different types materials:
- expanded clay;
- mineral wool;
- ecowool;
- sawdust;
- Styrofoam.
Each of them has a huge number of advantages, but there are also disadvantages that must be taken into account when planning work. Each material has its own installation technology. The most common insulation materials for ceilings are expanded clay and sawdust. These are bulk materials used to protect against the penetration of cold air from the attic or attic.
Features of creating thermal insulation
Insulating the ceiling in a private house is one of the most difficult measures for thermal insulation of a house. There are several important points to consider:
- the created structure should not be heavy, as it puts additional load on the roofing elements;
- it is necessary to take into account existing restrictions on the thickness of insulation;
- the outer side of the insulation must have waterproofing protection;
- ceiling insulation work is associated with inconvenience.
On a note! If there is a residential attic under the roof, insulate its ceiling; if it is an attic, then insulate the attic floor inside or outside, but it is better to insulate both.
External insulation with expanded clay
Expanded clay is a porous material in the form of crushed stone or gravel, obtained by firing low-melting clay rocks that swell at a temperature of 1050 - 1300 degrees. Quality is determined by grain size, strength and volumetric weight.
Features and advantages of expanded clay
Expanded clay is an inexpensive material, for the production of which available raw materials and simple equipment are used. A cubic meter of placer M200 - 450 with delivery costs from 980 rubles. Thermal insulation technology using it is not difficult and does not require professional knowledge. For ceiling insulation to be effective, the expanded clay mound must be at least 10 cm thick. The thicker it is, the better.
Advantages:
- excellent thermal insulation characteristics;
- high degree of sound insulation;
- Not heavy weight;
- strength;
- fire resistance;
- environmental friendliness;
- rot resistance;
- resistance to aggressive chemical environments.
Technology of using expanded clay as insulation
Insulation is carried out from the attic side. Before filling the grains, vapor and waterproofing is laid. Builders often use roofing felt for these purposes, but this is not the best option from an environmental point of view. Roofing felt contains tar, which releases harmful substances, especially in summer, when the roof becomes very hot. For vapor and waterproofing, the best option would be the modern, inexpensive material “Izospan” of series C or B. To achieve maximum savings, aluminum foil or ordinary polyethylene film is suitable.
Let's consider how to insulate the ceiling in a wooden house with expanded clay, in what sequence and in what quantity it is laid.
- Take measurements of the length and width of the spaces between the beams. Roll polyethylene film roll out and cut into strips, the length and width of which will be 10 cm greater than the distance between the beams.
- Lay waterproofing with an overlap of 20 cm on the walls and the edges of the beams. To ensure a high-quality protective layer, the seams are taped with a special tape.
- Glue the joints of the roofing material with rubber bitumen mastic. When using aluminum foil, foil-based tape is used.
- Insulate chimney pipes and rafter beams in the same way.
- Secure the canvas with a construction stapler and masking tape.
- Place crushed clay on the vapor barrier.
- Mix large and small fractions of expanded clay and pour them between the beams.
- To protect the thermal insulation package from damage, a cement-sand screed. In the attic, plank flooring is installed on the beams or other flooring methods are used.
Inexpensive insulation with sawdust
The cheapest insulation for the ceiling is environmentally friendly sawdust. They must be of medium fraction, dry, aged for at least a year, and not infected with fungus.
Thermal insulation solution with sawdust
To prepare the solution, take:
- 10 buckets of sawdust;
- 1 bucket of cement;
- 0.5 buckets of slaked lime
- antiseptic (borax, copper sulfate);
- water.
The dry components of the solution are thoroughly mixed, an antiseptic is added to the water, after which the water and the dry mixture are thoroughly mixed. To determine the readiness of the mixture, take it in your hand and squeeze it. If the solution is ready, no moisture should be released when compressed; when you unclench your hand, the lump of the finished solution should not crumble.
Sequence of laying the solution
- Vapor and waterproofing is installed. This is done in the same way as when using expanded clay.
- The cement-sawdust mixture is evenly distributed over the surface.
- The solution is compacted to a thickness of 25-30 cm.
The insulation flooring acquires the necessary properties within two weeks. When walking on it, a crunching sound is heard, but the base does not sag.
Important! It is recommended to install thermal insulation using sawdust in warm weather. When they dry quickly, they form a durable thermal insulation layer.
Mineral wool for home insulation
Mineral wool is a thermal insulator traditionally used in construction. Characterized by low level thermal conductivity, non-toxic, lightweight and easy to install. Mineral wool is presented in a wide range on the building materials market. Stone (basalt) wool is considered the highest quality and most effective. Thermal insulation of the ceiling using it will cost more.
Scheme for laying mineral wool
When working with mineral wool, you must follow safety rules. Small particles of fibers separated from the slabs get on the skin and into the lungs, which is unsafe for humans. Protective clothing, a respirator and gloves will help protect against them.
The sequence of thermal insulation with mineral wool:
- steam and waterproofing is laid on a surface cleared of dust and dirt (glassine is most often used for this);
- the overlapping areas of the waterproofing strips are glued;
- the edges are wrapped on the beams, secured with a stapler and secured with tape;
- basalt insulation is laid tightly on glassine so that there are no gaps between it and the beams;
- for greater efficiency, another layer is laid on top of the first layer, covering the beams and floor cracks;
- the remaining gaps are filled with foam;
- a second layer of vapor barrier is laid on the mineral wool, and a screed is made on it;
- boards, chipboard or plywood are laid on top of the screed.
Thermal insulation using ecowool
Ecowool - crushed cellulose with antiseptic and fire-resistant additives. It is considered one of the best natural insulation materials for a wooden house. For maximum effect, the ecowool layer must have a thickness of at least 150 mm. When laying it, it must be fluffed and lightly compacted to avoid shrinkage.
Ecowool absorbs moisture, so when using it there is no need for a vapor barrier film. It is laid on wooden floors using a special blowing machine. The insulating layer is monolithic and saturated with air, the cracks are carefully blown out.
Thermal insulation using foam plastic
Foam plastic is a heat-insulating material obtained by foaming polymers under the influence of high temperatures while simultaneously filling them natural gas. If you cannot decide how to insulate the ceiling from the inside, choose polystyrene foam. Here he has no equal.
Positive characteristics of polystyrene foam
- light in weight;
- simple and easy to install;
- easy to cut and fasten;
- has low thermal conductivity;
- moisture resistant;
- with excellent sound insulation properties;
- not subject to rotting and decomposition;
- affordable.
Insulating the ceiling in a private house with polystyrene foam from the attic side is done in the same way as with basalt wool.
How to insulate a ceiling from the inside with foam plastic
It is more difficult to insulate from the inside than from the outside. In the attic, the material is laid between the rafters and sewn up. In a living space, it is attached to the bottom of the rafters overhead. The difficulty of the work is that it is performed with outstretched arms.
Insulate the ceiling from the inside in the following sequence:
- The cracks are carefully filled with foam or caulked.
- If necessary, a frame is mounted.
- The vapor barrier is secured with a construction stapler.
- Sheets of foam plastic are glued to the vapor barrier.
- Another vapor barrier layer is laid on the foam.
- Then the final finishing is done - hemming with boards.
Note! The best option– insulation of the ceiling in the house from the inside and outside.
Tips for foam insulation
- the insulation should be laid as tightly as possible, since due to the cracks formed between the slabs, cold bridges will form, which will reduce all efforts to nothing;
- for internal insulation with foam plastic, one layer 5 cm thick is sufficient;
- if the insulation of a wooden ceiling in a private house is carried out from the outside, then the foam can be laid in several layers;
- for a heated attic you will need ventilation gap, without which condensation forms, the room becomes damp and mold appears in it.
Important! Insulation from the inside cannot be carried out after the renovation is completed. Performed during the construction and renovation stages.
teploguru.ru
Which ceiling insulation to choose
To insulate the ceiling, it is important to choose natural materials that will not compromise the environmental friendliness of a wooden house. They must be strong and durable, easy to install. The last quality is important if you plan to insulate the ceiling with your own hands. And, of course, the ceiling insulation should have high sound and heat insulation.
Experts recommend using sawdust, expanded clay, mineral wool or other rolled materials to insulate the roof and ceiling. They meet the requirements listed above. Don't choose synthetic insulation, since they will violate the environmental friendliness of housing. In addition, such products may cause headache and lead to complications in the functioning of the respiratory system.
Insulation with sawdust
Sawdust is the most accessible and cheapest material. Most often, these raw materials turn out to be completely free. To insulate a residential building, you will need a layer of mortar 25-30 centimeters thick, for seasonal residence and rest - 20 centimeters, for a bath you need 30-35 centimeters.
To prepare the solution, take half a bucket of lime, ten buckets of dry sawdust (10 liters each), one bucket of water and one bucket of cement (10 liters each), ten tablespoons copper sulfate or Boers. Lime is added to dry cement and mixed, then the mixture is mixed with sawdust and water is gradually poured in. Add vitriol or borax. Mix thoroughly. The mass is ready when, when squeezed in a fist, it forms a lump.
Before laying insulation, wooden structures must be treated with antiseptics and other protective agents. Do not forget that wood is a living material that is susceptible to the negative effects of moisture and insects. Treating walls and ceilings in a wooden house will increase the service life of the wooden structure and prevent rotting, loss of color and natural properties.
After processing the wooden floors, waterproofing material is laid over the entire area. Regular roofing felt, PVC film and aluminum foil will do. Then the prepared mortar with cement and sawdust is evenly scattered. Finally, the warm sawdust layer is compacted.
Insulation with expanded clay
Expanded clay - economical and environmentally friendly pure material, which is made by firing clay in a special oven. Expanded clay is resistant to fire, which cannot be said about sawdust and mineral wool. It tolerates temperature changes well, does not rot and is not afraid of rodents. The installation scheme for this insulation is very simple, so you can easily insulate the ceiling with your own hands.

The technology for insulating expanded clay ceilings in a wooden house is as follows:
- Wooden floors are covered with protective agents, the wiring and pipe outlet (if any) are insulated with non-combustible materials. Thin iron sheets and metal pipes are suitable;
- The entire outside ceiling is covered with waterproofing. Also take any rolled material (roofing felt, foil or film). You can secure the waterproofing with a construction stapler or double-sided molar tape;
- Then a layer of vapor barrier is laid. The material is overlapped and secured with a stapler. The top of the vapor barrier film is covered with crushed clay;
- Expanded clay is laid on the clay. The thickness of the layer is also determined depending on the purpose of the structure. For residential cottage and baths make a layer of 20-25 centimeters, for country house 15-20 centimeters is enough;
- A screed of cement and sand is placed on the expanded clay, which will protect the expanded clay from negative impact external factors.
At the end of the work, finishing is carried out if attic space planned to be used for housing or work. Flooring made of chipboard or floorboards is attached to the beams. This flooring will serve as the floor for this room. Read more about finishing the floor in a wooden house here.
Ceiling insulation with mineral wool
Mineral wool is also environmentally friendly and natural material, which, unlike sawdust and expanded clay, can be used to insulate the ceiling both inside and outside. When working with mineral wool, it is important to use a respirator, goggles and other protective equipment, since small particles of fiber that get into the eyes or respiratory system can be harmful to health. Mineral wool is characterized by low weight and high density, easy and quick installation. The material is not exposed to insects and rodents.

Internal insulation of the ceiling with mineral wool is carried out in the following sequence:
- Treatment wooden structures protective equipment;
- Lathing the ceiling using bars or boards, which are fastened at a distance of 40-60 centimeters from each other. To create lathing, wooden products with a cross section of 40x40, 50x50, 40x100, etc. are suitable. The width of the bars, slats or boards depends on the thickness of the insulation layer;
- A waterproofing film is laid on the finished wooden sheathing and secured with self-tapping screws;
- Mineral wool is laid on the waterproofing and secured with a construction stapler;
- A vapor barrier layer is laid on the mineral wool.
When laying mineral wool, make sure that there are no cracks or gaps through which warm air will pass. Condensation will accumulate in such areas and the wood will begin to rot.
Today they produce special cotton insulation materials with foil. This material reflects back rather than transmitting or retaining heat. It is highly resistant to moisture and has a long service life. Mineral wool with foil is optimal for rooms with high humidity, for example, for insulating a bathhouse or sauna.
Finishing the ceiling in a wooden house
After insulating the ceiling from the inside, proceed to installing a false ceiling, plasterboard or wood panels, and then to finishing. The most popular finishing material is considered wooden lining. These are affordable and easy to install products that look harmonious and aesthetically pleasing. In addition, they are suitable for finishing both the ceiling and walls in any room (in the steam room, living room, on the terrace and balcony).

Using plaster is an affordable and simple method that gives a classic, smooth finish. white ceiling. But this color is rarely appropriate in a wooden house. For complex design solutions and two-level ceilings use plasterboard, which is highly durable.
Solid wood panels are 100% made from elite wood, so such materials are very expensive, strong and durable. The solid wood ceiling looks prestigious and solid. Veneer panels are much cheaper, but are not inferior in aesthetic qualities. You will find a variety color scheme products that will make the interior of your home luxurious and sophisticated.
Easiest installation finishing materials- when laying a relief false ceiling, since it is attached directly to the base. Such a ceiling will help create an original ornament or pattern and make the design unique.
Each expert will advise for finishing the ceiling in log or timber house use wood. It will preserve the environmental friendliness and atmosphere of a wooden house, fit harmoniously into the interior and create cozy atmosphere. Wood “breathes” and provides access to oxygen.

A wooden ceiling is indispensable for baths and saunas. Wood resists moisture and does not dry out, tolerates high temperatures and does not heat up. It has a healing effect and gives a pleasant forest aroma. Wood is easy to install and process. Using paints and varnishes you can give the surface any color and shade. At correct processing it will last for many years.
Not every material that is suitable for finishing the ceiling in a house can be used for finishing a bath. Such materials must withstand high humidity, sudden temperature changes and large amounts of steam. What to use for finishing a bath, read the link http://marisrub.ru/uslugi/vnutrennie-otdelochnye-raboty/otdelka-bani-ili-sauny.
Before any finishing, the ceiling in a wooden house must be insulated and good sound insulation. First, a rough ceiling or lining is constructed, which is insulated various materials. And only then do they begin installing the finishing decorative surface.
Insulation of the roof and ceiling is an important and responsible process. If the work is carried out correctly, the house will remain warm for a long time, and there will be a comfortable and favorable atmosphere inside. In addition, insulation will allow you to equip and furnish the attic space.
Experienced masters of “MariSrub” will help you choose suitable materials, quickly and reliably insulate the ceiling and carry out roof finishing work. They will install a rough version of the ceiling, lay insulation and soundproofing materials. They will install the finishing surface and complete painting, varnishing and surface treatment work.
blog.marisrub.ru
What material to choose for ceiling insulation
In wooden houses, ceilings are insulated in most cases:
- polystyrene foam;
- mineral wool;
- ecowool;
- polyurethane foam;
- sawdust;
- expanded clay and so on.

To successfully insulate a ceiling, certain calculations must be made, since the effectiveness of “insulation” will depend on the material itself, its thickness and quality. In addition, you should take into account the internal and external temperatures (minimum and maximum), the design of the ceiling and roof, including the heat transfer coefficients of each element. As a result of thermal engineering calculations, the thickness of the layers of thermal insulation materials is determined.

The ceiling in a wooden house can be insulated in two ways: from above (from the attic) and from below (from the room). You can do it in two ways at once, in which case it will be much warmer.
Insulation of the ceiling from below (from the inside)
This method of insulation is quite good, but its implementation is not possible if repairs have already been made, the ceiling and walls have been made. Therefore, you need to think about insulation in advance.
This method can be used when renovating rooms or building a house.

Ceiling insulation is convenient for finishing plastic panels, plasterboard, slatted ceiling or other type of ceiling mounted on a frame base.
- Before installing the frame, be sure to thoroughly blow out all existing cracks with foam. If the cracks are quite large, they should be caulked and then blown out.
- Using a stapler, you need to attach a vapor barrier film (glassine) to the ceiling. As a result, the ceiling will be able to breathe, this will ensure the absence of condensation.
- Thermal insulation material should be laid in a way that is convenient. Can be in large or small pieces. The main thing is that the material is laid as tightly as possible - this will not allow cold air to pass through the cracks.
- After it is laid thermal insulation material You can begin installing the ceiling covering.
 Materials for insulating the ceiling from below
In a wooden house, it is best to use polystyrene foam, mineral wool or ecowool as insulation. These materials are quite good for work. But it is undesirable to use glass wool for work - it is not convenient for installation, and it is also harmful to health.
External methods of insulation
There are various methods of insulation, which differ both in cost and in the materials used. In general, the cost of work is largely determined by the choice of insulation.
Naturally, most people want to save money. Therefore, the cheapest materials are selected. However, such savings will not always be justified, because cheap materials may have certain disadvantages. However, it's up to you.
Insulation with sawdust
This is a simple and inexpensive option. Insulation with wood sawdust is a time-tested method.
You will need:
- dry sawdust of medium size;
- plastic film or glassine;
- cement in a ratio of one to ten;
- water.
 If there are very fine sawdust, more cement will be needed, which will reduce the effectiveness of thermal insulation. This will also apply fresh sawdust. It is best to take dry and medium ones so that there is no mold smell.

Styling:
- The surface should be prepared, it should be cleared of debris and unnecessary objects, and then covered with glassine. This will protect the sawdust from moisture from below. Instead of glassine, you can use polyethylene. The joints should be taped.
- The sawdust is thoroughly mixed with dry cement and water is added little by little. 20 buckets of shavings will require about 3 buckets of water.
- The resulting mixture should be evenly distributed over the ceiling, compacting it slightly with your feet. The layer should be about twenty centimeters. Such insulation should be carried out in the middle of summer, so that everything will dry out before the cold weather.
Insulation with expanded clay
Expanded clay is the best solution, because small pests and rodents do not like it, it is light, durable and does not rot. It also absorbs sounds well.
You will need:
- expanded clay;
- glassine;
- boards;
- scotch.
Styling:
- The surface should be prepared, it is cleared of debris, after which it is covered with glassine or film, secured to the beams. The joints should be taped.
- Expanded clay should be poured in a thick layer - at least 20 cm. If you live in cold regions, then the layer should be increased to 40 cm, but only if the ceilings are quite strong, since such a layer will weigh a lot.
- Expanded clay should be carefully covered with glassine. You can also use roofing felt, after which boards are laid on top.
Insulation with mineral wool
This method will be more expensive than the first two, but it will be more effective in terms of insulation.
You will need:
- vapor barrier film;
- polyurethane foam;
- mineral wool;
- stapler and tape;
- sand-cement mixture or boards.
 Styling:
- The surface should be prepared, it should be cleared of debris, and then covered with a vapor barrier layer. The joints should be taped, and the edges should be secured to wooden floors. The ceilings should also be under the film.
- Then you need to lay the strips or slabs tightly mineral wool, however, there is no need to compact them. In order for the insulation efficiency to be higher, it should be laid in two layers, with the top layer covering the joints of the bottom one.
- Existing cracks and gaps should be blown out with foam. Then all this needs to be covered with film. You can lay boards on top or screed.
 Ceiling insulation can also be done using polystyrene foam or polystyrene foam. The installation of such materials is identical to insulation with mineral wool.
You can also combine these materials for better thermal insulation. The insulation of the ceiling should then be done as follows: after the vapor barrier layer, sheets of foam plastic should be laid. Existing cracks need to be blown out with foam, after which layers of mineral wool need to be laid. The remaining actions are carried out according to the method described above.
hozayindoma.ru
Materials for ceiling insulation work
Today, the following materials can be used to insulate ceilings:
- Expanded clay is a lightweight, durable, fire-resistant material that retains heat well and has excellent sound insulation properties.
- Sawdust is an environmentally friendly and inexpensive material.
- Polystyrene foam is one of the best options for ceiling insulation, which has a large number of positive characteristics.
- Mineral wool is lightweight, non-toxic, but costs much more than other insulation materials.
- Ecowool is a high-quality but expensive material.
- Clay – has excellent thermal insulation properties.
Each of the listed materials has its own advantages and disadvantages. If you need insulation for the ceiling in a wooden house, but you don’t know what kind would be better suited For your situation, do not rush to buy the most expensive material. To begin, carefully study the information provided.
Insulation of ceilings from the inside
The main disadvantage of the presented method of insulating ceilings is the fact that you have to fix all the elements above your head, and this is a very inconvenient position.
Important point! If the house has already been renovated, then the presented method will not be relevant for you. Experienced specialists recommend insulating ceilings at the stage of interior work, during the construction of a house (or during major renovations).
The sequence of insulating ceilings from the inside:
- 1. If there are cracks in the ceiling, be sure to eliminate them using polyurethane foam. Large holes must first be caulked.
- 2. In order to prevent the appearance of condensation, you need to attach a vapor barrier film to the ceiling. To perform these works you need a construction stapler.
- 3. Next stage– laying thermal insulation material. Do this so that you are comfortable and the pieces of material fit tightly together, preventing warm air from leaking out.
- 4. Ceiling coverings are being installed.
The listed stages of insulation work are designed for the use of ecowool and glass wool. If you decide to use foam plastic (materials similar in structure), then after fixing the vapor barrier film, pieces of this material are glued to it, and another layer of film is applied on top.
The final stage of this work includes fixing the ceiling sheet or lining the ceiling with specially prepared boards. Pay attention to the fact that industry experts recommend insulating the ceiling in a room on both sides at the same time.
Sawdust - high-quality insulation?

For a more detailed analysis of the question of how to insulate a ceiling in a wooden house, it is necessary to consider the main methods of carrying out this work using different materials.
The use of wood sawdust for external insulation of ceilings has been time-tested.
This is an inexpensive and moderately effective method, which requires the following components:
- Water.
- Cement.
- Polyethylene or vapor barrier film.
- Dry sawdust ( optimal size- average).
The whole process consists of the following steps:
- 1. Prepare the surface: remove debris, seal the cracks, and lay down the film.
- 2. A mixture of cement and sawdust is prepared. Water is added gradually.
- 3. The resulting mixture is laid (layer height 15-20 cm).
Here's a great video from a real home owner who decided to insulate his ceiling using sawdust. Look what he finally says:
Note! The above work should be carried out no later than July-August, so that the mixture of cement and sand dries well before the cold weather. The main disadvantage of the presented method is that the wood tends to rot, and the entire protective layer can be destroyed by rodents and insects.
Application of expanded clay

In many respects, the presented material is one of the best for use as a material that retains heat in the house.
It will not be eaten by mice or damaged by insects, it is designed for a long period of use, does not rot and has excellent sound insulation.
To install insulation, in addition to expanded clay, you will need:
- Drywall/Boards.
- Vapor barrier film.
- Scotch.
The entire process of installing insulating materials can be divided into the following stages:
- 1. Preparing the coating. The debris is removed, the joints are sealed, and the film is laid.
- 2. Expanded clay is poured. The height of the covering must be at least 20 cm.
- 3. Vapor barrier film and boards are laid on top.
By the way, here is a very revealing video in which a foreman with many years of experience share your thoughts about ceiling insulation using expanded clay:
Some owners wooden houses Expanded clay is laid so that its height is 30-50 cm. Of course, the thicker the protective layer, the better the heat will be retained, but do not forget about the loads on the floors. This amount of expanded clay has a decent weight; not every structure can support it.
Mineral wool

The nature and first stages of performing these works are the same as in the case of sawdust. After preparing the surface, cotton wool is laid, cracks and holes are blown out (large ones will definitely be caulked), and then the whole thing is covered with film. You can put boards on top or make a screed.
Some experts advise doing combined protection. To do this, lay the first layer of polystyrene foam (its analogues), and the second layer of mineral wool. Further steps are carried out according to the above scenario.
Ceiling insulation using clay

Today clay is the same popular material as it was a hundred years ago. Its main advantages are durability, reliability and the ability to retain heat well. Clay as insulation is used only together with sawdust.
After preparing the coating, a vapor barrier film is laid, onto which a solution of clay and wood sawdust is applied (layer thickness 10-15 cm). At first, it is necessary to monitor how the solution dries. All cracks must be sealed with clay.
Representatives of the older generation (especially villager) they still remember the times when clay mixed with straw was used as insulation. But today such a solution is practically not used.
Roll insulation
The process of insulating the ceiling of a wooden house in this case is slightly different from all of the above methods:
- 1. The first stage includes preparing the surface, driving nails into it (not completely) and zigzag tensioning the threads.
- 2. Rolls are laid.
- 3. The vapor barrier film is fixed.
- 4. The nails are driven all the way in to better press the insulation.
- 5. Boards or drywall are nailed on top.
Important point! If you work with roll insulation (mineral or glass wool), be sure to use protective clothing, glasses, gloves and a bandage for your nose and mouth to prevent harmful particles from getting on your skin, eyes, nose, etc.

Carrying out this work, be sure to make sure that there are no gaps anywhere.
If you decide to insulate the ceiling, be sure to study the tips provided by professionals.
- Before starting work on ceiling insulation, be sure to check the condition of the roof. If there are gaps, cracks, etc., first eliminate them, and only then proceed to insulate the ceiling.
- If you decide to insulate the ceiling from the inside, combine this work with renovations in the room.
- Do not try to fill large cracks with foam alone; first caulk them.
- For internal insulation of the ceiling, it is quite enough to use polystyrene foam, the thickness of which does not exceed 5 cm.
- Laying roll materials must be carried out by two people, even experienced specialist will not be able to hold the threads and insert the cotton at the same time.
- When carrying out work on insulating ceilings, always try to lay the material so that the joints overlap and the cracks are closed.
This article explains in detail how to properly insulate a ceiling in a wooden house so that the work done is of high quality and effective. If you have carefully studied the information presented, then you will not have any serious problems in the process of insulating ceilings.
Insulating the ceiling in a house allows you to solve two important problems: improve the thermal insulation of the home and its sound insulation. In order for the efficiency of this work to be maximum, it is necessary to properly insulate such a ceiling. When solving this issue, there are several options for insulation with various thermal insulation materials. In each specific case, you need to choose the one that will best solve the problem with the least financial and time costs.
Option I. Insulation with sawdust
The advantages of this insulation option are that sawdust is a very affordable insulation material that is inexpensive. Therefore, when the problem arises “What is the best way to insulate the ceiling in a wooden house?”, then the solution using sawdust is one of the most common. Insulation is performed using sawdust-cement mortar. Let us consider in detail the process of performing such work.
Preparation of materials
- Purchase sheet glassine. Its amount should be equal to the surface area of the ceiling.
- Sawdust - several bags. It is easy to calculate the required amount of this material. It is necessary to divide the entire ceiling area by 5. As a result, we obtain a number that is the volume of the filler, i.e. sawdust. Requirements for the quality of sawdust used as insulation:
— the larger the fraction of sawdust, the less cement will be needed. Therefore, insulation will be inexpensive in terms of financial costs. In addition, the more cement in such a solution, the worse its thermal insulation properties.
- dry to the touch;
— complete absence of mold smell;
- they must be mature in time (they must be at least a year old); - Cement - several bags. Calculating this value is also easy. It is taken with water in the proportion of one part cement to 10 parts water. And water is taken at the rate of one and a half buckets of water per 10 buckets of sawdust. Water must be taken in exactly the specified proportion so that the solution does not turn out to be too wet. This may affect the drying time of the solution. In the hot season, extra warm moisture– a source of proliferation of fungi and microorganisms.
- An important point in the question of how to properly insulate a wooden ceiling is the choice of the time of year when this work is carried out. They need to be done in such a way that by autumn all the solution has evaporated. excess moisture, located in it.

Mortar laying technology
- We spread the waterproofing material over the entire area of the ceiling surface.
- Mix this mixture according to specified proportions so that it turns gray.
- Sprinkle the resulting solution evenly over the entire surface.
- We compact the resulting layer of thermal insulation. For this purpose, you can simply walk around the resulting surface. You can perform the compaction process with a special construction tamper (it is better if its platform is wooden). But the effort required is small, considering that this is the ceiling of a house, and not a concrete path on the street.
- After this solution has hardened, characteristic feature when it is ready, there will be a slight crunch when pressed.
- It should be noted that this method is used if there is free access to the ceiling from above. If there is no possibility of free movement along the ceiling surface, then it is necessary to perform insulation from the inside of the room.

Option II. Use of roll materials
Features of working with these materials
When the question arises about how to properly insulate the ceiling in a wooden house using other methods, one immediately thinks of roll insulation. These include glass wool, mineral construction wool and others lightweight technological insulation.
Significant disadvantages of these materials are irritation on human skin from contact with them. And if a person is prone to allergies, this can become a significant factor in its manifestation. In addition to skin irritation, these tiny particles get into your eyes and mouth. When performing such work with these materials, you need to protect yourself with very thick clothing, a respirator and safety glasses.
Technology for laying roll insulation
- An anti-condensation film must be attached to the ceiling. You can use glassine as it. For greater security, you can additionally use plastic film. If this operation is not performed, the glass wool or mineral wool may become significantly wet from condensation, which will negatively affect the thermal insulation. In addition, moisture can become a source of fungal rot on a wooden ceiling.
- Nails are driven into the ceiling so that the head of the nail is not driven into the surface of the ceiling.
- Using these nails, the threads are pulled in a zigzag manner. Hats help these threads not to come off. The purpose of the thread is to hold the unfolded roll material in a fixed position.
- Lay out the insulation in this way: lift the thread, lay the insulation in the space between the ceiling and the thread. The work needs to be done by two people: one person lays out the material, and the second pulls the thread at this time. It is not recommended for one person to perform such work.
- The nails are driven deeper to clearly fix the insulating layer.

Insulating the ceiling from inside the house
Ceiling insulation from inside the house is most often done using foam boards. In this case, slabs of this material with a thickness of 5-10 cm are used. This material is convenient for such work because it can be easily cut with a knife.
Therefore, individual strips that are not solid slabs can easily be glued to a wooden surface in places where it is not possible to lay a solid sheet. You can use special construction adhesives for this, for example the famous “Dragon”.
Insulation technology from the inside

One of the disadvantages of such insulation from inside the room is the loss of room height. But you can come to terms with this, realizing that you have done a very important useful thing to preserve heat in the house. Considering how relevant the topic of paying for heat is, we can understand that a loss of height of 5-6 cm is a minor disadvantage of such work.
In the harsh Russian winters, the problem of high-quality insulation at home is a matter of, if not survival, then at least the comfort of life and health of your family members. In a “cold” cottage without any thermal insulation, heating costs will break all imaginable records, and colds will become the norm for its residents.
But this will not happen if you do good insulation of the walls, floors and ceilings in the house. This is especially true for ceilings - heated air always tends upward, and if it does not meet a barrier on its way in the form of a layer of thermal insulation material, it will simply go outside. And you will end up with condensation on the ceiling and b O higher heating costs.
The quality of ceiling insulation greatly depends on what material is used and how competently its installation was carried out. And at this moment the owner is faced with the question: what to choose? Today, there are many types of insulation on the building materials market, and each of them is presented as the best in its segment. This article should help you in solving the problem of choosing thermal insulation materials; it will tell you about their features, installation methods, advantages and disadvantages.
Methods for insulating the ceiling
First, you need to talk about ways to insulate the ceiling. In our case it will be the ceiling last floor, above which there is only the attic and the roof - it is through it that the main heat losses occur.
The first method of insulation is external. If you do not plan to make an attic under the roof, then this method is suitable for you. A frame is mounted on the attic floor using wooden beams and boards, inner space which is filled with thermal insulation material. The design of the frame depends on what kind of insulation you use.

If you want to build an attic or a small warehouse in the attic, then you should insulate the ceiling from the inside. In this case, in the rooms of the top floor, the above-mentioned frame is formed on the ceilings, secured with dowels and nails. After laying the thermal insulation material, it is covered with plasterboard, plastic panels or clapboard. This method of insulation is very labor-intensive and also reduces the height of the living space. Therefore, at the stage of building a house, you should take this point into account and make the walls of the last floor a little higher.

Advice! A layer of vapor barrier should be laid between the insulation and the ceiling, otherwise the moisture rising with the air will be absorbed by the insulation, which will significantly deteriorate its properties. In addition, dampness under the roof is not in the best possible way affects the strength of the rafters.
Insulation of ceilings in a house with mineral wool
Mineral wool is a fibrous heat insulator produced in the form of rolls or slabs. The composition of the material is determined by GOST R 52953-2008, and there are three types of mineral wool - stone, slag and glass (better known as glass wool). Let's take a closer look at them.
Prices for mineral wool
mineral wool
GOST R 52953-2008 “Heat-insulating materials and products. Terms and Definitions"
Stone wool is made from various rocks, such as diabase or gabbro, and also contains clay, limestone, dolomite and a binder containing formaldehyde resins. The average thermal conductivity coefficient of stone wool is 0.08-0.12 W/(mK). In our case, the lower its value, the more suitable the material is for the role of insulation.
Important! One of the biggest disadvantages of mineral wool is that it may contain substances that, when heated, release phenols into the air, which are dangerous to humans. There have been discussions and debates around this issue for a long time. The safest is considered to be basalt wool, which contains a minimal amount of potential harmful substances.
Unlike stone, slag wool is made from blast furnace slag and other metallurgical waste. The thermal conductivity coefficient averages 0.47 W/(mK), which, combined with its high hygroscopicity (the ability to absorb moisture), makes slag wool an unsuitable material for insulating ceilings. In addition, it has residual acidity, so it should be kept away from metal pipes, beams and other products.

Glass wool ranks first in terms of thermal insulation quality among mineral wools - 0.03 W/(mK). It is also distinguished by a very low price. The disadvantages include the fact that particles of this material can cause harm to humans if they get on the skin, eyes or lungs. But this is, to one degree or another, characteristic of all types of mineral wool, therefore, when working with them, it is necessary to wear gloves, safety glasses, a respirator mask and closed work clothes.
The main advantage of all types of mineral wool is that this material is very convenient for transportation, carrying and installation, as it is light in weight. In addition, it is non-flammable and at very high temperatures can only sinter (while losing its thermal insulation properties). And it is especially important for country houses that mineral wool is not an attractive place for rodents, insects, fungi or mold.
The most famous manufacturers of this material are the companies Isover, Ursa and Paroc. If quality is important to you, then when going to hardware store look for mineral wool from these companies. When choosing, also pay attention to the density of the material - the ceiling may not withstand samples of mineral wool that are too dense and heavy.
The insulation process should begin by determining the area of the ceiling, because first you need to calculate how much mineral wool, vapor and waterproofing films you will need. Next we will look at the technology external method ceiling insulation. If you require internal insulation, follow the same instructions, but swap the layers of hydro- and vapor barrier.
Glass wool prices
glass wool

Calculation of ceiling area
In addition to the insulation itself, you will need wooden boards or metallic profile, tools for cutting mineral wool, protective clothing and equipment (gloves, respirator and goggles) and fasteners.
- First, we lay a vapor barrier film on the floor of the attic, making sure that there are no breaks in it. The laying should be overlapped, the seams should be taped with special vapor barrier tape.
- On top of it we install a lathing made of wood or galvanized profile. The distance between the slats should be several - a couple of centimeters - less than the width of the sheet or roll of mineral wool. This way the insulation will fit more tightly. The height of the lathing should exceed the thickness of the thermal insulation layer by 1-2 centimeters in order to subsequently ensure air circulation between it and the waterproofing.
- We unpack the mineral wool and place it in the space between the slats. If the material is laid in several layers, the next layer should overlap the seams of the previous one.
- From above to the sheathing using furniture stapler We fix the waterproofing. In this case, as mentioned above, there should be a small space between it and the mineral wool for air circulation.

Foam insulation
Foam plastic is considered the second most popular after mineral wool. Foams are called polymer materials, consisting of cells filled with gas. That is why foam plastics perform well as a heat-insulating material. Of these, polystyrene foam and polyurethane foam can most often be found in everyday life. On average, the thermal conductivity coefficient of polystyrene foam is 0.041 W/(mK), which in terms of insulating qualities makes it similar to glass wool.

Like mineral wool, expanded polystyrene and polyurethane foam have low price and light weight. The latter property makes them convenient for transportation, storage and installation on the ceiling. However, polystyrene foam has a number of disadvantages that make it not the best choice for a residential building.
- Polystyrene foam burns well and at the same time emits many substances hazardous to humans. Moreover, they can be released even with slight heating.
- Mice can grow in the foam layer, but it is worth noting that it is not a breeding ground for insects or fungus.
- In a room whose ceiling is insulated with foam plastic, a “greenhouse effect” may occur.
There are two ways to install polystyrene foam - on a frame and with glue. The first is in many ways similar to mineral wool insulation, but when laying foam sheets between slats, “liquid nails” must be applied to their sides. And about installing this material using glue, you should tell us in more detail and step by step.
Prices for foam plastic
Styrofoam
- The surface on which the foam will be laid is thoroughly washed and cleaned of possible irregularities. If necessary, it can be primed.
- Glue is applied to the foam sheets (tile glue works well) and after waiting three minutes the sheet must be pressed to the surface of the attic or ceiling.
- Repeat the procedure with all other foam sheets.
- Apply a layer of reinforcing plaster to the sheets and lay a fiberglass mesh. After drying, the mesh is covered with another layer of plaster.

Penoizol as insulation
An alternative to polystyrene foam and polyurethane foam can be penoizol, which is a “liquid” foam. Thanks to special additives, it gets rid of the main disadvantages of its solid counterparts - attractiveness to rodents and flammability. The disadvantage of penoizol is that to apply it you need to call a team of workers with special equipment, and this can be quite expensive.

The technology of insulation using penoizol is simple: we lay a vapor barrier and fill the space between attic beams a layer of insulation to a thickness of 20-30 centimeters.
You can additionally lay a layer of roofing material on top and lay a plank floor.
The prefix “eco-” in the title of this material is not used for advertising purposes. Ecowool is truly an environmentally friendly material, as it consists of 80% natural cellulose. The remaining 20% are various additives, such as lingin, which gives the structure stickiness, or boric acid and antiseptics that protect ecowool from rotting, fungus and rodents. This material also contains fire retardants, thanks to which ecowool does not burn, but only smolders under the influence of flame and very high temperatures. Thermal conductivity of the material is 0.038 W/(mK).

There are two ways to insulate the ceiling using environmentally friendly cotton wool - dry and wet. In the first case, the material is placed in prepared “cells” of the ceiling, but its thermal insulation properties will be only 60-70% of the possible ones. The second method uses special equipment that moistens ecowool and sprays it under high pressure. When in contact with water, the insulation becomes sticky and adheres tightly to the surface of the ceiling or attic. The disadvantage of ecowool is precisely that for its “wet” application you will need special equipment and people who know how to work with it.
Let's consider the stages of insulating the ceiling using ecowool externally.
Prices for ecowool
- The surface of the ceiling is cleaned and leveled - it is necessary to get rid of dirt and construction debris.
- A lathing made of wooden beams is installed, similar to the lathing for laying mineral wool. If desired, you can skip this step, but then it will be impossible to use the attic.
- A layer of vapor barrier film is laid. If necessary, you can wrap the sheathing structure itself in it.
- Using a blowing machine, ecowool fills the space between the slats. Special attention should be given to the cracks and hard to reach places. The minimum layer of insulation should be 25 centimeters, but if you live in an area with very cold winters, then the thickness should be increased to 40-50 cm.
- A waterproofing film is laid over the ecowool, overlapping and with the seams secured using special tape.

Video - External attic insulation with ecowool
Ceiling insulation using expanded clay
Expanded clay is a bulk thermal insulation material, which is stones made of baked clay with a porous structure. It is very popular as floor insulation, but is also suitable for ceilings if their insulation is carried out externally. The thermal conductivity of expanded clay is 0.18 W/(mK). Due to its composition, this insulation does not burn, does not smolder or melt, does not emit harmful substances into the air and is unattractive to fungus or mice.
But at the same time, expanded clay is inferior in thermal insulation properties to foam plastic or mineral wool, and, moreover, is very dense and heavy material, therefore it can only be used for fairly strong ceilings that have support beams.

The technology for insulating the ceiling with expanded clay is as follows.

An alternative to expanded clay among bulk thermal insulators can be foam glass, also often called foam crumb. Its thermal conductivity is 0.08 W/(mK), which is more than two times less than expanded clay (we remind you that in the case of insulation, the lower this figure, the better).
Sawdust as insulation
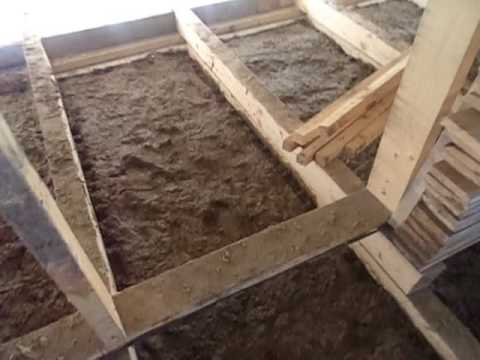
Finally, we come to a material that has been used as insulation for decades, even before foam and mineral wool were invented. This is sawdust. They can be used either independently, simply filling the attic with them, or as part of a mixture with clay or cement.
The only advantage of such insulation is its low cost - you can either use waste from your own construction, or go to the nearest sawmill and get the material for free or for a nominal price. But does the cheapness of sawdust outweigh all its disadvantages?
Prices for expanded clay
expanded clay
- Sawdust burns well, so when using it you should protect it metal boxes all electrical wiring in the attic. In addition, this material should not be used near a stove or fireplace chimney.
- Rodents, insects, or fungus may appear in sawdust, and without impregnation with an antiseptic, you will not be able to get rid of these problems.
- The material shrinks greatly over time, which significantly worsens its thermal insulation properties. In addition, you will have to regularly add fresh sawdust.
- With such insulation it is impossible to use the space under the roof - neither build an attic nor store old furniture and other things in the attic.

The cement-sawdust solution is prepared as follows: for 10 parts of sawdust of fine or medium fraction, take 1 part cement and 1 part lime. The substances are thoroughly mixed together until a dry mixture is formed. Then you need to take 5-10 parts of water mixed with a few tablespoons of copper sulfate. In our case, vitriol acts as an antiseptic that will prevent the sawdust insulation from rotting. Pour in the mixture and bring it to a homogeneous mass. Checking whether it is ready is quite simple: take the cement-sawdust mixture and squeeze it in your fist. If no water drips from it, then it is ready.

Next, you need to prepare the attic for insulation. To do this you need to lay vapor barrier material and process everything wooden elements structures with fire retardant (impregnation that protects against combustion). After this, you need to lay out the cement-sawdust mixture, level it and leave it for a couple of weeks so that it dries completely.
Important! If necessary, cement can be replaced with clay. Also remember that when drying, cracks may appear in the cement-sawdust insulation. They need to be sealed using the same mixture.
Bottom line
This concludes the review of materials for thermal insulation of the ceiling in the house. Now, after weighing all the pros and cons, you can choose the most suitable insulation for you. Below is a table designed to compare the characteristics of thermal insulation materials.
Table. Comparison of the main parameters of popular insulation materials.
| Name | Density, kg/m3 | Thermal conductivity coefficient, W/(mK) | Flammability |
|---|---|---|---|
| Glass wool | 200 | 0,03 | Doesn't burn, melts |
| Basalt wool | From 75 to 200, depending on the brand | 0,12 | Doesn't burn, melts |
| Styrofoam | From 40 to 150 | 0,041 | Burns, releases hazardous substances |
| You can additionally lay a layer of roofing material on top and lay a plank floor. | From 40 to 75 | 0,038 | Doesn't burn, melts |
| Expanded clay | From 800 to 1200 | 0,18 | Does not burn |
| Sawdust | From 200 to 400 | 0,08 | Burning |
Don't want to breathe phenols and are you a fan of environmental cleanliness? Then you should opt for ecowool, but you will have to consider the costs of hiring a specialist who will insulate the ceiling using this material. The most optimal in terms of cost, ease of installation, safety and thermal insulation properties is mineral wool, while it is worth highlighting basalt wool separately as containing the least amount of harmful substances and having the most wide range permissible temperature. The cheapest options would be sawdust or expanded clay. Polystyrene foam is relatively inexpensive and has good thermal insulation, but the substances it releases can be dangerous.
Video - What is the best way to insulate the ceiling of a private house? Comparison of options
A dwelling made of wood is the warmest and most comfortable for human habitation. To ensure comfort, the ceiling in a wooden house is insulated. This allows you to retain heat from heating devices and serves as a barrier to the penetration of cold air from the outside. You can perform the operation yourself. It is important to study the process technology, strictly follow it when performing work, and choose the right insulation.
Choice of insulation
Sawdust as external insulation from the attic side
When choosing a material for insulating a wooden ceiling, you should decide how the material will be laid - outside or inside. External thermal insulation involves placing insulation in the attic. In this case, you can use bulk materials - sawdust or expanded clay, as well as mineral wool, glass wool. Rolled fabrics or sheets of foam plastic are suitable for lining the ceiling from the inside.
Sawdust
The cheapest and most accessible insulation is sawdust. They are pre-mixed with cement and diluted with water in a ratio of 1:10. The resulting mixture is applied to the surface to be insulated. To obtain high-quality insulation, sawdust must meet the following requirements:
- good drying;
- absence of mold and foreign odors;
- age at least one year;
- medium sized pieces.
Sawdust is used to insulate the ceiling from above. Before applying the mixture to the surface, you need to lay a layer of waterproofing made of roofing felt or plastic film.
Mineral wool

You need to wear a mask when working with glass fiber mineral wool.
For thermal insulation of the ceiling, mineral (stone) wool is used. It's loose soft material, consists of thin fibers, between them there are air cavities that ensure heat retention. Mineral wool should not be compacted during installation so as not to disturb the air gap.
To insulate the attic ceiling, it is convenient to use insulation in mats. It is laid between the roof rafters and secured to the sheathing with wide-headed nails. The thickness of the insulation layer is preliminarily determined using thermal engineering calculations. In addition to thermal protection, the insulation provides sound insulation.
Mineral wool has a long service life, but requires a thick layer to protect against the cold. Disadvantages include its high hygroscopicity, which requires a reliable waterproofing layer.
Roll insulation

Stone wool in a roll is absolutely safe to use
As roll insulation use mineral or glass wool. They have a low density, which makes them soft and easy to roll. Stone wool is a non-flammable material - it does not support combustion and does not cause smoke.
Glass wool is an insulation material that consists of glass threads tangled in a chaotic manner. Requires body and respiratory protection when working with it. This is a light, elastic fiber, fire resistant. High quality have materials from German manufacturers.
Ecowool is made from cellulose, has a beautiful light gray color, and is used for finishing the ceiling.
Styrofoam
To properly insulate the ceiling in a wooden house, you should pay attention to polystyrene foam. This one is porous synthetic material It is light weight, retains heat well, and is waterproof. Available in the form of rectangular plates various sizes and thickness. They are easy to install and can have decorative coating, which eliminates additional ceiling finishing. Used for thermal insulation indoors and outdoors.
Clay insulation
The weight of clay is quite large, it is necessary to calculate the amount per square meter
To the advantages of natural natural material include its environmental friendliness, plasticity, low thermal conductivity, ease of use. The clay is mixed with sawdust, and the resulting mass is applied to the ceiling surface covered with a water-repellent film. As the clay dries, cracks appear and are immediately covered up. A layer of 15 cm is sufficient to retain heat.
Self-insulation
How the ceiling insulation in a house will be carried out depends on its design features, insulation material and the wishes of the owner.
Insulation of the ceiling from the outside

The slabs are laid end-to-end on a layer of vapor-proof film
The process is similar to floor insulation. The insulation is placed along the attic floor between the joists. For example, we can consider laying mineral wool. Work order:
- A vapor barrier film is laid between the joists and on them, and secured with a construction stapler.
- Mineral wool mats are placed tightly between the lags, having previously been cut into plates of the required size.
- Lay out a layer of waterproofing from sheets of roofing felt. A gap of 2-3 cm is left between the roofing felt and the surface of the insulation. The waterproofing is nailed to the joists.
- If the attic will be used, make a floor covering from boards, chipboard sheets or plywood.
Expanded clay is used for thermal insulation. He has positive traits: does not burn, environmentally friendly, not damaged by rodents and insects, does not become moldy. It is poured in a layer of 20-25 cm. A thicker layer puts a greater load on the ceiling, a smaller one will not provide sufficient thermal protection.
Insulation of the ceiling with polystyrene foam is carried out using the same method as with mineral wool. The advantages are ease of installation, does not absorb moisture, and absence of dust and dirt during installation. Light weight does not increase the load on the floor. Do not step on the foam; boards or plywood are laid over the joists.
Insulation of the ceiling from the inside

WITH inside when insulating with mineral wool, a vapor-proof film is also placed
If it is necessary to insulate the ceiling from the inside of the room, you need to take into account that its height will decrease by the thickness of the thermal insulation layer. Warm air coming into contact with a cold ceiling forms condensation. First, you need to apply a layer of vapor barrier to prevent moisture from entering the wooden surfaces. After laying the insulation, it is also insulated from steam.
Materials for vapor barrier must be non-flammable, not emit harmful substances, and protect the ceiling from damp fumes. Vapor insulation ensures a comfortable indoor climate and protects building structures.
For vapor barrier, polyethylene film, foil-coated polyethylene, and polypropylene are used. The coating is made continuous, individual sheets of film are laid with an overlap of 150 mm.
The procedure for performing work on installing thermal insulation for the ceiling:
- Vapor barrier made of roofing felt or polyethylene film. Can be secured with glue.
- Fasten the mounting rail with self-tapping screws.
- Foam plastic is installed between the slats. Using roll material it is rolled out onto the surface and glued.
- Lay a second layer of vapor barrier.
- Mask the thermal insulation cake finishing panels made of PVC, plasterboard or clapboard.
- Drywall is painted with acrylic paints.
Use mineral wool for internal insulation Not recommended. To obtain the desired effect, it is necessary to lay a thick layer of it, which significantly reduces the height of the room.
Preparatory work

The bark beetle infests wood if left untreated.
To obtain a high-quality thermal insulation coating, the base is carefully prepared. The first step is to remove any remaining construction debris, dirt, wash off dust and dry the ceiling. The gaps between the boards are sealed with sealant. If they are small, use wood putty.
Wood is susceptible to harmful insects, mold and mildew. To protect wood, impregnations and fire retardant primers are used. Coat thoroughly, leaving no gaps.
Possible mistakes
When thermally insulating a wooden house on their own, people who do not have experience in construction make a number of mistakes that can significantly affect the initial result. One of the important ones is insufficient protection of the structure from moisture, lack of vapor barrier and waterproofing.
The second mistake is the high load on the floor structure caused by the use of heavy materials. This causes deformation and sagging of the ceiling, threatening its collapse. Strengthening the ceiling is expensive and causes inconvenience when living in such a room.