Is there anything in this world comparable to the pleasure that comes from spending a few hours with family and friends in your own steam room? A real chopped bathhouse built with my own hands, is the pride of any owner. In this article we will briefly tell you about the basics of building a chopped bathhouse with your own hands at all its stages: foundation, choice of wood, lower crown, walls, roof, floor and several typical options layouts.
Foundation for a chopped bathhouse

Construction work begins with studying the site, carrying out all necessary calculations and bath design. In our case, given that this will be a log house, a simple preliminary design, in which the main parameters of the future building will be entered. As soon as the size and shape of the structure are indicated, the exact location for the bathhouse on the site is determined, you can begin to build the foundation.
Everyone knows the appearance of a strip foundation - these are concrete strips on which they rest load-bearing walls. The base of the strip foundation should be 10 cm wider than the wall - this will be more reliable and stable.
First you need to mark the area:
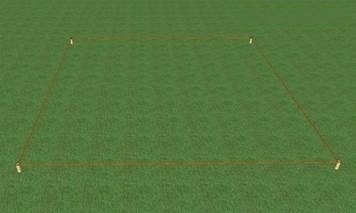
Clear the area of debris, mark the place where the first corner of the building will be located, drive a peg and mark it with a triangle or any other way. On one side of the mark, measure the length that, according to our calculations, the longitudinal wall of the structure has. On the other side, measure a distance equal to the transverse wall in the center lines. Having determined the points where the walls will end, drive in the second and third pegs. Calculate the place opposite the first corner of the bathhouse, drive another peg there and move the triangle. Ideally, you should get a rectangle, the difference between the diagonals of which does not exceed 2 cm.
After marking, we begin digging a trench. If the soil on your site is sandy, then it is enough to dig a ditch 50-60 cm deep, if the soil is clay, you can deepen the ditch. After you have dug a trench, you need to surround it with an edged board, strengthening the edges - this will be formwork. As a rule, for such work they use edged board with a section of 150 by 25 mm. When installing, please note: the height of the formwork must exceed the height of the foundation by 10-15 cm. When wet or clay soil It’s better to prepare a good sand cushion.
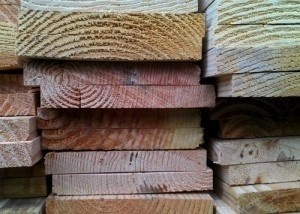
Edged board – best option for formwork: for this material Smooth surface, which allows you to significantly reduce the costs of subsequent front finishing of the finished foundation.
Wood selection
Properly selected wood is half the success. As a rule, log baths are built from deciduous and coniferous species, distinctive feature which are strength and moisture resistance. It can be larch, pine, spruce or oak. For the construction of a bathhouse, it is recommended to choose well-dried logs with a diameter of 200x250 mm. Wood moisture content should be within 10%. More 100% sauna timber to choose from
The basis of a chopped bath: we install the lower crown
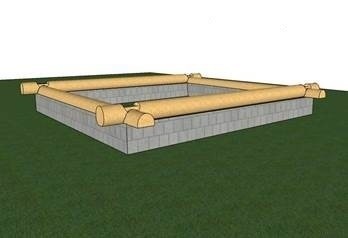
Lower crown stands on a foundation, in close proximity to the ground and gets wet more than other crowns during precipitation. Before laying the first, lower crown, it is necessary to waterproof the foundation to prevent the walls in the lower part of the building from getting wet. To do this, it is enough to lay 2 or 3 layers of bitumen waterproofing material between the foundation and the logs.
The lower crown, which is called the frame, is made from thick logs. For greater reliability and durability of the structure, the frame is often made from a species that is highly resistant to rot and moisture - larch or oak.
The first crown can be laid in one of the two ways described below.
- First way. Two logs are placed on the foundation parallel to each other, having previously cut off 4-5 cm from each for a tight fit. Insulation is laid between the log and the waterproofing - it can be tow, jute or moss. Two more logs are also laid parallel to each other on the two free sides, strengthening them on the first hewn logs.

Advantage: the logs undergo minimal processing and remain intact, if you do not take into account the removal of 4-5 cm, which makes the flashing durable and strong.
Disadvantage: appearance too large cracks between the foundation and logs that need to be sealed with bars, bricks or log particles. Alternatively, you can pour a foundation with different levels of perpendicular sides.

- Second way. Four logs are selected for the crown. Two of them are cut off by half, the remaining two - by 4-5 cm. With this installation, there are no gaps between the crown and the foundation. At the joints, the logs are connected using the method corner connection"in a state of rage."
Advantage: no gaps and tight fit to the foundation.
Disadvantage: part of the log is removed, which violates its integrity and makes the wood less durable.

Important: To reduce the risk of rotting of the bottom crown, that part of the hewn logs that comes into contact with waterproofing materials, before installation it is advisable to treat with an antiseptic.
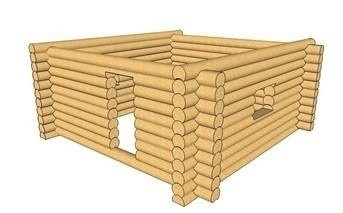
Walling
As soon as the lower crown is ready, you can start building the walls - you need to lay the logs horizontally, forming the crowns. At this stage you should Special attention pay attention to the corner connection of the walls, on which the solidity of the entire building depends.
Types of corner joints of logs
There are two ways to connect logs - a corner with a remainder and a corner without a remainder.
Angle with remainder - logs are connected in such a way that when connected they protrude beyond the walls of the structure by 20-30 cm.
Advantage: easy to manufacture, does not require additional insulation and practically not blown through.
Disadvantage: material consumption is 10% more than with the “corner without residue” method.
Angle without rest: logs are connected to each other with wooden locks cut at the ends. In this case, the remains of the logs do not protrude beyond the walls of the building.
Advantage: aesthetics.
Disadvantage: high labor costs and the need to additionally insulate the walls from the outside. In addition, if the logs are not held together with dowels when joining “without remainder”, then the log house will be less stable.

There are many types of corner joints with a remainder, but the two most common methods are:
Angle angle: in our case, this type of notch was used when laying the lower crown. In the upper and lower logs, recesses of the same size are selected, into which the logs then go. This method is rarely used nowadays, because it is too difficult and time-consuming to adjust the size of the recesses and make the joints airtight. As a rule, logs are connected “in a circle” if it is necessary for all the tops of the crown to be located in the same plane.

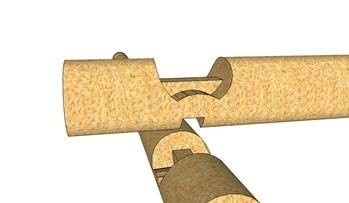
Bowl angle: simple and practical way, used in the construction of walls, which even an amateur can master. The top log fits into a recess in the bottom log, cut into a bowl that replicates the seat of the incoming log.
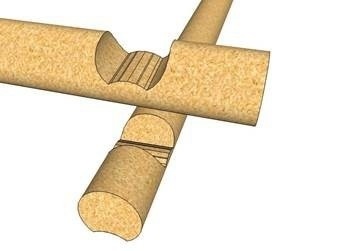
The most suitable option for a bathhouse is considered to be cutting into a bowl “in the tail”: a protrusion is left at the base of the bowl along the lower log, and a recess is selected in the upper log that is suitable in size to the protrusion.
Formation of walls
Having chosen one of the corner connection methods, you can begin to form the walls of the bathhouse, horizontally laying the crowns in the desired sequence. The grooves formed during installation between the crowns are filled with insulation. Traditionally, tow or moss is used for these purposes.
During the assembly process, you need to mark out places for windows and doors in the walls. Crowns can be made from individual pieces of logs or simply sawed logs in the designated places. It is advisable to do this right away, because if you cut out the windows later, the logs may become stuck, the partitions will drop and large gaps will appear between the covering log and the upper level of the partitions. When the frame is installed, you need to cut openings for the door and windows in the designated places using a chainsaw.
Important: windows and doors must be floating so as not to interfere with the natural changes in the dimensions of the log house during shrinkage. To do this, spikes are formed in the lower and side parts of the opening, 6-8 cm wide and 4-5 cm high. Windows and doors are installed in door and window frames.
Roof for a bath
The optimal solution for chopped bath- a gable roof, which, although it will cost more than a single-pitch roof, will look more neat. Under the roof you can arrange a room for storing bath accessories and drying brooms. 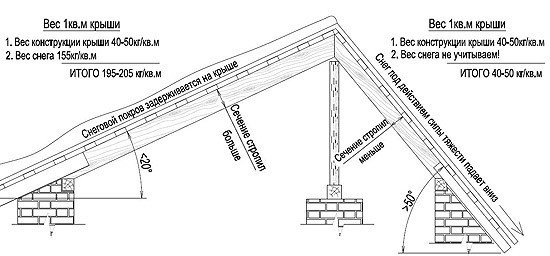
The figure shows that the greater the angle of inclination of the slope, the less load it is subjected to during snowfalls.
As a roofing material, you can choose roofing felt, slate, ondulin, corrugated sheets, and metal tiles. Any material within the financial capabilities of the bathhouse owner will do. The angle of inclination is selected depending on the selected roofing material.
Floor in a chopped bath
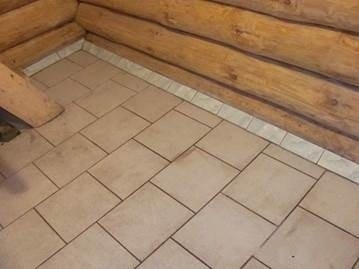
Wide choose modern materials allows you to make the floor not from wood, but from more durable and moisture-resistant materials. The wooden floor quickly gets wet and dries slowly, as a result of which the process of rotting begins, and unpleasant odors and microbes, which is harmful to health.
The best option for a bathhouse is a concrete floor covered with tiles.
Please note that the floor is made only after the installation of the sewer system.
Layout of a chopped bath
At the design stage, it is necessary to designate which rooms will be in the bathhouse and how to rationally distribute the total area between them.
As a rule, a bathhouse includes several rooms:
Tambour, optimal area 1 m2: the main function of the vestibule is to prevent moist or frosty street air from getting inside, otherwise condensation will freeze on the front door and it will be impossible to open it;
Locker room or rest room: according to the recommendations, the standard locker room area is determined at the rate of 2-4 m2 per person, if built small sauna for 4-6 people, it is enough to allocate 8-10 m2 for this room;
Washing room: according to the standards, 2.7 m2 per person is allocated for this room, some owners combine a washing room and a steam room;
Steam room: according to the standards, 2-3 m2 are allocated per person to make it comfortable to steam; the area can be calculated with some margin.
Video on building a bathhouse with your own hands
And finally, a useful video:
We also recommend:
If previously bathhouses were built exclusively from wood, today other materials have appeared (brick, aerated concrete), despite this, wood is the classic and most popular material. A log bathhouse helps create a special atmosphere typical of a traditional one.
Russian log sauna: advantages
Most people prefer to build a sauna from a log with their own hands, since this material has a number of advantages:
- environmental friendliness. For a trip to the steam room to bring maximum benefits, it needs to be built from natural and environmentally friendly materials. pure materials, which is a tree;
- special aroma. When heated, the wood emits a pleasant and healthy aroma, which makes the process of visiting the bathhouse healthy and enjoyable;
- saving. The process of manufacturing and preparing materials is quite simple, and therefore the price is low;
- high thermal insulation. Wood retains heat well, which is important for a bathhouse;
- good ventilation. Logs allow steam and air to pass through, keeping the room warm;
- aesthetics. Wooden buildings they look neat and cozy, they fit perfectly into any exterior;
- long service life. Wooden buildings are different high level reliability, if you follow the rules, you will get a building that will serve you for many years.

Log sauna: disadvantages
- fire hazard. Wood burns, unlike brick or aerated concrete, so it must be treated with special means;
- shrinkage. Within six months after construction it is impossible to carry out Finishing work, in contrast to which has minimal shrinkage;
- need for careful care. Wood is susceptible to rotting, so it must be treated with means that will protect it from the effects of the external environment;
- difficulty of assembly. Building a sauna with your own hands from a log is quite difficult, so if you do not have sufficient skills, it is better to entrust the work to professionals.

Log sauna: step-by-step instructions
To build a bathhouse, you need to follow a certain order.
Stage 1. Selection of material
The first step is to choose the type of wood from which you plan to build a log bathhouse. As a rule, pine is used. This material has a low price, it is durable, reliable and resistant to temperature changes and moisture. Less popular options are spruce, cedar, and larch.
It is better to choose logs cut in winter, as they will have good moisture resistance. The diameter of the logs is 180-250 mm. Please note that the difference between them should not exceed 30 mm; if this condition is violated, the building will end up with cracks.
It should also be taken into account that the same type of tree may differ in its density if the trees were grown in different climatic conditions.
When purchasing or procuring materials for building a log sauna with your own hands, it is important to pay attention to a number of points:
- they should be even. It is permissible to change the thickness by 10 mm per meter of length, no more;
- The presence of blue spots is unacceptable. They are signs of decay;
- the core should have a uniform dark shade;
- there should be no resin pockets;
- Gaps in the branches are unacceptable, since they are signs of a rotten core.
Rounded logs are an excellent option for building a bathhouse. In production, they are leveled along their entire length and coated with an antiseptic that protects them from rotting. The log has grooves for laying, which simplifies the process of assembling the log house.

Stage 2. Drafting
Design is an important part of construction. You can do the project yourself, find it on the Internet ready-made option or turn to professionals. Decide on the place where you will build, the size of the structure, the location of windows and doors, the arrangement of furniture, the placement of electrical wiring and sewerage.
A correctly drawn up project will facilitate the construction process.
Stage 3. Construction of the foundation
When we build a bathhouse from logs or any other material, we always need to pay special attention to the foundation. It directly affects the reliability of the entire structure. To choose the type of foundation you need to pay attention to the soil.
If it is clayey, swampy or forested, then a strip foundation is suitable. For buildings on a slope, it is better to choose a screw or pile one. It is also possible to install a columnar foundation.
After erecting the foundation, it is necessary to lay a layer of waterproofing; usually roofing felt is used for these purposes.

Stage 4. Construction of walls
The construction of a log bathhouse begins with the installation of a “mortgage crown”. It is recommended to use the thickest logs for it. First, two logs must be placed strictly parallel to each other on different sides of the future building. Then you need to lay two logs perpendicularly into the grooves.
The following crowns are laid out similarly.

Currently available for purchase ready-made baths. They are made in production, then assembled, quality checked, and then disassembled again. Such logs are packaged and numbered, and then sold complete with assembly instructions. In this case, making a sauna from logs will be much easier and faster.
Below is how to build a log sauna. Video:
When assembling a bathhouse from a log with your own hands is completed, you need to wait until the logs dry, and then move on to the next stage.
Stage 5. Caulking the walls
For caulking, you can use flax, jute, and wool felt. The process of sealing cracks should begin with the lowest rows, gradually moving upward. To do this, spread the canvas across the groove and hammer it inside with a special spatula. It is necessary to caulk the corners of the room especially carefully.
Caulking of the walls must be done strictly along the perimeter; you cannot treat each wall one by one. This may lead to misalignment.

Stage 6. Roof installation
The roof is usually made of slate or ondulin, the latter has certain advantages: it is lighter, which simplifies installation, and also has a longer service life.

Stage 7. Installation of windows and doors
After assembling the log house, you need to make openings for windows and doors. For safety reasons, doors must open outward. It's better to choose wooden windows and doors, since plastic when heated can release harmful substances.

Stage 8. Finishing work
Finishing of a log bath should be carried out six months after completion of construction. Typically, lining is used for interior decoration of bathhouses - a material that is a leader in this area.
At the same stage, the stove is installed, the necessary communications, electricity, etc. are installed.
The finishing touch is the installation of furniture.

DIY log sauna: photo


Construction of a bathhouse from a log: video
Do you want to build a bathhouse, but don’t know what material is best to use to realize your idea? Then be sure to pay attention to the timber. A bathhouse made from this material will be environmentally friendly, reliable and durable. At the same time, you can handle the construction of such a structure with your own hands.
IN self-construction Bathhouses made from timber are absolutely nothing complicated. This material has many advantages over its closest analogue - rounded logs (logs). Among the main advantages of timber, the following points should be noted:


However, in order for a bathhouse made of timber to fully demonstrate all its advantages and serve for the longest possible period of time, you must approach the choice of building material responsibly and competently.
What timber can be used to build a bathhouse?
The most important operational parameters of the finished steam room directly depend on the quality of the wood. First of all, make sure that the logs are intact. No cracks or other defects are acceptable. Even minor damage can lead to big problems in the future, causing the wood to rot and collapse.

Make sure there are no blue spots on the surface of the wood. Such defects indicate the presence of rot inside the material, the development of which in most cases is provoked by a variety of pathogens. Such material cannot be used for the construction of a steam room or any other building.

There should be no noticeable signs of damage from beetles and other pests on the timber.
High-quality timber has a perfectly flat and smooth surface. It is strongly recommended to refrain from purchasing material with distortions or any other damage - when laying the crowns, all deviations will clearly appear.

Guide to building a bathhouse
Pre-compile your own, order or find a bathhouse design in an open source. Calculate by project required amount building materials and start building a bathhouse from timber. Start by laying out the foundation.
The first stage is the foundation
The finished steam room made of wood will have a relatively low weight, which makes it possible to refuse to install monolithic recessed foundation structures. A structure made of timber will feel great on a regular strip or column foundation.
To arrange a strip-type foundation, dig a trench around the perimeter and under the walls of the future building, fill the bottom of the hole sand and gravel mixture, lay the reinforcing mesh, install the formwork and pour the concrete. The optimal foundation depth is 70-100 cm. When choosing a specific depth, be guided by soil freezing indicators for your region.

Strip foundation - construction procedure

The foundation should rise above the ground by at least 50 cm - this will ensure the necessary protection of the lower crowns from excessive dampness.
Place strips of sand and gravel inside the perimeter of the strip base. In the future, you can fill them with concrete or build a wooden floor - choose the specific option at your discretion.
For arrangement columnar foundation it is necessary to erect supports made of brick or concreted asbestos pipes around the perimeter, in the corners and under future internal walls baths Under each such support, a concrete “cushion” should first be installed. Place the pillars in 150 cm increments.

Regardless of the type of base chosen, it must be subject to additional reinforcement.


Allow the concrete to gain strength for 3-5 weeks and proceed to further work.
The second stage - waterproofing the foundation

Apply molten bitumen to the surface of the base, and a layer of roofing felt on it. Let the bitumen harden and repeat the above steps. As a result, you will receive reliable two-layer moisture protection.
Before proceeding with further work, saturate everything wooden elements antiseptic. Such processing should be carried out after preparing the notches for fastening the beams, if such notches were not available initially.
The third stage is the first crown

Proceed with laying the first crown of walls. To do this, first lay slats up to 1.5 cm thick, pre-treated with an antiseptic, on a waterproofed base. Lay the slats in increments of about 30 cm.

Place the first row of beams on the slats. Thanks to the slats, contact of the timber with the foundation of the bathhouse will be eliminated. This will ensure additional protection from rotting wood and will significantly extend the service life of the material.

Lay the first crown without fastening for now. Make sure it is laid correctly and evenly using a square and level.
If necessary, level the bottom crown beams and then attach them to the foundation. There are several mounting methods. The most optimal and frequently used method involves fixing the timber with anchor bolts.
However, quite often developers refuse to attach the bottom beam to the foundation. In practice, the structure stands perfectly well without fastening the lower crown, held by its own weight. The advantage of this solution is that in the future, if necessary, the lower crown beam can be replaced with much less effort.
Fill the space between the first crown and the base with polyurethane foam.

The fourth stage - the remaining crowns

Perfect for laying out bath walls wooden beam section 15x15 cm.
Cover the first crown of the timber thermal insulation material. Jute or moss are traditionally used for insulation. You can also use tow. If moss or tow is used, the thermal insulation should be laid out with a 10-centimeter overlap at the edges. In the future you will use the raised edges for caulking.


Lay the second crown of timber and secure it with wooden dowels. Pre-drill mounting holes of the appropriate diameter. Typically, the length of one dowel is enough to fasten 2-3 rows of timber.
Lay out the walls to the required height. Every 3-4 rows check the structure with a square and building level. Place a sealant between the crowns.

There is no need to secure the top two crowns. The wood will shrink. Ceiling beams can only be installed after the wood has completed shrinkage. To install the beams, the upper crowns will need to be dismantled.
Fifth stage - door and window openings

There are two options for arranging openings for installing doors and installing windows.
In accordance with the first option, the mentioned holes are created after the construction of the timber bath is completed. To do this, you first need to leave small gaps in the crowns where doors and windows are installed. The dimensions of the gaps depend on the dimensions of the products being installed.

After completing the construction of the bathhouse, you will simply use a chainsaw to make openings for installing doors and windows.
In accordance with the second method, openings for doors and windows must be left during the construction of the bathhouse. This option requires a more significant investment of effort and time. To implement the task, you will need to use special grooves and bars with end notches.
Stage six - caulking
Leave the finished timber box for “wintering” for 6-7 months. During this time, the wood will shrink sufficiently. During the “wintering” period, cover the timber with boards and slate.
If you used tow or moss as an interventional sealant, you can skip this point in the instructions - your log bathhouse most likely will not need additional caulking.

However, experts still recommend studying the condition of the structure. If you find noticeable cracks, be sure to caulk. To do this, twist the tow or moss into a rope and force the material into the gap, followed by compaction.
You can also use jute sealant to fill gaps. In most respects, this material is superior to tow and moss, but costs a little more.
Seventh stage - roof


The roof should become reliable protection your timber bathhouse. To the arrangement roofing structure You can start only after the wood has shrinked, otherwise the roof will move and it will be significantly deformed.
First step. Lay down wooden beams on top top harness walls
Second step. Attach rafter legs to the fixed beams in increments of 100 cm. To connect the rafters at the ridge of the roof, cut them at the required angle.


Third step. Nail a continuous deck of boards to the rafters (if for finishing soft will be used roll material) or build a sheathing (if you plan to finish the roof with tiles, slate or other sheet material).


Fourth step. Mount the finishing roof covering in accordance with the instructions for the selected material.

Fifth step. Cover the roof ridge with galvanized iron. This will protect it from adverse environmental influences.
Sixth step. Sew up the roof gables with suitable available materials - clapboard, wooden board or siding. At this point, focus on your individual preferences.
After finishing roofing works start insulation and other insulation work, interior decoration and arranging a steam room in accordance with your project.


Good luck!
Video - Building a bathhouse with your own hands
Russian bathhouse with aromatic steam or a broom - great way relax, drive away problems and worries. And if this bathhouse is built with your own hands, then its healing power increases.
Building a bathhouse is, of course, not an easy task, but it is quite feasible. The material for a traditional Russian bath is wood: pine, spruce, aspen. Modern technologies They allow you to build a log house in a few days, and completely build a bathhouse in a season. Let's look at construction methods log bathhouse from traditional and time-tested to modern.
Building materials for building a bathhouse
To build a log bathhouse, debarked or rounded logs are used. Barked - a log with the top layer, while the structure of the wood is not disturbed, which increases its durability. Rounded - aligned along the entire length to a single size.

Preparing logs for construction of a log house includes several stages. To build a bathhouse, pine, spruce or aspen are used. You can also use oak for the lower crowns - it is not afraid of moisture, and the lower logs will not rot. Logs are felled in winter time, cut off the branches and trim the bark with an ax or plow. At the same time, they pay attention to the quality of the log, its color, rejecting:
- Logs that are crooked or have sharp thickenings. The change in thickness should be no more than 1 cm per meter of length;
- Knotted logs with cavities near the branches - they are rotten inside;
- Logs of unnatural color, with spots on the cut, and also having a core that is too large in diameter;
- When buying ready-made logs, you should also reject overdried ones - they are difficult to process. The degree of drying is determined by hitting it with the butt of an ax - the sound produced should be dull.
Rounded or calibrated logs are made only under production conditions: the diameter of the log is equalized along the entire length and, to protect it from destruction and rotting, the wood is subjected to forced impregnation with an antiseptic, and the sections are painted with a special composition. The rounded log has a longitudinal groove for laying; its shape can be different - lunar, crescent-shaped, or Finnish - with more complex shape ensuring a tight fit. The diameter of a rounded log can be from 180 to 320 mm; the thicker the log, the warmer the sauna will be. The assembly of a log house from rounded logs is carried out quickly, within a few days. You can also order a ready-made log house.

In addition to the log house, for the bath you will need:
- Concrete or concrete blocks for arranging the foundation;
- Beams or logs and edged boards for rafter system and roofs;
- Roofing;
- Windows and doors;
- Decoration Materials.
Design
The project is the very first and very important stage construction, which will help you not only calculate materials and costs, but also make your work easier. If you are building a simple village bathhouse with a dressing room, you can complete the project yourself. If the bathhouse has several rooms and connections to communications, it is better to entrust this matter to professionals. Companies involved in the sale of log cabins sell standard projects baths, and you will certainly find the right one at a reasonable price.

The project must take into account the dimensions of all rooms, the location of windows, doors, and communications connection points. After this, make a calculation required material. When calculating the height, take into account the shrinkage of the logs; for debarked raw logs it is about 5%.
Foundation
For a bathhouse, the foundation is made of strip, shallow or columnar, depending on the soil. For heaving soils, a shallow foundation is chosen. For small bathhouse a columnar foundation is suitable for concrete blocks. If the area of the bathhouse is large, it is better to give preference to a strip foundation buried below the freezing depth of the soil. After the foundation is erected, a layer of waterproofing - roofing material - is laid on it.
Construction of a log house
The first, or frame crown, is made from the thickest, preferably oak, log. It is placed on waterproofed foundation, having previously cut off its lower part and treated it with an antiseptic. The log house is placed using the “in the bowl” or “in the oblo” method. Before laying each log, it is adjusted by cutting out a groove on its lower surface round shape. The lower the air temperature in the winter months in your area, the deeper the groove should be. We have already written about it.

When laying logs, the north side of the log is oriented towards outside baths - you can determine it by its thinner tree rings on the cut. The north side of the tree is more resistant to rot and cracking; this property will help the bathhouse last much longer. The thicker part of the logs is placed alternately in different sides to maintain the horizontality of the log house. Dried moss or hemp fiber is placed between the logs. The upper crown of the log house, called the Mauerlat, serves as a support for the rafter system, so its choice must also be taken responsibly.
After assembly, the log house is caulked using moss, flax tow or felt. The caulking is carried out starting from the lower crown, going around it around the crown. If you caulk one wall first, the bathhouse may become warped. After caulking, the bathhouse will rise slightly, and the hole will take on almost its previous dimensions during the settling process.
Log house made of rounded logs
If you ordered a ready-made log house made from rounded logs, its assembly should not cause any difficulties. Instructions are attached to the log house, and you need to follow it, observing the following requirements:
- The casing crown must be trimmed from the bottom side for a better fit to the foundation. It is waterproofed from the foundation with 2 layers of roofing felt;
- The logs are impregnated with a fire-retardant composition at their joints;
- The logs are connected using hardwood dowels, which are recessed into the log by at least 3 cm;
- Before drilling holes for the dowels, the logs to be joined must be secured with temporary nails, which are removed after joining;
- Linen tow or fiber is laid between the logs;
- Each crown is laid using a level, preventing it from skewing.
Rafter system and roof
The erected log house must be placed under a temporary or permanent roof in the same year. The roof structure for a bathhouse is usually chosen to be a simple gable roof, and a cold, ventilated attic is installed underneath it. The pitch of the rafters is selected depending on snow load in your region, it is usually about a meter and a half. If you plan to insulate the attic, then the pitch of the rafters should be selected based on the size of the insulation boards.

The rafter legs cut into the mauerlat, resting on it, and are fastened together at the top. A sheathing is placed on the rafters, and a waterproofing roofing material, for example, roofing felt, is laid on it. You can choose the final roofing covering to your taste: corrugated sheeting or metal tiles, ondulin, slate.
Windows and doors
The finishing touch to the rough finishing of the bathhouse is the doors and windows. They are cut into a ready-made log house, reinforced with a frame, to which the frames and doorway are then attached. Entrance door, like all doors in the bathhouse in general, must open outward - this is not only convenience, but also a safety requirement.
Decor summer cottage is not considered complete if not erected. You can build a bathhouse by hiring qualified builders for this, or you can start building a bathhouse with your own hands, and you can use different materials: stone, natural wood, brick, concrete. First, you have to rummage through many projects, review colorful photos of bathhouses, then outline a work plan ( phased construction baths). This article is all about the technology for constructing a log bathhouse; video materials for beginners will help you understand the technology for constructing a log house made of wood.
How to choose the best tree for a bathhouse?
Planning the construction of a bathhouse from natural wood, it is important to choose correctly construction material. Logs should be selected of approximately the same diameter, and naturally dried wood is much more suitable for building a bathhouse than artificially dried wood. Forced drying with electric current or hot air makes the wood fragile, increases the possibility of distortions of the bathhouse frame during further operation, and also increases the risk of large quantity cracks
Logs intended for the construction of a bathhouse should not be damaged or affected by fungus or rot.

Choose well-dried wood
Proper artificial drying of wood
When choosing the option of artificially drying logs, you should adhere to certain rules:
- Drying logs is best done without access to sunlight to prevent uneven drying, so the logs are stacked under a canopy, with each row needing to be placed on pads.
- On each log it is worth making a longitudinal cut 5 cm deep, this will prevent the logs from twisting.
- The drying period under a canopy is at least 8 months, after which the bark is removed from the logs and they are again placed in a stack, where the timber is dried for another six months.
Choosing a foundation for a bath
The choice of foundation for the construction of a bathhouse directly depends on the composition of the soil at the construction site. Classic version the foundation for a bathhouse made of logs is strip, but sometimes they are arranged columnar foundations. On peat soils and quicksand it will be necessary to build monolithic slab or score screw piles. All options have their pros and cons, so we’ll look at them in this article. classic example– construction of a strip foundation for a bathhouse.
If you are planning a small bathhouse, it is enough to arrange a shallow strip foundation, the depth of which should be from 40 cm. The heavier the building, the lower the foundation level.

Construction of a bathhouse on strip foundation
Before starting work on the foundation, it is necessary to carry out a general layout of the site, ensuring a one-way slope for the unhindered flow of water that forms from precipitation.
Then markings of the future foundation are made on the site, carefully checking the dimensions. It is convenient to carry out the bathhouse building using pieces of reinforcement and twine or fishing line. First, the first peg is driven in, marking the corner of the building. From the corner, marking continues in compliance with the planned dimensions of the building; they are immediately marked internal partitions, which serve as stiffeners. The width of the foundation is usually equal to the width of the walls plus 10-12 cm.
They begin to prepare trenches for the foundation, while at the bottom it is necessary to arrange a sand cushion. Sand is poured into the bottom of the trench, watered with water, and rolled with special rollers. Thickness sand cushion V finished form should be 10-15 cm. Then they begin the construction of formwork, which is assembled from wooden shields.
Advice! To prevent liquid concrete from seeping through the holes between the boards, the inner walls of the formwork should be lined with roofing felt.
A segment is placed in the body of the foundation plastic pipe which will provide ventilation to the foundation. The height of the formwork must exceed the grout level. After completing the formwork, you can begin to reinforce the foundation. A frame made of reinforcement with a cross-section of more than 12 mm should not reach 3-5 cm from the edges of the foundation.
Advice! The fewer connections there are on the reinforcement, the stronger the frame is. The reinforcement can be connected using tying wire or welding.
Concrete is poured into the formwork gradually, avoiding the possible formation of voids. Work on concreting the foundation should be carried out quickly, avoiding delamination. The top of the foundation is watered with water on sunny, hot days. During rainy weather top part It is useful to cover with film - this will prevent washing off concrete mortar. Allow the foundation to gain strength - this will take at least 3 weeks.
How to properly build a log house
To build a bathhouse, it is important to choose correct tree– the most suitable options are larch, pine and spruce.
Advice. Can be used different breeds wood, it is important to provide for the manufacture of lower crowns from larch. If the decision is made to build a bathhouse from pine and spruce, then the lower crowns are laid out from pine.
The lower crown is laid over a layer of waterproofing, while for better contact with the surface of the foundation, the lower logs are trimmed to a quantum. Subsequent rows of logs are laid “in a cup”, for which purpose a notch is first made on each log.

Construction of a log house
The erected walls made of logs are treated with special compounds against woodworms, fire and rotting.
How to properly make a roof on a log bathhouse
The roof of the bathhouse can be of two types:
- Shed roof– easy to erect, does not require large material costs. The disadvantages of the design include a small attic space.
- Gable roof– allows you to equip an attic space for household or other needs.
Having chosen the type of roof, they begin to build the rafter system, which is attached to the mauerlat.

Bath with gable roof
Let's consider a simple option pitched roof. When choosing a pitched roof, a height difference between two supports is usually provided, which is about 20 degrees. This is achieved in two ways:
- walls are being built different heights;
- a special support unit is installed on one side of the bathhouse box.
Important! The angle of inclination of the rafters should be 35 degrees, in snowy areas - at least 45.
Rafters can be installed without struts for a span length of up to 4.5 meters with a rafter pitch of 60 cm.
If the span height is over 4.5 meters, the installation of struts is necessary. Installation rafter legs must be carried out using metal fasteners, this will avoid deformation of the roof during shrinkage of the building. The roof covering is made from roofing materials at the choice of the bathhouse owner.
Construction of a bathhouse from a log house: video
Log bathhouse: photo