The flower garden is the highlight of everyone summer cottage and vegetable garden. With a bright and rich spot, it transforms the area, delivering aesthetic pleasure. That's why many gardeners strive to decorate their flower beds in every possible way. And very often, decorative fences and borders are made for these purposes, which harmoniously frame the bed with vegetation. Read about what types of fencing for flower beds are, what and how you can make them with your own hands in this material.
Many gardeners grow flowers and plants without any decoration of flower beds. Flowers, of course, are beautiful in themselves, but using a fence also has its undeniable advantages:
- Decorates the garden. Thanks to simple design The flower garden looks well-groomed, neat and interesting.
- Protects from children. Restless children love active games on fresh air, therefore, their active activity is not excluded in a summer cottage or garden, where they can accidentally touch and damage plants by stepping on the garden bed, but thanks to the fence this will be much more difficult to do.
- Protects against pets. Of course, a fence is not a 100% guarantee of protection from pets, but it will nevertheless serve as a barrier against unnecessary pet attention.
- Helps harmoniously divide the area into zones. Thanks to this function, you can conveniently distinguish between beds and flower beds, which makes caring for them easier. different plants and cultures.
- Prevents plant overgrowth. If you grow plants that tend to grow rapidly, then the fence will become a barrier and preserve the integrity of the garden bed.

How to make a fence for a flower garden with your own hands
There are a great variety of options for making decorative fences for flower gardens. To choose what to make a fencing for a flower bed with your own hands, you should learn about the advantages and disadvantages of popular materials, as well as study the instructions for making the structures. All this will help you decide which fence will be easier and more convenient to make for you.
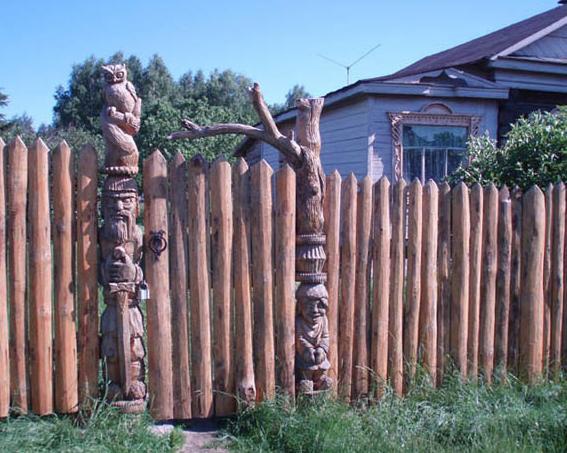
Wooden fencing
Wood is a favorite material of summer residents and landscape designers. It makes wonderful decorative decorations and buildings for the cottage and garden, for example, gazebos, benches, artificial bridges, mills and much more. Wooden fencing for flower beds is no less popular.
It is worth giving preference to wood the following reasons:
- All designs with it turn out to be surprisingly cozy, stylish and attractive.
- This material is easy to work with. You can make excellent fencing even if you have no experience working with this material.
- To make a fence from this material, you can use the most standard tools.
- If the material becomes damaged or deteriorates, you can easily replace the entire structure or some individual parts.
- Wood does not heat up and does not reflect the rays of the sun, so you don’t have to worry about the plants getting burned or damaged.
- The material is environmentally friendly.

However, it should be noted that the only disadvantage of using wood is that it is short-lived. But such imperfection is not critical, because the material can be treated with special substances, and sometimes fresh paint can be applied.
Advice! Before implementing any wooden structure into the ground, it is recommended to treat the wood with an antiseptic, and wrap the part that will be in the ground with a small piece of roofing felt.
The following decorative wooden fences are most often made with your own hands:
- wattle fence;
- fence made of wooden logs;
- fence made from transverse cuts of wood;
- fence.
Below you can study the instructions for making these wooden structures.
Wattle
The design in the best rustic traditions will add comfort to even the most pragmatic garden. The height of the fence can vary depending on your desires - from a high hedge to mini garden fence.

Garden fences for flower beds and beds are made by hand according to the following scheme:
- First of all, you should install stakes along the border of the flowerbed; they need to be deepened so that they stand securely. They must be quite dense to support the rods. Please note that the smaller the distance between them, the stronger the structure will be.
- Then you should prepare the rods - just clear them of bark and equalize them in length. To make wattle fence, you need to choose flexible rods (willow rods are ideal).
- Now you can start weaving: first the twig is passed from the front side of the peg, and then from the back side.
- To secure the rods, you need to nail their ends to the pegs.
- Gently tap each row with a hammer to compact the structure.
Video: how to make a wattle fence for a flower bed.
As you can see in the pictures, cozy wicker fences perfectly frame the garden vegetation.


Fence made of wooden logs
It is an attractive structure made of wooden logs buried in the ground (a composition similar to a palisade). Very often used by gardeners when decorating flower beds.

You can make a wooden fence for a flower bed from logs with your own hands according to the following scheme:
- Take logs of the same length and width. You can leave them in their original form or remove the bark. When choosing specimens with the required height, you should remember that you need to choose logs about 20-25 centimeters longer, since they need to be deepened into the ground.
- Dig a groove along the borders of the flower bed; its depth should be about 20-25 centimeters.
- Then the logs should be buried in the groove, covered with earth and thoroughly compacted.
Video: demonstration of making a wooden structure.
The fence is very interesting, looking at these photos it’s hard to argue with it.


Fence made from cross cuts of wood
Construction from saw cuts - small and cozy decoration for flower beds and gardens. Making such a mini-fence with your own hands is not difficult:
- you need to buy or make wood cross-cuts yourself;
- bury the cuts halfway into the ground around the perimeter of the bed (you can install them in one row or several);
- for greater beauty of the decorative fence, you can lay the saw cuts horizontally next to the vertical row (in the photo below).

Fence
From the classic wooden fence To fence off an area, it’s a good idea to make a mini-copy for a flower garden. A picket fence can be made very original, you will have the opportunity to choose interesting color for color, different shape of material, height. That is, it can be a massive, tall hedge, or a small, neat fence.

Do beautiful fence for a flower garden and beds, you can use the following algorithm:
- First of all, you need to prepare the materials: you will need thin wooden blocks or cutting boards (they should not be very large in size), long and thin boards for the base, longer bars as support posts.
- Two long thin boards, which act as a base, are nailed horizontally (one on top, the other below) to the bars or scraps of boards in a vertical position.
- Support posts must be nailed to the two ends of the horizontal board.
- Then you should deepen the columns into pre-dug holes, cover them with earth and compact them.
Video:


Metal
Fencing made of this material can be cast, welded, or forged. Almost any metal flower bed fencing will fit perfectly into your summer cottage and decorate it.
You can make some products yourself (if your skills allow), buy them in specialized stores, and you can also order them from an organization that produces metal products. In addition, the product can be ordered according to an individual design.

The advantages of metal fencing for flower beds are durability, attractive, solid and stylish look, protection of beds. The disadvantages of this design include the cost, which is often not very low, as well as corrosion.
The photographs show options for metal fencing:


Stone
Stone is a wonderful friend for a flower bed. Together with the vegetation in the garden bed, the stones look very organic and make the flower bed complete. Most often, limestone, basalt, tuff, shale, and sandstone are used to create stone fencing.

Do decorative fence for flowerbeds with your own hands made of stone is very easy and profitable. You can simply stack the stones next to the bed in the form fencing, and make a cement foundation. The latter option is, of course, more reliable and durable.
Photo gallery of stone fencing for flower beds:


From scrap materials
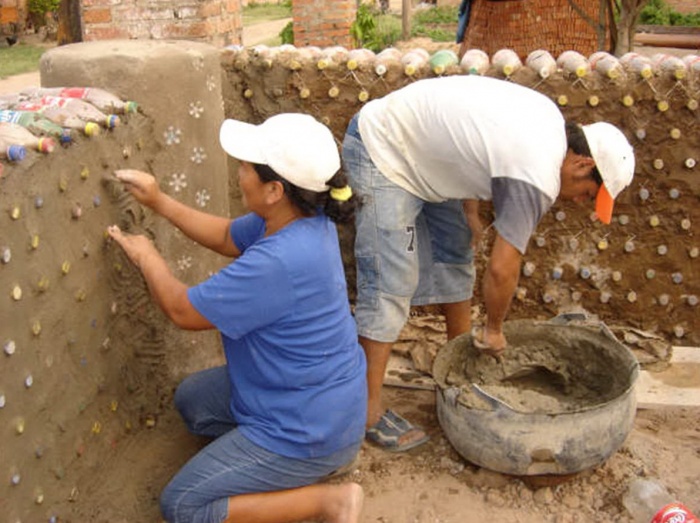
Beautiful does not mean expensive and difficult. You can create it in your garden beautiful fencing for a flowerbed with your own hands from scrap materials, while saving money. So, you will not only decorate flower beds and beds, but also give a second life to forgotten and unnecessary things. For example, it is practical to use optical discs, slate, plastic and glass bottles, old car tires, and ceramic products. Let's look at the most popular options:
Glass bottle fence
To create a decorative fence from glass bottles It is possible to use both transparent and colored containers, and you can also paint the glass container yourself.

You can make a glass fence for a flowerbed with your own hands:
- Prepare the container: fill it with water for a while so that the labels come off, then remove the bottles, clean them of any remaining dirt and labels, and let them dry.
- Mark the lines along which you will place the bottles. The outline of a decorative fence can be either strict (rectangular, round, square) or ornate or non-standard.
- Dig a trench that is as wide as the bottles and about fifteen centimeters deep.
- Place the bottles, neck down, around the perimeter of the bed.
- Fill the trench with soil and compact it well.
You can enjoy photographs of simple flowerbed fencing made from this available material:


From plastic bottles
Plastic bottles make and. Previously, it was already described how to build a regular fence, now it’s time to tell you how to make a fence for a flower bed with your own hands from this plastic material at hand. The technology is exactly the same as in the case of glass bottles, only for greater stability it is better to fill the bottles with sand. A little tip: to add bright accents, you can paint plastic bottles in your favorite color or several colors at once.


From tires
Tires are a popular material at hand for gardeners. It makes excellent compositions. For example, in provides detailed information on how to do flower beds made from tires, as well as various ideas on this topic. From the old ones car tires also turn out great swans, read detailed information about making swans, you can.


Photo gallery of ideas for inspiration
Entertaining summer residents have come up with many original fencing for flower beds from purchased and scrap materials. Each of them has its own charm and uniqueness. To understand this, you can simply look at the photographs of the original compositions:


Beautiful flower garden- this is not only timely care of plants and flowers, fertilizing, watering, eliminating weeds, but also edging the flower bed. You don’t need to be an experienced landscape designer or a jack of all trades to decorate flower beds in an interesting and original way. You just need to be patient, show diligence and imagination.
In contact with
You made several flower beds on your site, planted them in various flowers. The area has taken on a charming appearance, but it feels like something is missing... Some finishing touch to make the overall picture look complete. The solution is simple - install decorative fences.
Advantages of using decorative fencing in the garden
You will not only decorate the flower garden, but also solve several additional tasks:
- fences allow you to achieve a uniform style throughout the entire site;
- the territory looks more well-groomed and tidy;
- the fence holds the grass and plants, preventing them from “spreading” beyond the flowerbed;
- using decorative fence, you can divide the territory of the site into functional zones;
- your flowers will be reliably protected from cats, dogs and other animals;
- the fence will tell guests where not to step, so as not to inadvertently destroy the first inconspicuous shoots.

Using a decorative fence for flower beds, you can divide the site into functional zones
Specialized stores sell a variety of plastic fencing of the most different forms and colors, you can also buy forged fences or wooden fences, however, the cost of such decorative elements Not everyone can afford it. But even novice gardeners can make a fence for flower beds with their own hands from stones, plastic and glass bottles, willow twigs and small logs.

Video about what kinds of fences there are for flower beds
What materials can be used to build a decorative fence. Their pros and cons
Basically, at dachas they use leftover building materials or purchase inexpensive ones.Wooden fences
Wooden structures bring people closer to nature, blend with the landscape, and are easy to repair. The material is easy to process, so you can create fences with your own hands. When choosing a tree, you need to consider what you will need special drugs for insect control.
Wooden fences are susceptible to rotting, so the material must be treated promptly.
Natural stone fencing
The structure, made of cobblestones, looks very natural. To create such naturalness, you need to try, selecting parts according to size and connecting them with mortar. The disadvantage of this structure -heavy material gradually settles, so it is necessary to restore the bed.
Metal fences
Cuttings of rods and pipes have always been in demand in summer cottages:- short ones were used as fastenings for sides;
- medium cuttings connected with wire lift large branches well;
- long ones will serve perfectly as trellis posts when growing grapes.
Modern designs of decorative borders and beds
Plastic is one of the new materials for country fences; it does not require special care, easy to use, long service life. When purchasing such material, it is necessary to require certificates for environmental safety. Flexible border tape is a plastic sheet with a wavy surface. The advantages are obvious:- availability;
- Convenient installation with minimal tools;
- simply give the required shape;
- does not deteriorate in the soil, does not rot.
Video: border tape
How to make a wooden fence for flower beds with your own hands
Most a good option A fence made of twigs, pegs, planks or logs is considered to be a fence. The tree gradually decomposes in the ground, filling the soil with nutrients. In winter, wood freezes less than stone or plastic, which means that the root system of plants will be protected from freezing.
Willow fence

The most successful option is a fence made of twigs, pegs, planks or logs.
Wicker fences for flower beds look charming. Although making wattle fence requires time and some effort, the result will delight you for many years!
Willow twigs can be obtained from the shores of any natural body of water. It is recommended to prepare them in early spring, then the bark will be easy to remove, and as a result you will get a strong fence of a pleasant light color. Having collected more twigs, prepare them for work: peel them from the bark and cut them to the same length. Along the perimeter of the flower bed, install pegs with a diameter of 3 cm at equal distances. The closer the pegs are to each other, the stronger the wattle fence will be. The pegs are braided according to the principle of basket weaving - the rods are passed either in front of the stakes or behind them. After completing 3-4 rows, compact the entire structure by tapping it with a hammer so that after drying your wattle fence does not become loose. The ends of the twigs can be further secured by nailing them to the pegs.
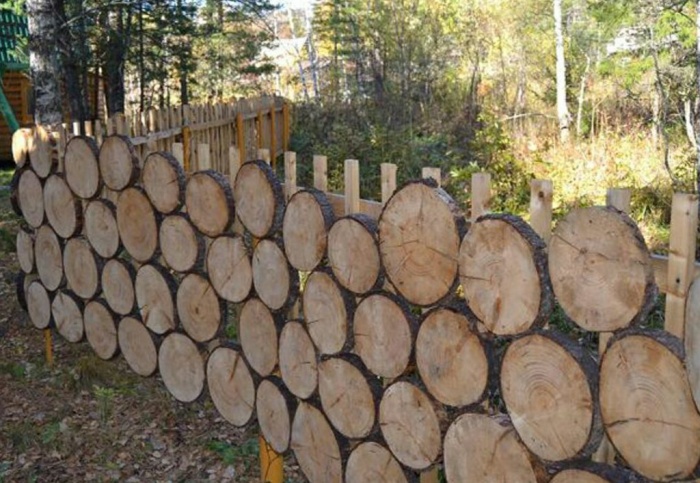
Decorating a flower bed with logs

A long-lasting beautiful fence for a flower bed is made from small logs of wood
A long-lasting, beautiful fence for a flower bed is made from small logs of wood. Logs of approximately the same diameter and height are prepared, taking into account the fact that about 20 cm will go underground. A strip of turf is removed from around the flowerbed and a shallow ditch is dug. Logs are placed in it, close to each other, then the lower part of the logs is covered with earth and compacted thoroughly. It is recommended to first remove the bark from the logs and treat them with a special solution; then such a fence can last for about 50 years. Instead of logs, you can also install pegs.
Miniature wooden fence
Decorative fences for flower beds made from boards look charming. It will take more time to make such a fence, but the result is worth it! First make blanks of the same size from boards or wooden planks with a triangular or shaped top, fasten them together with transverse boards to create several small sections. Dig the posts into the ground at equal distances and secure the prepared sections to them using self-tapping screws or nails. The finished fence is covered oil paint for protection from rain and snow.
DIY decorative metal fence
Set for work: tape measure, rope, level, cement mortar, crushed stone, supports, welding machine, shovel and logs.
Suitable for supports iron pipes, it is possible to use square or round section not less than 70 mm in diameter. To mount the logs, we purchase a 25 x 40 mm flat profile.
We fasten the logs horizontally, due to them a strong connection of the profiled sheets will be created.
- We explore the terrain of the territory. We select suitable places to place the gates.
- We mark the area. So we install rods around the perimeter of the fence and connect them with rope. We also mark areas for racks. Maximum size between them is 3 meters.
- We dig holes for the racks approximately 20 cm in size and up to 1-1.3 m deep.
- We install the supports, checking them strictly according to the level.
- Fill the bottom of the holes 20 cm with gravel or crushed stone and fill cement mortar. It takes 3 days to dry. Special caps are put on the supports; they will protect the structure from rain.
- Install cross beams. For better fencing strength we use welding machine A. We select the number of crossbars according to the required height of the fence. For example, for a fence 1.8 m high, 2 crossbars are enough. When the fence is built higher, the number of joists is needed more.
Brick fence
We will place the bricks on cement mortar; it is not difficult to prepare it yourself: mix a portion of cement with three portions of sand, add water until a mass is created.Before work, you need to decide on the size of the fence. When the fence is intended for decoration, it is convenient to build it in half a brick. If the fence is intended for protection, it should be made of one and a half to two bricks. The length of the product varies up to 3.5 m.To ensure the reliability of the fence, the masonry is done in columns with piers, and pillars are also made in the gates. Rods and rope are used to mark the foundation. We place pegs along the walls and corners of the trench at intervals of up to one meter, using a rope between the rods. We mark the areas of pillars and gates. Trim the corners using a square. All the shortcomings need to be corrected.
Making the foundation
- We dig a trench 6-7 cm larger than the intended masonry, a depth of 0.8-1 m. We trim the walls and bottom of the pit. We place up to 10 cm of sand into the trench, compacting it well.
- We put up the formwork. We lay boards so that the surface is level after concreting. To reinforce the foundation, we connect the rods into a mesh with wire. We place the net on compacted sand.
- We concrete the trench. We make the composition from a portion of cement, two or three portions of water with sand, four to five portions of crushed stone. We thoroughly level the poured surface and remove the air by piercing it with reinforcement. We leave the pouring for three to four weeks for strength.
Fence laying
First, lower the bricks into water for a minute. Due to this, the pores are moisturized and will not absorb moisture from the solution. For strength and reliability, we will build a one-piece fence along its length.
- We make pillars from four bricks, creating space inside. The void is filled with reinforcement and concreted. First, we lay columns three bricks high. We lay the walls between the columns at the same height.
- We connect the columns with the spans and lay out the reinforcement.
- We increase the masonry to the height of three bricks in the same way. We build it this way to the required height: put 3 rows, reinforce, again 3 rows and then reinforcement.
Plastering the fence
- We moisturize the walls. Apply a layer of plaster up to one and a half cm.
- Let the solution dry for an hour. Level the plaster with a lath and let it dry for 2 days. In between, we moisten the plaster to prevent cracks from appearing.
- After 2 days, we again moisten the plaster with water for troweling.
From natural stone to plastic bottles

When installing the border, large stones are pressed into the prepared concrete pad around the perimeter of the flower bed
Quite often, fencing for flower beds is used in landscape design. from natural stone round or uneven shape. Such borders look noble, with their help you can significantly transform the area near your cottage or country house. Whatever stones you use - small or large, they must be fastened with cement so that the fence does not fall apart under the pressure of the soil. When installing a border, large stones are pressed into a prepared concrete pad around the perimeter of the flower bed, and small stones are held together using concrete mortar, to which special glue is added for greater strength. For tall flower beds You can lay out a border of flat stones, fastening them with cement.
You can simplify the process by replacing natural stone with brick. Decorative fences for flower beds made of red brick are ideal for decorating a garden in a country style. It is possible to lay a border made of bricks without concrete mortar, since the smooth sides of the bricks form a strong adhesion that can withstand the pressure of soil from the flowerbed and prevent the structure from falling apart under its own weight.
Video about fencing for flower beds
The most economical solution is to make a fence for your flowerbed yourself from glass or plastic bottles. Although such a fence is easy to deform, you can always replace a damaged bottle with a new one. For one small flower bed you will need from 15 to 25 bottles of the same shape. Fill the bottles with any bulk material: sand, soil, small stones. Cover them with lids and dig them, neck down, halfway into the soil around the perimeter of the flowerbed. If desired, you can paint the resulting fence.
How to care for fences - minimum requirements for summer residents
A combined fence made of wood and brick has little moisture resistance, so you need to take care of the paint and varnish coating. It doesn't take much effort. It is enough to occasionally check the product for suitability of varnish and paint, as well as timely updating.

In the fencing, it is necessary to pay attention to the correct calculation of the load and the selection of reliable frame posts. This calculation also takes into account the situation, such as the presence large dogs on the site, resting on fences or many anthills that destroy wooden panels.
The fence made from car tires needs to be repaired every one or two years - remove cracked paint and renew it to increase the life of the fence.
When the fence is made of picket fence, the wood needs special care:
- treatment with antiseptic substances that protect wooden crafts from pests;
- painting the fence.
To increase the service life of a metal fence, it is necessary to update the varnish and paint coating, so before applying new paint It must first be sanded and degreased. A surface that has been cleared of peeling coating will take on the new paint much better.
For hedges everything is clear, pruning, proper watering and crown formation will help create a green fence on the site.
Now you know how to fence a flower bed, all that remains is to decide on general style designing your site and stocking up suitable material. Having once spent time creating decorative fences, you will be able to admire your landscaped area for several years!
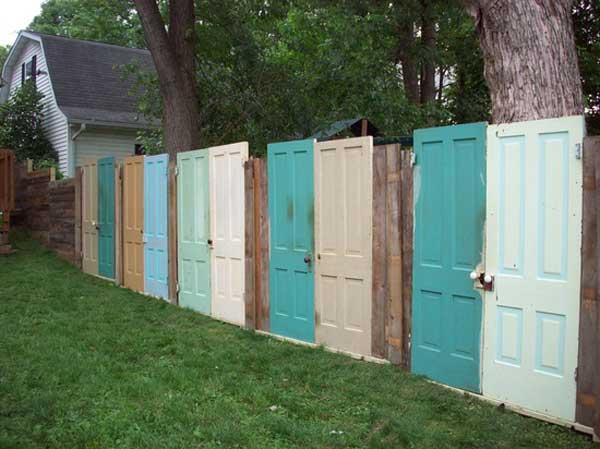
For most, privacy is an important factor. It allows you to feel safe and be the master of your possessions. It is normal that we do not tolerate unexpected interference in our personal lives. At the dacha and country house it can be easily prevented by installing a fence from scrap materials. Ordering ready-made structures can be quite troublesome, since a special approach to delivery and installation is required. In some cases, it is difficult to choose exactly what you would like the most. This article will describe what components can be used, and the photo will show ready-made options.
Important Factors
The construction of your own fence at the dacha or in a country house should begin not with installation work, but with the preparation of a small questionnaire that will allow you to determine your goals and purpose. Here's something to think about:
- how high will the fence be?
- what is the main purpose of the fence;
- will it only be a fence for flower beds;
- what material is most available for fencing;
- what can be combined;
- Is serious protection against intrusion important?
These points will allow you to analyze exactly where the fence will be located. It can serve as a decorative element that will further decorate the area of the site. Perhaps the purpose of such a fence will be to fence flower beds or vegetable crops so that animals do not harm them. It would be good to decide on the material and, if necessary, collect the required amount for the fence.
Metal fence
Perhaps, when you hear about a metal fence, your imagination conjures up pictures of powerful and large fence structures, which over time become covered with rust and require constant painting. But if you approach the issue creatively, you can end up with a very interesting country fence that will attract the attention of passers-by.

Bicycle frames
If you have been repairing bicycles or have a friend who accepts scrap metal, then you can build an interesting fence from bicycle frames. It is better to choose those made of aluminum. They do not require special care and are highly resistant to the corrosive effects of moisture. The first step is to sort the structures by folding them by size. This will allow you to alternate during the assembly of the fence at the dacha. All iron frames are cleaned of old paint and sanded down until metallic color. After this, it is not recommended to leave them in an open space, as they will quickly become covered with rust.

Next, you need to measure the inner diameter of the tube into which the front fork was installed. A metal pipe is selected according to a given size. The process of installing the fence will be very simple. A piece of pipe of the required length is taken and inserted into one of the frames; it will serve as the initial support. After this, a partner holds one part, and a second person strings the frames, alternating their sides and sizes. Once they are strung, you will need to secure the fence. To do this, metal posts made of the same pipe are installed at the corners of the fence, which are sunk into the ground.
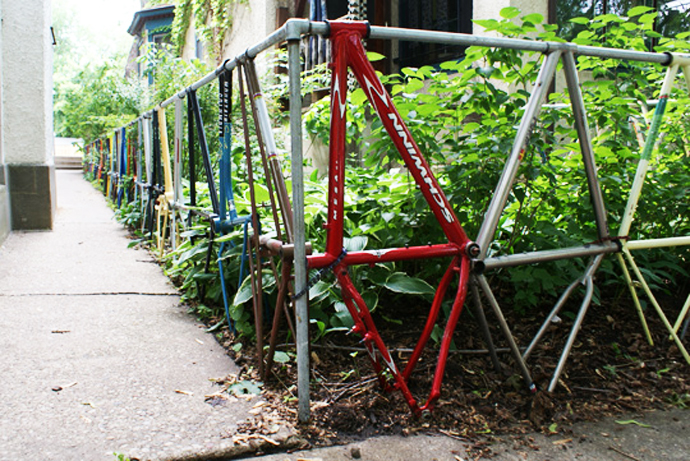
In order not to use a welding machine during installation of the fence, it is enough to cut threads at the ends of the pipe and, using an angle tee, assemble the fence junction unit. Some people prefer to provide additional rigidity to the fence structure by pouring a small base of concrete and immersing the lower part of the frame into it. Once the fence is assembled, the frames can be painted in one or more colors.
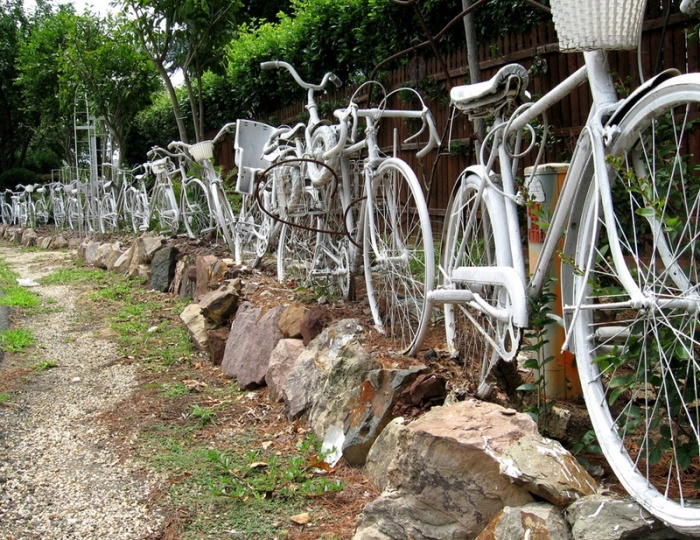
Advice! If there a large number of old bicycles that cannot be restored as a whole, then there is no need to disassemble them into frames for a fence. They can be mounted entirely as a fence. An example of such a fence is in the photo.
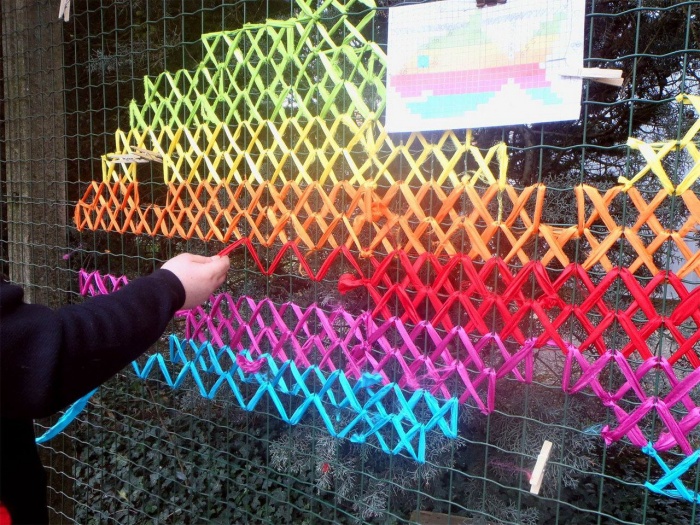
Embroidered shirt on mesh
Many people have a chain-link fence installed at their dacha, which separates the area from its neighbors or serves as the main fence. Such a fence can be made unique for the entire village. To do this, you can place embroidery on the fence. It is done according to the principle of regular cross stitch. You can use waste knitting threads as material. They can be easily replaced using plastic or cellophane bags. You can definitely find them lying around in abundance. Just cut them into small strips and you're done. You can place any design on the fence. To do this, the photo file must be uploaded to a service (for example, this https://xfloss.ru/), which will break it down into colors and squares. After this, you can begin to realize your masterpiece. One of the options can be seen in the photo below.
Wooden fencing
A wooden fence is one of the classic fencing solutions for a summer cottage. The boards are given various shapes so as not to be like your neighbors. This type of fence requires constant maintenance. The fact is that wood is very sensitive to moisture and pests, so the fence must be periodically painted and treated with antiseptic compounds. Here are some non-standard and beautiful options hedges that are suitable to make.
Logs in the form of pencils
If you cleared your site of old trees or prepared firewood, then some logs can be used for a fence. Unnecessary boards are also suitable for a fence. They will not need to be processed in any special way. All that is required for such a fence is to remove the bark and sharpen one of the ends of the log or board. There is no need to equalize their sizes. If they are scattered throughout the fence, they will look more interesting. A special effect would be to paint them in different colors. To fix the fence on the site, it will be enough to dig a little into a few main logs, which will be larger. They need to be placed evenly so that they hold the entire fence. After this, two transverse strips are nailed with inside hedges

Stump fence
This fence will be an excellent decorative fence for the site. It requires virtually no investment. For such a fence, it will be enough to cut round timber of the same length. For example, they can be laid on cement mortar, as shown in the photo below. The solution itself for such purposes is made only from cement and sand. The ratio should be 3 parts to 1 for such a fence. Additionally for the fence you will need good foundation. It is modeled after a shallow strip foundation. A trench is dug under the fence to a depth of 50 cm. A 15 cm layer of coarse sand is placed on the bottom. It compacts well. Next, a layer of fine crushed stone of the same height is placed. After this, the formwork is placed and poured concrete mortar. After two weeks you can install a fence on it. The fence logs are laid in a checkerboard pattern, held together with mortar.
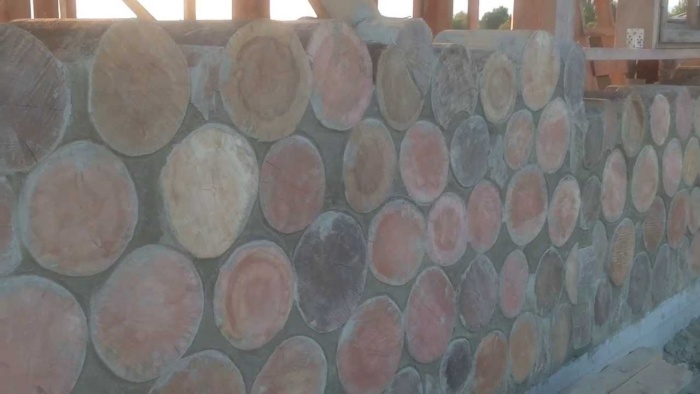
Note! In the photo below you can see another option for implementing such a fence. It is assembled not from whole logs, but from small cuts of round timber. The basis for such a fence can be an old wooden fence or several buried logs.
Plastic is in use
The invention of polymer compounds and their derivatives has greatly simplified life and introduced new types of materials. But in some cases, plastic has only made matters worse, supplying landfills with tons of waste that will take hundreds of years to be digested by bacteria. If you decide to rationally use what others consider garbage, then from plastic products You can implement an excellent option for a fence. You can use bottles and old pipes.
Water bottles
Such goodness can be found both at home and among neighbors. It is easy to make various household items from PET bottles. There are several options for fences that can be assembled quite quickly from this material. The main operations that will have to be done are to soak the bottles that will be used for the fence in water to remove the label from them. It is also advisable to wash them from the inside so that no stains or other inclusions remain on the walls. The lids should not be thrown away. The hedge may collect rainwater and lose its appearance. The air inside the containers will give them good rigidity.
One of the options for implementing such a fence can be seen in the photo below. You will need to sort the bottles by color and shape. Several posts are placed along the perimeter where the fence will be located. They can be wooden or metal. The latter are not simply dug into the ground, but are fixed with a solution, following the example of what was described for a wooden fence. The bottoms of the bottles are cut off, except for those that will be located in the fence closer to the ground. The bottom needs to be cut to the same height, because it will still be useful. If the caps are no longer needed for any projects, then they can be left on the fence, if needed, then they remain only on the top row of bottles.
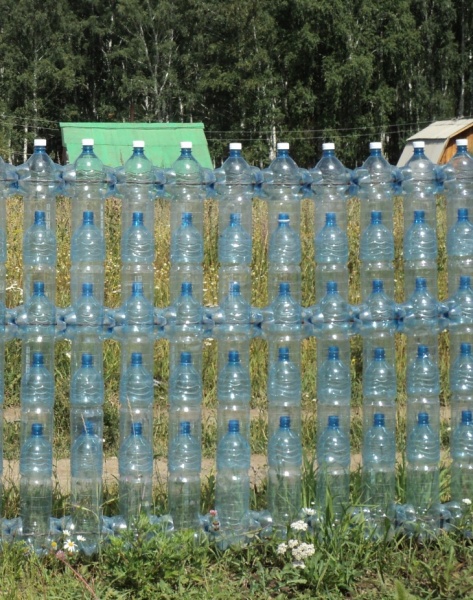
Depending on the height of the fence, the number of bottles is calculated. You can start from the fact that the height of the bottle is 25-30 cm. For a fence 1.8 meters high, you need to stretch at least four rows of wire between the posts. A bottle is strung on a wire. After this, two bottoms are installed. They are located with the cut part facing the bottle. Their purpose is to ensure the same distance between adjacent bottles so that the design looks more harmonious. Between the bottles that are strung on the fence wire, another one without a bottom is installed. Subsequently, a fence is formed with partitions made of bottles.
Note! Securing the bottles for collection can be a little easier. To do this, they are located not vertically, but horizontally. They are simply strung on a wire, like beads. You can clearly see such a fence in the photo below.

If you want to build a more reliable fence from plastic bottles, you will have to tinker a little. Each individual container will need to be filled with sand or clay. It is important to compact the material inside well. To fasten the bottles together, you will need to prepare a solution of sand, cement and clay. The ratio of sand and cement is as given above for a wooden fence, and six parts of clay are needed. The bottles in the fence are additionally tied at the necks with wire. The elements are laid out in a checkerboard pattern. Additionally, the surface can be plastered to create a monolithic fence.
Advice! From plastic bottles you can build an excellent fence for a flower bed. You don't have to put in any special effort. It is enough to cut off the neck and cap of the bottle and simply sink it into the ground so that the bottom rises 5 cm.
Plastic pipes
Polypropylene pipes are increasingly used for the installation of heating and water supply systems. But some people prefer to replace them with cross-linked polyethylene pipes. It’s not worth throwing away what remains, because you can build an excellent fence from them for a plot or flower bed. All you need for this is the ability to work with a soldering iron for plastic. Implementation options and forms can be very different. Using imagination and various fittings, you can build a fence following the example shown in the photo.

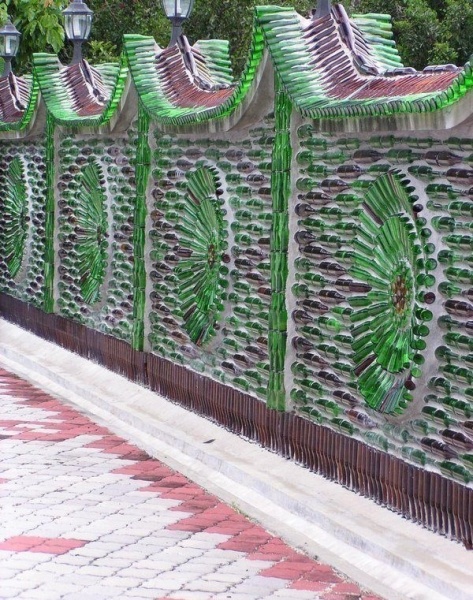
glass fence
Building your own glass fence using double glazing would be great and expensive. But there is a free material that is perfect for these purposes - a glass bottle. Before installing the fence, you will need to carry out the same preparation as in the case of a plastic bottle. They can easily be soaked in an old bathtub outside. There is no need to compact earth or sand inside, since the bottle should retain its transparency. There are two main ways to implement this type of fence:
- monolithic wall;
- screen made of bottles.
To make a fence in the form of a screen, you will additionally need metal rods or wire, as well as a corner and pipes for posts. The first step is to install the columns that will act as supports. The distance between them will depend on specific project. They can simply be dug into the ground or fixed to concrete mortar. In the latter case, you will need to prepare a mixture of sand, cement and crushed stone in proportions of 3 to 1 to 2. A hole is made 50 cm deep, a fence post is inserted, leveled and filled with the prepared solution.

The next step is to make metal frames for the fence in the form of rectangles or squares using a welding machine. They are attached to the mounted posts. A hole is drilled in the bottoms of the bottles for a rod or wire. The bottles are simply strung onto the base. A wire or metal rod is attached to metal base. Adjacent “beads” must be placed end to end to achieve the effect of a wall. On a sunny day such a fence will play different colors when passing rays.

Advice! A screen fence can be made not on metal, but on wooden base. For this purpose, frames are made with additional transverse boards. The distance between the boards should be equal to the height of the bottle. Holes with a diameter similar to the neck are drilled in the boards and inverted bottles are inserted into them.
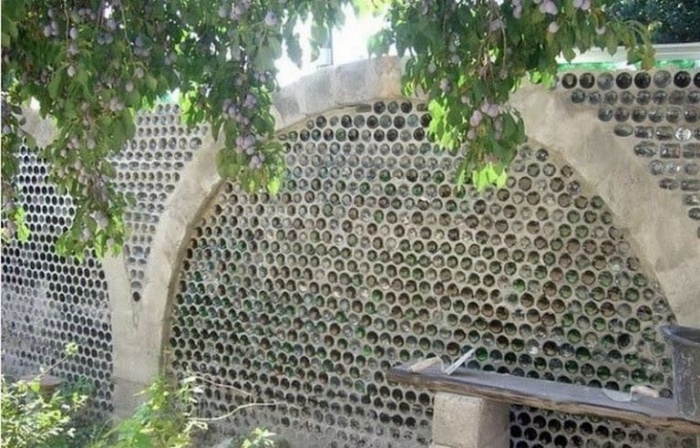
The monolithic version of the fence will require a lot of effort and time, but the result will pleasantly surprise not only you, but also all passers-by. The first thing you need to do is sketch small drawing how the bottles will be positioned. In a fence they can be laid simply in rows with interlacing. Looks quite interesting. The bottoms must be laid outwards, and the necks must be left inside the fence so that light can pass through. You can make a fence with a pattern, as seen in the photo below. To do this, you will need to sketch a small sketch of the fence indicating the specific colors of the bottles and their quantity to make it easier to choose.
The first stage of constructing such a fence will be preparing the foundation. It is made according to the same principle as for a log fence. Next, a solution for the fence is prepared and the placement of bottles begins on it. It is worth laying out in even rows so that the solution gradually gains strength and can hold the entire fence wall.
Advice! A fence for flower beds can also be made from glass bottles. To do this, they are embedded upside down in a makeshift border or simply sunk into the ground.
Rubber fence
Rubber not because it stretches, but because it is made from old tires. In general, such improvised materials make excellent flower beds. But if a full-fledged hedge is required, then this is also easy to arrange. You will have to stock up on enough tires. It would be good if they were the same size and also had a similar tread. You can buy them at car scrapyards at a low price. There is no need to build a base for such a fence. It will be enough to level the area for the fence well.

The first row of tires is laid so that the tires are close to each other. They need to be fastened together so that they do not diverge. Soil or sand is poured inside, which will give additional stability to the fence. The next row is laid out to create a checkerboard pattern. That is, the tires should not lie on top of each other, but on the seams. Soil is also poured into the voids. To make the hedge look alive, you can plant various flowers or climbing plants in the ground. Such a fence has a drawback, which is manifested in the height limitation depending on the diameter of the tires. If a fence is required high altitude, and the tires are small, then you will need to mount holding posts that will be located inside the tires. An example of such a fence made from improvised means, which was made by hand, can be seen in the photo.

Conclusion
As you can see, for a fence at the dacha or in a country house, you can use any available means that are available in sufficient quantity. There is also the option of a wicker fence, as well as a hedge. It is quite problematic to describe each option in one article. In general, you shouldn’t limit your flight of fancy. It is always possible to combine various construction and non-construction materials when erecting a fence.
Summer residents and estate owners are constantly striving to improve local area. A reasonable layout of the site plays an important role in this, and clear delimitation of land using fences helps resolve the zoning issue. You can build a decorative fence with your own hands using inexpensive construction material, but improvised means.
Functions and features of using a decorative fence
First of all, you should decide what purpose the installation of such a fence serves: protection of seedlings and flower beds, zoning of the territory, or purely decorative?
The first function is to divide the area, highlight flower beds and flower beds, and define garden paths. All this can be achieved using a low picket fence.
The second function of decorative fences is to prevent unwanted intrusion into the “sacred” territory of the owner - beds and flower beds. In addition, a clear definition of boundaries is not only functional, but also aesthetically pleasing.
So, if the area is small, then you can opt for a wicker fence - it looks beautiful, and special costs does not require, is easy to create, since it is made from durable flexible branches.
Advantages of installing decorative fencing yourself
The first advantage of erecting a fence is the originality of the idea, which can be realized using one of the inexpensive materials - wooden slats or branches. In addition, the advantages are:
- delimitation of space - the entire site will be divided into separate functional zones;
- safety of vegetation - the first shoots grown with such love can be damaged by carelessness of pets or guests, and the fence, even if low, will save your seedlings;
- well-groomed - especially for summer residents, whose main hobby is flower beds and flower beds;
- unity of style - decorative fences that are the same for all zones will emphasize the concept of landscape design.
Types of decorative fences made from scrap materials for cottages and country houses
There are a lot of them, and you can use almost any available material: plastic, brick, wood, stone, rubber.
Plastic
The most popular material for a decorative fence is a plastic bottle, which we often simply throw away. It can be placed both vertically and horizontally, thanks to which entire compositions can be created on a personal plot.
It is one of the available and practically free building materials. The simplest type of decorative fencing is bottles of mineral water, carbonated drinks or beer buried upside down to the base of the neck.
Perhaps the only thing that needs to be taken into account when choosing this type of fencing is the same shape of the bottles. But you can choose the color yourself.
Advice: to prevent such a fence from being carried away first strong wind, the bottles must be filled with any bulk material - sand, small crushed stone, earth.
In addition, plastic bottles can be used to delimit the direction of garden paths.
Rubber
This “building material” is considered the second most accessible. And all because old car tires are used as fencing!
They will look good as borders for flower beds - whitewashed, painted, painted. And if you have a lot of tires, you can build a real one out of them. high fence for the local area.
The advantage of such fences is their durability, moisture and frost resistance, accessibility and the ability to be used as a “green fence”. However, if there are not so many tires, then instead of a whole fence you can make separate flower beds or even beds.
Advice: the lower crowns should be tightly packed with soil so that the fence does not sag or fall to one side over time.
Wood: picket fence, fence
For the manufacture of wooden fence It is not necessary to purchase lumber; it is enough to use boards, slats and even branches that are on hand.
Tip: wood deteriorates faster than plastic, so before installing the fence you need to coat the wood with a special antiseptic to prevent rot and insect pests. The treatment can also be done with hot bitumen, covering the part of the tree that will be buried in the ground.
In addition to a decorative picket fence, you can make a fence from slats, simulating a mesh or decorative hedge with your own hands, for example, from a grapevine.
Brick
It is another inexpensive material for building a fence. If brick and its fragments remain after construction, then the problem with fencing the flower bed area will be solved.
Tip: a flower bed laid diagonally with bricks looks best.
However, such a fence serves only as a decorative fence - it cannot provide protection against intrusion by domestic animals.
Glass
Glass bottles can also be used as decorative fencing for flower beds and flower beds. It looks neat, doesn’t require any special expenses, and will last longer than plastic and rubber.
Stone
Fences from natural stone, for example, granite, fit into any landscape design, because the material itself is natural. Pieces of material can be laid out in flower beds and designated garden paths In addition, the path itself is laid out with it, which creates a unity of design style.
Tip: to increase performance characteristics The stone fence must be fastened with cement mortar, and luminescent paint must be used as decoration, with the help of which an ordinary fence will turn into a luminous one after dark. This idea will be an excellent solution for decorating borders along garden paths.
Among the advantages of stone fencing, it is worth noting the possibility of erecting a fence of completely different heights, the strength of the fence and the durability of the structure.
Metal
For those who have a welding machine in their working arsenal, building metal fences on the site will not be difficult. You can weld scraps of pipe or reinforcing rod onto a pre-prepared frame. True, this option cannot be classified as a budget option; here you will have to fork out for both cooking material and high-quality fasteners so that the fence lasts a long time.
There are more budget option metal fence - a DIY decorative wire fence.
In addition to the above fences, you can also use hedge- the bush grows quickly, serves and decorative decoration, and fencing the area from the curious glances of passers-by.
DIY decorative fence made of branches
You can make a decorative fence with your own hands from scrap materials in several stages.
Preparatory work
Preparatory work includes several stages, which should be considered step by step.
Main works
Before making the fence itself, you need to prepare tools and materials:
- hand drill;
- wire for fastening;
- small carnations;
- pliers;
- hammer;
- willow branches;
- pruner;
- supporting material (reinforcement, pieces metal pipes, wooden beams or even thick branches).
Now you can begin the actual construction of the fence:
- Installation support pillars. Pegs are installed in the dug trench (you can use a hand drill to deepen it). The step between them will depend on the height of the fence. So, for small fences for a flower bed or flower garden, a fence 0.5 m high is sufficient. Therefore, the distance between the supports should be at least 0.5 m.
- After the reinforcement has been dug in, you should begin weaving the fence. To strengthen the structure with the first rod, you can stretch wire between the supports. It can also serve as a guide for young rods. The first row must be fixed with the ends of the wire.
- Subsequent rows are woven in the same way. It is important to remember that they must go in a checkerboard pattern. And, of course, to strengthen the weaving, you can periodically pass a thin wire through.
- At the end of the process, it is recommended to fix the ends of the rods using the same wire or nails (if wooden beams were used as supporting elements).
Video: instructions for making your own fence from a grapevine
"Store" options
If the budget allows, then available materials can be replaced with purchased ones. Thus, construction and garden supply stores sell various decorative fencing, which can easily be assembled on site yourself.
Fence made of plastic elements
- availability of ready-made parts and ease of installation;
- the ability to construct fences as flat surface, and on a site with a slope;
- flexibility of elements, variety of shapes, colors and the ability to imitate any natural material(stone, wood, brick);
- light weight, allowing you to easily carry parts around the site.
- it is impossible to manufacture individual elements yourself, so everything will have to be purchased at the store;
- if some parts are damaged, they will also need to be replaced with custom ones in order to maintain the unity of the design;
- poor frost resistance - at low temperatures the plastic is destroyed, but this can be avoided by removing the decorative fencing in the barn for the winter until spring.
Fence made of polymer products
This polycarbonate sheets, mounted on a metal frame.
- aesthetic appearance;
- variety of sizes and colors;
- high quality material.
- high cost.
Concrete fence
Decorative concrete fencing is very popular today and suits any style decision, in which the house and outbuildings on the site are decorated.
- durability, strength;
- variety of shapes, types of products;
- Possibility of painting in any color, decoration in any style.
- high price.
Despite the so-called budget, decorative fences made by yourself will also require some care (stone and brick structures are not considered).
So, a fence made from car tires needs to be restored once every year or two - remove the old peeling paint and cover the rubber with new one in order to extend the life of the fence for several more years.
If your fence is made of picket fence, then the wood, just like rubber, needs additional care, namely:
- timely treatment with antiseptic compounds that protect wood from insect pests;
- new painting of the fence.
Repairs are necessary to extend the life of wire or other metal fencing. paint coating. This means that it will have to be sanded and degreased before applying new paint. In addition, as you know, any surface cleaned of old coating “grabs” new layers of paint much better (and faster).
As for the hedge, everything is clear. Timely watering, pruning and crown formation will help to grow a real “green fence” on the site.
The methods discussed above for constructing decorative fences for dacha and garden area- budget. Owners of private houses, as a rule, whenever possible, purchase ready-made decorative fences that simply need to be assembled on site. However, it is worth remembering that a purchased factory product will not replace the original designer one.
Reading time ≈ 3 minutes
Today, many city people take a plot outside the city and build houses. It can be either a residential building or summer cottage. But any home remains unfinished not only without landscaping the site, but also without a fence. And if you can invite specialists to build a house, then you can make the fence yourself. But to do this, you need to decide what it should be.
Material selection
One option is to make a decorative fence with your own hands, for the construction of which you can use different materials. It will serve not only as protection from unwanted guests, but also as a decoration. Today, you won’t surprise anyone with an ordinary fence, but with the help of a decorative fence, as in the photo, you can not only surprise neighbors and passers-by, but also create a more comfortable corner around your house.

Many people think about how to make a decorative fence, and what material should be chosen for this? There are many options, you just need to use your imagination. To do this, you can take the most various materials: boards and bricks, stones or rods. You can even use glass and plastic bottles. Moreover, you can create a decorative fence for your dacha both in the form of an external fence and to delimit internal areas.

Probably the most original version is a decorative fence made of branches or vines. Such fences have been built for a long time, why not return to using this material again? In order to make such a decorative fence with your own hands, you need to prepare the following materials:
- stakes (preferably oak);
- battens or beams;
- thin twigs (annual ones from willow or vine are best);
- axe, hammer and antiseptic.
Construction of a decorative fence

Below are photos of a decorative fence made by yourself, after reading which you can have an idea of what kind of fence such a fence should have. In case in the process self-construction If there are any difficulties with such weaving, you can also watch the video, which is available at the bottom of the article.

It is necessary to cut the rods with a sharp knife, which should be steamed well in water. This is done to make them more flexible. They should remain in water for a day, and only after that they can be used for weaving. All posts are treated with an antiseptic so that they can stand in the ground as long as possible. You can use both vertical and horizontal weaving methods. For example, a fence from the street can be made using vertical weaving, and then it will resemble an ordinary fence. A horizontally You can fence off any area or passage to the house inside the yard. But for vertical weaving you will need armor between the stakes.

When weaving vertically, the posts are fixed at a distance of 2 meters from each other, and 3 bars are attached between them. And after that, a vine is woven alternately between these beams: first in front of the top beam, then behind the middle beam, and again in front of the beam. The next vine is in reverse order. And so on until the end of the fence. As a result, we will get a decorative fence, as in the photo.


