Choosing interior doors, we want them to have a beautiful aesthetic appearance in addition to practicality. Well-chosen elements and correctly installed door trims will make the room more attractive and cozy. The article examines the types of products, their features and installation methods.

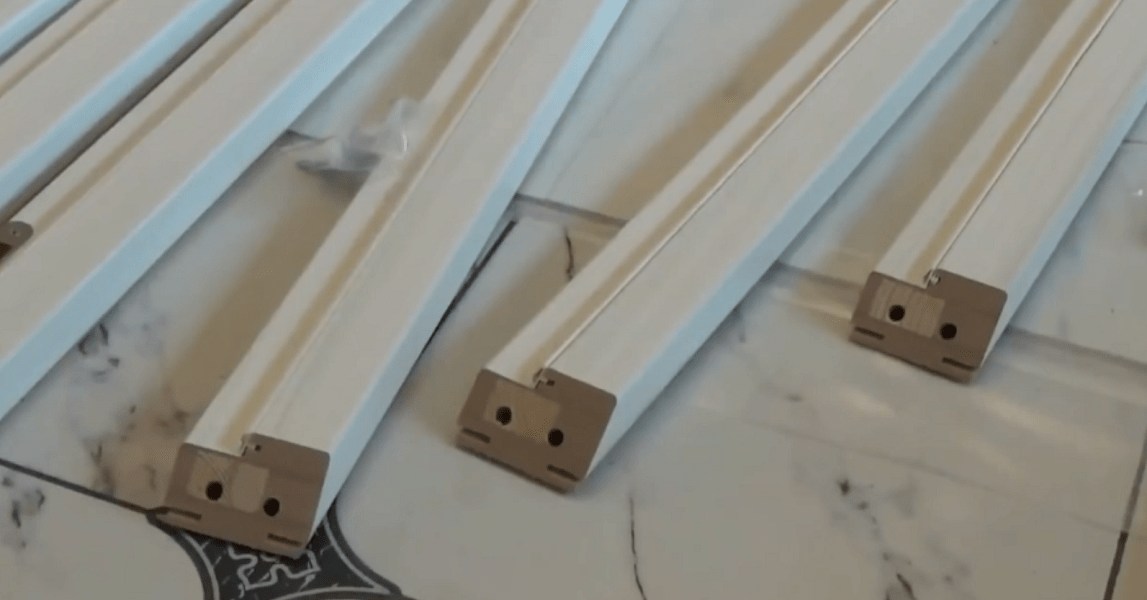
Door accessories are designed to create beautiful door portals that will look better and richer. Adding a frame when installing a door is required if there is a gap between the wall and.
In addition, structures are necessary for:
- Closing irregularities.
- Masking slopes.
- Strengthening the entire doorway structure.
- Preventing door frame distortions.

Types of products
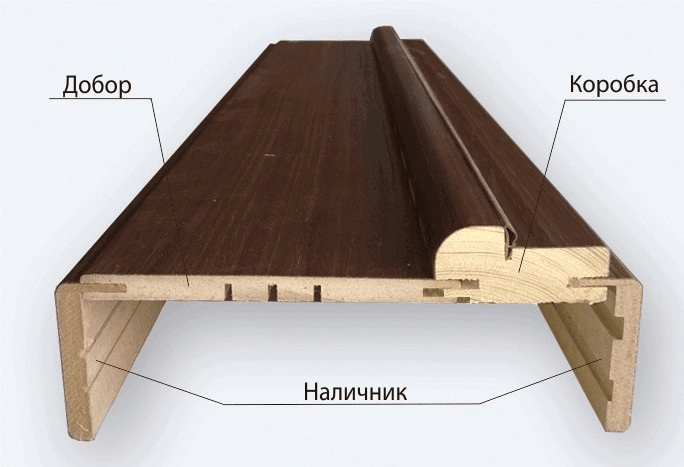
Door extensions are additional strips that cover the wall in the opening, “adding up” its thickness, which is lacking in the width of the frame.

The main types of additional payments are presented in the table:
| Type of addition | Peculiarities |
|
|
This is a strip of laminate or MDF that does not have a facing edge. In this case, the installation of doors with extensions by yourself must be done with special care. A deviation of even two millimeters will reveal the gray raw edge of the part. |
|
|
The end of the part is pre-closed, matched to its tone, edge tape, which will make minor flaws invisible. The price of the edge is very small, it is glued quickly using a regular iron. This method protects MDF boards from swelling under the influence of moisture, which is especially important for door blocks installed in bathrooms and kitchens. |
|
|
This is the most complex design additional Its peculiarity is the presence of special grooves that allow installation without the use of screws and nails. In this case, the extension fits perfectly with the box and. The width of the element is adjusted by the depth of the groove. |
|
|
The peculiarity of the combined design is the addition + platband. In appearance, the product is decorative corner with grooves of great depth. Doors with extensions of this type are installed only when facing a small amount, up to 45 mm. |


The advantages of installing extensions are:
- High speed of finishing process of doorway.
- The room can quickly be given an aesthetically complete look.
- The absence of exposure to moisture on wood and MDF protects the structure from deformation and peeling of the outer layer of the finishing coating.
- The planks hide the joints between the wall and the frame.
- When the sash moves, vibration on the frame leads to cracks in the plaster or wallpaper. The extensions camouflage this area, as in the photo.

Materials for additions
In the manufacture of elements, the following are most often used:
- Tree. It's environmentally friendly pure material, but its disadvantage is that it can deteriorate due to unfavorable conditions that arise during operation, which requires additional processing.

- Plastic. But for arranging extensions, an ordinary one will not be suitable cheap material, it is necessary to choose high-strength plastic, preferably reinforced with metal.

- MDF. Due to low mechanical strength and instability to moisture, such materials are most often used for arranging interior openings. During installation, cracking of the planks is possible, for example, when driving nails. Therefore, it is first necessary to drill a mounting hole to install the fastener.

- Chipboard. It is of lower quality, but can be used to decorate the interior entrance door of a house and has a low cost.

Calculation of the number of elements

Domestic manufacturers produce doors for serial production different widths, 2 meters high, and European kits have a height of 2.1 meters. The platbands, accordingly, have the same length.
In this case, the width of the door panels can vary from 50 to 550 mm, and the thickness is selected according to the thickness of the groove available at the end of the main frame. High-quality panels made from MDF, solid wood, laminate, usually have a thickness of 10 mm.
The ability to handle carpentry and measuring tools is already a reason to try to solve such a difficult task as installing interior doors with your own hands. The work is simple, but tricky in its own way. It will take scrupulousness and even tediousness in marking and adjusting, otherwise it will not be possible to install the interior door with the frame correctly.
Features of installing interior doors
At first glance, nothing complicated, but this is only a superficial impression. It's about about not just installing the frame and door leaf into the interior opening, but doing it beautifully, without distortions, scratches or sagging hinges. If this is your first experience, then it is best to make a detailed step by step instructions DIY installation of interior doors. This is not shameful for beginners. Even experienced craftsmen often make notes with their own hands - what not to forget and what to pay attention to when installing a door frame on a specific interior partition.
During the installation process, you will need to solve two of the most difficult problems yourself:
- Correctly assemble and install the frame of interior doors, align and secure it so that the frame does not sag under the weight door leaf;
- With your own hands, mark and cut out the mounting grooves on the vertical post of the frame and on the end of the interior door leaf.
U experienced craftsman It takes 2-3 hours to install an interior door; a beginner will need at least a day to completely install the frame and hang the door leaf.
Advice! It is not necessary to stupidly follow the instructions for installing interior doors, which recommend sequentially installing lock fittings, attaching hinges, and only at the very end solving problems with hanging interior doors. The main thing is to install the frame and door leaf with your own hands with a fresh mind, and you can put off the trim, locks and handles with trim for the next day.
There will be a lot of measuring and sawing. All cuts are made by hand hand hacksaw, therefore, in addition to fresh forces, you will need to stock up on quality tools.
Tools for installing interior doors
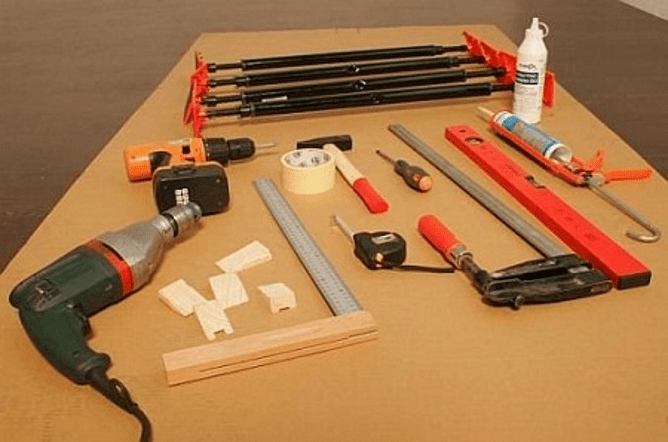
A day or two before the start of work, you will need to assemble a working arsenal for working with lumber. You can collect it from friends or rent it. Why two days before installation? Because well before starting work, you will need to check with your own hands the serviceability and functionality of each tool:
- Construction levels - small, 70-100 cm, and large, 150 - 200 cm, with a working bubble indicator. Usually they don’t pay attention to the condition of the camera and beacon, considering them to be in good working order, but at rental stores you can sometimes find bent and even broken copies, these are the most important tool in the installation of interior doors;
- Marking tool - carpenter's corner with a ruler, tape measure and meter metal ruler. We check for the presence of angle marks at 90° and 45°;
- A screwdriver or electric drill with a bit attachment for cross-head screws. We check with our own hands how the cartridge holds, and the serviceability of the wiring - batteries;
- Cutting tool, you can cut the timber of interior doors with a jigsaw, but it is best to stock up on a pair of hacksaws - carpentry and metal. The first is used for cutting box parts, the second is used for fine cutting of platbands.
In addition to the tool, you will need a hammer, a clamp, a carpenter's chisel, foam in a can, tape and gloves. There is little dust and waste generated when installing interior doors, but you will still have to periodically remove it with your own hands so as not to spread it throughout the apartment.
In addition, it would be correct to have a hammer drill with a bayonet blade in stock, because when installing an interior door frame, problems may occur with the doorway in the wall. Ideally, the gap between the frame posts and the ends of the opening should remain 10-20 mm, for normal alignment and foaming of the cracks. In reality, the opening may be uneven, and you will need to knock down part of the concrete or stone with your own hands, a hammer drill or a hammer and chisel.
How to assemble an interior door frame
The best option would be to purchase a ready-made door kit, which usually includes:
In this case, the entire process of installing the box interior frame comes down to transferring the second parts of the hinges onto the frame parts with your own hands, assembling the holes with self-tapping screws and installing them in the opening.

The entire job will take less than two hours. One of the options for installing interior doors with your own hands in the video

The only drawback of the above scheme is that not all manufacturers modern models interior doors manufacture their products in kits designed for do-it-yourself installation. Most often, the customer buys a door leaf, and the trim and frame parts are purchased with the expectation of installing an interior door with a frame on their own.

How to install an interior door with your own hands
First of all, you need to lay out the door leaf on a level area. Next, the selected pair of beams is laid to the left and right ends of the sash. Using a tape measure, we measure the width and expected height of the future supporting frame. Then, using a building level and a tape measure, check the dimensions of the interior passage.
Important! This is done in order to determine whether the platbands will cover the edges of the hole in the wall, and what thickness of additional elements should be used.

If you “miss” the height or width of the frame, you will have to redo the platbands yourself, or, even worse, you will need to raise the interior door in height.
Assembling a door frame frame of any size
In order to install the interior door without distortions, it is important to choose the correct distance between the left and right posts so that the door leaf fits into the frame with a small gap, no more than 2 mm on each side. In this case, the door will open freely without jamming in the hatch.

The easiest way to assemble the frame with your own hands is using a clamp, a saw and two blanks. Vertical racks, as in the case of preparation, they are placed at the ends, leveled and fixed with clamps.
On the side of the upper and lower edges of the canvas, an allowance equal to the thickness of the timber is left on the workpieces. At the same time, on the left allowance, a cut line is applied with your own hands at an angle of 45° for further joining with the horizontal crossbars of the frame. Without disassembling the structure, markings are applied to cut out the grooves for the canopies, lock and handle.

If the interior door is too wide or complex shape, then usually at this stage they check the conformity of the configuration of the frame with the door to the shape of the interior opening. To do this, a pair of nails are driven into a wooden plank at a distance from each other equal to the outer width of the frame. The plank must be secured above the opening, and a couple of plumb lines are hung on the nails. If the gap between the frame and the wall is 10-15 mm, then the calculation is correct.
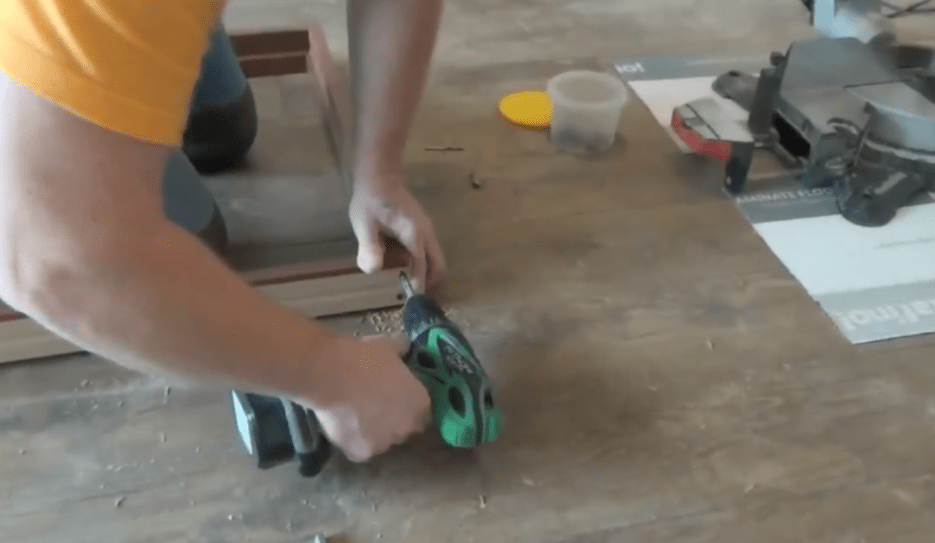
Installing hinges on an interior door
After all checks have been completed, it is necessary to cut out mounting grooves for the awnings in the canvas using a chisel or carpenter's knife and hammer. The easiest way to mill a niche is using a hand router, but, as practice shows, the work can be done with your own hands and without expensive power tools.
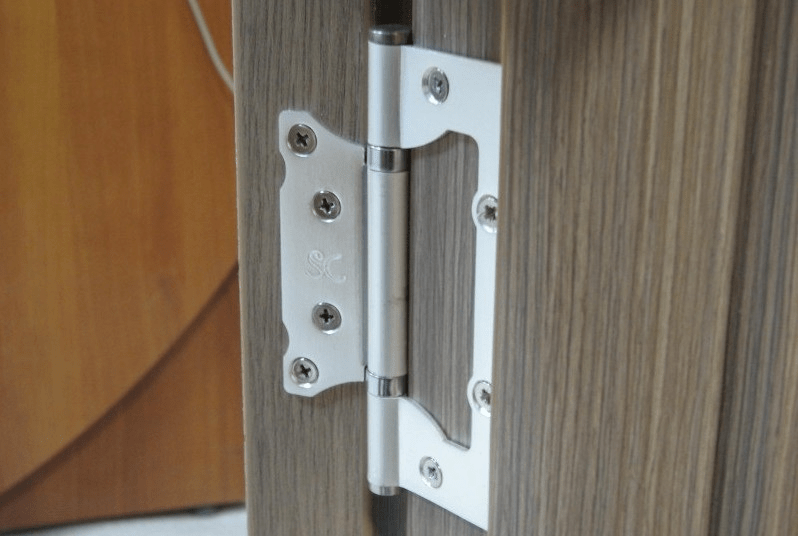
If this operation is difficult, then for interior doors you can use overhead hinges or models for drilling. For installation you only need to drill holes for screwing in the fasteners.
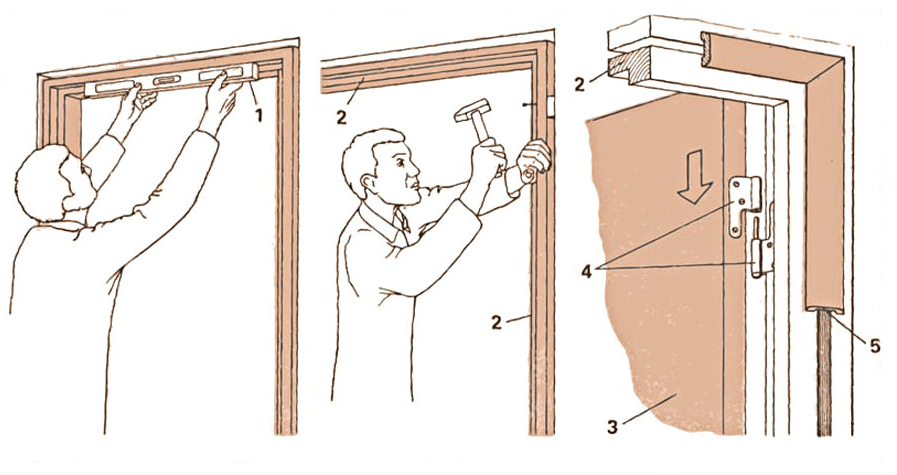
We fix the frame in the doorway
- We mark the level of the upper horizontal cross member of the frame with a marker on the steppe, this will help to perform the correct installation horizontally and vertically;
- Using wedges and a building level, we level the frame vertically and horizontally with our own hands. We fix the position of the frame in the opening wooden plugs and wedges.

Advice! If the frame and door leaf are light in weight, then the frame can be fixed with mounting perforated petals to the wall of the interior partition.

Next, you need to blow out the space between the frame and the wall with polyurethane foam; while installation is being carried out on the polyurethane foam, you need to check it again and, if necessary, finally level it vertically using a long building level. Apply a small amount to the top mark building level and, if necessary, we adjust the frame to the required height.

Installation of door leaf
After the loot is firmly fixed with hardened foam, it is necessary to install the mating parts of the canopies. To do this, initially the door leaf is raised with wedges so that there is a gap of 1-2 mm between the threshold and the lower edge.

All that remains is to install the sash on the awnings, and you can move on to decorative finishing interior doors.
Installing trim on interior doors
Covering the frame with platbands is not particularly difficult. First of all, install the vertical trim strips. The height of the plank is measured according to the mark made earlier, after which the platband is applied to the frame and the cut line is marked at an angle of 45 degrees.
Advice! It is best to make the cut yourself using a thin hacksaw blade for metal. First stick tape onto the cutting line. The plank is nailed with wallpaper nails or placed on glue.
The second vertical casing is installed in a similar way. After the installation of the vertical parts has been completed, you can mark the cut line on the horizontal strip and install it on the door frame in the same way.
What are the sizes of extensions for interior doors?
Additional strips are used as an additional element to increase the width or thickness door frame. Most often, installing extensions on interior doors is required in a situation where the wall is much thicker than the canvas, and there is a gap between them that needs to be closed.
The width of additional slats ranges from 10 mm to 200 mm, for interior designs the most popular size is 10-20 mm, and often, due to the non-standard profile of the slot, the extensions have to be ordered or cut out with your own hands from the trim strips.

How to install extensions on an interior door
If after installing the box the unpleasant fact is discovered that vertical plane frame is recessed into the space of the interior opening relative to the wall surface, then the only way to correct the position is to use additional strips.

You must first determine the size of the extension; to do this, place a building level on the wall and use a ruler to measure the distance to the front edge of the box. Thin strips are nailed with wallpaper nails, wide extensions are glued to the frame.
Professional advice on how to install interior doors
Among the features of installing home doors, the following problem areas can be noted.
Before installing the trim, you need to make sure that the frame or additional strip is located in the same plane with the surface interior wall. Otherwise, even if you do it perfectly with your own hands, a gap will definitely appear between the platbands.
The second problem we have to face is sagging doors if installed incorrectly. To correct the position, you need to remove the door leaf, place washers, or trim the edge and install the door in place.
Conclusion
Installing interior doors with your own hands will require a little practice in installing awnings and extensions, but in general the work is not difficult, and with the right skill you can hang the door in a few hours. The craftsmen claim that with each installation, the quality of their DIY work doubles.
Replacing an entrance door today represents a whole range of work. And this requires additional elements such as extensions and platbands. And if earlier the slopes were finished using cement mortar and colors, then today design move no longer used. The installation of additional equipment has come to the fore front door followed by framing with platbands.
Accessories for door frames
New material, which is additional material, appeared not so long ago. But it’s hard to imagine modern life without it. doorway. Therefore, you should get to know him better.
Purpose
The extensions are designed for lining the slopes of deep doorwaysWhy do you need an extension for the door block? This element is intended to decorate the opening after installation of the box. The fact is that when producing boxed bars, manufacturers adhere to standard size in width. And it is somewhat less than the depth of the doorway where it will take its place. And to make the frame frame look more natural, free space supplemented with special panels, which are called additional panels.
Varieties
Depending on the design project, the following types of additions can be used:
- Wooden;
- Metal.
The most common are products made from MDF, which are most often found on shelves construction stores, and in the apartments of citizens, thus covering the nondescript slope of the doorway. The next most popular products are wood products, and only then metal type doborov.
 Extras with MDF platbands
  Polyvinyl chloride panels have become no less popular. These products are easy to use and maintain, which is why they are increasingly used for framing. doorways.
In addition to the material of manufacture, slope framing can be divided into three more categories:
- With missing edge;
- With existing edge;
- Telescopic view.
 Edge options
 The edges of the first type of trim are not processed, but represent the simplest evenly cut edges. They are closed with platbands installed on top of the ends of this product. The disadvantage of using extensions that do not have cladding is their potential fragility due to the penetration of water vapor into the product.
The edge extension has the appropriate processing. This type is much better protected from moisture penetration. Some inconvenience associated with trim that has processed edges is the need to select the exact size in width. If this is not done, then the edge will have to be cut, which will automatically deprive it of all its advantages.

Telescopic extensions are distinguished by the presence of a machined groove and ridge on the side parts. If you need to close a wider slope, you just need to take another product and connect it to another. Some differences in width can also be easily eliminated by simply moving two parts apart without losing the attractive appearance. Thus, decorative element frames the doorway, making it complete and beautiful.
How to make extras with your own hands?
If you couldn’t buy a set of extensions along with the door block, then you can always make this element yourself. And in the case of finishing a house with wood, such a solution will be optimal.
To perform the work, you can choose the usual planed boards thickness no more than 20 mm. The width is selected based on the depth of the doorway. To eliminate the option of warping, which constantly haunts natural wood, can be used MDF panel or PVC. Such materials are well suited for finishing the entrance door opening both outside and inside.
 The width of the extension depends on the depth of the doorway
 Often the panels used have a tongue and groove design. To prevent them from interfering, you should cut off the excess with a jigsaw or hand circular saw. For soft material, use a chisel, which can easily remove any ridge. The cut side should be processed to give it the appropriate appearance for joining with the platband. The wood is planed with a plane or router, and the PVC panels are simply cut evenly with a stationery knife.
You can put insulation under the homemade addition, for example, mineral wool. This will relieve apartment owners from extraneous sounds coming from landing. This insulation perfectly blocks noise, so its use for finishing a doorway will the right decision. In addition to the absence of extraneous sounds, the use mineral wool will make the front door warmer, because there will be no drafts or cold bridges.
 The stain preserves the structure of the wood
 Methods for installing extensions on the front door
Finishing the doorway of the front door can occur in three ways:
- due to the door frame;
- installed on the wall of the opening itself;
- mounted on a special frame.
In most cases, installation of an additional board involves the use of a special groove selected on a box beam. And the main fastening material here is “liquid” nails. Due to the fact that the addition does not carry a load, adhesive fastening will be quite enough.
An alternative to “liquid” nails are self-tapping screws. They are twisted into a decorative element with front side. But if it is not hidden with an appropriate overlay, then the appearance of such a finish will not be entirely attractive. In rare cases, nails with a decorative head are used for fastening. But this option requires an appropriate interior design of the hallway.
 Installation of extensions is carried out using liquid nails or self-tapping screws
Whichever installation method is chosen, the following actions will be performed:
- Two side blanks of the same size are cut;
- Mounted on the side slopes of the opening;
- The top blank is cut out;
- Installed between the side elements.
This algorithm can be performed in the opposite direction, when the trim of the front door opening starts from the top element. In this case, the side panels should take a position between the floor and the top bar. But at any joint, installation is carried out only from the side elements. This is the most correct and convenient option.
In order for the slopes to be as airtight as possible, a silicone sealant. Next, an extension is inserted into it, secured in one of the listed ways. This ensures that there is no air movement through the joints between the workpieces and the door block.
What to do if there is no groove
Finishing slopes with extensions can be done not only if there is a special groove in the box. This causes some inconvenience in terms of creating a clear and even outline of the opening. But even in this case, you can achieve the desired result.
To carry out work on installing extensions on a box without a groove, you must:
- measure the depth of the doorway from the edge to the frame beam;
- file wooden blanks for the frame;
- install the frame using bars, a building level and self-tapping screws;
- secure the extensions to the frame using mounting adhesive, screws or nails.
According to this plan, you can carry out future work and get a smooth and beautifully designed doorway.
Accessories for metal doors
IN Lately began to gain enormous popularity. These blocks do not have a special groove for installing extensions, although there is a clear need for them due to the minimum width of the iron box. And this is where drywall comes to the rescue.
 Extras for metal door installed using drywall
 To install extensions in an opening with a metal entrance door, it is necessary to cut strips whose length is equal to the depth of the slopes. The number of parts depends on the height of the box beam. The installation frequency should not exceed 30 cm, which makes it possible to give the finish proper strength. The planks are glued to the wall with glue. If necessary, an additional one is attached to one part so that the level of the walls exactly matches the contour of the door block.
When the original frame is ready, installation of the extensions begins. Any materials that are available to the apartment owner will be suitable for the work. Additional strips are attached using assembly adhesive applied to inner surface each element. Upon completion of the work, it is necessary to install platbands on the new metal entrance door.
Platbands on the front door
If the extensions are a continuation of the box, filling the slope of the opening, then its completion can be called the platband. There is also a large selection here.
Purpose and varieties
The immediate task facing such an element as the platband is to frame the doorway. These interior elements are decorated with them. Modern door frames can be divided into the following categories:
- flat;
- rounded;
- curly.

The first option allows docking in any form. But rounded and figured platbands can only be sawn at an angle of 45 degrees. In this case it is necessary to have special device, called a miter box.
 Curly trims are sawed at an angle of 45 degrees
 In addition to the shape, platbands can be divided into:
- Monolithic;
- With built-in cable channel.
The use of monolithic elements can be considered classic version framing doorways. But cable channels began to be placed in platbands in order to “hide” excess wires from prying eyes. These structural elements are made of PVC and consist of two parts. One is attached to a wall or box, and the other serves as a decorative cover that covers the wires laid inside.
Methods for installing trim on the front door.
Platbands according to the method of fastening can be divided into:
- Invoices;
- Telescopic.
 Overhead trims are installed using fasteners, and telescopic ones using a comb
 The first method involves fastening the elements using nails driven through the body of the platband into a box or wall. Other types of fasteners can also be used, which will be hidden under the decorative element.
Telescopic platbands are installed using a special comb inserted into a groove on the extension or additional strip. In this case, you can use glue to firmly fix the part in its place.
Installed in the house beautiful doors play the role of the entrance to the room, they are also entrusted with an aesthetic mission, helping the designer in creating unique style in the interior of the room.
Additions, or need to be installed if the width of the box structure differs from the thickness of the wall where it is installed. In addition to the main function, to hide unsightly unevenness or to remove slopes that quickly get dirty out of sight, the extensions strengthen installed structure doors and hold it, protecting it from possible warping.
How to install extensions on interior doors yourself and is this even possible in principle? The answer is yes, it is possible, and most importantly, they can be installed both on existing doors and when installing new ones.
Extras - what types exist?
Every person should always have a choice, this statement also applies to extras, which can be done in two ways:
- on our own;
- in industrial conditions.
For making boards yourself, the following types of boards are most suitable:
- flat;
- edged;
- tongue and groove.

If the walls are damp or are distinguished by their considerable thickness the best view The material to be used for completing the installation yourself is waterproof plywood, which, due to its properties, will not be subject to deformation in the form of delamination, cracks and deformation from excess moisture.
Doing something with your own hands is always commendable, but accessories made in industrial conditions are not only convenient, but also much more economical. Manufacturers make additional boards from MDF, which is processed decorative coating, the length of the finished boards ranges from 80 to 550 millimeters.

The standard procedure for installing extensions involves attaching them to a special recess, which is located inside the new structure. If the extensions need to be installed on a door that is already installed, then attached extensions, which are adjacent to the frame, or underlay extensions, which are slipped under the installed door, are perfect.
What to do if the door is installed askew
There are situations when installing additional material will not be advisable and should not be done. And such a situation is a skewed jamb design, in which the level of irregularity of the top bar exceeds five percent. As a rule, the design of the box cannot be skewed, but if deviations can still be observed, this indicates a violation of the production technology, which led to defects in the design.

Necessary tools and necessary accessories
It is clear that to install the extension you will need certain tools, which include:
- milling manual typewriter for working with wood;
- hand circular saw;
- clamp with soft covering.
If the clamp saw is securely attached to the surface of the stool, with the disc facing up, you will get a completely functional circular saw, which is necessary when installing extensions. A soft covering for a clamp can be made using several layers of heat-shrinkable tubing, each of which must be heated in turn by bringing it to the fire and cooled.
Supplies for installing extensions you will need:
- stable stools - 3 pieces, it is important that their height is the same;
- five wooden planks measuring 30x30 millimeters;
- ten wedges;
- plasterboard, if this is not possible to purchase, packaging plywood will also do.
Installing a door panel - basic calculations
At the first stage, it is necessary to correctly perform the calculations, for which doorway we determine the plane that will be the base, in Figure 5 plane “B”. The plane “B” will be the base, its mark on the floor is marked with a pencil. In order to correctly perform all calculations, the Pythagorean triangle method is used, shown in Figure 5:
- the width of the doorway, half of it, is taken as three basic lengths (ZI), that is, if the width of the doorway is 60 centimeters, then the indicator ZI will be 10 centimeters (60:2:3);
- using a cord, from each corner of the opening we measure the distance to point “O” and make marks 5l. The distance from the middle of the opening, point “O” in Figure 5, to the base point “B” should be 4l, only in this way the line between points “O” and “B” will be perpendicular to the surface of the opening.

Walls with a slope, how to install extensions
Using a slope in calculations, as a rule, it turns out that the walls are not far from ideal and cannot boast of being ideal. flat surface, on the contrary, have either a negative or a positive bias, what to do in such a situation. Faced with uneven walls, you can try to use plaster to level the slope, but the result will be positive only if the slope is no more than five millimeters. If the slope is more than five millimeters, then it is necessary to use an additional wedge, which is performed during the process of sawing the extensions.
Foam treatment
After the additions are installed, before plastering work is carried out, the cracks must be filled with foam. The main thing is not to forget that when hardening, polyurethane foam tends to expand significantly and increase in volume. Therefore, in order to prevent deformation of the jamb due to the pressure exerted by the foam, the wedges that act as a straightener should not be removed until the foam has completely dried.
Most in a simple way installing the extensions is their installation, carried out simultaneously with the installation of the door and its frame. Let's look at the installation procedure:
- on the prepared stools, the structure of the finished door jamb, which must be installed so that its inner side is located on top;
- using diagonals, we align the corners, the size of which should be the same, for this you can temporarily nail the bar;
- We cover the perimeter of the box structure with strips of plywood, which can be attached using nails, or drywall; for fastening, you should use self-tapping screws; the material should protrude;
- The top bar is installed clearly between the side ones. After that, we apply glue on the edge, which is suitable for wood, until the glue sets, we insert the extensions. After this, you just have to wait until the glue dries;
- the temporarily nailed strip can now be removed, and the door frame structure can be installed in the opening;
- using wooden spacers, the box is leveled, for which we use a plumb line to check verticality;
- We achieve a horizontal position of the top strip on the door using wedges, which after installation we treat with polyurethane foam;
- we treat the wall surface by applying a layer of plaster;
- Finally, we install the skirting boards;
- We attach the platbands with glue.

In order to facilitate the installation of the extensions, you need to make sure in advance that you have several wedges on hand, no larger than 4 millimeters in size. After preliminary preparation Before installation is completed, you must do the following:
- knock off a layer of plaster and check for the presence of a quarter in the structure, if a quarter is installed, in this case you only need to select the correct size of the extension;
- shorten the material to the required size;
- on inner side apply glue and install in place;
- using wedges we level the material, leveling its height;
- We insert the planks one by one into the prepared opening width;
- We fix the extensions using wedges;
- Apply a layer of glue to the extensions and install;
- We use polyurethane foam to process cracks;
- apply a layer of plaster.

Interior doors are installed.
Video instructions on how to install extensions on interior doors
01.08.2014
Interior doors are installed on one of last stages repair. In addition to installation, it is of great importance here right choice sizes and configuration of the door block. We offer an article on how to quickly, correctly and technologically install doors, platbands and slopes with your own hands.
Dimensions and types of door frames
Before arming yourself with a chisel and a screwdriver, let’s study the basic rules and regulations for installation. The door block must be installed in the opening freely, maintaining gaps sufficient to form a foam seam.
The thickness of the door assembly is determined by the width of the pillars. For standard gypsum plasterboard partitions and half-brick walls, the door is installed in a block 75 or 73 mm thick. In the openings of main walls, pillars with a width of 100 mm are used. Please note that in the first case, the doors are installed without slopes.
The standard width of door leaves with a height of 200 cm and more can range from 600 to 1000 mm, sizes change in increments of 100 mm. For doors with a height of 190 cm, the minimum leaf width is 550 mm, the maximum is 900 mm. We will start from the dimensions of the canvas to calculate required sizes opening.

The thickness of the MDF box stands can vary from 22 to 33 mm. Factory-made pillars made of laminated veneer lumber can have a thickness of up to 35 mm, and those produced in “garage” workshops can have a thickness of up to 50 mm. Ultimately, what matters is the actual size of the narrowest part—the fake part. To calculate the horizontal dimensions of the opening, we add to the width of the door leaf two values of the thickness of the pillar in the narrow rebate part. The height of the opening depends on whether the door is installed with a threshold or flooring will be laid in a continuous contour. In the first case, we add two values of the thickness of the slats in the recessed part to the height of the canvas, in the second - one value plus an additional 15 mm.

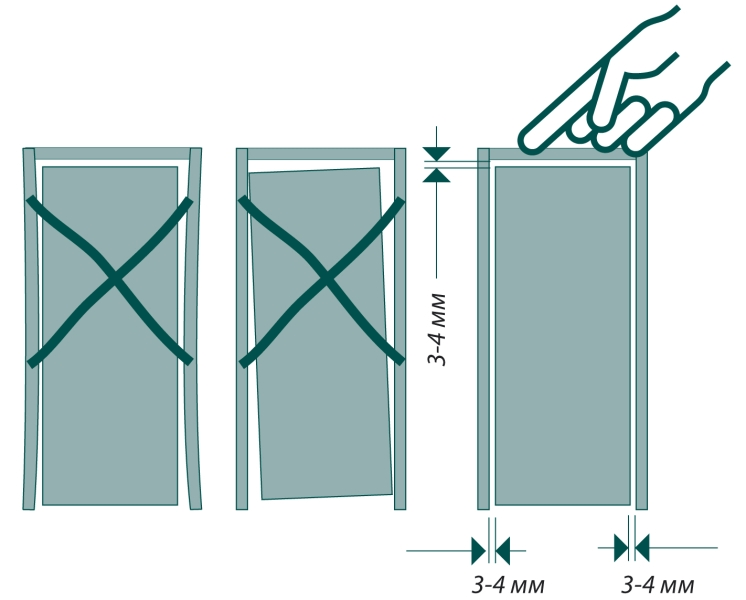
But that's not all. For the door to move freely and close, a gap must be maintained between the leaf and the frame. For doors made of MDF or prefabricated panels, the gap is 3 mm on each side of the rebate. For doors made of solid wood, the gap is 4-7 mm, depending on the quality of the wood and the assembly of the product. As for the technological gaps between the door block and the opening, it is recommended to adhere to a value of 15-20 mm.
Preparing the opening
It is not enough to simply make sure that the opening width corresponds to what is required at any arbitrary point. The profile of the door frame must fit exactly into the opening in a strictly vertical position, so at least one side should be aligned vertically.
Expanding the opening is not a problem; this is done using a cutting wheel and an angle grinder or a hammer drill. But sometimes the opening has to be reduced. To do this, you need to secure a block of appropriate thickness on one or both sides. Sometimes, to reduce the opening, a wood lining is installed on all three sides.

Fastening the door block to the walls is carried out by polyurethane foam, which means the surface of the edges of the opening must have high adhesion. In gypsum plasterboard partitions, openings are formed by the central shelves of rack profiles. It is enough to clean their surfaces from traces building materials and lightly sand with sandpaper. Openings in stone walls It is necessary to clean it from dust and dirt, then coat it once with a primer.
Assembly and installation of the door frame
The door block frame is assembled from two side posts, top crossbar and, optionally, a lower jumper that acts as a threshold. Fitting and fitting of parts should be carried out on a flat floor, with the stand parts facing towards you.
First, cuts are made on both side posts: the protruding strip is cut with a matching hacksaw with a distance from the edge equal to the full thickness of the pillar. This is done for the correct abutment of the profile bars in internal corners Lutki. When the cuts are made, a jumper is inserted between them. Its length should be equal to the width of the door leaf, plus the values of the gaps between the door and the frame on both sides.

The height of the door frame is the length of the door leaf with gaps on the top and bottom or only on the top side for installation with or without a threshold, respectively. This distance should be set aside when the box is assembled on the floor without fastening. According to the marked length, the stands are simply cut in a miter box at a right angle.
If a threshold is installed in the lower part, it is cut out longer than the upper crossbar by at least two values of the thickness of the pillars. If the upper jumper is installed spaced between the posts, then the threshold is simply applied to the box from below. Naturally, you need to remember to make undercuts for the central protruding strip. If, as a result, the threshold protrudes slightly beyond the dimensions of the door frame, it is not necessary to trim off the excess.

To fasten the parts of the box together, you can use non-heated anodized screws or furniture confirmations. The connection is made in the corners of the box: first, the fastened parts must be set at 90°, and then drill one pilot hole with a diameter equal to the rod of the self-tapping screw or confirmat without taking into account the thread, displacing it from the center by 15-20 mm. When the first fastening element is screwed in, the right angle is checked again, after which the second fastener is screwed in, also offset from the center, but in reverse side. If the box is installed without a threshold, its bottom is temporarily secured with a wooden plank. The plank should be screwed into those places that will subsequently be hidden under the trim or additional trim.
Installing the box in the opening takes 10-15 minutes. At first door block it is fixed using spacers - wedges cut from polystyrene foam. You need two wedges for each vertical part of the box and one under the top crossbar. A foamed polyethylene tape is rolled out under the threshold of the box. Due to the soft fixation on foam wedges, the box can be freely adjusted. On the side into which the door will open, the frame should be positioned flush with the plane of the wall finishing. This is done using a long rule attached to the wall with a slight overhang into the opening. Special attention you need to pay attention to the corners of the box, applying the rule obliquely along two adjacent sections of the wall.

Once the door is aligned, it is temporarily secured to the ends of the opening. If the stands have an overhead strip with a secret groove, fastening is done through this groove - with a regular self-tapping screw through and through. When installing doors in gypsum plasterboard partitions, this is the only option invisible fastening. If the door block will have slopes, first screw mounting or U-shaped plates to the back side of the pillars for plasterboard profile, through which the box is fixed in the opening.
The value of such fastening is purely nominal; it is necessary so that the block does not move due to foam expansion. When the door is secured, all gaps between the block and the opening are filled with polyurethane foam to half or 2/3 of the seam volume. It is important that the foam circuit is continuous. Further work on the door can be continued after 1.5-2 hours.
Hinges and other accessories
Practice shows that it is better to hang the door before the frame is fixed in the opening. Firstly, the door serves as a spacer element that does not allow the foam to squeeze out the flexible pillars. It is only necessary to place 3 mm chipboard spacers between the door and the frame while the foam hardens. Secondly, the loot on the floor is simply easier to manipulate when inserting loops.

First, the hinges are cut into the door frame itself, retreating 20-25 cm from the upper and lower corners. The hinge must be positioned so that the cylinder is almost flush against the corner edge. Parts of the loops with pins are attached to the loot, which should be facing towards the top crossbar. The hinges are first attached as is, without insertion, each screwed with two screws. Next, the plates are outlined along the contour with a sectional knife; this is necessary to trim the veneer, so it is guaranteed not to be undermined during the process of sampling the material.
Next, you need to remove the loops and walk along the formed cut with a chisel, turning the blade towards the inside of the cut. The hem should be made 1-1.5 mm deeper than the thickness of the hinge plate. After this, sampling can be done in two ways. The first and optimal way is to remove the thickness of the plate manual router, not reaching the cutter 1-2 mm to the hem line, and then form the edges of the sample with a chisel. The second method is to apply an arbitrary number of notches to the surface with a chisel and use it to remove the material, periodically trying on the loop until the plate is recessed flush with the rest of the surface.

To install hinges on the door, you need to temporarily insert the blade into the hinge, checking that the gaps are even on all sides. Next, using a sharp knife, place two marks on the corner edge of the canvas exactly in those places where the edges of the hinge plates adjoin the door. Now the door can be removed, placed on its edge, the hinges screwed on, circled around them with a knife, and then - by analogy with inserting hinges into a door. If single-sided insertion hinges are used, the marks should be placed with a pencil along the edges of the cylinder, and then simply screw the back part of the hinge without cutting out the groove.

Locks, latches and sealing brushes are easier to install on the door when hung. First, at the end of the door, using a feather drill, a groove is selected for the internal mechanism of the lock or latch. The final shape of the groove must be given using a chisel. Next, the body is installed in the groove, the lock is temporarily secured with screws, after which the outer bar is traced along the contour with a knife. After sampling the material, the lock or latch body is finally installed; you first need to drill holes for the square pin.

Installation of slopes and platbands
The final phase of door installation begins - installation of the decorative frame. You should start by installing extensions to form slopes. The best way their fastening is done with “liquid nails” glue, the type of which is chosen in accordance with the material of the walls. The top plank is installed first: it must be cut exactly according to the shape of the upper edge of the opening, taking into account the angles of the slope. To secure the top panel, you need to apply a bead of glue about 5-7 mm thick on it in a zigzag and press it firmly, supporting it with a long strip.

Next comes the installation of side panels. To accurately observe the upper slope of the slope, to door frame you need to attach a square and mark the difference in height that forms the upper extension. The width of the board is cut so that its edge protrudes above the plane of the wall by about 1 mm. It is important to remember that to the width of the trim you need to add approximately 2/3 of the depth of the groove into which the trimmed edge of the board is inserted.
The fastening of the platbands is also done using polymer glue. First, all parts must be cut to the size of the opening and the pattern of joining corners. There are two options here: the planks are either connected with an oblique cut at 45°, or first vertical trims with a straight end are attached, and then a horizontal element is inserted between them, the edges of which are made with an undercut of oblique slopes. For reliable pressing while the glue is fixing, it is recommended to cash both sides at the same time, tightening them with clamps.