Experienced rabbit breeders should know how rabbit cages are built with your own hands. Only in this case can you be sure that long-eared pets will not be endangered by low-quality materials or improper manufacturing processes. There are no particularly specific conditions for keeping rabbits; you just have to take into account that their wild counterparts live in ordinary burrows. Since there is nothing complicated about how to build a rabbit cage with your own hands, even novice rabbit farmers can do it.
Cell components and materials used
Any cage intended for rabbits must be equipped in a certain way. It must contain the following parts:
- The frame and supports on which the entire structure rests are made of wooden blocks. To ensure that rabbits kept outside are protected from rodents, cats and dogs, it is worth placing their cage at a height of about 70 cm from the ground.
- Walls made from plywood, boards or mesh. For beauty, you can decorate the walls outside plastic or wooden slats. For ease of cage care façade parts make two doors (one from a mesh, the other from a board).
- Floor most often made from slats or mesh. Some rabbit breeders install a solid floor, only placing a mesh in the back to remove waste through it. There are adherents of different materials who learn from their own experience what is best for animals kept in different conditions.
- The roof is most often made of the same material as the walls, and to protect it from environmental conditions when kept outdoors, you can install an additional covering of any roofing material.
When creating cages for rabbits, it is not recommended to use metal. In the heat, the iron becomes hot, which causes discomfort for animals, and in the cold they can easily freeze to such a coating. Even when creating the simplest cage for rabbits with your own hands, you need to make sure that all the parts are smooth and not dangerous. Any defects in the mesh should be eliminated, and the wood should be treated with sandpaper.
Various designs
Before you make a cage for rabbits with your own hands, it is worth finding out what designs exist for keeping them. Several types of structures are now known:
1. An ordinary cage for keeping rabbits is represented by a kind of box on high legs with two doors. Inside, the space is divided into a feeding and nesting compartment, and a manhole is equipped between them. Cages should be equipped with feeders and drinkers of various designs, as well as sufficient space for the animal to be active. If you make the most popular rabbit cage with your own hands, its diagram should look something like this:
Some sizes can be increased slightly, based on the breed of rabbits, but in most cases these are the parameters that are suitable for adults.
Of course, there are some differences when creating cages for young animals, pregnant and lactating females, and adults, but in general they are all built according to the same scheme. To keep two individuals in one cage, it is worth slightly increasing its size.
2. The design of the cell proposed by I.N. is considered very complex. Mikhailov. Mikhailov cages for rabbits are entire mini-farms or, as they are called in scientific sources, reproduction units. Its units are equipped ventilation systems, original feeders, many manholes and shelves, electrically heated uterine compartments and drinking bowls, self-removal systems for manure, etc. The head farm is constantly improving its cages, so followers should regularly visit the authors' farm to keep up with the latest developments in the field of accelerated rabbit breeding.
3. Unlike the previous unit, the design proposed by another author, N.I., has taken root among the people. Zolotukhin. Creating a Zolotukhin cage for rabbits with your own hands is not a very difficult process, and besides, the author does not even think about hiding his ideas. From above, its design looks like this:

The floor is made of plywood or flat slate, not from the grid. Mesh, about 10-15cm wide, is only used on the floor at the back of the cage, as this is where rabbits urinate most often. Zolotukhin’s designs are three-tiered: two cages in three floors, with each upper floor moved back by the distance of the grid in the floor - so the waste products of rabbits do not interfere with the inhabitants of the lower cages. Also, a distinctive characteristic of these cages is the absence of a stationary queen cell: in winter, a burrow house is placed in the cage, and in summer, the female rabbit makes a nest right in the hay.
Craftsmen create other designs with different quantities tiers and with different equipment, using combinations of the most suitable, in their opinion, components of the cage and building materials.
Stages of creation
It is worth considering in detail the process of creating the simplest single cage for a rabbit (more complex designs are also based on this approach):
- First you need to choose a place where the rabbitry will be located. It should be protected as much as possible from wind and drafts.
- The next thing you need to create a rabbit cage with your own hands is drawings. They take into account the purpose of a particular cell, its various contents, and the structure of the entire structure. When determining the size, you should rely on the size of a specific breed, but most often they take the size of 150*70*70 cm.
- Next, a frame of beams is made according to the dimensions. If in the front part the height of the cage is usually 60-70 cm, then in the rear part the height is taken less (so that the roof is tilted).
- The frame is sheathed with plywood, boards or other selected material. Inside, the cage is divided by a partition into nesting and feeding compartments, and a hole with a diameter of 20 cm is cut out in the partition. To prevent rabbits from gnawing the partition, it is better to line the hole with tin.
- After the walls, they begin to make the roof (for ease of maintenance, it is better to make it removable).
- Cages are hung on the façade doors, and the door to the aft compartment is made of mesh, and the door to the nest compartment is made of boards.
- When keeping rabbits outside, you can attach an additional structure made of mesh for walking to the back of the cage. If you carefully think through the design of ladders and shelves, you can provide the rabbit with the opportunity to sometimes eat pasture. shelves, etc.),
- tall and solid pallet(this is important both for the pet itself, since its paws do not have pads, and for the owner, so that the contents of the cage are not scattered around),
- absence of sharp elements, slippery surfaces, parts treated with varnish or paint for the safety of the big-eared animal.
Cages are usually purchased for residential use because they are quite beautiful. But beauty does not always mean convenience for a pet, and therefore it makes sense to think about how to make a cage for a decorative rabbit with your own hands. You can easily make a cage that will be similar to the purchased version from a fairly high rectangular basin (to create a tray) and galvanized mesh with cells no larger than 25*25 mm.
This mesh bends easily and does not break, making it easy to make a parallelepiped without a lower part, and insert the lower ends of the wire into pre-made holes on the side of the basin. There is a door on one of the walls. To prevent the floor from being slippery, you can pour sawdust into the cage or put corrugated cardboard on the bottom. At the end, you need to place a drinking bowl, feeder, ladder and other entertainment for your eared pet in the cage.
How to build a rabbit cage yourself? This question usually arises among beginners who decide to start rabbit farming. Experienced farmers usually develop designs that are convenient for themselves, making it easier to care for animals.
Cells can have different structures and be made from a variety of materials. They are made completely simple or additionally equipped with “conveniences”, such as running water or heating. In the construction of the cage, much will depend on the planned number of rabbits, their breed and size, on the availability of retreat materials and on the place where it will be installed, on the desire and ability to equip it with various devices, as well as on the ability to work with carpentry and plumbing tools.
Cell placement
Rabbit cages can be located in utility rooms, such as, for example, or directly on the street. Therefore, they can be divided into three types according to their location and the method of breeding rabbits:
- Year-round outdoor placement of cages, when animals are constantly outdoors.
- Keeping pets indoors all year round.
- Combined breeding option, that is, in winter period rabbits are kept indoors, and with the onset of warm weather they are transferred outside.
Experienced rabbit breeders believe that the most optimal way to breed these animals is to keep them outdoors all year round, as this promotes the development of immunity to various diseases and the formation of healthy, high-quality hair. In addition, when raising rabbits outdoors, the productivity of females significantly improves, which increases the number of rabbits in the litter and their endurance.
Street cages
Rabbit cages are most often installed outdoors if you plan to breed a large number of animals - a hundred or more animals.

Convenience of arranging rabbit hutches in street conditions is to have more space and ease of care for your “menagerie”, since each of the cells needs periodic cleaning.
Rabbit cage
To build outdoor cages, fairly durable materials are used, since the structure must be reliable and stable - these qualities will help protect rabbits from adverse weather conditions. natural factors, as well as from penetration into the cells of predatory animals - dogs, foxes, cats or rats.

It is advisable that the building be located under a large front canopy so that any precipitation, as well as direct sunlight, do not bother the pets too much.

If the rabbits will be outside all year round, then it is necessary to take care of insulating one of the parts of the cage. These animals tolerate low winter temperatures well, but it would still be a good idea to create comfortable conditions for them and a special place where they can bask on particularly cold days and nights.
Cages placed indoors

Cages placed in non-ventilated areas can be made entirely of metal mesh attached to a wooden frame and have a wooden lattice floor. If breeding pets is carried out indoors, it is important to think carefully about the convenient disposal of their waste.
Combined rabbit breeding option

In another case, if funds and space allow, cages are built in two places - both on the street and in a barn. This method of farming is unlikely to be suitable for those farmers who raise a large number of pets, since installing winter and summer cages will require a fairly large area.
Cell design and size
Rabbit cages can be single-tiered or multi-tiered. In addition, their design may vary depending on the main purpose - for breeding, for raising young animals or for keeping adult pets.
Single-tier and multi-tier structures
Cells can be single-tiered or multi-tiered, but they are arranged in no more than three tiers.
- Single-tier cells
Single-tier buildings are raised above the ground by 700÷800 mm and covered with a roof made of or metal sheets. If this option of buildings will be located on the street, then it is better to choose slate roof, since the metal heats up quickly, and rabbits do not tolerate extreme heat very well.

To collect and dispose of animal waste, a single-tier cage is often equipped with metal pan, made in the form of a drain, for the convenience of its regular cleaning.
- Multi-tiered cells
More often, multi-tiered cages are practiced, which can have two or three tiers, and on each of which a different number of sections are placed. Such structures are most often made of bars, boards and galvanized mesh, and are used for breeding rabbits, both outdoors and indoors.

Such cage designs are called sheds - in them, tiers with sections are located one above the other, which helps to significantly save space.
A two-tier design is considered the best option, as it will allow for comfortable care and monitoring of pets.
It is recommended to raise the shad above the ground by 500÷600 mm when installed indoors, and by 700÷750 mm when installed outdoors. This cage is considered the best for keeping rabbits, so it is used most often.
When building multi-tiered cages, there must be a space of at least 150 mm high between each of the tiers. An inclined one is installed above the cells metal roof. In the space between the tiers and under the lower tier, inclined tides are fixed. They are necessary so that rabbit waste does not fall into the lower cages and does not linger on the lower roof, but flows to the ground or into a common or separate drain for each tier located at the back of the structure. At each of these ebbs, sides are bent on the sides to prevent waste from falling beyond this plane.

Some owners prefer to use removable plastic trays, which are mounted on skids under the slatted floor and can be removed for cleaning and rinsing.
Another option is for the trays to be installed directly in the cages. In addition, sometimes cages are made with a solid floor. Both of the latter options are probably still not very convenient, since the bedding in the cages will have to be changed quite often - once every two to three days.
Cages for breeding
In cages intended for breeding, special chambers are installed on the sides, or space is provided for installing a mobile queen cell. In a design with a stationary compartment, the walls, removable floor and ceiling are made solid, since it must be well insulated and not blown through by drafts, otherwise the rabbits will die.

The floor in the rest of the cage, where the food section is located, is made of wooden blocks or metal mesh.
The mobile queen cell is a completely closed box with round hole to enter. The box should also have an additional side door to allow it to be cleaned and dried.
breeding cages

A mobile queen cell is convenient because it can be rearranged, if necessary, into different cells, and it is also easier to clean and change bedding.
This chamber is insulated with dry, mold-free hay or shavings. It is not recommended to use small sawdust, as they can get into the respiratory tract of the rabbits, and they will die.
If breeding is carried out in winter, then a few days before it, it is recommended to place an electric heating pad in the queen cell to create comfortable conditions for the female rabbit.

During the cold season, it is often impossible to do without heating the uterine tract, so instead of a heating pad, you can also use a regular light bulb, which is kept constantly on during this period. It is placed in a compartment located behind the wall of the uterine chamber. Having chosen this heating option, it is necessary to take care of fire safety, so the chamber where the lamp will be located must be sheathed with a thin metal sheet.
Another way to heat this part of the cage is, which is fixed to the bottom of the queen cell, and a removable floor panel is placed on top of it. When using this option, it is imperative to ensure that the cable located in the cage is solid, without splicing. This system, installed in accordance with all the rules, allows you to regulate the temperature in the uterine compartment depending on the temperature outside - it can be connected to a thermostatic regulator.
For cages located indoors in barns, it is best to make queen cells mobile so that they can be taken outside for thorough cleaning, ventilation and drying in the sun. If a built-in uterine chamber is planned, then the floor must be removable.

Each section of cells of this type usually has a length of 1000÷1200 mm, a depth of 550÷650 mm, a height on the front side of 550÷600 mm and 400÷450 mm on the rear wall. The built-in uterine chamber is made 350÷400 mm wide.
Cages for young animals
Cages for young animals should be designed to accommodate 8÷20 rabbits at a time, aged from three to five months. A group cage is made with an area of approximately 0.25 - 0.3 m² per pet, with a wall height of at least 350 mm.

If the cages are made multi-tiered and installed on the street, then they must be raised above the ground by at least 700÷750 mm.

In cages for young animals, the warm nesting compartment should also be well insulated for the winter, in approximately the same way as for newborn rabbits. For insulation, hay or straw is used, laid 15÷20 mm thick. You should not choose artificial materials for insulation, as they have a bad effect on the development and growth of babies of all breeds of rabbits.
Cage for adult rabbits

For adult rabbits of medium-sized breeds, cages are made with sections 600÷700 mm deep, a front height of 600 mm and a length of 1000 mm - these are the minimum dimensions for the comfortable development of an adult animal. The same block design is used for these cells; each block contains two cells separated by a wall.

It is also necessary to provide for the union of these cells into one, for example, for the mating period - for this, the partition between them is made removable. It is recommended to make the floor in cages for adults from galvanized mesh.
It is very important to take into account that pets must move freely inside the cages, since their growth and development will depend on this.
Cage with aviary for walking
This cage design is well suited for keeping young animals or for rabbits of reproductive age. The cage consists of two compartments - an area completely enclosed by walls and a roof and a mesh enclosure. The two compartments are connected by a round or rectangular entrance cut into the rear wall of the cage with solid surfaces. Rabbits in such cages have the opportunity to move freely and safely, which is beneficial for their development and growth.

The dimensions of such structures may vary, but usually the depth of a closed cage is 600÷650 mm, and the depth of the enclosure is 800÷1000 mm. Most often, a regular single-tier block is built, consisting of two separate cages, and then, if there is space behind it, a mesh enclosure is attached to it.
Cages for giant rabbits
Large rabbits of the “giant” meat-skin breed require a special approach, since not standard cages are built for them, but those with more significant parameters. Individuals of this breed grow to sizes from 550 to 650 mm in length, and their weight ranges from 5.5 to 7.5 kg. These numbers must be used as a starting point when drawing up a construction design drawing.

For one adult “giant” rabbit, you will need a cage measuring at least 960 mm in length, 700 mm in depth and 600÷700 mm in height.
For young animals of this breed, in one litter of which there are on average eight rabbits, you will need a cage of 1.2 m², at least 400 mm high.
Since “giant” rabbits have quite a lot of weight, the floor of the cage should be reinforced - it is also covered with galvanized mesh, but made of thicker wire, for example, 2÷2.2 mm. In addition, to prevent the mesh from bending under the weight of the animal, when making the floor, you must first secure bars measuring 30×30 mm, laid at a distance of 35÷40 mm from each other, and then lay and secure a metal mesh on top of them.

Some farmers lay a solid floor in their cages, but in this case, the most the best option will install plastic or rubber trays in them. If you choose this option for arranging the cage, then you will have to clean it of waste daily or once every two days.
metal aviary
California rabbit cage
This breed of rabbits (a hybrid of the New Zealand breed, the Soviet chinchilla and the Russian ermine) is quite popular due to its ease of care and resistance to negative winter temperatures. In size, adult individuals of the Californian breed are smaller than “giants” and their length is 450÷500 mm, but their weight sometimes reaches up to 4.5÷5 kg. The cage for these rabbits should be approximately 0.4÷0.5 m² in size. The paws of pets of this breed are covered with coarse hair, so they will be quite comfortable in cages with mesh or slatted floors.

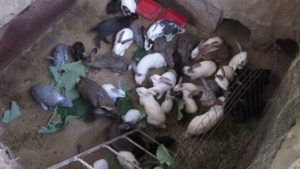
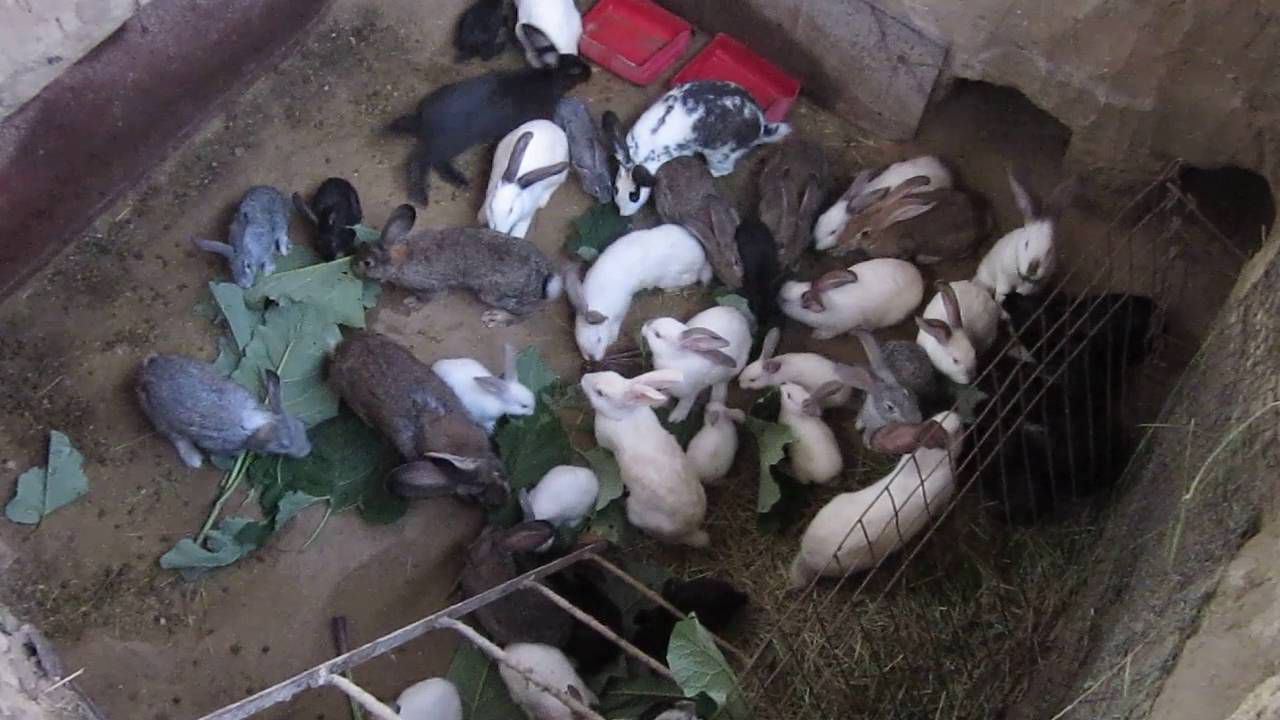
When California rabbits are raised exclusively for meat, they are often kept in a pit measuring 2000x2000 and 1000 mm deep. The walls of the pit are reinforced with slate, a plank or mesh floor is laid on the floors, a low fence is installed around the pit and a roof is built.

An earthen niche is made in one of the walls of the pit, which is not reinforced in any way. It is necessary to create conditions close to the natural habitat of these animals. Rabbits will happily dig holes in the ground, and with proper care they will reproduce well and raise young on their own.
Feeders and drinkers for rabbit cages
To make caring for your pets easier, it is worth considering a convenient supply of food and water for them. There are many different designs, both feeders and drinkers. They can be purchased ready-made or even made yourself.
Drinking bowls
Rabbits need a lot of clean water, and if you pour it into a bowl that is not fixed at a certain height, then various debris will fall into it, or, even worse, the rabbit, stepping on it with its paw, will simply knock it over and spill the water.

It is very important to decide on the choice of material from which the drinkers will be made. For example, if you install products made of thin plastic, they will not last for a long time, as rabbits will chew them. In metal cans, water will quickly become dirty and cloudy. Therefore, experienced rabbit breeders have developed several simple designs, which allow you to constantly provide for animals required quantity water.
Automatic drinkers
This type of drinker is often used both on large farms and in small households. The design of this drinking bowl consists of a bowl connected to a container filled with water. Moreover, the bowl is in the cage, and the container is located outside, so it is easy to replenish it with new supplies of fresh water.

The principle of operation of such devices is quite simple - as the water decreases from the bowl, a new portion of liquid will flow into it from the container. In this case, the float system is triggered - there is little water left in the bowl, so the valve installed in the container opens and the drinking bowl is replenished with water. It is quite difficult to make such a drinking bowl yourself, but it can be purchased ready-made.
Nipple drinkers
The nipple type of drinker is convenient and practical, since in this case the animals cannot spill the water - it remains in the tube until the rabbit begins to drink, performing sucking movements.

The disadvantage of this water delivery system is that at low temperatures the water in the container and in the tubes quickly freezes, so this drinker can only be used in the warm season.

Vacuum drinker
There are several ways to make a drinking bowl from a regular plastic bottle, and they should be considered, so the manufacturing process can be carried out independently.
The operating principle of this design is based on the laws of physics, and to make it, you need to proceed as follows:

- A bowl having a flat bottom, sides approximately 50 mm high and elongated shape fixed to the cage at a height of 100 mm from the floor, so that half of it is inside the cage and the other remains outside.

- A regular plastic bottle of two or one and a half liters is filled with water. The bottle is then closed with a cap or even a piece of paper, which is pressed firmly to the neck. Next, the container is quickly turned upside down and placed in a bowl. The neck should not reach the bottom 2÷3 mm. The bottle is then secured to the cage using wire or clamps.
- The lid is carefully unscrewed (if paper was used, it is simply pulled out), and the bowl is filled with water by about ⅔. As your pets drink water, water will flow from the bottle into the bowl, filling it to its previous level.
Throttle drinker
This drinker works on the principle of a conventional hand washbasin, that is, when you press the throttle installed together with the valve in the bottle cap, water begins to flow down the throttle through the resulting hole.

There should not be a hole in the lid big size, but the throttle should move up and down easily in it. A rubber gasket can be used as a valve, which holds the throttle well and covers the hole in the bottle cap in a calm state.
The bottle with this device is fixed vertically on the cage, at a height of 250÷300 mm from the floor.
Hanging drinker
This is a very simple version of a drinking bowl, made from a plastic bottle; it is suspended on wire holders at a height of 250÷300 mm from the floor. To make such a drinker, a cutout is made in the side of the bottle, 100÷120 mm wide and almost the entire length of the bottle, 50÷60 mm away from the lid and bottom.

The drinking bowl is secured with outside cells so that the hole cut in the bottle is turned inward. In the cage at this level, part of the mesh wall is also cut out so that the rabbits can easily reach the water. Such a drinking bowl will have to be replenished with water quite often, but it is extremely simple to manufacture.
Feeders
It is advisable to plan the feeders at the stage of drawing up the drawing of the entire structure. Feed supply devices can be of three types:

- Senniki are most often located between two adjacent cells and have a V-shape. They are made together with the design of the cell itself - they are, in fact, its integral part. Fresh grass or dry hay is placed in these feeders, and the rabbits pull it out through the lattice walls.

- Feeder for filling feed. This product is necessary for rabbits to enrich their body with minerals and vitamins, which contributes to the rapid growth of animals. This food is especially important in winter time when there is no grass, fresh vegetables and fruits.

Feeders for feed can be made of metal sheet used for laying sewers or other materials. An important condition that must be met for the effective operation of this device is the correct and reliable fastening of the container to the cell wall. The principle of operation of such a device is that food independently enters a bowl located in the cage from a container fixed outside it, as it decreases.
- A device for vegetables, fruits, tops and other fresh shredded products can be made of any material. It is made spacious and easy to clean. The feeder must be kept clean, otherwise harmful insects may grow in and around it, which can cause various diseases in animals.
Making your own multi-tiered cage
Before purchasing materials, it is recommended to draw up an accurate drawing of a cage or multi-tiered complex. It is necessary to foresee the location of feeders and drinkers on the plan, especially in cases where they will be built into the overall structure.

In this case, a step-by-step description of the manufacture of a three-tier cage with a width of 1400 mm, a height of 1900 mm and a depth of 600 mm is presented.
For work you will need the following materials:
| Name of materials or components | Size, mm | Quantity |
|---|---|---|
| Board | 100×30 | 10 m |
| timber | 50×30 | 27 m |
| Plywood 15 mm | Standard | 1÷2 sheets |
| Metal grid | Wire 0.7 mm, mesh 25×25 mm | 8 m² |
| Metal galvanized sheet | Thickness 0.6÷0.9 mm | 3 m² |
| Self-tapping screws | 50 | 300÷500 pcs. |
| Nails | 60÷70 | 100 pieces. |
| Latch locks for queen cells | Standard | 6 pcs. |
| Hinges for securing the hinged doors of the queen cell. | 12 pcs. |
The table below describes the cage installation process step by step:
| Illustration | Brief description of the operation performed |
|---|---|
 | From the purchased boards it is necessary to make parts for mounting the frame: - 100×30×2250 mm – 4 pcs.; - 50×30×1340 mm – 12 pcs.; - 50×30×540 mm – 12 pcs.; - 25×30×540 mm – 72 pcs. |
 | Six identical frame frames measuring 1340x600 mm are assembled from prepared lumber. |
 | Making frames is easy. First, one is assembled with precise dimensions and squareness, and then it is used as a template for making the rest. To assemble each frame, you will need two beams measuring 50x30x540 mm and two beams measuring 50x30x1340 mm. Smaller bars are secured between two long ones using two self-tapping screws at each connection |
 | The result of installation should be six neat, even frames of the same size. |
 | The next step is to position the frames and fix them on boards measuring 100x30x2250 mm, laid at a distance of the width of the frame. The distance between the frames forming the frame and the floor of the cage of each tier should be 400 mm. The space left between tiers is 180 mm. The first tier should be raised 400 mm above the ground. The frames are secured with two self-tapping screws, screwed in along the diagonal intersection line at the joints of the frame frame and side boards. |
 | The next step is to fasten the frames along the top edge with two boards laid parallel to the bottom ones. It is important here to ensure that the frames are perfectly vertical. To check their verticality, a building level is used. |
 | Next, the blocks for installation of the grated floor are prepared. Their size should be 25x30x540 mm. |
 | The distance between the sheathing bars should be 15÷20 mm (lightwise). They are installed inside the frame frame, and through it, on the side, secured with self-tapping screws on both sides. |
 | The floor of the cells on all three tiers is lined in exactly the same way. If it is planned to make a queen cell on one of the tiers, where breeding occurs, and where the rabbits will be kept until a certain age, then in this place the floor of the cage should be solid and removable. The arrangement of the queen cell was described above. |
 | Will each of the tiers be divided into two separate cells? between which a hay box is mounted in the shape of the Latin letter V. Hay or grass for rabbits will be placed here. The sennik is formed from four bars, which are installed on both sides of the frame. The size of the hay is 150÷200 mm in the upper part, and 6÷8 mm in the lower part. Naturally, it is necessary to achieve a clear correspondence in the location of the inclined crossbars on both sides of the frame. |
 | To ensure that the doors have the correct rectangular shape, a hay barn can be made from boards by cutting one of their sides at a certain angle and connecting them at the bottom from the inside of the cage. Thus, the outer edge of the hay barn will be smooth and will act as a wall to which the door will adjoin. In addition, the front parts of the hay barn can be cut from plywood 15 mm thick. |
 | The frame of the hay barn is sheathed inside along installed bars (or cutouts made at an angle in boards or plywood) with a mesh of 0.7 mm wire having cells of 25 × 25 mm. |
 | If you plan to make a queen cell in the cage, then it is separated from the cage by a plywood or plank wall with a small entrance. To make it easier to attach this wall, additional bars are mounted into the structure, to which the plywood jumper will be attached. |
 | The entrance to the wall can be round or semicircular, but it must be located at a height of 100–120 mm from the floor of the cage - this distance must be maintained so that the rabbits cannot get into the large cage until they can overcome this height on their own. The width of the entrance to the queen cell should be approximately 150 mm. After the hole is cut, it must be cleaned with sandpaper, since its edges must be absolutely smooth. |
 | The width of the queen cell is usually 300÷350 mm. The jumper wall is fixed on the bars, then the same wall is mounted with outside cages, and then the roof panel is fixed. If in the main space of the cage the roof can be covered with a metal mesh, then in the queen cell it should be continuous. IN last resort A bottom made of plywood is placed in the queen cell compartment. However, it should not be secured to the lower bars with self-tapping screws, since after the rabbits grow up and are moved to other, more spacious cages, the bottom part is removed from the uterine chamber, washed, dried and put in place for the next birth. |
 | The final stage in the installation of the queen cell is the installation of a hinged external door on it across the entire width of the chamber. At the bottom, the door is secured to the beam with two metal hinges. |
 | A latch lock or latch is installed in the middle of the upper part of the door panel. |
 | Next, the cage door frame is made from 30x30 mm bars. It is made according to the size of the opening formed in the cell wall. The door frame bars are fastened together at the corners with two self-tapping screws. |
 | The illustration shows the finished door frame before it is covered with metal mesh. |
 | The mesh is fixed to the frame using staples and a stapler - such fixation will be quite sufficient. |
 | A door with a mesh installed on the inside looks like this. |
 | Hinges on mesh doors can be mounted at the bottom (in which case the door will be hinged), or on one side of the opening (in which case it will be hinged). It all depends on ease of use in specific conditions. |
 | If the cages will be installed under a roof, for example, in a barn or other indoor utility room, then the walls and roof of the cages can also be lined with mesh. When installing the structure outdoors, the side and rear walls and roof must be covered with plywood or boards |
 | It is very important to make the correct tides under each tier of cages so that animal waste from the upper cages does not fall into the lower ones. To make ebbs, a metal sheet is used, on which the edges are folded on the sides - these sides should have a height of 80÷100 mm. The ebbs are attached to the front lower part of the frame under the cage, and its other edge is laid on the rear wall of the lower cage and extends beyond it by 300÷350 mm. Thus, the ebb tides are tilted and they protrude back beyond the structure so that they do not interfere with the approach to the rabbitry from the front side. |
 | The result should be something like this cell. In terms of complexity, this design option can be called the simplest and most accessible even for beginners. |
If you understand the principles of constructing cages for rabbits, then when drawing up a drawing, if desired, you can make your own adjustments. But it is still necessary to always keep in mind that any adult rabbit requires at least 0.5 m² of living space. It’s even better to adhere to the recommended section sizes, about 1000 mm in length, 600÷ 700 in depth, and from 400 to 600 mm in height.
And at the end of the article, there is a video in which the rabbit breeder shares the secrets of the design of improved cages:
Video: an interesting version of cages for rabbits
Depending on the age and size of the pet, the cage parameters may vary. For example, for rabbits of the "" breed, special cages will be required. Certain breeds will also need their own special cages.
The length of the cage for females with hatching should be 175-185cm, width – 1m, height – 60-70cm. During the hatching period, it is important that the female feels comfortable. Rabbits are incredibly afraid of dampness and drafts. Place the cages so that they are not constantly exposed to the sun. The façade of the cage should be placed to the east or west. Dig the pillar into the ground (to a depth of 0.6-0.8m), place stationary cells. Portable cages can be placed on stands or wooden trestles. Single-tier cages can be installed at a level of 70-80cm from the ground. In order for rabbits to move easily in cages, the structures must be free. For rabbits weighing over five kilograms, cages with a length of 130-150 cm, a depth of 70 cm, and a height of back wall– 40-45cm, front wall height – 55-60cm.
Group cages are used for transplanted young animals. In such cages you can simultaneously keep from eight to twenty rabbits.
From three to five animals under three months of age or two to three rabbits over 3 months of age are kept in individual cages.
For one rabbit, the cage area should be at least 0.5 square meters. m, at least 35cm – wall height.

When making group cages, take into account the number of individuals, because each animal will need at least 0.15-0.20 square meters. m.
External cages for keeping rabbits can be one-, two-, or three-tiered. There should be 35 cm from the surface of the ground to the cells of the lower tier.
In winter, when you need to care for suckling rabbits, you should cover the floor in the nesting compartment with straw. The layer of straw is up to twenty centimeters.
Choose non-artificial materials for making the cage. Synthetic materials have a bad effect on the development of rabbits - this rule is important for all breeds of rabbits.
Cage for adult rabbits

Since large cages are needed for a female with a hatch, a cage with the following parameters will be sufficient for an ordinary rabbit: width 60-70cm, height - 60cm, length -100cm. These are the minimum cage sizes for one adult.
The rabbits are growing, and they will need larger cages. For adult rabbits, cages with the following parameters are suitable: width – 60-80cm, height – 50cm, length – 120-150cm. Farmers say that in such a cage an adult will feel free and have personal space. Experts agreed that the floor of the cage should be made of mesh or slats. In appearance, the cage should resemble a block consisting of two cells, each of which can contain an adult.
You can fence off the feeding and nesting compartments of the cage with a wall, although the pet will not get lost and will find food.
When choosing cells, you need to take into account gender. A cage for a female rabbit will not suit a rabbit, although they will be of the same type. Consider the cage size and external conditions when creating the cage.

A two-tier shed is a row of cages placed in one or several tiers. Details about. A two-tier shed would be a suitable choice - it reduces the working area and does not complicate the control and care of pets. This design is used in the southern regions or on the street. But such an enclosure can be organized in a barn or for the use of summer keeping rabbits. The shad should not stand on the ground. It is preferable to place it at a height of 50-60cm. Considering the size of the pet, the width of the shad should be up to 2m, depth – up to 1m. You can also make a two-tier shed yourself. You will need boards, slate and a durable steel mesh. The shed is built on a one-sided principle. A concrete foundation will increase the stability of the structure. Improved design includes manure channel and drip trays. Sheds are the best way to keep rabbits. Arranging a shed allows you to keep several pets and makes caring for rabbits easier.
It is important to make a drawing of the cage and in the future add additional houses or even rows of houses for new pets. In the sheds, all the cells are the same in size, the houses are covered with a canopy, placed close to adjacent structures and placed one above the other. The convenience of this design is that the rabbits will spend spring and summer outside.
In winter, rabbits in sheds are given specially heated water. Typically, a nursery for grass or hay is set up between two houses. The cages have waste-free hopper feeders - they need to be loaded for 3 - 8 days. The bunker feeder can be made from steel sheets. In spring and summer they use automatic feeding drinking water for rabbits. The passage in the shed is located at a slight slope from the center to the exit. The rear walls of the cage form the walls of the shad. The sheds have small windows with bars. In winter, the windows with bars are closed with folding doors. The doors are made from the inside of the cells. Be sure to hang drinking bowls and feeders. An overhead road for trolleys (for transporting feed) is equipped along the middle passage.
You will need a double cage with a queen cell. The queen cell is a removable compartment where babies up to a month old will be kept. It is also called the aft compartment. The largest part of such a cell is called the feed cell. There should be a hole between the cells, measuring 17x20cm. A similar design is suitable for a male and a female, two rabbits with babies. Solid wooden partition or mesh will separate the compartments. It is best to make the floor from wooden slats (1.5 cm increments), then the manure will fall into the lower pan.

Rabbits do not live long and should be comfortable in the house. You should not save too much on materials, because healthy pets will fully pay for the costs. A double cage with a queen cell includes a nursery, a door to the nesting compartment, a mesh door, a folding drinker and feeder, a stand post, and a feeder axis.
The designs should be such that there is no need to constantly open the doors to fill them. Sawdust or small shavings are not suitable for bedding - the dust from them will cause the rabbit to sneeze.
Double cages with mesh aviary
To build a double, single-tier cage with a mesh enclosure, you will need 0.6 sq. m mesh (cells 35x35mm); lumber - 0.2 cubic meters. m, 1.3 sq. m of metal mesh (cells 18x18mm) - if this is not available, then all-welded mesh (cells 16x48mm) will do. Similar designs are needed for non-pregnant rabbits of reproductive age. They can also house adult rabbits and young animals separated from their queens.
Cages for rabbits with devices for storing food for 1-2 weeks
These are advanced cages, they are made from various building materials. Features: in the center there are structures for breeding stock, and along the walls there are enclosures for young individuals. The structures can be two- or three-tiered. But make it so that feces and urine do not fall from the upper cells.
For the uterine compartment: 40x70x60cm, for the light compartment: 60x70x60cm. Auto-drinkers, feeders, nurseries for grass and hay are located in a bright compartment. Install a mesh or slatted grille at a height of 5-10cm in the uterine compartment and at a height of 10-15cm from the floor in the light compartment. In summer you need to clean the cages more often because worms form in the manure.
Cage sizes for Zolotukhin rabbits
Nikolai Ivanovich Zolotukhin, a famous rabbit breeder, developed his own concept for keeping rabbits.
In such cages there are no pallets, the floor is made of boards or slate, the rear walls are mounted at an angle, there are no special queen cells, grain feeders are fixed to the doors, only there is a narrow strip of mesh floor along the rear walls of the structure. Cell dimensions: 70x100cm, cells are placed one above the other in several tiers, queen cells are also placed. To prevent the baby rabbits from falling out through the open door, place a board in front of the queen cell. Queen cells are placed one above the other. A separate opaque door, common to all structures, is installed. The queen cell is located in the cage itself, only part of the removable board is fenced off.
Dimensions of cages for giant rabbits
Breed large rabbits meat and skin direction was called the “gray giant”. Required dimensions designs: width 35cm, length – 60cm, height – 40cm. You can make a more spacious cage: height – 61cm, length – 96cm, width – 68cm. The “gray giant” rabbit lives in areas with different climatic conditions.
Dimensions of cages for fattening rabbits
The following design is suitable: width 50cm, length 70cm, height 30cm. To make a rabbitry, you will need a soldered mesh, the cells must be square. You will need rolled wire, diameter 6mm. Thinner wire should be wrapped around the joints on the structure. In such designs, water is supplied through nipple drinkers, and there are also small feeders with a supply of food. The animals are fed for about a week. During this period they should be carefully looked after.
Cage sizes for California rabbits

California rabbits are easy to care for. This is a hybrid of Russian ermine, Soviet chinchilla and New Zealand breed. The dimensions of the structure can be 1.5 times smaller than for “gray giant” rabbits. These rabbits can tolerate the cold well even without bedding. For a cell with a queen cell, 0.4 square meters will be enough. m, for one individual – 0.3 sq. m. They are easy to maintain. California rabbits have coarse fur on their feet. When placing individuals in mesh blocks, place pets of the same age - this will make it easier to care for, feed, and conduct veterinary examinations.
To raise California rabbits solely for meat, keep them in a pit. Setting up a pit is very easy, and the living conditions of these rabbits in the pit will be as close as possible to natural conditions their habitat.
To build a rabbit pit, you need to dig a hole with approximate dimensions of 2x2x1 m, strengthen the walls with slate or concrete, lay a mesh or plank floor, enclose the hole with a fence, and make a roof. California rabbits will burrow, mate, breed, and raise young.
To avoid degeneration of rabbits, do not allow inbreeding. The rabbit breeder is obliged to supply water, feed, and periodically carry out selective selection. To avoid inbreeding, the first generation to reach sexual maturity, obtained from a particular male, must be captured and replaced with other rabbits.
California rabbits eat dairy products, fish or meat meal, and various protein supplements well. In winter, pets should have warm liquid to drink. Constant access to water is required for rabbits.
In recent years, it has become very popular among farmers to breed California rabbits. This breed is easy to breed on specialized farms. European rabbits are the ancestors of this individual. Initially, breeders set themselves the task of developing a meat breed of rabbits with good skins. This breed is one of the most famous meat rabbit breeds. 7-8 rabbits is the average fertility of rabbits. When breeding, female rabbits can produce 11-12 rabbits. Rabbits are white (grayish) at birth, and by 3.5-4 months of age they become similar in color to adult rabbits. In two months, newborn rabbits gain two kilograms of weight. Adult female rabbits weigh 4.7-5.2 kg, rabbits - 4.5-5 kg. If you cross New Zealand white rabbits with California rabbits, you can achieve excellent results breeding. Rabbits of this breed have drooping legs. California rabbits have been successfully bred on slatted floors. The tail of Californian rabbits lies close to the body, the chin is symmetrical, the head is set on a short neck, a wide back and shoulders, and a cylindrical body of medium length.

This breed may also be called the “California White Rabbit” because it is pure white. However, the tips of the ears, tail and paws may be brown or black. Usually such a rabbit weighs no more than 5 kg. If you weigh more, you are obese. The rabbit's legs are thick and short, its eyes are pink, its skeleton is strong and light. The length of the ears does not exceed 10cm. Experienced breeders advise novice rabbit breeders to pay attention to breeding California rabbits, because they are easy to keep.
The length of the fur is approximately 3cm, the length of the body is 50cm. The head is round, medium-sized. The rabbit's fur is shiny and thick. California rabbits can also be bought for entertainment, because they have a peaceful disposition and cheerful character. With proper care, California rabbits can live up to ten years. However, due to their large size, such individuals will be difficult to keep as ornamentals. Rooms with moderate, constant air temperature and lighting are suitable for their maintenance. You can feed them hay, grass, cereals, flour, vegetables, and cereals.
Optimal cage sizes for rabbits
Suitable cages will have the following dimensions: length - 120-150cm, width - 60-80cm, front wall height - 45-50cm, the door should be mesh, dimensions 65x70x50cm, slatted or mesh floor.
Dimensions of industrial cages for rabbits
Industrial cage designs are modular, which, taking into account the stages of the process cycle, allows new designs to be added to existing ones. Dimensions: 2x2x1x7m, there are ten uterine compartments, measuring 40x92cm. To facilitate access to the boxes, there are spring-loaded lids. The operator, using the lifting covers of the partitions, can clean the rabbit uterus sections without any obstacles, perform weaning, individual therapy, palpation, and insemination. To remove litter, all cages have removable corner panels.
Breeding rabbits in households can be profitable, as well as result in complete losses. Rabbits actively breed, grow quickly, eat green food, and their meat and skins are expensive - and this brings considerable profit to the breeder. However, they are capricious in maintenance and subject to high mortality. Therefore, the construction of a rabbitry should be given the closest attention. We will tell you how to create a rabbitry with your own hands in this article.
The word "rabbit" has a double meaning. This is the name given to the room where rabbit enclosures are located, as well as cages placed together and mini-farms located on the street.
Most often, rabbit farms are heated and lit rooms with good ventilation, where cages are located in tiers. In regions with a mild climate, open rabbitries are more often used, which are a structure of two or three walls covered with a canopy.

Rabbit farm - inside view
A good rabbitry must meet the following requirements:
- create comfortable conditions for living and breeding of animals;
- be easy to use for a person of average height and build;
- have a well-thought-out system for removing waste from cells and their subsequent disposal.
Buildings for rabbitry are made one-story and rectangular. They are built in accordance with GOST 23838.
In practice, cages with these animals can be placed in a frame-type barn.

Common designs and their features
A standard indoor rabbitry is closed room, equipped with lighting, ventilation and heating systems, and less often with a water supply system. There are cages in long rows, usually in three tiers. Between them there are passages, the optimal width of which is 1.5 m. Often part of the rabbitry is separated for technical rooms and feed storage.
Multi-tiered mini-farms

Rabbit hutch in a hole
This is one of the most controversial decisions; there are approximately equal numbers of supporters and opponents of this design.

An example of “pit” rabbit keeping
Pros of “pit” content:
- life in burrows is natural for rabbits;
- in the pits a microclimate, humidity and temperature that is normal for rabbits is naturally formed;
- animals breed all year round;
- good litter survival;
- animals get sick less often and gain weight better;
- feed is given to all animals at once, this saves time and effort.
Disadvantages of “pit” content:
- it is impossible to regulate mating;
- it is difficult to monitor the condition of individual individuals;
- difficult to catch animals;
- there is a possibility that the rabbits will dig under the walls and escape.
 Example No. 1 of keeping rabbits in pits
  Example No. 2 of keeping rabbits in pits
  Example No. 3 of keeping rabbits in pits
For pit housing in a rabbitry, a hole 1 to 2 meters deep is dug around the entire perimeter. The floor and walls are concreted to prevent escapes. The resulting hole is filled with sand approximately 20 cm thick, on which a net is laid for easy cleaning. Feeders and drinking bowls are placed inside, and you can let rabbits in.
According to a number of farmers, pit housing is the best option, as it is as close as possible to natural conditions residence of rabbits. It is believed that the characteristics of meat from rabbits living underground are much better. However, despite all the advantages, organizing such housing is associated with a number of difficulties. dealing with rabbits in pits in .
All-season option with insulated compartments
The climate of Russia is such that in most of its territory the winter is too cold for keeping rodents outdoors or in uninsulated rooms. Therefore, to successfully keep rabbits, you need to think about insulation. There are two options here, and to achieve best result they need to be combined. Either heat the rabbitry or insulate the compartments themselves in which the animals are kept.

The temperature in the place where they are kept should not fall below -5. The ideal range for this time of year is considered to be from +5 to +15-20 degrees. Approaching the upper threshold of the specified range is most desirable; in warm conditions, rabbits reproduce well and gain weight. This will help prevent seasonal “breaks” in this type of business.
In the queen cell, the temperature should not fall below 10 degrees, otherwise the rabbits may die, or, under the best circumstances, they will lag significantly behind in development, and the farmer will spend more on maintaining the young than he will ultimately make a profit. It must be taken into account that rabbits are born naked and are very sensitive to cold. Although the female herself takes care of heating the cubs and insulating the nest, both mole rats and rabbits that have already grown up and have grown fur - low temperatures are all harmful. Systematic freezing leads to slow growth and poor weight gain, as well as decreased immunity.
Russian rabbit breeders came up with an original way to insulate compartments. A “pocket” made of thick plywood is attached to the bottom of the compartment, into which an EG-1 (or other) electric heating pad is placed. Using a transformer, if necessary, the heating pad is switched to a reduced mode, thereby heating the floor of the cage.

Basic principles to follow when setting up a rabbitry
Regardless of the chosen design of the rabbitry and cages, there are certain sanitary and hygienic standards that must be observed. In particular, there are certain standards for lighting, temperature and ventilation of cells. When creating a rabbitry, they must be adhered to.

Types and sizes of cells
From the description of large structures, let's move on to small ones, that is, to cells. They can be used either autonomously, to keep one or two animals separately from the rest, or stand in a barn-type rabbitry or be part of a collapsible mini-farm complex.
There are a lot of options for rabbit cages. But they can all be divided into three conditional groups, depending on their purpose.

Queen cells
These are specially designed cages where female rabbits are placed for lambing. There she gives birth and lives with the cubs until they reach twenty days of age.

A distinctive feature is the presence of a nest. It is a box made from scrap materials, such as plywood, and has dimensions of 40 cm x 40 cm x 30 cm.

Rules for building a nest:
- it is necessary to cut a hole in the nest at a height of at least 10 cm. This is done so that rabbits that are too small cannot get out of the nest;
- the floor in the queen cell should only be solid;
- the plywood from which the nest is made rots from the secretions of the animals, so it is necessary to lay a piece of waterproof material on the bottom, for example, a sheet of stainless steel, and on top - a thick layer of straw;
- the lid is made so that it can be raised and lowered (it is best to place it on furniture hinges);
- if the queen cell will be standing outside or in a cold room in winter, you need to take care of heating (you can use a cheap and proven heating method: an infrared lamp placed in a special compartment).

Two-section cage with hay for adults
This type of design is good for housing two adult animals. At positive temperatures it is permissible to display it outdoors; at sub-zero temperatures it is recommended to use it indoors, including heated ones.

A two-section cage is a wooden box 1.4 - 2 m long, 0.5 to 0.7 m high and 0.5-0.7 m wide. The top, bottom, side and rear walls are made solid. For this purpose, it is best to use structures made of sanded, unpainted boards knocked down without cracks, but other solutions are also possible, for example, from fine mesh or tin. In the last two cases, it is worth taking care of a rigid, strong frame that will support the entire structure.

Drinkers and feeders are placed along the edges, so that animals cannot climb into them with their paws.
Two-section cages can also be made multi-tiered. This will help to use the rabbitry area more efficiently.
Video - DIY two-section cage
Cage with nest
This option is a little more complicated to make, but allows the rabbit to lead a more natural lifestyle. In this case, the cell is divided into two compartments with a hole between them. The smaller compartment is insulated with hay and serves as a nest.
Group cells
Enclosures for young animals 3-6 months old, also called group cages. Animals can be either different-sex or same-sex. Please note that uncastrated males may begin to show aggression towards each other early, in which case they must be placed in individual compartments. The typical dimensions of this cage are 120 by 50 by 40 cm.
How to create a blueprint for a rabbitry
Of course, you can make a drawing of an individual cage or a whole rabbitry yourself, or simply adjust any of the above options to your size. The main parameter you need to know is the number of rabbits that you plan to keep in the cage.
- One young animal requires a minimum of 0.1-0.2 m2. For a comfortable stay, this norm should be increased to 0.5 m2. Males that are planned to be allowed to breed need 2 times more space.
- An adult animal needs at least half a meter of free space. Ideally, a meter to be able to move fully.
- For large breed rabbits, these standards need to be increased. The dimensions should be such that the animal can freely stretch out to its full length along the cage without resting its body against the walls, and can sit without touching the lid with its ears.
- The queen cell must have a separate nest. His standard sizes- 40 cm x 40 cm x 30 cm.
When the dimensions are determined, you can begin the drawing. You should start by drawing out the top view: draw a rectangle of the required dimensions, if necessary, divide it into sections. Then, all elements are indicated on the drawing: partitions, doors, manholes, feeders, etc. Dimensions are indicated everywhere. Based on the top view, a side view is drawn. The imaginary cut should pass through the most technologically complex section, for example, along the nest of the queen cell. The sizes must match. You can draw the view from below, paying particular attention to the legs and support structure.
Nuances in making a rabbitry
If this is your first time building a cage, here are a few tips that will come in handy. They are not obvious to new farmers and will help to avoid mistakes.
Watching a video, where you can personally observe the construction process by professionals, also helps to avoid mistakes.
Video - Step-by-step construction of a cage for rabbits
Tools and materials
To build a rabbitry you don’t need anything particularly rare or expensive. As for the tools, a regular construction kit is sufficient. Having a welding machine will be a plus.
Prices for popular models of jigsaws
Jigsaw
Usually, clapboard, timber or ordinary boards are used for construction. It’s just not recommended to use them; rabbits chew through the wood. Therefore, it is combined with the following materials:
Let's look at what materials the parts for creating cells are made from.
- Frame. It is made from wooden blocks.
- Side and back walls. They are made from thick boards. There are recommendations to make walls from plywood, but this should not be done. Plywood is less durable, it warps from moisture, delaminates and bubbles, and, most importantly, rabbits quickly chew through it.
- Front wall. Made from fine mesh. Iron mesh can only be used if it is painted or coated, otherwise it will rust.
- Floor. It is made of fine mesh or boards stuffed in parallel.
- Roof. Made from wood, roofing felt, slate. But corrugated sheeting can be used exclusively for covering cages standing under a canopy or indoors - it gets very hot in the sun.
How to choose a place
Regardless of whether you want to build a building, a mini-farm, or just put a few cages under a canopy, you need to start by choosing a suitable location.
Accepted in Russian Federation building codes allowed to build on personal plot outbuilding with an area of 15 sq. m. and a building for keeping farm animals or poultry with an area of 40 square meters. m. The residential building must be located at a distance of at least 15 m from the two above-mentioned buildings.
Additionally, you need to take care of the following:
Even if there is no place on your personal plot that fully satisfies all these conditions, try to get as close to the ideal as possible. Minor discrepancies are not critical.
Prices for various types of timber
Step-by-step instructions for creating a rabbitry for beginners
At first glance, it seems that such a structure is very difficult to build on your own, but this is just an illusion. Even for a delitant it is quite possible to make a rabbitry on your own, spending from several hours to several days on it.
If you decide to build a rabbitry with your own hands, the algorithm of actions should be as follows.
Step 1. Using the tips above, choose a place for the future rabbitry, decide on its size, layout, and material for construction.
Step 2. Build the cage frame according to the dimensions in the drawing. It can be wooden or metal. If several cells stand side by side, the frame should be solid.
Step 3. Using a carpenter's square and level, attach the shelf and upper frame to the frame;
Step 4. The bottom and lid are assembled on a frame made of wooden beam or cut them separately from thick plywood. In the latter case, it is necessary to cut holes for the legs at the corners.
Step 5. The bottom and lid are attached to the frame.
Step 6. A mesh is nailed to the door. Attach it to the frame furniture dowels.
We nail the frame, which will later contain the mesh.
Shchag 7. Cover the sides of the cage with mesh or boards. The mesh is cut with metal scissors and placed on the screws with a screwdriver.
Prices for popular models of screwdrivers
Screwdrivers
Watching a video of the manufacturing process will also help with construction.
Video - Do-it-yourself rabbit cage from professionals
This video shows in detail all stages of construction and provides useful tips for beginners.
As you can see from the article, making a rabbitry with your own hands is quite possible even for a beginner. You just need to strictly follow the advice, and everything will work out.


Live in country house brings a lot of positive aspects in the form of clean air, absence of noise and city bustle, availability of places for relaxation and entertainment. Also important is the fact that own plot can be grown garden crops or raise pets. This can become a source of environmentally friendly products and help the family budget. If you want to get into animal husbandry, then there is no better option than raising rabbits. At the same time, the decision to raise eared animals alone is not enough. You will need knowledge about keeping furry beauties and comfortable cages where they can “gain weight.” Of course, it’s easier to buy a ready-made rabbitry. However, we recommend making the cages yourself, since this gives you the opportunity to choose the design and size of the structure in strict accordance with personal preferences and the availability of free space for its installation.
Purpose and structure of the rabbitry
Today, two main systems for keeping rabbits are used.
- In insulated rabbit hutches closed type- this method is relevant for northern regions and middle latitudes. Adults are kept in individual cages, and rabbits are kept in communal cages, which are installed in a heated building.
- In outdoor cages. In this case, adult animals are placed separately from young animals, which are placed in group rabbitries and walking facilities.
Outdoor rabbit houses can be single or multi-person. Most often, the cage is designed to accommodate one adult rabbit or several young animals.
The simplest cage for rabbits
The cage is divided into two parts: a feed compartment with an area of about 0.5 square meters. m and a nesting “room” with an area of at least 0.25 sq. m. Often the feeding space is made common, with living compartments located on both sides of it.
The parts of the rabbitry communicate with each other using a round manhole up to 20 cm high. The aft part is equipped with a feeder, and for convenience it is made of lattice or covered with wire mesh. Access to this part of the cage is provided by a door measuring 40x60 cm.
The frame of the rabbitry is made of durable timber or round posts with a thickness of at least 8 cm, and the cage itself is placed at a height of 70–80 cm from the ground. The wall material can be wooden boards, clay wattle, hardboard, plywood, etc. The roofing material is slate, roofing felt or polycarbonate laid on top of the boards. Tin roofing is used only if the rabbitry is installed in a well-shaded place.
The floor of the cage is made from edged boards, sloping towards the back wall. A gap is left in this place for urine to drain. Great solution is a narrow strip of metal mesh located at the far end of the rabbitry floor.
Common designs and their features
Livestock specialists and amateur rabbit breeders have developed many models of cages for keeping rabbits. The most common designs of rabbit hutches are:
- single-section cage;
- design with two sections;
- rabbitry with queen cell;
- three-section (family type);
- solid wire;
- Mikhailov mini-farm;
- Zolotukhin cells.
The most successful and simple design that can be repeated with your own hands can be considered a two-section one.
Two-section cages are very convenient for keeping rabbits
To save space, the cages are installed in several tiers, forming a so-called shed. This design saves material and makes caring for animals easier. It is this system that is used in the designs of rabbit hutches by famous rabbit breeders Mikhailov and Zolotukhin.
A double cage with a queen cell (feed compartment) is used to place the female rabbit during birth. Nesting material is used as a queen cell removable type- newborn rabbits are kept in it until they reach one month of age. Between the food compartment and the main part of the cage, a hole measuring 20x20 cm is arranged.
At the time of giving birth, the female is placed in the queen cell. It is often done in an ordinary cage, setting up a closed compartment with a hole
All-wire rabbitries are convenient for mass breeding or on farms. Along with the advantages of simplicity and ease of maintenance, such cages also have a significant drawback - they require a separate room for installation.
In a family-type cage you can place two females with young animals or two individuals of different sexes. The compartments between the compartments are made of mesh, slatted or solid wooden partitions.
Single-section cages, although they are the simplest to manufacture, are practically not used in private farmsteads due to the low hygiene and aesthetics of the structures.
Before starting the construction of a rabbitry, they prepare the tools and materials that will be needed for the work, and also take the necessary measurements and draw up drawings of the future structure.
Tools and materials
To make a rabbit hutch you will need the most common carpentry tools
To build a rabbitry from wood and various available materials, you need to stock up on:
- wooden beam with a cross-section of at least 60×60 mm;
- planed boards 25–30 mm thick;
- slats with a cross section of at least 25×40 mm;
- plywood, OSB, plexiglass - for walls and partitions;
- polycarbonate, tin, slate, soft tiles or roofing felt - for roofing;
- mesh with cells no more than 40 mm for walls, doors and floors;
- furniture dowels;
- nails and screws;
- door hinges, latches, carrying handles.
In the process of work you will need ordinary carpentry and plumbing tools:
- hammer;
- screwdriver or set of screwdrivers;
- drill with a set of drills;
- hacksaw for wood and metal;
- jigsaw;
- grinder with a disk for woodworking or an angular circular saw;
- chisel;
- roulette;
- carpenter's square;
- bubble level;
- metal scissors.
When building a rabbitry, safety requirements should not be neglected. Be sure to use a protective shield or eye glasses, and when working with cutting tools, you must exercise extreme care and caution.
Calculation of optimal cell sizes
When calculating sizes rabbit cells based on the conditions of their keeping, the breed, size of the rabbits, as well as the purpose of the rabbitry (queen house, structure for single or group housing, structure with walking for young animals, etc.).
During the calculation process, certain standards and recommendations are followed.
- The length of the cage for nursing females should be from 170–180 cm in length and at least a meter in depth. The height of the structure is taken to be 60–70 cm. Rabbit houses are installed on pillars or supports dug into the ground at a height of 70–80 cm from the ground.
- The rabbitry for large individuals weighing more than 5 kg should be spacious - at least 130 - 150 cm long and 70 cm wide. The height of the front wall is 40–50 cm. The roof is sloping due to a decrease in the height of the rear wall by 10–15 cm.
- Young animals are kept in group cages of 8–20 animals at a time. In separate buildings, 3–5 rabbits that are less than three months old are placed, and older animals are kept in the amount of 2 to 4 individuals per cage. For young animals, the height of the cage can be reduced to 35 cm, but the living area should not be less than 0.25 square meters. m.
- Adult rabbits are placed in individual cages with a minimum size of 100x60 cm. If conditions permit, these dimensions are increased by 20–30 percent, which is especially important for mature males, since limited mobility in cramped conditions leads to their infertility.
- If a two- or three-tier shed is constructed from cages, then its width should not exceed 200 cm and its depth should not exceed 100 cm.
Of course, when calculating a rabbitry that you will make yourself, you can deviate a little from these recommendations. Nevertheless, it is still not worth reducing the size in order to save space or materials - animals should feel spacious and comfortable. At the same time, you will always not be at a loss - the rabbits will gain weight faster and get sick less.
Option drawings
Convenient, durable and inexpensive outdoor rabbit hutches can be made from a wooden frame covered with metal mesh or lined with solid material.
A simple rabbitry with a compartment for hay A three-section cage for adults A rabbitry with nesting compartments A two-volume closed cage A rabbitry with a run for young animals A four-tier shed
The presented drawings and diagrams of rabbit hutches range in size from 45 to 100 cm in width and up to 2.5 meters in length.
The cage frame is made of wooden beams with a cross-section of 50×50 mm or larger, and doorway- from slats with a cross-section of at least 25×50 mm. Plywood or plank roof with slate or soft roll coating should protrude beyond the perimeter of the frame by at least 150 mm.
The walls of the cells are made solid or covered with steel mesh. At the same time, mesh, lattice or panel partitions are installed in rabbitries for group housing. For this, 50x50 mm beams covered with mesh, 25x40 mm slats and boards with a thickness of 25 mm or more are used. The lower part of the rear and front walls has a rim made of boards 10 cm wide. The design of the rear and side walls must exclude drafts, therefore, depending on the installation location, these elements can be either solid or lattice.
Having chosen the appropriate drawing and made the necessary calculations, you can begin making the rabbitry.
DIY rabbitry - manufacturing instructions
Let's look at two models of rabbit hutches that are easy to make at home. The first design is a three-section type cage, designed to contain two adult individuals or females with young animals. The second model, which we propose to make, is a more complex two-tier shed - the Zolotukhin rabbitry, famous among rabbit breeders.
A simple three-section cage of an original design (with step-by-step photos)
A rabbitry can be a real decoration of the economic area and a source of pride in the work done
To build a rabbit hutch you will need minimal experience with plumbing and carpentry tools. During the work you will need lumber, plywood or OSB, steel mesh, soft roofing and plexiglass. Despite the simplicity of the design, the rabbitry has an original shape and can decorate the utility area suburban area. At the same time, the design has natural ventilation, which is undoubtedly beneficial for the health of animals.
Construction of the frame
Placing the cages at a distance from the ground will keep the animals safe and make feeding easier. The height of the installation is such that it is possible to involve not only adults, but also children in caring for the animals.
Drawing of the frame of the rabbitry
A convenient shelf installed on the lower tier will be an excellent storage for hay and feed, which will always be at hand.
The supporting legs of the frame are made of wooden beams with a thickness of at least 60 mm. Their height is 850 mm.
- The boards of the upper frame and supporting structure shelves. The elements of the lower trim are mounted at a distance of 372 mm from the ground. The work requires using a level and a carpenter's square to ensure that the cage is level and stable.
Installation of the lower frame
- For a cage with an additional compartment, a cut is made in the front trim of the upper frame, after which the cut-off part is attached to its original place using a piano loop. In the future, this folding board will provide convenient access to the inside of the rabbitry.
Installing a piano hinge
- In order to secure the upper base and shelf, support rails are screwed onto the inside of the upper and lower frames. Precise adjustment of these elements will give them the opportunity to perform another role - spacer bars for the supporting legs of the cage. This will reduce the wobble of the rabbitry and significantly increase its stability.
Installation of spacer rails
- The boards for the base of the cage and the shelf are cut out of boards, thick plywood or OSB. To ensure that these parts fit into place, shaped cuts are made in the corners for the supporting legs of the rabbitry.
Adjustment of base and shelf panels
- The shelf and base are mounted in place.
The final stage of frame assembly is the installation of base panels and shelves
How to make the main compartment
Drawing of the main compartment
- The assembly of the rabbitry body begins from door frame. It is assembled from slats reinforced with furniture dowels. Cutouts are made in the side jambs so that the door can move vertically.
The elements of the main rabbitry compartment are assembled using dowels
- The sliding door body is assembled from slats and covered with mesh. Furniture dowels are installed on the outside of the door, which will serve as guides when opening it. The door is installed in the frame, for which the dowels are inserted into the slots on its side posts.
Door installation
- The frame of the nesting compartments is assembled on both sides of the door. Mount the base of the rear and side walls.
- They make rafters to make the roof. To do this, the slats are cut at an acute angle and assembled in pairs using self-tapping screws. The rafters are installed, attaching them to the upper cross members of the frame.
Making rafters
- Triangles are cut out of OSB or plywood and secured in the openings between the middle compartment and the roof. According to the drawing, they are screwed to the rafters with self-tapping screws.
Attaching the main compartment trim
- Rectangular roofing elements are cut out of sheet material, and then attached to the rafters. At the rear, a folding roof panel is made by cutting out a rectangular section of the roof and installing it on a piano hinge.
Making a panel for lining the rear part of the roof
- After assembling the frame, the wood is treated with drying oil and painted. The piano loop located on the roof of the cage is protected with adhesive tape.
Cage lining and external arrangement
- All walls are sheathed from the inside with a metal mesh, which is cut with metal scissors and secured with self-tapping screws and a screwdriver.
Covering the side elements of the frame
- First, the sides are sheathed, after which the front wall of the rabbitry is installed. For ease of transportation, folding handles are screwed to the side elements of the frame. A latch is attached to fix the folding plate on the front board of the frame and a latch to fix the door.
Gate valve installation
- You can increase the aesthetics of the cage with a rabbit figurine, cut according to the presented template from sheet lumber. After painting, it is installed on the front surface of the roof.
Rabbit pattern for cage decoration
- The roof of the rabbitry is covered soft roof, which is attached to the plywood base with metal staples using a stapler.
Fastening roofing material using a stapler
- To make a ridge, a narrow strip of bitumen shingles is cut off, after which it is glued with a special glue for soft roofing.
The ridge is glued with special glue for soft roofing
- To protect rabbits from drafts, use a plexiglass shield cut to fit the side wall. It is attached to the frame frame at the bottom with furniture dowels, and at the top with a latch.
Installation protective screen plexiglass
- Assemble and install the inner rabbit box and ladder. After painting, these elements are installed inside the rabbitry.
Making an inner box that acts as a nest
- The cage is installed in the chosen place and the rabbits are populated.
How to build a Zolotukhin cage with your own hands
The design of the cage, developed by the famous Russian rabbit breeder N.I. Zolotukhin, has become widely known due to its ease of manufacture, low cost and a number of improvements that make caring for animals easier.
The rabbitry designed by N. I. Zolotukhin has received recognition from many amateur rabbit breeders
Design Features
General view of Zolotukhin cells
The Zolotukhin rabbitry is a three-tier shed made of double cages. A special feature of the design is that the floor at the back wall of the house is made of mesh to a width of 20–25 cm and each upper tier is shifted back by exactly the same amount relative to the lower one. Since rabbits relieve themselves primarily at the far edge of the rabbitry, their waste passes freely through the mesh cells and ends up in a pre-installed collection container. This allows cleaning to be done several times less frequently and reduces the maintenance time for each department.
Another option for cages in which, instead of shifting the upper tier, the rear wall of the cage is sloped
Other advantages include the ability to quickly convert an ordinary cage into a queen cell and a specially designed feeder that does not allow animals to transfer food. Feedlot doors provide proper ventilation, so you don’t have to think about installing a forced air intake.
Due to the fact that the roof of the lower tier is the floor for the upper cells, it becomes possible to save roofing material, and the construction of a common frame for six cells allows you to reduce the consumption of lumber.
Dimensions and correct layout of the rabbitry
Zolotukhin cells are undemanding when it comes to material. For their manufacture, scraps of boards and slats left over from repairs, pieces of tin and polycarbonate, slate sheets and metal mesh are suitable.
The design of the Zolotukhin cell is extremely simple
A well-known rabbit breeder says that exact dimensions and drawings are not needed to build a rabbitry. To build a cage, a diagram and approximate dimensions are enough:

To arrange a queen cell, a partition with a hole up to 0.2 m high is installed in the cage.
At the bottom of the hole, a 10-centimeter piece of board is nailed to prevent the baby rabbits from falling out of the nest.
Step-by-step manufacturing instructions
- Front and rear support posts are cut out of timber with a cross-section of at least 6x6 cm.
- Four frames are made from the same timber. Of these, three structures serve as the base of the cages, and one serves as the roof of the rabbitry.
- The frames are attached to the support posts, taking into account the height of the cages and the slope of the floor to the rear wall. In order to ensure proper geometric accuracy, a building level and a carpenter's square are used when assembling the frame.
When assembling the frame, you can use metal corners, which will ensure the strength of the connections
- Vertical struts are installed, which divide each tier into nesting and feeding compartments. These same elements will later serve as door frames.
Bottom frame trim
- The floor of each tier is installed from flat slate or boards connected into a groove or quarter. In this case, a 20–25 cm gap is left at the far wall.
- Install a strip of metal mesh on the remaining part of the floor of each tier.
Installation of a mesh floor section at the rear wall of the rabbitry
- Door frames are made from slats with a minimum cross-section of 25×40 mm. They are covered with metal mesh.
- The doors are installed on hinges and bolts are installed.
- The rabbitry is sheathed with panels cut from polycarbonate, plywood or OSB, as well as steel mesh.
The cage lining can be made of any material, for example polycarbonate.
- Cover the cage with the chosen roofing material. Under soft coverings (bitumen shingles, roofing felt) a continuous plank sheathing is installed.
Of particular note is the original design of the feeder. It is assembled from wooden slats in the form of a tray the size of two-thirds of the aft compartment. The outer frame of the feeder should be twice as high as the inner one, and the bottom should have a slope of at least 35º. With this design, the side walls are sewn up with plywood triangles with their vertices down. The feeder is installed directly into the door, bending the mesh inside the rabbitry. The tray is secured as follows: on each side through the door frame and top part A through hole is drilled into the side wall of the feeder, into which a metal rod is installed (you can use a long nail). The design allows you to rotate the feeder for cleaning without opening the rabbitry door.
An excellent drinking bowl can be made from an ordinary plastic bottle
You can buy drinking bowls for rabbits or make them yourself. A very popular design is a plastic bottle screwed upside down to a mesh and a low water container. Thanks to rarefaction, the liquid flows out of the bottle gradually as it is consumed or evaporates in the summer.
Tips from an experienced rabbit breeder for creating quality houses (video)
As you can see, there are no pitfalls in the design of rabbit hutches, so even the most complex cage can easily be made with your own hands. When starting production, you should remember that the rabbitry may not be ideal from the point of view of aesthetics and geometry, but it simply must be safe for animals. Therefore, when working, carefully handle wooden surfaces, bend the protruding ends of the mesh rods, remove the protruding parts of nails and screws. In the process of breeding rabbits, carefully follow all the requirements for keeping and breeding, and they will definitely repay you with a good appetite, excellent health and rapid weight gain.


