More recently, bath procedures were used only for hygienic purposes. However, today a bathhouse is both a massage and beauty salon, and a place for joint relaxation with friends, and even a kind of psychological relief room. We can say that the bath is visited to relieve stress, improve health or just to lose weight. This article will discuss how to make a sink in the bath, which will provide you with comfortable conditions during the bath procedures.
Features of the washing department
It is important that the washing compartment is thought out at the design stage of the bath. The main thing in the washing equipment is the hot / cold water system and drain. Considering the fact that humidity is always high in the washing room, it is important to properly equip ventilation. With its help, you can prevent the formation of pathogenic bacteria, mold and fungus.
The approximate area per person is 1 × 1.2 m, but it all depends on your financial capabilities. For finishing work, it is best to use natural materials:
- Ceramic tiles are environmentally friendly, durable and do not require special care. A variety of color palettes, shapes and textures allows you to experiment with the design of the finish. The only drawback of the material is the slipperiness of the finished surface when laid on the floor and the complexity of installation. But if the tile floor is covered with a rubber mat or a wooden ladder is laid, then there is no shortage.
- Wood is quite suitable for finishing the sink. There are no such high temperatures as in the steam room, so even coniferous woods are quite suitable. The resins contained in the needles improve the moisture resistance of wood. However, with all this, before finishing work, all wooden elements should be coated with wax or natural oils to increase their service life.
- Natural stone is not often used for complete sink finishing. It is usually combined with wood and tiles. The material is durable, natural and very durable. However, it is not so easy to make stone cladding on your own without knowledge and skills. Artificial stone is characterized by light weight and ease of installation. Its price is much lower.
Among the artificial materials often used for finishing the washing, the leaders are PVC panels and lining. They are easy to mount, they are affordable and have high moisture resistance. The disadvantage of such a finish is instability to mechanical damage, toxicity.

Note! The use of impregnated wood, chipboard and fiberboard for arranging a washing room is prohibited. At elevated temperatures, which are observed in the bath, these materials emit toxic fumes.
In the process of bathing procedures, about 40 liters of cold and 8 liters of hot water fall on one person. With the active use of the bath, the water consumption will be appropriate, which implies the need for a high-quality drain.

The algorithm of actions for arranging the drain is as follows:
- At a distance of 0.5 m from the foundation, you need to dig a trench with a depth below the freezing of the soil inside the washing room.
- Also dig a trench from the street. The length from the wall to the drain well must be at least 2 m. The volume of the well is from 1.5 m 3. When digging a trench, a slight slope should be made, which is 2 cm per meter. This will prevent stagnation of water in the sink.
- Lay a sand cushion 20 cm thick at the bottom of the trench. This is necessary to reduce soil pressure on the drain pipes.
- Now it's time to lay the pipes. You can use one of the types of plastic pipes that are most popular these days.
- A manhole should be made at the junction of the pipes, allowing, if necessary, to clean the clogged drain or repair it.

An ordinary cesspool or septic tank can be used as a drain well. However, you can not place a pit near the bath to avoid the accumulation of dampness.


Washing baths are rarely equipped with separate showers and trays.

Usually a ladder is used to drain the water. So, the ladder set consists of the following parts:
- A siphon with a water seal that blocks unpleasant odors that can enter from the sewer.
- The decorative grille is mounted on the body of the ladder and rests on it. The surface of the grate and the side of the ladder must be on the same level.
- The drainage ring is designed so that when the waterproofing breaks, water flows back into the drain through the hole in the ring.
- A steel clamping flange is used to ensure the tightness of the waterproofing connection with the drain body.
- Ladder body.

The place for installing the ladder is determined even when designing the washing room. This is due to the fact that the equipment will be mounted in the floor. It directly depends on how to make the floor in the washing room. After arranging the drain, care should be taken to connect it to the ladder. To do this, you will need to install a pipe with a slope of at least 3 °.
Note! The floor should also have a slight slope towards the ladder, which will prevent the accumulation and stagnation of water in the washing room.
materials
To install a ladder, you need to prepare:
- cement;
- sifted sand;
- heat and sound insulating material;
- mastic / adhesive composition;
- waterproofing membrane;
- finishing material for arranging the floor.
Installation technology

First you need to lay the heat-insulating material, in our case it will be foam. Its thickness should be 4 cm or more. In this case, the foam must be of high density, which will provide good rigidity.
Note! To maintain the slope of the floor to the place of the drain, check each step with a level. Make a cutout in the foam for the sewer pipe and ladder.
When the preparatory work is completed, you can fill the floor with sand-cement mortar, so you will fix the ladder. Pre-treat the ladder with a solvent. With all this, the screed must be laid taking into account the slope necessary to direct the water to the drain. Make sure the drain is tight.

Note! After the screed has dried, use silicone sealant to process the joints of the drain. Remember, water from the sink should only drain through the drain.
Waterproofing and finishing

You also need to perform waterproofing, in which you should drown the fiberglass seal. Waterproofing should be applied along the perimeter of the wall to a height of 10-15 cm, and then a fiberglass mesh should be glued onto it. After that, a second layer of screed should be poured.
After the screed dries, you can start finishing the ladder. An adhesive composition is applied to the screed and tiles / mosaics are laid. In this case, the grate of the ladder should be on the same level with the finishing material. At the end of the finishing work, all seams should be sealed with a moisture-resistant grout. By the same principle, tiles are laid on the walls, but this will be discussed further.
Note! If you plan to lay a plank floor, then lay the roofing material on the base, and then install the crate.
Communications

In order for bathing procedures to be enjoyable, it is important to ensure sufficient air circulation in the washing room. To do this, install a supply and exhaust ventilation system in it. It can help reduce the level of humidity in the air.
Install a chimney into the wall and lead it over the roof. So, the air will be cleaned more efficiently. Install the supply pipe at a height of 2 m from the ground.
Note! Forced ventilation will be more cost-effective. It needs to be made so that it works when the electricity is turned on.
At this stage, plumbing should also be carried out. It is easier to do this through a centralized plumbing system.

Note! To provide washing with hot water, install a boiler.
There is no way to connect to a centralized water supply? Then you need to make an alternative decision. Provide bath water from a well. The algorithm of actions is simple:
- Dig a trench below the freezing level from the spring to the sink.
- Make a sand cushion in the trench 20 cm.
- Lay pipes in it to provide water supply.
- In the bath, install two pumps - for pumping water from the well and circulation. You will also need to install a storage tank for water. Connect a water heater to this system already.
Heating
There are several ways to organize heating in a washing room:

Wall and ceiling decoration

As a facing material for walls and ceilings, you can use marble / ceramic tiles, wooden lining or natural stone. To save money, tiles can be laid 1.5–1.8 m from the floor. The remaining space of the walls and the ceiling can be painted with paint that is resistant to water and moisture.
- On the wall bordering the steam room, you can immediately lay the finishing material without waterproofing. If we are talking about wooden lining, then the slats must be tightly fixed to each other and to the wall.
- If you decide to use tiles as a finish, then lay it in the same plane. The level will help you with this. The seams should be wiped with an antifungal compound.
- A waterproofing layer must be applied to the walls of the shower room before laying the cladding.
- In the classic version, the ceiling, as well as the walls, are sheathed with wooden clapboard. If tiles were used as wall decoration, then the ceiling must be opened with water-repellent paint.
Note! Before finishing the ceiling, it must be insulated. To do this, use foil, soft clay, wax paper, sawdust and mineral wool. The brick ceiling should be pre-plastered, and plank flooring 6 cm thick or more should be laid on the wooden floor.
Based on the size of the steam room and your wishes, the washing room can be made as a separate room or combined with a steam room. By following the instructions in the article, you can make a functional washing room. If you have questions on the topic, then ask them to our specialist. Do you have experience with car washes? Share it with us and our readers in the comments.
Video
See an overview of the finishes in the bath:
Photo


Washing in the steam room is characterized by high levels of humidity. Therefore, the selection of building and finishing materials must be approached responsibly, taking into account the specifics of the operation of the premises. We study step-by-step instructions on the rules for arranging a washing room.
Content:
Traditionally, in addition to the steam room, a rest room, a dressing room and a washing room are built in the bathhouse. The latter must meet all the requirements for maintaining temperature and humidity. If desired, you can install a shower or wooden tubs. Also, washing in the bath is often equipped with a small pool or an ordinary wooden trough, if the dimensions do not allow. In addition, benches are an important element here. On them you can do massage, rubbing or wrapping. In small steam rooms, the washing department is combined with a bathroom.
Features of the device of the washing department in the bath

It is necessary to think over a place for a washing room at the construction stage. The main point in the equipment is the organization of cold, hot water supply and drain. Due to the high humidity of the air, it is important to pay attention to the arrangement of ventilation to prevent the appearance of fungus and mold.
As for the size of the washing bath, an approximate area of \u200b\u200b1 * 1.2 meters is calculated per person. In general, it depends on your capabilities and wishes. It is recommended to use only natural materials as finishing materials.
Best suited for this:
- Wood. Unlike a steam room, it is better to use conifers here. Due to the resin content, they are characterized by high moisture resistance. To increase the service life, they are coated with natural oils or wax.
- Ceramic tile. It is durable, environmentally friendly and does not require complex maintenance. It is offered on the market in more than 200 colors, and therefore it is used to implement non-standard design ideas for decoration. Of the shortcomings - the complexity of installation and too slippery surface. Therefore, during operation, it is recommended to lay a wooden ladder or rubber mats. With such a lining, an overlap should be made on walls with a height of 0.4 meters or more.
- A natural stone. It is rarely used for complete finishing. Often this material is combined with wood or tiles. It is strong, durable and environmentally friendly. At the same time, stone cladding is quite difficult to do on your own. Ease of installation and light weight, unlike natural, is characterized by artificial stone. In addition, the price for it is almost three times lower.
Materials for the construction of washing in the bath

High humidity and the relatively small size of this room require increased attention to the choice of materials for the construction of a washing room in the bath. When starting the installation of a washing department, it is worth taking care not only of “working” materials, such as clay, gravel, sand, cement, crushed stone, sawdust. It is also important to choose a high-quality waterproofing agent (it can be mastic or roofing material), expanded clay, moisture-resistant drywall, insulation (mineral wool is the best solution).
During construction, various devices will also be needed for drain equipment in the washing room, showers and benches for relaxation. You can buy a shower cabin ready-made or make it yourself.
Take care of the exhaust and ventilation for this room. To do this, purchase supply and exhaust pipes.
The last stage of construction work is the finishing of the floor, walls and ceiling. Choose a finishing material that will have increased moisture resistance (tiles, wooden lining).
Arrangement of a drain in a washing bath

Do-it-yourself construction and equipment of a washing room in a bathhouse is carried out in several stages. Arranging a water drain is the first step. Keep in mind that 1 person on average needs about 8 liters of hot and up to 40 liters of cold water for bathing. If the bath is used actively, then the water consumption will be high. This water should be provided with a quality outlet.
Features of the drain device in the washing department of the bath:
- At a distance of 50 cm from the foundation inside the steam room, we dig a hole with a depth of one and a half meters. This depth is needed to prevent freezing of drain water in winter.
- We dig a trench from the pit to the street with a length of 2 meters and make a well for draining. Its volume should be from 1.5 m 3.
- We process the moat and the pit completely with oily clay, a layer of 10 cm.
- Inside the room, we fill the pit halfway with gravel and up to the top with sand or completely with sand only.
- We carry out the same with a recess for draining inside the bath.
- In the outer trench and the drain well, we make a gravel-sand cushion 1 meter in height. Such a mixture will provide high-quality filtration of water from chemical detergents.
- You can organize a drain by equipping a concrete or steel ladder. We install a branch pipe in it at a height of 10 cm from the bottom and a steel plate under a slope at a height of 5 cm from the bottom.
- We fix the side and top sides of the plate hermetically. Cover with a lid with holes.
- We mint the joints of the drain pipes and coat them with cement mortar.
Please note: you can not have a drain pit under the room itself in order to avoid dampness.
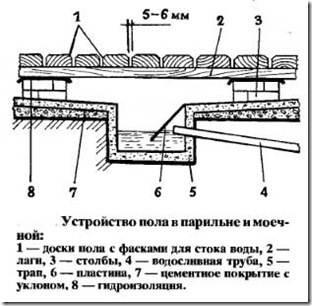
Installation of the floor in the washing bath

The technology of laying the flooring in the washing department of the bath is similar to how they equip the floor in the steam room. In the washing room, you can lay tile or ceramic tiles on the floor, and its inexpensive option, since it is recommended to cover it with wooden ladders from above. This is done in order not to slip and walk comfortably even barefoot.
When installing the floor in the washing room, follow these instructions:
- We fill the floor with concrete and make a cement-sand screed. For additional insulation, we add expanded clay to the solution and fill it with layers, between which we lay a heat insulator (construction felt soaked in hot bitumen). The floor must slope towards the drain hole. At the joints with the walls, we fill in bitumen to increase moisture resistance.
- We waterproof the surface. If it is planned to lay a wooden floor, then we lay roofing material and mount a crate on the floor. To finish the floor with tiles, we use waterproofing mastic.
- We lay the "fine" coating. This process is optional, since you can leave the floor concrete and install a wooden ladder on it. You can build such a device yourself from carefully polished planks. Remember: the planks for the ladders must be carefully sanded so that there are no notches left. After all, you may be walking barefoot on them.
Wall and ceiling decoration in the washing room of the bath

For wall and ceiling cladding, you can use ceramic, marble tiles or wooden lining. Of the more expensive options for wall decoration, natural stone is suitable. If you want to save money, then in the washing room you can lay tiles no higher than 1.6–1.8 meters from the floor. The space up to the ceiling can be painted with waterproof paint.
Instructions for finishing the washing compartment in the bath:
- On the wall that borders the steam room, we immediately mount the finishing material without an additional layer of waterproofing. We fix the slats of the wooden cladding tightly to the wall and to each other.
- If tile is used as a finishing material, then it must be laid strictly in one plane. To do this, use the building level. We rub the seams between the tiles with an antifungal compound.
- Before finishing the wall near the shower, it is necessary to initially carry out its thorough waterproofing. And after laying the finishing material.
- We sheathe the ceiling with wood or paint with water-repellent paint when decorating the walls with tiles.
- It must be insulated from above, using foil, wax paper, soft clay, mineral wool and sawdust. On the brick ceiling, we make a cement-sand screed from above, and on the ceiling of a wooden bath we fill a boardwalk with a thickness of 6 cm or more.
Installation of a shower cabin and benches in a washing bath

If your bath is designed to be visited by several people at the same time, it makes sense to install 2-3 shower cabins in the washing room. You can purchase and install a finished shower stall. It is easier to install, but more expensive.
For self-assembly of the shower cabin, we construct a plasterboard or plywood wall in the corner of the washing room. We make ceramic tiles in the corners and install a pallet. We strengthen the base with a frame made of wood or concrete and connect it to the sewer drain. The door leading to the shower cabin is made of a plastic or metal frame that fits the size of the cabin. We attach a sheet of plastic to the frame. It is fixed with loops in the right places.
An important element in the washing - benches. There must be several of them, so that there is enough space for everyone who wants to relax after the steam room and carry out wellness procedures. We build them from bars and planks. Along with the benches, you can install in the washing and massage couch.
Communications in the washing department of the bath

To stay in the washing room was comfortable, it is necessary to ensure high-quality air circulation in it. It is necessary to create a supply and exhaust ventilation system that will reduce air humidity. Also at this stage, you should take care of the water supply of the washing. The task will be greatly simplified if it is possible to carry out a centralized water supply system.
We mount the hood in the wall and bring it out above the roof for efficient air outlet. We install the supply pipe at a height of two meters from the ground. It is better to equip forced ventilation with an electric motor that will work when the electricity is turned on.
We bring to the washing centralized water supply. To supply hot water, the room is equipped with a storage water heater. We bring the metal-plastic supply pipe to the device from below, and the output pipe - from above. If it is not possible to conduct a centralized water supply to the washing room, it is necessary to ensure the supply of water from the well. To do this, we dig a trench from the source to the washing. The trench should be at a depth below the ground freezing level. We put water supply pipes in the trench.
In the bath, we install a system of two pumps, a treatment structure and a tank in which water will accumulate. In this case, one pump will pump water from the well into the bath. The second is to distribute among the premises. We connect a water heater to the system.
You can do it “the old fashioned way” - install a container of water on the stove in which it will heat up.
Heating of the washing department of the bath

Heating the washing in the bath can be carried out in several ways:
- The heating of the washing room can be carried out together with the heating of the steam room compartment. The heat source is a stove-heater. It should be installed in the wall between the steam room and the washing department. It should be noted that this type of heating does not guarantee uniform heating. In addition, after the end of the bath procedures in the winter, it is necessary to drain the water from all containers and sources.
- A more practical way to heat the bath and washing is electric. To heat the washing room, it is enough to install 2-3 radiators in the room, depending on the heated area. True, the cost of such heating is not low, and in the event of a power outage, we get a “frozen” bathhouse and damaged equipment.
- It makes sense to supply a gas main and install a separate gas boiler in a bath if the building is large - about 150–200 m 2. Otherwise, you can install several gas convectors in the sauna rooms. For washing, one device is enough. Convectors work on bottled gas or main.
- If the bath is located near the house, then it can be heated through a heating main from a common house system. In this case, ordinary radiators are installed in the bath rooms. For a medium-sized washroom, one radiator is usually sufficient.
Depending on the size of the steam room and personal wishes, the washing room can be equipped in a separate room or be combined with a steam room, being a kind of continuation of it. Before you make a washing in the bath, decide on its location, size and material for decoration. By following the instructions and performing the work in stages, you can build a functional washing department yourself.
Washing room is one of the main premises of any bath. In the process of arranging this room, the key requirements of building and finishing technologies and a number of additional nuances should be taken into account: any, even the smallest omission, in the future can lead to a significant deterioration in the performance of the room.
Floors deserve special attention in the process of arranging a washroom. The operating conditions of the washing room are such that the floor here is constantly exposed to moisture and frequent temperature changes, which must be taken into account in the process of designing the structure and its subsequent construction.

In order for the floor in the washroom to serve as long and efficiently as possible, it must meet the following requirements:
- contribute to the rapid and effective removal of moisture. To do this, the floors, as a rule, are made with a slight slope in the direction of the drain hole, or they are equipped according to the flowing technology;
- fully ventilated and dry quickly;
- withstand operation in conditions of high humidity and temperature extremes;
- be laid so that the possibility of drafts in the room is not allowed.
The main types of floors for the washing room
The most widely used in private construction are wooden (additionally classified into leaking and non-leaking) and concrete structures.

The simplest option. On a pre-prepared base (lower crown, concrete base, support pillars, etc.), logs are fixed, which act as the basis for the subsequent placement of the boardwalk.

Laying of boards is carried out with gaps of 3-5 mm - through them, water will be freely drained from the washing room.
As a rule, such floors are made collapsible, which allows, if necessary, to remove the boards and take them out of the room for better drying.
The method is budgetary and easy to perform, but has a significant drawback - it is impossible to insulate this kind of floor.
In the case of leaking wooden floors, the structure can be equipped without observance of the slope: the water will go into the gaps between the flooring elements, and then into the ground under the bath.


Boards are laid without gaps. The possibility of parsing such a floor is not provided.
The system is equipped with a slope towards the drain hole - through it the water will drain into the water collector, and then through the pipe it will be discharged outside the building.
The design includes a "black floor" and a heat-insulating layer.
When arranging a non-leaking floor structure, special attention should be paid to solving the issue of ventilation of the underground space. As a rule, to ensure sufficient ventilation, a hole is made in the floor (or several, depending on the area of \u200b\u200bthe room) and a plastic pipe is inserted into it. Pipes with a diameter of 50 or 100 mm are optimally suited.

concrete floors

Relatively simple in arrangement, durable, reliable and unpretentious in maintenance design. In practice, pouring a concrete floor often requires a much more modest financial investment compared to building a wooden structure.
The concrete floor has the only drawback - it is cold. There are several options for solving the problem:
- walk in shales;
- insulate the floor well. The most popular option;
- install a floor heating system. It requires tangible financial investments and the involvement of third-party specialists if the private developer does not have the appropriate skills.
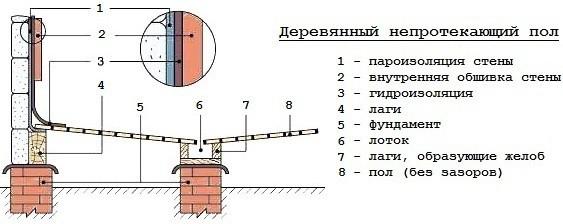
The procedure for arranging a wooden floor in a washroom
The procedure for arranging a wooden floor consists of several main stages. First, the base is prepared, then the flooring is equipped (the technology is somewhat different for leaking and non-leaking floors), and then ventilation issues are resolved
Laying a wooden floor begins with the installation of a log. Usually larch or pine timber is used. Flooring, if possible, should be made of boards, the material of manufacture of which coincides with the log wood. As noted, the floors are equipped with a slope towards the drain hole (in the case of a leaking structure, this rule can be ignored).
Installation of the log is carried out along the width of the room, i.e. the smallest distance between opposite walls. If the room is square (for example, 4x4, 6x6, etc.), the lag can be installed in any direction.

Important note! Logs are mounted transversely with respect to the drain.
For greater convenience of perception, the information is divided into several steps, supported by illustrations and diagrams and presented in a table format.
Table. Lag installation
| Stage of work, illustration | Description |
|---|---|
Let's start with the arrangement of support chairs. Preparation, planning | To ensure sufficient rigidity and stability of the log, a support chair is arranged in the center of each of them. For the manufacture of such supports, you can use wood, brick or concrete pouring. In the case of using wood or bricks, a support platform with a thickness of 200 mm or more is pre-poured with reinforcement at least with a chain-link mesh. Make the dimensions of the platform such that it protrudes approximately 50 mm from all sides of the future support. |
| Dig a hole for the base of each of the equipped sites. The recommended depth is 400 mm. Tamp and level the bottom of the pit and its walls. Fill the bottom of each recess with 10 cm of sand and compact it well, spilling it with water for better quality. Pour 15 cm of gravel on top and also thoroughly tamp. Install the formwork, pre-assembled from edged boards, into the prepared pit. You can use screws to fasten individual boards. In height, the formwork must rise at least 50 mm above the ground. Lay waterproofing material, such as roofing material, along the edges of the pit. Prepare concrete from 1 share of cement, 3 shares of clean sand and 4-5 shares of crushed stone. Water - approximately 50% by weight of cement. The consistency of the mixture should be quite thick. Fill the formwork with a 10-15 cm layer of concrete and compact it. Place a piece of reinforcing mesh on top of the fill, pre-cut in accordance with the dimensions of the formwork. On top of the mesh, pour the next layer of concrete up to the upper edges of the formwork and tamp thoroughly. Give the pads at least 1-2 days to dry. |
| Apply preheated bitumen to the surface of the equipped concrete platform, and put a layer of roofing material on top. If the bath is erected on a tape base, the height of the concrete pads must correspond to the height of the tape, i.e. their "tops" should be at the same level. |
| In the case of a columnar foundation, the supports must be erected to the level of the top of the embedded beam, on which the logs will rest in the future. |
| In the photo you can see the finished concrete pad. For a better understanding, the structure is shown with a brick support already erected and a log laid on top. In the same photo you can estimate the dimensions of the brick support. Traditionally, it is laid out with the dimensions of 2x2 bricks, and the height is selected individually in accordance with the conditions of a particular building. Usually 4 rows are sufficient. Masonry is carried out on a standard solution of 1 part cement, 3 parts sand and water. Lay out supports for each log. The number of supports is determined by the cross section of the beam. So, if you make logs from a bar / board with dimensions, for example, 15x10 cm or 15x8 cm, one such support in the middle will be enough. Installing supports every meter will reduce the cross section of the timber / board used to 10x5 cm or even 8x5 cm. |
| After the erection of the planned number of supports, you can proceed to the stage of preparing the underground, or rather, the earth in this part of the structure. If it is planned to arrange a leaking wooden floor, and the composition of the soil on the site allows it to pass moisture well, fill the underground with 20-25 cm of gravel and tamp thoroughly. As a result, water will drain into the gaps between the flooring elements, pass through the backfill layer and soak into the ground. Crushed stone in this situation will take on the functions of a kind of filter that ensures normal removal of moisture, prevents silting of the underground and helps maintain a normal level of humidity. |
| If the soil does not absorb water in the best way, the work will become somewhat more complicated: you will have to equip a tray in the ground, through which in the future water will be discharged into the water collector (pit), and from there - outside the building. To implement the mentioned idea, you make a clay castle with a slope towards the water pit. Some developers resort to arranging a castle from concrete mortar, but this solution leads to an unreasonable increase in financial costs. The clay castle is made in the following order: you pour about 10 cm of gravel on the ground of the underground space, pour a 15 cm layer of clay on top, and then level it so that a gradually increasing slope is provided from everywhere in the direction of the tray to remove moisture. The recommended settings are shown in the diagram. |
| If the arrangement of a non-leaking structure is planned, at the same stage you can insulate the underground with expanded clay, maintaining a minimum distance of 15 cm between the installed lags and the backfill to ensure effective ventilation of the underground space. |
| Dig a pit near the wall in the washroom. A height of 300 mm and a width of 40-50 cm is usually sufficient. Tamp the walls of the pit and additionally strengthen them with clay. From the equipped pit, lead the pipe to remove moisture from the water collector to the planned place (sewer, gutter, etc.). Use a pipe with a diameter of at least 11 cm - the liquid will be drained through it as quickly as possible. The pipe is laid with a slope, as can be seen in the diagram. |
Let's start installing the lag | Fixing the lag is traditionally performed with anchors. When installing a non-leaking system, the first lag is laid near the wall opposite to the pit for collecting water. In accordance with the technology, the installation of the extreme logs should be carried out in such a way that they are at the highest elevation in relation to the rest of the elements - this will ensure the correct slope to the water collector. |
| Those logs, the installation of which is carried out along the edges, are not equipped with notches. In other lags, cuts are created. Observe the mowing of the order of 0.2-0.3 cm. Similar cuts can be prepared in the areas of contact between the log and the supports erected for them (the width of the cut is provided along the width of such a support). The total slope of the finished surface should be about 10 degrees. When determining the depth of the cut to be created, be guided by the number of lags to be installed. For example, if your washroom has a small area and 4 lags are enough to build a floor, make deeper cuts than in rooms with six lags and a large number of such elements. |
| When erecting leaking wooden floors, you can start installing the log from any convenient wall. The slope in this case is optional, so the elements can be installed at the same height. Saw a beam for a log according to the dimensions of the washroom. Keep in mind that between the installed lags and the walls of the room, an approximately 30-40 mm ventilation gap should be maintained. |
| Before installing the log, the embedded crown / support must be covered with a waterproofing material. Usually ruberoid is used. You are already familiar with the technology for arranging such insulation. Additionally, the timber for the manufacture of logs is impregnated with an antiseptic. |
| Be sure to control the horizontal fastening of the lag. If the control bubble in the level deviates from the center, hem the areas where the logs are in contact with the beam / support. Hem until the logs are level with the horizon. |
| To control the correct fastening of the lag in relation to each other, also use the level. For greater convenience, put a flat board on the installed logs and place a control device on it - a level. Control is carried out near the walls, as well as in the center of the lag. If necessary, hem the installed logs or trim them with wooden linings. |


The flooring of the mentioned structures will be carried out in a slightly different sequence, as a result of which there is a need for an individual consideration of two technological operations.
Prices for wooden beams
wooden beam
Leaking wood floor decking
To perform this work, an unedged board is used. Pre-cut the flooring elements. The most even surface must be provided from the end of the boards. If you wish, you can immediately purchase an edged board.
Proceed to the arrangement of the flooring of the leaking floor, following the technology presented in the table.
Table. Floor decking with leaky structure
| Stage | Explanations | Illustration |
|---|---|---|
| Cut the boards to the dimensions of your washroom, keeping in mind that there must be at least a 20mm ventilation gap between the decking and walls. |
|
|
| You can start from any wall convenient for you, erected parallel to the chosen direction of the flooring. Step back from the selected wall about 20 mm, lay the first deck board on the logs and nail the deck element. Select the length of the fasteners according to the thickness of the board to be laid. So, for fastening 4-centimeter boards, 8-centimeter nails are optimally suited. |
|
|
| Nails are driven in approximately 1.5 cm from each edge of the board. Important note! When driving in nails, set them at about a 40-degree angle. To fasten the board to the joist, use at least 2 nails. Fasteners try to sink a little (about 1 mm) into the material. |
|
|
| Having nailed the first board, proceed to fastening the second. The minimum recommended distance between decking elements is 3 mm. For greater convenience and ensuring the same gap width, you can use templates with the necessary parameters, made, for example, from fiberboard. Fasten all boards in accordance with the considered technology. |
|
|
| As a rule, they refrain from painting the floor in the washroom - without paint, the material will dry faster. It is enough to limit yourself to a coating in the form of 2 layers of drying oil. |
|


The procedure for arranging the flooring of a non-leaking floor in a washroom

For this flooring, a grooved board is used. Equip the flooring elements with a groove inside the room - the fitting process involves tapping with a mallet on the end with a groove. Otherwise, the sheet pile may simply break during the implementation of this event, because. it is 2 times thinner than the main canvas of the board.
The arrangement of the flooring is discussed in the following table.
Table. Non-leaking flooring
| Stage of work, illustration | Explanations |
|---|---|
| The flooring technology involves the preliminary arrangement of the "black" floor. Nail the bottom of the installed logs, along the edges, with wooden blocks measuring 5x5 cm. Lay the boards of the “black” floor on the fixed bars. You can lay board cuttings, material of 2-3 grades, unedged boards, etc. Fix boards with nails. |
| Lay a waterproofing material over the boards of the "black" floor, for example, a special film or roofing material. |
| The technology involves the arrangement of a heat-insulating layer. Expanded clay is suitable for insulation. It is enough to fall asleep in the intervals between the lags. A second layer of waterproofing material is laid on top of the insulation. |
| After arranging the "black" floor, proceed with the installation of the tongue-and-groove boards of the finishing flooring. The basic recommendations are the same as in the case of a leaky floor, but the boards are laid without gaps. If you wish, you can refuse to fasten the flooring elements with nails - this way you can remove the boards and take them out of the washing room to dry. In this case, the following method of fixing the flooring is used: the boards are fixed from the edges with 2x3 cm bars. The bars themselves are attached to the logs with capercaillie screws. If necessary, the screws are unscrewed, the bars and boards are removed and taken out to dry. |


vapor barrier membrane prices
vapor barrier membrane
Solving ventilation issues
The simplest option for organizing ventilation of the space between the "black" floor and the finishing flooring was mentioned earlier - holes are prepared in the floor and pipes leading out of the room are fixed in them. A diagram of such a system is shown in the following image.

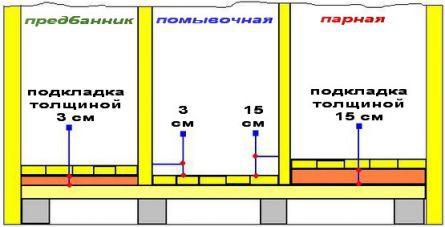
Another option for providing ventilation is the arrangement of multi-level floors. In this case, the height of the floors in different rooms will be different. So, in the washing room, the floor is made on average 3 cm lower than in the dressing room.
The first option has received the greatest popularity among developers. The procedure is extremely simple: in the process of arranging the floor in the corners of the washing room, special holes are left in the base for further installation of ventilation pipes. Pipes having a diameter of 5-10 cm are mainly used. The material of manufacture may vary.

Directly pipes for ventilation are mounted after finishing the walls of the room. Ventilation pipes with a diameter of 5 cm or less can be masked under the skin if desired. More impressive pipes are usually mounted in the corners and attached to the surface of the walls with special clamps. It is advisable to install pipes with a diameter of more than 5 cm in baths that are visited more than twice a week.
Prices for different types of ventilation pipes
ventilation pipes
The procedure for arranging concrete floors
A concrete floor will last more than 25-30 years, while the service life of wooden flooring and logs is limited to an average of 6-10 years, however, independent installation of a capital structure will require more significant labor costs - you will have to prepare / buy a concrete mix, pour it with reinforcement, lay thermal insulation and other related activities.
Instructions for self-arrangement of the concrete floor in the washing room are given in the table.
Table. The procedure for arranging a concrete floor
| Stage, illustration | Description |
|---|---|
| Moisture from the washroom will drain into the pit. Dig a hole for it. A pipe with a diameter of 15-20 cm is laid in the pit and discharged into the sewer system, gutter or other suitable place. The diagram shows the optimal dimensions of the pit for a small 4x4 bath. Change the recommended values in proportion to the dimensions of your room. |
| We level the soil and fill it with about a 15-centimeter layer of broken brick. On top we fall asleep a 10-centimeter layer of gravel and carefully tamp. You can use a more traditional backfill option, replacing the broken brick with sand. Some developers first fall asleep rubble, and then sand. In general, each option is correct. |
| On top of the backfill, we lay a layer of roofing material or other suitable roll material with approximately a 10-centimeter overlap on the walls. Seams and joints are coated with bitumen for complete sealing. |
| On top of the waterproofing material, we pour a layer of expanded clay for insulation. We select the thickness of the layer in accordance with the climatic features of your region. In the case of a washing room specifically, they are often limited to 5-10 cm backfill - and the costs are minimal, and walking on the finished floor is not so cold. Lay a reinforcing mesh over the expanded clay. Some developers limit themselves to using a chain-link mesh - for a compact room it is usually quite enough. A more reliable option is a mesh with cells of the order of 15x15 cm, assembled from 10-12 mm reinforcing bars. Standard flexible tie wire is used to fasten the rods at the intersections. The grid can be fixed with cement mortar. Often strips are made that simultaneously serve as guides. |


The main work is done. It remains only to level the fill with a cement-sand mixture. The composition is evenly distributed over the surface and smoothed out with a suitable device, for example, a piece of edged board with even ends. To prepare the solution, it is best to use perlite, i.e. expanded sand - the screed will help to increase the reliability of the structure and its thermal insulation properties.

When using perlite, it is very important to maintain the correct proportions. Pour 2 buckets of expanded sand into a concrete mixer or trough for manual preparation of a solution. Pour about 10 liters of water into a container and mix everything thoroughly. After that, you will notice that the volume of the mixture has decreased by about 30% - these are the properties of perlite.

Next, add half of a 10-liter bucket of perlite and mix the mixture for 5-10 minutes, then add 5 liters of water and continue mixing until a homogeneous mass is obtained. Then pour a bucket of perlite and about 2 liters of water into the mixture. Continue to mix until a practically free-flowing composition is obtained. Don't add water. Let the solution stand for about 10 minutes and resume mixing - the composition will gradually gain plasticity.
perlite prices
perlite 10l
For greater convenience, before the screed, you can fix guides on the base, for example, from a drywall profile - it will be easier to navigate along them. In large areas, you can’t do without guides at all, but in a compact washing room you can manage without them, controlling the evenness of the surface with a level.
Lay the plastic mixture on the floor and level it. Do not make a layer too thick - 10-15 mm is enough. Remember to observe the slope in the direction of the water intake. The mixture hardens for 4-5 days. You can lay floor tiles on top. Use non-slip lining - this way you minimize the risk of injury to your washroom.


In the photo - the location of the lighthouses when forming a slope in the shower


Now you have a complete understanding of the procedure for arranging floors in a washing bath on your own. Follow the recommendations received, and you will be able to cope with the implementation of the considered activities as well as a professional master, significantly saving on the services of third-party workers and doing everything in the best possible way, because each technological operation will be controlled by you personally.

Successful work!
Video - Floors in the bath in the washing room
One of the main premises of the bath, if not the most important, is the washing room, so the finishing of the washing room in the bath should be carried out with the utmost care and thoroughness. Bath is a place of relaxation for almost every person. However, not every person who has conceived the construction of a bath complex on his site has an idea of \u200b\u200bhow the finishing of the washing department of the bath is carried out.
How to finish the washing compartment in the bath?
When arranging the washing department, you should think through everything to the smallest detail. Therefore, before finishing this room of the bath complex, you should study all the features and nuances that are characteristic of these rooms.
The modern structure of such a structure as a bath complex includes several rooms that differ in their purpose and, accordingly, have different interior decoration. The main premises of the bath complex are:
- dressing room;
- restroom;
- dressing room;
- steam room;
- washing room;
- toilet;
- shower and some others.
The design of each of the premises depends entirely on the wishes and financial capabilities and personal preferences of the owner of the bath complex. Each owner strives to equip the premises for himself to the maximum extent possible, however, there are general requirements that must be met during the finishing process so that the premises can normally perform the functions assigned to it.

The decoration of the washroom in a wooden bath is different from the decoration of this space in a bath complex built from a different material. The main requirement that must be met when finishing the bath space is high-quality insulation to preserve the maximum amount of heat and minimize heat losses. To reduce the degree of heat loss, the bath should be insulated both outside and inside. For these purposes, a huge variety of heaters are offered in hardware stores. For maximum heat retention indoors, it is recommended to apply a layer of foil to the walls.
Building materials used in the decoration of the bath complex
At the moment, there is no shortage of finishing and building materials, and manufacturers are constantly developing new types of such building materials and offering them to consumers. When carrying out finishing work in the premises of the bath complex, it is recommended to give preference to environmentally friendly building materials. The most suitable building material for finishing inside the bath complex is wood. This natural building material fully meets the necessary building requirements. Finishing building materials today are made from a wide variety of wood species, which allows you to create your own unique design in each separate room of the bath complex.
Not everyone is suitable for finishing work in the room. When choosing a material for finishing work, you should pay attention only to the building material that is made of moisture-resistant and durable wood. The most popular types of wood are the following:
- cedar;
- Linden;
- larch.
In addition, the wood of the abachi tree has become popular today.
The best option, which is suitable for decorating the walls of the washing room, is linden wood.
In the process of heating, this material releases oils into the surrounding atmosphere, which give the surrounding air a pleasant aroma and have a beneficial effect on the human body. Another advantage of the finishing building material made from linden is the absence of changes in the structure and color of wood when it is heated to a high temperature and exposed to high humidity.
 Cedar wood, like linden, is excellent, suitable, for example, for finishing a washroom in a log bath. The advantage of lining made of cedar is that this wood does not heat up much under the influence of high temperature, the degree of heating in some cases is even lower than that of linden. The disadvantage of lining from cedar wood is that it has a higher cost.
In the process of finishing the room, larch wood can be used. The lining made of this building material has a beautiful cut and a high degree of moisture resistance. Larch wood in the process of heating gives off a pleasant aroma, which is an undoubted advantage of this finishing building material.
Floor installation and installation of lining on walls
Before finishing the walls, you need to prepare the floor in the room. Floor finishing should also be approached with all responsibility. The most optimal option for finishing the floor of a washing room in a modern bath is a tile finish.
 To prevent falling on the floor in the washroom, it is recommended to make a special ladder from processed rails. As a material for the ladder, you can use wood of the same species as for wall decoration.
Finishing the walls of the bath with the help of lining is carried out in the same way as in other rooms, however, there are differences in the method of fixing the material and placing the planks.
Wooden lining in the process of finishing can be located both in a horizontal direction, and vertically and diagonally. In addition, the lining can be combined by placing the slats in different directions. Depending on the chosen direction of installation, the frame of the bars is also located differently.
Fastening the lining is carried out in several ways.
The method using a kleimer is used when carrying out decorative finishing of the room. However, it is worth noting that this method of attaching the finishing material causes difficulties when used by a beginner. This method of installation is quite laborious and complicated.
In the case of finishing shelves and seats, you can use the through method of mounting strips of material.
When using the through method of fastening, the self-tapping screw is screwed directly into the bar through the bar.
Very often, when carrying out finishing work, inexperienced builders make mistakes in finishing and decorating the premises. The most common mistake during work is saving on materials that provide vapor barrier and thermal insulation of bath rooms. This approach to finishing leads to the appearance during further operation of a complex of inconveniences associated with a rapid loss of temperature in the room. If such problems are identified already in the process of operation, it will be necessary to invest significant financial resources and materials to correct the situation.
 Very often there are problems during the installation of the ventilation system. As a result, mold may appear in the washroom.
To decorate the premises, you should not use a grooved board, as it dries very slowly, which leads to the appearance of fungi on its surface.
For high-quality waterproofing of the room, the material is laid in 2 layers. A layer of insulation is also laid on the surface of the waterproofing layer in two layers.
A vapor barrier layer is laid on top of the thermal insulation. At the last stage, the installation of finishing material - lining is carried out.
The ventilation system in the room must function constantly. This will avoid the appearance of excessive dampness and, accordingly, prevent the appearance of mold fungi and microorganisms.
The interior of the washing room in the bath
The washing room in the bath is a room no less important than the steam room. In the old days, it was not provided for, but in a modern sauna and a Russian bath, they cannot do without a washing room. The interior of the washing room in the bath should harmoniously fit into the overall design solution.

Planning during the construction phase
The washing device must be considered at the design stage of the bath. Several important points should be considered:
- Organization of water flow. On average, about fifty liters of water are consumed per bath visitor. If the bath is equipped with a shower, water will be spent much more economically. In the absence of a shower, moisture must go through the floor. Do not place a drain pit directly under the floor of the sink. Dampness in this place will certainly cause mold and a musty smell in the bath.
- Drain arrangement. The floor surface must be sloped to direct the water towards the drain. The slope should be sufficient so that moisture does not form puddles, but not too steep, since it is easy to slip on such a floor.
The floors of the washing room in a wooden bath should be finished with a material that is resistant to moisture.
In addition to high humidity, the washing compartment differs from the steam room and dressing room in temperature conditions. It should be more comfortable than in a hot steam room, but at the same time it should not be cold here. Floor insulation and organization of heating in the washing room are important stages in the construction of a bath.
In the washroom, there must be a shower or a bench and a container with warm water. In modern baths, loungers are installed in this room for massage and relaxation after the steam room.


Important! For a washing bath, proper ventilation is important. Even with the correct device for draining and draining water, it is necessary to organize active air circulation to protect against dampness.
The ceiling and walls of the bath must retain heat and be reliably protected from moisture. The finish of the washroom is selected from environmentally friendly materials that do not emit toxic substances when heated and wet.
Common mistakes in finishing the washroom in the bath:
- defects in the thermal insulation of the floor and walls lead to rapid cooling of the room;
- poorly organized ventilation contributes to the development of mold and fungal growths;
- the use of plastic in the design of the walls and ceiling of the bath is undesirable, since the material deforms over time and releases toxins when heated;
- glazed tiles on the floor of the washing room can lead to falls and serious injuries;
- the bath is not finished with a tongue-and-groove board; its surface can become a suitable soil for the development of bacteria and mold.


How to choose finishing materials
In finishing the washroom, you should follow a few basic recommendations:
- materials for interior design of the bath should have a natural basis, the use of linoleum, plastic, oil paint, fiberboard is unacceptable;
- the dimensions of the washing room must comply with the formula 1 person x at least 1.2 square meters of area;
- to decorate the walls of the washing room, it is better to use softwood that is resistant to moisture.
The bathroom needs regular cleaning. Tiled flooring is easy to clean and process with special products. Ceramic tile is a material that is resistant to the development of mold and fungus.
The combination of ceramics and wood for the washroom is the most practical option.

Advice! So that visitors to the bath do not accidentally slip on wet tiles, you can install a wooden grate on the floor. After use, the grate should be dried in the steam room or in the fresh air.
Pros and cons of finishing materials for washing
The interior design of a washing room in a bath made of timber, logs or other materials should be not only attractive, but also practical. That is why not all finishes and materials are applicable to this room. Advantages and disadvantages of traditional finishing materials:
Tile
Finishing with ceramic wash tiles looks neat and attractive. It is quite applicable for finishing the walls and floors of the bath. Before laying tiles, wooden walls must be treated with a waterproofing material. On the floor for tiling, a screed is made with a slight slope towards the drain hole. The positive qualities of this finishing material include strength, resistance to the adverse effects of moisture, ease of maintenance and environmental friendliness. The material has a large range of colors and may vary in pattern and texture. The downside is the tightness of the coating, the exactingness of the cladding process and the fragility of the material.
Advice! When finishing floors with ceramic tiles, it is better to make an entry on the walls of at least forty centimeters. With this option, water will not get on the wall covering.

Tree
In a washroom interior project, this material can be used for walls, floors and ceilings. Resinous wood species are better able to withstand the high humidity of the bathhouse. Dampness is successfully resisted by material treated with special means. For these purposes, wax, oils, water-based paints are used. There are practically no disadvantages in wood finishing, except that the tree loses its attractive appearance over time.
Advice! Waxing wood is considered the most expensive, but it is also the most effective. It is the wax that will preserve and emphasize the rich texture of natural wood for a long time.


A rock
This material is used to process the floor and walls of the bath. You can combine natural stone and wood finishes. Among the positive qualities of the stone, its durability, strength and environmental friendliness should be noted. But stone is a heavy finishing material and requires certain skills in laying. Natural stone is not cheap.
Advice! You can compensate for the shortcomings of natural stone by using its artificial counterpart. It is relatively light, easy to install and inexpensive.


Plastic
Plastic panels are an attractive and inexpensive material for finishing a washroom. They are connected by a tongue-and-groove method and create an airtight coating of the ceiling and walls. The panels have a wide range of colors, they can imitate wooden lining. But this material is very sensitive to temperature changes, it can lose its shape and, if overheated, fill the sink with an unpleasant pungent odor.
Advice! If the choice is made in favor of the use of plastic, it is necessary to pay special attention to the waterproofing of the walls of the bath. A gap must be left between the paneling and the waterproofing layer to avoid the accumulation of condensate.

Dye
The use of paint in the finish of the washroom is a simple and economical solution. Water-based paints are safe for human health and very easy to use. The main disadvantage of such a coating is its fragility.
Each of these materials can be used in the interior design of the washroom. They can be combined. If your own skills are not enough, finishing work can be entrusted to invited specialists.
Swimming pool and other washroom furnishings
When considering a swimming pool in a bath project, several nuances should be taken into account:
- the font will evaporate a lot of moisture;
- water will splash on the floor and walls of the room;
- if the size of the pool exceeds 3 meters in length, it will require a separate room.
A small tub made of plastic or wood can be located in the washing room.


Advice! It is better to drain the water from the pool after each session. To avoid excessive evaporation of moisture, the font is covered with a lid.
Pools in the washroom can have a different shape and location. The font can be buried flush with the floor or installed on its surface.
For the interior of the washing room in the bath with a font, you will need to install comfortable sun loungers and benches for relaxation.
In the setting of a washing bath, pieces of country furniture - sun loungers are applicable.
For lighting, you can use ceiling and wall lights, LED strip.
Shelves for shampoos and washcloths are made of moisture-resistant material. After the bath session, they are released to dry.
Advice! Potted plants can be installed in the washing room with a pool. They will "balance" the space and will feel great in a humid environment.
Spathiphyllum, chlorophytum and sansiviera are perfect for landscaping a washing bath
To decorate the interior, you can use unusual painted tubs or ladles, carved hangers for washcloths. Carved benches of different sizes look good.


- For floors in a washing bath, it is better to choose ceramic tiles with a rough finish that imitates natural wood. This floor will not slip.
- If the dimensions of the washing room allow, it is necessary to install a shower cabin and a washbasin in it. With a small size of the baths, the baths are usually limited to a barrel-font or a pouring bucket.
- The room should have at least one bench of a suitable size for massage procedures.
- The use of LED lighting is not only a beautiful and original technique, but also a very practical solution. Sealed LEDs handle high humidity and work flawlessly.
- In the design of the washing bath, unusual basins and towels, original washcloths, thermometers, and bottles are appropriate.

The interior design of the washing room in the bath should take into account the specific features of the room. In the decoration of walls, floors and ceilings, it is better to use materials that are resistant to high humidity and temperature changes. A washing bath with a pool or a font can be at the same time a relaxation room, especially if it is decorated with live plants and bright accessories.
Interior decoration of the washing room in the bath with panels, tiles or stone
To decorate the premises of a bath or sauna, it is necessary to use only environmentally friendly, natural materials. But when it comes to the washing compartment, the resistance of the material to moisture is first of all important. Water during washing can get on the walls, ceiling and, choosing the wrong material, repairs will have to be done at least once every three months. The interior decoration of the washing room in the bath, the material and its features, we learn and choose together with the readers.
 washing in the bath can be finished with various materials.
 Interior decoration of the washing room in the bath: choose the material
To decorate the walls of the washing compartment, you can use any moisture-resistant material, and you should not be afraid of high temperatures. If the washing room is planned separately from the steam room, then it does not exceed 45º. What basic requirements should the material for finishing the washing room meet:
- not afraid of moisture;
- easy to mount (in the case of do-it-yourself work);
- has an affordable price and high quality.
Is wood suitable for finishing the sink?
Wood is considered the best material for finishing a sauna or bath. But, when choosing a material for a shower room, the characteristics of the wood species are taken into account. For a steam room, they take linden or oak, since at high temperatures the resinous wood begins to cry with drops of resin. For the washing department, on the contrary, it is necessary to use a lining with a high resin content, since it is less afraid of moisture. Lumber from aspen or larch is suitable for finishing, on the contrary, when moisture gets on them, they only become stronger.

 The wood in the finish of the sink can be very beautiful.
 Aspen or larch have one big minus, the price for lining or imitation of timber from these types of wood is high. You can use pine or spruce, but after sheathing, the walls are covered with protective compounds, such as varnish or wax. They form a thin protective film on the surface, which will prevent moisture from getting inside the wood.
If you choose the right wood for finishing the washing room, protect the walls and ceiling from moisture, then the finish will last at least 1-2 years.
For a durable finish, you should pay attention to ceramic or plastic materials.
Tiles in the washroom
Tiles have been used to decorate baths for several decades. The material perfectly withstands moisture, quite durable. Modern tile is available in various designs, you can pick up at a price of 100 r / m².

 Even inexpensive ceramic tiles in the sink will be practical and aesthetic.
 When choosing ceramic tiles for finishing your shower room, you should not forget that the floor covered with material will be quite slippery. To prevent injury, wooden gratings are laid on top of the tiles. After each shower, the grates are dried, otherwise they will quickly darken and begin to rot.
You can put together gratings with your own hands, but difficult nails are taken as fasteners, but galvanized or brass ones. Simple iron ones are subject to corrosion.
Among various ceramic tiles, it is more practical to use glazed. The coating on top will betray additional protection against moisture and the material is more aesthetically pleasing.
Granite or marble in the decoration of the bath
Granite or marble tiles are the most expensive of all finishing materials. Do not forget that the stone is heavy, so it is not recommended to mount it on the ceiling. As an economy, walls can be finished with granite or marble mosaics up to half or 40 cm from the floor.

 Marble tiles for a washing bath can have a variety of colors.
 Natural stone looks rich in the interior, but laying out the material with your own hands, without experience, is difficult. We recommend that before fixing the stone to the wall, lay out a drawing on the floor, only then fix each element in its place. The work is painstaking, requires a lot of time and perseverance.
The price of granite, marble is high from 1200 m2, but the finish will last from 30 years or more.
Plastic panels in the finish of the washing bath
The most inexpensive option is to trim the shower with plastic lining, panels. Modern panels have a different pattern, for example, under the tile. You can combine wall panels with tiled floors. It is not difficult to mount the panels, so all the work is easy to do with your own hands. Plastic is not afraid of moisture, easy to clean.

 Plastic is the most inexpensive material for finishing a washing bath.
 The main disadvantage of plastic panels is fragility. The material is afraid of mechanical and chemical influences. The seams darken over time, as it is quite difficult to clean them. But the price of plastic is low.
Another negative point concerns inexpensive Chinese plastic panels. A room finished with such material has an unpleasant synthetic smell that does not disappear for a long time. When choosing plastic for finishing the walls and ceiling of your washing bath, buy only high-quality material from reputable manufacturers.
Choosing how to finish the washing in the bath, start from your capabilities and preferences. You can make plastic trim, but repairs will have to be done more often. Wood and ceramic tiles are in the middle of the price-quality ratio. But there are some nuances that must be taken into account. So, wood without an additional moisture-resistant coating will not last long, with the exception of expensive aspen and larch.
Granite and marble are considered the most durable and environmentally friendly, but the price of the material is high. Do-it-yourself decoration with stone is problematic, so you have to fork out and pay for the work of professionals.
Plastic is suitable for washing walls and ceilings, but you need to choose the material carefully.
Another nuance that must be taken into account when choosing materials is what the walls, floor and ceiling of the washing room are made of. It is easier to finish a bath made of timber or round timber with clapboard, from gas blocks or bricks with tiles or stone.
One of the finishing options can be seen in the video:
Whatever material is chosen, it is necessary to take care of the ventilation of the shower compartment, since after each procedure the premises must be dried and well ventilated. Otherwise, any material on the walls, floor, ceiling will be moldy and the finish will quickly become unusable. The interior decoration of the washing bath must be done correctly, otherwise repairs will have to be done often.
Remember, a bath should give pleasure and bring health, which means that any room, and especially a washing room, must be kept clean in it!
Washing in the bath: features and device

 Washing in the steam room is characterized by high levels of humidity. Therefore, the selection of building and finishing materials must be approached responsibly, taking into account the specifics of the operation of the premises. We study step-by-step instructions on the rules for arranging a washing room. Traditionally, in addition to the steam room, a rest room, a dressing room and a washing room are built in the bathhouse. The latter must meet all the requirements for maintaining temperature and humidity. If desired, you can install a shower or wooden tubs. Also, washing in the bath is often equipped with a small pool or an ordinary wooden trough, if the dimensions do not allow. In addition, benches are an important element here. On them you can do massage, rubbing or wrapping. In small steam rooms, the washing department is combined with a bathroom.
 Features of the device of the washing department in the bath


It is necessary to think over a place for a washing room at the construction stage. The main point in the equipment is the organization of cold, hot water supply and drain. Due to the high humidity of the air, it is important to pay attention to the arrangement of ventilation to prevent the appearance of fungus and mold.
As for the size of the washing bath, an approximate area of \u200b\u200b1 * 1.2 meters is calculated per person. In general, it depends on your capabilities and wishes. It is recommended to use only natural materials as finishing materials.
Best suited for this:
- Wood. Unlike a steam room, it is better to use conifers here. Due to the resin content, they are characterized by high moisture resistance. To increase the service life, they are coated with natural oils or wax.
- Ceramic tile. It is durable, environmentally friendly and does not require complex maintenance. It is offered on the market in more than 200 colors, and therefore it is used to implement non-standard design ideas for decoration. Of the shortcomings - the complexity of installation and too slippery surface. Therefore, during operation, it is recommended to lay a wooden ladder or rubber mats. With such a lining, an overlap should be made on walls with a height of 0.4 meters or more.
- A natural stone. It is rarely used for complete finishing. Often this material is combined with wood or tiles. It is strong, durable and environmentally friendly. At the same time, stone cladding is quite difficult to do on your own. Ease of installation and light weight, unlike natural, is characterized by artificial stone. In addition, the price for it is almost three times lower.
Materials for the construction of washing in the bath


High humidity and the relatively small size of this room require increased attention to the choice of materials for the construction of a washing room in the bath. When starting the installation of a washing department, it is worth taking care not only of “working” materials, such as clay, gravel, sand, cement, crushed stone, sawdust. It is also important to choose a high-quality waterproofing agent (it can be mastic or roofing material), expanded clay, moisture-resistant drywall, insulation (mineral wool is the best solution).
During construction, various devices will also be needed for drain equipment in the washing room, showers and benches for relaxation. You can buy a shower cabin ready-made or make it yourself.
Take care of the exhaust and ventilation for this room. To do this, purchase supply and exhaust pipes.
The last stage of construction work is the finishing of the floor, walls and ceiling. Choose a finishing material that will have increased moisture resistance (tiles, wooden lining).
Arrangement of a drain in a washing bath

Do-it-yourself construction and equipment of a washing room in a bathhouse is carried out in several stages. Arranging a water drain is the first step. Keep in mind that 1 person on average needs about 8 liters of hot and up to 40 liters of cold water for bathing. If the bath is used actively, then the water consumption will be high. This water should be provided with a quality outlet.
Features of the drain device in the washing department of the bath:
- At a distance of 50 cm from the foundation inside the steam room, we dig a hole with a depth of one and a half meters. This depth is needed to prevent freezing of drain water in winter.
- We dig a trench from the pit to the street with a length of 2 meters and make a well for draining. Its volume should be from 1.5 m3.
- We process the moat and the pit completely with oily clay, a layer of 10 cm.
- Inside the room, we fill the pit halfway with gravel and up to the top with sand or completely with sand only.
- We carry out the same with a recess for draining inside the bath.
- In the outer trench and the drain well, we make a gravel-sand cushion 1 meter in height. Such a mixture will provide high-quality filtration of water from chemical detergents.
- You can organize a drain by equipping a concrete or steel ladder. We install a branch pipe in it at a height of 10 cm from the bottom and a steel plate under a slope at a height of 5 cm from the bottom.
- We fix the side and top sides of the plate hermetically. Cover with a lid with holes.
- We mint the joints of the drain pipes and coat them with cement mortar.
Installation of the floor in the washing bath


The technology of laying the flooring in the washing department of the bath is similar to how they equip the floor in the steam room. In the washing room, you can lay tile or ceramic tiles on the floor, and its inexpensive option, since it is recommended to cover it with wooden ladders from above. This is done in order not to slip and walk comfortably even barefoot.
When installing the floor in the washing room, follow these instructions:
- We fill the floor with concrete and make a cement-sand screed. For additional insulation, we add expanded clay to the solution and fill it with layers, between which we lay a heat insulator (construction felt soaked in hot bitumen). The floor must slope towards the drain hole. At the joints with the walls, we fill in bitumen to increase moisture resistance.
- We waterproof the surface. If it is planned to lay a wooden floor, then we lay roofing material and mount a crate on the floor. To finish the floor with tiles, we use waterproofing mastic.
- We lay the "fine" coating. This process is optional, since you can leave the floor concrete and install a wooden ladder on it. You can build such a device yourself from carefully polished planks. Remember: the planks for the ladders must be carefully sanded so that there are no notches left. After all, you may be walking barefoot on them.
Wall and ceiling decoration in the washing room of the bath

For wall and ceiling cladding, you can use ceramic, marble tiles or wooden lining. Of the more expensive options for wall decoration, natural stone is suitable. If you want to save money, then in the washing room you can lay tiles no higher than 1.6–1.8 meters from the floor. The space up to the ceiling can be painted with waterproof paint.
Instructions for finishing the washing compartment in the bath:
- On the wall that borders the steam room, we immediately mount the finishing material without an additional layer of waterproofing. We fix the slats of the wooden cladding tightly to the wall and to each other.
- If tile is used as a finishing material, then it must be laid strictly in one plane. To do this, use the building level. We rub the seams between the tiles with an antifungal compound.
- Before finishing the wall near the shower, it is necessary to initially carry out its thorough waterproofing. And after laying the finishing material.
- We sheathe the ceiling with wood or paint with water-repellent paint when decorating the walls with tiles.
- It must be insulated from above, using foil, wax paper, soft clay, mineral wool and sawdust. On the brick ceiling, we make a cement-sand screed from above, and on the ceiling of a wooden bath we fill a boardwalk with a thickness of 6 cm or more.
Installation of a shower cabin and benches in a washing bath


If your bath is designed to be visited by several people at the same time, it makes sense to install 2-3 shower cabins in the washing room. You can purchase and install a finished shower stall. It is easier to install, but more expensive.
For self-assembly of the shower cabin, we construct a plasterboard or plywood wall in the corner of the washing room. We make ceramic tiles in the corners and install a pallet. We strengthen the base with a frame made of wood or concrete and connect it to the sewer drain. The door leading to the shower cabin is made of a plastic or metal frame that fits the size of the cabin. We attach a sheet of plastic to the frame. It is fixed with loops in the right places.
An important element in the washing - benches. There must be several of them, so that there is enough space for everyone who wants to relax after the steam room and carry out wellness procedures. We build them from bars and planks. Along with the benches, you can install in the washing and massage couch.
Communications in the washing department of the bath


To stay in the washing room was comfortable, it is necessary to ensure high-quality air circulation in it. It is necessary to create a supply and exhaust ventilation system that will reduce air humidity. Also at this stage, you should take care of the water supply of the washing. The task will be greatly simplified if it is possible to carry out a centralized water supply system.
We mount the hood in the wall and bring it out above the roof for efficient air outlet. We install the supply pipe at a height of two meters from the ground. It is better to equip forced ventilation with an electric motor that will work when the electricity is turned on.
We bring to the washing centralized water supply. To supply hot water, the room is equipped with a storage water heater. We bring the metal-plastic supply pipe to the device from below, and the output pipe - from above. If it is not possible to conduct a centralized water supply to the washing room, it is necessary to ensure the supply of water from the well. To do this, we dig a trench from the source to the washing. The trench should be at a depth below the ground freezing level. We put water supply pipes in the trench.
In the bath, we install a system of two pumps, a treatment structure and a tank in which water will accumulate. In this case, one pump will pump water from the well into the bath. The second is to distribute among the premises. We connect a water heater to the system.
You can do it “the old fashioned way” - install a container of water on the stove in which it will heat up.
Heating of the washing department of the bath


Heating the washing in the bath can be carried out in several ways:
- The heating of the washing room can be carried out together with the heating of the steam room compartment. The heat source is a stove-heater. It should be installed in the wall between the steam room and the washing department. It should be noted that this type of heating does not guarantee uniform heating. In addition, after the end of the bath procedures in the winter, it is necessary to drain the water from all containers and sources.
- A more practical way to heat the bath and washing is electric. To heat the washing room, it is enough to install 2-3 radiators in the room, depending on the heated area. True, the cost of such heating is not low, and in the event of a power outage, we get a “frozen” bathhouse and damaged equipment.
- It makes sense to supply a gas main and install a separate gas boiler in a bath if the building is large - about 150–200 m2. Otherwise, you can install several gas convectors in the sauna rooms. For washing, one device is enough. Convectors work on bottled gas or main.
- If the bath is located near the house, then it can be heated through a heating main from a common house system. In this case, ordinary radiators are installed in the bath rooms. For a medium-sized washroom, one radiator is usually sufficient.
Depending on the size of the steam room and personal wishes, the washing room can be equipped in a separate room or be combined with a steam room, being a kind of continuation of it. Before you make a washing in the bath, decide on its location, size and material for decoration. By following the instructions and performing the work in stages, you can build a functional washing department yourself. Author: TutKnow.ru editors
The floor in the washing room from the tiles in the bath
The design of a modern bath provides for the presence of several rooms: a steam room, a dressing room, a rest room, a shower room (washing room). The washing room in the bath is of particular importance, everything here should be as comfortable and functional as possible.
The main feature of this room is the active use of water. That is why the arrangement of floors and drainage is of particular importance here.

Features of the floor in the washroom
The floors in the washing bath must meet several basic requirements:
- security;
- strength;
- ventilation;
- heat resistance;
- moisture resistance.
Floors in the washroom must be permeable to water and dry quickly. It is important that the coating is warm so that you can walk on it without shoes. Temperature fluctuations and high humidity can provoke the formation of fungus and mold, so the floor covering must be resistant to these processes.

What are the floors
There are several options for flooring in the washing room. The coating can be: concrete with ceramic tile lining, wooden with grating, solid with water outlet.
In public baths and saunas, the floors are often made of concrete, using a glass wool insulation system. In small home baths, softwood flooring is usually installed. Larch has proven itself especially well.
For the installation of wooden floors, mineral wool is laid between the lags for insulation. For flooring, ordinary boards are used, they are covered with a polyethylene sheet with high edges and a drain hole.
Wooden floors in the washroom are easy to install and do not require special expenses, but do not differ in durability.
Concrete-ceramic flooring will not be as warm, but will last for several decades.


Pros and cons of ceramic tile floors
Tiled flooring has a number of undeniable advantages:
- the tile is not afraid of moisture, fungus and mold;
- tiled flooring makes it possible to make a floor slope for water drainage;
- tile floors can be heated with a modern “warm floor” system;
- ceramics has a long service life;
- the cost of the material is relatively low;
- tiles are distinguished by a variety of colors and shapes;
- ceramic flooring is easy to wash and clean;
- laying tiles on a concrete screed does not require special professional skills and can be done by hand.
The disadvantage of the ceramic coating in the bath is its fragility. If a glass shampoo bottle or a metal basin falls in the wash basin, the tile may crack. Experts recommend making a small margin when buying tiles for subsequent repairs.
The owners of a home bath, which is heated once a week, should take into account that in winter it is quite difficult to heat the bath so that the ceramic floor in the washing room is warm. To solve this problem, you can apply the technology of "warm floor" or cover the floors in winter with rubber mats.


Concreting the floor of the washing room under the tiles
The quality of water drainage from the washing room depends on the correct concreting of the floor. For these purposes, the floor must be poured with a slope for drainage and a water receiver connected to a sewer pipe should be provided. Considering that in the future the floor will be covered with tiles, it is necessary to provide for its insulation.
At the place of water flow, a water seal will be required so that odors from the sewer do not enter the room and there is no draft.
Stages of concreting the floor in the washroom:
- A sand and gravel cushion 15 centimeters high is poured onto the compacted soil. A layer of heat and waterproofing material is laid on it. The material is filled with sand.
- A reinforcing mesh is laid at the bottom of the future floor to give the future structure additional strength. Before pouring concrete, a wooden box is installed at the junction with the sewer, which is subsequently removed and the necessary connection is mounted in its place.
- On the first layer of a cement mortar screed, made with an inclination, a layer of dry solid insulating material is poured. A second layer of screed is poured onto it and leveled with a metal rule.


With strict adherence to this technology, the floors in the washroom, covered with tiles, will not be icy. The surface of the screed will warm up quickly and retain heat for a long time. Water with the right slope will be able to completely leave, and the water seal will not allow the appearance of foreign odors.
Important! The slope on concrete floors is mounted from the moment of pouring.
In order to be able to walk barefoot on the tiled floor, a “warm floor” system is installed. Such a design will save on heating the bath room. For a washing bath, any type of floor heating is suitable: infrared, water or electric. The heating system is installed directly under the floor tiles.


For your information! Underfloor heating is ineffective with wooden flooring. Wood does not conduct heat well and retains it, preventing it from penetrating into the room.
The most economical is a warm floor based on water heating pipes, which are heated by a sauna stove, which simultaneously heats the water for washing. The thickness of the filling of such a floor must correspond to the thickness of the heating pipes.
How to make a slope
The optimal angle of inclination of the floor in the washing room is 1:100 to the center of the room. A ladder is installed in the center for arranging a drain into the sewer pipe. Alternative places for draining can be a platform at the entrance or in the corner.
To comply with the slope when pouring the floor, beacons are installed. The easiest way is to make a bias towards the center of the room. For other options, an “envelope” fill is used:
- after calculating the height difference between the drain and the edges of the room, height marks are set;
- beacon cords are pulled from the edges of the room to the drain hole;
- beacons are filled;
- tile laying is carried out taking into account the fact that the sides parallel to the drain lie horizontally, and the perpendicular ones repeat the slope.


Tools and materials for laying tiles in the washroom
The following materials will be required for work: floor tiles, cross-limiters for even seams between the coating elements, specialized waterproof tile adhesive, waterproof grout for joints.
Styling tools:
- spatula with a comb;
- ordinary spatula;
- rubber spatula for grouting;
- rubber mallet;
- container with water for wetting tiles;
- grinder or machine for cutting ceramic tiles;
- cord and building level.

Tile installation technology
Facing the floor in the washing bath with ceramic tiles has some features:
- the concrete screed should dry well, it must be thoroughly cleaned of construction debris and dust;
- the tile before laying is soaked in water for 3-4 minutes, so it will not take moisture from the glue;
- tile laying starts from the most prominent place in the room.
The order of work on facing;
- Tile adhesive is applied to the tile with a notched trowel. This method of application increases adhesion to the screed.
- The tile is applied to the place of attachment and leveled with a mallet.
- Excess glue is removed with a spatula.
- To maintain even gaps between the elements of the coating, plastic crosses are used.
- To comply with the horizontal direction, the laying is checked with a building level.
- Glue on the front of the styling elements is immediately washed with a wet sponge.
- Twelve hours after the end of the work on the lining of the cross, the seams must be removed and wiped. Polymer grout will protect the joints from moisture. So that the grout does not stand out against the background of the coating, color is added to it. Excess mixture is removed with a damp sponge.

How to choose the right tile for your bathroom
The washing room in the bath is a room with specific requirements, so it is important to choose the right tile for flooring. Floor tiles are glazed, double-fired, and unglazed. In the first case, the material is resistant to sudden temperature changes.
What you should pay attention to when buying material:
- the surface of the tile must be rough, non-slip;
- the reverse side of the elements should be embossed for better adhesion to the screed;
- for laying tiles with your own hands, it is better to purchase rectangular tiles; multifaceted elements are difficult to install;
- when buying, it is worth considering a margin of ten percent for trimming elements and repairing the coating.

Common mistakes when installing a washing machine
Nobody is insured against mistakes in construction work, especially if a home master takes up the matter. It is worth learning from the experience of others and avoiding the main mistakes:
- No need to look for benefits in purchasing cheap materials for moisture and heat insulation. This approach will lead to involuntary expenses later on.
- It is important to provide good ventilation in the washroom without drafts. Thus, the formation of fungal growths and mold can be avoided.
- In the washing room, as in the entire bath, you should not make plastic ceilings. From the temperature difference, they are deformed and release toxic substances into the air.
- The floors in the shower room, around the pool, in the washroom are not finished with smooth glazed tiles. This coating can cause serious injury.
- For the floor and walls in the washing compartment, a tongue-and-groove board is not used. This material has the ability to collect dirt and gain moisture.


Ceramic tile floors in the bath are a practical and durable solution. If you correctly approach the technology of pouring the base and laying the material, such a floor will last for more than a dozen years and will properly perform its functions. In addition, modern tile manufacturers offer a wide selection of materials that will become a real decoration of the bath.
One of the main premises of the bath, if not the most important, is the washing room, so the finishing of the washing room in the bath should be carried out with the utmost care and thoroughness. Bath is a place of relaxation for almost every person. However, not every person who has conceived the construction of a bath complex on his site has an idea of \u200b\u200bhow the finishing of the washing department of the bath is carried out.
How to finish the washing compartment in the bath?
When arranging the washing department, you should think through everything to the smallest detail. Therefore, before finishing this room of the bath complex, you should study all the features and nuances that are characteristic of these rooms.
The modern structure of such a structure as a bath complex includes several rooms that differ in their purpose and, accordingly, have different interior decoration. The main premises of the bath complex are:
- dressing room;
- restroom;
- dressing room;
- steam room;
- washing room;
- toilet;
- and some others.
The design of each of the premises depends entirely on the wishes and financial capabilities and personal preferences of the owner of the bath complex. Each owner strives to equip the premises for himself to the maximum extent possible, however, there are general requirements that must be met during the finishing process so that the premises can normally perform the functions assigned to it.
 The decoration of the washroom in a wooden bath is different from the decoration of this space in a bath complex built from a different material. The main requirement that must be met when finishing the bath space is quality to preserve the maximum amount of heat and minimize heat losses. To reduce the degree of heat loss, the bath should be insulated both outside and inside. For these purposes, a huge variety of heaters are offered in hardware stores. For maximum heat retention indoors, it is recommended to apply a layer of foil to the walls.
Building materials used in the decoration of the bath complex
At the moment, there is no shortage of finishing and building materials, and manufacturers are constantly developing new types of such building materials and offering them to consumers. When carrying out finishing work in the premises of the bath complex, it is recommended to give preference to environmentally friendly building materials. The most suitable building material for finishing inside the bath complex is wood. This natural building material fully meets the necessary building requirements. Finishing building materials today are made from a wide variety of wood species, which allows you to create your own unique design in each separate room of the bath complex.
Not everyone is suitable for finishing work in the room. When choosing a material for finishing work, you should pay attention only to the building material that is made of moisture-resistant and durable wood. The most popular types of wood are the following:
- cedar;
- larch.
In addition, the wood of the abachi tree has become popular today.
The best option, which is suitable for decorating the walls of the washing room, is linden wood.
In the process of heating, this material releases oils into the surrounding atmosphere, which give the surrounding air a pleasant aroma and have a beneficial effect on the human body. Another advantage of the finishing building material made from linden is the absence of changes in the structure and color of wood when it is heated to a high temperature and exposed to high humidity.
 Cedar wood, like linden, is excellent, suitable, for example, for finishing a washroom in a log bath. The advantage of lining made of cedar is that this wood does not heat up much under the influence of high temperature, the degree of heating in some cases is even lower than that of linden. The disadvantage of lining from cedar wood is that it has a higher cost.
In the process of finishing the room, larch wood can be used. The lining made of this building material has a beautiful cut and a high degree of moisture resistance. Larch wood in the process of heating gives off a pleasant aroma, which is an undoubted advantage of this finishing building material.
Floor installation and installation of lining on walls
Before finishing the walls, you need to prepare the floor in the room. Floor finishing should also be approached with all responsibility. The most optimal option for finishing the floor of a washing room in a modern bath is a tile finish.
 To prevent falling on the floor in the washroom, it is recommended to make a special ladder from processed rails. As a material for the ladder, you can use wood of the same species as for wall decoration.
Finishing the walls of the bath with the help of lining is carried out in the same way as in other rooms, however, there are differences in the method of fixing the material and placing the planks.
Wooden lining in the process of finishing can be located both in a horizontal direction, and vertically and diagonally. In addition, the lining can be combined by placing the slats in different directions. Depending on the chosen direction of installation, the frame of the bars is also located differently.
Fastening the lining is carried out in several ways.
The method using a kleimer is used when carrying out decorative finishing of the room. However, it is worth noting that this method of attaching the finishing material causes difficulties when used by a beginner. This method of installation is quite laborious and complicated.
In the case of finishing shelves and seats, you can use the through method of mounting strips of material.
When using the through method of fastening, the self-tapping screw is screwed directly into the bar through the bar.
Very often, when carrying out finishing work, inexperienced builders make mistakes in finishing and decorating the premises. The most common mistake during work is saving on materials that provide vapor barrier and thermal insulation of bath rooms. This approach to finishing leads to the appearance during further operation of a complex of inconveniences associated with a rapid loss of temperature in the room. If such problems are identified already in the process of operation, it will be necessary to invest significant financial resources and materials to correct the situation.
 Very often there are problems during the installation of the ventilation system. As a result, mold may appear in the washroom.
To decorate the premises, you should not use a grooved board, as it dries very slowly, which leads to the appearance of fungi on its surface.
For high-quality waterproofing of the room, the material is laid in 2 layers. A layer of insulation is also laid on the surface of the waterproofing layer in two layers.
A vapor barrier layer is laid on top of the thermal insulation. At the last stage, the installation of finishing material - lining is carried out.
The ventilation system in the room must function constantly. This will avoid the appearance of excessive dampness and, accordingly, prevent the appearance of mold fungi and microorganisms.