So, you want to make a brick barbecue in your area. Drawings and photographs of this device will help you choose a contractor, since you will have an idea of what exactly you need.
And they will certainly help you if you decide to make a brick barbecue with your own hands. In this case, you simply need drawings and photographs. Only they will give you the opportunity to see the final result of your actions.
Which brick barbecue to choose?
Well, you've decided that you should have a brick barbecue next to your house. To choose a craftsman who will build this structure for you, you must imagine in advance the option that will be right for you.

After all, when ordering, you need to show the master at least a sketch so that he can imagine the scope of work. And accordingly I was able to set a price for you.
And for this you just need photos and diagrams that you can use here.
How to make a brick barbecue with your own hands
Some brick barbecues, drawings and photographs of which are presented on this page, were made by their owners themselves. In general, all these devices for frying meat and fish could be made by their owners.

After all, laying out a stove/grill of this type is quite simple. Just look at the barbecue orders for the simplest options, and you will understand what I’m talking about.
The most simple options are laid out in half a brick and have simple geometry. This means that even a beginner who has never held a trowel or spatula in his hands will be able to lay out such a barbecue out of brick.
The procedure for laying a barbecue
To place a normal roasting oven on outdoors, you need to look at the orders and just follow the steps of these instructions:
- We are pouring the foundation for the future furnace. A thickness of 10-12 cm and the use of reinforcing mesh is sufficient. The thickness depends, of course, on the size of the barbecue.
- We lay out rows of bricks sequentially, according to the order. Brick is best.
- We mount work surface. Select for garden barbecue The cast iron option is better, especially if the barbecue is under a roof.
- Next, we lay out a brick chimney or use metal version chimney.

Order No. 1. Large barbecue.

Order No. 2. Combined barbecue with space for a cauldron.

Order No. 3. The simplest barbecue.
After the solution has hardened, two preliminary heatings should be made. After this, you can use this wonderful stove outdoors for its intended purpose.
Brick BBQ – photo gallery
Here are a few photos of how you can decorate a brick barbecue in the courtyard of your own home.


Meat, fish, and vegetables cooked with your own hands in a barbecue oven have an impressive taste and special aroma. It is not difficult to lay out the barbecue oven, observing necessary technology furnace work. We have prepared for you detailed instructions with drawings and order so that you can fold it yourself.
E. Gudkov's barbecue oven well combines two functions in one design - a barbecue grill and a hob with a burner.


Foundation
Materials
The main materials for a monolithic slab are: concrete, reinforcing mesh.
To construct the foundation, it is enough to use concrete with compressive strength B15 (M200). You can prepare it by following the following proportions:
- Cement M 400 - 1 part.
- Crushed stone or gravel, the size of which should be less than 30 mm - 4 parts.
- Sand - 2 parts.

Impurities in the sand of clay, organic particles, mica, and dust inclusions should be no more than 10% of its volume. In coarse aggregate (gravel, crushed stone), the amount of impurities that reduce the strength properties of concrete should be less than 2%.
Consumption of concrete components by weight per 1 m3:
- cement - 325 kg;
- sand - 1300 kg;
- crushed stone - 1300 kg;
- water 205 kg.
Armature
To reinforce the foundation, a mesh of class AIII reinforcement is taken
We accept the size of the foundation larger size oven 10 cm from each edge. If the furnace has a size of 1400x1000 mm, then the foundation will be 1600x1200 mm.

Tools
- probe (for compacting concrete);
- tamper (narrow), protected by metal;
- tamper (round) with two handles;
- rammer (square), covered with metal underneath;
- smoother (for leveling concrete);
- scraper (to remove laitance);
- grater;
- board (for smoothing concrete);
- trowel;
- shovel - straight cutting part;
- shovel - pointed lower part;
- shovel for mortar.

Laying concrete mixture
A properly selected and constructed foundation is a guarantee of the strength and durability of the entire structure. Here it is very important to know what kind of soil will become the basis for the stove. Sufficiently dense soil can easily support the structure of a barbecue oven. But there are pitfalls here that you need to be aware of.
There are soils that can change their volume due to wetting or lowering the temperature. These are swelling clay, subsiding loess and containing soluble salts, water-saturated (when ice freezes, the volume of soil increases), with particles of biological origin (peat), etc. These soils require special measures to strengthen them.

The marking of the future foundation can be done by pulling the twine over the pegs. The size of the pit for the sand cushion is taken according to the size of the foundation slab (160x120 cm). Since the barbecue oven will be located outside, the soil will winter period time will be subject to freezing and thawing. Depending on the type of soil, the depth of the sand cushion can reach 1000 mm.
Filling the hole with sand must be done in layers (15 cm) with compaction or pouring water to compact it. Before laying the sand, you can lay geotextiles on the ground, which allows water to pass through but prevents the sand from being washed away by groundwater.

Waterproofing consisting of 2 layers of roofing felt must be laid on the sand cushion. This will protect the concrete from water in the ground and keep uncured concrete from flowing into the sand.
Boards for formwork are used from coniferous and hardwood a thickness of at least 2 cm and no wider than 15 cm. The posts, to which the formwork boards will later be attached, are driven into the ground after 50 cm, and then reinforced with struts. Before you start installation concrete mixture, it is necessary to clean the formwork from dirt and moisten it.
Next, the reinforcement is installed in the formwork. The reinforcing mesh is tied into a three-dimensional frame using vertical rods, taking into account the distance between them and the size of the protective layer of the working reinforcement - 2 cm.
It is advisable to do concreting in one go. This will ensure the same curing time for concrete. Also, we must not forget about tamping the concrete mixture to remove formed air bubbles and compact the concrete.

To maintain the moisture regime necessary for normal hardening of concrete, it is covered with moistened burlap, tarpaulin or other similar material. You can, 3 hours after pouring the concrete, pour a layer of wet sawdust or sand onto its surface, which is periodically moistened (5 times a day). This regime is maintained for 7-14 days until the concrete reaches 50-70% of its strength.
Important! When the outside air temperature is below +5 °C, fresh concrete must be insulated to maintain a uniform setting regime.
The formwork can be removed when the concrete has gained at least 50% strength. In days it will depend on the air temperature:
- +5 °C - 12 days;
- +10 °C - 8 days;
- +15 °C - 7 days;
- +20 °C - 6 days.
In any case, the indicator for the possibility of removing the formwork will be the hardness of the corners and surface of the structure. It is possible to begin work on the construction of a barbecue oven only after 2 weeks, taking into account the air temperature.
Gudkov barbecue oven body
Materials
- Fireproof brick (fireclay) GOST 390-96.
- Ordinary clay brick GOST 530-2012.

The furnace body is made of either refractory or ceramic brick (necessarily solid). Refractory bricks can withstand temperatures of 1300 °C or more. Ordinary clay brick must be well fired. Unburned, hollow, silicate, and cracked bricks are not suitable for stove masonry.
The stove will require 465 bricks.
Furnace appliances:
- single-burner hob 420x500 mm;
- barbecue grill 420x500 mm;
- a metal sheet 500x600 mm;
- cleaning door 140x140 mm;
- blower door 270x140 mm;
- combustion door 250x270 mm;
- grate 300x200 mm;
- steel corner 32x32x4 mm, length 500 mm - 4 pieces, 600 mm - 6 pieces;
- steel wire 2 mm - 10 m;
- asbestos cord 5 mm - 10 m.
Clay-sand solution
For furnace work, mainly plastic, most often red clay and fine sifted sand are used. The required proportion of the solution composition is taken based on the fat content of the clay. The fat content depends on the percentage composition of sand in it:
- oily - 2-4%;
- average - 15%;
- skinny - 30%.

Composition of the solution (clay, sand):
- oily - 1:2.5;
- average - 1:1.5;
- skinny - 1:1.
Important! Before starting work, the clay is soaked for a day, and then, gradually stirring, sand is added little by little.
You can also buy ready-made mortar mixture for furnace work. Such mixtures can withstand high temperatures and will significantly reduce the time required to prepare the solution.
Stove maker's tool
Stove masonry is the same brickwork, so basically the tool for it is almost the same.
 1 - pickaxe; 2 - trowels; 3 - mallet; 4 - jointing; 5 - plumb line; 6 — level; 7 - square
Garden combi stove body
Work on the construction of the furnace body must be carried out only if there is at least a temporary canopy over it. For ease of work, you can first lay out the body dry, selecting bricks.
Important! The chipped side of a brick cannot be placed inside a firebox or chimney.
Before laying, clay bricks are moistened for 1-2 minutes. dropping into the water. Fireclay bricks are only rinsed to remove dust. Seam thickness clay brick should be less than 5 mm, and for fireclay - 3 mm.
When performing furnace work, it is necessary to maintain strict horizontality of the surfaces of each row and verticality of the corners. The dressing of the seams should be 1/2 brick.
All stove appliances installed simultaneously with masonry work. Metal and brick have different amounts of linear expansion, so all metal elements of the stove are installed with a gap of 3-5 mm, then this gap is filled with asbestos cord.
Steel wire is attached to the stove doors to embed it into the masonry.
Orders


You can install a cast-iron cooking stove, or you can install a barbecue grill if desired.


When installing a vault over hob the brick is installed on steel corners. A barbecue grill or cast iron stove is also placed on the corners. Chimney channel for garden barbecue oven you can make 270x140 mm, 270x270 mm, and also 400x140 mm. The inner wall of the chimney must be plastered so that it is smooth and does not allow soot to accumulate in uneven areas.


For fire safety The barbecue oven is installed no closer than 7 m from the walls of the house. The finishing of such a stove is chosen according to the owner’s taste. This can be jointing, plastering or tiling.

Drying the oven is done carefully, without rushing. It is heated with a small amount of fuel for 3-8 days.
Any holiday on fresh air One can hardly do without deliciously cooked food on the fire, which saturates it with the energy of nature. And a home-made oven will embody any recipes of a hospitable host.
Good day everyone!
Today we’ll talk about how to set up a barbecue in your summer cottage. Not a portable metal one, but a brick stationary one. What's good about this grill? First of all, design qualities. Made not only in an original form, but even in a simple design, it will bring to your country cottage area element landscape design and will become a place of comfortable relaxation.
Step-by-step instructions for a brick grill
So, we decided to build a brick grill. What do we need for this? Let's start with tools and materials. First of all, since we have brick grill, which means we will need a brick. Since we are building a kind of oven, we will therefore need a special oven or fireclay brick. This is a fireproof brick that can withstand big differences temperatures Mortar for bricklaying is a mixture of clay and sand, pre-soaked. For the barbecue, since it is stationary, a foundation will be needed. To make it we need cement, sand, formwork boards, reinforcement, stones and crushed stone. For fastening additional elements need to cook metal corners, gratings, various valves and sheet iron.
As for tools, you will need a shovel, trowel, buckets, and a trough for mortar.
The amount of brick depends on the project that you draw yourself, or find a ready-made one. Below are several options for a brick grill.
If you don't want to bother with complex circuits of your building, but you just want to supply enough simple barbecue, then the following scheme may be suitable.
Making the foundation
The foundation of the barbecue must be level, for which you can use building level. It will also be necessary to use roofing material for waterproofing.
Based on the size of the grill in the project, we dig a hole. We line the bottom of this pit with stone and crushed stone and install the formwork. After this, we fill the hole with a concrete mixture (if anyone doesn’t remember, its proportions of cement and sand are 1:3), while laying the reinforcing mesh.
In the meantime, while the concrete is cooling, you can prepare a clay mortar for masonry. To do this, soak the clay in a special container (tub, barrel) for a week. Stir it periodically and add water if necessary. After this, add sand. To check the quality of the solution, you need to mix a little clay with dry sand, then roll the mixture into a rope with a diameter of 1 cm. If it does not lose its shape, crack or spread, then everything is fine.
After the concrete has completely hardened, you can begin laying bricks.
Brickwork
We begin the laying with the construction of three supporting walls - two side and one rear. If you need a through design, then you don’t have to make a back wall.
The pictures below show the order of the bricks.
If necessary, you can make compartments in the grill, one for frying and the other for dishes. To do this, we create cavities in the supporting part by placing another intermediate wall of half a brick.
After all the walls have been laid out, we cover them with a concrete slab. For this purpose we use OSB board suitable size. We install it from below so that after the concrete has hardened, the formwork can be safely removed. Place a square frame on top edged boards, the height of which is equal to the thickness of the slab being poured.
We put dense polyethylene on the OSB and fill it with a solution with a layer thickness of 1-2 cm. After this, we lay four reinforcing bars with a diameter of 12-14 mm and fill the entire formwork fine-grained concrete(crushed stone fraction 0.5-1 cm).
In general, there are quite a lot of options for a simple barbecue. You don’t even have to bother with mortars, but simply stack the bricks on top of each other, as in the picture below:
But if you want design, then you can offer such models.
Brick grill with a stove for a cauldron. Brick ordering
Another option for a barbecue that you can install at home is a barbecue that has an added oven under a cauldron.
This means that a traditional stove under a cauldron is installed next to the barbecue. Both of these structures are separate, but for aesthetics and to give the appearance of a single whole, a connecting seam is made between them.
The procedure for constructing such a barbecue is similar to that in the previous version. We just add the installation of a stove under the cauldron.
We begin the whole process by laying the first row without using clay-sand mortar. To do this, first we lay out everything corner bricks, which should form a rectangle. We stretch a string between these bricks. Next, we lay the bricks of the first row and check the correctness of the masonry. For this purpose, we measure the diagonals of the formed rectangle; if they are equal, then we lay the bricks on the mortar. If not, then we adjust the masonry. We lay the bricks of the first row on the mortar, the thickness of the seams should be 3-4 mm.
Well, further masonry is carried out according to the chosen order. Below are a few examples of this arrangement that you can use for your construction.
Installing a stove under a cauldron includes the following steps.
Laying the 1st row.
We lay a completely red brick. We start with a whole brick. Next, we apply this method to each odd row.
Laying the 2nd row.
Red brick is placed around the perimeter, and fireclay brick is placed in the middle. The row starts with half a brick. The same is done with all other paired rows. The second row will be the bottom of the firebox. In the first two rows we leave space for an ash pan, where we build the door of this ash pan into the masonry.
Laying the 3rd row.
It is made continuous, with the exception of the space above the ash pan. The grate is installed here. To do this, we cut grooves in the brick of the third row. In addition, we also close and fix the ash pan door next to it.
Laying 4 and 5 rows.
The brick is laid in such a way that there are holes for the firebox door and the chimney. We divide the stove into two parts. One will become the outer wall of the stove, and the second will be its central part. Between them we do small space. The central part is made in the form of a square with a circle in the middle, which is the firebox.
The central part is made of fireclay bricks. We fix the firebox door.
Laying the 6th row.
We do everything in the same way as when laying the previous row. The only thing is to block the outer hole for the chimney. The brick should tie the seams of the previous row.
Masonry 7-11 rows.
The 7th row overlaps the firebox door. In the 9th row you need to make holes through which flue gases will escape. In the 11th row we make a circulation hole in the front of the furnace. Next, we place the 12th row and attach slabs with a hole for the cauldron on it.
Do-it-yourself brick grill with a roof - drawings and photos
Sometimes, while preparing a delicious barbecue on your country grill, unexpected rain ruins the whole action. Naturally, the question arises about the need to place a barbecue under the roof.
It should be noted that there are many factory designs of such barbecues. One of them is presented below.
But, as you can see, this is a completely metal grill, and we are building a brick one. The simplest and most natural option is to put up a canopy. Below are several options for such canopies.
If you are planning to make a barbecue with a roof, then the drawing of the barbecue itself is best done immediately with such a structure. Of course, you can first build the grill itself and only then attach a canopy to it.
Choosing the material for the canopy is an important step. For the roof itself, materials such as metal tiles, cellular polycarbonate or slate. The sides of the canopy can be assembled from metal pipes section 30x30x1.5 mm or 40x40x1.5 mm
In general, making a canopy is not difficult, the main thing is to approach this issue creatively and everything will work out
And finally, two videos that show how to make a brick grill yourself.
Good luck with your construction and delicious kebabs!
Meat, fish, and vegetables cooked with your own hands in a barbecue oven have an impressive taste and special aroma. It is not difficult to lay out a barbecue oven, following the necessary baking technology. We have prepared detailed instructions for you with drawings and order so that you can fold it yourself.
E. Gudkov's barbecue oven well combines two functions in one design - a barbecue grill and a hob with a burner.
Foundation
Materials
The main materials for a monolithic slab are: concrete, reinforcing mesh.
To construct the foundation, it is enough to use concrete with compressive strength B15 (M200). You can prepare it by following the following proportions:
- Cement M 400 - 1 part.
- Crushed stone or gravel, the size of which should be less than 30 mm - 4 parts.
- Sand - 2 parts.
Impurities in the sand of clay, organic particles, mica, and dust inclusions should be no more than 10% of its volume. In coarse aggregate (gravel, crushed stone), the amount of impurities that reduce the strength properties of concrete should be less than 2%.
Consumption of concrete components by weight per 1 m3:
- cement - 325 kg;
- sand - 1300 kg;
- crushed stone - 1300 kg;
- water 205 kg.
Armature
To reinforce the foundation, a mesh of class AIII reinforcement is taken
The size of the foundation is taken to be 10 cm larger than the size of the stove on each edge. If the furnace has a size of 1400x1000 mm, then the foundation will be 1600x1200 mm.
Tools
- probe (for compacting concrete);
- tamper (narrow), protected by metal;
- tamper (round) with two handles;
- rammer (square), covered with metal underneath;
- smoother (for leveling concrete);
- scraper (to remove laitance);
- grater;
- board (for smoothing concrete);
- trowel;
- shovel - straight cutting part;
- shovel - pointed lower part;
- shovel for mortar.
Laying concrete mixture
A properly selected and constructed foundation is a guarantee of the strength and durability of the entire structure. Here it is very important to know what kind of soil will become the basis for the stove. Sufficiently dense soil can easily support the structure of a barbecue oven. But there are pitfalls here that you need to be aware of.
There are soils that can change their volume due to wetting or lowering the temperature. These are swelling clay, subsiding loess and containing soluble salts, water-saturated (when ice freezes, the volume of soil increases), with particles of biological origin (peat), etc. These soils require special measures to strengthen them.
The marking of the future foundation can be done by pulling the twine over the pegs. The size of the pit for the sand cushion is taken according to the size of the foundation slab (160x120 cm). Since the barbecue oven will be located outside, the soil will be subject to freezing and thawing in the winter. Depending on the type of soil, the depth of the sand cushion can reach 1000 mm.
Filling the hole with sand must be done in layers (15 cm) with compaction or pouring water to compact it. Before laying the sand, you can lay geotextiles on the ground, which allows water to pass through but prevents the sand from being washed away by groundwater.
Waterproofing consisting of 2 layers of roofing felt must be laid on the sand cushion. This will protect the concrete from water in the ground and keep uncured concrete from flowing into the sand.
Formwork boards are used from coniferous and hardwood with a thickness of at least 2 cm and no wider than 15 cm. The posts, to which the formwork boards will later be attached, are driven into the ground after 50 cm, and then reinforced with struts. Before you start laying the concrete mixture, you need to clean the formwork from dirt and moisten it.
Next, the reinforcement is installed in the formwork. The reinforcing mesh is tied into a three-dimensional frame using vertical rods, taking into account the distance between them and the size of the protective layer of the working reinforcement - 2 cm.
It is advisable to do concreting in one go. This will ensure the same curing time for concrete. Also, we must not forget about tamping the concrete mixture to remove formed air bubbles and compact the concrete.
To maintain the moisture regime necessary for normal hardening of concrete, it is covered with moistened burlap, tarpaulin or other similar material. You can, 3 hours after pouring the concrete, pour a layer of wet sawdust or sand onto its surface, which is periodically moistened (5 times a day). This regime is maintained for 7-14 days until the concrete reaches 50-70% of its strength.
Important! When the outside air temperature is below +5 °C, fresh concrete must be insulated to maintain a uniform setting regime.
The formwork can be removed when the concrete has gained at least 50% strength. In days it will depend on the air temperature:
- +5 °C - 12 days;
- +10 °C - 8 days;
- +15 °C - 7 days;
- +20 °C - 6 days.
In any case, the indicator for the possibility of removing the formwork will be the hardness of the corners and surface of the structure. It is possible to begin work on the construction of a barbecue oven only after 2 weeks, taking into account the air temperature.
Gudkov barbecue oven body
Materials
- Fireproof brick (fireclay) GOST 390-96.
- Ordinary clay brick GOST 530-2012.
The furnace body is made of either refractory or ceramic brick (necessarily solid). Refractory bricks can withstand temperatures of 1300 °C or more. Ordinary clay brick must be well fired. Unburned, hollow, silicate, and cracked bricks are not suitable for stove masonry.
The stove will require 465 bricks.
Furnace appliances:
- single-burner hob 420x500 mm;
- barbecue grill 420x500 mm;
- metal sheet 500x600 mm;
- cleaning door 140x140 mm;
- blower door 270x140 mm;
- combustion door 250x270 mm;
- grate 300x200 mm;
- steel corner 32x32x4 mm, length 500 mm - 4 pieces, 600 mm - 6 pieces;
- steel wire 2 mm - 10 m;
- asbestos cord 5 mm - 10 m.
Clay-sand solution
For furnace work, mainly plastic, most often red clay and fine sifted sand are used. The required proportion of the solution composition is taken based on the fat content of the clay. The fat content depends on the percentage composition of sand in it:
- oily - 2-4%;
- average - 15%;
- skinny - 30%.
Composition of the solution (clay, sand):
- oily - 1:2.5;
- average - 1:1.5;
- skinny - 1:1.
Important! Before starting work, the clay is soaked for a day, and then, gradually stirring, sand is added little by little.
You can also buy a ready-made mortar mixture for furnace work. Such mixtures can withstand high temperatures and will significantly reduce the time required to prepare the solution.
Stove maker's tool
Stove masonry is the same as brick masonry, so basically the tools for it are almost the same.
1 - pickaxe; 2 - trowels; 3 - mallet; 4 - jointing; 5 - plumb line; 6 — level; 7 - square
Garden combi stove body
Work on the construction of the furnace body must be carried out only if there is at least a temporary canopy over it. For ease of work, you can first lay out the body dry, selecting bricks.
Important! The chipped side of a brick cannot be placed inside a firebox or chimney.
Before laying, clay bricks are moistened for 1-2 minutes. dropping into the water. Fireclay bricks are only rinsed to remove dust. The seam thickness for clay bricks should be less than 5 mm, and for fireclay bricks - 3 mm.
When performing furnace work, it is necessary to maintain strict horizontality of the surfaces of each row and verticality of the corners. The dressing of the seams should be 1/2 brick.
All stove appliances are installed simultaneously with masonry work. Metal and brick have different amounts of linear expansion, so all metal elements of the stove are installed with a gap of 3-5 mm, then this gap is filled with asbestos cord.
Steel wire is attached to the stove doors to embed it into the masonry.
Orders
You can install a cast-iron cooking stove, or you can install a barbecue grill if desired.
When constructing a vault above the hob, the brick is installed on steel corners. A barbecue grill or cast iron stove is also placed on the corners. The chimney channel for a garden barbecue stove can be made 270x140 mm, 270x270 mm, and also 400x140 mm. The inner wall of the chimney must be plastered so that it is smooth and does not allow soot to accumulate in uneven areas.
For fire safety, the barbecue oven is installed no closer than 7 m from the walls of the house. The finishing of such a stove is chosen according to the owner’s taste. This can be jointing, plastering or tiling.
Drying the oven is done carefully, without rushing. It is heated with a small amount of fuel for 3-8 days.
Any outdoor holiday is hardly complete without deliciously cooked food on the fire, which saturates it with the energy of nature. And a home-made oven will embody any recipes of a hospitable host.
Barbecue - this word has many meanings: a leisure event, a recipe for cooking meat, a sauce for meat, the meat itself, cooked in high temperature, but they all boil down to one thing - the result should be meat cooked over an open fire or hot coals. If there must be an open fire, then this meat will be cooked in nature, that is, the very name “barbecue” suggests relaxation - in the country, in nature, in your own garden. Today we will talk about how to build a brick grill with your own hands.
What is barbecue and its benefits
Such a stove is a stationary device, as it is built from brick. Although you can find portable options made of metal elements and parts, but, undoubtedly, a brick barbecue oven has many advantages, since:
- Externally, a brick barbecue grill looks impressive and complex, but in fact the design is so simple that even a non-professional can make such a grill. And so that you can understand more clearly how to set up a barbecue oven with your own hands, drawings and practical recommendations we will provide in the article below;
- The functionality of a stationary barbecue is significantly higher: you can cook barbecue meat, fry shashlik, cook grilled meat and steak, bake flour products, cook meat or fish over an open or closed fire (bake), you can dry fruits, bake vegetables, smoke and dry various products, including mushrooms, etc.;
- A brick barbecue is built with a solid rear wall, its purpose is to uniformly redistribute the temperature from burning coals throughout the chamber, as well as to retain heat in it for a long time;
- The presence of a chimney pipe frees the cooking area from smoke;
- Since firewood or coal burns in a brick firebox, and not on steel pallet, as in a portable barbecue, the combustion zone becomes safer, and the outdoor stove itself lasts much longer;
- The brick structure retains heat for a very long time, which means that with one kindling and use of the barbecue you can cook several dishes according to different recipes$
- If you build a barbecue in a country house or garden house, then it will be possible not only to cook food, but also to heat the room.

There are a huge number of options, designs and designs for barbecue stoves, but structurally they are divided into the following subgroups:
- A grill with a grill grate or spit, with an enlarged open firebox, which can also serve as a fireplace in a gazebo or house;
- A roaster (oven or oven) similar to a Russian stove, in which you can bake meat, fish, vegetables, or bake bread and pies;
- Barbecue grill;
- Recessed niche for pots, cauldrons, boilers;
- Smoking smoke chamber;
- Standard hob;
- Various combinations of all these options.

The simplest barbecue oven
This is a U-shaped structure made of red refractory brick with a height of at least 100 cm (see picture below). A stove like the others stationary structures barbecues are built on a strong concrete foundation.
At a height of 0.75 m from the foundation level there are side brick steps - the bricks are laid perpendicular to the main masonry, and they are needed to install a tray for ignition and combustion of fuel. Higher in brick wall inserted (in advance drilled holes) metal guide rods, which serve to change the height of the pallet in order to maintain a constant and optimal temperature regime cooking meat or other products.
The combustion and cooking chamber is located in a kind of brick casing, which is formed by the side and rear walls of the barbecue, and serves to protect from the wind, as well as to accumulate and preserve heat. This barbecue design does not have a smoke channel and an upper closed vault, which in other designs increase the efficiency of the stove and its efficiency. 
The fuel combustion area must be equipped with fire-resistant bricks and fire-resistant cement mortar, mixed with purified sand in proportions 1:3. You can also use clay in proportions 1:3:3 (cement - sand - clay). The walls of the barbecue grill are made of ordinary red or facing bricks. Attaching to this simple barbecue additional work surfaces, shelves and niches can significantly expand the functionality of the design. 
Brick BBQ Blueprints
The dimensions, design and exterior of a brick barbecue depend mainly on the landscape features of the site. Based on the average height of a person during construction, the grating and working surface are arranged at a height of 9-10 bricks. All additional structures and devices must be made removable. A standard barbecue is shown in the drawing - its dimensions are 1500 x 7500 mm, detailed ordering allows construction to begin immediately after the procurement of building materials. If this drawing is too large or small, the scale can be changed while maintaining the proportions.

To build a brick barbecue you need to prepare fireclay and facing brick, as well as bulk materials for two types of solution: clay solution for the combustion chamber, and cement-sand mortar for side and rear walls. You will also need:
- For the construction of the foundation - crushed stone, sand, cement, reinforcement, formwork material;
- Sheet metal for combustion chamber and oven;
- Iron doors for the combustion chamber and ash chamber, chimney door (valve), cast iron grates or grate, cast iron hob;
- Metal angle or reinforcement bars for the construction of vault floors, hob and other horizontal floors;
- Multilayer plywood for the arch, roofing felt or roofing felt;
- Concrete mixer or large capacity for mixing the solution manually;
- Grinder and discs: for cutting brick and metal;
- Furnace and rubber (wooden) hammer, trowel, trowel, spatulas different sizes, level and plumb;
- Entrenching tool, wooden tamper, buckets for mortar, construction cord and stakes for marking the foundation.

The construction of the foundation begins with digging a trench 0.4-0.5 m deep with arrangement at the bottom sand-crushed stone pillow, which is moistened and compacted. Mounted wooden removable formwork, which fits the simplest reinforcement cage or mesh: the rules for making a frame are the same as when building a foundation for a house.
Cement-sand mortar is prepared from bulk materials in proportions: 1 part cement, three parts sand, four parts crushed stone or gravel and four parts water. After pouring the solution, it must be covered with polyethylene or roofing felt and left for a week until it gains strength. After 7 days, the foundation is opened, the surface is covered with a layer of waterproofing (or coated with hot tar) along the width of the tape, and the laying of the first row of bricks begins.
Hot zones are laid out with fireclay bricks on clay-sand mortar, the remaining rows are laid out with ordinary bricks and mortar. All bricks must be soaked in water for 24 hours before laying.
First, a niche for fuel is opened with a shift of the next row relative to the previous one by half a brick. The height of the stove is 28 bricks, the chimney goes higher. According to the given order, the laying proceeds quickly and without delays, since the diagram for each row is fully working. To ensure minimal shrinkage, a 48-hour break is taken every 6-8 rows.
From the first to the eighth row there is a fuel compartment, in which you can also store kitchen utensils. 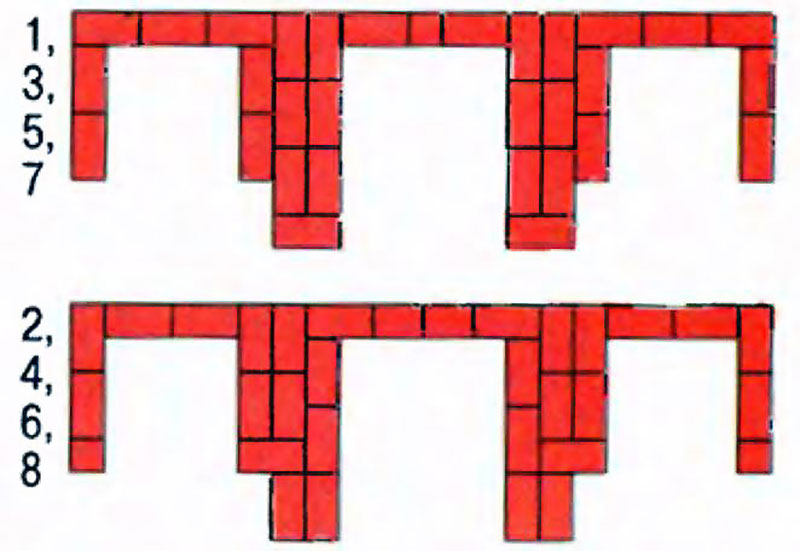
The ceilings for the niche arches are lined up after the eighth row. After the ninth row, steel lintels are built in. 
By laying out the next two rows (10 and 11), a ceiling and a pedestal are formed, and iron corners or channels are built in for mounting the tabletop.  Firebox
To arrange a semicircular vault, use plywood template. 
Subsequent rows must be narrowed - from rows 15 to 24 to complete the volume of the combustion chamber. The twenty-fourth row is released by ¼ to separate the border of the firebox from the chimney. The same detail serves as decor, like the release on row 12. 
The place on the site has great importance– a smoking barbecue should not disturb either residents or neighbors; the barbecue should be protected at least by trees from wind, sun and rain, therefore the choice of building materials depends on the location, and, accordingly, construction tools. Here are some simple rules:
- Between the house and the barbecue there should be optimal minimum distance, since you will have to walk a lot while cooking;
- There should be no tall vegetation around the barbecue;
- Smoke from the stove should move away from the house, and not towards the house;
- It is advisable to select the exterior of the barbecue in accordance with the design of the home and site;
- On small area it is recommended to build a small oven, and vice versa;
- A bulky brick grill with several work areas is installed on a concrete foundation.


