In one of the articles we looked at the main ones, but you can buy and make a second floor in the attic of an apartment building.
Having received a building permit attic floor, and once you begin its construction, you will appreciate the resulting increased space. Such additional space will cost you much less (about 15 - 20%) than, for example, a neighbor’s apartment purchased for the same purposes.
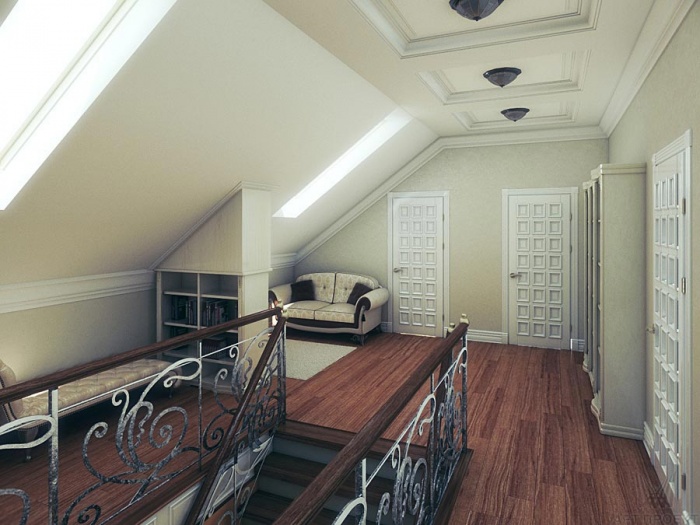
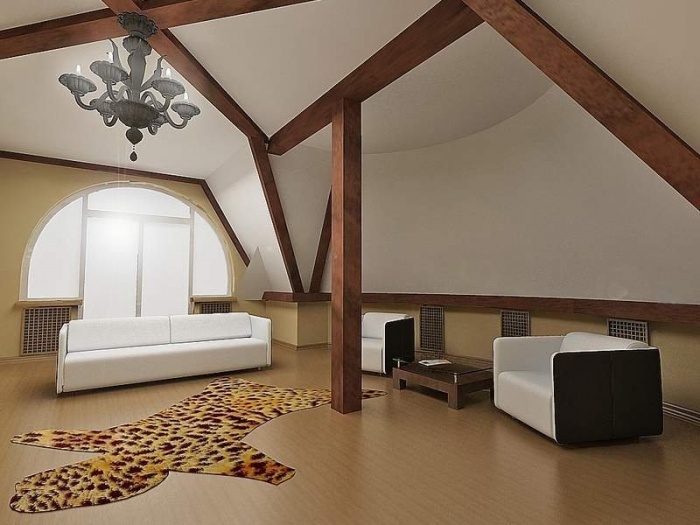
Office in the attic of an apartment building
Of course, such work is only suitable for older houses with attics. IN modern houses attic floors are often already given over to other purposes.
The special advantages of the attic include the fact that in this room you can make a layout to your own taste, unique and very original. The sloping roof will give special comfort sleeping place, originality and designer charm.

And with a well-thought-out window design and timely snow removal in winter, you will have a magnificent view and excellent illumination of the room.
An important feature is also that it is not always possible in ordinary apartments. This, of course, requires financial costs and skill in constructing a chimney with a hood, but everything is compensated when you are in winter time you can enjoy sitting in a rocking chair, admiring the crackling fire and burning wood.
 Fireplace in the attic of a house
 Do not be upset if the roof in your home is not sloping, but flat. Instead of a vertical interior wall, you will get a usable roof. You can arrange a place for a barbecue or a tennis court (a stone's throw from own apartment!) - any city dweller could dream about this. Thus, you get the illusion of life outside the city, and you will get to work as usual.
Read also
Redevelopment options 1 room apartment
Disadvantages of the second floor in the attic
In addition to all the listed advantages, living under a roof also has its disadvantages. The arrangement of the attic itself is already quite a troublesome and expensive pleasure. Even at the stage of obtaining permission from the authorities for the construction of an attic space (attic), and subsequently for repairs, it requires a lot of time and money. Also, the buyer must understand that the meters under the roof are not equivalent to the meters in ordinary apartment, due to pitched roofs, flat space is lost.
 Pitched roof makes the livable space much smaller
 The law prohibits vertical associations. Therefore, converting an attic into an attic and combining it with the floor below will be considered illegal. What does this mean? The fact is that such a redevelopment will not be issued to you, and you will not be able to sell the apartment resulting from the merger as housing with a single space. In addition, it will take you almost a year, or even more, to independently obtain permission and approval for a project for arranging an attic.
The opinion of real estate market experts is that the purchase attic space can be considered an unprofitable investment today, since in the modern real estate market there are many offers for ready-made duplex apartments and penthouses in new buildings.
 Duplex apartments in new buildings
 It is also worth understanding that only attics in old houses are suitable for reconstruction, due to the lack of engineering communications. Along with this, recently the sale of attic premises in the Central Administrative District, where most of these houses are located, has been suspended in order to develop and approve a new market price per square meter.
On the top floors there is usually an elevator motor, which constantly produces noise. You may be able to isolate it separately in a soundproofed room, but then you may be subject to claims from the fire safety service and other competent authorities.
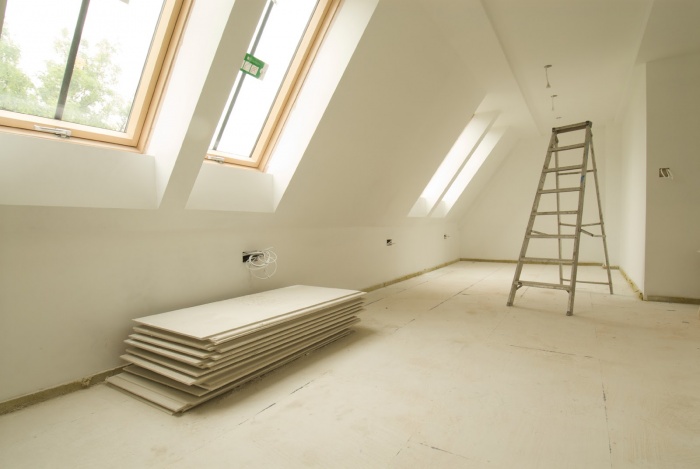
Consumables
So, let’s consider the question “How to build an attic or a second floor?”, taking it from the theoretical plane to a completely practical one, namely, we will discuss with you the possibilities of building a second floor in your house above the existing first. The fastest and cheapest way was, is and, most likely, in the near future, will remain the option of building from wood. As vertical racks 100X100 mm and 100X50 mm timber is used to organize additional flooring (joists) and as a material for roof installation. We will also need:
- antiseptic for wood (it will help make the tree invulnerable to natural factors and pests);
- insulation (mineral wool in rolls is ideal);
- material for internal rough finishing (edged board, lining, OSB sheet, DSP or plasterboard);
- material for exterior finishing (plastic, euroboard).
Roofing material that affects this moment, great variety. This is both bitumen slate and ceramic tiles, And soft roof(such as “ondulin”), and stamped painted galvanization, which everyone with great persistence continues to call “Euro tiles”. In short, everyone can choose a roofing material according to their budget and in accordance with their ideas about the ideal.
Don't forget about vapor and waterproofing. Particular attention should be paid to translucent structures that will subsequently fill window and door openings. Place an order for window and door designs preferably in advance.
The list of “consumables” should also include self-tapping screws, anchor bolts, nails, staples for a construction stapler and, of course, drills for wood and metal, a drill for a hammer drill (in accordance with the diameter of the anchors), cutting wheels for an angle grinder and files for a jigsaw ( for timber, it is advisable to take double-sided ones for rough cutting).
We are building the second floor
When all necessary materials prepared, we proceed directly to construction. Of course, everyone who sets out to remake something understands that before building something, at least part of the existing one must be destroyed. Therefore, dismantling work is carried out first.
Basic structure
To begin with, the old roof is carefully dismantled and a site for installation is prepared. load-bearing structure. In some cases, the supporting structure can be a welded frame made of profile pipe, to which beams are subsequently sewn. However, if you work with wood correctly, you can do without welding.
Next, we will install logs that will serve as additional overlap. If you disassembled old roof to the end existing walls, then it is best to fasten the logs with anchors at the same ends, first aligning them to the level. If new logs lie on top of the old wooden floor– you can use self-tapping screws after first checking the strength of the fastening points and the existing horizon. Let's face it - the fastest, but not the most best options. It would be more correct to initially lay 100X100 mm beams around the perimeter, having previously made cuts in them for installing vertical posts. They are attached with anchors, as described above, to the upper end of the wall.
Advice!
Beams for installation can be lifted all at once and laid in the center of the building in the form of a pyramid. In the event of sudden precipitation, you can cover everything with film without much difficulty and time, using ordinary construction stapler. In this way, you will protect your “opened” house from moisture penetration, and will not allow the wood, already ready for installation, to get wet.
Such work with the perimeter greatly facilitates subsequent installation. You can “throw” logs onto a beam that is fixed and extended into the horizon without fear of making a mistake. Although, no matter which option you choose, we recommend spending a little time and organizing jumpers between the new joists across the entire floor area. This will not only increase the rigidity of the structure itself, but will also allow you to later sew up the OSB or OSB floor without any problems. DSP board, having previously laid insulation. The main condition is that the edge of the sheet coincides with the center of the log beam and (or) lintel, because this very edge should under no circumstances be “in the air.” If you don’t really want to bother with jumpers, we can advise you to simply sew up the floor edged board(40 mm) along the joists.
Frame and roof
However, we somehow digressed from the topic of the supporting structure, so we will return to it. Installation of vertical racks requires special attention and careful approach. This seemingly simple process determines how smooth your walls will be, so don’t skimp on purchasing a new level to be sure of the final result.
The vertical height is calculated quite simply:
desired height of the second floor room + depth of cut in horizontal beam+ 100 mm (joists) + floor and ceiling lining material.
So, the verticals are inserted into the prepared cuts, leveled, secured from below and connected to each other by boards using ordinary nails. Now you can proceed to the transverse parts. The cuts on the verticals can be made on site or in advance (whichever is more convenient for you). First of all, the upper horizontal beams are attached - the basis of the future ceiling and roof. You should get a rigid, stable frame. We hope that inserting the crossbars vertically will not be difficult at all.
Once the base is ready, we can begin installing the roof. If the area is not large, you can limit yourself single-pitch construction. Sections can be assembled on the ground and lifted for installation one at a time. If it is necessary to install gable roof, then everything is done locally.
Shed roof with your own hands
The production of these types of roofing is described in detail on our website in the “Attic” section. There you will find a lot useful information about choosing the angle of inclination, design features, fastening systems and much more. By the way, the installation of roofing material on a ready-made roof with subsequent hydro- and thermal protection is also described there in great detail and with high quality. Therefore, we will not dwell on this in detail here.
Having completed work on the frame of our second floor made of wood, all we have to do is organize openings for door and translucent structures. In common parlance, install traps under windows and doors. Having finished with this, you can safely proceed to exterior decoration and installation of doors and windows. The rough “interior”, as a rule, comes down to laying the floor, lining the ceiling and covering the walls with the material already listed above. For those who want to organize an entrance to the second floor through the overlap between the first and second floors, we strongly recommend that you first study the material on our website in the “Staircases to the second floor” section. This will save you from unnecessary headaches and “How?” questions.
Door frame and window openings
Alternative to wood
Of course, the light did not converge like a wedge on the “tree”. Wood is simply the lightest of materials, and you can make anything your heart desires from it. If the foundation of an existing building allows you to bear additional loads, you can use foam blocks to build the second floor. Working with this material is somewhat more complicated than working with wood, but it eliminates a lot of additional manipulations with insulating walls and inserting verticals with horizontals. However, the choice of material for the construction of the second (or third) floor is a purely personal matter.
Attics
But we will definitely say a few words about the construction of an attic, as an alternative to the second floor. In principle, the material used is the same as described above, the “consumables” are the same, and the sequence of installation of the structures is similar. But still, what is an attic? This is, in fact, a living under-roof space. The same second floor. The roof is made of a broken or regular gable, and inner space it is sewn up according to the configuration of the support posts, thereby expanding the residential area. The advantages of the attic are the possibility of installing translucent roof structures, as well as the possibility of glazing the gables, which gives the entire building some sophistication.
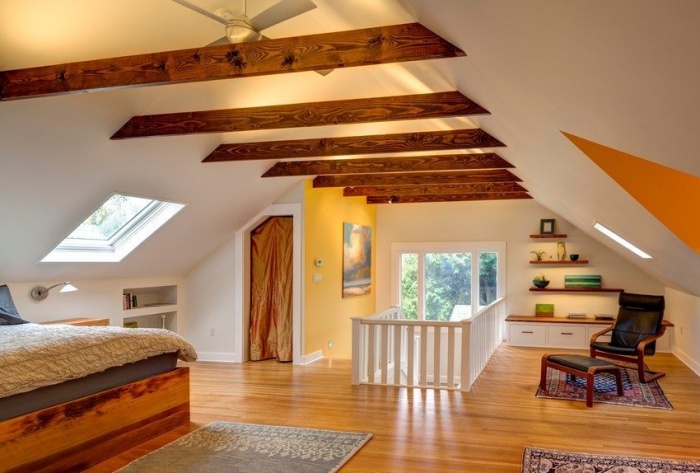
IN Lately construction country house very often it is not limited to one floor. In order to expand the space, a second one is built or the attic room is insulated and brought into a condition suitable for comfortable living. This means that you can’t do without a staircase in the interior of the first floor.
A do-it-yourself staircase to the second floor can easily be assembled from a ready-made kit, which can be purchased from companies specialized in the development and manufacture of this interior functional element. In the catalogs offered, you can choose a staircase that will ideally fit into the decor of both floors, and will be comfortable and safe for all family members to ascend and descend.
You can try to build a staircase yourself, but in this case it is necessary to do so, since if the design is not well thought out, a familiar element of the house may well become a traumatic “simulator”.
In addition, you need to decide what role the staircase will play in the interior. It may be completely invisible and not be decorative decoration room, or can become the center of the composition around which the entire design of the room will be built.
Therefore, to choose a suitable instance, it is better though would schematically draw the staircase you wanted would see in your home, but you can already find ready-made option and adapt it to a specific room.
Before choosing a staircase model, you need to know how it is designed and how to calculate its correct parameters.
The main components of the stairs
The design of a staircase has many components, some of them are mandatory, while others may not be included in the design of some types of this structure.

So, a staircase cannot do without steps and the supports that support them - these are the main elements of the most simple designs interfloor stairs.
- The step itself consists of two parts - vertical and horizontal. The first of them is called riser, and the second is called gait. The riser is a support for the step, but sometimes they do without it.
- Supports can be of two types:
— the bowstring is a beam that supports the steps from their ends;

- stringer - a beam supporting the steps from below.
- Railings are also important element stairs, although it is not present in all types. But if there are children or elderly people in the house, then there is no way to do without them.
- Balusters are vertically installed supports for railings, which most often become not only a functional part of the staircase, but also its decorative decoration. This element can be made from different materials and have different forms.
Since there are different types of stairs, each of them may have parts that are necessary specifically for a particular design.
- Stand - this element is used to construct a spiral staircase. Steps of a special shape are attached to the rack with a certain pitch, which form a spiral rising from the first to the second floor.

- Bolts are special bolts, which are also elements supporting the steps; they are attached to the wall and directly to the steps themselves. They are not used for everyone, but only for certain types of stairs.
Types of stairs
Having found out what elements the stairs consist of, you need to understand in more detail what each type of these structures looks like, installed between floors.
Marching staircase
This type of staircase is popular for any type of private home. It consists of one or more straight flights, equipped with evenly spaced steps. It is convenient to go down and up, but the disadvantage of this model is that it requires a lot of space in the room.
 The most common - marching stairs
If the staircase consists of several flights, then each of them must have at least 3 ÷ 4 and no more than 15 steps. Failure to comply with this standard may make climbing stairs uncomfortable. Typically, the number of steps in each flight is 8 ÷ 11 pieces, and special platforms are installed between flights. Their sizes are multiples medium length step.
- Marching stairs can be closed or open. The first of them have risers in the design of the steps, and the second are installed without them. The open option is convenient in cases where the steps are not wide enough.
- Marching stairs can have steps attached to stringers or strings. For these parts, boards with a thickness of at least 45 ÷ 50, and better yet, even 60 ÷ 70 mm are selected.
- If a straight staircase without turns has more than 8-9 steps, then for strength it is also recommended to divide it with a platform.
- In the case when the staircase is built with a slight turn, it is called a turning one, and sometimes in this area, instead of a landing, steps are installed, which are called winders.
 Winder steps quarter reversible staircase
 - In addition to the above types, flight stairs can be:
— quarter turn– the angle of which when turning is 90 degrees, and they are located mainly at the junction of two walls;
- half-turn - their rotation has an angle of 180 degrees;
- circular models - marches successively form a 360-degree turn.
Design of staircases on rails
The name of these stairs on the rails comes from German word"bolzen", which means bolt. So it's a bolted ladder. In fact, it is a fastener in the form of a pin with threads at its ends. With their help, steps and fences are fastened together and mounted in the wall. Thanks to these devices, the design looks light and airy. The absence of risers also contributes to this.

Besides, similar model It can be stretched over a certain section of the wall, or it can look quite compact. Despite the apparent lightness, the design is reliable and durable, it can withstand hundreds of kilograms, which is why ladders on bolts are becoming increasingly popular.
 Despite the “airy” appearance, the ladder on the rails is very reliable
 Naturally, such a structure cannot be located in the middle of the room, since it must be attached to the wall; the main condition for installation is the strength of the material from which it is built.
It is quite difficult to calculate a staircase with rails on your own, but you can purchase it as a kit or order it from professionals to make it, depending on the specific conditions of the house.
Video: installation of a wooden staircase on rails
The installation of this structure is quite complicated, and it is better to entrust it to qualified craftsmen who can assess the possibility of its installation. Therefore, before purchasing a kit, it is best to first consult with specialists.
Spiral interfloor staircase
This design is more difficult to install, but has the advantage that it occupies the smallest area of all. existing options, therefore ideal for rooms with small area. In addition, such a staircase can be installed in any convenient location room and, if desired, make it the center of the interior composition, since the design has a fairly aesthetic appearance.
 Spiral staircase - saves space, but is not always convenient for carrying large objects
 Can be different types, but for two-story house A model consisting of a stand and wedge-shaped steps is best suited. For rack choose metal pipe or wooden support.

- The rack itself is fixed to the floor of the first floor and in the interfloor or attic ceiling.
- The steps are attached to it with the narrow side and rotated so that the overall structure resembles a spiral.
- Balusters are installed on the wide side of the steps, top part which are fixed in the handrail, repeating the spiral direction of the entire structure.
Video: installation of a spiral staircase
What is inconvenient about such a model is the fact that it will be difficult to lift or lower down some massive piece of furniture. In addition, when choosing such a model for installation, you need to know that the smaller the opening for it in interfloor covering, the steeper and more inconvenient the stairs will be.
It is not difficult to calculate the screw structure. To do this, determine the area in the room where it will be installed, and calculate its center - this will be the location where the rack will be installed. Next, the distance from the post to the border is measured - this will be the span width, i.e. length of steps.
For comfortable walking on such stairs, the size of the middle step should be at least 200 mm, and the widest part should be no more than 400 ÷ 420 mm.
It is quite possible to make and assemble such a structure yourself, if you have skills in working with wood and the ability to calculate the loads on the selected material. However, if you do not have confidence in your abilities, then it is better to entrust the work to a specialist, since an incorrectly constructed structure is very dangerous.
Requirements for the design of stairs
Before you begin, you need to know the requirements for the staircase design.

Safety is perhaps the most important condition. In order for it to be fully implemented, it is very important to accurately calculate all the parameters:
— the angle of inclination, the width and height of the steps, the method of fastening the first and last of them are calculated;
- if the staircase is not located between two walls, a fence must be installed, and its height must be at least 800 ÷ 850 mm;
- if there are small children in the house, the balusters supporting the handrail of the fence should not be located further from each other than 100 ÷ 120 mm;
— the width of the steps should be 200 ÷ 300 mm;
- the ladder must withstand sufficiently large loads - for residential buildings they are 300 ÷ 350 kg/m²;
- the steps must not be slippery - the texture of their outer covering must be carefully thought out;
— the entire structure must be securely and rigidly fixed between floors;
— it is undesirable to install the structure at an elevation angle of more than 45 degrees;
— the width of the spans cannot be made less than 850 mm, but the optimal option is 1000 ÷ 1200 mm;
- the staircase will be less dangerous if it is divided into two or three parts by platforms;
— fastenings for structural elements must be made of quality material, so you can’t save on them;
- If wooden parts are processed independently, then you need to bring them to perfect evenness and compliance with the dimensions established by the drawing or patterns.
Video: mistakes in the design and construction of stairs
Calculation of staircase parameters and production of parts
Since for self-made and installation, a marching design with steps laid on a stringer is the most affordable, as well as convenient and safe to use, so it is worth considering.
The first thing to do is to calculate the location, number and size of steps, as well as the width of the staircase span.
Calculation of staircase parameters
The calculation of the design of the flight of stairs is carried out as follows:
- The height of the room and the length of all or part of the wall - the space allocated for installing the stairs - are taken as a basis. Having reduced these values to scale, draw a right triangle, in which the staircase itself will be the hypotenuse, and the legs will be the height of the rise and the floor.
An angle of 45 degrees is considered ideal for installing a staircase, but it can be changed depending on the wishes of the home owner and the area of the room.
- A comfortable tread width should be at least 200 mm, so the leg of the floor, based on its natural length, is divided by this value. The resulting number of steps is marked on the drawing.
- The height of the risers, convenient for movement, should not exceed 100 ÷ 120 mm. To calculate them, you need to divide the height of the total rise by the selected height of the risers and also transfer it to the drawing.
- Thus, you can calculate the dimensions of the stringer for laying the steps.
- The width of the stairs will depend on the preferences of the residents and the size of the room.
Video: example of calculating a mid-flight staircase
Manufacturing of staircase parts
In order to correctly manufacture parts, you need to accurately transfer the dimensions from the drawing made to the material and select high-quality, well-dried wood.

- The most difficult thing is to cut the stringers perfectly evenly, since the reliability and strength, as well as the aesthetics of the structure, will depend on this. For these load-bearing elements choose a solid board without cracks and numerous large knots, with a thickness of at least 45 ÷ 50 mm.
- The width of the treads can be 1.5-2 cm greater than the space provided for them on the stringers, plus the thickness of the risers. The steps should be perfectly smooth with neat rounded edges, and this is also very important to take into account. For them, a board with a thickness of 30 ÷ 35 mm is selected.
- If it was planned to make the staircase closed, with risers, then they must also be done carefully. For these elements you do not need to take a board large thickness, since basically the entire load will fall on the stringers, and the risers will play a role supporting the structure. A thickness of 15 ÷ 20 mm is sufficient.

- It would be better to purchase balusters and handrails from finished form along with fastenings. If there are children in the house, then, for safety reasons, it is worth installing two balusters on each step. In the case when the children have already grown up, then one element supporting the handrail is enough.
Prices for various types of staircase elements
Elements of stairs
Installation of stairs
Installation of the stairs is the most crucial moment after the manufacture of all structural elements, and it must be approached with the utmost responsibility.

- The stringers are installed first according to pre-established marks. On the floor they are fixed to a support beam fixed in the right place, and in the upper part they are installed in the cut-out gaps in the floor beam. Sometimes, to secure the upper part of the stringers, they use metal supports installed on a beam covering the ceiling. The fastenings for these load-bearing elements are anchor bolts.
To ensure that the parts are installed perfectly evenly, during the installation process they are constantly aligned with a plumb line and the building level.
- If risers are provided, then they are screwed before laying down the tread surface.
- Then the tread panels are secured on top of the stringers and risers with self-tapping screws.

The fastening of risers and steps occurs in a complex, and proceeds down up.

- Then, when the steps are ready, you can proceed to installing the balusters.
On both sides, that is, on the floor of the first floor and at the top of the stairs, support posts are installed, which will become the border for general design handrail (railing). They will also play both a supporting and decorative role.

Balusters can be different sizes, and are made from various materials, so they can be attached in different ways. Some of them are simply installed in drilled holes in steps and handrails, others are screwed with self-tapping screws, and the mounting points are closed with decorative plugs.
- , they are covered on top with handrails, which are fixed to the supporting outer posts. If necessary, another support post can be installed in the middle of the stairs.
- If three or even four racks are installed, then instead of balusters, two or three even boards (planks) fixed parallel to the course of the stairs can serve as a reliable fence.
- When the entire structure is assembled, you can proceed to surface treatment using a grinder and sandpaper. Preparation is carried out before applying protective and decorative paint coatings.
- The first layer that is applied to the wood is antiseptic compounds. They will protect the wood from rotting, mold or mildew, and from domestic insects. After this, the structure is allowed to dry completely.

- Next, the staircase can be varnished in several layers (preferably on water based) hot wax or paint.
- If it is necessary to darken the wood, it is first coated with stain or other tinting compounds, and then, after drying, a varnish coating is applied on top of them.
After drying paint coating, the staircase will be ready for use.
Photo instructions for creating a wooden staircase
 Step 1 - drawing of the future design


Video: another interesting option for installing stairs to the second floor
If you need to install it in your house, you need to carefully calculate every step of your work and approach it with all responsibility and accuracy.
You can use the attic space more rationally if you arrange living rooms there, which are called an attic.
The attic floor can occupy the entire area of the house or only part of it (or garage). Sometimes the attic floor serves as a replacement for the second floor.
What is an attic floor?
To put it simply - living room(s) in the attic (i.e. an attic-type room)
According to construction terminology- attic (or attic floor) is a living space located on top floor a house that has an attic roof (i.e. the facade of the attic is partially or completely limited by the roof surfaces).
The difference between the attic and the second floor - comparative characteristics
If you try to compare which is better, the attic or the second floor, you will get something like the following picture.
| Parameter | Attic | Second floor |
|---|---|---|
| Price | Below. The amount of savings depends on the type of attic | Higher |
| Duration of work | Lower compared to building a floor | High |
| Height of vertical walls | Up to 1.5 m.p. | Over 1.5 m.p. | Below | Higher |
| Air volume | Lower due to sloping walls | Higher |
| Square | The usable area is smaller due to the “dead” zones where the roof meets the wall | Higher |
| Room layout | The layout of the attic floor is carried out taking into account the presence of blind areas | Free |
| Land area | Doesn't change | Doesn't change |
| Illumination | Better, more light penetrates due to sloping windows | Depends on the number and location of windows. In addition, the deep slope of the window blocks 2/3 of sunlight |
| Glazing area | 25% less than when using vertical windows | Minimum 1:8 to the surface area of the walls (depending on location) |
| Window | Sloping attic | Vertical |
| Temperature | At correct execution all stages of work are almost the same | |
| Heat loss | Higher | Below |
| The need for thermal insulation material | Below | Higher. The ceiling above the floor needs to be insulated |
| Aesthetics of the structure | A house with an attic floor looks more elegant and unusual | Typical design |
However, it is worth noting that there are cases when it is impossible to build an attic floor. For example:
- load-bearing walls and the foundation may not withstand the additional load;
- the walls are made of porous materials that can collapse.
- small house dimensions. With a mandatory height of 2.3 m (according to sanitary standards, SNiP is limited to 1.5 m) it is difficult to equip a full-fledged living space with a small surface area. If the width of the house is less than 5 m.p. There is no point in building an attic. The resulting area will be insignificant, but the costs will be high.
Is the attic considered the second floor?
According to urban planning standards, the addition of an attic does not affect the number of storeys of the building. Those., a private house, in which the second attic floor is arranged, is considered (is) a one-story house.
Documentation regulating the calculation and construction of the second floor of the attic type.
The superstructure of the attic floor is regulated by the provisions of the following regulatory documents:
- SNiP 2.08.01-89 “Residential buildings”;
- SNiP II-3-79 “Construction Heat Engineering” (standardizes the arrangement of enclosing structures, including roofs);
- SNiP 23-05-95 “Natural and artificial lighting”;
- SNiP 21-01-97 " Fire safety buildings and structures";
- SNiP 2.01.07-85 “Loads and impacts”;
- sanitary and hygienic standards.
Types and types of attic floors - dimensions and dimensions of the attic
The height of the attic floor determines its type (type):
- full floor. vertical wall above 1.5 m;
- attic. The height of the smaller wall ranges from 0.8 to 1.5 m;
- semi-attic. The height of the wall is less than 0.8 m.
 Depending on the needs of the residents, rooms on the attic floors can be arranged for various functional purposes.
But most often there are bedrooms and lounges.
If the requirement for a building height of 2.3 m is met, then according to the standards prescribed in SNiP, the area of the attic floor cannot be less than 16 sq. m. In this case, the bedroom must be at least 7 square meters.
If the height of the walls of the attic floor exceeds 2.3 m, then the construction of a bedroom of a smaller area is allowed. The justification for reducing the area is the large total cubic capacity (volume) of the room.
Armed with this theory, you can begin to build an attic floor with your own hands. Construction is not a troublesome task if you have detailed step-by-step instructions.
Construction of the attic floor (attic)
 Before starting construction, you need to create a project for the attic floor. You can do the project yourself or turn to professionals.
Note that building an attic with your own hands is within the capabilities of anyone. But it is quite difficult to take into account all the determining factors and calculate loads without special knowledge.
First, let's find out what affects the attic project.
Choose appearance mansard roof quite difficult, because This is influenced by a number of factors:
- visual effect. First of all, subjective sensations are taken into account. The final choice may fall on another model, but the starting point is here;
- living space. Rafter system gable roof“steals” area and creates “dead” zones, but hip roof allows you to use almost the entire space of the attic superstructure;
- financial opportunities. A pitched roof is the cheapest option;
- roofing material. Some types of roofing material can be used if a certain roof slope is maintained. For example, for tiles the angle should be at least 25°, and for PK-100 corrugated sheeting (wave height 100 mm) 3-4° is sufficient;
- general architecture of the building;
- wind and snow load. The snow should slide off the roof;
- condition of load-bearing walls and foundation. The condition of load-bearing walls can be judged after a visual inspection. The presence of cracks indicates a problem. The use of porous material in the construction of a house reduces the ability of the wall to withstand the load created by the attic. It is difficult to judge the foundation. But knowing its type and what materials and technology were used in its construction, you can calculate what load it can withstand;
- arrangement of internal communications and ease of connection to them;
- choice of windows. Installation of special skylights(tilted windows - sliding, turning, sliding) is carried out directly in rafter part. They are more expensive, but they allow you to provide better ventilation. to install vertical windows you need to build walls or gables. The surface area of light-transmitting structures must be at least 12.5%;
- selection of materials for construction. The cheapest and most popular option for performing the work is to use wood. Technology frame construction quite simple. It is a mistake to think that erecting a wooden attic floor is unacceptable. According to SNiP 21-01-97 use wooden structures during the construction of an attic floor, it is allowed with proper wood processing and a building height of up to 75 m.
- complexity of calculations. During construction pitched roof loads on load-bearing walls are distributed unevenly. Ignoring this fact will lead to subsidence of the walls and destruction of the foundation.
The main shapes of roofs are shown in the figure.

Nuance. The smaller the angle where the roof meets the wall, the more usable area you will get.
Some projects of houses with an attic floor are presented in the photo.

Before starting work, you must have a drawing, sketch, diagram or drawing with all dimensions.
The drawings of houses with an attic presented below will give you an idea of what needs to be put on the diagrams.


Calculation of the area of the attic floor
The ability to use the attic for living space is calculated using the formula
АхВ + 0.7хС
A- total area of premises whose height exceeds 2.5 m;
IN- total area of premises, the height of which ranges from 1.1 to 2.5 m;
WITH- the total area of premises, the height of which ranges from 0.8 m to 1.1 m.
0,7 - correction factor. It says that theoretically this area can be used, but with significant restrictions.
Reduce the number of unused square meters It is possible if you raise the walls to a height of more than a meter. This is achieved through the construction of attic walls. The attic walls of the attic floor are a superstructure over the load-bearing walls.

Material prepared for the website www.site
Construction of the attic floor (attic)
Next we go directly to construction work or for reconstruction (conversion of the attic into an attic floor). For those who want to convert the attic into an attic, they need to dismantle the old covering.
Then the rafter system is installed, for which you will need:
- log (diameter at least 180 mm) or timber (preferably laminated veneer lumber, dimensions 80x80 or 100x100);
- board (40x1500) for sheathing;
- hardware, burnt wire, anchors or fittings. In order to fulfill reliable fastening all elements;
- floor beams. The finishing floor will be laid over them;
- finished staircase to the attic floor. It can be located outside the attic or inside. Outdoor placement creates inconvenience when using it in the cold season and in the rain. The inner steals usable area lower floor. A compromise could be spiral staircase. Even at the most small room a compact folding or retractable ladder is installed.
- roofing material;
- protective films;
- thermal insulation material;
- material for finishing walls and ceilings.

Attic floor rafter system - device technology
The construction of the rafter system begins with the installation of the Mauerlat, then it is assembled and installed rafter legs. It is easier to collect them on the ground. Installation begins with two opposite legs. Then a rope is stretched between them. It regulates the accuracy of installation.

After installing the frame of the rafter system, the legs are fastened together. That is, the sheathing is filled. The sheathing pitch depends on the type of roofing material.
The process of building an attic floor - video
The frame is ready. Executed correctly roofing pie has the form shown in the figure.

Windows on the attic floor
Dormer windows are installed between the rafters. To make the fastening more reliable, in the place where the window is installed (at the top and bottom on rafter system) horizontal beams made of timber are installed.
Insulation of the attic floor
It is necessary to take care of energy saving. Absence air gap created by the attic increases heat loss through the attic roof.
Two-story houses are not only practical, but also beautiful. When choosing the method and materials for finishing the second floor, you should familiarize yourself with some tips professional builders. The architecture of the attic can amaze the imagination with its non-standard and originality.
Before decorating the attic of a private house, you need to get acquainted with the features facing works. Photos of the finishing of the second floor in a private house will help you choose more suitable design premises.

Preliminary work
During preliminary work Before finishing the attic, low walls are built along the edges of the room. At the same time, the inset skylights is a pretty practical solution.
The attic is a full-fledged living space, so for the comfort of living in it it is necessary to carry out insulation. Finishing will make the premises more comfortable. With a complete renovation and finishing of the attic space, the owners of the house receive additional living space.
During finishing works it is important to adhere to the principles:
- Stingrays must be protected as much as possible from wind and precipitation. It is necessary that they withstand serious temperature changes.
- Thermal insulation of the roof is carried out both indoors and outdoors. This increases the protection of premises from freezing and drafts.
- To insulate the attic, in addition to the insulation material, it is necessary to prepare sheets of plasterboard. Cement particle boards are suitable for finishing.
- The insulation pie includes a vapor barrier and a windproof layer.
Elements of the rafter system can become a decorative decoration for the attic space.
Floor finishing
For proper finishing second floor floor wooden house a layer of sound insulation should be created inside the ceiling. For this purpose, you can use any soundproofing material. Insulation such as mineral wool copes with this task quite well. It is laid between the floor beams. Before laying the insulation on the beams, it is necessary to spread the film. Can be stacked mineral wool 5-10 cm thick. Expanded clay, as well as granulated penoizol, are excellent for insulation.
Advice! To soundproof walls during finishing, you should not choose foam plastic. He has low level sound absorption. At the same time, small rodents love it.

Finished floors are laid on top of the beams. When the beams are located less than 40 cm apart from each other, they can be laid plywood sheets. At long distance Between the beams, boards are first mounted on them. They must have a thickness of at least 3.5 cm. The main condition is to maintain the shape of the boards when walking. The floor should not bend under the weight of a person’s body. Plywood sheets can then be laid on these boards.

Finish floor covering
A variety of materials can be used for finishing the floor in the attic. Their choice depends on the chosen style of the room and the characteristics of its use. Quite often, carpet, linoleum, and laminate are chosen to cover the floor in the attic. If you are installing a bathroom on the second floor, you will need to lay ceramic tiles.
To install parquet, you must first lay the underlay on the floor. This will ensure the necessary shock absorption and sound insulation of the floor. To lay the tiles, you will need to create cement screed. It must be reinforced.
Interior finishing options
When creating living quarters in the attic, it is necessary not only to finish, but also to insulate the walls that are formed by the roof of the house. To do this, mineral wool or penoplex is installed between the rafter legs. The insulation is closed on the roof side waterproofing layer, and from the room side - a vapor barrier.

Before finishing the rafter legs are covered with plywood. It is important to properly secure the vapor barrier film. To do this, you should carefully study the instructions for finishing the room using a vapor barrier.
As a result of this work, the roof slopes will be well insulated. Finishing of the attic can be carried out after the roof construction is completed. With this solution, the insulation material is hemmed from the side of the room. Gable walls are insulated in the same way.

Finishing the attic with plasterboard
Plasterboard sheets have many advantages. When using this material, home owners are in the black. This is due to the ease of installation of the material, ease of processing, the possibility of insulating walls and wide scope for design solutions.
Thanks to the use of drywall, you can create niches, arches and columns. The technology for installing such material in the attic is quite simple. Simple alignment of walls and ceilings is another advantage of using plasterboard sheets.
Plasterboard slabs must be fastened to the frame using a screwdriver. Before finishing, the sheets are pre-cut into elements of the required dimensions. To obtain smooth edges, trim them with a plane. Drywall sheets must be firmly fixed with screws. The step between the fastening elements should be 20-25 cm. When finishing a door or window, fastening is also carried out along the perimeter of the opening. If the sheathing is single-layer, the screw must be screwed in 1 cm. For double sheathing, it should be mounted 3.5 cm.
Important! Between the edges plasterboard sheets during finishing it is better to leave a gap of 5 mm. This is necessary to compensate for roof swings. Subsequently, they must be puttied and sealed with reinforcing tape.
As you can see, finishing the attic with plasterboard is quite simple. Numerous videos will help you understand the finishing technology in more detail. Further decoration of the room can be completely different. You can wallpaper or lay tiles on drywall.

Finishing walls and ceilings
Eurolining has gained wide popularity when finishing attics. The use of this material has not lost its relevance for many years. Eurolining is practical and durable, and also looks beautiful. Facing attic premises tree - enough interesting option.
Installation of this material will not be difficult. You just need to secure the boards with their ends facing each other. They are hemmed directly to the rafters. Eurolining is fixed directly to the walls. In this case, there is no need to create a frame.
When using wood when finishing the attic, the room can be decorated in different ways:
- To make the interior more impressive, you can paint the boards in dark tones mixed with light ones. This will highlight decorative cladding in the interior of the room.
- When using a block house, the room can be successfully divided into different zones. Elements of the system that are visible can be selected in such a way that they contrast with the walls. Quite often, stain is used to color them.
- Wallpaper with silk-screen printing on the entire wall is suitable for such rooms. Such decoration should be framed with molding.
- Furniture made in an antique style looks quite impressive when decorating walls with this material.

Advice! If the interior is lacking original solutions, it can be revived using decorative stone. They should issue small plot walls.
Lining with eurolining
Sometimes fixing eurolining to the frame is convenient and practical solution. The work is performed in a certain sequence:
- Light-colored types of eurolining are selected. Among them it is worth highlighting maple, fir, ash and spruce. Thanks to this, the space will visually expand.
- Prepare slats with a width of 5 to 5 cm.
- The covering parts are connected by tongue and groove.
- Before installation facing material it is necessary to fill the frame with 15x45 mm slats. There should be a distance of half a meter between them.
- The lining is attached to special brackets. Small nails can be used to secure the planks to the frame.
- The surface of the slats is covered with stain or mastic.

To dilute the monotonous interior of the walls, MDF sheets should be used. In this case, you can create harmonious interior, as well as increase the durability of the surface. The bottom of the wall, decorated, looks very impressive MDF panels covered with cork.
As you can see, the second floor of a wooden house can be finished in many ways. Numerous photos show what to create original finish DIY at home is quite simple. The main thing is to use your imagination and be careful. In this case, you should remember the recommendations of experienced builders.


