Mini-vegetable gardens on balconies, loggias and verandas are becoming fashionable. They provide an opportunity for people who do not have land plots, try your hand at plant growing and enjoy delicious, healthy, fresh vegetables, herbs, and berries. One of the most popular balcony crops is tomatoes. At making the right choice varieties and skillful care, they will certainly delight you with a good harvest.
For limited space Not all varieties of tomatoes are suitable for a loggia or balcony. Too tall, branchy bushes with heavy fruits are best left for industrial greenhouses or open ground. Compact specimens that are easy to care for are often grown on balconies.

Among the main requirements:
- Bush size. Long vines will feel uncomfortable on a balcony. Perfect option– determinate plants, whose height does not exceed 50 cm. Such bushes do not require tying, they do not need to be pinched or pinched. Not too branchy tall varieties are suitable for growing on trellises; they can also be planted in hanging baskets;
- Growing season. For a balcony or loggia you need to choose ultra-early ripening varieties. The shorter the interval from emergence to harvest, the better;
- Productivity. It is convenient to grow brush tomatoes on the balcony, which are cut in whole bunches;
- Disease resistance. The stronger the plant immunity, the higher the chances of good harvest. It is advisable to choose hybrids that are especially resistant to major nightshade diseases;
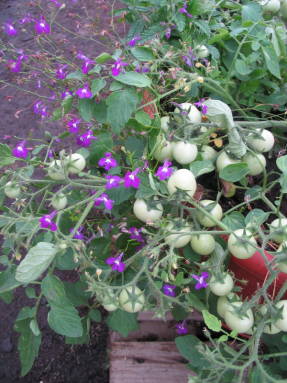
- Decorative. Balcony tomatoes should not only be productive, but also beautiful. Mini-tomatoes look especially impressive different colors. Bushes planted nearby with round, elongated, pear-shaped fruits in pink, yellow, orange, and bright red shades look no less elegant than exotic flowers;
- Versatility. It is worth choosing varieties with moderately thick skin, suitable for fresh consumption or canning.

| Variety | Description | Productivity from 1 sq. m |
|---|---|---|
| Tomatoes are racemose, round, bright red in color. The taste is pleasant, sweetish, the skin is thick. | 2 kg |
| Standard low bushes, oval, bright red fruits. The taste is delicate, sweet with a slight sourness. | 2.5 kg |
| Very productive, the fruits are honey-yellow, elongated, ripen in large clusters. The skin is thick, the taste is sweet, with fruity notes. | 2.8 kg |
| Very small round fruits with dense skin, ripen in large clusters. The yield is good, the taste is rich, sweet and sour. | 2.6 kg |
| An indeterminate shrub suitable for hanging baskets. The fruits are pear-shaped, bright yellow, with a delicious fruity taste. | 4 kg |
| Moderately tall bushes can be grown on trellises or in hanging baskets. The fruits are elongated-oval, sweet, ripen in clusters. | 2.8 kg |
| An ampelous variety with long flowing branches and sweet cherry fruits of deep pink color. | 2.5 kg |
| Suitable for growing in hanging baskets. Compact bushes, elongated fruits, bright red, very sweet. | 3 kg |


Growing conditions: what should a balcony be like?
A balcony facing southeast or southwest is suitable for organizing a mini-garden. On hot southern loggias you will need to organize shading. Northern balconies, where the sun is less than 3 hours a day, are not suitable for growing tomatoes.

It is advisable to place the plants closer to the railing or wall of the balcony. Constant strong wind slows down the development of plants. Baskets with ampelous varieties are not hung too high so that it is convenient to care for the plants. tall bushes convenient to attach to trellises made of wood, plastic or rope. They are mounted on a free wall, protected from the wind as much as possible.
You can mark it next to the tomatoes spices. They will not only decorate the composition, but will also repel pests. The best companions for balcony tomatoes are lettuce, mint, oregano, celery, regular or curly parsley.

Video - Tomatoes on the windowsill
Soil and containers: what to prefer
Tomatoes love light, nutritious soil with neutral or slightly alkaline acidity. Ready-made soil mixtures should not be used; they are poor in nutrients and contain excessive amounts of peat.

However, such a substrate can be taken as an additive to a self-composed soil. Beginning gardeners can try one of the following options:
- a mixture of garden soil with humus and a small portion of peat;
- turf soil combined with compost and a ready-made peat-based substrate;
- old garden soil with the addition of compost and washed river sand.
All components are thoroughly mixed. For greater nutritional value, wood (preferably birch) ash or superphosphate is added to the substrate.

It is convenient to grow tomatoes in deep plastic or wooden boxes located along the railings and walls of the balcony.


Planting seeds
To get a quick harvest, it is recommended to grow balcony tomatoes in seedlings. Planting begins in March. Deep containers with pallets are filled with soil so that about 1 cm remains to the edge. The soil is lightly compacted, furrows are made in it, into which the seeds are sown. Before planting, they are treated with a growth stimulator for 10-12 hours. Disinfection is not required for seed purchased in a store. All necessary procedures it passes before packaging.


The seeds are planted slightly deeper and sprinkled with a layer of soil. Then the soil is generously sprayed with warm, soft water from a spray bottle. It is possible to grow tomato seedlings in plastic cassettes or individual pots. This method eliminates picking; the plants are moved into the ground by transshipment, eliminating damage to the roots.


During growth, seedlings are watered once every 5-7 days. After the first true leaves appear, the tomatoes are fed with complete mineral fertilizer or a weak solution of mullein. The second feeding is carried out before moving young plants to permanent place residence.


Video - How to grow tomatoes or tomatoes on the balcony
Life on the balcony: transplantation and care
On glazed loggias grown seedlings can be planted in the first half of May. They are planted on open balconies later, closer to the beginning of June. The bushes are placed at a distance of at least 40 cm from each other; closer proximity reduces the yield. It is better to tie tall varieties to trellises; they will add decorative value to the balcony; heavy branches will hold securely without breaking off in gusts of wind.


When replanting, you need to take into account the needs of the plants. Each bush should have at least 4 kg nutrient substrate. A layer of expanded clay or pebbles is placed on the bottom of the boxes. The same soil mixture in which the seedlings grew is used, and wood ash is added to it for nutritional value. Young tomatoes move with a clod of earth, protecting the roots from damage. In the first days after transplantation, the bushes should be protected from direct sunlight, protecting them with awnings or roller blinds.
Tomatoes are a rather demanding crop. They love warmth and humidity, but do not tolerate direct sunlight and stagnant water in the soil. Water tomatoes only with warm, soft water (rain, settled or boiled). Watering is carried out in the morning or evening, after sunset. From time to time it is useful to water the plants with water in which eggshells have been infused.
Indeterminate plants growing on trellises or in baskets require pinching. After the formation of the third flower cluster, the side shoots are removed. If the stem is stretched excessively, you can pinch the growing point, this stimulates the rapid formation of ovaries.

Immediately after transplantation, plants are no longer fed with complexes containing nitrogen (urea, ammonium nitrate). These components contribute to the abundant growth of green mass to the detriment of fruiting. To stimulate the ovaries, superphosphate and potassium sulfate in the form of aqueous solutions. During the season, plants are fed at least 3 times. Mineral complexes can be replaced with organic matter (humus, bird droppings, diluted mullein).


Video - How to grow tomatoes on the balcony
September 14, 2016
Specialization: master in construction plasterboard structures, finishing works and styling floor coverings. Installation of door and window units, finishing of facades, installation of electrical, plumbing and heating - I can give detailed advice on all types of work.
In this article I will tell you how to grow tomatoes on the balcony; this crop is well suited for urban conditions, but in order to get a good harvest, you need to create for the plants optimal conditions. In fact, there is nothing complicated in the work process, and all problems most often stem from the fact that people do not know important nuances cultivation or use dubious advice, of which there is a lot on the Internet.
The process of growing tomatoes on the balcony
This will be a kind of step-by-step instructions, divided into 4 main stages. There are no trifles in work, every action has great importance and has an impact on the final result, so do not ignore any of the recommendations.
Step one - choosing quality seeds
If I say that almost half of the success depends on the choice of planting material, I am unlikely to be mistaken. The fact is that specially bred varieties are suitable for balconies, which are adapted to the conditions of city apartments; they are distinguished by such characteristics as small plant size, shortened ripening times and unpretentiousness to external conditions.
I will tell you about the varieties that I used when growing, but this is only a small part of the possible options:
| "Balcony Miracle" | Perhaps the most famous and popular option for growing in an apartment. The fruits are round, bright red in color, and ripen in about 85-90 days. The bushes do not require garter; one plant bears an average of about 2 kilograms of fruit. Tomatoes are suitable for both salads and pickling |
| "Angelica" | One of the fastest ripening varieties - the fruits ripen within 80 days after germination, which allows you to get a harvest before an outbreak of late blight, which usually occurs in August. The plants are not tall, the fruits are medium-sized - from 40 to 70 grams, does not require staking |
| "Pearl" | My favorite variety due to its unpretentiousness - the plants tolerate cold and heat, lack of moisture and nutrients in the soil. The fruits are slightly elongated shape small size, their characteristic feature is that the content of mineral salts and sugars in them is twice as high as in other options |
| "Bonsai micro" | This variety is distinguished by its decorative properties - the bushes grow only 12 cm high, they all have the same shape, up to 1 kg of tomatoes are harvested from a bush, they are small - they weigh about 15-20 grams. The advantage of this option is that it can be planted in small pots of 2.5-3 liters |
I do not rule out that there are many other excellent varieties; when choosing, you need to consider the following factors: purpose (best special options for and window sills), size of bushes, ripening period. Buy seeds only from trustworthy stores, otherwise you may end up with one and a half meter giants instead of stunted plants.
![]()
Balcony tomatoes of Western selection can also be considered; very often they even exceed our options in terms of yield, but they are more difficult to purchase, and the cost will be several times higher.
Step two - preparing everything you need
As I noted above, we will consider growing tomatoes on the balcony step by step, we have dealt with the first stage, but in addition to seeds you need to have a set of necessary items on hand, we will deal with them too:
- The easiest way to grow seedlings is to use conventional plastic cups , if you wish, you can buy special boxes for seedlings, but if you want to save money, then the first option will do Great. There is no need to make any holes in the bottom, the plants grow well just like that;

- Nowadays there is no need to prepare a soil mixture, just buy ready-made soil in the right quantity. Remember that one adult plant should require approximately 5 liters of soil (for the Bonsai Micro variety, 3 liters is enough), based on this, the required volume is calculated;
- For mature plants, pots or flower boxes are used, you can build containers yourself; this option is good because you can make structures to suit the parameters of your balcony.

Don’t forget to prepare a place for plants in advance; ideally, if they stand on a hill for the best results, you can build simple benches for this. Balconies facing south and southeast are best suited.
Step three - sowing seeds
Now let’s figure out how to grow seedlings from seeds; the process can be done in two ways: without germination and with germination of seed material. Let's look at each of the options in more detail and start with planting without germination:
- First of all, you need to soak the seed material in a solution of potassium permanganate, this is necessary, firstly, for disinfection, and secondly, in order to separate low-quality seeds. It is very simple to distinguish them: good seeds will sink to the bottom, and empty ones will remain on top, and they need to be drained after 15 minutes;

- Next, you need to fill our cups with soil and water it warm water . A hole is made in the middle with a depth of 1-1.5 cm, no more is needed, 2 seeds are placed in it, which are covered with earth, there is no need to compact anything, as this will complicate the germination of seeds;
- If you sow seeds in large capacity, then the distance between them should be at least 3 centimeters, and between the rows you need to make a gap of at least 6 centimeters;

- The crops are covered with transparent polyethylene and placed in a warm place; shoots will appear in 5-7 days. You can transfer the containers to the windowsill, as the sprouts need light. Optimal temperature for seedlings – 20-23 degrees daytime and 16-18 degrees at night, try to maintain just such a regime;
- If you planted in cups and you grew 2 plants, then the weaker sprout must be carefully cut off from the soil; you cannot pull it out, as you can damage the roots of a neighboring tomato;
- Watering is done approximately once a week, using water at room temperature., standing for at least 24 hours. You can additionally spray the plants with a regular sprayer;
- Hardening of seedlings can begin about 2 weeks after germination; to do this, first simply open the window, then you can take the containers out onto the balcony and keep them there for a long time. open window, if the weather is warm and calm. There is no need to check what temperature the seedlings can withstand and take them out into the cold; such extreme actions can ruin the fruits of your labor.

The second planting option differs from the first in the way of preparing seeds, I will only talk about initial stage, since further actions will be the same as in the above option:

- First of all, the seeds are soaked for 15-20 minutes in a solution of potassium permanganate, all floating elements are removed;
If your seeds have been processed (this is easy to see by their characteristic color), then there is no need to disinfect them.
- Then you need to prepare a solution with a growth regulator; personally, I usually use Epin, but it can be any other similar option. The instructions will tell you how to make the composition; seeds are placed in it and left for about 10 hours, this will improve their germination and accelerate growth;

- Soaked seeds should be placed on a damp cloth or gauze, covered and left in a warm place.. After three to four days, sprouts should appear; all seeds that have not begun to grow can be discarded;
- Next, you need to make holes in the prepared containers and drop one seed in there.. To avoid damaging the sprouts, I usually use a toothpick; wet seeds cling well to it and can be carefully placed in the soil. Further actions are produced according to the algorithm described above.

Above we looked at how to plant and how to care for seedlings, now we will figure out how fertilizing is done, since this is also an important part of agricultural technology. The easiest way is to use a ready-made complex fertilizer for tomatoes; it can be purchased at any specialty store. The work is done as follows:
- The first feeding is done 12 days after the sprouts emerge;
- The plants are treated the second time 8-9 days after the first application of fertilizers;
- The third time is carried out approximately a week after the second and at least a week before transplanting the plants to a permanent place.

To prevent fungal diseases, you can treat the seedlings twice with a milk solution (50 g per 500 g of water).
Do not forget about the fact that plants are always drawn to the light, therefore, in order for your tomatoes to turn out even, you need to turn them with the other side to the window every 3-4 days.
Step four - transplanting seedlings and caring for plants
Now let’s figure out how to properly grow full-fledged tomatoes on the balcony; the process begins with transplanting seedlings:
- As I noted above, it is best to use cups, since you can get a plant with a piece of soil and transplant it to a permanent place, this creates minimal stress for the plant during transplantation and ensures almost one hundred percent survival rate;
- The size of the pot should be approximately 5-7 liters; for dwarf varieties, 3 liters is enough. You can also use long boxes; tomatoes are planted in them at a distance of 30 cm from each other, so that as they grow they do not suffer from lack of space;
- 2-3 cm of drainage material is poured onto the bottom of the containers; the easiest way is to use expanded clay, which is sold in bags and costs little. It will allow excess moisture to drain through the hole, which must be at the bottom of the pot or box;

- Next, you need to pour the soil into the pot, after which it is watered with warm water. Before planting a plant in a pot, you need to make a hole the size of the seedling with soil, after which the plant is placed there. The soil is compacted and watered again, at which point the work can be considered successfully completed;

- Now let’s figure out how to grow a rich harvest at home, first of all you need to provide the plants with sunlight, they should be located on the south or east side, this is ideal;
- Watering the plants is done as the top layer of soil dries; on hot days this is done every other day., in cooler weather less often. The soil should not be overdried, but overmoistening will not be beneficial either;

- Once every 10-12 days, fertilizing is done with the same complex fertilizer.. Good results brings foliar treatment - spraying with a solution boric acid(1 g per 10 liters of water), this prevents flowers from falling off and improves fruit set;

- The question often arises whether it is necessary to plant stepsons; most varieties do not allow stepsons, so there is no need for this work. But if your stepsons are growing, then you need to break them off with your hands at a distance of half a centimeter from the base;
- Another important question– Is it necessary to pollinate tomatoes on the balcony? I only looked at self-pollinating varieties, so you don't need to do anything, but to improve plant set, I still recommend shaking the plants lightly in the morning;

Treat the plants with the preparation “Ovary” before pollinating them by shaking, fruit formation will noticeably improve
- To speed up the formation of fruits and their ripening, the method of tearing the roots is used, for this you need to grab the base of the plant and slightly pull up. You shouldn’t be too zealous, you need to tear the small roots, and thereby improve the nutrition of the ovaries;
- In order for tomatoes to ripen faster, it is necessary to remove already ripe fruits, this will help increase the flow of nutrients to green tomatoes.

Traditional technology involves harvesting in the summer, but many people ask whether it is possible to grow tomatoes in the winter. This is possible if you follow the technology discussed above.
It is best to take the Pinocchio variety, as it grows well in room conditions, this is especially important if it is cool on the balcony in winter and you have to keep the plants indoors. The basic materials are the same as in the case described above, but you need to add a lamp to the list daylight, winter daylight not very good, so you will have to use an artificial option.
The work is carried out as follows:
- Let's figure out when to plant Pinocchio: if you need tomatoes for the New Year, then you need to plant them in early October. You can do this with both dry and sprouted seeds; the second option in this case is preferable due to faster germination;
- The seeds are planted in cups and placed near the window; in order to ensure their high-quality lighting, a fluorescent lamp should be fixed at a height of 25 cm and turned on in the morning and evening, this will allow the plants to develop more intensively;

- In this case, there is no point in hardening the plants, because they will always be indoors; here it is much more important to ensure the required temperature for the plants;
- After transplanting into pots, you need to again place a lamp over the plants, since tomatoes grow much slower without light;
- Do tomatoes need to be pollinated? Everything here is the same as in the first case: shake the plants slightly during the flowering period and use preparations to improve fruit formation; they are especially relevant in winter.
- When the fruits begin to ripen, do not wait until they are completely red; you can also pick brown tomatoes; they will ripen on the windowsill, but the rest of the tomatoes will receive more nutrients and they will ripen faster.

The best varieties of tomatoes for the balcony
In order for tomatoes to delight you with a harvest, you need to choose the right varieties. Plants should:
- Have short or average height;
- Small size;
- Give a lot of fruit.
The following varieties meet all these requirements: Yellow Pearl, Red Pearl, Pinocchio, Balconi Wellow, Bonsai.
Pearl yellow
Early ripening variety, hybrid. From the moment of planting to the beginning of fruit formation, an average of 3 months passes. The plant reaches a height of up to 60 cm. The variety is resistant to diseases, slight temperature changes and lack of sunlight. A ripe tomato is bright yellow in color and round in shape. The weight of 1 tomato averages up to 50 grams.
Red pearl
Early ripening hybrid. From the moment of planting to the start of fruiting, up to 95 days pass. Tomatoes round shape, small, bright red. Weight of 1 tomato up to 50 g. The variety is unpretentious in care, resistant to temperature changes, and has high resistance to disease.
Balcony Well
Mid-season hybrid. The fruits are small, cherry-type, with a bright yellow color. When choosing this variety, growing tomatoes on the balcony allows you to get the most bountiful harvest.
Bonsai
Determinate variety, ripens quickly (up to 3 months), has high yield. Plant height up to half a meter. The bushes are small in size and have a beautiful appearance and can be grown as decorative design. The weight of the tomato is up to 65 grams, the shape is round, the color is red.
Preparing and sowing tomato seeds
Best time to sow balcony tomatoes, the cultivation of which we are considering in February and March. Before planting, the seeds are soaked in potassium permanganate for half an hour, and then in a growth stimulator for 10 hours.
Then place it in a warm place on moistened gauze. After 3 days, the seeds will take root and can be transferred to small containers with soil.
The seed is planted 1 cm deep, leaving a distance between plants of up to 3 cm. It is best to grow seedlings in a mixture of peat, turf soil and humus in a 1:1:1 ratio, or use a ready-made substrate from the store.
Caring for tomatoes on the balcony during seedling development
Boxes with seedlings are placed on a southern windowsill, covered with film and placed in a warm, draft-free place. After the first shoots appear, the containers are moved to the windowsill.
Temperature and lighting
Compliance required temperature regime: at night up to plus 17 degrees Celsius, during the day - up to plus 25.
Growing tomatoes at home in winter means increasing daylight hours. Helps to cope with this task Fluorescent Lamp, which is placed at a height of 25 cm from the leaves. Turn on the lights during cloudy weather, before dawn and after sunset.
Fertilizing seedlings
Tomato feeding during the period of active development is carried out three times:
- primary - 12 days after planting the seeds, use 1 tsp for fertilizer. urea per 3 liters of water;
- the main one - counting 10 days after the primary one: apply organic complex fertilizer (for example, Rossa), according to the instructions;
- strengthening - a week before planting seedlings in a permanent place: combine watering with fertilizing, diluting 1 tbsp. l. nitrophoska per 3 liters of water.
Treating seedlings against diseases
During the seedling development stage, it is important to protect tomatoes on the windowsill; growing and caring for them can be nullified if they are infected with fungal diseases. To do this, seedlings are treated with milk: 50 grams per half liter of water.
Picking and seating
To form beautiful seedlings she is turned different sides to sunlight at intervals of several days.
Diving begins after the formation of a full-fledged third leaf plate and is transplanted into a pot of small (up to 5 cm) diameter. When transplanting into a container bigger size Possibly worse root development.
After 30 days, the seedlings are transplanted into a container with a volume of 3-5 liters.
Tomatoes on the balcony - growing and pinching
The temperature on the windowsill should be no more than 30 degrees Celsius, otherwise the plants will stretch out and internodes will form on the leaves.
For balcony tomatoes, one watering per week is enough. It is necessary to use settled water at room temperature, and add it so that it does not fall on the leaves - right at the root.
For self-pollination, after the start of flowering, the balcony tomatoes are gently shaken. But a more effective method of pollinating tomatoes at home is treatment with Ovary.
After the formation of stepchildren is completed, it is necessary to pinch the tomatoes on the balcony - growing without this measure can greatly reduce the yield, causing the fruit to become smaller. To do this, the shoots are broken off, leaving a small cutting of 5 cm on the plant.
Fertilize balcony tomatoes during flowering, and again after 14 days. Fertilizing with wood ash (1 tbsp per 0.5 liter of water) is best suited; you can use complex mineral fertilizer.
Tomatoes on the windowsill - growing and care video
Bottom line
Once you figure out how to grow tomatoes at home, you can enjoy fresh vegetables all year round: in the summer, picking tomatoes in the country, and in the winter - on the balcony. By selecting suitable variety and observing simple rules care, you can add greenery to your apartment, have a real home garden, and get a wonderful harvest.
If you don’t have a summer house or garden plot, but you really want to try to grow something with your own hands, then summer time as home greenhouse You can use a balcony or loggia. If they are glazed and insulated, then you can grow plants starting from early spring until late autumn.
Tomato is perhaps one of the most unpretentious “balcony” crops. In addition, the plant is very productive and, at the same time, decorative. With skillful care, your own plantation will not only provide you with fragrant fruits straight from the garden, but will also delight the eye with a scattering of red “berries” among the bright greenery.
The time for sowing tomatoes for insulated balconies and loggias is early March, for open balconies- end of March - beginning of April.
Growing seedlings
It is better to grow seedlings in separate pots or cassettes. When filling the earth ball with roots, transfer it from a small container to a large one, deepening the seedlings almost to the cotyledon leaves. In this way, a good root lobe is formed.
The grown seedlings are transferred together with a lump of earth into larger pots or planted in boxes. One plant needs about three liters of soil. For tall plants, the required volume of soil is 5-7 liters. Pots and boxes must have drainage to remove excess moisture from the roots. A layer of expanded clay or small pebbles is placed on the bottom in a layer of 2-3 cm; the bottom should also have holes for draining water. Tomatoes do not like excess moisture and do not tolerate stagnant air. Therefore, it is necessary to place boxes and pots for better ventilation of plantings on supplies, it is also good hanging planters. Tomatoes are not afraid of drafts.
Balcony seating

Tomato is a light-loving crop. Northern balconies are unsuitable for growing. South-eastern and southern ones are ideal. It is very hot on the southwest balconies summer heat, therefore, when growing tomatoes on them, it is necessary to shade the plants on hot days and be sure to ventilate them.
As soon as weather conditions permit (for glazed balconies and loggias - in early to mid-April, for open balconies - in early May), tomatoes are placed on the balcony. When the temperature drops sharply to minus, cover with a non-woven covering material. Caring for tomatoes on the balcony is the same as in a greenhouse.
The optimal temperature is +25+28°C during the day and +15...+16°C at night. Before flowering and fruiting, the temperature may be 2-3°C lower. The soil temperature should not be lower than +17...+20°C. Regulate the air temperature by ventilation, opening the doors and balconies. Ventilation is mandatory 2-3 hours after watering, especially during the flowering period of plants. During flowering, air humidity should not exceed 65%.
Watering and fertilizing
Tomatoes tolerate direct sunlight well and suffer from lack of light. Only in very hot weather should plants be protected from direct sunlight. Tomatoes should be watered rarely, as the soil dries out (no more than 2 times a week), but abundantly, completely wetting the soil. It is better to water in the first half of the day with warm water (+20...+25°C). If tomatoes are planted in boxes, you need to water the soil around the bush, and not under the bush. After watering, as soon as the soil dries out a little, it is loosened, which slows down the evaporation of moisture from the soil and ensures air flow to the roots. Simultaneously with loosening the soil, the plants are earthed up, which promotes the formation of new roots. If the soil has settled, you can add a layer of fresh peat or nutrient mixture on top.
Tomatoes are fed with a solution of mineral fertilizers; if necessary (in case of weak growth), you can use organic matter, for example, mullein (1:5) at the rate of 1 liter of solution per plant.
The first feeding with complex mineral fertilizers(30 g per 10 liters of water) is carried out a week after planting the seedlings in a permanent place. The remaining fertilizing is done at intervals of 10-12 days, mainly during the fruiting period.
Good results are achieved by foliar feeding, i.e. spraying the leaves with a nutrient solution. They promote better growth and development of plants and prevent flowers from falling off.
Bush formation
It is better to form low-growing tomatoes grown on the balcony into 2-3 stems, for which, in addition to the first stepson, a second stepson is also left. Tall tomatoes are formed into one stem, cutting off all the stepsons.
Tomato stems are brittle, so as the seedlings grow, the plants are tied to stakes or a trellis. IN Lately so-called “ampel” tomato varieties appeared that do not require garter. In fact, “ampel tomatoes” are not new varieties, but an idea: If you leave 2, maximum 3 shoots at the top of the cherry tomato stem, they will hang very picturesquely from the pots. The main thing is not to take too powerful and standard tomatoes for this. The latter have a strong stem, consisting of short internodes, which maintains an upright position for a long time.
During the entire growing period, it is necessary to remove shoots developing in the leaf axils. Without pinching, the plants become thickened, have less light and do not set inflorescences. You can't get a good harvest from such bushes. To avoid infection of plants with viral diseases, the stepsons are not pruned, but broken off with their fingers, trying not to damage the main shoot and leaves, leaving columns 2-3 cm high. This operation is best carried out in the morning, when the stepsons break off easily.
Diseased and yellowed leaves are also promptly removed, as well as leaves covering the fruits of the lower clusters of the plant when these clusters are fully formed.
Flowering and fruiting

Tomatoes are a self-pollinating crop; they do not require artificial pollination, but for better fruit set in cloudy and windless weather, you can lightly shake the flower brushes several times a day during the flowering period so that pollen from the upper flowers falls onto the flowers located below. In order for pollen to germinate on the stigma of the pistil, immediately after pollination it is necessary to water the soil or spray the flowers. During the flowering of the second and third clusters, for better fruit set, the plants are sprayed with a solution of boric acid (1 g per 1 liter of water). To prevent flower falling and improve the quality of fruits, flower clusters can be treated with growth stimulants.
After setting the bulk of the fruit, the top of the main shoot is pinched. At the same time, all the flower clusters are torn off, since the fruits on them will no longer have time to form.
To speed up the formation and development of fruits, you can also use a technique called “tearing the roots.” The plant is taken by the lower part of the stem and carefully pulled up, as if trying to pull it out of the soil in order to tear off the small roots. Then the plant is watered and hilled.
In healthy, strong plants, the upper leaves may curl slightly during the day and straighten out at night - this is the norm. If tomato leaves are directed upward at an acute angle and do not curl either day or night, flowers and ovaries fall off, then the cause may be dry soil, heat, poor ventilation and low illumination of plants.
With frequent watering and application to the soil large quantity nitrogen and organic fertilizers, the plants “fatten” - powerful bushes with thick stems and powerful stepsons grow, however, as a rule, a very weak flower cluster with a small number of flowers is formed. To straighten such plants, they are not watered for 7-10 days. In addition, to delay growth, it is necessary to apply foliar feeding with superphosphate (3 tablespoons per 10 liters of water). Plants are watered with this solution at the rate of 1 liter per plant.
Diseases and pests of tomatoes on the balcony
The most common fungal disease of tomatoes is late blight, a sign of which is the appearance of dark brown merging spots on leaves, stems and fruits. This dangerous disease can not only destroy the entire crop in a short time, but also spread to other indoor plants. Warmth and dampness contribute to the rapid development of the disease, which usually spreads in July-August. If by this time most of the fruits are already ripe, then at the first signs of late blight it is better to immediately destroy the diseased plants. In this case, unripe fruits should be lowered for 1.5-2 minutes. hot water(+60°C), then put it in a dry, warm, dark place to ripen.
Black leg The seedlings are affected, their root collar darkens, becomes thinner and rots. The plant withers and dies. The disease spreads with plant debris, lumps of soil, and partly with seeds. Control measures include moderate watering of plants, not thickened sowing; to prevent the disease, Trichodermin is added to the soil before planting (preferably mixed with Ecogel).
Tomato root rot (anthracnose)- a very dangerous disease. Sick plants wither and their root collars rot. Cucumbers also suffer from the same disease. Thorough disinfection of the soil with a solution is necessary copper sulfate, if possible, it is advisable to remove the infected upper layer soil and add fresh. Sick plants can be watered with the “Barrier” solution and sprinkled with the “Barrier” preparation. But it is still better to prevent this disease by using a mixture of Alirin or Gamair with Ecogel.
At the end of the growing season with the onset of cold rainy weather, tomatoes may be affected gray rot. Small, round spots appear on green or red fruits. They then enlarge and become watery. The causative agent of gray mold can also develop on other terrestrial organs (stems, leaves, flowers), they are also covered with gray mold. It is necessary to remove affected fruits and plants; If possible, increase the air temperature. When this disease spreads, the plants are destroyed, and the soil after growing tomatoes is thrown away.
Brown rot (fomoz) develops only on tomato fruits in conditions of high humidity and excess nitrogen. Phoma appears as a small brown spot (about 3-4 cm) around the stalk. Although it is not large on the surface, the internal tissue of the fruit also rots. Green and red fruits are affected. Affected fruits are destroyed .
Cracking of tomato fruits- physiological (non-infectious) disease. The reason is a sharp fluctuation in soil moisture. With excessive watering, the cell walls of the fruit skin cannot withstand the increased pressure and rupture. Then the wounds dry out, the fruits turn red prematurely, not reaching their size. Control measures - moderate watering at intervals. Many modern hybrids have genetic resistance to fruit cracking.
If there is a lack of calcium in the soil and an excess of nitrogen in dry conditions, there is a high probability of damage to tomatoes. top rot. On still green fruits, small watery or dry black spots with a rotten smell appear. To prevent this disease, regular watering and moderate application are necessary. nitrogen fertilizers. Infected plants are sprayed with a solution of calcium nitrate (1 tablespoon per 10 liters of water), the affected fruits are destroyed.
Spider mite lives on the underside of leaves, sucking cell sap and weaving a thin web around the leaf. At the beginning of the damage, light dots appear on the leaf, then discoloration of the leaf area (marbling) occurs and the leaves begin to dry out. Flowers and leaves fall off. Treatment of plants with Fitoverm (1 ml per 1 liter of water) is effective against mites. You can fight mites by spraying with infusions of onion or garlic peels (200 g of peels per 1 liter of water).
Whitefly- a small insect 1-1.5 mm long with a yellowish body and two pairs of powdery white wings. The larvae are flat, oval, pale green in color. They stick to the leaves, sucking out the juice. The affected areas of the plant are colonized by sooty fungi. The leaves become covered with a black coating, dry out, and the plant dies. Control measures - treatment with Confidor or Mospilan. Plants are sprayed in the morning or evening. During the season, it is recommended to carry out 2 treatments with an interval of 15-20 days.
Photo:LLC "SSF "TomAgroS" , Rita Brilliantova
Not all people have the opportunity to grow tomatoes in their garden or vegetable garden. It was for this category that special varieties that can be grown right at home on the balcony. To understand how to grow this vegetable at home, you need to look at each stage separately. Let's look at growing tomatoes on the balcony step by step.
Growing tomatoes involves the following steps:
- Preparing seeds. To do this, soak in a weak solution of potassium permanganate, then treat with the growth stimulator Epin.
- Preparing containers. The container should be torn so that it contains at least 3 liters of soil.
- Land preparation. For growing, soil from the garden or purchased soil from the store is suitable.
- Sowing seeds. To do this, first, small stones are poured into the bottom of the containers, in which holes are made, so that excess moisture does not accumulate at the bottom. Cover with earth and lay out the seeds no deeper than 2 cm. Sprinkle with earth and water.
- Picking seedlings. When the sprouts grow and the second true leaf appears, you can pluck the seedlings. The seedlings are carefully removed from their original place of growth and planted in separate containers.
- Transplantation to a permanent place. After about 30 days, the transplantation begins. More spacious containers are filled one third with soil, then the seedling is lowered, carefully covered with soil, and watered generously with soil.
When transplanting to a permanent location, stones must be placed at the bottom of the containers to ensure drainage.
Planting and growing cherry tomatoes on a windowsill: step-by-step instructions
Let's look at an illustrative example of how you can grow Cherry tomatoes on the loggia.
To do this you will need:
- prepare seeds;
- prepare fertile soil and cylindrical containers;
- sow seeds. The containers are filled with earth, the seeds are sown, watered, covered with film and placed in a dark place;
- When seedlings appear, provide them with sufficient lighting. If necessary, turn on lamps for additional illumination;
- pick seedlings into separate containers;
- plant in spacious containers in a permanent place.
Growing tomatoes on the balcony will not be difficult if you follow step by step instructions and fulfill all requirements, monitor seedlings and provide optimal conditions for plant growth.
Growing tomatoes on a windowsill:
How to plant and grow in plastic bottles
This growing method was invented in Japan, where it is not possible to grow organic vegetables in gardens.
Planting and cultivation is carried out in any plastic containers, the main thing is that there is enough land for normal development plants.
Seeds are disinfected and treated with growth stimulants. Then they sow in plastic bottles. With the emergence of seedlings, the seedlings are placed in a lighted place.
The pick is made when one or two true leaves appear. Seedlings are planted in separate containers or several are planted in one container; the main thing is to ensure free growth and development of each plant.
Watering and regular feeding will allow you to grow a good harvest even at home on the windowsill.

What size pot is required?
Any plastic containers or pots are suitable for growing. Small bottles are used for sowing seeds, and when the seedlings grow, they are planted in larger bottles.
The most suitable containers with a volume of 5 liters. One seedling is placed in each bottle.
What should a balcony (loggia) be like?
For growing tomatoes a balcony facing southeast or southwest is suitable. It will be too hot on a south-facing balcony and will require shading for the seedlings.
Plants need sunlight; if it is on the loggia for less than 3 hours, growing tomatoes will not succeed.
The best place for tomatoes is near the walls and railings of the balcony. It is important to protect seedlings from strong wind. High grades placed in a place protected from the wind and secured to trellises.
To repel pests, you can plant herbs next to the tomatoes, for example, mint, oregano, and parsley.
At correct location and care, the loggia will replace a regular vegetable garden, although the harvest will be somewhat smaller.
If the balcony is glazed, regular ventilation is necessary.

Proper care step by step
Tomatoes growing on the balcony require the same care as those growing in the garden. Watering, loosening, fertilizing, disease prevention necessary when growing tomatoes on the balcony.
In addition to the basic elements, caring for tomatoes on the balcony has some features.
How to care for balcony tomatoes
For successful cultivation On the balcony it is necessary to maintain an optimal temperature for the development of tomatoes.
The temperature during the day should be from 19 to 22 degrees, at night 15-16 degrees. In extreme heat, it is important to open the windows and ventilate.
Tomatoes can go without watering for several days; water when the soil becomes dry.
Topping
As the plant grows, stepsons begin to appear. Stepsons remove so that the plant is formed into 1-2 or 3 shoots.
For tall seedlings, the optimal option is to form 1-2 stems, for low ones - 2-3 stems.
When the ovaries have formed, you can remove the lower leaves. Spoiled, yellowed leaves must be removed.
When the plant is finally formed, pinching is necessary. Pinch off the top and all inflorescences, leaving at least four. This way the seedlings will develop correctly.
It is better to harvest the crop unripe. In apartment conditions, tomatoes will finally ripen.

What and when to feed
After 40-50 days have passed since sowing the seeds, the seedlings can be fed. The most the best feeding– humus.
It is added to the ground to a height of 2 cm. This feeding can be carried out 3 times before transplanting the seedlings into a permanent container.
Thanks to this feeding, the roots are saturated with oxygen and receive the necessary useful material. Humus in finished form buy in the store.
How often to water
The tap water is too hard and is not suitable for irrigation.. The best option left for a couple of days warm water, since tomatoes are a heat-loving plant.
It is very important to monitor the condition of the soil in the containers. The soil should not be too wet, otherwise the plant's roots will begin to suffocate and the plant may die.
Too dry soil will lead to a lack of moisture, the roots of the seedlings will begin to dry, and the tomatoes will turn yellow.
Tomatoes are not watered often: once every 3 days.. After watering, loosen the soil. In cloudy weather, you need to inspect the soil; if it is wet, you should stop watering.

Diseases and pests
Tomatoes growing on the balcony may be affected by late blight disease. Brown spots form on leaves, stems and fruits. This fungal disease can quickly destroy the plant and fruits.
To prevent the disease, special medications are used.
Can for balcony tomatoes spider mite attack, whitefly. For whiteflies, the drug Inta-Vir, Commander is used. Akarin, Fitoverm, Borneo - drugs to combat spider mites.
Suitable self-pollinating varieties
With proper care, even a beginner can cope with growing tomatoes at home.
There are special varieties suitable for growing on the balcony. If the balcony is spacious enough, you can grow tall varieties. Low-growing and dwarf varieties are also grown.
The most popular and suitable varieties for growing on the balcony:
- Pearl;
- Bonsai;
- Balcony miracle;
- Angelica;
- Ballerina.

Pearl the most unpretentious variety. The fruits are slightly elongated and tasty.
Balcony miracle- a common balcony variety. The bushes are low, productive, and resistant to diseases. Red fruits are suitable for fresh consumption and canning.
Bonsai refers to dwarf varieties. The fruits rarely grow larger than 25 grams. These bushes look very beautiful.
Angelica one of the most early varieties. The fruits ripen 80 days after germination. The bushes are low and do not need support.
Ballerina– a tall variety, when ripe the fruits turn pink. The shape of the fruit is very interesting - pear-shaped.
All tomatoes are self-pollinating plants. They also come in low-growing and cocktail varieties. The table shows which varieties are such.
You can grow tomatoes on the balcony in summer and winter. Plants will decorate any apartment with their beautiful appearance. Proper care will provide the whole family with tasty and beautiful fruits.