You can transform old or ordinary objects into unique ones using various techniques, but one of the most popular and accessible is decoupage. Available materials and tools are used in the work. All you need “special” is paper or napkins. Below we will tell you how to master decoupage for beginners. You don't have to buy anything super expensive. Glue, napkins, varnish, brushes, scissors. That's the whole set of necessary tools.
Decoupage for beginners: collecting everything you need
First, let’s briefly talk about what you’ll have to work with and what you’ll have to work with. In general, decoupage is fastening on the basis of a material or paper with a printed pattern. To ensure that the design does not wear off longer, it is coated with several layers of varnish. Here is a brief description of the decoupage technique.
Decoupage is a technique that allows you to make something special out of ordinary things.
Base
Any weakly absorbent base is suitable as a base for decoupage. What can this technique be used on? On the following grounds:

As you can see, the list is substantial. Only very porous substrates with a lot of irregularities are not suitable for decoupage. And this way you can decorate everything: from dishes of any kind to furniture and doors (and you can use both the surface of the doors and glass inserts).
List of tools
You need a few tools:

Everything from tools. Unless you still need stationery - a ruler, a pencil, an eraser.
Consumables
Now we will talk about consumables. We won’t talk about napkins and paper here—they’re a separate item. In addition to them, to make decoupage with your own hands, you will need:

That's all that may be required, so although decoupage requires a financial investment for beginners, it is not very large.
Napkins, paper
For decoupage, napkins and paper with a printed pattern are used. They are glued to the surface and covered with varnish. There are the following types of materials for this type of decor:

In general, they also use special pastes to create three-dimensional images, ordinary photographs from which the bottom layer of paper has been removed, and other drawings. But it’s not easy to work with them, and this is not decoupage for beginners, but for those who are already developing their skills.
Napkin decoupage: techniques
The main idea of decoupage is to decorate a surface with an image or design. The process is creative and there are no concepts of “right” or “wrong”. The surfaces and patterns are different, so different techniques are used. You just need to choose the method that works best for you.

Decoupage bottles - a good start for beginners
The easiest way to start mastering decoupage is by gluing large fragments. When you learn how to glue napkins without folds, you can move on - master the methods of volumetric decoupage or using crackle varnish. In the meantime, let's figure out how to work with large fragments.
Preparatory work
First of all, you need to remember that napkin decoupage for beginners will have to start with preparing the base. It should be even, smooth, without holes, chips, or humps (except for those that are specially provided). To help - putty and sandpaper. After the surface is leveled, the workpiece is covered with primer (selected according to the type of material) and then coated with white paint.

The white paint step is mandatory. The fact is that the napkins are very thin, and when glued they become translucent. If they are glued to a white surface, the design remains bright. If the surface is colored or dark, it fades noticeably and there is no desired effect. Therefore, paint must be applied even to plastic or ceramics, and possibly in several layers.
What to do with a napkin
First you need to decide what type of napkin to use.

How to decide whether to tear the napkin or cut out elements from it? According to the size of the picture. If the fragments are large and have clearly defined boundaries, they are cut out. If the drawing is small, it will stick one next to the other, they will be torn. This will make it easier to match the edges.
Gluing methods
You can only choose how to glue napkins for decoupage through experience. First of all, we decide what exactly we will glue with. Can:
- Varnish.
- Special glue.
- PVA - diluted or not.
- Glue stick.
- Egg white.
Gluing to varnish is no worse than gluing to glue. But after drying, you can’t do anything - the napkins become almost monolithic with the product. If you don't like something, you won't have a chance to change it. That’s why beginners most often use PVA glue - it’s cheaper and easier to work with.

If you decide to use PVA, you will have to think (or try) to use it diluted or undiluted. Most often it is diluted with ordinary water in a 1:1 ratio. When using such an adhesive composition, you must be prepared for the fact that the napkin gets wet from the water and may stretch out. different sides, from careless movements to tear. In general, you need to adapt.

A glue stick is also a good option... if you can get all the bubbles and wrinkles out. This occurs normally on smooth, slippery surfaces. If the surface is rough, this is much more difficult. It is safe to work with egg white, but it is specific, so if you want it, you have to try it.
How and where to apply the adhesive
Beginners usually choose their first object for decoupage to be small in size. In principle, this is not bad. It’s just desirable that the form be simpler: without large quantity bends.
If the decoration object is small, you can use a brush or fingers to apply the glue. Then use the same “tool” to level the napkin. Use a flat or straight brush - whichever is more convenient for you. Many people prefer to work with their fingers - you can feel all the folds.

When gluing napkins for decoupage, you can apply the glue to the object or to the napkin. They do this and that. When applying to a napkin, again, there are two techniques:
- The glue is applied evenly to the entire piece to be glued, applied to the base in the middle. Using movements from the middle to the edges, air bubbles are expelled and folds are straightened.
- A certain amount of glue is poured into the middle of the fragment. Next, the steps are the same: lay it on the base, smooth it out.
In the second technique, it can be easier to deal with bubbles and folds - with a large amount of semi-liquid glue it is easier.

What and how you do is not important. It is important that there are no wrinkles or bubbles
You can do the same if you spread glue on the base: make a small puddle in the place where you are going to glue the fragment, lay it down, and, lifting the edges, drive out the bubbles and smooth out the folds.
Decoupage of a flat surface: glue + iron
When decorating flat surface You can do it easier than to drive bubbles through the entire napkin. Apply a layer of PVA glue to the primed surface or coat it with a glue stick. Spread well so that no “tracks” are formed. Let it dry. To speed up the process, you can take a hairdryer.

Place and level the napkin on the dry surface and smooth it with your hands. We place a piece of baking paper on it and begin to smooth it with a hot iron from the edge.

Decoupage for beginners - maybe try something like this?
As the glue heats up, it saturates the napkin. Usually it turns out quite smooth. When everything is glued, coat the top with more glue and let it dry. This is perhaps the most easy way master decoupage for beginners.
File+water and glue
Decoupage for beginners using a document file (choose thicker film), water and glue. This is a good way to decorate large drawings(cut out). Pour a little into the middle of the file clean water, place the cut out fragment in it, face down. We carefully straighten it, expelling bubbles and straightening wrinkles. In a puddle of water this is not difficult.

When the fragment is straightened, lift the edges of the file and drain the water. The design remains stuck to the smooth film. In this state it is convenient to “try it on” and look for the best place for it.
Having found the area where you want to place the decoration, we apply the design on the film and begin to smooth it out. This is a very difficult moment. You need to ensure that at least one edge of the napkin sticks. After one of the edges of the image has been fixed, gradually smoothing and lifting the edge of the film little by little, we ensure that the napkin remains on the base. If you act gradually, gradually gluing the picture to the base, bubbles or folds will not appear. This method is suitable as decoupage for beginners.

When one edge sticks, everything is no longer difficult
The last step is to coat the stuck napkin with diluted PVA glue. After it dries, we apply protective layer varnish
A few secrets
This cannot be called methods of gluing napkins for decoupage. These are little tricks and tricks that can help you get rid of creases faster or better.
- Before work, the cut out fragments are moistened with water from a spray bottle. The napkin stretches, but when it dries it no longer shrinks. If it has become very warped, it is ironed. Then use it as usual. Since the paper is already straightened, it hardly stretches anymore. Everything goes easier.
- Moisten the fragment with acrylic varnish in the form of an aerosol. In this case, the napkin will become rigid, it will not stretch or form folds. But varnished, it no longer allows glue to pass through, so we coat the surface with glue and glue the treated napkin onto it.
- Wet the napkin that is already lying on the base (dry) and only then coat it with glue. It's a little difficult to explain, watch the video.
We eliminate flaws
If the surface is decorated with small torn fragments, from which it is necessary to obtain a single whole, straighten the edges of the fragments with a brush or fingers. If there is color unevenness somewhere, dilute the paint of the desired shade and paint over the translucent base.
When the surface is no longer very wet, but has not yet dried, you can use thin brushes and acrylic paints to draw in the details, add brightness and clarity.
The next step is to decorate the edges of the product. There are different approaches here. In some places you have to trim the edges evenly, painting the sides, in others you can wrap the napkin on the back side and glue it there. In general, this is also a whole science.

Getting it to the finish line is an equally creative process.
After this, you can leave the product to dry. To speed up the process, you can use a hair dryer, but you need to keep it at a considerable distance, move it all the time and make sure that it dries evenly. If after drying you see that there is a fold on the glued napkin, you can still fix it. Take fine-grained sandpaper and sand it. We act gently so as not to damage the drawing around.
Varnishing
The dried product is coated with acrylic varnish on water based. You can use another one, but this one is considered the best. Apply one layer first, and after it dries, apply a second one. You can stop there, but if active use is expected (boxes, chairs, etc.) there may be more layers of varnish - three or four.
Photos of products using decoupage technique
Studying technology is not bad, but without knowing the possibilities, it is difficult to imagine what can be done and what can be expected. A few photos will help you decide what you can or want to do.

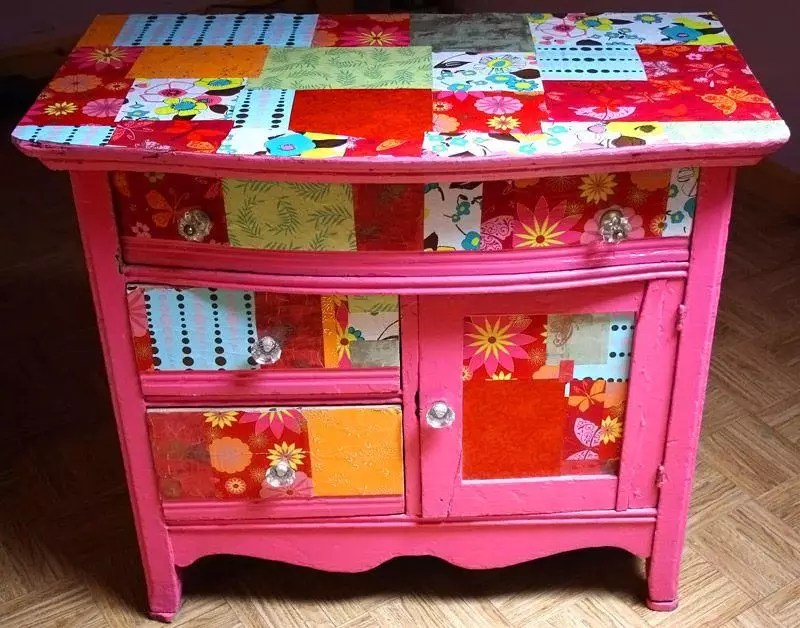
Convert old table into a new and very unusual one - decoupage can do it


Stools are also an art object

This technique is called reverse decoupage - napkins are glued onto glass front side
Decoupage - original technique decorative decoration. It is based on gluing paper and other materials to the surface of an object. Often, it is suitable for finishing old furniture. The technique has several advantages. The main thing is that it is very simple. The owners will not have any problems making decoupage with their own hands. With its help, you can transform your interior and update your furniture without major expenses.
What is needed for decoupage?
In your work you can use pictures from paper, napkins, textiles, etc. There are no restrictions here. For example, if after renovation there are several rolls of wallpaper left, they can be used to decorate furniture.

Modern technologies have expanded the possibilities for decoupage. Three-dimensional pictures are created and printed on a printer. Thanks to this, the owners do not have difficulties in choosing themes for furniture decoration.

Let's look at some tips for beginners on decoupage furniture. First you need to prepare everything you need for your work:
- Material (paper, textiles);
- Glue;
- Soft bristle brush;
- Acrylic lacquer;
- Sponge/rag.
Naturally, the list of accessories does not end there. Much will depend on the style and technique chosen, as well as the desired effect.

Decoupage technique
Experts identify several basic techniques:
Classic. Finishing material it is simply glued to the surface, and the top is coated with varnish. At the discretion of the owners it is possible additional processing. For example, the material can be painted, artificially aged, and other original effects can be used.

Reverse decoupage. Option used for finishing glass products. The decorative material is glued with reverse side.

Artistic decoupage. Interesting way, which involves combining the pasted picture and background into a common canvas. One of the most difficult techniques to implement. If this is your first time decoupaging furniture with your own hands, then you should abandon such an idea.

Volumetric decoupage. With its help, images with a relief texture are formed. To give the desired volume, additional materials are used.

Decopatch. An option when the surface to be finished is not only decorated with a picture, but also filled with particles special paper, which imitates fabric, fur or other materials (necessarily natural). Some elements are glued closely, which allows you to form a single background.
Popular effects
There are several popular decoupage effects:
Gilding. The pasted picture is covered with a layer of golden, silver or other metallic paint. If the budget allows, then gold leaf or a cheap fake will do. If you look at the photo of decoupage furniture with gilding, you can see that it adds luxury to the interior.

Formation of artificial abrasion. A good option, if you need to decorate the room in retro style. This decoupage of furniture will give guests the feeling that all the interior items have survived several decades. To achieve the desired wear, the surface is waxed, painted, and then sanded.

Craquelure is an interesting effect that allows you to create artificial cracks on an object. To work you will need a special varnish. The surface is processed in stages - regular paint is applied, varnish and paint again. When upper layer dries, the object will become covered with small decorative cracks. Another way to visually age an object.

How to choose the right style for decoupage?
Before you begin step-by-step decoupage of furniture, you need to decide on the style of its design. Here a lot depends on the interior and personal preferences of the owners. It is important that the finished item looks harmonious in the interior and does not stand out against the general background.

Almost any materials, colors and motifs are suitable for decoration. The main thing is that they please the eye and fit together well. Today, the Victorian and Provencal style is considered very popular.

In the first case, interior items are decorated with gilded reliefs. They look elegant. If the choice fell on Provencal, then the patination technique is suitable, artificial aging and the creation of defects (cracks and abrasions).
Images are selected individually for each style. For example, in the Victorian style they often use pictures with little angels, girls, and luxurious bouquets of flowers.

As for images for the Provençal style, notes of romance and tenderness should prevail here. For example, pictures with flowers, hearts, etc.

Photo of furniture decoupage


Of course, each of us has things in our everyday lives that are scary to look at, but we don’t dare throw them away. You just can’t say goodbye to your grandmother’s shabby sideboard?
Or, perhaps, you just don’t want to part with the children’s, and therefore so dear to your heart, stool?
Then this article is for you. All over the world it is gaining increasing momentum DIY furniture decoupage It’s very easy to do, and most importantly, interesting!
What is decoupage?
First of all, when getting down to business, you should understand what decoupage is. This decorative design, based on cutting from a variety of materials - paper, leather, napkins, and then gluing them onto the selected item.
It comes from China, but reached its greatest prosperity in Europe, from where it came to us. The method is also called “art for the poor,” but do not take this as an insult, we are talking about materials that are more than accessible to each of us.
After all, various napkins, magazine clippings, and just three-dimensional pictures from the Internet - this is the basis for creative incarnations. This art does not set rigid boundaries, so do not limit the flight of your imagination, do not hesitate to implement even the most daring idea!

Basic techniques for do-it-yourself furniture decoupage
Today, there are several implementation technologies. Let's talk and analyze each of them.
Classic do-it-yourself furniture decoupage
This method involves covering the prepared plane with the picture you like. This can be done dry, wet or hot. This method does not require any special skills, which means anyone can decoupage furniture with their own hands.
The dry method of gluing clippings is the easiest for beginners and the most popular among professionals. The pre-prepared motif should be applied with a flat, wide brush. It is important to note that you need to apply from the center to the edges, removing all bubbles.
Wet, or as it is also called, wet method decoration. The prepared cutting is first moistened with water using a cotton pad (do not overdo it, the ornament can easily “float”), then filled with glue.
The glue can be distributed in the same way as in the dry method - with a brush, or with a cotton swab, or even with your finger.
The hot method involves using regular household iron. The plane is treated with glue, and after it dries, the prepared motif is applied. Carefully, through wax paper, iron at medium temperature.
Experiment and choose the method you need, remember that this is purely individual!
Furniture decoupage technologies
- Reverse decoupage technology
Suitable for glass or tinted objects. It differs from the previous one only in that it is applied to the back of the object; - Artistic “napkin technology”
One of the most interesting. It involves combining the “appliqué” and the canvas into one whole; the complete picture is recreated through artistic painting or other methods of decoration; - Decoration "deco patch"
It involves not just a combination of a carved ornament and a canvas, it implies the merging of many pictures into one whole, filling the voids of the canvas. In other words, individual pieces are glued end-to-end and form a single solid background; - Using volumetric decoupage
A stereo effect of the picture is achieved. Let me explain that with this technology, the applique is glued to a previously prepared part from a molded element (it can be made of polymer clay, cold porcelain, etc.)

Decoupage of old furniture with your own hands is not only useful, because you give new life things, bring new colors to them, but also something exciting!
Let's look at this topic in even more detail, because it is one thing to paint a picture, and quite another thing to effectively decorate the selected item.
Basic effects of decoupage
Tired of the color of the facades? Or maybe they are too worn out? This means it’s time to add gloss and shine, which can be achieved using various effects. Let's look at the main ones:
Adding volume with shadows
Well, of course, what could be simpler and more effective than a correctly placed shadow? You need to apply the shadow with a dry artificial brush, carefully driving in and blending the pastel according to the design. Remember, the blurrier the boundaries, the more “live” the shadow.
Gilding
Fancy some gorgeous inlay? This can easily be achieved by resorting, for example, to analogues of gold leaf sheets.
Or you can do it even simpler - glue sheets of gold or silver paint, and the worn-out item will literally shine!
Toning, or creating a gradient
In nature, you will never find a flower, leaf, or blade of grass of a single color. Nature has endowed each of its components with unique colors.
Try to give naturalness to the picture. Gently use a flat brush to create a beautiful unevenness of color, let it “glare” in some places, and darken in others, on the contrary.
Creating artificial wear
Achieved by creating abrasions on the field of the applied design. Artificial aging gives a flight of fancy and allows you to fantasize about the history that this item carries.
Craquelure effect
Similar to the worn-out effect in that it also creates artificial aging. Only craquelure is the formation of cracks by applying a special varnish, which, when dried, gives cracks of any shape and size.
Patination
Also from the category of “old” techniques. In other words, this is the creation of dark spots that imitate wear. Patination is usually applied to the corners of furniture.

Now we have learned even more about this wonderful technique. But how can you make sure that decoupled items fit organically into the interior of your home? Think in advance about the style in which you will do the work.
Some motifs resemble summer lightness, while others resemble the seriousness of shapes and patterns. For example, for provencal style Motifs such as wildflowers, rustic ornaments, wreaths and bees are typical, but to create a Victorian style use gold leaf, artificial aging, ornaments from lush bouquets and angels.
But this absolutely does not mean that the decoupage technique is just a prerogative dacha options, absolutely not! Many things can be “modernized” with decoupage, and they will look fashionable, bright and catchy.

Master class on furniture decoupage
The correct technique for decoupaging furniture involves the presence of certain stages that will allow you to complete the work efficiently and with pleasure. Let's talk about the main ones.
Preparing interior items
Before starting work, familiarize yourself with the selected surface and inspect it carefully. There should be no chips on it and deep scratches, it should be hard and homogeneous. If wooden surface dried out, or large chips have formed in it, treat them with epoxy glue, remove the residue with a special spatula and wait until it hardens. If you decide to paint the surface, first sand it with sandpaper and apply paint. Only after completely dry you can start working;
Preparation of material
Think seriously about what exactly you want the thing to be? How should it fit into the interior? What does she need to add that will highlight the style of the entire room.
Find suitable options for decoration, these can be napkins, lace, pieces of paper, magazine clippings, and even pieces of leather. How exactly to prepare the appliques - tearing or cutting - is up to you.
If it consists of an ornament that is difficult to cut out, and its background matches the tone of the surface on which you will apply it, I recommend that you simply carefully tear it off.
If you need to cut out a specific design, for example, a flower, I don’t recommend tearing off the napkin; spend a few minutes of time, but do everything as carefully as possible.
Application
The application techniques were described above; it is worth adding only that the beauty of the future product depends on accuracy. Do not rush under any circumstances, do everything as accurately and efficiently as possible, remember that it is better to spend time and ultimately be proud of your work than to rush and then regret what you did.
The final stage of application should be opening the surface with varnish.
Perform the necessary manipulations - tint the cutout, or give it a gradient. Take another look at the end result and check for any bubbles under the application or pieces of debris.
Everything suits me? Then feel free to take up the brush and coat your creation with varnish.
By the way, to decorate something in horizontal plane much more convenient than any other, so think about this factor in advance.

How to get rid of furniture defects
So, you have chosen a decoration object. It could be old chest of drawers, a chair or a whole closet. Sometimes objects, especially wooden ones, dry out or acquire defects on their surface over time. Don’t rush to get upset, all this can be fixed.
- A chip has formed on the tree. It's simple: use a cotton swab dipped in iodine to carefully treat the chipped area;
- The crack is too deep. There are several options:
– Furniture wax, which can be replaced with mastic. Heat the material and rub it thoroughly into the crack;
- Epoxy adhesive. As discussed above, apply epoxy to the crack, remove the residue with a spatula and let it harden;
– Furniture putty. It can be selected in different tones, according to the tone of your product. - If the varnish is damaged, remove the varnish and re-treat it;
- If the surface is swollen from moisture, fill a syringe with PVA glue, carefully pierce the swelling in several places, and inject the glue. Cover with a cloth and place under weight for several days;
- If it comes unstuck PVC film- glue it with “Moment” glue;
- It appeared on the tree because of the heat White spot? Automotive polishing mastic will solve the problem. Wrap it in a napkin and rub vigorously. Abrasive components will remove the stain, and polishing components will polish the surface;
- Small scratches can be carefully painted over with a marker.
In this article we learned about a wonderful activity - decoupage of old furniture with your own hands. Usually, creativity characteristic of women, because they are the ones who create comfort and warmth in the house! And an old table, cabinet or chest of drawers will come in handy for your creative impulses.
Feel free to create and experiment, bring even the most daring ideas to life. Don’t grab onto a grandiose object, just start small, and you will see how all the mystery, comfort and originality of decoupage will unfold before you.


DECOUPAGE OF OLD FURNITURE WITH YOUR HANDS
Decoupage is a fascinating and uncomplicated activity that has many techniques and is accessible to even the youngest craftswomen. With its help, you can make exclusive interior items that will decorate not only your home, but also the exhibition halls of art galleries. In this review, we will look at how to perform with your own handsdecoupage for beginners step by step with photo. Don't worry that things won't work out, it's actually very simple. With the help of this technique, old furniture, dishes, shoes and many other things will find a new life in your home.
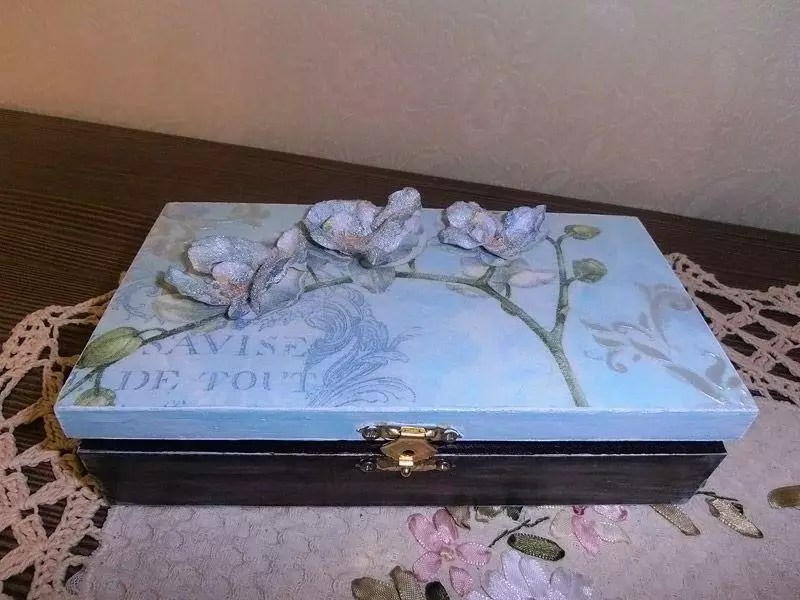
Products with decoupage are works of art
First of all, let's understand the definitions. Decoupage is gluing a design onto a surface. The picture can be placed on wood, leather, fabric, glass and almost any other product.
Reverse decoupage is the same process, but has only one feature - the picture is glued under the material. This can only be done on transparent surfaces: glass and plastic. Of course, in this case the picture is pasted face up.

For your information! If a plate is used for direct decoupage, then in the future it will only serve a decorative function. And when using the reverse technique, the dishes can be used as usual.
Tools and materials for work
| Materials and tools | Note |
| Using this technique you can decorate a book, dishes, flower pots, bottles, furniture, . In general, literally everything that is in your home. |
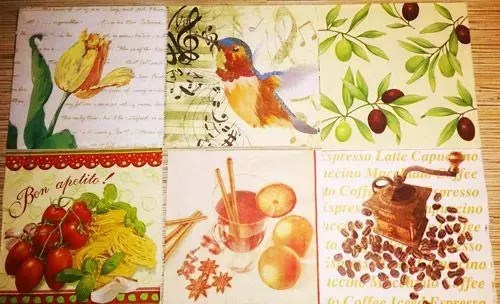
| Pictures can be used from special decoupage cards and napkins. In addition, for this purpose, craftswomen use drawings on fabric, old newspapers, and magazine clippings. |
| You can use regular nail scissors or a special tool that is sold in craft stores. The main thing is that the edges of the blades are very sharp. This is the only way to carefully cut out the desired image on a thin napkin. |
| You will need flat soft brushes. The pile in them should be tightly fixed. Lost lint can be a serious problem. It's better to have several brushes different widths for smoothing and applying glue and varnish. |
| It is best to use regular household PVA. You can buy a specialized composition, but it will cost more. Among varnishes, it is better to give preference to acrylic. It does not emit toxic substances and is easy to use. |
| To decorate your work, you may need acrylic-based paints, sponges, primer, sandpaper, and craquelure. |


Decoupage kits
Basic Techniques
You can fix the drawing on the surface different ways, let's look at them:
Method one
A simple technique of decoupage from napkins consists of placing it on an object and securing it with glue. After drying, the surface is varnished.

Method two
For reverse decoupling, a transparent base is used. The image is glued face down to the glass. After drying, fix with varnish.

Method three
Artistic composition. To make it, many images are used, which, when glued, are combined into one. To make the picture look like one whole, painting, shadows and accents are added.

Method four
This technique is called "decopatch". For it they use pictures from magazines, drawings on fabric. To get rid of clear boundaries, the edges of paper drawings are torn off. The surface is completely filled with images.

Method five
Creating a three-dimensional image. This is a technique that requires the talent of an artist. First, an image from a paper napkin is pasted on. And then painting is done on it with careful drawing of all the smallest details.
Decoupage bottles for beginners: step by step with photos and recommendations
- the simplest and available material, from which you can make original gift. You can buy a bottle of wine or fill the container with your own homemade drink. Luxurious decoration will make an impression in any case.

We have already listed the materials and tools necessary for the work, so we will not dwell on this in detail. The only thing that needs to be added to the list is a windshield wiper. They pre-treat the bottle, which has been cleared of labels.
Important! Work with glass vessel It's better to wear gloves. Your fingerprints are unlikely to have artistic value, so it's best not to leave them.
Bottle decoupage sequence for beginners, step by step with photos:
| Illustration | Description of the stage |
Applying primer  | Can be used for priming acrylic lacquer or PVA. The soil should dry well. |
Making the background  | As a background you need to take a white or light acrylic paint. You may need to apply two or even three coats to achieve a completely opaque surface. |
Applying images  | The design on the napkin is carefully cut out with scissors. If the background of the picture and the bottle matches, do without scissors and carefully tear off the napkins. To make the design on the print easier to apply, it should be soaked in a plate of water. |
We fix the drawing  | You need to apply varnish over the surface of the drawing. This can be done with a soft flat brush or a spray bottle. You should make sure that the picture is not covered with wrinkles. If necessary, it must be carefully straightened with a brush. |
Finishing  | After complete drying, you can carefully sand minor imperfections in the work. To highlight details, use a brush and dark paint. After finishing, apply finishing layer varnish coating. |
Another option original design- decoupage bottles with tights. Master class on video:
Some tricks of decoupage on glass for beginners: step-by-step recommendations with photos of applying a design from napkins
The first experience of gluing a napkin can be unsuccessful: wrinkles and folds inevitably appear, which spoil the whole result. Some tips on how to avoid this:
- To apply a design to a convex surface, you can make “darts” on it. Cut the edges of the picture with scissors or even cut out triangular pieces. It is better to be careful with the last option; there is a risk of ruining the image if the angle of the cut is incorrectly calculated.

- You can apply glue to the surface, and then apply the design and straighten it with a brush. Another method would be just as good - apply glue over the design, straightening it at the same time.
- If the image is applied to an almost flat surface, you can pour glue into the center, apply a napkin and carefully disperse the composition, straightening the material over the surface.
- You can stick an image onto a perfectly flat sheet using an adhesive pencil.
- You can apply a design using a piece of polyethylene (a bag or a stationery file). The design is placed face down on polyethylene and moistened with water. Then a bag with a wet napkin is applied to the surface to be pasted. The package is removed, the napkin remains.

A simple master class on decoupage shoe boxes
Smooth surfaces cardboard box from shoes - an excellent basis for decoration. This interior box will become a favorite place for household little things.
| Illustration | Description of the stage |
Surface preparation 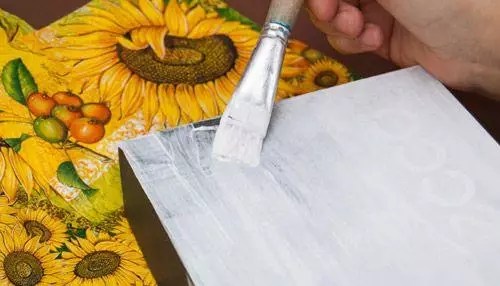  | The corners of the box need to be strengthened with pieces of masking adhesive tape, and then the surface should be primed with acrylic primer or paint. After drying, the primer should be lightly sanded with fine sandpaper. You may need to repeat the procedure if the layer does not lie flat enough. Then you need to paint the box with the color chosen for the background. |
Drawing 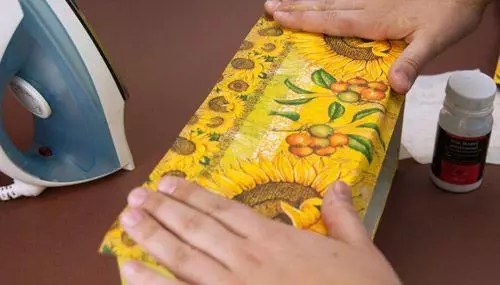 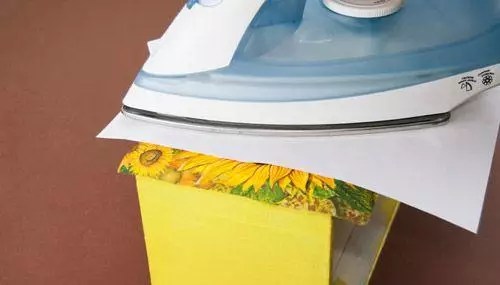 | The place for the drawing is covered with decoupage glue. After the layer has completely dried, a pattern is placed on top and smoothed with a hot iron through a sheet of paper. Afterwards the napkin is covered thin layer varnish A layer that is too thick will cause the design to become blistered. This procedure is repeated over the entire surface of the box. |
Decoration and finishing 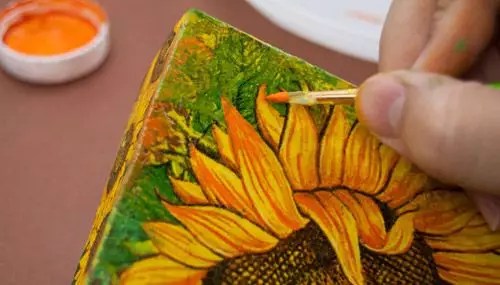  | Using a foam sponge, apply background paint and other shades to match the image. Draw with a brush small parts. To add some casualness, you can squirt white paint on top using the bristles of a toothbrush. Afterwards the final varnish coating is applied. |

Decoupage of furniture in Provence style: master class on updating a chest of drawers
Having tried your hand at simple things, you can safely start decoupage with your own hands using napkins. In addition to the usual list of working materials, you will need wood putty. It is used to pre-level all the cracks, cracks and other irregularities on the surface of the chest of drawers, cleaned of old paint.
Decoupage sequence kitchen furniture do it yourself, photo and description:
| Image | Operation description |
Preparation 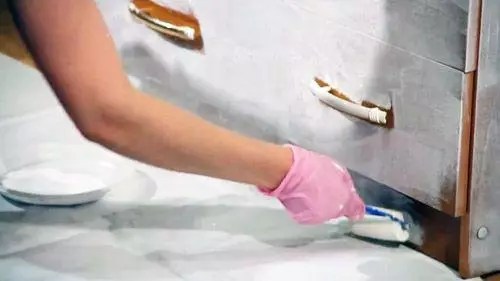 | The furniture must be thoroughly cleaned of all layers, and defects must be smoothed out with putty. After drying and sanding, all surfaces are coated with a primer and sanded with fine sandpaper. |
Preparing pictures  | The design on the napkins is carefully cut out or torn off by hand, and the bottom layer is removed. The picture is coated with glue and applied to the furniture. The application is carefully straightened with a brush. |
Finish coating 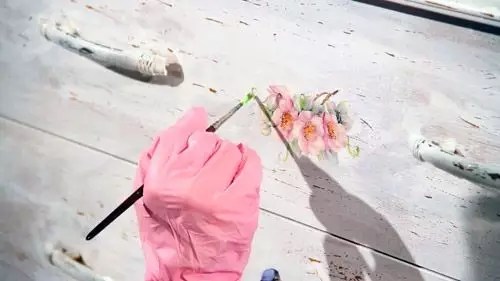 | No need to hurry. All drawings must dry. You need to varnish all the furniture, not just the place of decoration. On large areas This is convenient to do from a spray bottle or spray can. This way the varnish will lay down in a thin layer. For the best effect, you need to apply 3-4 layers in succession, waiting for complete drying between treatments. |
 | Result. |
Helpful advice! If you need to apply a design to a polished surface, the polishing is pre-treated with sandpaper until the shine disappears.
When decorating furniture with fabric, the process is practically no different from that described.
Decoupage master classes on video
As they say, it is better to see once than to hear a hundred times. That is why we offer a selection of video decoupage lessons for beginners.
How nice it is to create something with your own hands! And it’s doubly pleasant when, with the help of creativity, you can bring old things back to life, use them again to the fullest, without being embarrassed by their obsolescence appearance. Craftswomen all over the world know a lot of techniques that allow you to beautifully decorate different types products we use in everyday life. Do-it-yourself decoupage of furniture with napkins is far from new way updating cabinets, chairs and much more, but now it is at the peak of popularity. How to turn old furniture into an exquisite piece?
Furniture is now simply an element of home furnishings. However, just a few decades ago, furniture was treated much better - it was taken care of and valued, since it was difficult to get something interesting and beautiful. And what were the chests of drawers made by the hands of my great-grandfather worth! They were passed on as real family heirlooms and preserved for children and grandchildren. Now, in most cases, such products are sent to a landfill, with rare exceptions they go to live in the country.

But what if now you don’t make hasty decisions, don’t spend money, but, after spending a little of your time, restore some old wardrobe? Especially in modern conditions It’s not difficult to get materials that can be used for this - craft stores can be found on every corner, and there are often some suitable supplies and tools at home. It is recommended to restore old furniture for the following purposes:
- receive an exclusive product;
- update the interior by decorating the furniture to a certain style;
- realize creative abilities;
- there is no opportunity to buy new products.


One of the most popular techniques for bringing old furniture back to life is decoupage.. This is a fairly simple method, having studied and mastered it, you can turn any element of the decor into something original, unique, and striking in its beauty.

What you need to know about decoupage?
Decoupage is one of the options decorative design surfaces, which is based on the use of paper clippings from newspapers, wallpaper, postcards, etc. Elements made from other materials can also be used - for example, fabric, leather. The technique is very simple - to describe it briefly, all the work consists of gluing beautifully arranged patterns onto the surface and covering them with varnish in compliance with certain rules.
The history of decoupage has its roots in China, despite the fact that the technique has a purely French name, which can be translated into Russian as “cutting”. The first mention of this method of decoration dates back to the 12th century, but it reached particular popularity only in the 17th century in Europe - furniture was brought here from China with very high prices. beautiful ornaments, but it was expensive and not everyone could afford it. That is why Venetian woodworkers came up with the idea of gluing patterns cut out of paper onto their products. By covering them with a huge amount of varnish, the craftsmen ensured that the furniture resembled that very expensive Chinese one. But such products were much cheaper and therefore sold like hot cakes.

On a note! At the dawn of the appearance of decoupage in China, only the poor decorated their homes with cut out patterns and fragments, but now products using the decoupage technique can also be found in richly furnished homes.
Over time, decoupage began to be used to decorate walls and ceilings - as a rule, this was done by people with a small income, but who wanted to keep up with fashion. Then rich ladies also became interested in the technique and decorated boxes and fans with cutouts.
Table. Decoupage techniques.
| Equipment, photo | Short description |
|---|---|
 | In this case, the selected pattern is simply glued to outside decorated surface. Next, the picture is varnished, sanded and covered again with a layer of varnish. Can be decorated with additional paint. |
 | With this type of technique, some elements are glued so as to be higher than the rest relative to the horizontal. Typically, multilayer patterns or special modeling compounds are used. |
 | The technique is applicable when designing transparent coatings (for example, glass) - the design is glued from the back side with the front surface facing the glass. |
 | The surface to be designed is completely covered with all kinds of different textured materials. Thus, a solid background is formed. |
 | The technique imitates artistic painting, when the line between the surface itself and the pattern is almost invisible due to an artificially created smoky halo. |

On a note! When choosing a decoupage technique, you should focus on the general style of the room.
Before you start decorating old furniture, you should also familiarize yourself with the effects that can be used in decoupage:
- gilding(use of gold, silver paint, use of a sheet analogue of gold leaf);
- craquelure(imitation of cracks using a varnish of a special composition and a certain brush stroke technique);
- toning(enhanced color effect, pastel and dry brush are usually used);
- aging(creating abrasions that will allow the furniture to look expensive and elegant - creating the illusion of the rich history of the product. The surface is treated with wax, painted, then rubbed with sandpaper);
- patination(creation of dark spots of natural color, allegedly appearing from the touch of hands).
 Perpetual calendar. Blank - prefabricated plywood, techniques - decoupage, aging, patination
 You can decorate any surface using decoupage. It can be wood, cardboard, glass, ceramics, metal, plastic, etc. But most often the method is used to decorate wooden products.

What tools and materials will be needed?
Decoupage of furniture with napkins involves the use of a number of tools, as well as the acquisition necessary materials. The list of the latter includes:
- paper napkins. In this case, the choice can be made in favor of ordinary dining rooms or you can buy ones specially designed for decoupage. Paper handkerchiefs will also work;
- pore filler– necessary for sealing cracks and crevices on old furniture, helps make the surface perfectly smooth;
- sandpaper– for grinding;
- decoupage glue or PVA(it’s better to use a special one, PVA leaves marks);
- acrylic varnish for wood, matte or glossy – optional;
- appliqués– images used for this technique.

The list of tools is small and includes large and small scissors, a medium-hard glue brush. May need wooden block for sandpaper. If there Grinder, then you shouldn’t give it up.

Secrets of technology
Before starting work, it is worth familiarizing yourself with several secrets of performing decoupage. They will help make the work interesting and unique.
- To achieve expressiveness of the pattern, it is recommended to cover its surface with wax, paint and only after that - varnish with a glossy effect.
- To create scuffs and decorate furniture in a vintage style, you will have to use sandpaper.
- The craquelure varnish will develop cracks only after drying.
- Artificial gilding must be covered with a special film.
- To get a three-dimensional pattern, you should proceed as follows: the same pattern is cut out of the material several times, then glued together layer by layer with silicone glue. It is this adhesive composition that will give volumetric view picture.
- Before starting work, varnished or painted furniture is degreased.
- Varnish can be used to prime the surface.

 Decoupage - which finishing varnish to choose?
 Master class on decoupage of a chest of drawers with napkins
Let's look at an example of how to update an old chest of drawers that has lost its appearance using decoupage techniques.
Step 1. To do this you will need to prepare everything necessary materials– ruler, scissors, varnish, napkins, sandpaper, primer. Anything that could interfere with work is removed from the surface of the chest of drawers. Cracks are sealed with foam filler. You can use putty to fill deep flaws. After this treatment, the surface should dry for 3-5 hours.

Step 2. A small block (such that it is comfortable to hold in your hand) is covered with sandpaper. Next, the surface of the chest of drawers is sanded in a circular motion - all the bumps and irregularities are ground down. The resulting dust is swept away.

Step 3. The surface is cleaned with acetone and covered with a primer layer of white paint. Then it is sanded again with sandpaper to increase adhesion.

Step 4. An iron is used to smooth out wrinkles on napkins. The napkins are ironed until smooth. If the material is multi-layered, then it will have to be divided into separate layers.

Step 5. The napkins are laid out on the surface of the chest of drawers as they will be glued. If necessary, they can be trimmed, the main thing is to do this so that the pattern matches both the trim and the whole napkin.


Step 6. The napkins are glued to the surface one at a time. Then they are varnished in stages - it is important not to leave uncoated areas. Sometimes, if the paper is very thin (as in this case), you don’t have to use glue - just cover the laid out napkins with varnish, which will keep them on the surface.


Step 7 The edging is being done. To do this, napkins are cut into small strips, which are also coated with varnish and fixed on the edge. Due to small work surface The varnish is first applied to the edge itself, then a napkin is applied to it, and the top is again coated with varnish applied with a thin brush.


Step 8 After the varnish has dried, the hanging napkin is removed from the edge. A piece of sandpaper is used for this. It is applied perpendicular to the edge along the edge - the napkin easily comes off after this treatment. The edge turns out smooth.


Step 9 The final stages are another grinding of the surface, treating it with acetone and applying another layer of varnish.

 Decoupage of a chest of drawers with napkins - before and after photos
 Decoupage stool
With the help of decoupage you can update not only a closet or chest of drawers, but also old chair or a stool, as in this master class.
Step 1. For ease of use, the seat of the stool can be removed from the legs.

Step 2. The process of sanding the surface with sandpaper begins. If you don't have it at hand grinder, then a piece of coarse sandpaper is screwed onto the block. Sanding is done very carefully over the entire surface. There should be no irregularities left.


Step 3. The surface can be wiped well with a cloth soaked in acetone. This will degrease the surface and remove dust resulting from sanding.

Step 4. The surface is primed with acrylic construction paint using a brush. The layers are applied evenly. You can apply up to 3-4 layers of paint. You need to use white color.


Step 5. The painted surface is sanded again with sandpaper. 
Step 7 The napkin is covered with a layer of varnish. It is necessary to carefully coat the edges and corners. During the process of applying varnish, all irregularities on the napkin are smoothed out. The varnish is applied with a brush. The napkin is visually divided into 4 parts, each of which is coated separately. First, the varnish is applied along the inner edges of the visual square, then diagonally to the corner of the stool, then the remaining areas are coated. Other visual squares of the napkin are also processed.
Removing overhanging excess napkinStep 9 The varnish layer dries well.

Step 10 After the varnish has dried, the surface is sanded again with sandpaper. At this stage it is important to perform the procedure very carefully.

Step 11 To decorate the sides you will need brown gouache and a little varnish. They mix with each other in small quantities. The resulting composition is, as it were, driven into the sides with a brush. The actions are carried out with an almost dry brush.
Video - Decoupage. Glue on a large napkin
This is how you can give new life to old furniture. And it will last for many more decades. And most importantly, no one can boast of exactly the same design; decoupage products are truly exclusive!
5 /5 (4 )


