Growing cucumbers, tomatoes, flowers and other things is a favorite pastime of all summer residents and gardeners. But the construction of a greenhouse, as a rule, is quite a costly, labor-intensive and lengthy undertaking. And you always want it faster and cheaper.
And there is such a solution. Anyone, even a non-qualified builder, can build on own plot greenhouse from plastic pipes with your own hands.
Contents of the article
Features of a frame made of polypropylene pipes
The greenhouse frame is the basis of the entire structure. It will depend on him how long the greenhouse will last. If the frame of the greenhouse is unstable, then the covering will be deformed, torn, and, therefore, will not be able to perform its functions for a long time.
The frame for a greenhouse, in general, can be made of any material: wooden beam, metal pipe or profile fittings. However, all these materials have one serious drawback: in a humid greenhouse environment, they quickly become unusable due to susceptibility to corrosion.
Unlike the materials listed above, the greenhouse frame is made of polypropylene pipes, metal-plastic, HDPE or PVC pipes tolerates humid environments well and temperature changes. Let's consider all the advantages and disadvantages of a greenhouse made of PVC pipes.
Advantages and disadvantages
- resistance to external factors– a greenhouse made of plastic pipes does not respond to climatic and weather conditions, as well as the microclimate features that the greenhouse provides;
- lightness - this design is easy to install and dismantle with your own hands. It will not cause problems if it is necessary to move around the site;
- strength is one of the main requirements for a frame. A greenhouse made of PVC pipes can easily withstand the load of winds and precipitation;
- durability - PVC pipes do not change their structure even under extreme conditions. And in the future, if any element becomes deformed, replacing it will not be difficult;
- fire resistance – a greenhouse made of plastic pipes is not subject to fire, since the PVC material itself does not burn;
- moisture resistance - plastic does not deform or collapse from a humid environment, which a greenhouse must preserve;
- environmental friendliness, PVC is an environmentally friendly material. It does not emit fumes harmful to plants and humans;
- affordable price - this factor is important, since everyone who undertakes construction with their own hands wants to finish it with the least financial losses. Pipe greenhouses are much cheaper than similar structures made of wood or profile fittings.

The only drawback of this design is the low weight of the frame. A greenhouse made of, in contrast to a similar design made of profile reinforcement, is required needs laying the foundation and securely attached to it. Otherwise, when there are gusts of wind, you may have to catch up with your greenhouse in neighboring areas.
Preparing for work
Before you begin laying the foundation and installing the frame with your own hands, you need to make detailed calculations and purchase required material and prepare your tools.
We make calculations:
- First of all, you need to decide on the place where the greenhouse will be installed. The area should be level and clear of weeds.
- Based on the chosen location, we select the shape of the greenhouse (we will talk about possible shapes later), calculate the perimeter, and draw a plan.
- We calculate the required amount of material, based on the fact that the distance between the pipes should not exceed 90 cm.
- We buy material.
- We prepare the tools.
Material and tools
Let us note right away that you should not try to save on connecting materials. Exactly stability will depend on their quality and frame strength. And this, in turn, directly affects the durability of the pipe greenhouse itself.
To build a greenhouse with our own hands, we will need the following materials:
- PVC pipes. Ideally, you need to use pipes with an external diameter of 25 mm, an internal diameter of 16.6 mm and a wall thickness of 4.2 mm;
- strapping wire or plastic tees for connecting the frame;
- rods of profile reinforcement with a diameter of 10-12 mm and a length of 600 to 1000 mm for attaching the frame to the foundation;
- foundation materials. The set of materials depends on what kind of foundation is planned to be laid. We can use either wooden beams with a diameter of 50x50 mm, or cement mortar with profile reinforcement;
- fastenings for fixing the casing;
- film or polycarbonate for covering.

Set of tools:
- garden auger;
- sledgehammer;
- drill;
- hammer;
- pliers.
This is just a sample list necessary tools. During the work process, you may need a hacksaw, scissors, an ax or something else.
Foundation or frame?
Due to the lightness of the structure, greenhouses made of pipes do not require a solid foundation. But it’s still worth remembering that pipes must be securely fastened to a base that cannot be lifted by the wind. What is the best way to attach a greenhouse?
It goes without saying that making a wooden frame is much easier than pouring a full-fledged foundation. However, it is worth remembering that the frame for the greenhouse is made of wooden beams with a diameter of 50x50 mm, to which PVC pipes are attached using profile fittings.
Wood is a material susceptible to corrosion, fungi and rot. Therefore, after a short period of time, you will have to change the frame, and, in the worst case, also get rid of mold and fungal contamination of the soil.
This option for fixing the greenhouse is convenient if you plan to move it around the site every couple of years.
The foundation is a solid structure that can serve for decades. Therefore, it is worth building it if you decide to take up greenhouses thoroughly and their location will not change for years.
It is very easy to secure the greenhouse to the foundation. During the process of laying the foundation, rods from profile reinforcement are installed at a distance of the pipes of the greenhouse frame (no more than 90 cm), onto which the greenhouse is subsequently placed and secured.
Arched greenhouse
You can build a greenhouse of any configuration from PVC pipes. The most common ones are arched greenhouse and a gable greenhouse. The arched shape is much easier to install with your own hands, so beginners are recommended to start with it.
Let's consider the technology of installing an arched frame for a greenhouse made of polypropylene pipes using the example of a greenhouse measuring 10x4 meters.
When building a greenhouse of a larger or smaller size, it will be necessary to recalculate the amount of material, respectively, up or down.
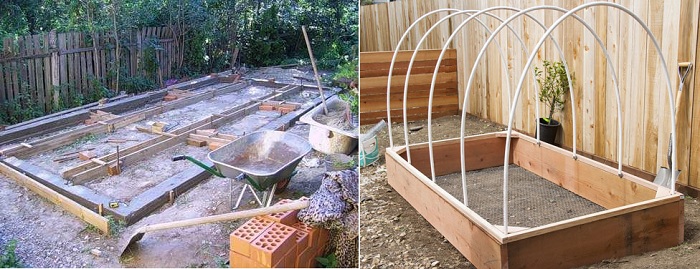
- Let's make the foundation. The width and length of the foundation or frame (depending on what you decide to build) corresponds to the size of the greenhouse itself.
- Next we will need reinforcing bars. We cut them into pieces 70 cm long and install them strictly opposite each other at a distance of no more than 90 cm. If the greenhouse will be attached to a frame, the rods should be installed on the outside of the wooden base. If the foundation option is chosen, the rods are cemented into the foundation itself.
- We install the arcs. We take PVC pipes of the same length (in our case, the length of the pipes is 6 meters.) The number of arches corresponds to the number of fastening fittings. The pipes are put on the fittings on one side, and then carefully bent in an arc and put on the pins on the other side of the greenhouse.
- We make wooden or plastic frames for attaching the doors and vents of the greenhouse on opposite sides of the building.
- We install the central load-bearing longitudinal beam. Since PVC pipes do not come in ten-meter lengths, we take two five-meter ones and connect them with a clamp. We attach the stiffener in the very center arched design along the greenhouse. For fastening, you can use clamps or binding wire.
- We fasten the longitudinal stiffeners in the same way along the slope. Two or three pipes on each side.
- We install a pair of racks under the central stiffener. It is not necessary, because the structure is already quite stable, but it will not be superfluous.
- We fix the covering.
In case of attachment to wooden frame, the frame is tightly fixed, using metal plates and self-tapping screws, to the outside of the wooden beams.
If the greenhouse is installed on a foundation, additional fastening pipes to fittings is carried out using bolts and nuts. To do this, a through hole is drilled through the pipe and rod, then a bolt is passed through and tightened with a nut.
Gable greenhouse
The difference in the construction process, in general, is not big. The only problem is that the gable design provides corners that are connected by soldering plastic elements. For this You will need a special soldering iron for PVC pipes.
The whole algorithm installation work almost identical to the previous one. Therefore, we will briefly consider the algorithm, focusing on its features.
- We are building the foundation.
- We fix the reinforcing bars.
- We install pieces of plastic pipe of the same length on the reinforcing bars. This will be the height of our greenhouse along the bottom edge of the slope.
- We attach tees to the upper edges of the pipes. To the corners there are crosses.
- Next, we begin to show our imagination and remember our childhood skills of collecting construction sets. Our task is to collect gable roof. The only condition is that all roof elements must be the same length.
- We cover the frame with an awning.
Greenhouse lining
There are two main materials that can be used to cover a greenhouse: polyethylene film and polycarbonate. Both of these materials meet the main requirements for covering a greenhouse:
- resistance to climatic and weather conditions;
- light and ultraviolet permeability;
- the ability to maintain the microclimate inside the greenhouse.
Covering with plastic film
To cover a greenhouse, it is better to use reinforced film, since ordinary polyethylene quickly deteriorates under the influence of sunlight.

To cover a greenhouse you need:
- Cut the polyethylene. It is better to perform this process directly near the frame in order to accurately calculate the material. The pieces of film should be slightly larger than the walls of the greenhouse, since it will be attached using turns and folds under the structure.
- To attach the film, you can use any clamping devices, including clothespins or money clips.
- You can make fastenings yourself. To do this, sections of pipe of larger diameter are cut lengthwise and then put on the frame, thereby pressing the casing to the frame.
- Upon completion of work, the bottom of the casing is tucked under wooden base or pressed tightly against the foundation.
DIY greenhouse made of plastic pipes (video)
Polycarbonate sheathing
Polycarbonate sheathing will cost a little more, but will also last much longer. In addition, such material is a means of thermal insulation, so it will help preserve the greenhouse in winter and quickly warm the ground and create a microclimate during the sowing period.
Polycarbonate has a special property of expanding and contracting with temperature changes.
Therefore, rigid fastening of the sheathing to the supporting structure is not allowed. This action may lead to deformation and cracks covering material.
The polycarbonate sheets are fastened using self-tapping screws and thermal washers. The mounting holes are drilled to a slightly larger diameter than the body of the self-tapping screw. A rubber washer is placed under the cap. This allows the skin to play and not deform due to temperature changes.
Greenhouse on suburban area Not only is it a decoration, but it also allows you to get a harvest of environmentally friendly vegetables for the whole family.
To achieve this goal, a PVC greenhouse built with your own hands is ideal. The standard designs offered on the market are not always suitable for the site in size and shape.
One of the popular ways to arrange this simple structure is to make it yourself. For this purpose they are used various materials, designs, installation methods.
Don't need a greenhouse? We invite you to read the article -.

Types of greenhouses


At using PVC The following pipe designs are usually suitable:
- wall-mounted - the structure is adjacent to one or two walls of a building, residential or technical;
- a greenhouse with two slopes in the shape of a house;
- polygonal, with a sloping roof;
- arched - with a round dome.
Wall buildings
They are usually installed against a wall on the southwest or south side of the building. In this case, it acts as a kind of accumulator of thermal energy, heating up during the day and releasing it during the cool night time.
The disadvantage of such greenhouses is the constant exposure of the wall to air of increased humidity in the internal atmosphere, which can contribute to its premature destruction.
This can be avoided by plastering the surface and painting it with waterproof paint. To attach the greenhouse frame to the wall, you can use tubular brackets in the form of a glass.
The internal size of the pipe must correspond to the outer diameter of the plastic pipe of the frame so that it fits freely into it. The connection must be secured with a screw perpendicular to its axis. Metal bracket needs to be painted to protect against corrosion.
As a covering for such a greenhouse it is advisable use monolithic polycarbonate. It is transparent, which makes the building an additional decoration of the exterior of the site.
Gable types
This is the most common form for closed ground devices. The popularity is explained by the simple shape of the frame, which can be made by hand using standard PVC pipes and fittings.
 This frame is strong, durable and quite resistant to wind and snow. Such frames provide a low reflection coefficient, and this contributes to optimal heating of the PVC greenhouse under the influence of sunlight.
If you install the slope at a sharper angle, you can achieve random removal of snow masses from the roof, which eliminates the need for periodic cleaning in winter.
But this is only possible on a hard surface that does not sag under load. Window glass or cellular polycarbonate has this property.
Gable greenhouses are equipped with doors and vents for ventilation. They release warm, moist air that accumulates under the roof.
If the side walls of such a greenhouse are installed with a slope, the illumination in the morning and evening hours will be higher. This complicates the design somewhat, but in mid-latitudes such a solution will be justified.
Arched structures
Without a doubt, they are the most popular forms of structures for constructing closed ground. The design is durable, good stability and incredibly simple to install. In addition, preparing the site for its installation does not require complex decisions.
Thanks to the use of lightweight PVC pipes, the greenhouse frame is light enough to be moved to another location without disassembly, which improves the ability to optimize crop rotation.
 The versatility of the material allows you to choose any size and configuration of the structure.
The arched shape of the greenhouse is demanding regarding its location in space. The building must be oriented its axis from south to north. In this case, in the morning and evening hours there will be maximum amount sunlight.
In the daytime, the dome part of the greenhouse is most illuminated, where the refraction of rays is not so significant.
Dome buildings made of PVC pipes
 This design can be considered a variant of the arched design. This shape ensures unhindered removal of snow from the blood, which facilitates maintenance in winter.
In addition, this form is better suited for growing tall plants. Ventilation in a dome greenhouse is much more efficient, given the reduced volume of space at the top of the building.
Making a greenhouse from PVC pipes with your own hands is not difficult, since the installation uses proven assembly technologies similar to those for plumbing systems. The same fittings are used.
Site selection and site preparation
The efficiency of its use largely depends on the choice of location of the greenhouse. We have already pointed out the importance of orientation in relation to the cardinal directions. But it is also important that it is in a well-lit place, without being obscured by bushes or trees growing nearby.

In addition, the site on which a structure made of PVC pipes is installed must be on a strictly horizontal platform. The durability of the structure depends on this. If it becomes distorted, conditions are created for the polycarbonate or glass coating to shift, which may be followed by its destruction.
With a greenhouse made of PVC pipes up to 6 meters in length, it can be installed on a base made of wooden beams. It needs to be placed on a level surface in the fall, and in the spring it must be additionally checked for horizontalness and compliance with its shape.
As a rule, this is a rectangle and it is enough to ensure that the diagonals are equal. After performing this operation, the base must be additionally fixed to the ground with anchors.
When installing a wooden base, you need to add a drainage layer of sand and gravel mixture 10-15 centimeters thick under it. This will allow for more active removal excess water from under the greenhouse.
To install a greenhouse made of PVC pipe longer than 6 meters, it is preferable to use capital strip foundation . This is especially important for soils subject to seasonal swelling.
Calculation of the need for materials for a greenhouse made of PVC pipes + drawings
To determine the amount of materials, you need to develop a drawing of a greenhouse made of PVC pipes for making it yourself.

In order not to perform tedious calculations for each part separately, it is better to use graph paper to complete the drawing. This will allow, with a certain scrupulous execution, to obtain the true dimensions through measurements. The accuracy with this method of execution is sufficient to perform the calculation.
Please note that all moldings are available in standard lengths. Therefore, when designing, it is necessary to take into account the possibility of their rational cutting in order to avoid unnecessary waste.
Standard sizes of some materials:
- Pipes PVC size 20-25 millimeters are produced in lengths of 1, 2, 3 and 6 meters.
- Wood beam coniferous species– 4 or 6 meters;
- Cellular polycarbonate with a thickness of 4, 6, 8 millimeters is produced in sheets with a width of 2.05 and a length of 4, 6 or 12 meters.
- Polyethylene film with a thickness of 90-200 microns is sold in rolls, the width ranges from 1 to 3 meters. When installing, welding along the width is allowed. All you need is a household iron and aluminum foil.
The distance between the arcs of a greenhouse made of PVC pipes is selected depending on the coating material. For film it should be 0.7-0.75 meters.
If the coating is made of polycarbonate with the sheets overlapped by 10-12 centimeters, then it is necessary to provide for each sheet a support of at least 3 arches, that is, the distance between them should be: (2.05 - 0.1) : 2 = 0 .97 meters. The number of sheets is determined by the given length of the greenhouse.
 The amount of materials for the end walls is calculated separately. Basic structure It is made from a wooden block measuring 50 x 50 millimeters and covered with the main covering material using planks 15-20 millimeters thick.
The design of the end walls should provide a door passage about 90 centimeters wide and a height of 1.8-2.0 meters, so that it is convenient to use a garden wheelbarrow. A window should be provided in the upper part of the end wall.
If polycarbonate is used for the coating, it is fastened in two ways:
- By applying a screed across the greenhouse body. This part is made of galvanized steel strip with a width of at least 40 millimeters and a thickness of 0.7-1.0. The length of the strips should exceed the outline of the frame by approximately 0.5-0.7 meters, which are needed to form the clamp. Tensioning is done with an M10 pin, the length of which is 20-25 centimeters, using two nuts and washers.
- Fastening to the arches with cutting screws with special compensating washers with an installation pitch of 250-300 millimeters.

To install doors and windows, you will need 2 canopies for each part. Below are drawings of various frame options with dimensions.


Connecting pipes and fittings when assembling a greenhouse
To assemble the greenhouse, PVC pressure pipes and corresponding fittings are used - couplings, angles, tees and crosses.

When a set of parts is selected, they need to be checked for compatibility. A normal fitting should be put on the pipe, immersing no less than 2/3 of its length.
Adhesive connection
Adhesive compositions for PVC contain this material as the main component, diluted with a special solvent, which keeps it in a fluid state. Additives are also used as additives various kinds to improve adhesion and give the composition the desired consistency.
After applying the glue to the parts, long chains of PVC molecules are mixed, and as a result of the evaporation of solvents, the mass thickens. The material of both parts is mixed to form a monolithic, durable unit.
When purchasing glue for PVC, you need to carefully read the instructions for use, which contain instructions on how to prepare for gluing and proper implementation process.
At room temperature, the glue sets time is about 4 minutes. At a temperature of 40 degrees it is reduced to one minute.
Detail in life size cut from the pipe with special scissors. They are designed in such a way that they do not leave burrs at the end.
Watch the video
Cutting can be done with any saw with fine teeth (hacksaw), but after this you need to carefully remove burrs, which may adversely affect the alignment of the parts when gluing.
Before gluing the surface, the parts to be joined must be prepared in a special way. The main goal is degreasing. Gluing can be done outdoors, weather permitting. The air temperature should be within 5-35 degrees.
It is important to remember that the brush for applying the adhesive mass must be made of natural bristles, otherwise synthetic material will also be dissolved and this may damage the strength of the connection. Often, adhesive manufacturers include a brush in the package.
The parts are glued in the following order:
- Test the pipe and fitting for compliance. Mark the boundaries of glue application with a marker.
- Clean parts from burrs and gross damage.
- Degrease the surfaces to be bonded.
- Apply glue with a special brush.
- Align the parts by sliding the fitting onto the pipe. Rotate the parts at an angle of about 90 degrees and install them in the desired position. This operation should ensure uniform distribution of the glue over the surfaces.
- The parts must be held firmly for 15-20 seconds.
- Depending on the temperature environment The drying time and final setting of the glue will be up to 4 minutes.
- Excess adhesive mass from the surface of the parts must be removed with a rag.
- Glued parts cannot be moved for 15-20 minutes.
Watch the video
When gluing PVC parts, the following defects may occur:
- Partial non-gluing occurs when the glue is applied unevenly and when there is gross damage on the surface of the parts. This can also be caused by an overdried layer of glue - the time after application until the parts are aligned is no more than 12-15 seconds.
- When performing work under conditions of minimum permissible temperatures, it can lead to soft non-gluing, which indicates insufficient polymerization of the glue.
- A porous adhesive layer is formed when the glue is applied unevenly. The reasons for this may include contamination in the gluing area, poor mixing of the adhesive mass before application, and involuntary displacement during drying.
Gluing is the main method of assembly. However, when constructing greenhouse frames, there is no need for tight connections. Therefore, when performing such work, an assembly method using metal fasteners is often used.
Assembling a frame from PVC pipes with screws
The nature of the loading of greenhouse frame elements made of PVC pipes allows its assembly using fasteners. This method even simplifies the assembly process. A sloped surface is not an obstacle to drilling if you use a simple jig.
 During installation, drilling may be required at the installation site. With PVC pipes this is not a problem. In the right place, it is enough to leave a deep mark, which is easily made with a sharpened triangular pin made of any metal. In this case, the drill will not slide to the side along the sloping surface.
To assemble the greenhouse, it is enough to use standard M6 bolts with a convenient head shape. To install them you will need holes with a diameter of 6.5 millimeters. Along with the bolt, you will need a corresponding nut, a standard washer and a spring washer - a lock washer. Care must be taken when tightening - PVC pipe does not have high compressive strength.
Watch the video
Do-it-yourself foundation pouring
A supporting base for a greenhouse is also necessary, as for any other structure. Only in this case it works a little differently.
The greenhouse itself, especially one made from lightweight PVC pipes, has low weight and high windage. If it is not properly strengthened, it may well go “for a walk” in neighboring areas.
Watch the video - benefits concrete foundation
How to build a foundation for a greenhouse:
- A support base made of wooden beams is installed if it is planned to keep the greenhouse in this place for 2-3 years. However, it is possible, without displacing this structure, to simply replace the wooden base.
 It uses timber 150x50 or 120x100 millimeters. Before laying it, you need to level the area and remove the turf from the locations of the supporting base.
It is necessary to arrange a drainage layer of a mixture of sand and gravel 120-15 centimeters thick. Lay waterproofing made of roofing felt in one or two layers on top of the drainage.
Lay the timber along the contour of the frame. Check the resulting rectangle for equality of diagonals, secure the sides together. Before laying, the material must be treated with an antiseptic, this will increase its service life.
It should be noted that treatment with antiseptics does not guarantee a long service life of the greenhouse; it will either have to be moved after a few years or the support must be changed.
The base can be secured to the ground different ways. Most often, pieces of reinforcement 80-90 centimeters long, driven into the ground, are used. But screw anchors are more reliable. It's more expensive, but more reliable.

A layer is poured over it concrete mortar, into which the first corner block is installed. It must be carefully aligned to the horizon using a building level. Then pull the cords and lay out the rest of the blocks along the perimeter. The setting time of the masonry mortar is about 7 days, after which you can continue to install the greenhouse frame from PVC pipes with your own hands.
- A brick foundation on a concrete base is installed if there is loose soil on the site. To install a support for the greenhouse, you need to dig a trench in the ground 40 centimeters deep and 20 wide. Along its bottom you need to make a drainage layer 15-20 centimeters thick. It needs to be compacted and watered for better compaction. Install reinforcement in the amount of two cores 5 centimeters from the bedding, using supports made of broken bricks. It is advisable to install the formwork, leveling its upper edge horizontally.
Concrete pouring should be done in one go, continuously. In this case, you need to install M12 anchor bolts at a distance of no more than 1.5 meters from one another.
After the concrete has completely hardened, place brick belt two bricks around the perimeter.
Watch the video
After a week, you can begin installing the greenhouse frame.
Other methods of making a foundation for a greenhouse using other materials are also used. Their choice most often depends on the presence and type of remains from the main construction on the site.
Step-by-step instructions for assembling a greenhouse frame
Greenhouse kits of various sizes are sold at construction markets. The included instructions provide complete instructions on how to assemble and install them.
But their designs and sizes do not always satisfy the buyer in terms of compliance with the installation location. Then greenhouses made of PVC pipes required sizes are made by hand.
But the basic assembly and installation techniques do not depend on this, since the components are the same.
Watch the video
The following connecting elements are used during assembly:
- Cup - plastic product with an internal diameter corresponding to the external size of the pipe. Attached to the base with a self-tapping screw through the bottom. The tip of the arch is inserted into the hole and secured with a screw.
- A tee is a connecting element with three holes. When assembling the arch, perpendicular coaxial holes are used, intended for installing longitudinal ribs during the installation of the frame. Used only for making outer arches.
- The crosspiece is used for the same purpose when installing intermediate arches, to which longitudinal ribs are connected on both sides.
The mating parts can be fastened with glue or screws. The second method is used more often, since greenhouses are installed, as a rule, in early spring, when the outside air temperature may not be sufficient for a reliable adhesive connection.
When installing the greenhouse directly on the ground, the arches can be installed on pins.

For the manufacture of pins, reinforcing steel is used, the diameter of which is selected depending on internal size used for pipe frames. Their length is 0.6-0.8 meters, they are driven into the ground to a depth of about half a meter.
After installing all the arches, wooden box boards are installed around the perimeter of the frame. Their size is 40-50x120-150 millimeters. Fastening is done directly to the arches using a metal strip with self-tapping screws.
Watch the video
Installing the frame on a prepared base is practically no different from the described procedure for greenhouses made of PVC pipes when installed on the ground.

Installation of a door for a greenhouse
A normal greenhouse requires two doors, which are installed on both end walls. Their main purpose is to provide convenient service internal space structures.
Therefore, the width of the opening must be at least 90 centimeters, which allows the free passage of a garden wheelbarrow. The height should be about 1.8-2.0 meters.
In addition, the passage structure must be sufficiently sealed to ensure the preservation of the microclimate at night.
In addition to the door, the greenhouse is equipped with several windows for ventilation of the room. They are needed to remove warm, moist air that collects in the upper part of the building and is harmful to seedlings and greenhouse plants.

To make the door, a wooden block measuring 50x50 millimeters is used. The rectangular door frame is divided by a cross member. Required element is a jib that gives rigidity to the structure. The joints of the parts are additionally reinforced with corners made of galvanized steel.
The door leaf is made of the same material as the main covering of the greenhouse - film, polycarbonate or window glass.
Watch video - door installation
Installation of the door at the application site is carried out using standard door awnings in the amount of two pieces.

The doorway on the end walls is formed during the manufacturing process of their cladding. For this, wooden blocks are most often used, even if the main frame material is PVC pipe.
Installation of coating - polyethylene film or monolithic polycarbonate
To separate the room from the outside space, it is done in several ways:
- installing a cell phone or monolithic polycarbonate thickness 4 – 8 millimeters;
- coated plastic film thickness 90-200 microns.
It should be noted that using film is several times cheaper, but it usually has to be changed annually.
Watch the video
But polycarbonate, if it is of high quality (you need to be wary of Chinese counterfeits), can last up to seven years, after which the material begins to become cloudy due to wear on the outer surface.
 Before installing polycarbonate sheets on the upper ends of the arches, you need to install a self-adhesive sealing tape.
The sheet is installed in such a way that the internal cavities are located vertically. In this case, moisture does not accumulate in the voids.
For installation, special fasteners are used, taking into account the properties of the material, for working with which you only need a standard tool.
Watch video - installation and fastening of polycarbonate
A thermal washer and an elastic sealing ring are installed under the screw, and its head is protected by a cap. It should be remembered that this material has an increased coefficient of thermal linear expansion. Therefore, the hole for the screw should be 1.0-1.5 millimeters larger than the diameter of the screw.
 The distance between the fastening screws should be no more than 400 millimeters.
Joints and abutments of polycarbonate coverings are made using additional elements.
The procedure for installing polycarbonate is as follows:
- The end walls of the greenhouse are covered with sheets.
- The excess parts are cut out along the frame generatrix. To do this, you can use an ordinary construction knife.
- Openings for doors and windows are cut.
- The first sheet of polycarbonate is applied and secured. In this case, you need to make an overhang of 8-10 centimeters.
- Next, the remaining sheets are sequentially applied and fastened.

Installation of the film coating is carried out in the following order:
- The end walls of the greenhouse are covered with film. In this case, at the edges of the door and window openings, it is fastened with strips of 15-20x40 millimeters and nails 60-70 long.
- The film is fastened along the frame generatrix with a construction stapler as a temporary measure.
- The film is installed over the frame after sealing the ends. It is positioned in such a way that there is an overlap on the lower wooden base, to which they are attached with planks. If the greenhouse is installed directly on the ground, the edges must be tucked under the base of the frame and covered with earth.
- The edges of the film on the end sides are wrapped and secured with strips along with the previously installed film on the end wall.
Pros and cons of PVC
The material has a range of positive qualities, consisting of the following:
- Quick and easy installation and dismantling of structures.
- The disassembled structure takes up little space and is light in weight.
- The construction of a greenhouse from this material does not require any special skills or abilities and can be built with your own hands.
- Availability and low cost of materials for greenhouse construction.
- High strength and resistance to external factors.
- The service life of a PVC frame is estimated at at least 10 years.
Even with great desire Finding obvious flaws in the design of a greenhouse made of PVC pipes is not easy. It is considered dangerous to place them in regions with strong winds.
But this applies equally to any materials. And there is only one solution - installing additional braces and stiffeners. For durability, it is also not recommended to use in such conditions. soft material for covering.
With the onset of spring, every summer resident is faced with the task of planting seedlings and their further planting in open ground. But in order for the seedlings to become stronger and grow faster, it is necessary to create appropriate conditions for their growth. Such conditions include greenhouse cultivation of both seedlings and vegetables and herbs.
In the greenhouse, very comfortable conditions for plant growth - these are factors such as high humidity, warmth, absence of drafts and wind, release of oxygen by plants in such a closed warm room for the growth of seedlings is simply paradise. But building a greenhouse is a costly and troublesome task and requires a lot of labor to be invested in its construction. Of course, having your own permanent greenhouse is much better, but in the absence of a better one, you need to look for simple and available options construction and operation of this structure.
The ingenuity of our people always comes to the rescue, who will find a way out of any critical situation in life. The author does not have any use on his personal plot capital greenhouse, I decided to simplify the design and reduce construction time. And the idea is simple - you need to build a greenhouse from available materials, and he had plastic pipes and plastic film on hand. This is all that the author used to build the greenhouse.
So now let’s take a closer look at what the author needed and how he built a greenhouse on his site.
Materials: plastic pipe with a diameter of 20 and one with a diameter of 32, plastic film, bricks, tape.
Tools: hacksaw, hammer, knife.
First of all, I sawed three-meter pipes with a diameter of 20 mm for the subsequent manufacture of arcs for the greenhouse.

Then he sawed a 32 mm pipe into small cuttings with a hacksaw for the subsequent installation of 20 mm pipes in them, acting as greenhouse arcs. And drives them into the ground, leaving them a few centimeters above the ground.

Everything is done in the shape of a rectangle - this will be the base of the greenhouse, like this.

Then he takes pre-cut pipes with a diameter of 20 mm and from the beginning inserts one end into a pipe of a larger diameter, then bends it and inserts it into the other end of a pipe hammered into the ground, thereby creating an arc.

Next, the author, to strengthen the structure and add rigidity, lays a pipe over the arches and fixes it in this position with tape.

Then he covers the frame made of plastic pipes with plastic film and places bricks along the edges to avoid such an unpleasant moment when the wind tears off the film and drags it around the site.

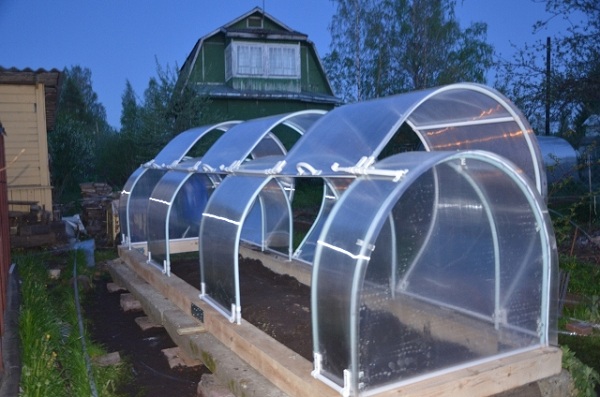
So all the simplicity of the design was completed in a few hours. Simple and cheap design greenhouse
Our man traditionally likes to grow trees, vegetables and fruits on his summer cottage. But our weather and temperature vary, and some crops require early planting and a long ripening period. This is where the need for greenhouses arises. Factory greenhouses - they can be capital and very light, arched and “house”, their glass and plastic are expensive and do not always fit the area in size and size. But there is always the opportunity to make a simple greenhouse with your own hands - for example, from plastic pipes.
What is a greenhouse and how does it differ from a greenhouse?
Often these concepts are confused. These designs, of course, are similar in material and design - frames and transparent coating - plastic, film or glass. But a greenhouse is most often a place where you can stand and care for beds or bushes, and an important condition: it must be capital.
Greenhouses come in an endless variety of shapes and materials
To protect against cold, wind, and precipitation, greenhouses are covered with plastic film or plastic sheets.
Greenhouse-greenhouse on a wooden base made of metal pipes under film
Plastic sheets - typically cellular polycarbonate - are used for permanent, heavy-duty greenhouses that are used throughout the year.
Polycarbonate greenhouse - reliable design
A greenhouse is a low, long shelter for a garden bed, often with a semicircular cross-section. As a rule, it is used for growing seedlings in the spring. Sometimes they are made on a wooden base and also stand stationary, on boxes of timber and boards.
A stationary greenhouse of this design is easier to make from metal pipes
And often they are placed directly on the ground above the garden bed. Then it’s easier to make them from plastic pipes so that they can be easily transported from place to place.
Semicircular greenhouse made of plastic pipes with folded film
Advantages and disadvantages of plastic pipes for construction
A greenhouse has a lot of advantages and very few disadvantages.
Advantages
Affordability - such a greenhouse will cost less than all other analogues
Ease of assembly - such a greenhouse is easy to design and manufacture, and if it is not needed (for example, in winter), you can always disassemble it and store it somewhere.
Versatility - can be used in different places on the site.
Lightness - if necessary, it can be moved from place to place without even disassembling the structure.
Durability - plastic pipes are absolutely durable, not afraid of dampness, cold, heat, fumes, fungus, and rotting. The film or joints may become unusable (from frequent assembly and disassembly), but replacement will also be quite cheap.
Aesthetics - a greenhouse made of plastic pipes always looks bright and does not look like a homemade product made from scrap materials.
Safety - such a greenhouse is absolutely safe for plants and soil.
A plastic pipe with a diameter of 20 mm is an excellent material for a lightweight greenhouse
Flaws
All material must be purchased according to calculations. You won't be able to make do with improvised means.
Making a structure with your own hands
We present here two options for greenhouses - a very simple one for one bed and a more complex and tall one.
The simplest greenhouse
This is the most simple design greenhouse It just couldn't be simpler. Curved sections of pipe are dug in above the bed on both sides in increments of approximately 50 to 70 centimeters. The step depends on the thickness of the film used, and the number of segments depends on the length of the bed.
Let's say our bed is 6 meters long. This means that we will need 12 pieces of pipe with a length of one and a half meters. Since pipes are usually sold cut into 4 meter pieces, we will cut them into 2 meter lengths. This means there will be 6 pipes. Fittings (devices for connecting pipes) are not needed. Ideally, fasteners can be used, but you can also fix the film on the pipes by tying its ends into knots and pressing the edges with stones.
Film can be either primary or secondary processed. The latter is much cheaper, but, as a rule, it either has an unpleasant brown, yellow or gray tint, or is completely opaque - gray or black, so it will not suit us. The film is sold in a sleeve, so we will need to cut it lengthwise. We will choose a thin film with a thickness of 150 micrometers.
The film sleeve is sold in rolls of 10 meters
Materials
Tools
- Scissors
- Shovel
Making a simple greenhouse
- We cut the four-meter pipe in half. We get 12 pieces.
- We stick each piece one by one into the ground more firmly, knock it down and stick it on the other side of the bed. The bed turns out to be under an arc.
- We cut the roll of film lengthwise and cover the resulting structure with it so that there are identical “tails” along the edges.
- We fasten the film to the resulting arches with clamps - two or three per arch.
- We press the sides of the film to the ground with bricks or cobblestones.
- We tie the “tails” with twine - if desired, they can be untied to allow air to flow.
A greenhouse over a bed made of buried plastic pipes
Our greenhouse is ready. This is a primitive design, but it will fully perform all the functions required for a greenhouse.
Making a greenhouse of a more complex design
Greenhouse more complex design higher, longer, it covers a larger area of land and is suitable for taller plants, has a door or two doors, sometimes vents, requires more pipes, complex elements of the system for connecting them, more film fastenings to the pipes (if film is used) or sheets polycarbonate (if polycarbonate is used). Can be used nonwovens- agrotex, agrospan, spunbond, can be - reinforced, which have much greater strength and withstand strong wind and even hail. Even bubble wrap is used. They conduct the sun's rays worse, but retain heat much better.
Therefore, you should approach the choice of greenhouse model and, accordingly, the choice of material with special care.
Choosing a greenhouse model
We choose a design model of average complexity. Let it be a greenhouse made of pipes on a wooden frame (it’s easier this way, no need to concrete the rods). We find the drawing on the Internet and, if necessary, adjust it to the dimensions we need and our capabilities.
Drawing of a greenhouse with wooden parts includes all fastening elements
All nodes are visible in more detail in another drawing; this drawing suits us better; it does not require the presence of wooden planks. It can be seen that everything is very simple - our greenhouse is assembled like a children's construction set.
System of fastening pipes to each other and to the base
Material selection
The length of our greenhouse is about seven meters. According to the drawing, we select pipes. Of course, we will need a pipe of a larger diameter and with greater wall thickness than in the previous one simple version. We choose a pipe with a diameter of 25 millimeters.
A simple plastic pipe is the most budget option
The fasteners must match it. We need quite a few cross fittings of the appropriate diameter for the cross-shaped connection of the pipes.
The cross fitting will hold the pipes together perpendicularly
You will also need tees for the ends of the greenhouse.
We connect the pipes from the ends of the greenhouse with tees
The boards for the frame should also not be very thin, so we choose their thickness of 25 millimeters.
The edged board will serve as the base of the greenhouse
Cups for securing pipes are difficult to find, so you can purchase regular external plugs.
The plug can also serve as a glass
It is better to choose not ordinary polyethylene film, but heat-resistant reinforced film - so that it can withstand serious atmospheric conditions - heavy rains, hail, wind, which often happen in our summer.
Reinforced film will last much longer
| Position | Name | Specification | Quantity | Unit price | Price | Notes |
| 1 | Plastic pipe FORA PN10 | Ø 25x2.3 mm | 70 meters | 33 rub/m | 2310 rubles | It is necessary to find a supplier whose pipes are sold by the meter, and not cut into pieces of several meters. Otherwise, pipe consumption will increase significantly |
| 2 | Cross fitting SPK 18110 single-plane | Ø 25 mm | 56 pieces | 18 RUR | 1008 rub. | |
| 3 | Tee fitting Enkor PPRC single-plane | Ø 25 mm | 14 pieces | 9 RUR | 126 rub. | |
| 4 | PVC plug | Ø 25 mm | 10 pieces | 8 rubles | 80 rubles | |
| 5 | Set of clamps for attaching the film to the greenhouse frame GRINDA 422317–25 (12 pieces) | Ø 25 mm | 5 sets | 60 rub/set | 300 rubles | |
| 6 | 25x200x6000 mm | 3 pieces | 370 RUR/piece | 1110 rubles | ||
| 7 | Reinforced polyethylene PET film | 200 microns (120 g/sq.m), 2x25 m per roll | 1 roll | 1,180 rubles | 1,180 rubles | |
| 8 | Self-tapping screws | About 2 kg | As needed | |||
| Total | 5114 rubles (excluding the cost of screws) | |||||
Required Tools
- Bayonet and shovel shovels
- Power saw (regular saw)
- Drill
- Screwdriver
Step-by-step process for making a greenhouse
- We choose a place. There must be good access, sunny, close to the water, level.
An example of a polycarbonate greenhouse in the landscape of the site
- Using a shovel we level the area for the greenhouse. If necessary, add fertile soil and peat.
An example of a polycarbonate greenhouse on a leveled area
- We install a frame for panic from boards. We cut them into pieces required length and connect with self-tapping screws. You can strengthen the connections with large steel angles. We carefully treat it with anti-rotting impregnation.
The greenhouse base made from boards is easy to assemble
- We attach plugs to the boards in the marked places with self-tapping screws - they will serve as glasses for the pipes.
Plugs will serve as glasses for pipes
- We cut the pipes into sections of the required length for arcs and horizontal sections.
- We insert the sections that should be the lowest into the glasses and fix them with self-tapping screws.
- We collect further sections. We fix all joints with self-tapping screws directly through the fittings.
Connecting pipes using fittings and screws
Tee connections look like this.
Tee connection from the ends of the greenhouse
- The greenhouse is gradually gaining constructive completion.
An example of a greenhouse that is close to completion
- We hang a wooden strip under the central upper longitudinal pipe for attaching the lamps.
The lamp strip is suspended from the central upper longitudinal pipe
- We cover the greenhouse with pre-cut reinforced film and fix it.
Covering with film goes something like this:
- We cut through the door and windows, strengthen the edges with tape. Here there is complete scope for creativity: you can cut out the door and windows from additional pieces of film, you can cut them directly onto the structure, sew or glue zippers or buttons for fastening.

To make greenhouses on your site with your own with my own hands Various materials are used, ranging from wood to metal. The craftsmen also paid attention to such material as PVC.
Do-it-yourself greenhouses made from PVC pipes can be found quite often. This is due primarily to the relative cheapness of the material, good workability, lightness and sufficient elasticity.
A greenhouse made from PVC pipes can be assembled with your own hands quickly enough, with a minimum set of tools, and both polyethylene film and polycarbonate sheets are used for covering.
Let’s make a reservation right away: a greenhouse made of PVC pipes is usually small in size and is not intended for all-season use; it is rather a greenhouse for growing early seedlings.
But nevertheless, such a greenhouse has all the elements of a real greenhouse, these are:
- Frame;
Greenhouse made of pipes - the material dictates the shape
A do-it-yourself greenhouse from PVC pipes can be made in one weekend at minimal cost.
Let's build such a greenhouse today and consider various options for its construction, both in terms of fastening the frame and installing the covering. Before we begin, we must immediately stipulate one condition: a greenhouse made of PVC pipes can only have an arched shape. Why?
Let's look at an example.
- Take a piece of PVC pipe, which is usually used for cold and hot water, approximately 1000 mm in size;
- Let's lay the pipe on two supports so that the ends of the pipe lie on the supports and the middle is free;
- Lightly press down on the center of the pipe. What's happening? That's right, it sags.
If we need a PVC greenhouse with straight walls, in this case we will have to install additional stiffeners and stops, and this is undesirable, for this would be better suited greenhouse from PVC profile, but that's a completely different question.
- Now bend the pipe slightly so that a kind of arc is formed;
- If you fix the pipe in this position and press on it in the central part, you will see that the pipe has become much more elastic;
- Valid conventional system arches. We think there are no more questions. Let's get started.
Greenhouse in one weekend - material, PVC pipe
Sometimes it’s possible without a foundation
Before we begin construction, we must resolve the issue of the foundation. Since the greenhouse we are setting up will not be used all year round, and our main task will be fast construction shelters for plants, we will completely abandon the construction of the foundation.
No, of course, we will need a foundation for the greenhouse, but it will not be quite a foundation. As for the sizes. If we use polycarbonate as a covering, then the size of the greenhouse will directly depend on the size of the polycarbonate sheet bent into an arc.
Our information - standard size polycarbonate sheet 2100 by 6000 mm.
Size selection
If polyethylene film is used as a covering, the dimensions can be arbitrary. Let's build a greenhouse the size 3820Х6300 mm.
Why did we choose this size?
- It is important to understand that when bending a PVC pipe, we will get the correct arc;
- Having a width of 3821 mm, we get half a circle with a radius of 1910 mm;
- In other words, this is half our width and the full height of the resulting greenhouse;
- If we decrease the width, the height will decrease accordingly.
As for the length, the pitch of our frame will be 900 mm.
- Respectively, if there are 8 sections we will have 7 spans;
- The calculation is simple: 7*900 = 6300 .
You can take a different size, the main thing is to understand the principle.
Materials for production
We will need:
- PVC pipe 25 mm
- Crosspiece for pipe 25 mm
- Tees for pipe 25 mm
- Skew tees
- Self-tapping screws
- Metal strip
- Rebar or steel rod
- Board 50X100 mm
- Self-tapping screws, nails
Main tool
From the tool we need:
- Hacksaw
- Hammer
- Screwdriver or screwdriver for self-tapping screws
- Metal hacksaw or cutting machine
- Plastic pipe welding machine
- Construction tape
- Building level
The first stage is the construction of the base
Everything is ready, let's get to work.
- It is necessary to assemble the frame of our future greenhouse from the board;
- Before installation, the wood must be impregnated with a special composition against dampness and mold;
- The frame is installed on a leveled area of our future greenhouse;
- Now it is necessary that the diagonal of our frame be correctly observed.

- To do this, cut 4 pieces of reinforcement 500 mm long and drive them into the corners of the frame with inside. Before driving each segment, carefully measure the diagonal.
We arrange the fastening of the frame arcs

The frame is ready and secured.
- We cut another 14 pieces of reinforcement, 65 - 70 mm long.
- On our frame it is necessary to make markings with a marker on the inside of its longest part, in other words along the length.
- The first mark is made at the very edge and then all the rest at intervals of 900 mm.
- According to the marks made, with outside frame, we drive pieces of reinforcement into the ground so that 300 mm remains sticking out on the surface. The reinforcement is driven flush against the frame.
- Now we make markings on the frame along the width.
- To do this, divide the width in half and, stepping back 400 mm in both directions, make marks.
Here, too, you need to hammer in the reinforcement from the outside in the same way as we did in the first case.
PVC pipe - making arcs

The first stage of work has been completed. Let's move on to making the arcs themselves.
- They are made as follows: two sections of pipe 3000 mm each are welded together so that they have a cross in the middle.
This is what concerns the internal arcs of the frame.
- External elements are made slightly differently. The pipes in the center are connected not by crosses, but by straight tees.
- The first part is ready. Arcs can be installed.

- They are inserted into the reinforcement lengthwise on one side, bent and inserted on the other.
- Thus, above our wooden frame we got a frame for our future greenhouse made of PVC pipes with our own hands.
Stiffening rib - installation

Now you need to install the central stiffener.
- To do this, cut pieces of PVC pipe of size 850 mm and are welded between the central tees and crosspieces. This strengthens our frame.
- Next, it must be additionally secured to wooden frame.
- Made from metal strip clamps in the form of the letter Ω.

- Using self-tapping screws, we attach the PVC pipe frame to the wooden base.
Base for door and window
The main work on the frame is completed. You need to think about the future door and window for ventilation.
Do you remember that we installed two pieces of reinforcement at our width? These are exactly the places where we will install the window and door.
- From the reinforcement driven in width, we draw a line straight up and make a mark on the outer arc of the PVC pipe.
- This can be done using a flat wooden slats, marker and level.
We have two marks on the same vertical line with the reinforcement. What are we going to do with them?
Let's insert skew tees here. You can do this as follows.
- Let's measure the distance from the bottom of the reinforcement to the mark.
- According to the obtained size, cut a piece of PVC pipe.
- We weld a tee to it so that we get an element with a tee at the top. The bevel connects to the pipe.
- Now let's cut the arc at the mark.
- This must be done with caution, the arc is under load.
- Next, we simply weld the tee into the resulting space. Of course, you can’t do this without an assistant.
Doors, windows, covering

The frame is ready.
As you can see, a DIY greenhouse made from PVC pipes is not anything complicated. All work can be completed in one day.

If you are planning, you can do this by simply nailing it to a wooden frame using nails and battens.

- The door and window can also be made from sections of PVC pipe.
- Next, they are also covered with plastic film and installed in place.

- You can also use sections of PVC pipe as canopies, but with a larger diameter. 25 the pipe should fit into it freely.
Polycarbonate coating - device diagram
If your greenhouse made from PVC pipes with your own hands will have a polycarbonate lining, then in this case you need to proceed as follows.
- Wooden blocks are placed between the ribs on the wooden frame.
- Thus, you have a continuous Smooth surface, with ribs recessed inside.
- Polycarbonate is fastened with self-tapping screws with the obligatory installation of thermal washers.
Our advice is that the diameter of the hole in polycarbonate should be 2 - 3 mm larger than the diameter of the screws. This gap will play the role of a compensator when polycarbonate expands due to climatic influences.
Concrete - extending the life of the greenhouse
Arranged this way PVC greenhouse, is not a long-term structure. It's all about the wooden frame of the foundation. But its service life can be significantly extended if the foundation is made of concrete.
This will not affect the structure itself at all, the manufacturing process will not change with a small exception, all the reinforcement is not driven into the ground, but is walled up in concrete.
The foundation turns out to be strong, and the absence wooden elements significantly extends the service life of such a greenhouse.
Your dimensions - how to do the calculations
Small addition.
Readers noticed that we suggested our own dimensions when making this greenhouse. But you can choose a completely different size.
Someone may wonder how, in this case, to accurately calculate the dimensions of the length of the pipe for making the frame.
As you understand, our frame element consists of two pipes and forms half a circle.
The width of the greenhouse is the diameter of this circle. If we know the diameter, we also know the radius. This data allows us to calculate the circumference.
The formula in this case looks like this:
- L = 2πR = πD
- L – circumference
- R-radius
- D-diameter
Let's imagine that you needed a greenhouse with a height of 2000 mm. This means that with the correct arc its width will be 4000mm.
In this case, the diameter of the circle will be 4000 mm and the radius 2000 mm.
Usually π (pi) is calculated as 3.1416. But for engineering calculations this is a very rough derivative. In order not to bother with large numbers, you can round it to 3.14. This will do too.
- L = 2*3.1416*2000=12566 or L=3.1416*4000=12566
This is the length of our circumference. But we only need half.
- 12566/2=6283 this is the length of our arc.
- The arc consists of two pipes and a cross. This means that the result must be divided again.
- 6283/2=3141 mm. We have received the size of the pipe we need.
Here we just wanted to show you that the calculation is not difficult and we simply listed all the steps.
But in fact, everything can be done much simpler. Understanding that an imaginary circle consists of 4 parts, we simply need to immediately divide the length of the circle by 4.
- L = 2*3.1416*2000=12566 or L=3.1416*4000=12566
- 12566/4=3141 it's simple.
Profile – you can do it this way

Sometimes greenhouses are made from PVC profiles. In this case, the greenhouse can have different shapes, it all depends on the desires and needs of the customer.
A greenhouse made from PVC profile has a very robust construction. Glass is usually used as a coating, but there are exceptions.
The PVC profile for greenhouses is exactly the same as for windows (see). Therefore, the use of glass in this design is entirely justified. Such greenhouses can be used both for a short period and all seasons.

The main advantage of greenhouses made of PVC profiles is their tightness and ability to retain heat well.
PVC profiles for greenhouses, together with the use of cellular polycarbonate, give truly amazing results.
But there is one important thing in these greenhouses.
The construction of such greenhouses at home is problematic, and industrially produced greenhouses have a high price. Therefore, for ordinary summer residents they represent a kind of luxury element in the garden.
But everything changes over time, and individual materials become more accessible over the years. Let us hope for the best.
Option for the lazy and impatient
Materials
Let’s immediately take the bull by the collar and determine the required quantity and name of building materials and consumables that we (you) will need. This:
- Boards and wooden blocks for the foundation. Since the foundation for such lightweight design not required. The thickness of the boards is flexible, from 20 to 40 mm, but this is for a large scale. Bars – from 25x25 mm.
- The pipe is plastic, PVC, white or any other. Initially, let's focus on the specific dimensions of the future greenhouse, and we will prepare a 13 mm pipe 6 meters long in quantity 19 pieces.
- Steel fittings or steel rods with a diameter so that they fit tightly inside the pipes. Enough 10 pieces 80-100 cm long.
- Greenhouse film, thick, choose any one at the market or in a store, preferably something stronger (see). Standard width, 24 linear meters.
- Consumables: plastic or aluminum clamps, small wooden boards (50 pieces), door hinges and handles, wood screws, any small nails.
Important! The wood must be good, all elements must be treated with an antiseptic or impregnated with at least drying oil. You can do both, and also paint.

Addition: a greenhouse can be built from metal-plastic pipes, the installation process is similar, choose the material yourself. Only if it doesn't cost more. It definitely won't be any stronger.
Process
Determine the location, but for now it’s better to clear it of the fertile layer by removing a few centimeters. Because during construction, nails and screws will certainly be dropped, shavings will fall, other construction debris and foreign bodies that are completely unnecessary for tomatoes will get into the soil.
And after installation, it will be possible to fill the beds inside the greenhouse with soil. At the same time, enrich it with oxygen while you dig, loosen and move it from place to place. Particularly experienced gardeners will never forget to immediately add fertilizer (see).
So, the installation of a greenhouse made of plastic pipes with your own hands begins:
- We take wooden blocks and make the simplest semblance of a foundation out of them, that is, we knock together a frame that we lay on the ground. To determine correct assembly, you need to measure the diagonals. If they are equal, then your frame is rectangular and not diamond-shaped. This finished frame can be very easily fixed if you drive reinforcement into the corners from the inside;
- How to install arches? Cut the reinforcement: each individual twig into 4 equal parts. As a result, you will have 36 pieces of reinforcement. We drive 40 cm from these pieces into the ground, let the rest remain sticking out. We score by long side, approximately at a distance of 60-65 cm between neighboring ones. And we put pipes on these branches of reinforcement sticking out of the ground, so we get parallel arches along the entire length of the structure. This will be the main frame of the greenhouse made of plastic pipes;

- At each base of these arches we fasten PVC pipes to a wooden foundation frame. These can be simple clamps that will tightly secure the end of the tube;
- Assemble the end structures according to the same principle, taking into account the rigidity that should still be present. The ends of the tubes are also placed on reinforcement driven into the ground, and then attached to a wooden frame from below;
- Check the size of the doorway while assembling it on the ground. It’s very easy to make a door together with a frame from bars; you don’t even need to cut anything at angles. Just make two rectangles, one inside the other. On the inner door (actually, the door) also nail a slanting strip to maintain rigidity. Then install the structure at the end of the greenhouse and secure it in any convenient way. We have hung the hinges, we will nail the handle after we stretch the film;
- Let's unwind it and carefully begin to pull it onto the structure. It is better to do this when the sun is outside and the weather is warmer than cooler. But you also don’t need to work in the heat, otherwise the film will then be stretched too tightly due to thermal expansion (more precisely, contraction), which can lead to its ruptures, especially in places of contact with pipes and in kinks. You can also fasten the film at your discretion: with slats, boards, or simply place a certain number of bricks on the free ends so that gusts of wind do not blow it to the northwest.
That's it, the greenhouse made of plastic pipes was installed in half a day. Don't forget to screw the door handle.


