A place for books, souvenirs, and trinkets dear to the heart - this is the main purpose of shelves on the wall. Some have a collection of candles on them, some have volumes of their favorite poet, and some keep photo albums on the shelves. The important thing is that the shelves themselves should be no less aesthetically pleasing than the objects stored on them.
Making a shelf out of wood is the first thing that comes to mind when making shelves yourself. Indeed, this option is the most common.

Wooden shelves are good because of the availability and cheapness of the material, ease of processing, and the ability to experiment with design. And start learning how to do things like this creative designs you can use a simple and universal shelf, which will not be superfluous in the kitchen, will be useful in the living room, and in the nursery, and other options for its placement can be considered.
Shelf materials:
- Wooden scraps of different lengths;
- Rope cut;
- 5 furniture panels;
- Wall fasteners;
- 2 rope rings;
- Jigsaw;
- Drill;
- Roulette;
- Pencil.
You need to make holes on the shelves (boards). They should be drilled at a distance of 6 cm from the edge, and 12 cm between each other.
Wooden scraps need to be sawn, their length can be different, but the height needs to be the same. Inside the sawn scraps, you need to drill holes for the ropes (through holes).
The lower knots of the ropes are tied first. The bottom shield (bottom shelf) is strung on them; between the shields along the edges there will be stacks of scraps as a gap between the shelves. It is better to divide all the scraps into parts, and lay out the same number of equal sections between each floor of the shelf.

The procedure is repeated, above the highest shelf on the wall the ropes are tied in knots. This must be done firmly so that wall structure it could not be deformed either with one’s own hands or by any other forceful action.
You will get a nice shelf on ropes inside stacks of scraps; you can place it in any room.
DIY wooden shelf, the simplest way (video)
Chipboard shelves on the wall
Chipboard is particle board, truly universal material For construction work. The dimensions of the slab and its flat surface make it possible to make various designs with your own hands, including wall shelves.
Perhaps only cutting chipboard causes difficulties, since the material is impregnated with resins. Most suitable tool for working with chipboard – an electric jigsaw.


It will not be superfluous following tips on working with this material:
- For wall shelves, laminated chipboards are often purchased;
- Often, self-made shelves are covered with laminated film or paper imitating various patterns (including natural ones);
- To easily tighten screws and self-tapping screws in a chipboard structure, you need to acquire an electric drill;
- In the kitchen, shelves from this material are often made, as they are convenient for storing containers with spices, cereals and pasta, jars with herbs collected with your own hands;
- In the hallway, such shelves serve as a place to store important household items;
- Such a shelf on the wall in the nursery may serve the purpose of book storage.
In small storage rooms, which are included in the layout of many apartments, you can make original shelves for household needs - do it yourself, quickly and inexpensively.
Round shelves on the wall
Round cardboard shelves for the kitchen or bathroom are the rage in interior fashion. They are usually made from cardboard and plastic pipe, which you cut with your own hands into circles 10-15 cm wide with a saw. The edges of the circles are sanded with sandpaper, and then future shelves are painted over in several layers.

The results are quite original round shelves, very suitable for the kitchen. interesting option registration You can store in them:
- Kitchen towels;
- Various brushes and sponges;
- Decorative trinkets;
- Herbal bags for making your own tea;
- Other beautiful kitchen gadgets.
The bathroom is round, unusual and very convenient shelves It would also be appropriate to hang on the wall: jars of cosmetics, towels, washcloths can also be stored in these cute shelves.
How to make a round shelf (video)
Square shelves on the wall
Wall compositions made from square shelves on the wall in the living room look great. Shelves of different sizes are painted in the same color, or perhaps in contrasting ones, and are combined into one wall pattern - small ones with large ones in one line, vertically or horizontally, diagonally.
Square shelves are usually small and difficult to accommodate many items. Most often these are various souvenirs, miniature vases, books.
Often these shelves are decorated with antiques and vintage items.
And to make such an interior decoration with your own hands, you can use standard materials. In most cases, wood is painted with matte bright paint and varnished. Or a self-adhesive film decorates the surface of such shelves.


Small shelves on the wall
The kitchen wall often requires small shelves. They do not take up space, do not burden the interior, but emphasize the overall mood of the kitchen. A wall shelf can be used to decorate a room.
If the shelf is made for the kitchen, you can place on it:
- Bright spice jars;
- Cookbooks and notebooks;
- Canvas bags with spices;
- Beautiful dishes.
You can make such shelves from wood, plastic, glass, and even a stack of painted and glued books.
Designer shelves on the wall
Such designs are rarely used in the kitchen, yet these exquisite things often decorate the living room, office, and nursery.

Nowadays, wall shelves in the form of:
- Labyrinth;
- Asymmetries;
- Upside-down book shelves;
- Modules;
- Forged structures in Provencal style.
Some shelves seem to continue the furniture, some are like protrusions on wallpaper, so they are disguised as a wall. There are fancy shelves that are made to order; they often echo the pattern of curtains or the pattern of parquet.
DIY bookshelf (video)
Conclusion
Shelves for the kitchen, living room, or nursery - you can make all of them yourself, armed with ideas from the Internet and your own imagination. Of course, such designs will outperform their store-bought counterparts due to their hand-made origin. And in monetary terms they can be cheaper.
Examples of shelves for the home with your own hands (photo)


Homemade kitchen furniture will never go out of fashion, these stylish interior items can be found in the apartments of different people social groups. Sometimes owners start small, first making shelves for the kitchen with their own hands, gradually moving on to more complex projects and drawings.
Description of the finished product
The kitchen is a kind of heart of any home; magic happens here - delicious and healthy food, this is where guests are invited and where you can relax from adversity working day over a cup of aromatic tea. Therefore, the kitchen, as a room with wide functionality, is subject to high comfort requirements.
When sitting down in a corner, many household members no longer want to have to stand up for the TV remote control or glasses; all these items that are necessary every day should be in close proximity to the resting place.
A kitchen shelf is needed not only next to a corner or sofa; when preparing food, the housewife also needs the convenience of arranging the necessary seasonings, utensils and other essentials. In order not to go to the other end of the kitchen to buy hot peppers for kharcho, it is much more convenient to place jars of seasonings next to the hob.

Do-it-yourself kitchen shelves or ready-made ones from the store must meet the same requirements:
- harmony with color scheme walls, floor and ceiling;
- comfortable shape;
- comfortable operation;
- safe materials for manufacturing.
Sometimes, when purchasing finished products in a store, consumers make typical mistakes:
- A shelf purchased for a kitchen looks like a foreign object in the overall interior of the room (it stands out strongly due to its external characteristics - finish, color, size, etc.);
- The purchased design does not correspond to its purpose: they begin to place wet dishes on a heavy shelf for flowers, as a result the shelf begins to crumble and quickly fails;
- The abundance of brackets and shiny fasteners in a kitchen of calm pastel colors without bright spots will cause discomfort to the viewer.
Design issue
You should start making DIY kitchen shelves only after carefully planning the details. Product design is an important issue in drawing up a project drawing. Moreover, the concept of design in this case is understood as a combination of all factors: a set of functions, appearance and decorative design.

Before you start making a shelf for your kitchen or purchasing it from a furniture store, designers recommend studying a few rules:
- A kitchen decorated in hi-tech style does not tolerate maximalism and pretentious items. Shelves should be neat, laconic in shape and neutral color. This style allows the use LED backlight furniture, and the most popular materials are plastic, metal and glass;
- Kitchen Scandinavian style can be decorated with shelves made of solid wood, light chipboard with all kinds of drawers for vegetables and trays for small items. Furniture made from logs or turned wood looks great in this interior. sea water wood;
- Country, classic or Provence style kitchens allow the installation of light shelves with decorative finishing. It is worth noting that decoration can be both carved wooden elements and objects artistic forging. Furniture pieces with carvings made from artificially aged wood look especially stylish in the above-mentioned interior styles;
- A DIY shelf for a modern kitchen is most often made of glass and has several metal or plastic inserts.
Modern designers allow the use of shelves for wine bottles and shelves with lattice sectors in the kitchen space. And corner models of kitchen shelves allow you to save usable area premises and perform all the same functions as traditional upright products.
Nuances of furniture construction
How to make a shelf for the kitchen with little experience and minimal knowledge of carpentry? The most simple model It has rectangular shape and wood or chipboard is used for its production. Important point– the thickness of the material should hold the objects that are planned to be placed on this shelf. Example: for arranging jars of spices, it is enough small item interior, while bottles with oil or vinegar require a different design.

When planning the height of the kitchen shelf, the choice is made in one of two directions:
- All household members can reach the placed items;
- Dangerous seasonings should not be reached by small children.
In small kitchens, shelves can serve as racks on which all kitchen utensils, food supplies and useful devices are compactly placed. When placing several rows of shelves, it is important to use the space so that these interior items protruding from the wall do not obscure each other and do not interfere with the comfortable atmosphere in the kitchen.
A DIY kitchen shelf can have a variety of fasteners, the difference lies in the materials used, the expected load level and the design of the products. The determining factor is the raw material for the production of fastenings.
All designs used in the kitchen interior are divided into the following types:
- floor;
- retractable;
- mounted
Set of tools for work

Kitchen shelves can be made from natural wood or light chipboards. Simple work is possible even for a schoolchild who likes to make furniture with his own hands. To implement the plan you will need the following set of materials and tools:
- raw materials: wooden boxes, wooden boards or chipboard;
- electric jigsaw;
- pencil with ruler;
- hammer;
- screwdriver, screwdriver (optional);
- hammer drill for drilling holes for fastening;
- brackets, consoles;
- sandpaper of varying degrees of grain for sanding;
- alkyd-based varnish (moisture-resistant);
- stain and brush (if necessary).

As for the shape of kitchen shelves, they can be anything: round, triangular or rectangular. To make shaped products you will need a compass. Wood itself is afraid of excessive humidity, and the kitchen microclimate can be called aggressive towards furniture made from this material. Therefore, great attention should be paid to protective manipulations: applying impregnating compounds, coating shelves with varnish, gluing special edging tapes and other measures.
Important: the size of the kitchen shelves themselves must be consistent with the parameters of the kitchen: small rooms are heavily overloaded with bulky furniture.
Using drywall
You can make kitchen shelves yourself from plasterboard, but ready-made structures can only be used to place light and dry household items and food supplies. Place plasterboard shelves must be kept away from sources of water and steam: multicookers, steamers, sinks, hob etc.

Most often, plasterboard shelves are decorative in nature, because gypsum is very hygroscopic and fragile. To slightly increase strength, the master strengthens it with metal profile(fixed on the back of the product). On the finished structure it will be possible to place interesting figurines, sets of spices, music speakers, etc. Neat plasterboard shelves can decorate any interior, but look especially good in a romantic interior.
To make shelves from plasterboard material, you will need the following tool and set of consumables:
- the drywall itself in sheets;
- metal profile;
- mounting foam for filling joints;
- metal screws, gypsum-wood screws;
- corner for fastening;
- putty;
- decorating materials: wallpaper, paint, mosaic, fabric, etc.

An interesting solution in the kitchen interior is the placement of decorative shelves in several rows; on them you can tastefully arrange collectible dishes or souvenirs from travels around the world.
Important: the play of colors when attaching decorative shelves looks original - rough wooden structures fixed with bright blue or black brackets.
Pull-out shelves and bottle holders
The most popular type of kitchen shelves among housewives can be called retractable structures. The popularity of such interior items can be explained simply: minimalism came into fashion more than 3 years ago, the trend continues to this day with minor innovations (notes of eco-style, for example).
Pull-out mechanisms facilitate the operation of shelves and allow ergonomic use work area in the kitchen. With such shelves everyone square centimeter kitchen area used as efficiently as possible.

Pull-out shelves are divided into several types:
- panels designed for storing lids;
- bread bins;
- food baskets;
- bottle holders;
- other designs with a retractable mechanism.
Standing apart from other types of retractable shelves are bottle holders, which are often made by wine lovers and collectors. Any sommelier will confirm that the storage conditions of wine directly affect its taste characteristics. Placing bottles in a vertically inverted position prevents oxygen from reaching the drink, which allows the wine to retain its original taste and aroma.
How to make a corner kitchen shelf
Before deciding how to hang shelves in the kitchen, you need to carefully consider the layout of the room. Corner designs are the most popular and stylish products. These shelves conveniently accommodate dishes, spices, jars of tea, etc.
Material for creativity - scraps of laminated chipboards that remain after production kitchen set. By the way, these trims can be bought at a furniture workshop for little money.

In total, making a shelf requires no more than 7 hours and the following tools:
- Jigsaw;
- Sanding machine or set of sandpaper;
- Set of drills various sizes(for woodworking);
- Square;
- Tape measure, pencil and compass;
- Screwdriver or simple screwdriver;
- Hexagon (4 mm);
- Stationery knife;
- Iron.
Accessories can also be purchased at a furniture workshop: edge tape(11-12 m), 8 screws, 16 confirmations, 4 hanging hinges, 16 plugs.
First you need to draw a sketch of the product using paper or a computer. The result of the work should be a virtual shelf diagram consisting of the following elements:
- 2 shelves with a radius of 19 x 90 cm;
- 2 shelves, the radius of which is 19 x 110 cm;
- 2 racks 44 x 26.5 cm;
- 2 racks 60 x 26.5 cm.

The shelf is made as follows:
- First, the sidewalls are cut out, for which markings are applied to the surface of the chipboard. If you have clamps, you can cut 2 sidewalls at the same time;
- The internal stand does not have a protrusion on top, so it is smaller. All chips along the edges must be immediately treated with a grinder or sandpaper;
- The next stage is gluing the parts with thermal tape, which is ironed through cotton fabric hot iron. To carefully process the bends of the material from the inside, you only need to press the tip of the iron. The tape sold usually has a width slightly greater than the thickness of the end. Excess can be trimmed using a utility knife;
- After completing work with the racks, you can proceed to assembling the structure. The crossbars are rectangular pieces of chipboard of identical length. It is very important to select the parts so that the vertical stand does not stick out from the shelf itself;
- Lower and top rack attached to each other corner clamp, confirmations or square;
- After fixing the inner stand at a certain distance from the outer one, the entire product is firmly connected. The fastening points are masked with plugs, and the shelf is hung on the wall.
There is no need to talk in detail about how to hang shelves in the kitchen. The strength of the chipboard allows you to place dishes, jars and kitchen utensils on the finished structure.
Shelf for Handmade dishes will look more interesting in a country kitchen than store-bought ones. Especially in an interior made in country style. An attentive guest will always notice products that you have made yourself: both you are pleased and he is interested. Moreover, making a shelf for dishes is very simple. In this article we will talk about this in detail.
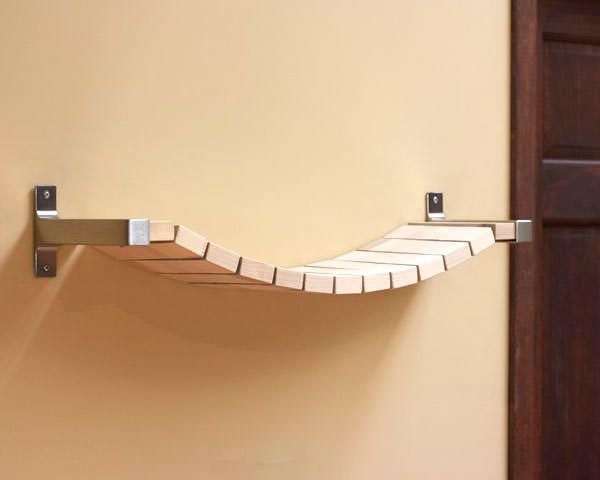
DISH SHELF LIKE YULIA VYSOTSKAYA
The idea to make a shelf for dishes was inspired by one photograph published in a magazine"7 days" . On it, the famous TV presenter Yulia Vysotskaya, who knows wonderful food, is depicted in her studio preparing another culinary masterpiece. Hanging on the wall in the background wooden shelf for dishes on which jars of spices stand.
![]()
Let's make a shelf from leftovers wooden planks that remained from production. You can choose any size, depending on where you hang it and what you will store on it. A 50 cm wide shelf for dishes is suitable for our kitchen., height 80 cm . It will have 4 horizontal shelves and 2 vertical racks.
MANUFACTURING A SHELF FOR DISHES
Let's proceed directly to production. Take a pine board 15 cm wide, 2 cm thick and cut 2 pieces of 80 cm each. Use a pencil to make markings on one board so that the horizontal shelves are located at a distance of 20, 25 and 30 cm from each other.. We will also draw 2 protrusions under wooden slats so that dishes do not fall off the shelf. Electric jigsaw Carefully saw off the excess along the drawn line. Now let's lean finished sample to another board and outline it with a pencil. Let's do a little jigsaw work again. We should have 2 identical racks of shelves for dishes.

By the way, it will be noted that working without a jigsaw dacha construction it would be much more difficult.

Let's go back to our dish shelf. After cutting out the two vertical posts, they need to be sanded well. To do this, on the corner grinding machine or, simply, a grinder, screw on a sanding plate and sand the racks with sandpaper number P120 or P180.

Now cut 4 pieces of 50 cm each.


Our dish rack will have a back wall. We will make it from clapboard. Let's cut several strips 80 cm longand connect them together.


Now let's decorate the dish shelf a little. To do this, take a wooden plank measuring 4 cm by 50 cm, draw a smooth half-circle line with a pencil and cut along it with a jigsaw. Using a metal crown, drill several holes with a drill and sand the plank with sandpaper.


To prevent the dishes from falling off the shelf, we attach 2 strips made of wooden fillets to the protrusions of the racks, which we previously cut out with a jigsaw. We will also nail them down.


We hang the shelf in the most visible place, put kitchen utensils on it and enjoy the work done. If you liked the article, share it on social networks.

Shelves are often used not only to complement and decorate the overall interior of the room, but also for a clearer and more expedient organization of space. Thanks to their use, the apartment owner has the opportunity to conveniently arrange a huge number of small things that would simply get lost in closets.
Today there are a lot of products on the market various models which are made from different materials. They also differ in design.

You can choose not only products with classic design, but also ultra-modern designs.

But more and more often people prefer to make such interior details themselves. Wondering how to make a shelf with their own hands, they re-read a lot of literature and look through many catalogs.

However, this does not mean that self-production The shelves are complex and it is beyond the capabilities of a person who does not have special skills. No, that's not true at all.

Familiarization with the literature in this case is necessary in order to create a product with beautiful design, which will fit into general interior. Let's take a closer look at what kind of shelves there are.
Types of shelves
Any specialist will tell you that before you start creating a product, you need to decide for yourself what kind of design you want to get and whether it will be combined with the interior. And only after that you can start creating the product.

After all, for a house decorated in a classically styled style, it is completely unacceptable to use trendy and modern shelves. They will look extremely ridiculous.


The most popular and widely known subtype of shelves is the classic shelf. This is due to the fact that it is quite easy to install, and the appearance, thanks to its simplicity, seems refined and sophisticated.
Both open and closed shelves are used successfully. Closed products are most often used for decoration and installation in rooms decorated in more modern styles. Glass and sometimes plastic are used to construct them.

Open structures can be used both in modernly decorated houses and in apartments with a classic design. Over the past few years, this particular type of shelf has gained enormous popularity and is therefore gradually replacing the classic options.

IN small rooms can be seen quite often corner shelves, which have a special method of fastening. They are mounted on adjacent walls, which are adjacent to each other. They are most often used in bathrooms, kitchens and utility rooms.

In addition to the above types of shelves that are mounted on the wall, there are suspended and floor-mounted structures. Hanging shelves are mounted in an unconventional way.

They are installed using cables and vertical racks, and attached directly to the ceiling. This mount looks quite unusual and original.

Floor structures are most often used in hallways. After all, hand-made floor shelves for shoes not only look beautiful, but also help you organize the space of a small hallway. At the same time, making them is quite simple.
How to make a simple shelf?
To create the claimed product, you should purchase or prepare some tools and materials in advance. As connecting elements, you can use whatever suits you best. But the most popular are ordinary screws, brackets and dowels.
Note!


For example, let's take a photo of the shelves with our own hands, which is presented below. It shows a product with the following parameters: width 250 mm, height 300 mm, length 1100 mm. For convenience, the manufacturing process will be divided into stages.
Stages of work
At the first stage, you need to complete the markup. To do this, you should lay the boards on a table or any other flat surface and transfer measurements from the drawings. The side walls must be exactly 268 mm high.

This marking is optimal because the side walls will be located between the two parts.

The second stage requires cutting the boards. To get smooth and neat cuts, you need to use a jigsaw. After cutting, you will end up with 2 fairly long pieces and 2 shorter ones.

At the third stage, you can begin processing the resulting workpieces. The resulting sections should be coated with a special protective varnish or stain, having previously sanded them.

Note!

If you only plan to paint the shelf, you can get by with treating it with a regular antiseptic primer. This way you will not only increase the service life, but also achieve a more uniform distribution of paint.

At the fourth stage of making a wooden shelf with your own hands, you begin to directly assemble it. The bottom board should be laid on a flat surface. Step back 8 mm from the ends of the workpiece and draw two lines parallel to the cuts.
2 points should be marked on them with a distance of 5 cm from the edge. At the marked points it is necessary to drill holes for self-tapping screws. The same manipulations must be done with the second workpiece.

After this, you should install the side blanks on the lower section of the board and secure them. Once you are done with attaching the side panels, proceed to install the top panel and secure it.

At the fifth stage, you should attach the brackets to the ends of the side panels, and make several holes in the wall for the dowels. After this, screw in the screws so that they protrude by 5 mm. And now your shelf is ready.

You can make acoustic shelves in the same way, but you need to take into account the size of the equipment itself. Measurements should be taken carefully, because if you make a mistake, the work will have to start again.
Note!


DIY photo of shelves


The kitchen has long been no longer considered a simple room where you can only cook and eat. This space has become one of the main and most important in the house, since it is most often where guests are received, important meetings with old friends are organized, and so on.
In order to make this room even more functional and convenient, many want to use different elements furniture, for example, shelves for the kitchen, which could replace cabinets.
Many owners are familiar with the problem of lack of kitchen space, but it is necessary to mark out so many things, utensils and little things that you simply cannot do without during the cooking process.

Pay attention to the article - this is exactly the area that is typical for large quantity apartments with small kitchens.
Types of shelves
The kitchen is a place where there should be many different drawers and shelves. Only in this room can you cover the entire wall with shelves to accommodate everything you need. Today, similar products of various configurations are produced from various materials, differing in size, color, texture, and so on.

Structurally, shelves can be classified according to the following criteria:
- corner;
- console;
- asymmetrical;
- vertical;
- open;
- with built-in light and drawers;
- covered with glass;
- having a regular fastening or hidden from view.

The most optimal are open shelves, which look great in the kitchen space and are easy to hang on the wall.
Open shelves: wood, glass or metal?
Basically, jars of cereals and spices, bottles of oil, and nice trinkets for decoration are placed on such easily accessible structures. However, they can also be used to place pots of live indoor plants, candlesticks, other decorative elements.

Convenience also speaks in favor of these models. open shelves, since it is much more comfortable to reach out and take what you need in an instant than to open a drawer in the table and look for the things you need.
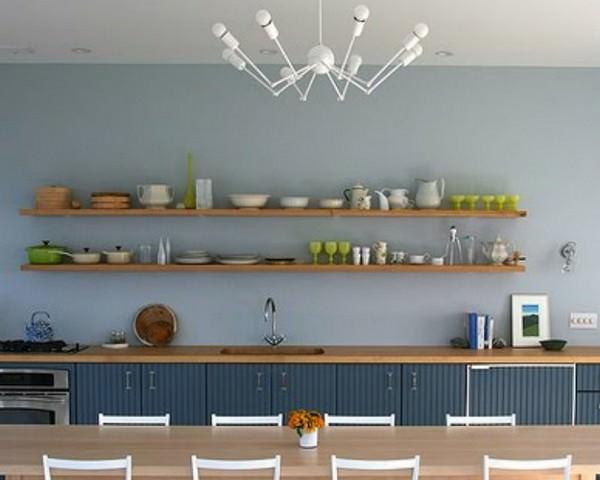
Wooden shelves for the kitchen
Hanging shelves are usually made of wood, since the material is practical and durable, and also does not require special care. Such products look especially impressive in a kitchen decorated in classic, country or Provence styles.

Wood shelves can look like regular strips of solid wood or be decorated with painted or carved designs. Glass or chrome inserts will give them special style, fits perfectly into a high-tech or modern interior.

As for the coloring of the shelves, in this matter everything will depend on the holistic picture of the design of the space. When the kitchen is decorated in white, it is attractive bright accents Products may become a juicy green or red shade. When it is impossible to choose in a store suitable option by color, then this problem can be solved in another way. For example, take chipboard boards, fasteners, a little paint, a little work, patience - the dream will come true.

Often in the interior of a small kitchen, shelves become the center design design common space. If one of the walls is filled with shelves and decorated with interesting things, then even an ordinary kitchen - sink, stove, table and chairs will become a real decoration.

Glass and metal shelves for the kitchen
In addition to using wood to make shelves, you can use other materials - glass or metal. Metal models will give kitchen space laconicism and thoroughness, glass will add elegance and modernity. If you have experience or desire, you can make glass shelves yourself.

For this job you will need the following items:
- drill;
- self-tapping screws;
- glass;
- holders;
- pencil.

First, a shelf template is drawn. To do this, select the size finished product. Make the dimensions of the corner to which you will have to attach it. When the shelf is made taking into account accurate measurements, it will be able to fit perfectly against the wall. The template should resemble a pentagon shape. The only difference between the manufactured shelves can be in length.

Using the template you made, cut out glass shelves. This is not an easy task at home. It is best to contact specialists. This will allow you to get shelf edges that are aesthetically pleasing and professional. The corners of the product should be rounded. The thickness of the glass must be at least 5 mm.

Next, you should attach the glass shelves to the wall. For this purpose, you can use ready-made structures. The bottom shelf is fixed first. On the surface of the wall, mark a point under it, applying the holder along with the glass. Mark the location of the hole with a pencil, then drill it into the wall and install the dowel. The shelf is attached with a holder, and then clamped with a screw, leveled, and then screwed to the wall.


