The idea of creating a homemade jigsaw is most often due to the disadvantages that factory hand tools have. You can make a small one with your own hands table machine, which will include a pusher, a reciprocating motor, and a saw tension system. In this case, you do not need complex drawings - once you understand the essence, it is easy to achieve the result.
The desire to create a homemade jigsaw may arise for several reasons:
- There is no power supply in the workshop, but it is possible to use the engines internal combustion low power.
- There are pneumatic motors, but the compressor power is not enough for a serial tool.
- The electric motor is powered by batteries or solar panels; the power of the source is not enough to use a power tool.
- It is required to obtain saw motion parameters that are unattainable using a commercial tool.
Designing a jigsaw is not difficult. A typical structure looks like this:
The installation is easy to adapt to any torque source. A pair of pulleys (one is located on the engine shaft, the other drives the crank mechanism) allows you to vary the gear ratio, reducing the load on the power unit and allowing you to get the required speed (they are also responsible for the number of saw strokes per minute) on the actuator.
A machine built according to the above diagram may have the most different configuration, the material of manufacture is also selected individually. Example ready installation looks like this:

Disadvantages of a manual jigsaw
The manual jigsaw is designed for shaping straight cuts. In this case, as the rollers, rod, and pusher wear out, the saw may wobble, deviate from a straight line, and change the angle of attack. Regardless of the quality of the tool components, the following features are always present:
- When the saw becomes dull, deviation from a straight line is observed when cutting material of uneven density (for example, low-quality chipboard). The saw is capable of leaving the cutting line when it encounters a knot in the wood.
- When trying to make a curved radius cut, you can observe the following picture: the upper cutting line, which the worker follows, follows an exact trajectory, the lower one deviates, goes to the side, the radius becomes larger. The higher the wear of the tool and the lower the sharpness of the saw, the more pronounced this phenomenon is.
- Some materials cannot be worked using a pick-up or bottom feed of the saw. The carpenter is required to move the tool forward extremely evenly, which is impossible to do very accurately; as a result, the saw runs out along the entry and exit path.
It is even more difficult to work with thin ones intended for figured cuts saws. Without practice, it is very difficult to achieve a good result, especially on thick slabs or wood materials. Let's look at how you can make a carpenter's job easier and the result better.
Standard solutions
The machine is made from a manual jigsaw based simple table . This device is common and mass-produced; samples can be seen in the photographs below.


The mechanics of work are simple:
- The jigsaw clearly fixes the tool, ensuring that there is no influence of the human factor (the hand can move the jigsaw unevenly).
- The presence of a support allows you to move the device without deviations along the trajectory.
With the help of a table, jigsaws begin to cut in a straight line, but the capabilities of such a device are limited. If you remove the side fence and try to guide the workpiece, forming a curved cut, the same problems of saw deflection arise. The problem can be solved by using a simple saw, rigidly fixed with a pair of rollers. Making curved cuts is now convenient and fast. What homemade and industrial products look like of this type shown in the following photos.


Tension devices for curved cuts
To perform very thin and precise shaped cuts, you can make a machine from a jigsaw with a saw blade tension system. The idea of creating it yourself is as follows:
- A very thin saw is used, ideally for a hand jigsaw.
- A clamp is attached to the rod of the power tool, which will tighten the cutting blade.
- The trajectory stabilization system will regulate both one freedom of movement and two (horizontal and vertical).
Used as a tension block hand jigsaw clamp, to which an adapter is made, which in turn is inserted into clamping fixture power tool rod. To ensure adjustment of one freedom of movement, a pair of angles and a bolt are used. The result of the implementation of the idea is presented in the following photo.

The saw provides clearly vertical movement, good tension can be created, but there is a mandatory runout in the horizontal direction. The canvas comes with a pick-up and does not move in a straight line.
The development of this idea is in the next photo. Here the part that fixes the trajectory moves, and the metal clamp provides structural rigidity and mechanical resistance.

The system is stabilized in two degrees of freedom, the cut made with its help is neat and precise. By using a diamond-coated cord for a hand jigsaw, you can cut glass without creating messy chips on the edges.
Accessories for extremely delicate work
If you need to act extremely delicately and slowly, you will need to reduce the force by cutting blade and at the same time ensure strong tension and precise movement of the file. For this, a homemade jigsaw is equipped with spacer devices with long shoulders.
In this case, the power tool does not operate in the cutting zone, but at some distance. This allows, depending on the wishes of the carpenter, to regulate the force, speed and amplitude of movement of the saw. One of the options for implementing the idea is shown in the following photo.

Depending on the needs of the master, the structure can be made of steel, have additional fixing zones, and the power tool cannot be installed rigidly, but with the ability to move within its support beam.
In practice, such solutions are rarely used. For delicate work that is performed constantly, it is much more profitable to purchase a specialized band saw, which will ensure quality and productivity.
As can be seen from the presented designs, a jigsaw can even be made from sewing machine having a moving rod.
In life home handyman, periodically there is a need to make figured and simply decorative cuts, including inside the workpiece. Gasoline, circular and regular hand saws they cannot cope with this task, due to their design features. To solve this problem use manual jigsaw, specially designed to perform such operations. This tool undoubtedly copes with its task, but when working with large volumes or dimensional materials, it definitely loses to its more professional brother - the jigsaw machine.
Buy something brand new, shiny and functional. table jigsaw It's absolutely no problem. Store shelves are filled with products from various manufacturers aimed at professional and amateur work. At first glance, the stationary jigsaws on sale seem to be very complex in terms of design, the assembly of which is carried out only by selected expert technicians. In fact, this is quite simple devices that you can do yourself if you have the desire and step by step instructions. And if the first point depends only on you, with the second we will definitely help and provide detailed guide By self-assembly homemade jigsaw machine.
Scope of application
Special design and thin saw blade, do tabletop jigsaw machine a unique device, indispensable when performing certain types tasks. This device has gained the greatest popularity in the woodworking industry. It is often used in fine works for the production of jewelry, souvenirs, musical instruments and furniture.One of the main features for which the wood jigsaw is so valued is the ability to carry out internal cuts on the workpiece without damaging its contour. Not the least role in usefulness of this device plays a role in the convenience of its use when both hands of the operator are free and can the best way control the position of the product on work surface. To everything else, it is worth adding the accuracy of the resulting cutting line, as well as the ability to work with plastic and metal. All of the above advantages make a tabletop jigsaw the best tool for sawing decorative elements.
The working principle of a jigsaw machine
To form the clearest possible picture of the structure of a tabletop jigsaw, you need to understand what it consists of. Next, we will list all the design elements of an elementary apparatus of this type, without additional functionality (removing sawdust, speed control, tilting the working surface and other gadgets). So, a stationary jigsaw consists of the following components:- Stable base
- Electric motor
- Crank assembly
- Desktop
- Upper and lower arm
- File clamping device
The whole process originates from the motor, which transmits rotation to the crank mechanism, which converts the circular motion into reciprocating motion. The connecting rod, which is part of the mechanism, transfers movement to the lower arm, causing it to move up and down. The entire structure described above is located under the desktop. The upper lever is located above the table surface and is connected to the lower spring, which serves as a saw blade tensioner. At the ends of both levers opposite to the spring there is a clamp where a saw is installed to cut the workpiece.
For greater clarity of the entire process described above, we present next drawing jigsaw with saw blade tension regulator function. Although this feature is one of the main ones, we did not present it in the description of the design of an elementary device, since it is possible to work without it.

Jigsaw machine from electric jigsaw
Not everyone has a need to regularly carry out decorative figured cuts. Often, to solve such problems, home craftsmen have enough ordinary manual electric jigsaw. Not everyone wants to purchase a bulky and rather expensive device for one-time use and further collection of dust. Still, in everyday life, sometimes there is a job that requires the most accurate and accurate cutting. In this case, you can assemble a fairly simple jigsaw machine with your own hands, using a minimal set of materials and a little imagination.
Today, there are many online variety of options executions of a tabletop jigsaw, varying degrees of complexity and efficiency. After reviewing dozens of products, we settled on the most interesting and at the same time simple assembly that meets the main requirements for cutting quality. Even a beginner who has the necessary tools at his disposal can assemble such a jigsaw machine from a manual jigsaw with his own hands. For assembly you will need:

- Chipboard sheet (3 pcs): 600x400x20 (length, width, height)
- Spring
- Profile pipe (1.5 m): 30x30x2 (length, width, thickness)
- Jigsaw
- Flat washers (4 pcs)
- Bolts for washers and connections
- Self-tapping screws for assembling the tabletop
Required tools:
- Welding machine
- Grinder with a metal disc
- Screwdriver
1.First of all, you should assemble the base of the future machine. To do this, take 3 prepared chipboard sheet or something else thick enough wood material and make a structure out of them that looks like the letter “p”. We fix it at the edges with self-tapping screws. For greater reliability and stability, you can make a back wall.


2. In the center of the surface of the assembled tabletop, we outline future holes for a file and several fasteners for a jigsaw. To do this, remove the sole from the jigsaw, apply it with the opposite (not flat) side to the future attachment point and make several points through the grooves of the sole. At this stage, it is necessary to maintain accuracy, since the jigsaw installed from below must have the most accurate, perpendicular location to the side edges of the table, in order to avoid distortion of the file during further work. We drill the marked points with a drill 3-4 mm, and the central one (for the file) by 10 mm. As in the photos below.


3. After fixing the jigsaw under the tabletop, we proceed to assembling the upper arm from square pipe, serving as a saw blade tensioner. As a fixed base, we cut off a part of the pipe, 300 mm long, and weld fixation elements (corners or ears) at one of the ends. The moving part should be slightly longer (about 45 cm). The connection of the two elements is carried out using a bolt with a nut and a U-shaped metal element welded to the end of the rack, as in the photo below.


A washer is welded to the end of the movable lever, which will be located directly on the file, which will serve as the upper fastening element.

4. Before installing the assembled tensioner structure to the surface of the table top, be sure to make sure that the end of the boom is located directly above the hole drilled for the file. If the top fastening moves too far to the side, the file will often break, complicating the cutting process. When the ideal location of the tensioner has been verified, we fasten the structure to the tabletop with bolts.

5. Since the jigsaw is not suitable for working with thin files, we make a simple adapter fastener for it. To do this, take an old saw blade, grind off the teeth with a grinder, cut them to 3-4 cm in length and weld a regular nut to the end, into which the saw blade will be clamped using a second nut and bolt.

When making such an adapter, pay attention Special attention to its length. If it is too large, the nut will hit the bottom of the tabletop, which may cause the tool to break.
6. When the file is clamped in both fasteners, all that remains is to tension it and start working. The implementation of such a function is simple. We attach the spring to the back of the movable lever using a bolt and nut, and fix the opposite part to the tabletop to the required length. Determining the tension is very easy. To do this, just run your finger along the file, like a guitar string. A high sound will indicate that the device is operational.

At this stage, the assembly of the elementary device is considered complete. To more clearly understand how to make a machine from a jigsaw, we recommend watching the following video.
Homemade jigsaw from a drill
A screwdriver and a drill are among the most common power tools in any household. These devices are quite powerful, have a wide range of applications and are sometimes even used as drives for various mechanisms. The author of the following manual on assembling a tabletop jigsaw with his own hands uses a drill as a motor.
The manufacturing process of a classic machine presented below does not require welding and cutting metal with a grinder, but at the same time perfectly demonstrates the principle of operation of such a device. The device is based on a simple crank mechanism, which can be made in a couple of minutes, having at your disposal a piece of plywood and a short steel rod with a diameter of 6 mm. Unfortunately, the author did not provide detailed drawing jigsaw machine, but answered many questions by editing a visual instruction video.


The entire assembly process includes quite a lot small parts, easy to understand and do not require additional comments. For this reason, we decided not to explain basic things in words, but to touch only on the basic details of the design. By tradition, we begin the instructions by listing the required materials.
- Wooden slats (2 pcs): 500x40x20 (length, width, thickness)
- Chipboard for base: 400x350x20
- Chipboard for work surface: 320x320x20
- Chipboard strips (2 pcs): 350x50x20
- Aluminum sheet: 400x400x1
- Drill (screwdriver)
- PVC pipes (4 pcs): 300 mm in length
- Self-tapping screws, bolts, washers and nuts
- Wood glue
- Steel rod, 6mm diameter (for crank assembly)
- Spring
Required tools:
- Screwdriver or drill
- Pliers
- Metal scissors
- Hammer

In place of the presented saw tension mechanism, you can install a small lanyard with a fixing nut. This way, the tensioning process will be more convenient and efficient.

The author uses steel wire as a file for survival in the forest. Of course, a perfectly even cut cannot be obtained with such an element, so at the ends of the upper and lower arms, you should make fastener. You can clamp the file between two washers, tightened with a screw and a pair of nuts.

For the most durable and convenient fixation of the crank, it is better to use a drill chuck with a key. If you have this element, you can quickly remove the drill or screwdriver when you need it in another place. You can just as easily tighten it back.

We hope that the presented manual was useful and clearly conveyed the principle of operation and manufacture of the device. More clear instructions on how to do it homemade jigsaw You can watch in the video below.
Save this page on your social media. network and return to it at a convenient time.
A jigsaw has long ceased to be a rarity and is present in the tool kit of almost any home craftsman. It is convenient and capable of cutting various materials, relatively safe. The jigsaw is designed for cutting curved shapes, closed or with complex configuration. It is indispensable when performing many works on home improvement, during construction plasterboard structures, boxes, on other works.
However, in some cases, working with a hand tool becomes difficult or inconvenient: poor visibility of the cut line interferes, it becomes necessary to hold the workpiece with both hands, etc. But the main problem with a manual jigsaw is that the file moves to the side, which is especially evident when cutting materials of great thickness and with small radii of curvature. In such cases, you need a jigsaw machine, which you can create with your own hands.
Purpose of the machine and operating principle
Figure 1 – Jigsaw machineA jigsaw machine is designed to perform curved or straight cuts of sheet materials along a pre-planned contour or along guides.
Unlike hand tools, where the file is attached only at one end and holds its shape solely due to its own elasticity, on jigsaw machines the file is attached at both ends.
Such a machine can become a woodworking, tabletop, saw, 4 in 1, made from a circular saw, drill and cutter, etc.
The main design elements are:
- frame with tensioned file;
- crank mechanism, providing reciprocating motion of the frame;
- work table and stand.
The jigsaw successfully replaces the crank mechanism, driving the frame with the saw. There are more simple designs, where the jigsaw is simply attached in an inverted position to the work table from below, and the file either holds its position during operation due to its own elasticity, or is fixed on top by guides or a spring-loaded bracket that moves with it during operation. This allows you to reduce power losses when transmitting movement to the frame, but requires the use of elongated saw blades, which are not often found on sale.
Advantage
The main advantage of a jigsaw machine is the ability to perform precise cuts without the file moving to the side. In addition, the advantages of jigsaw machines over hand tools are:
- more efficient visual control for the direction and accuracy of the cut;
- possibility of using guides;
- it becomes possible to install special templates that allow you to obtain many identical blanks;
- A narrower file is used to reduce the radius of curvature and cut out parts of more complex shapes.
Along with these advantages, another one appears - the need to organize a workplace for sawing disappears, since the machine has an appropriate plane for this.
Important! Along with the advantages, there are also obvious disadvantages - sawing becomes significantly more difficult or impossible internal parts, only trimming along the outer contour.
Basic design - drawings
There are ready-made platforms that allow you to quickly convert hand tools into machine tools. However, they are designed for jigsaws from a specific manufacturer and are not suitable for any device. In addition, the price of such platforms often far exceeds the cost of the tool itself. Therefore, it is much easier to make the machine yourself.
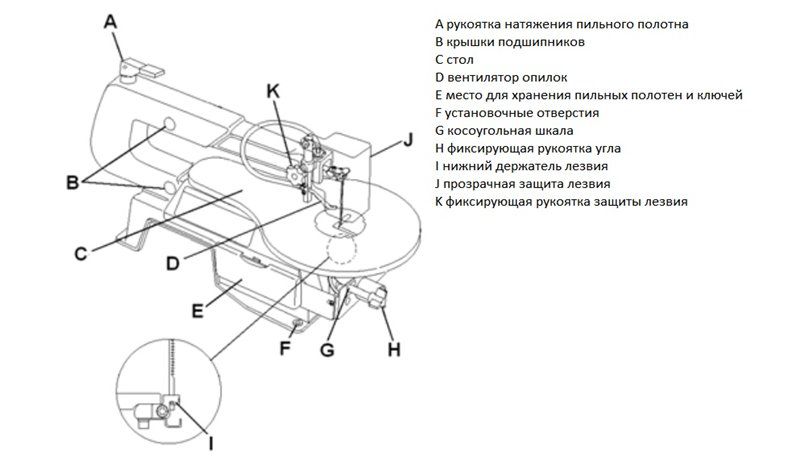 Figure 2- Design of a jigsaw machine
 The basis is the desktop.
It has been experimentally established that tables made of sheet metal- they are durable, ensure precision installation, do not require frequent replacement and do not reduce the working length of the file.
The jigsaw is attached to the table through holes in the support plane; if necessary, it can be easily detached and used in the usual way.
The work table is installed on the bed. It can be made of wood, chipboard or other materials. The main requirement is strength, easy access to the jigsaw and a size (height) convenient for the master.
A rocker arm is installed at the end of the table, on which the second end of the file is attached with tensioner. The simplest option is a regular spring, which tensions the file and prevents it from being pulled to the side when sudden changes cutting directions. The manufacture of this unit is one of the most difficult stages of work, since the quality and cleanliness of the sawing depends on it, as well as the amount of load on the mechanism and electric motor of the jigsaw.
There are two design options for the tensioner:
- Rigid rocker and spring block at its end with a movable saw attachment.
- A movable rocker with a spring at the opposite end and a rigid saw attachment.
Both options have their pros and cons; the choice is usually made in favor of the option that is the simplest and most accessible in terms of technical capabilities.
How to make a machine from a hand jigsaw?
Let's consider the procedure for making a jigsaw machine. The design consists of a work table with a jigsaw attached to the bottom. The rocker consists of a rigidly reinforced post with a movable spring-loaded lever. This option is considered affordable and reliable, devoid of unnecessary components and parts.
For simplicity and clarity, it is recommended to sketch out working drawings that will clarify some design features and answer questions regarding dimensions, connection points and other details of the assembly process.
The creation of a machine can be divided into three stages, which should be considered separately:
Preparatory stage
Before starting the actual manufacture of the machine, it is necessary to make some preparation. First of all, you should make a special adapter for installing the file. In most jigsaws, the seat end of the file is inserted into a socket and clamped with a screw.
The cutting element of the machine is a thinner and longer file with holes at the ends, which are placed on special pins (or through which mounting screws pass). Therefore, it is necessary to make an adapter, the lower part of which copies the shank of a standard file for this jigsaw, and the upper part is equipped with a hole for a screw with a nut, with which the adapter is connected to the bench saw.
Here the order of actions is not limited by anything - some grind the part the desired shape from a metal plate, others take a piece of a finished file with a shank and weld a steel washer to it, followed by processing for accuracy.
In addition, you need to prepare necessary tools and materials, including:
 Figure 3 – Drawing of a jigsaw machine
 - Bulgarian;
- electric drill with a set of drills;
- screwdriver;
- welding inverter with electrodes;
- pieces of chipboard or multi-layer plywood for desktop and bed;
- connecting corners;
- fasteners(self-tapping screws or bolts with nuts).
This list is not exhaustive; additional tools or materials may be needed.
Creating blanks
The first step will be to make a desktop. A piece of plywood or chipboard of the planned size is sawn off. There are no special restrictions here, but you will have to take into account the size of the room in which the machine will be placed. A table that is too small will be inconvenient for working with large parts, and too much table space will take up a lot of space in the room (or workshop).
As a rule, when choosing the size of the table, they are guided by the size of the parts that will be processed on the machine. Holes are made on the table for attaching a jigsaw and for a file. To do this, unscrew the sole from the tool, apply it to the table and mark the centers of the holes for the connecting bolts.
Important! The connecting bolts that secure the jigsaw to the work surface must have a countersunk head so that they do not protrude from the plane of the table and do not scratch the workpiece during operation.
 Figure 5 – Jigsaw beam
 The second step will be making the rocker arm. It will require two elements:
- rack;
- movable lever.
For the stand, take a profile pipe of rectangular cross-section and weld a support platform at the bottom.
Its size should ensure immobility, stability and reliability of the rack during operation under load.
The height should correspond to the length of the file in the maximum raised state, plus a small margin for the size of the attachment point.
The best option is that in the middle position of the saw, the movable lever is in a horizontal position.
The moving element is a beam mounted on a rack using a hinge joint. The length of the front part ensures that the saw blade attachment point is positioned exactly above the corresponding jigsaw element. The back of the lever is connected to a spring that provides tension.
Then you need to make a tension unit. It is a regular spring, which is tensioned using an adjusting screw. It is attached to one end of the spring, threaded through a special loop on the frame and tightened using a nut and washer.
Attention! Vibration can cause the tension nut to unwind, loosening the tension. It is recommended to secure it with a lock nut.
Assembly
The assembly process is not difficult. You need to do the following:
- Connect the work table and the bed.
- Install the jigsaw.
- Secure the stand with bolts.
- Install the lever.
- Attach the tension spring and secure on both sides.
If the calculations were performed correctly, the file will move exactly vertically without yawing to the sides. It is recommended that before starting the jigsaw, check its progress and make sure that no unforeseen situations are expected.
When working with a jigsaw, you should adhere to the following rules:
- do not put your hands near the moving saw;
- do not try to stop the saw or lever with your hands;
- change the cutting element only when the jigsaw is stopped;
- do not make much effort when feeding the workpiece to the cutting body;
- Do not work with workpieces that are too thick.
In addition, you should remember the rules fire safety and always unplug the tool from the socket after finishing work.
Self-production a jigsaw machine is not fundamentally difficult, however, not every craftsman needs it. As a rule, such devices are used by people who perform a large amount of work and need to create a optimal conditions. Everyone chooses the design features of the machine according to their own considerations and preferences, available options There are many. The quality and safety of the product directly depends on the degree of care and accuracy of assembly.
An electric jigsaw is a type of equipment for wood processing. Nowadays, the choice is presented not only in the usual manual version, but also in electric. These models, for example, Vario 502 dks, Dremel, have high performance, are quite easy to use, and are equipped with a large number of removable components.
These devices can be used both at home and in production. Today, such a mechanism can be bought ready-made or made with your own hands, for example, from an old sewing machine.
1 Technology of use
The main working element of a manual jigsaw is small files, which usually have a length of 50 to 120 mm. It is driven by an existing electric motor and makes translational movements vertically during processing of the product. In some mechanisms it works according to the pendulum type.
The workpiece itself in this design is attached directly to the base of the equipment. Such a fixation allows the worker to more easily operate the system and freely adjust the angle of the tool. Operator safety in this design is ensured by the presence of a special screen.

These models have appeared on mass sale in recent years. Previously they tried to make them for home use from a sewing machine. Today there is no need for this. The choice of models is very large.
1.1 Advantages and disadvantages of using jigsaws
TO strengths It is this technique that must be considered:
- Possibility of using the device for a wide range of woodworking thanks to a large number replaceable cloths.
- Greater reliability in use: due to the wide blade of such a mechanism, you can avoid breaking parts made of wood or tile during processing, as well as perform any complex contours with a minimum of effort.
- The ability to feed a piece of wood with both hands by attaching it to the blade. Previously, without such a device, working with samples manual type was much more complex.
- Ease of processing any kind of material – even relatively small ones the jigsaw can easily cope with wood 50 mm thick, not to mention more powerful models.
- Wide range of processing options.
Among the disadvantages of using such a device, the short stroke of the samples is usually noted, due to which the work with thick webs is significantly more complicated.

It is also impossible to make the bending radius as small as when using a manual sample (due to the peculiarities of fastening the file).
2 Scope of application of machines
Modern electric jigsaw machines are suitable for next works to choose from:
- Sawing out sheet stock complex contours.
- Processing the inner surface of the workpiece without violating its contour integrity.
- Finishing of some samples.
A tabletop jigsaw machine is used primarily for processing wooden blanks. It is most often used in the production of furniture and musical instruments. In recent years, they have also often begun to be used for the production of decorative items, as well as souvenirs.
2.1 Consumables
The main consumables that a tabletop jigsaw has are files, including spiral ones. They differ in length, size of teeth, distance between them and are selected for each material individually.
Usually, when setting up a jigsaw machine with your own hands and buying files for it, experts recommend focusing on the following features when choosing consumables:
- To cut wood or plywood workpieces, choose saw blades with a pitch of 2-4 mm.
- Metal samples, as well as plastic, are usually processed by choosing 1-2 mm files, including spiral ones. Experts who provide reviews on the use of such components recommend choosing models with a wavy edge. The choice of these is very large.
- When working with tiles, use special saw blades with an abrasive coating.
You can select these elements for processing wood and other materials not only based on reviews, but also based on technical characteristics the equipment you have chosen.

After all, almost every machine has a list of consumables, including all the files suitable for it for certain products.
Also, do not forget about additional elements such a design, which, for example, in the Dewalt, Dremel, Holzstar, Vario 502 dks models includes a drilling unit and an air pump. Their choice is great.
2.2 Design features of jigsaws
Currently, an electric jigsaw machine, in addition to those products that are created at home with your own hands, is presented on the market in huge quantities various products. Their choice is really wide, including models Dewalt, Holzstar, Vario 502 dks.
They are classified according to the following features:

In order to choose the right jigsaw, you need to It is already possible to analyze the device according to all parameters. And then you can get the ideal component to perform any task. You can also assemble a desktop jigsaw with your own hands, using general recommendations for the production of such devices.
It will not be difficult to do this yourself using a sewing machine or other similar mechanism. The main thing is to study the design well, select the necessary components and do everything to make the model reliable.
2.3 Electric jigsaw machine Enkor Corvette-87 (video)
Wood carving and sawing beautiful figures- an exciting activity. A person’s inclination towards this creativity manifests itself from early childhood and often remains throughout life. Everyone knows that this is difficult and rather painstaking work. It always requires not only special care, but also a lot of time. To eliminate this drawback and make your work easier, you need to automate the process. To do this, you just need to purchase a jigsaw in the store. However, such a device is not cheap on sale and not everyone can afford it. But this problem is easy to solve if you make a device for sawing and carving wood yourself.
For this you will need materials:
- drawings or diagrams;
- wooden blocks;
- short boards;
- pieces of old plywood;
- simple nails or screws.
Tools:
- medium sized hammer;
- regular hand saw;
- small plane;
- jigsaw;
- sharp axe.
Scheme or drawing
Before you begin assembly, you need to draw a diagram or make a drawing of the jigsaw yourself. With their own hands, rarely does anyone manage to complete a high-quality document on a good professional level, but it doesn't matter. You can always find a suitable drawing on the Internet and use it to assemble your jigsaw. Often for simple homemade device inventors use only a mini-circuit, simply drawn by hand. This is quite sufficient when you need to design a simple device for figured sawing made of plywood and wood.

Stationary option
There are often times when it is necessary to make perfect cuts in plywood or wood strictly vertically. This kind of work is simply impossible to do even with a factory jigsaw. A device that is always in your hand will produce deviations, and the edges of the slots will never be perfectly shaped. To make them straight and even, such work should be done only on a stationary machine, where the device for sawing in wood or plywood is firmly and securely fixed to the table surface.
To design a stationary jigsaw for figured cutting on plywood and wood, you must first prepare the material for building the table. It will provide a strong support for the machine and will also provide ease of use. All this is easy to make from wood. First you need to find suitable bars, mark them and make a table frame from them. After this, cut off identical boards, lay them on top and secure them with ordinary nails or screws. To ensure that the surface is sufficiently smooth, it is advisable to lay plywood on the table. It will not only make the surface smooth, but also create additional rigidity.

Next, you will need to install the unit itself for figure sawing from wooden blanks. Of course, you can make the entire mechanism out of plywood, but it will take too much time. The easiest way is to use a very simple method, where a standard factory device is installed to operate the saw - a jigsaw. To do this, you only need four small corners and a few screws. And then everything is done very simply: find the center of the table and drill hand drill hole through. Its diameter should be such that the factory file of a standard electric jigsaw can fit through it freely.
When a file is inserted into this hole and the entire device lies tightly on the table, you will need to draw a pencil around the duralumin support. Then use a jigsaw to cut a hole so that the body itself fits through it upside down, and its support bar sits tightly at table level. All that remains is to place small corners at the bottom and secure the platform with screws. At this point, the stationary jigsaw machine is considered built and you can safely begin work.
Sewing machine equipment
Today, many inventors successfully use modern methods, which differ good quality and precision in work. Particularly notable is the jigsaw machine using a band blade. However, despite the very high speed, not everyone can do it. For this reason, it is worth choosing a simpler method using an outdated sewing machine. Although her device has already served its useful life, it still needs to work homemade machine it won't affect. In addition, this is a fairly common and inexpensive option, where too much expense is not required.
For this homemade design machine you will need:

The construction of a table for a stationary jigsaw was discussed above, so we will not consider it further. But it is worth noting that a workbench can be perfect for these purposes. In addition, many old sewing machines already have a table-like design, as well as a mechanical drive. Therefore, here we will analyze only the main mechanisms that need to be changed.
Rework
Converting an old sewing machine into a tabletop jigsaw is not too difficult. First you will need to change the rear mechanical part where the needle is secured. To do this, it is necessary to file the shank from the side so that it fits freely into the clamp. standard canvas from a factory electric jigsaw. The hole in the bottom plate, which is intended for the needle, also needs to be enlarged. This is easy to do with a hand drill with a diameter slightly wider than the file.
Often the clamping foot on a sewing machine gets in the way when cutting thick plywood or wooden blocks. It is easy to remove by unscrewing the side locking bolt with your hands or a screwdriver. As the jigsaw works, sawdust will remain. They are easy to assemble if you place a small box underneath. But before that, you have to remove the shuttle along with the entire device that will interfere. Removing it is easy with just a small adjustable wrench or pliers.
Mechanical drive and motor
It is clear that turning such a machine by hand will be very difficult and inconvenient. Therefore, it is necessary to install an additional motor with a mechanical drive. Literally all samples sewing machines They have a pulley in their design. A motor is connected to it using a belt, which is turned on with your foot. If such a unit is not available, then it is not difficult to make it yourself. To do this, you just need to find an electric motor of suitable power. And then firmly attach it to the table using simple clamps - and you can actively get to work.


