A compact bathhouse 4x4 m is an excellent solution for a small area. Even in conditions of such a modest-sized design, you can quite successfully arrange all the necessary premises, resulting in a full-fledged, functional and comfortable bathhouse.


After reviewing the information below, you will learn about the most optimal options for the location of the internal premises of a 4x4 m bath, the choice of rational dimensions of each of them, and the features interior decoration, as well as additional related nuances.


Drawing up a project for any bathhouse, and a building measuring 4x4 m is no exception, begins with designating the location of the most important rooms of the building in question, i.e. steam room, wash room and dressing room.


Important! If a 4 by 4 bathhouse is built from logs (and this is the material most often used in the construction of structures of such modest size), keep in mind that the internal space will be somewhat smaller as a result compared to the external one. When performing calculations, subtract from inside of the logs used, the thickness of the log (in the case of felling “into the paw”), or add an additional 250 mm to this thickness (in the case of felling “into the bowl”). This will allow you to perform the required calculations as correctly as possible.
For example, if a bathhouse is built from logs 400 cm long and 24 cm in diameter, cut into a bowl, the internal dimensions of such a structure will not exceed 3x3 m. Consider these points in advance, wisely selecting the size of the logs and the cutting method, focusing on the desired internal dimensions baths


When drawing up a project, remember the following important nuances:


In the process of designing a compact bath, you need to take into account a number of additional important nuances:

The layout of the bathhouse can be supplemented with a terrace or porch, at the discretion of the owner. In general, there are usually no difficulties with designing the internal layout of a 4 by 4 bathhouse. You just need to first familiarize yourself with all the possible nuances of the work being performed so that you don’t have to redo anything in the future.
Bathhouse layout options 4x4 m
Basic information
The simplest version of a 4x4 m bathhouse is a structure consisting of one room, which simultaneously serves as a locker room/dressing room and steam room. An electric or conventional wood-burning stove is installed in the corner of the steam room. The room is equipped with 2-3 shelves 50-60 cm wide or more if free space allows. Along with this, this type of layout is extremely inconvenient, because it is much more comfortable when the bathhouse has both a washing room and a rest room. Moreover, in a space of 4x4 m it is quite possible to arrange them.


The standard layout includes a relaxation room, which simultaneously serves as a dressing room and dressing room, a steam room, and a washing room. The stove is usually installed in a steam room. As a result, the adjacent room (usually a relaxation room) is heated by heat emanating from the wall adjacent to the steam room.


If your budget allows, you can even build a small bathhouse with a 4x4 m attic. The first floor is reserved for a steam room and standard accompanying rooms, and on the second you can make a billiard room, an additional recreation room, or even a full bedroom.
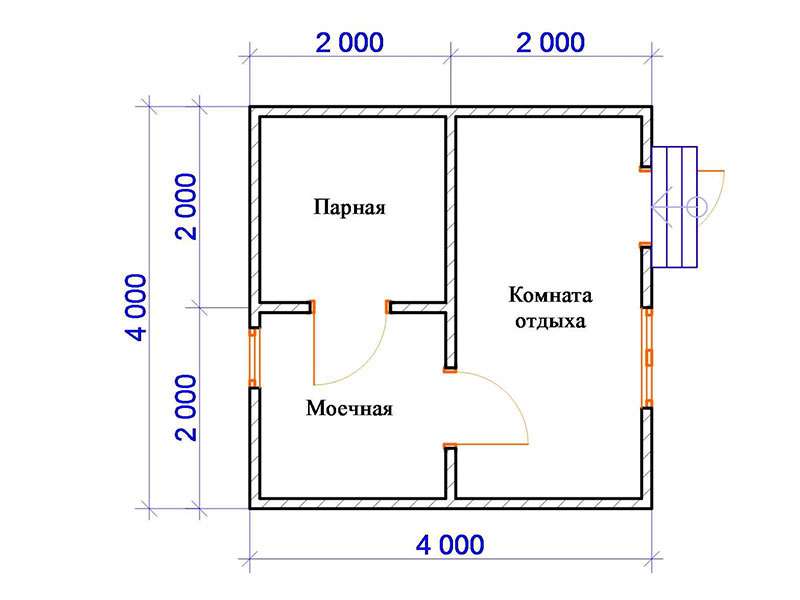
One of the most popular and successful options for the internal layout of a 4x4 m bath is shown in the following image.

The proposed project includes an attached terrace measuring 150x400 cm. There is enough space to install a compact table and chairs. In the warm season, you can while away the time here with a cup of tea or another drink after visiting the steam room.
The entrance leads to the dressing room. This room can simultaneously be used as a rest room, locker room, storage space for firewood and other accessories. The stove is installed in the steam room. The firebox door of the heating unit is located in the dressing room.


Installation of the furnace is carried out with mandatory compliance with the requirements against fire safety: the walls around are sheathed with refractory material, a sheet of metal 10 mm thick is laid in front of the furnace firebox.
Also very successful is the 4x4 m bathhouse project presented in the following image.


In accordance with the previous recommendation, the interior space here was first divided into 2 identical parts, one of which was eventually equipped as a spacious lounge. The other half was again divided in half, subsequently allocating one part to the steam room, the second to the washing room. In this project, the furnace is fired from the washing room.
If desired, you can install the stove against the wall of the steam room adjacent to the rest room so that the unit is fired from a large room. In these moments, the owner is guided by his personal preferences.
For comfortable operation of the steam room in the cold season, the project can be equipped with a small vestibule, as in the image below.


The area of the steam room's interior is determined in accordance with the expected number of visitors. In general, wash rooms in compact baths are in most cases made to a minimum size so that there is enough space to install a shower stall and, if necessary, a toilet. This option will allow you to allocate more free space in favor of the steam room.
Advantages and additional possibilities of 4x4 layout
Despite such modest dimensions, a space of 4x4 m is quite enough to arrange all the necessary premises:
- steam rooms;
- dressing room/rest room;
- washroom/bathroom;
- terraces/porches.
Having a covered terrace is a big advantage. Firstly, there is an additional equipped place for relaxation. Secondly, if there is a terrace, bad weather will not be able to spoil your visit to the bathhouse.


Along with this, if the space is limited to the strictly considered 4x4 m, in order to equip the terrace you will have to significantly reduce the dimensions of the internal rooms. In general, the owner will still have to sacrifice something in order to make the most efficient use of the available space, and what exactly is something everyone decides for themselves.


Interior dimensions
An important stage in drawing up the internal layout of any bathhouse is determining the optimal dimensions of each room, taking into account the available space. Calculations are usually carried out in accordance with the expected number of people who will simultaneously be in the room being equipped. For example, 1-2 people will be more or less comfortable in a steam room with an area of 3-6 m2, for 2-3 people you need to arrange a room of a larger size - on average 4-8 m2, etc.
The information given in the following table will allow you to quickly navigate and correctly determine the internal dimensions of each bath room.

As noted, the main rooms of any bathhouse are the steam room, wash room and dressing room, as can be seen in the following image.

Key information for each room listed is provided in the following table.
Table. Bath premises
PremisesBasic information
  |
If previously the dressing room was used primarily as a locker room, as well as a place for storing dry firewood and other bath accessories, now this room is often additionally equipped as a rest room. To do this, it is enough to place a table, chairs or a corner in the dressing room, as well as a TV and musical equipment, if space allows and there is a need for it. When calculating the area of the dressing room, be guided by the following rule: for 1 visitor at least 1.3 m2 of free space. At the same time, the mentioned 1.3 m2 does not include the space occupied by furniture and technical equipment. To ensure the required level of air exchange and overall greater comfort of use, an adjustable window is installed in the dressing room. Important! The door leading from the dressing room to the steam room is installed with the expectation of opening strictly in the direction of the first. |
  |
The key functions of this room are fully demonstrated by its name. For maximum ease of use, the washing machine is equipped with both cold and hot water supply. Water is heated using a furnace, electric water heater or other available methods. Design the washing room in such a way that each visitor is given free space of at least 1-1.2 m2. The equipment for the washing station is at the discretion of the owner. For example, you can get by with installing a regular shower tray, but it is much more comfortable to place a full-fledged shower stall in the washroom. |
  |
The design of the main bath room is carried out taking into account many important nuances and additional points, including: - dimensions of the furnace and features of its installation; - free space between heating unit and the objects closest to it; - approximate number of people visiting the steam room at the same time; - dimensions of shelves and their number, etc. If you follow current requirements, the steam room must be designed so that each visitor is given at least 1 m2 of free space if the person sits while in the bathhouse. The mentioned quadrature does not include the space occupied by the interior furnishings of the steam room, passages, etc. It is recommended to make the steam room at least 200-210 cm in height - this will ensure optimal heating performance and will allow every average visitor to comfortably use the bathhouse. Regarding the length and width of the steam room, everything depends on the specifics of the project. Along with this, it is necessary that either the length or width of the room exceeds 2 meters. |
The issue of designing shelves as one of the key elements of arranging a steam room deserves special attention.


So, if they are placed on shelves, their width should be from 90-100 cm, and their length should be at least 180-200 cm - such dimensions will be comfortable for most visitors with an average body constitution.
If the steam room space is not enough to arrange “lying” shelves, you will have to limit yourself to installing shelves for sitting. Recommended dimensions of such elements: length - in accordance with the size of the steam room, width - 40-50 cm.

 Plans for bathhouses with separate steam room and shower: a - bathhouse for 1-2 people with seated seating in the steam room

The lower shelves are traditionally made the narrowest - this part of the steam room is the least hot, which is why children usually sit below. Draw up a project with the expectation that there will ultimately be at least a 1-meter gap between the top shelf and the ceiling of the bathhouse. The recommended distance between the shelves themselves is 350-500 mm.


Plans for baths with a combined steam room and shower: a - for 1 person; b-for 2 people; c - for 3 people:
1 - steam room-shower; 2 - dressing room; 3-doors; 4 - shelves for sitting; 5-stand; 6 - oven; 7 - bench; 8 - shelf-bed; 9-bed; 10 - chair; 11 - table
If desired, the owner can change the recommended dimensions at his discretion. It is only necessary to control that, as a result, each visitor to the steam room feels comfortable in it and, at the same time, observes the basic safety regulations.
Possible configuration options for shelves in the steam room are presented in the following image.

Regarding the interior lighting of the steam room, there are only 2 recommendations:
manufacturing materials and design of lighting fixtures must be designed for use in a bathhouse;
the installation of lamps must be done so that there is enough light in the steam room and the light does not “hit” the eyes of the bathhouse visitors.
We design the interior decoration of a 4x4 m bath
In addition to the nuances of the internal arrangement of the bathhouse premises and their dimensions, special attention should be paid to the finishing of each room. Traditionally, natural and environmentally friendly materials are used in the interior design of a bathhouse, the favorite among which is wooden lining.
Materials for interior finishing works
Wood – natural material, meeting all basic sanitary and hygienic standards and requirements for issues interior design buildings and rooms with high humidity and temperature.


Wood, unlike various kinds of artificial “brothers”, does not emit components harmful to human health during the heating process. In addition, the natural material is characterized by excellent thermal properties, impressive durability and relatively low thermal expansion.


However, not every type of wood will “feel” equally good in a bathhouse. Since ancient times, Russian steam rooms were finished mainly using larch, cedar and linden. Among modern options Abashi wood is highly respected - lining made from this material is ideal for finishing bath rooms from the inside. Basic information regarding the materials mentioned is given in the following table.
Table. Properties of materials for finishing bath rooms
MaterialMaterial
 |
When heated, this material releases a number of different essential oils, under the influence of which the air around is saturated pleasant smell. In addition, the released essential oils have a beneficial effect on the human body. During operation, linden does not lose its original color, which makes it possible to think much less often about the need to repeat repair and finishing work in the bathhouse. |
  |
A material that is rapidly gaining popularity for the improvement of interior bath rooms. Tropical wood is characterized by minimal thermal conductivity and promotes effective heat retention in the bathhouse, almost without heating up during operation. The material has a visually pleasant yellowish tint and an almost uniform texture, making the finished finish look very beautiful. |
 |
The material “feels” great in the temperature and humidity conditions typical for a steam room. When heated, cedar wood releases pleasant aroma needles When choosing cedar lining, consider one very important point– low-quality material during operation may begin to intensively release resin, so it is recommended that finishing be carried out exclusively using high-quality boards designed specifically for the planned event. |
 |
Edged or tongue-and-groove boards made from hardwood are excellent for cladding ceilings. Coniferous species are not suitable for finishing floors - during the heating process, many of them release resin, the contact of which with the skin leads to burns. |
Walls in the steam room
The finishing of the steam room should be done using wood as much as possible. High Quality, because It is in this room that the most severe operating conditions are created.
Important! When covering the steam room with clapboard using nails, fastening must be done using the “sunk-in” method. The boards are not directly covered with anything after sheathing, because... When heated, any paint and varnish materials begin to release substances harmful to humans.
When designing the interior decoration of the steam room, be sure to provide for the installation of a high-quality thermal insulation layer - thanks to it, the heat will be retained inside the room for as long as possible, which will allow you to avoid excessive and inappropriate heating costs. Thermal insulation is usually installed in combination with hydro-vapor barrier materials, which ensure a longer service life of both insulation and finishing materials. If you wish, you can buy a combined material that combines the functions of insulation and vapor barrier, for example, based on mineral wool with a foil coating.


The cladding of the steam room is best done using hardwood. Favorites include abashi and linden. A more budget-friendly and quite good option is aspen.


Steam room floor
When designing a floor, you can give preference to a leaky or non-leaky wood structure, or a permanent concrete floor. Concrete floors are usually finished with tiles. The advantage of this option is a longer service life compared to wooden structures.

Boards require much more frequent repairs compared to concrete and tiles. If selected wood flooring, for its arrangement it is better to take an edged or tongue-and-groove board. The flooring elements are attached to pre-arranged timber joists. The floor design is traditionally made with a slight (usually 2 mm per 1 m) slope in the direction of the drain hole.
The decoration of the relaxation room is done at the discretion of the owner - here the temperature and humidity conditions are not as extreme as in the steam room, so the choice is limited mainly by the preferences of the owner, the available budget and the features of the project.
Wash room finishing
The walls in the washing room can be covered with clapboard made of larch, or any of the previously mentioned materials. The main requirement is that the finish must be as resistant to moisture as possible.

In view of the mentioned requirements, the most preferable finishing option for the washroom is softwood, for example, cedar or pine. These materials tolerate contact with moisture normally, maintaining key performance and aesthetic qualities for many years of service.
Video – Bathhouse 4 by 4 layout inside
Bathhouse 4 by 5: design and layout
Let's consider the option of building a bathhouse of the most popular size. Dimensions 4x5 are close to ideal. According to this, instructions for choosing a layout and building a bathhouse of this type will be of interest to many.
We prepare the project ourselves
Buy finished project baths, designed by specialists and navigating through them during construction is very convenient option. But not everyone can afford it, so you will have to develop everything yourself. The declared dimensions allow you to experiment a little with the arrangement of the rooms. It is even possible to create a separate room for the installation of a distribution panel and a small boiler room (if necessary). But this will require making partitions between the walls, which is often associated with increased financial costs.
When starting detailed modeling of rooms in a schematic drawing, it is necessary to consider the location of the following rooms and additional elements:
- dressing room with rest room;
- washing area and shower room;
- steam room and the location of the stove in it;
- installation of ventilation ducts and chimneys in the wall.
Room layout
In order to comfortably accommodate a large family in the bathhouse, the layout can be made by slightly adjusting the internal space. In this case, it is permissible to slightly increase the area of the steam room, thereby creating the opportunity for more people to steam in it. Do not greatly underestimate the dimensions of the rest room. Sacrifice a couple of squares of washing area. Then you can relax with a large group, take a steam bath, and take turns taking water procedures. 

How to arrange a dressing room?
This is a kind of air cushion between the cold outside and the warmth in washing department. Therefore, the procedure for insulating walls requires special attention. Its functionality should not be underestimated. The dressing room protects the premises from the cold and allows you to relax after the steam room. Perfect size in a bathhouse with dimensions of 4x5 - this is a meter wide and 3-3.5 in length. In this case, the entrance to the bathhouse can be made from one edge, separating the room itself with another door. Thus, cold air will not go into the break room.
 A stove heated from the dressing room will allow you to create additional coziness. In this case, the entrance to the washing compartment should be in the middle. The steam room and the room with the shower are located on different sides, while the steam room should be in contact with the rest room with one wall. Stove heating is installed in this side so that it can heat two rooms. In addition to the correct location of the dressing room and its interaction with other rooms, you must adhere to the following recommendations:
- Wall insulation must be double insulated to minimize any heat loss;
- necessary quality lighting not only artificially, it is also necessary to install a window;
- the location of benches for rest and clothes hangers is worked out separately.
Making a washing area
The layout allows the wash compartment to be relatively large. The placement of several watering cans is allowed, provided that direct access to water is used. There are also special requirements for the construction of this department. For example, the area is calculated based on 1 m/sq per person. A slight reduction in dimensions is allowed if it is necessary to redesign the premises. The optimal size for a bathhouse is 4x5 meters, would be a washing room with dimensions from 1.8 to 2 meters. In such an area you can place all the amenities, including benches for installing bath accessories.
In the washing department, ventilation is simply necessary. For large rooms, you can make two vents at the top of the walls or one full window. In some variants ventilation holes located at the bottom and top to ensure a constant flow of air throughout the room. This is more necessary to ventilate the wooden floor. If the surface is finished with ceramics, then natural ventilation is sufficient, without creating an additional inflow. 

Correct steam room design
The most important thing is the functional compartment in the bathhouse. There are increased requirements for the arrangement of a steam room. Considering that in a 4x5 meter bathhouse the steam room has a fairly spacious room, it is necessary to take care of a high temperature sufficient to carry out the appropriate procedures. Therefore, it is recommended to make a stove-heater, having first built a foundation in the intended location of the masonry.
The use of devices powered by electric heating elements is not always justified in economic terms, which affects high energy consumption rates. You can reduce the dependence of consumption by double thermal insulation of the paired compartment or additional installation steam generators.
The correct design of a paired compartment also includes the level of comfortable movement. The overall dimensions of the bathhouse allow you not to save on space, and in some cases you can sacrifice space in the washing room and relaxation room to create space in the steam room. In this regard, electric ovens will be more profitable. But for them you will have to lay electrical wiring separately. A heater is more profitable, but it takes up more space. It is necessary to find the best option. Because the room is designed for several people, there should be no discomfort due to lack of space.
 The shape of the steam room is a regular square or rectangle, depending on the location. In any case, it is necessary to work out the installation of the oven in such a way that it is located on the opposite side of the shelves. If the stove is heated from the dressing room, then according to the location, the paired seats are constructed in a different plane.
What will we build from?
Considering the use of all possible options material for the construction of a bathhouse 4x5 meters, it is difficult to give preference to any one type. Medium dimensions allow the construction of buildings on frame basis, but you will have to spend money on additional insulation and finishing. A brick bathhouse, provided it is laid with ceramic stone, does not require additional decor, but such buildings also do not have a high degree of thermal savings.
The most the best option there will be a frame assembly, but good tree It is not cheap and therefore will require additional finishing, both outside and inside. Treated wood eliminates this. High natural thermal insulation values make it possible to avoid the need for additional wall insulation. But for such privileges, you will have to pay an amount almost equal in cost to building a brick bathhouse.
Structural features
Despite the choice of material, a 4x5 bathhouse requires a reliable foundation. Whether it is a strip base or a pile version - they must be capital, made in accordance with all standard indicators. Preliminary soil reconnaissance is required to determine the depth of the foundation. Even the most reliable strip foundation poured with reinforcement in several layers, subject to passage at its level groundwater, will collapse in literally 2 years. 

Having given preference to laying a log frame from untreated wood, after erecting the walls under the roof, it is necessary to allow the structure to stand for at least six months. Shrinkage processes occurring during this period of time minimize minor flaws. Insulation work will be easier to carry out, and besides, after shrinkage, the risk of breaking door structures and window openings is minimal.
Particular attention is paid to insulation, because, unlike small bathhouses, a structure with dimensions of 4x5 will be more difficult to warm up if the walls, floor and ceiling are poorly insulated. Provided that in attic the rest room will be equipped, additionally insulate the rafter system. Heating inside the attic and temperature changes contribute to the accumulation of condensation, which can subsequently cause fungal deposits to appear on the wood.
The option of building a 4x5 bathhouse allows you to experiment with the layout of the premises. But this needs to be done thoughtfully so as not to harm the overall microclimate necessary to create comfort inside.
4 by 4 bathhouse project: layout
It is not always necessary to build on the site large bathhouse, if the territory is not very large, then it is quite possible to get by with smaller sizes. If you attach a small terrace to the bathhouse, then by installing a table and several chairs, it will be pleasant to relax on it.
The size of the dressing room allows you to put a wardrobe, a bench there and remove the fire door. It’s convenient to place a shelf nearby to store some firewood. Now it is easy to use as a relaxation room, since one of its walls is as much as 4 meters.
4 by 4 bathhouse projects made from logs or timber are truly high-quality buildings that combine efficiency and functionality. They are designed for a family with average income. In this case, options are possible: simple one-story ones, or with an attic and terrace.
Bath design


The first place any construction begins is the foundation. It is constructed depending on the type of soil. But the most suitable support-columnar one made of brick.
It is quite enough for such a relatively lightweight design. Excavation consist of preparing the construction site.
4x4 bathhouse projects are distinguished by the fact that, with a modest size, they will accommodate all the main rooms:
- Washing;
- Steam room;
If finances and the size of the plot allow, the bathhouse can be supplemented with a terrace. It will serve as an additional place to relax.
It is advisable to build a bathhouse near artificial or natural reservoirs, so that after the steam room it will be pleasant to plunge into cool water. Natural lakes or ponds must be located at least 30 meters away to avoid flooding.
Wash room


The best bathhouse is the one with all the walls made of wood - from logs or timber. They provide excellent thermal insulation, but at the same time allow air to pass through - natural air exchange occurs, regulating humidity.
There will always be a pleasant woody aroma in the room, which appears within a few minutes after the stove starts heating.
- A simple and durable ceiling for a washing room is a hemmed ceiling, when the surface is covered with clapboard. First, several layers of thermal insulation are laid on the ceiling beams, after which it is covered with boards from the attic side.
- A solid wall should be installed between the steam room and the washing room, and not a panel partition;
- The door from the steam room to the washing room should not have locks.
Note! The floor in the washing room must be dry and non-slippery. And no cold elements except water. The air temperature is higher than in the waiting room, but lower than in the steam room.
Steam room: features


Should I cover the steam room with clapboard? This question worries many who decide to build a bathhouse on their own. It all depends on what material was used for construction. The timber requires mandatory additional thermal insulation.
But with a log the situation is different; the diameter of the logs has a direct influence:
- 4 by 4 bathhouse projects made from 200 mm thick logs do not require cladding, they will retain heat well;
- 150 mm - insulation is done at will, if it is important to save additional centimeters of area, then you don’t have to sheathe it. But then the heating of the steam room will last longer, and the heat will remain for less time;
- 100 mm – clapboard cladding and insulation are required.
Shelves in the steam room should be placed at different levels to select an acceptable temperature. The price of arranging a steam room directly depends on its design - a regular rustic style will cost much less than a stylized one.
To decorate the steam room, only certain species of wood are used - linden, cedar and larch, but today this list has been expanded and aspen and abashi are allowed. They don't highlight harmful substances, keeping beneficial features for a long time.
Waiting room: features

It is advisable to do it in the dressing room big windows, but high from the floor, the higher the better. So that cold air does not drag across the floor. The vestibule must be insulated, otherwise the heat from the steam room will flow away faster. The interior of the dressing room needs to be organized taking into account the fact that you will have to undress in it, that is, you must install hangers or a closet.
There are certain requirements for the premises:
- No drafts;
- Good lighting; there is no need to make it too dim, like in a steam room. It is better if the light is natural;
- A sufficient area is required, at least 1.3 square meters. meters per person;
- If a stove firebox is installed in the dressing room, then the approach to it should not interfere with the rest of the vacationers moving around the bathhouse.


The finishing of the dressing room can be done in a classic style using hardwood - alder, linden or birch, but to save money, coniferous wood - spruce or pine - is allowed. Resin will not be released from them, since there is no elevated temperature.
The instructions for carrying out construction work recommend covering all bath rooms with impregnation. It will extend the service life.
Conclusion
The size of the bath does not affect its benefits. By properly planning the space, you can achieve its maximum functionality. The project plays in this matter main role- it contains all the information about what the bathhouse will be like, materials for construction and finishing, a clear interior plan (see also the article “Project of a 4 by 4 by 5 bathhouse - on “medium” sizes, as well as on the “middle” class, everything is holding together").
The video in this article will tell you in detail about the features of medium-sized baths.
Bathhouse projects made of 3x4 timber - drawing
For owners of small land plots you have to constantly resort to all sorts of inventions and tricks in order to compactly place all the necessary buildings, plantings and other elements on the existing territory.


Particularly relevant in such conditions is the issue of arranging a bathhouse. Even if there is very little space, with the right approach you can still build a full-fledged building with all the necessary premises: a steam room, a wash room and a dressing room. For example, an excellent option for a small area is a compact bathhouse made of 3x4 m timber: wood is known as a completely safe, environmentally friendly material for humans, and the construction of such a small structure, provided proper planning, will not require excessive effort and financial costs from the contractor.


After reading the information below, you will consider in detail the most successful design option for a bathhouse made of 3x4 m timber, you will be able to study the necessary accompanying drawings and, in general, you will receive a number of useful information regarding the competent design of compact buildings for such purposes.


Despite its more than modest dimensions, a bathhouse measuring 3x4 m has a number of advantages over buildings that are more impressive in size:

Bathhouse 3x4 m: basic information about the project
With a competent approach, even on a modest area of 3x4 m, you can accommodate all the necessary premises, making them, at the same time, spacious enough and comfortable to visit. The recommended dimensions are as follows:
- rest room (at the same time it will serve as a dressing room and dressing room) – 2x3 m;
- steam room – 2x2 m;
- washing room (you can also install a toilet here if necessary) – 1x2 m.
One of the typical versions of a three-dimensional model of a compact bathhouse made of 3x4 m timber is presented in the following image.

For greater ease of use, the project provides for the installation of windows in the washroom and rest room. For a rest room of such dimensions, a window measuring 70x70 cm is optimal. For a washing room, you can use a product of more modest dimensions - 50x50 cm. The presence of windows will allow you to further save on furnishings ventilation ducts. As a rule, natural air exchange is quite sufficient for rooms of such modest size. If desired, a window can be made directly in the steam room (a window of about 50x50 cm in size is enough, maybe a little smaller) - thanks to this, you can be comfortable in the room during daylight hours, without spending money on electric lighting.

 Installation wooden windows for dowels


The walls of the bathhouse are built from wooden beam. Both profiled and glued materials are suitable. The optimal dimensions for external walls are 15x15 cm or 10x15 cm.


Internal partitions are made of the same material with a cross-section of 10x15 cm. The recommended profile has a number of advantages:
- the bathhouse will be strong, warm and durable;
- moisture will not be able to penetrate between the rims, which will also have a positive effect on the service life of the bathhouse and the comfort of its operation for the user;
- the atmosphere in the bathhouse will be as pleasant and healthy as possible (coniferous timber is used for construction, which ensures the relevance of the above statement).
To keep the steam room warm, it is finished using foil or foil-coated material, due to which a significant part of the heat generated by the stove is reflected back into the room, allowing, among other things, additional savings on heating the bath.


The best option is insulation using mineral wool. thermal insulation material with foil layer. Among other things, the advantages of using this particular material include eliminating the need to install additional water vapor barrier layers.


The insulation is placed in the space between the timber and the sheathing material.

It is customary to use lining as a finishing material - this is the most rational option in terms of technical, operational, environmental and financial characteristics. In terms of price-quality ratio, the leader is aspen lining. If you have a sufficient budget, you can give preference to cladding made from other materials, for example, abashi.

The design of external walls and internal partitions represents a single frame, which guarantees maximum reliability, quality and durability of the finished building.
Helpful advice! If you have the desire and a sufficient budget, a 3x4 m bathhouse can be made with an attic floor. The extra space is perfect for arranging large room recreation, billiard room, bedroom or other room at the discretion of the owner. A variant of such a construction (top view) is presented in the following image.


It is most advisable to equip the structure on a columnar foundation - it is cheaper. If the soil characteristics on the site do not allow the use of “pillars”, a strip concrete base is poured. In general, other options can be used supporting structures, for example, a pile foundation or even monolithic slab– these points are determined individually, taking into account the characteristics of the area and the personal preferences of the owner.


The construction of the floors in a 3x4 m bathhouse is usually double - this solution allows you to install a thermal insulation layer (most often made of expanded clay), which guarantees a more comfortable visit to the bathhouse and rational consumption of energy resources.


Each owner chooses a stove for heating a bath at his own discretion. In a steam room of such modest size, the most appropriate option would be to install a standard metal heater or even install a modern electric unit. If desired, you can also build a brick oven, but this will significantly increase the final price of the project.

The most appropriate layout option for a 3x4 m bathhouse is shown in the following image. It is he who was taken as the basis for compiling this material.


If you wish, you can build your bathhouse in full accordance with the given drawing or make adjustments, for example:
- change the number, dimensions and location of internal premises;
- add additional elements (usually a porch or terrace/veranda);
- move internal partitions;
- change the installation location of windows, doors, stairs (if provided) at your discretion;
- remove elements of the architectural ensemble that you do not need.
Nuances of designing basic elements
As noted, the best option the base for a bath of this size is columnar foundation. The proposed project uses 9 blocks - one each in the corners of the structure and the intersections of walls and partitions, as well as additional block in the center of a long internal partition or external wall that does not have intersections with internal partitions. You can take as a basis next drawing, adapting it to the configuration of the bathhouse being built.


Walls
To build the walls of a 3x4 m bathhouse, a coniferous profiled beam measuring 15x10 cm is used. The thickness of the walls will be 10 cm. In regions with a cold climate, it is more advisable to build walls 15 cm thick - this will increase the final cost of the project, but in the future it will make it possible to save on heating the bathhouse. The technology for producing profiled timber eliminates the need for additional external finishing (the interior of the premises is covered with clapboard; in general, if desired, the owner can also perform external finishing).
First, the first crown is laid on top of the support pillars. The technology is shown in the following image.


Jute is placed between the crowns for additional compaction and insulation. Options for connecting timber in crowns are presented in the following images.


To fasten the crowns, you can use metal nails in the wood floor or wooden dowels. The necessary drawings and diagrams for drawing up the project are presented in the following images.


Recommendations regarding the design of insulation and finishing works have been given previously. If desired, instead of profiled timber, you can use its laminated veneer lumber - this point is at the discretion of the owner.
In accordance with the project under consideration, the bathhouse consists of 3 internal rooms: a relaxation room, a washroom and a steam room itself. If desired, the bathhouse can be redesigned by changing the length of the partitions and their location.
The material for the construction of internal partitions should be selected in accordance with the material of the main frame. So, if the external walls are built from profiled timber, you also need to use it to build internal partitions.


The optimal roofing structure for the structure in question is gable roof with hanging rafters at the base. One end of the rafter beam rests on the outer wall or floor beam. Elements of the rafter system are mounted in increments of no more than 120 cm. Optimally - 90-100 cm.
At the top joint, the rafter legs are fastened together using a plank or beam. To further strengthen the connection, a special wire is used. If the rafters are built from boards, the connection can be achieved using nails.
Supporting elements are constructed from boards up to 2 cm thick, depending on the chosen finishing roofing covering, i.e. expected loads. On the side of each slope, the rafters are additionally fastened with 30-40 mm boards installed diagonally.


To ensure subsequent fastening of the final roofing covering, a sheathing must be included in the design of the bathhouse - its elements are attached to the rafters. The choice of a specific lathing design (solid or sparse) is selected in accordance with the installation technology of the finishing coating used.
The sheathing is made of boards or timber. Most often, wooden blocks are first attached to the rafters, on top of which the plank flooring is laid.

When choosing the step of fastening the sheathing, you should focus on the features of the technology for laying the finishing roofing material. For example, if metal tiles are selected, the sheathing elements are installed in increments of about 350 mm. Counter batten slats are fixed on top of the sheathing (attached along the rafters, creating the required ventilation gap and ensuring the fixation of the underlying insulating film material), and the selected covering material is attached to them.
The final roofing covering is installed in the standard sequence:
- the coverage area and the required amount of material used are determined;
- the selected material is equipped in accordance with the technology relevant to it;
- installation of shaped elements is carried out;
- eaves overhangs are being installed;
- Snow guards are installed.
If arrangement is planned attic floor, its windows are installed on last stage the above technology.
The decision on choosing the finishing roofing material remains with the owner of the bathhouse being built. A summary of the most popular options is given in the following table.
The modern market offers a huge range of finishing roofing materials. Information about the finishes most often used when decorating a bathhouse is given in the following table.
Table. Roofing materials
MaterialDescription
  |
Flexible fibrous sheets made from cellulose fibers and bitumen impregnation. The material is widely popular in private construction, “bribing” mainly affordable price and fairly good performance characteristics. |
 |
Steel roofing sheets with a complex relief surface. Characterized by high strength, lateral stiffness, bearing capacity and durability. |
  |
It is famous for its excellent aesthetic indicators, practically not inferior to its natural (ceramic) counterpart, long service life and relatively affordable cost. The only disadvantage is the fact that the material makes quite a lot of noise when it rains. |
 |
Plastic, durable, resistant to deformation, beautiful and generally perfect for completing roofing work. |
Floors and ceilings
The ceilings, like the floor joists, are made of timber with a section of 15x10 cm. The recommended step for installing individual supporting elements– 90 cm. If desired, you can use timber measuring 15x5 cm, but in this case the logs will have to be attached in 60-centimeter increments.
A diagram of one of the most successful and frequently used floor design options is shown in the following image.

To insulate the floor, you can use expanded clay or mineral wool. The ceiling is predominantly insulated using mineral wool materials. To line the ceiling, wooden lining is used, preferably made of hardwood (resin will not drip from such material).
The floor in the bathhouse can be wooden or concrete. Wooden structures are further classified into leaking and non-leaking.
In the case of arranging a leaking wooden floor, the boards are mounted with some gap (usually about 3 mm). Water will flow into the gaps formed. The disadvantage of the design is the impossibility of installing a heat-insulating layer.


A leak-proof wooden structure is subject to insulation, but requires an approximately 2-degree slope in the direction of the drain hole.


For the construction of the subfloor, unedged boards 18 mm thick are traditionally used. The finishing flooring is laid from tongue-and-groove boards with a thickness of 26 mm or more.
The main advantage of a concrete structure compared to a wooden structure is its longer service life. In addition, in this case it becomes possible to install a floor heating system, thanks to which the bath will be warmer and generally more comfortable.
Standard diagrams for installing a concrete floor in a bathhouse are presented in the following images.


Windows and doors
The project proposes the installation of double-hung windows with double glazing. As noted, there are 2 windows: for the rest room (70x70 cm) and the wash room (50x50 cm). The location of windows, as well as their number, can change at the discretion of the owner.
For installation in interior spaces frame doors with lining in the form of lining are proposed. There are 3 internal doors in total: for the steam room, dressing room and wash room. At the owner's request, laminated or paneled doors can be installed.


 Installation of windows in the bathhouse
 Bake
The traditional solution is a regular stove-heater. The owner can either buy one of ready-made models, or make the oven yourself, having read the corresponding instructions. Several of the most successful types of sauna stoves are presented in the following images.

 Brick heater

The sauna stove is built/installed on its own foundation. The depth of the base is up to 50 cm in relation to the floor of the steam room or other room chosen for placing the stove. The foundation is traditionally laid out of rubble stone and filled with concrete. A layer of roofing material for waterproofing is laid on top of the hardened fill, and a row of bricks is placed on it. The stove itself is placed on top of the supporting brick row.


Important! For fire safety purposes, the floor in front of the firebox sauna stove need to be covered with a metal sheet with a thickness of 10 mm. The distance between flammable elements and heating parts of the sauna stove must be at least 300-500 mm.
Safe and efficient operation of a sauna stove is impossible without a chimney. As a basis for the project, you can use the drawing of the smoke exhaust system shown in the following image.


Materials for the construction of a bathhouse according to the considered project
Summarizing all of the above, we can draw up a table of the main construction and finishing materials required for the construction of a 3x4 m bathhouse made of timber. Their number, as well as a set of additional elements, is determined individually in accordance with the characteristics of a particular project.
Table. Materials for building a bathhouse
MaterialPurpose
Designing the work order
The procedure for constructing a bathhouse yourself is a topic for a separate discussion. For better orientation and understanding of the possibility of constructing the structure considered with your own hands, the table shows the standard sequence for performing this work.
Table. Sequence of bathhouse construction
Work stageImageAdditional information
  |
The necessary preparatory measures have been carried out in advance: - the site is cleared of debris; - the top fertile ball of soil is removed; - marking is being carried out. |
|
| The base is being waterproofed |   |
To do this, the upper planes of the pillars are coated with molten bitumen, on top of which roofing felt is laid and pressed. |
| Stacked lower crown timber |   |
|
| Walls are erected to the designed height |   |
Insulation, for example, jute, is placed between the crowns. |
| False ceiling being installed |  |
|
| The rafter system is being erected |   |
|
| A roofing pie is being made |  |
|
| Internal partitions are being erected |   |
|
| Openings for windows and doors are prepared and then installed |   |
|
| Logs are installed and a boardwalk is installed or a concrete floor is poured. |  |
You have familiarized yourself with the most successful project for a bathhouse made of 3x4 m timber and received the necessary information about the main stages of drawing up the project. The knowledge gained will help you independently plan the configuration of a future compact wooden structure or monitor the activities of third-party designers if you decide to use their services.
Good luck!
Video – Projects of bathhouses made of 3x4 timber - drawing
Optimal bath: what is it like?
desire to have own bathhouse visits many people on the site: it provides a unique opportunity to improve your health, relax and unwind after a hard day. And if the bathhouse is near your house or dacha, and you don’t need to go anywhere, this method of relaxation is generally priceless. But there are a lot of questions: where to put it, how to deploy it, how many and what kind of rooms there should be, what size and what kind of foundation to make, and a thousand others. For now, let's talk about the layout of the bathhouse on the site and inside.
Layout on the site
You need to start by choosing a place to build a bathhouse. In this case, you need to rely on data from a geological survey of the site: choose the best soils and the lowest location of groundwater. Then the foundation can be made inexpensively, and the bathhouse will stand well. Without such a survey of the site, you have to choose at random.


In this case, it is advisable to immediately exclude places where groundwater comes close. They can be seen at sunset. Inspect the area in the evening. If there are places where small midge curls in a column in one place - there is water close below. It’s good to dig a well here, but you can’t build a house or a bathhouse.
Having excluded all wet areas, you can try to fit the planned building in dry areas. There are also some restrictions here:
- the distance to the well should not be less than 5 meters;
- the distance to the nearest residential building is at least 8 meters;
- The toilet and compost pit should be located as far away as possible.
If your site overlooks the shore of a river or lake, it makes sense to put a bathhouse nearby: you can take a dip and not bother with building a pool. It will also be possible to organize a water supply from the reservoir, but in this case it will be necessary to fool around with the drainage so that the wastewater does not get there. So optimal location baths on the site are an individual matter.


Bathhouse layout inside
The most common layout of baths: entrance to the south, windows of the rest room to the west. The entrance is in the south because the snow melts here first and there are usually fewer snowdrifts. And windows are made in the western wall, because most often they steam in the afternoon and the setting sun illuminates the room.
But this is only the most common layout and nothing more. You can place both the entrance and the windows in the way that seems most convenient to you: maybe you have an amazingly beautiful landscape to the east, and to the west all that is visible is the wall of the neighbor’s barn. No one will stop you from doing as you see fit.
What rooms are needed in a bathhouse?
There are constant battles around how to properly take a steam bath. They also apply to the number and volume of premises. There are several approaches to this issue. Choose the one that is closest to you.
Tambour

This bathhouse layout has a small vestibule. It will not allow cold air to rush into the room
The first postulate is that when using a bathhouse all-season (and in winter too), there should be a vestibule at the entrance to the bathhouse. Otherwise, the rest room will quickly get cold: with each opening of the door, a portion of cold air will rush into it. There is no debate here. There are only a few options for organizing a vestibule: it is fenced off inside or attached outside.
If you only steam during the warm season, there is no need for a vestibule. In the summer, people often relax outside after a steam room: on the terrace or porch.
Sink and steam room: separately or together?
But there is a dispute about the composition of the premises that are needed in the bathhouse. Most people are of the opinion that the steam room and sink should be separate. But since the size of the baths is usually small, these two rooms turn out to be small. This is good for dry-air saunas: small volumes warm up quickly. In this case, a separate sink from the steam room is also necessary: the sauna must be dry. No more than 10% humidity. A large amount of steam at a temperature of 100°C or higher will burn the nasopharynx and bronchi. Therefore, if the bathhouse is dry-air, then the sink must be separate.

Some supporters of moderate temperatures and high humidity - a regime that is typical for a Russian bath - believe that a washing room and a steam room can and should be combined. There are several reasons for this:
- The first is that in a small steam room, when water is applied to the stones, the temperature and humidity conditions change sharply. There's nothing you can do about it: the volume is small, and the steam literally hits everyone who is in it. If it is possible to make the steam room larger, the issue is not so pressing.
- The second reason is physiological. In the steam room, the pores open. If it is much cooler in the washroom, they close again while you are in it. The next time you enter the steam room, you have to steam them again. If the “washing room” is a trestle bed located in the corner opposite from the shelves, then no “cooling” occurs.
In principle, the second problem can be solved: you need to maintain a fairly high temperature in the washing room, 35-40°C, and there is already enough humidity there. It will create an almost “hammam” atmosphere. Under such conditions, you can rest. To do this, trestle beds are made in the washing department, on which people rest in a warm, humid atmosphere after the steam room. Then the washing area should be large. And they go into the rest room only when they are no longer going to enter the steam room.

The second approach to vaping is different: after the body has warmed up, it needs to be cooled down. For this purpose, contrasting procedures are used - cool or cold showers, dousing, rubbing with snow, etc. That’s when a separate washing room with a cool atmosphere is needed. There are also fonts with cold or cool water here. With this approach, they stay in the steam room for quite a long time - 10-15 minutes, because they need to warm up again.
Ideally, you will need to visit both types of sauna to decide which is best for you. Whichever one will be better for you is the one worth building.
Now, let's summarize. The bathhouse can have two or three rooms. There may be a relaxation room, and separate rooms for a steam room and a washing room. In another option, there is a relaxation room, and the steam room and washing room are combined in one room.
Locker room
This room can be classified as optional, but it is desirable. It is much more convenient if all things are collected in one place. But even here questions and disagreements arise: where should the doors go. There are usually two options: to the rest room and to the washing room. Both options are imperfect.
If the entrance to the locker room is made from the rest room, then after undressing you will have to walk through this room. If there is no one else in the bathhouse, this is one thing, but if a campaign has gathered and someone is already resting, this is a completely different story.
The second option is preferable from this point of view: from the locker room you immediately go to the sink, and from there to the steam room. But then damp air from the sink will inevitably end up in the locker room. And damp air = wet clothes. It's still a pleasure. So you usually have to choose: walk through the rest room in a negligee or put on wet clothes after the bath.
But more often, they still make an entrance to the locker room from the washing room, and solve the problem of humidity with good ventilation: they make two channels, one at the bottom for the intake of fresh air, and the second at the top for the removal of damp air. Usually built into the top exhaust fan(for wet rooms). Like this in a couple, natural and forced ventilation cope with high humidity.
Dimensions of rooms in the bathhouse
In addition to the composition of the premises, it is necessary to determine the size. Since most often there are three rooms - the sink and the steam room are separate - we will describe approaches to choosing sizes for all three rooms.
Steam room layout
The main thing when planning a bath is to decide on optimal sizes steam rooms It’s clear that you want to save on construction costs and on wood for heating. But a room that is too small is completely uncomfortable: the sauna overheats quickly, and you feel like you’re in a cage.
It is most reasonable to proceed from how many people should fit in the steam room at one time. Moreover, the sizes also depend on the type of steam room. No one moves much in the dry air vehicle. Everyone sits decorously on the shelves: at this temperature you can’t move. Therefore, one meter is enough for one person to “sit”. To lie down, it’s already 2.2. So here it is. Decide how long a person can sit with you and how long can lie down. Then you calculate the area of the shelves, add space for the stove and a little for the passage to the shelves. You get the minimum dimensions of a steam room for a sauna.


In a Russian bathhouse, they mostly lie on the shelves. And also, the bathhouse attendant is waving brooms. Therefore, the dimensions here should be larger.
For a wet Russian steam room, the width and length are chosen so that two or three can lie comfortably - depending on how many people will be steaming at the same time. We calculate the area of the required shelves (80-100 cm wide for one, 2.2 to 2.5 m long), add the area for placing the stove, the screen around it, approaches and gaps, and we get the minimum volume of the steam room for a Russian bath. If the dimensions do not allow, leave one “lying” place, always a place where the bath attendant stands, and, if possible, at least a small shelf for “sitting”.
In general, the area in the steam room is used more rationally if it is not square, but rectangular. Moreover, the oven is usually located on long side. And also keep in mind that from the stove, even covered with a brick screen (for Russian baths it must be covered with a screen), there should be a distance of about 20-30 cm to the shelves, but more is better.


For information on choosing ceiling heights and doors, read the article « The height of the ceiling and shelves in the bathhouse and sauna ». Briefly, we can say the following: for a conditioned steam room (steam is mixed evenly throughout the entire volume) finished ceiling not lower than 2.10 m, and for pie (steam collects under the ceiling) not lower than 2.4 m.
Let's immediately talk about the height of the shelves - this is another stumbling block when designing a steam room. In general, each parameter is selected individually. If you customize the steam room “to suit you,” then the height of the shelf should be up to the knuckles of your lowered hand. Stand on the floor (on a grate or stool, if you have one), lower your hand down. Where your knuckles are is where the surface of the shelf should be.
If several tiers of shelves are planned, then the top one should not be closer to the ceiling than 115 cm. And one more thing: the second one is higher than the first - 45 cm: then you can not only lie on the top shelf, but also sit (if you want it “hotter” ).

You need to draw everything in size and it all should fit into the steam room in its “pure” form, taking into account the walls and insulation layer
But not everyone who will take a steam bath has the same height. That's why they make side steps. You can have several pieces of different heights for people of different heights: they lean on such a step when they need to climb onto shelves. The same steps are used by the bathhouse attendant: people have different waist circumferences, and sometimes even in a steam room that is tailored to suit you, you have to stand on a step to make it more comfortable.
One little advice: Make the steps wide. Firstly, if necessary, you can sit on them, and secondly, wide and low ones are more stable.
Sink dimensions
Here again, there are two approaches: either try to get by with the minimum - this is if the size of the bathhouse is limited, or plan it as convenient as possible, and put the resulting dimensions into the project. If we talk about the minimum, then you can get by with a small shower, above which you can also attach a shower device. In this case, a size of 1.5 * 1.5 meters will be sufficient. A little cramped, but not too tight.


For comfort and in case you relax in the steam room, you need to place trestle beds here. Then, probably, you need to fence off the shower stall separately - it’s 1.2 * 1.2 m (or more, if you want). And add one or two trestle beds (depending on the number of people steaming in one go). The size of the trestle beds may be similar to the shelves in the steam room, or slightly different. Here the dimensions are no longer critical. The main thing is to lie comfortably.
Some people put fonts in the washing room. Here you can’t get by with small dimensions, and the sizes of the font can be different - from one and a half meters in diameter and more.
Dimensions of the rest room
And again, two layout options even in baths of the same size. Some try to block off as much area as possible for the relaxation room, leaving a minimum for the steam room and washing area. This option is suitable if the bathhouse is something like a club. Then the main action is precisely the gatherings in the relaxation room. And the room stands out and is accordingly spacious.
But there are people who enjoy precisely the processes taking place in the steam room. And then the situation changes radically: the rest room is allocated minimum required: hanger, table, several benches/armchairs/chairs. All. But all other areas are allocated for the steam room.

Having decided on the size of all the rooms and their location, take the time to draw everything to scale. This can be done on a computer using programs or the old-fashioned way on checkered paper. Just draw large, and while maintaining proportions, taking into account the thickness of the walls and partitions, insulation and finishing. Then count the real areas that remain in “pure” form. Absolutely: a surprise awaits you. And unpleasant. All the piers and walls take up a lot of space. And in the remaining space you will need to “fit” all the items. There are especially many difficulties with the steam room. So be especially careful here. Most likely, the already completed bathhouse plan will have to be redrawn, and more than once.


Pay attention to the location of the doors. It is desirable that they be located as close as possible. Especially in walk-through rooms. It's all about the same utilitarianism: it's impossible to use all the passages. So they eat up a decent amount of space.
From a security point of view
It is also necessary to consider the layout of the premises in the bathhouse from a safety point of view. Therefore, it is advisable to make the path from the steam room to the street as simple and short as possible, without labyrinths. This is necessary in case someone becomes ill. How faster man If he can go out into the fresh air, so much the better. Therefore, some projects provide two doors in the steam room: one from the washing room - for regular use, the second - to the vestibule - for emergency situations.
In order to be able to evacuate as quickly as possible, the washing room must have a window of decent size - no less than 50*50 cm. And it must open inward (again, safety precautions). And it’s better not to skimp on size: small sizes will not provide the amount of fresh air required for ventilation. It’s also difficult to climb out through the small window.


Many, by the way, do not install windows in either the washing room or the steam room, and they are very mistaken. Now we will briefly explain why.
These windows are needed not for lighting, but for ventilation. The steam room needs two windows - one in the wall opposite the door, measuring 40*40 cm or so. Its upper edge should be level with the door lintel. The second window in the steam room is made under the shelf. It can be small - 20*20 cm.
All of them are needed for ventilation and drying of rooms after use. Then you will not have any problems with wood and fungus. They are also opened to correct temperature/humidity. Everyone is comfortable with their own conditions, so they regulate them with the help of windows. Read more about where windows should be in a bathhouse and what sizes you can read here, and in the article “Which doors to choose for a bathhouse and sauna” we're talking about about doors and their sizes.
The window in the washing room is also an emergency exit. You shouldn’t forget about this either. Of course, we try not to break the rules and install the stoves correctly, but it’s better to be safe.
Many owners of private houses sooner or later catch themselves thinking about what is on their property. This is a great idea, the sauna itself, steam room and sink, the layout of which can be very diverse, will give a lot of pleasant emotions and many hours of relaxation. Of course, you should carefully prepare for the construction of such a structure on the territory. The bathhouse has a special atmosphere and safety requirements, so you need to think through everything down to the smallest detail.
Design and layout of a bathhouse with washing and steam room


It is very important to take into account many factors that will be decisive in the question of which pair to be on. These questions are:

 Interior decoration and design of a relaxation room in a bathhouse

These are just some facts that must be taken into account in the process of preparing for the construction of a place where you can steam, swim and just have a good time with intimate conversations.
You should understand what should be in the bathhouse. This:
- Steam room;
- or shower;
- Toilet;
- Locker room;
- A place to rest (usually located in the dressing room).
 Layout with dimensions of a bathhouse with a relaxation room
Everyone can adjust these spaces by adding something of their own. However, each of the rooms must be in a bathhouse; you can only add an additional one.
In addition, the structure should be erected taking into account safety requirements, namely fire safety.  Example of finishing and design of a washing room
What materials can you choose for construction?
Most often found in private areas. However, depending on which one or other sizes, the choice of materials may vary.  Bathhouse layout option 4 by 6 meters
  A selection of options for steam room layouts in a bathhouse
Most often, they rely on the following types of raw materials for construction:

Read also
Step-by-step construction of a bathhouse
Each of the presented materials is worthy to serve as the basis for the construction of a bathhouse. The main thing is to follow the rules and requirements when constructing a building yourself.
What must be in the sink
The layout of a 3x5 bathhouse or other parameters must necessarily include such spaces as a sink and steam room, a bathroom, and a locker room.
Of course, if desired, each owner of a land plot can independently decide to supplement the space with non-main premises. For example, billiards, a recreation room and much more that can only come to mind.
The washing room must have:
- Swimming pool or shower with cold water;
- Sink for washing.
 An example of placing a sink in a steam room

These are the attributes that you can’t do without in a washing room. The main thing is to do the layout correctly so that all the parts are located in the right places and are comfortable for use.  Layout of a sauna with sink and terrace
It is also worth making sure that the washing room prefers coatings that are resistant to moisture and high temperatures. This can be tiles, wood coated with special solutions.
 An example of tiling a bathhouse sink


As a rule, a shower room or swimming pool is placed in such a way that it is convenient to enter after warming up in the steam room, that is, next to the steam room.
What should be present in the steam room
If the space of the bathhouse is three by four meters, then you won’t be able to speed up too much in the process of thinking about the layout of the room. In small baths minimum sizes a dressing room, a small sink and the steam room itself is also quite compact.
In the steam room, for the comfortable use of this room, there must be niches on which you can sit. Often this design is made in the form of steps.
 Drawing and layout of a compact steam room
This makes it possible to accommodate even the smallest space, quite a lot of people. The layout of the steam room is usually standard. Typically, heating sources are located in the far left or right corner. That is, firewood or stones onto which special mixtures are poured to achieve indoor desired temperature. Heat sources are placed on a special heat-resistant surface, making it possible to comply with safety precautions.  Layout and design of a steam room in a wooden bathhouse

Niches are located under the wall, usually in a “V” shape. In the middle of the room, the steam room is usually located wooden stand, which provides comfort when leaving the steam room.
Small country cottage area – a big problem for the owner. After all, on this land (usually three or six acres) you need to fit everything - and country house, and a barn, and a bathhouse. Modern architectural solutions make it possible to do this without any problems - for example, a bathhouse measuring 4 meters with your own hands will fit perfectly into the exterior of the site, without interfering with anything and fulfilling its health purpose.
Build compact sauna size 4 x 4 m can be done without contacting construction organizations and the company, especially if it is a frame-panel project. For a family of 3-4 people, 4 4 is optimal in terms of room area and number. The bathhouse will have a steam room (or room for a sauna), a dressing room (room for storing bath accessories, clothes and shoes), and a relaxation room.
A log structure is good for its traditional nature, but with the same external dimensions, the internal area of the premises will be smaller (due to the diameter of the logs), and this is a big drawback for a bathhouse with dimensions of 3 by 4 or 4 x 4 meters. This property of a log structure must be taken into account when making calculations.
Some planning features:
- It is more convenient to build a small bathhouse in such a way that the internal effective area was divided into two identical rooms: the first room will be used for relaxation after a steam room or sauna, and the second will be reserved for a steam room and a shower room with a toilet. The second large room is divided into unequal parts: a larger area is allocated for the steam room;
- You can save on size if you plan the heater near the wall in the recreation room, but the placement of the stove can be absolutely arbitrary, but in compliance with all fire safety requirements;
In the bathhouse project small size You should be guided by the following features:
- The entrance doors to the bathhouse can be located on any side of the building that is convenient for use, and depends mainly on the location of the interior;
- It is better to place the entrance doors to the rest room, shower room and steam room taking into account free movement between them, and not close to each other;
- The main thing is that the shower room is located next to the sewer entrance, which will make construction a little cheaper, and make the drain faster and more difficult to clog;
- A small 4 by 4 bathhouse, the layout of which is shown in the figure above, must have a spacious (for 2-3 people) steam room, which means it must be larger than a shower room, since several people can steam in a steam room at once, while Only one person can enter the shower room;
The main thing about a compact bath
The simplest design of a bathhouse measuring 4 x 4 meters consists of one room, which simultaneously serves as a vestibule, a steam room, and a dressing room. It's quite inconvenient, but compact. A heater or electric stove is installed in any convenient corner of the steam room, and two or three shelves up to two meters long and up to half a meter wide are made in the room, and the bottom shelf is made wider than the top ones.
The figure below shows just such a project - it has only one large room which is divided by a thin partition in order to retain steam in the steam room. The stove works for both rooms, but the hot part is located in the steam room. 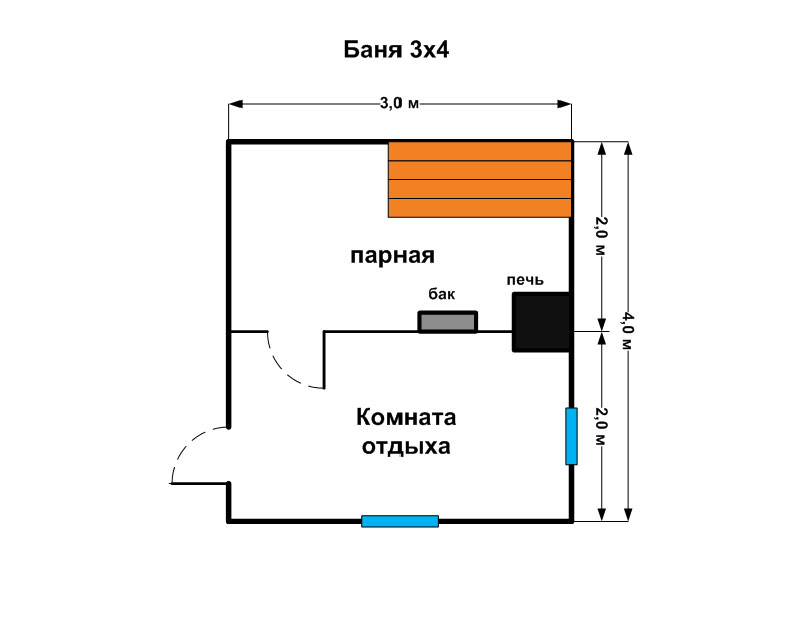
This project does not have a porch, as it is designed for a minimal budget. But, if a porch is built, then it should direct a person into the vestibule, which will go into the dressing room. This measure will help to better retain heat in the bathhouse. You can store firewood and other sauna supplies in the dressing room.
The stove is made of red refractory bricks and installed on a separate concrete foundation, the inside walls are sheathed fire-resistant materials. A thick steel sheet of metal – ≥10 mm – must be secured in front of the furnace door of the furnace.
The division of premises by area is done based on the expected number of visitors. Standard projects are based on traditional requirements: the shower room is made as small as possible, giving way to the steam room. 
It is quite difficult to fit a terrace for a bathhouse measuring 3 x 4 or 4 x 4 meters into the design parameters of the building, since it takes up space from the remaining premises, and the project does not involve expanding the external dimensions of the building.
Internal planning of the bathhouse should be carried out taking into account the available free space and the people who will be able to steam and relax at the same time. Practice has shown that, for example, two people will feel comfortable in a steam room if its area is ≤ 6 m2, and for three people the area increases to 8 m2. The table shows data on the possible number of people depending on the size and area of the bathhouse premises:
| Premises | Seated position | Lying position | Seated position | Lying position | |||
| Number of persons | 1 | 2 | 2 | 2 – 3 | 3 | 3 – 4 | 4 |
| Steam room (dimensions in cm, area in m2) | 85 x 115 | 115 x 115 | 115 x 180 | 130 x 180 | 140 x 180 | 150 x 180 | 150 x 200 |
| Shower room | 115 x 130 | 115 x 145 | 180 x 180 | 180 x 180 | 180 x 200 | 180 x 210 | 200 x 210 |
| Waiting room | 100 x 215 | 100 x 260 | 120 x 295 | 130 x 310 | 140 x 340 | 150 x 360 | 180 x 360 |
| Sauna | 215 x 215 | 215 x 260 | 295 x 300 | 310 x 310 | 320 x 340 | 330 x 360 | 360 x 380 |
The following tips can be given to floor lighting:
- All lighting fixtures must be moisture-resistant;
- The light from should not be direct.
Finishing facilities
Properties of wood for interior decoration of bathhouses:
| Breed | Shrinkage, % | Strength of wood with 15% humidity, MPa (kgf/cm2) | ||||
| Radial | Tangent | Along the fiber | Bending | Skol | ||
| Radial | Tangent | |||||
| Coniferous wood | ||||||
| Pine | 0,18 | 0,33 | 43,9 | 79,2 | 6,9 (68) | 72,0 (73) |
| Spruce | 0,14 | 0,24 | 42,3 | 79,4 | 52,0 (53) | 52,0 (52) |
| Larch | 0,22 | 0,40 | 51,1 | 97,2 | 8,3 (83) | 72,0 (72) |
| Fir | 0,9 | 0,33 | 33,7 | 51,9 | 4,7(47) | 52,0 (53) |
| Deciduous hardwood | ||||||
| Oak | 0,18 | 028 | 52,0 | 93,5 | 8,5 (85) | 10,4 (104) |
| Ash | 0,19 | 0,30 | 51,0 | 115,0 | 13,8 (138) | 13,3 (133) |
| Shores | 0,26 | 0,31 | 44,7 | 99,7 | 8,5 (85) | 11,0 (110) |
| Maple | 0,21 | 0,34 | 54,0 | 109,7 | 8,7 (87) | 12,4 (124) |
| Elm | 0,22 | 0,44 | 48,6 | 105,7 | – | 13,8 (138) |
| Elm | 0,15 | 0,32 | 38,9 | 85,2 | 7,0 (70) | 7,7 (77) |
| Deciduous softwood | ||||||
| Aspen | 0,20 | 0,22 | 37,4 | 76,6 | 5,7 (57) | 7,7 (77) |
| Linden | 0,26 | 0,29 | 39,0 | 68,0 | 7,3 (73) | 8 (80) |
| Black alder | 0,16 | 0,23 | 36,8 | 69,2 | – | – |
| Black aspen | 0,16 | 0,21 | 35,1 | 60,0 | 5,8 (58) | 7,4 (74) |
The wood for the construction and decoration of the bathhouse has been selected for years and decades, and the table you see above is based specifically on the practical use of wood in conditions of high humidity and contrasting temperatures. The most suitable types of wood for bathhouses are larch, linden, cedar, and from “foreign” wood that does not grow in the Russian Federation - abashi. The standard and comfortable interior decoration of a bathhouse is lining, which is considered not only practical in terms of installation, but also environmentally friendly. When heated, the lining does not emit toxins or other substances harmful to humans. And if the carriage is made of the above-mentioned types of wood, then, when heated, it will release beneficial esters. 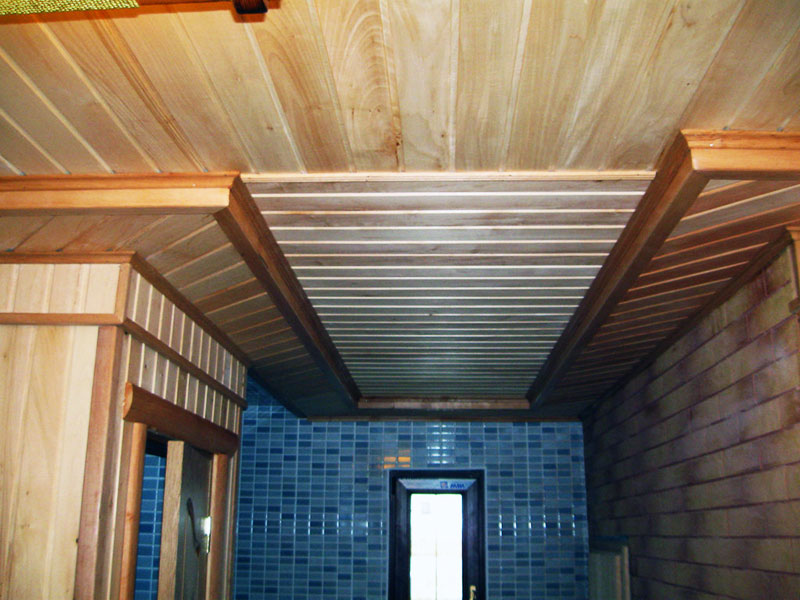
- Linden - retains its yellowish color throughout its operation, regardless of humidity and temperature;
- Abashi - almost does not conduct heat, always feels the same temperature to the touch, does not burn the skin. The uniform texture of yellow color makes the room lighter;
- Cedar - has healing properties, according to traditional medicine, is hardy against high temperatures and humidity, in addition to the release of essential oils, gives a pleasant smell of forest when heated;
You should choose lining not only according to its appearance– low-quality lumber can release resins when heated, and liquid resin that gets on the skin is a 100% burn. Therefore, specifically for finishing purposes, lining or boards with veins of resin are not allowed, while wood for the construction of a bathhouse frame may have such minor defects.
It is best to finish the ceiling with a tongue-and-groove board made of hardwood - there will definitely be no resin in it, and the multi-layer structure makes the material strong and durable. It is precisely because of the presence of resins that coniferous wood is not welcome when finishing internal surfaces any bath.
They built a house for me in 2018, according to my design, by professionals in their field. The project itself is somewhat more expensive compared to its competitors, but in our village they built one more house and the owners were satisfied.

We ordered the construction of a bathhouse, they completed it in the shortest possible time, without any complaints about the work of the team.

Full cycle From the production of materials to the assembly of the house, the organization is excellent. Quality, professionalism top level. I recommend.

It is very important to find your own manager who will advise not only when concluding a contract, but also during construction. We talked with Igor, as a result, the bathhouse is ready on the site, we are using it, everything is fine. Thank you.

Great houses, great service! They told us everything and helped us with the choice. You can see everything live - we went to a facility under construction roughly similar to ours, where we saw how they work, only after that we decided to build. We thank the managers and builders for their patience in answering all the questions!

In 2018 we ordered a bathhouse. We are very pleased with the work of the employees of this company. Starting with the estimate and ending with the construction team. We were lucky because of the promotion and received a sauna stove as a gift!

Thank you for the house with a sauna. The website lists some prices, but in reality it turns out to be more. But it’s understandable that the price indicated is for the very minimum, like everyone else on the Internet, if you want comfort, pay extra for extras. In general, “thank you” to the builders.
The cost of building a log house 4x4 bathhouse without roof finishing is 211,000 rubles
- The foundation is support-column. 2 blocks per cabinet (for one-story houses) and 4 blocks per cabinet on a cement screed (for houses with an attic). Concrete blocks, solid, size 200x200x400 mm. The cabinets are installed on a compacted sand cushion. Sand (PGS) is provided by the customer.
- External walls – profiled timber natural humidity section 145x90 mm (wall thickness – 90 mm) “block house” or straight profile.
- In total, there are 16 crowns in the frame of the one-story baths. There are 17 crowns in the log house of the baths with the attic.
- An open terrace (if any) on supports made of planed timber with a cross-section of 100*150 mm, with shrinkage jacks. The fencing is a handrail made of planed timber with a cross-section of 40*100 mm. Steps at the entrance.
- The clear ceiling height of the first floor (from the floor joist to the floor beam) for one-story baths is 2.15 m (+/-50mm); for baths with an attic 2.29 m (+/- 50 mm)
- The second floor is attic. Clear attic ceiling height (from floor beam to ceiling beam) – 2.25 m
- The height of the roof at the ridge for one-story baths is 1.20 m.
- The gables are a frame made of natural moisture boards with a section of 150*40 mm, 100*40 mm. The external finishing of the gables is lining (spruce/pine AB) 17*90 mm. Wind protection – NANOIZOL “A” (for buildings with an attic).
- In the gables of one-story buildings, a door (1 piece) and ventilation hatches (1 piece for each gable, under the ridge) are installed.
- In the gables of buildings with an attic, ventilation hatches are installed (3 pieces for each gable).
- Eaves and roof overhangs with a width of 200 mm (for one-story buildings) and 300 mm (for buildings with an attic). The cornices and overhangs are hemmed with clapboard (spruce/pine AB) 17*90 mm.
- Construction of window and door openings with a dressing crown, without installing casing bars.
- Assembly of a house/bath on the customer's site.
The price of a turnkey 4x4 bathhouse with a foundation and stove is 328,000 rubles
- The foundation is columnar. 2 blocks per cabinet (for one-story baths) and 4 blocks per cabinet on a cement screed (for baths with an attic). Concrete blocks, solid, size 200x200x400 mm. The cabinets are installed on a compacted sand cushion. Sand (PGS) is provided by the customer.
- Waterproofing – roofing felt in one layer.
- The strapping is a beam of natural humidity with a cross-section of 150x100 mm. Along the outer perimeter the strapping is laid in two rows. The timber is processed protective composition.
- Floor joists - natural moisture board with a section of 40x150 mm per edge, with a pitch of 600 mm.
- The subfloor is a natural moisture board with a cross-section of 22x100mm. Steam, waterproofing – NANOIZOL S.
- Floor insulation – 100mm KNAUF/URSA mineral wool (or equivalent). Vapor barrier – NANOIZOL V.
- The finished floor of the first floor is dry tongue and groove batten(spruce/pine AB) 36mm thick. Every fifth board is fastened with self-tapping screws (for the possibility of re-upholstering the floors in the future).
- External walls - profiled timber of natural humidity with a section of 145x90 mm (wall thickness - 90mm) "block house" profile or straight. A total of 16 crowns (for one-story baths) and 17 crowns (for baths with an attic).
- The partitions of the first floor are profiled timber of natural humidity with a section of 145x90 mm, straight profile. They cut into external walls with a depth of up to 30mm.
- Inter-crown insulation – jute fabric 6mm thick
- Inter-crown connection – on metal dowel(construction nail 6x200mm, 250mm).
- Corner connection - “half a tree”. The outer corners of the log house are covered with clapboard (spruce/pine AB) 17*90 mm in two rows.
- An open terrace (if any) on supports made of planed timber with a cross-section of 100*150 mm, with shrinkage jacks. The fencing is a handrail made of planed timber with a cross-section of 40*100 mm filled with carved balusters. Steps at the entrance.
- The terrace floors are dry tongue-and-groove floorboards (spruce/pine AB) 36mm thick. They are attached with self-tapping screws to each board. The boards are laid in 5 mm increments.
- The terrace ceilings are lining (spruce/pine AB) 17*90 mm. Vapor barrier – NANOIZOL V.
- The clear ceiling height of the first floor (from floor to ceiling) is 2.10 m (+/- 50mm) for one-story bathhouses and 2.25 m (+/- 50mm) for bathhouses with an attic.
- The ceiling lining of the first floor (except for the steam room) is lining (spruce/pine AB) 12.8*88 mm. (joint for layout is allowed)
- The second floor is attic. Clear attic ceiling height (from floor to ceiling) – 2.20m
- Floor insulation – 100mm mineral wool KNAUF/URSA (or equivalent). Vapor barrier NANOIZOL V.
- The attic floors are dry tongue-and-groove floorboards (spruce/pine AB) 36mm thick. Every fifth board is fastened with self-tapping screws (for the possibility of re-upholstering the floors in the future).
- The cladding of the walls and ceiling of the attic is lining (spruce/pine AB) 12.5*88 mm (a joint for layout is allowed).
- Insulation of attic walls - 100mm basalt mats ROCKWOOL (or equivalent). Vapor barrier – NANOIZOL V.
- The attic partitions are a frame made of natural moisture timber with a cross-section of 40*75 mm, sheathed on both sides with clapboard (spruce/pine AB) 12.5*88 mm. The partitions are not insulated.
- Rafters - trusses made of natural moisture boards with a section of 150x40mm, 100x40mm. Installed in increments of 900-1000 mm.
- The gables are a frame made of natural moisture boards with a section of 150*40 mm, 100*40 mm. The external finishing of the gables is lining (spruce/pine AB) 17*90 mm. . Wind, moisture protection – NANOIZOL “A” (for baths with an attic).
- In the gables of one-story baths, a door (1 piece) and ventilation hatches (1 piece for each gable, under the ridge) are installed.
- Ventilation hatches are installed in the gables of bathhouses with an attic (3 pieces for each gable).
- The sheathing is a board of natural moisture with a cross-section of 22*100 mm, with a pitch of 300 mm. Counter-lattice - 20*40 mm slats, along the rafter slopes.
- Roof covering – ONDULIN (burgundy, brown, green) or galvanized corrugated sheeting. Under-roof vapor barrier – NANOIZOL S.
- Eaves and roof overhangs are 200 mm wide (for one-story baths) and 300 mm (for baths with an attic). The cornices and overhangs are hemmed with clapboard (spruce/pine AB) 17*90 mm.
- The staircase to the attic is single-flight, on strings made of planed timber with a cross-section of 145*90 mm. Floorboard steps. The handrail and fencing in the attic are planed timber with a cross-section of 40*100 mm.
- Finishing the walls and ceiling of the steam room - lining (aspen B) 14*90 mm (joint for layout is allowed). Reflective insulation on a foil base - NANOIZOL FB. Counter rail – 10*40 mm (ventilation gap – 10 mm). Before covering, the timber base of the walls is treated with a protective composition for baths and saunas NEOMID 200.
- Two-tier shelf made of planed boards (aspen B) 28*90 mm. Joint width – 40 cm (height – 50 cm); Lounger width – 60 cm (height – 110 cm).
- Installation of the ERMAK 12/ERMAK 16 stove with a hanging tank (stainless steel 35 l) for heating water.
- The base of the stove is brick in one row. Cutting the combustion portal - brick.
- Fire insulation - basalt cardboard, ceiling and roof passages, reflective screen made of smooth galvanized steel on basalt cardboard, flue sheet.
- The chimney is vertical, with an outlet into the roof through the ceiling. Starting pipe - stainless steel 0.5 mm, stainless steel gate valve, stainless steel starting adapter, sandwich pipes 115 * 200 mm (stainless steel 0.5 mm * galvanized 0.5 mm), galvanized head.
- Installation of a shower tray 800*800 mm with a siphon in a washing room. The drainage outlet beyond the perimeter of the bathhouse is a plumbing PVC pipe with a diameter of 50 mm.
- The windows are wooden, double glazed, with sealing and fittings (screw-in hinges, twist locks). Inward opening doors. Dimensions (h*w) 1200*1500 mm; 1200*1000 m; 1200*600 mm; 600*600 mm; 400*400 mm. Windows are installed in casing boxes.
- The entrance door is wooden, paneled, solid (spruce/pine A). Size (h*w) 1800*800 mm (for one-story baths; 2000*800 mm (for baths with an attic). Handles, hinges. On front door a padlock is installed.
- Interior doors – bath, frame (aspen A). Size (h*w) 1750*750 mm. Handles, hinges.
- In window and doorways casing bars (swarms) are installed.
- Sealing of corners, joints, abutments - spruce/pine A/aspen AB plinth.
- Finishing of windows and doors – spruce/pine frame A on both sides, aspen AB
- Nails for fastening parts are black construction nails.
- Nails for fastening the lining – galvanized 2.5x50 mm
- Nails for fastening plinths, layouts - finishing galvanized 1.8x50 mm.
- Loading, delivery up to 400 km from Pestovo, Novgorod region, unloading of a set of material.
- Assembly of the bathhouse at the customer's site.
- BONUS. Accessories for the steam room. Stones – gabbro-diabase 40 kg.
We have compiled for you a convenient table of differences in the configurations of bathhouses for shrinkage and turnkey.
|
CONSTRUCTIVE |
SHRINKABLE |
FULL CONSTRUCTION |
|
Columnar foundation made of concrete blocks 200*200*400 |
Yes |
Yes |
|
Double strapping made of timber 150*100 mm |
Yes |
Yes |
|
Floor joists made of boards 40*150 per edge with a pitch of 600 mm |
Yes |
Yes |
|
Subfloor made of boards 22*100/150 mm |
No |
Yes |
|
Floor insulation with hydro and vapor barrier |
No |
Yes |
|
Finish floor – dry tongue-and-groove floorboard 36 mm |
No |
Yes |
|
Walls and partitions made of profiled timber of natural moisture with a cross-section of 145*90 mm (wall thickness – 90mm) |
Yes |
Yes |
|
Assembling a log house on steel dowels |
Yes |
Yes |
|
Corner connection - half a tree |
Yes |
Yes |
|
Intercrown insulation - jute |
Yes |
Yes |
|
Rafters - trusses made of timber 40*100/150 mm with a pitch of 900/1000 mm |
Yes |
Yes |
|
Sheathing – board 20*100/150 mm |
Yes |
Yes |
|
Roof covering – ondulin / galvanized corrugated sheet C20 |
Yes |
Yes |
|
The eaves and roof overhangs are lined with spruce/pine AB clapboard |
Yes |
Yes |
|
Window and door openings with a dressing crown, without installing casing bars |
Yes |
No |
|
Window and door openings with installation of casing bars |
No |
Yes |
|
Installation of windows and doors |
No |
Yes |
|
Ceiling lining – spruce/pine lining AB |
No |
Yes |
|
Insulation + vapor barrier of floors/attics |
No |
Yes |
|
Finishing the walls and ceiling of the attic - spruce/pine lining AB |
No |
Yes |
|
Finishing the walls and ceiling of the steam room - aspen lining AB + shelves |
No |
Yes |
|
Installation of stove and chimney |
No |
Yes |
|
Installation of a shower tray 800*800 mm with a siphon in a washing room. Exiting the drain outside the perimeter of the bathhouse |
No |
Yes |
|
Stairs to the attic |
No |
Yes |
|
Finishing: plinth, platbands |
No |
Yes |
|
Loading a set of material, delivering it up to 400 km from our base, unloading at the customer’s site |
Yes |
Yes |
|
Name |
Cost, rub) |
Unit |
|
Construction of the foundation for screw piles or reinforced concrete foundation |
8-921-930-69-80, |
|
|
Decorative finishing of the plinth - pick-up () |
1000-1600 |
linear meters |
|
Installation of reinforced concrete slabs 500*500*100 mm for support pedestals ( ) |
PC. |
|
|
Protection (backing board) of the first row of strapping made of larch boards 50*150 mm ( ) |
linear meters |
|
|
Protection (backing board) of the first row of strapping made of larch boards 50*200 mm ( ) |
linear meters |
|
|
Double strapping made of timber 150x150mm |
linear meters |
|
|
Double strapping made of timber 150x200mm |
linear meters |
|
|
Installation of floor joists made of timber 150x100mm |
linear meters |
|
|
Installation of larch floors decking boards"corduroy" (for open terraces)() |
2000 |
m*2 floors |
|
Installation of finished floors from tongue-and-groove larch floorboards 27 mm ( ) |
2000 |
m*2 floors |
|
External walls made of profiled timber are moisture resistant with a cross-section of 145x140mm, partitions are made of profiled timber. humidity section 145*90 mm |
2500 |
linear meters external walls |
|
External walls and partitions made of kiln-dried profiled timber with a cross-section of 145x90 mm |
2300 |
linear meters external walls And partitions |
|
External walls made of profiled kiln-drying timber with a cross-section of 145x140 mm, partitions made of profiled kiln-dried timber with a cross-section of 145x90 mm |
4000 |
linear meters of external walls |
|
The outer walls are made of profiled timber. humidity with a cross section of 145x190mm, partitions made of profiled timber. humidity section 145*90 mm |
4500 |
linear meters of external walls |
|
External walls are made of profiled chamber-drying timber with a cross-section of 145x190 mm, partitions are made of profiled chamber-drying timber with a cross-section of 145*90 mm. |
5300 |
linear meters of external walls |
|
Set of kiln-dried lumber ( ) |
1000 |
m*2 building area |
|
Pairing crowns with a wooden dowel |
1000 |
|
|
Assembling a log house using a SPRING UNIT FORCE ( ) |
2000 |
linear meters external walls and partitions of the log house |
|
Assembling a log house with the height of the crowns tied with steel studs |
1500 |
linear meters external walls and partitions of the log house |
|
Corner groove-tenon joint (warm corner) |
6000 |
one corner of the log house |
|
Corner connection “into the bowl” ( ) |
from 30 000 |
house kit |
|
Inter-crown insulation – holofiber() |
300/450/600 |
linear meter of external walls of the log house |
|
Increase in ceiling height by 14cm (+ one crown in the log house) |
500/750/1000 |
linear meters external walls and log partitions |
|
Insulation 150mm |
m*2 insulated area |
|
|
The construction of a staircase on strings made of laminated veneer lumber, with wide steps, turned pillars, balusters and a figured handrail. |
25000 |
PC. |
|
Roof covering – metal tiles RAL 3005,5005,6005,7004, 7024,8017) |
m*2 roof |
|
|
Roof covering – corrugated sheeting with polymer coating(RAL 3005,5005,6005,7004, 7024,8017) |
m*2 roof |
|
|
Installation of a drainage system (PVC, DEKE) |
1200 |
linear meters roof slope |
|
Installation of corner snow barriers ( ) |
linear meters roof slope |
|
|
Construction of tubular snow barriers ( ) |
1300 |
linear meters roof slope |
|
Attic structure: sparse flooring made of edged boards By ceiling beams, door in one of the gables + dormer window in the opposite gable |
m*2 ceiling |
|
|
External finishing of gables – house block spruce/pine AB 28*140 |
m*2 gable area |
|
|
External finishing of gables - imitation timber 18*140 mm |
m*2 gable area |
|
|
Treatment of the entire building with fire-bioprotective composition NEOMID ( ) |
m*2 building area |
|
|
Surface treatment with oil for terraces NEOMID ( ) |
m*2 floors |
|
|
Treating the walls and ceiling of the steam room and washing room with NEOMID varnish “for baths and saunas” ( ) |
m*2 walls and ceiling |
|
|
Treatment of the ends of the log house with NEOMID TOR PLUS ( ) |
opening/corner |
|
|
Treatment of shelves in the steam room with NEOMID oil ( ) |
1000 |
m*2 shelf |
|
Finishing walls and ceilings with washing lining made of larch 14*90mm ( ) |
1500 |
m*2 walls and ceiling |
|
Installation of a “leaky floor” in a washing room ( ) |
5000 |
m*2 floors |
|
Finishing with paired lining OSIN A, including shelves - OSIN A |
m*2 walls and ceiling |
|
|
Finishing with paired lining LIPA A, including shelves - LIPA A |
1200 |
m*2 walls and ceiling |
|
Finishing with paired lining LIPA EXTRA, including shelves - LIPA Extra more details more details) |
35 000 |
PC. |
|
Installation of PVC windows with single-chamber double-glazed windows |
from 4000 |
PC. |
|
Installation of PVC windows with double-glazed windows |
from 5000 |
PC. |
|
Installation of a heat exchanger in the ERMAK furnace, installation of a remote tank (stainless steel 60 l) on the wall of the washing room, water supply hot water metal-plastic pipes |
20000 |
PC. |
|
Installation of a tank (stainless steel 50 l) on a pipe above the stove, with a tap leading to the washing room |
13 000 |
PC. |
|
Installation of another ERMAK furnace ( |
12 000/16000 |
set |
|
Chimney device made of stainless steel 0.8 mm thick (includes a protective screen and a stainless steel flue sheet) |
16 000/20000 |
set |
|
Delivery over 400 km from Pestovo, Novgorod region. |
km |
|
Construction shed 2.0*3.0 / 4.0 m () |
from 21 000 |
PC. |
The whole country rests on such workers
Alexey Gennadievich!!! Due to lack of time, I couldn’t write to you - thank you very much for the work of your employees in building the bathhouse, two young men, unfortunately, I don’t know their names, they worked clearly and harmoniously, the quality of the bathhouse is EXCELLENT!!! The whole country rests on such workers. All our friends and relatives also noted the impeccable work of the guys, which resulted in the bathhouse we dreamed of.
The guys built us an amazing bathhouse
I would like to express my deep gratitude to Alexey (general director), Sergey Zorin and Vladimir Chistyakov (builders)! At the beginning of August, the guys built us a stunning bathhouse, taking into account all our wishes. The delivery of materials was carried out on time, the construction was completed even ahead of the previously agreed time, the quality of materials and work is at the highest level. In general, just a fairy tale! I advise you to build only with Russian carpenters!
"Price quality"
The work is pleasing to the eye. Fast, high quality, on time. I thank the team of guys (Evgeny, Dmitry, Sergey) and General Director Alexey Roslov for the work done. I ordered a bathhouse with a 6x6 attic, project B-20, with minor changes, “for shrinkage”. All work was completed ahead of schedule and with high quality. All my wishes were taken into account. I was very pleased with Alexey Roslov’s attitude towards his work. He always promptly and competently answered all my questions and resolved controversial issues. The team, despite the young age of the guys, worked quickly and smoothly, and at the end they gave advice on caring for the timber and preserving it for the winter. Next year I will do the finishing with the same team. "Russian Carpenters" wins in all respects compared to other large companies. “Price-quality” is about them. Again Thanks a lot. I will recommend it to everyone.


