Access intercoms - devices with magnetic keys, electric intercom, push-button and public order control in residential and public spaces. This device is connected to or to power sources that operate autonomously. The device helps to carry out control, in which the user can not only identify a guest by voice or video image, but also open the door without leaving the apartment.
Existing types of entrance intercoms
This is possible thanks to the advanced intercom functions.
All components of the structure are mounted on the entrance door and in the residents’ apartments. The calling panel, on which the buttons are located, is installed at the entrance. A digital code is recorded in the intercom memory, which activates the switch that transmits the signal. How does a digital entrance intercom work:

Multi-apartment intercom system
An audio intercom is simple and reliable, but, unfortunately, it begins to become outdated very quickly. Color panels based on a sensor are becoming fashionable, since their cost is constantly falling; there are models that have the ability to record all incoming calls to a flash drive. The user has the opportunity, upon arriving home, to see who came in. Like apartment intercom stands on almost every entrance in many cities.
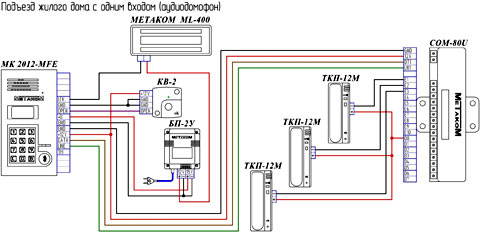
 Intercom connection diagram in apartment building
Intercoms are divided according to the method of codifying incoming guests and the principle of addressing the number of subscribers who need to be served.
Intercom brands and number of subscribers
Maloabonensky - installed at facilities and in. These devices can serve only one subscriber, for example, in cottages, at security posts, at the entrance to a house, or. Multi-subscriber – designed for entrances to multi-storey and administrative buildings.
Not so long ago, these structures could only serve 6 people, but progress does not stand still, and this moment you can buy intercoms various configurations, which can serve more than 1000 subscribers, while making dozens of entrances accessible.
 Various brands intercoms
 The installation of an entrance intercom must be carried out by specialists from the company that will subsequently service it. Device types:

What is the indication of guests on intercoms?
An intercom with a camera allows you to view the area from the side, in front, or into the stairwell. A special feature of the device is covert filming from inside the building. Particularly prestigious intercoms can provide audio and video surveillance; they have a control panel with a perceptive and particularly sensitive screen. Can record and save events and faces of visitors in the amount of 16 pcs. 
Some manufacturers have gone further - through an intercom screen they began to use identification using a mobile or TV. This is done manually or automatically: the signal arrives at the device and the intercom role is activated, and after the conversation is completed, it switches to standard mode. Wireless types of intercoms have such properties. The above aspects affect the price and popularity of blocks. Ordinary audio intercoms, unlike video intercoms or the most elite modifications, have a low selling price.
Device Manufacturers
Metacom
Metakom intercoms – innovative systems. By purchasing these devices, we can be sure of their flawless operation for a long time. The principle of operation and installation is no different from other similar devices. Metakom intercom is the simplest and consists of a handset and a panel. The intercom will work correctly if it is installed correctly.
 This is what the Metakom intercom looks like
 Installation of entrance doors with Metakom intercom is carried out by specialists from a company that sells intercoms. The systems have a number of advantages:
- there are no mechanical switches on the panel, which helps eliminate the problem of keys blocking and oxidation of wire contacts;
- doors are opened with a key;
- you can open the entrance door using a special, programmed digital code;
- easy maintenance, installation and reprogramming.
For the Metakom intercom to work correctly, you need to install it correctly, connect it and configure it. It is better to entrust this work to a company that employs specialists in the installation and maintenance of entrance intercoms of this brand.
Visit
Manufacturers have developed inexpensive and high-quality Vizit intercoms.
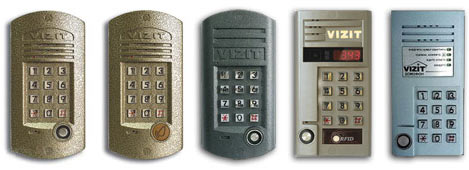
The external panel of this device is made in a housing that prevents break-ins. At the same time, the intercom can operate in very harsh weather conditions. Vizit intercoms have various components and are assembled at the request of the client; often the installation of access doors involves the installation of a Vizit audio intercom. You can select a control unit for the call block, which determines how many subscribers will be connected, video cameras - dome or case, locks electromechanical locks. There are dozens of options for completing the installed equipment.
Cyfral
Installation of the intercom must be carried out strictly according to the instructions. Cyfral includes this with every kit they manufacture. You can install the intercom yourself by reading this manual, but if you don’t have enough knowledge, then do not risk your safety and the integrity of the device, contact the installation company.
These digital intercoms are connected using a telephone cable, to which the subscriber handsets will be connected in parallel.
When connecting Cyfral intercoms, you need to program it correctly.
Commax
Commax intercoms are produced by a Korean company; they are one of the leading manufacturers in the market for the sale of these products. The Commax video intercom kit includes:
 Commax video intercom equipment
 - calling panel with camera;
- monitor;
- electric lock.
Commax video intercoms differ in characteristics, since they are not the same for different models:
- can be monochrome or color;
- can be equipped with a handset or speakerphone;
- There are kits with motion sensors;
- There is a function for taking photos or video recording, with data saving.
This video intercom can be connected to a regular intercom using an interface unit - a module that helps connect almost any video intercom. This interface unit will allow not only a video intercom, but also several cameras that are installed in the entrance and a panel installed directly on the subscriber’s floor. An interface unit with an entrance intercom is connected for devices with a coordinate or digital device.
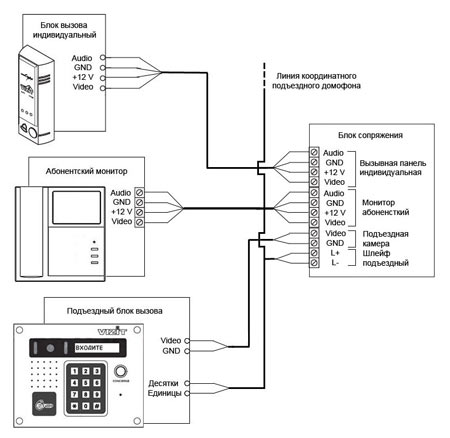 Intercom connection diagram via interface unit
 Intercom - already required device for the owner of a home in an apartment building. It minimizes the access of strangers to the entrance: tubes equipped with audio and, in many houses, video communications allow you to quickly identify the person on the other side of the door. Many people are interested in whether it is possible to connect an intercom in an apartment on their own. Of course, if you understand at least the basics of electrical engineering. And we, in turn, will bring for you detailed instructions, which will help you easily cope with this matter.
About the design of the intercom
Before connecting an intercom in an apartment building yourself, let’s look at the design of the device. This throughput device with communication functions (audio and video communication) has become popular in last decade, taking the place of less convenient combination locks that previously protected some of our entrances. Intercom systems are most often installed by specialized companies for the entire entrance. They subsequently maintain the system.
The most popular manufacturers of intercoms today are Vizit, Commax, Falcon Eye, etc.
In the diagram above you saw the main components of the intercom system. Before connecting the intercom yourself, let’s refresh our memory of their functions:
- A tube. It is installed in the apartment so that the tenant can answer the call and open the door for the guest. This subscriber element must be connected to a common locking system.
- Call panel. This is what we see next to the entrance door - a key code reader, keys for dialing an apartment number or code, an auxiliary screen.
- Lock (locking device). Today, electromagnetic variations are the most popular. At least with proper application physical strength It is still possible to open them without a key; they are considered the most reliable. Previously, there was a popular option with a regular metal valve, which was opened by an electric motor.
- Switch module. This element of the system is responsible for transmitting a signal from the calling panel to a specific resident.
- System power supply.
- Exit button and so on.
In the video intercom system, an element such as a video camera appears at the calling panel. The image is transmitted by a microcomputer.

Types of intercoms
Before you connect the intercom yourself, you need to decide on the type that suits you best:
- Digital. The guest's call is transmitted over a two-wire line, where the apartment number is recognized. Pairing here is the work of jumpers that transmit a signal to a specific handset over a twisted network. Each of the latter is equipped with microcircuits for such an operation. All apartments, not only the entrance, but also the floor are connected to this controller.
- Coordinate matrix. A simpler option, which is why it is considered more reliable. Here a switch is connected to the coordinator, and when a call is made, it transmits a signal to a specific handset. The connection itself is wires of units and tens. From here, each apartment is defined by two cables, the numbers of which, naturally, cannot be repeated. To establish communication, a signal via DAT1 is required. Then the information is converted and processed by the modulator, after which it is connected to a specific one and ten. The connection to the apartment via LIN occurs due to the operation of an electromagnetic relay.

Safety precautions
Before connecting the intercom yourself, remember the most important rules safety precautions:
- Turn off the power supply at the main electrical switch before working on electrical wiring.
- Use high-quality licensed products and components.
- Do not install the transformer outdoors or in a damp room.
Wire selection
Begin self-installation We advise you to choose a wire for an intercom - focus on its required length:
- For audio device:
- Up to 50 m - 6/10.
- More than 50 m - 1.5 mm.
- For video device:
- Up to 25 m - 6/10.
- More than 25 m - 1.5 mm or maximum cable.
Electrical protection and wiring
We continue to talk about how to connect the intercom handset yourself. The connection itself is only possible to an electrical network protected by a 16 A circuit breaker or a 10 A fuse. To ensure the safety of residents, a 30 mA residual current device is also installed.
Two types of power supply are used for the intercom device:
- The transformer is located separately from the intercom, connected both to it and to the network.
- The tube is integrated with a transformer and is connected to an outlet using a power cable.
One of important topics regarding how to connect the entrance intercom yourself - wiring. Make sure that it fits only in corrugated pipes. Therefore, you need to accurately measure the distance from the outer panel to the speaking tube in order to lay the pipes to the required length. The free ends of the wires should protrude approximately 20 cm from them.
Installation of a street panel
How to connect an intercom yourself? The next item is the installation of an outdoor external panel:
- The approximate height of the element from the ground is 1.6 m.
- For overhead panels on the door or wall, the locations of the mounting dowels are marked, then holes are drilled according to the marks and the device is attached.
- For built-in options, lines are drawn for the groove, and the position of the built-in box is noted.
- Using a chisel, cut the groove, taking into account the thickness of both the built-in element and corrugated pipe.
- Install and secure the recessed box with cement.
- Then place the corrugated tube in the hole. If necessary, secure its position with nails.
- Carefully putty the fine with the pipe, simultaneously pulling out the nails holding the last one.
- Now cut the wires from the pipe to the required length and connect them to the street panel.
- The action ends by fixing the street panel in the built-in box.

Installing the Internal Device
If external device You don’t always have to install it (the company that supervises the intercom at your entrance can do this), then you will have to do the installation of the handset if you want to take matters into your own hands. Here is an approximate algorithm of actions:
- The approximate recommended location of the tube is 1.5 m from the floor.
- Next, you need to determine on the wall where to lay the corrugated pipes from the external access element. If the transformer is built into the tube, then there is only one path, if not, then two - to the intercom and, in fact, to the transformer.
- Again, you make fines with a chisel along the thickness of the corrugated pipe.
- The next step is to place the pipe in the groove and further cement it or putty it.
- Mark the exact location of the tube, drill holes for the dowels that will hold it.
- Attach the handset stand.
- From a corrugated pipe, connect necessary wires to the handset.
- Install the intercom on the mounting brackets and secure it with screws.
- The transformer (if it is not built-in) is installed in a protected place (for example, a distribution panel) and connected to common system wires strictly according to the diagram. It can only be connected to a network protected by a fuse!

Video intercom installation
We figured out how to connect a digital intercom yourself. Its variety is a video intercom, connected according to a similar scheme. But before installation, please consider the following:
- The video camera should not be installed against sunlight or powerful lighting.
- The video eye must be protected from vibrations and mechanical damage.
- The camera should be protected from rain and not exposed to high temperatures(more than 40 degrees).

Independent installation of an intercom is the prerogative of people who have dealt with electricians more than once. If you are doing this for the first time, we advise you to carry out the work under the guidance of an experienced friend, since all descriptive instructions are of a general, advisory nature and do not prevent specific problems during installation.
Alexei
Nowadays, installing a video intercom is becoming popular not only in offices, but also in private cottages, houses or apartments. Their functionality expands the usual audio intercoms by the presence of a camera and monitor, which displays an image of what is happening outside.
The standard contents of the kit sold on the market include:
- Handset for conversation
- Screen panel
- Up to three surveillance cameras
Unlike conventional audio models, installing a video intercom in an apartment guarantees a higher degree of security organization, allowing you to visually observe everything that is happening near the entrance to the yard or house. The completely safe equipment connection scheme can be called unique.
How to choose a video intercom
 There are many modifications of video intercoms on the market, which differ in design, quality, cost, parameters, and number of supported functions. But all models can be divided into several groups:
- Black and white or color
- With or without video recording function
- With open or closed camera
When considering the installation of a video intercom, you need to take into account each of the characteristics.
Transmitted Image: CRT or LCD
The first parameter that people pay attention to is the type of image being transmitted. All devices, as in video surveillance systems, can be divided into color and monochrome - this is the main pricing factor.
More often they choose to install video intercoms in a private home, based on cathode ray tube or CRT technology. They have slightly exaggerated dimensions and are capable of transmitting black and white images.
Among the main advantages of CRT technology are:
- Durability
- Endurance
- Low cost
LCD or liquid crystal models are more modern and transmit color images. However, differing more elegant design, smaller dimensions and instant switching on, their cost is an order of magnitude higher than that of CRT.
Watch the video, selection criteria:
Type of connection and manufacturers
It is possible to install an intercom that operates autonomously (in private cottages and houses) or connected to the entrance (in apartments). In the second case, you will have to contact the organization that installed the equipment at the entrance and clarify the list of models that are compatible with the access system.
When purchasing equipment, it is recommended to give preference to one manufacturer to avoid compatibility conflicts. Today, many of the companies producing security systems offer video intercoms to their clients. Most of them are adapted for use in any conditions.
Camera type and display diagonal
 It is possible to install video intercoms in an apartment, to which more than one camera is connected. Popular removal devices – Pinhole.
They are easily hidden in a wall or on a call panel thanks to the small lens diameter. Sometimes they use video eyes that are mounted directly into the door or gate - their picture quality is much higher.
If you need to monitor more than one door, you should install a video intercom with support for several tracking devices. The more cameras there are, the wider the display diagonal should be.
Memory
Most modern models are equipped with flash memory, which can store from 128 to 512 frames. In this case, the camera saves images after pressing a specific programmed button.
Increasingly, a video intercom with a DVR is being installed, which is equipped with a separate slot for memory cards. The device is capable of saving not only individual pictures, but also video of everything that happens, which can then be viewed on personal computer or TV.
Additional functions
 There are two types of video intercoms offered on the markets:
- With speaker
- With handset
Models with a speaker are more compact, usually equipped with a large display and have a remote control. However, choosing between the two options comes down to personal preference.
Another useful feature is connecting the intercom to the TV. If the front door is located too far away, this function can become simply indispensable.
Don’t forget about the possibility of expanding security systems and connecting additional equipment.
Price
Often the main selection criterion is the cost of installing video intercoms with all the necessary equipment, which reaches tens of thousands of rubles. It is directly proportional to the quality and functionality of the equipment. For those who prefer cheap but cheerful things, you should pay attention to devices in the price range of 4-7 thousand.
Video intercom installation
 The installation can be divided into the following stages:
- Planning work and concluding an agreement with the organization performing installation
- Cable routing
- Installation and testing of equipment
To plan installation work recommended before in the hallway and around front door finishing will be completed. This will provide several advantages: it will be possible to install a hidden power supply, wall the panel into the wall and hide the wires.
In the event of a voltage drop, an installation with a backup power source is provided to ensure battery life in unforeseen circumstances.
Next, you need to select the kit to be installed and determine its exact location. The calling panel and cameras are mounted at a height of 160-170 cm. To achieve optimal viewing angles, there should be no obstacles nearby:
- Horizontal - within 50-70 degrees
- Vertical – within 70-90 degrees
In an apartment, the control panel is installed in any convenient location so that the call can be heard in any of the rooms.
Let's watch the video, the stages of installing an intercom:
One of the most important stages Installing a video intercom with your own hands - laying wires. The stability of the entire system depends on how competently it is done. Experts recommend using special signal cables or twisted pair.
The maximum cable laying distance is 35-40 meters, otherwise the signal will begin to fade significantly. The location of power wires next to each other can cause interference in the circuit. An additional cable with a cross-section of 2x0.75 mm is provided for installing an electric lock. And don't forget about the power cable.
Then the equipment is installed: power supplies, external and internal panels, additional cameras, etc. All together it must be connected according to the diagram included in the kit. If the components security system purchased separately, you should ensure their compatibility (220 V).
Watch the video, instructions for installing an intercom with your own hands:
There is nothing difficult about installing a video intercom in an apartment with your own hands. However, feeling any lack of confidence in their abilities, they entrust each stage to professionals. Only they can guarantee the quality and stability of the system.
 Despite the simplicity of the described work steps, they require a lot of time and maximum concentration. Any, even minor errors, can affect the quality of audio and video signals. To protect yourself from mistakes, install video intercoms by trusting specialists.
Before choosing a contractor, it is recommended to familiarize yourself in detail with the offers on the market and look through the reviews of past customers. Buy everything necessary equipment And Consumables It is recommended to contact the installation company.
When concluding an agreement with a contractor, his specialist must visit the customer. He is obliged to make a small sketch of the premises and territory, photograph the most important areas, take measurements and provide an estimate.
Of course, the price for installing a video intercom along with the equipment depends on many factors, but the main one is the type of living space:
- For an entrance door near an apartment – from 7 thousand rubles
- For a private cottage or house – from 10 thousand rubles
- For office space or apartment building– from 18 thousand rubles
Before starting work, it is necessary to conclude a contract. It details the responsibilities of both parties and the cost of performing the entire range of work. The Contractor must guarantee the proper operation of the entire system and take measures to eliminate possible malfunctions caused by his fault. In turn, the customer undertakes to operate the equipment correctly. Additionally, it is recommended to conclude an agreement on periodic maintenance of the system.
 When installation is completed, it is necessary to check the functionality of the system in the presence of the person performing it. The customer must confirm that everything is in good order and meets his requirements. Having discovered problems within warranty period, the contractor must eliminate them.
A competent specialist, before leaving the client, must show all the features of using the installed device. He is also obliged to give a copy of the contract, all Required documents and warranty cards for equipment.
Let's sum it up
Video intercom installation – great way protect yourself from unwanted guests and intruders. After all, you can observe everything that happens behind the door from inside the room.
The factors that determine the quality, convenience and stable operation of the system are the competent selection of equipment and its installation. When faced with such a task for the first time, you should trust the specialists. And there is no need to save - the money spent will quickly pay off.
An intercom is a convenient and practical element of access control to a room.
It is not surprising that they are increasingly being installed not only in entrances apartment buildings, but also in private mansions or even dachas.
To access a high-rise building, you need a multi-subscriber device. And for a private home it is better to choose a low-subscription one. Its kit contains a calling panel with one or two buttons and one or two internal units.
There are audio intercoms and video intercoms. The first ones are equipped with speakers and microphones, they allow you to hear and talk with the visitor. Video intercoms also make it possible to see him in order to finally decide whether to let him in or not.
Video intercoms come with monochrome and color images. Although the first ones are already considered obsolete, many still choose them because black and white are cheaper, and the picture is more contrasting and clearer. Especially at dusk and at night.
In the vast majority of cases, an analog signal is used to transmit data. However, in subsequent years, more and more IP intercoms began to appear, which transmit a digital signal using standard packet data transmission. Signal transmission can be carried out by wire or “over the air” (radio communication).
Read the article on how to choose. In continuation, we advise you on which video intercom to choose for a private home?
Installation

It is quite easy to connect an intercom for a private home with your own hands, if you have an idea of the principles of operation of the device and its component parts.
The set of a popular video intercom with analogue communication includes two main components - an external calling panel and an internal remote control.
The first is installed outside, next to the front door or gate - where the bell was previously installed.
The indoor remote control is installed in the house, in a convenient place.
Additional components can include another video camera, an electric lock on the door, or a DEC tube. The presence of these devices does not make the circuit much more complicated, since they are all connected to the internal remote control.
Installing an intercom in a private house consists of the following stages:
- Cabling.
- Installation of the external panel.
- Installation of the internal panel.
- Connection, configuration, connection of additional peripherals.
It is most convenient to lay the cable with your own hands at the stage of construction or repair, before the work is carried out Finishing work. If you have to put them in already finished house, then you can use special cable channels or ditch the walls and then seal them.

The cable is usually not included in the package and must be purchased separately. For a regular video intercom you will need a four-wire shielded copper cord.
Some stores sell special wires, where two ordinary copper conductors are adjacent to a two-core coaxial cable - this is more suitable option, because the coaxial circuit provides additional protection from interference. If the intercom for a private house allows you to connect an electric lock, then it would be reasonable to add two more wires that will control the locking mechanism from the house.
The external calling panel is usually installed with your own hands when the finishing work is completed. Panels can be mortise or overhead. For mortise ones you need a niche in the wall, overhead ones are attached to a flat surface.
To attach the panel, you need to disassemble it (remove the cover), mark locations on the wall for mounting screws or bolts, drill holes, and screw the panel.
The interior remote control kit includes fastening elements. You need to attach them to the wall in a place convenient for you and then install the main unit. It is recommended both external and inner panel install at a height of about 150 cm so that it is located slightly below eye level. In this case, use will be most comfortable.
The most crucial moment is connection. There's really nothing wrong with it. The main thing: do not mix up the wires. The sockets on the panels are marked, “audio” needs to be connected to “audio”, “video” to “video”, etc.
One important point- if a coaxial cable is used, then it is preferable to use its core for transmitting the video signal, and the braid for the general cable (ground, GND). Such a scheme will provide maximum quality sound and video.
The switching topology will look approximately like the illustration.

If you are installing a wireless device, then there is usually no need to lay a cable and connect it, you only need to supply power.
The connection diagram for an IP intercom differs in that it may not include an internal remote control at all, and instead you can use a TV, computer or communicator. Or you can connect several devices at once with your own hands using a simple network switch or router.
For switching, a standard eight-wire UTP, FTP or STP cable (“twisted pair”) and 8P8C connectors (commonly called RJ45) are used.
Cost of devices and installation services
The market offers wide choose models of different price levels, with different sets of additional devices.
| Model | Prices |
|---|---|
| Eplutus EP-2280 | 3300−3600 RUR |
| Eplutus EP-2230 | 4100−4500 RUR |
| Tantos Amelie | 6000−6300 rub. |
| Gardi Ireas | 6300−6500 RUR |
| Kocom KCV-A374SD | 8000−8500 RUR |
| Commax cdv-70ux | 15,000−17,000 rub. |
| BAS-IP AG-04 | 15,500−17,000 rub. |
If there is no desire or opportunity to make the connection yourself, then you will need to pay from 9-12 thousand rubles for the services of specialists.
Installing an intercom in a private home is a great way to make life easier for yourself and your guests, making your home more secure and convenient. And if you know how to lay the cable with your own hands and screw in the screws, you can spend a very modest amount.
However, if you want to have a modern smart House, where the intercom is integrated into local network where you can chat with a visitor literally from every room, then it is wiser to choose a more expensive one, but modern model with IP data transfer protocol.
You can purchase the most basic kit, and then supplement it with an electric lock, another camera and other peripheral devices.
It is worth paying attention to additional functions:
- IR illumination for night observation;
- GSM module for sending messages to the owner’s phone;
Now almost any entrance multi-storey buildings, office buildings are equipped with intercom. This is done in order to prevent unauthorized entry into the territory, access to which is by definition limited. What kind of device is this, how exactly does it work?

Design and principle of operation
An intercom is an electromagnetic locking device with the ability remote control the process of opening and closing from remote controls (handsets) located in apartments or offices. The system is installed on the entrance door and protects the building from unwanted entry.
Depending on the system for connecting apartments to the intercom device, a distinction is made between digital and coordinate devices.


With a coordinate switching system, a separate cable goes from the intercom to each apartment, but with a digital system, there is only one connecting cable. It would seem that digital intercom devices should be cheaper, however, in fact, everything is exactly the opposite - their cost is almost 3 times higher than that of coordinate ones. But it is believed that this pays off with higher reliability and security similar system communications.
Based on the type of communication, intercoms are divided into audio and video devices. From the name it is clear that video intercoms have a screen that displays the identity of the calling visitor, while audio devices provide only voice communication. Naturally, devices that transmit video images provide more high level protection, but do not forget about the price aspect - they are much more expensive than voice intercoms and, as a result, much less common. Typically, video devices are installed on the gates of large private properties.


Connecting to digital intercoms
How to properly connect a digital intercom handset in an apartment? This is not at all difficult, provided you follow a few rules. The subscriber node of the intercom system consists of a panel and a handset. The panel is usually installed on the side of the front door; the installation location of the tube can be anywhere, if desired, the only thing is that you will need to run the cable from the panel there. The internal structure of an intercom handset is almost no different from a telephone handset - it also has a microphone with a speaker and a microcircuit. The access door unlock button can be located either on the handset or on the wall panel.
On the rear side of the panel part of the device there are two terminals with polarity symbols (“+” and “-”). You need to connect a two-wire line to them. It is important not to reverse the polarity of the wires during installation - otherwise the system will not function.
To facilitate this process, wires of the same polarity are usually the same color.


The initial installation of an intercom system is always carried out by professionals, self-replacement comes down to buying a new intercom, actually replacing and connecting the wires. Before purchasing a handset, check the type of intercom you have. For digital and coordinate systems there are different models. The connection diagram of the handset to a digital intercom has its own characteristics. During the installation process, you must dial the apartment number. It's done like this.
- Carefully open the intercom housing. You will see that there are paired pins on the chip with numbers 1-2-4-8
- Using special jumpers, connect the pairs in parallel so that the sum of their numbers equals the number of your apartment. For apartment No. 15, for example, you need to short-circuit the first four pairs.
Please note that problems with one apartment intercom can affect the functioning of the entire system; this is the main disadvantage of such systems. To localize a fault within one floor, floor controllers can be additionally integrated into the system.

Installation on a coordinate matrix type device
Connecting a handset to an analog (coordinate matrix) device differs from the same operation with a digital device. An analog intercom system operates on the principle of a telephone exchange - reception, analysis and connection with the desired subscriber is carried out by a switch. Subscribers are most often connected to the system in parallel.
There are 2 special buses for connecting the intercom with the switch. On the first bus, the contacts (D0-D9) are responsible for tens in apartment numbers, on the second (E0-E9) - for units. Connect the wire from the terminal with a plus sign to the contact responsible for the ten in your room (for apartment No. 87 - 8), the wire from the negative terminal is connected to a single contact (7 in our example).
If there are more than 100 apartments in your entrance, the intercom model must correspond to this number (there must also be a third bus, responsible for hundreds in apartment numbers). The principle is the same.


In some cases, when installing an intercom system, installers reprogram the panel, shifting the numbers by a certain amount. This action is performed, for example, if it is impossible to connect hundredth numbers. In such a situation, you will not be able to connect the handset yourself; you will have to call the specialist who set up your system. Switches are typically installed on each floor in distribution boards and are connected to each other in a parallel circuit.
It is also possible to install one switching device for the entire entrance, but in such a situation additional tens of meters of cable will be required in order to sequentially connect the apartments on the upper floors. If, when connecting at least one subscriber intercom to the entrance analogue system, the polarity of the wire connection is violated, this may affect the functioning of all system devices, as is the case with digital intercom communication.

Possible faults
During the operation of the intercom system, various problems may arise. malfunctions:
- mechanical damage to the tube;
- When you pick up the handset, the signal continues to sound;
- failure of the lock release button;
- the voice of the caller is hard to hear;
- if you press the door open button, the call is dropped.
In the first case, it is easier to replace the damaged part (pipe), because they are not so expensive. The main thing is to choose the right intercom for your intercom system model. In situations where the call signal does not turn off when the handset is picked up, there is no connection with the calling visitor and there is no reaction to pressing the lock control button - look for a breakdown in the handset switch. You can repair or replace it yourself, however, it is still recommended to entrust this to professionals, especially if you have never done anything like this before. This procedure requires some experience and appropriate tools.


If you have to press the electric button several times to open the lock, the microswitch is to blame. It is not difficult to change this part yourself, even if it is located on the intercom handset. It is enough to carefully unsolder the contacts of the faulty part, remove it and solder a new one. If the visitor is hard to hear, the problem is in the speaker or microphone. In some models, such a malfunction may be caused by a clogged “Balance” resistor installed on the intercom handset board.
In the latter case, you can try to twist the resistor lever yourself; in most cases, audibility is restored.

Unauthorized disconnection of a call when the lock is unlocked may be caused by an interruption in the electrical circuit coming from the speaker. In this case, carefully inspect all cable connections - both on the panel and on the intercom. Of course, turn off the device first. If there is a break somewhere, you need to replace the wire or solder the contacts of the wire and terminals. To summarize, we can say the following: in many cases, you can replace a damaged tube of both a digital and a coordinate matrix intercom yourself; this is a fairly simple action. Only in some cases is it worth calling the adjusters of your intercom system.

To learn how to connect different intercom handsets, see the following video.


