In order not to put clothes and personal items in narrow closets on small shelves, you should think about designing your own dressing room. After all, sometimes it’s not immediately possible to find required element clothes, you have to search for a long time and waste time. A dressing room does not have to be large; sometimes a small closet or pantry is enough.
What is a dressing room for?
It is very simple to make a dressing room with your own hands according to drawings and diagrams with photos; you can place it in any corner of the apartment. What is its advantage:
- All things are neatly folded or hanging in one place.
- You can immediately match your outfit with an accessory in the form of a bag, tie or headdress.
- The opportunity to make any fantasy come true.
- Light weight structures for creating shelves and partitions in the dressing room.
- The ability to make the most of the resulting space.
- Long-term and reliable storage of things, protecting them from fading and direct sunlight.
- Clothes do not wrinkle or wear out.
- The ability to arrange clothes by color, season or style.
- You can store shoes inside household items, for example, an iron, ironing board, bed linen, children's or Christmas toys, etc.

Varieties
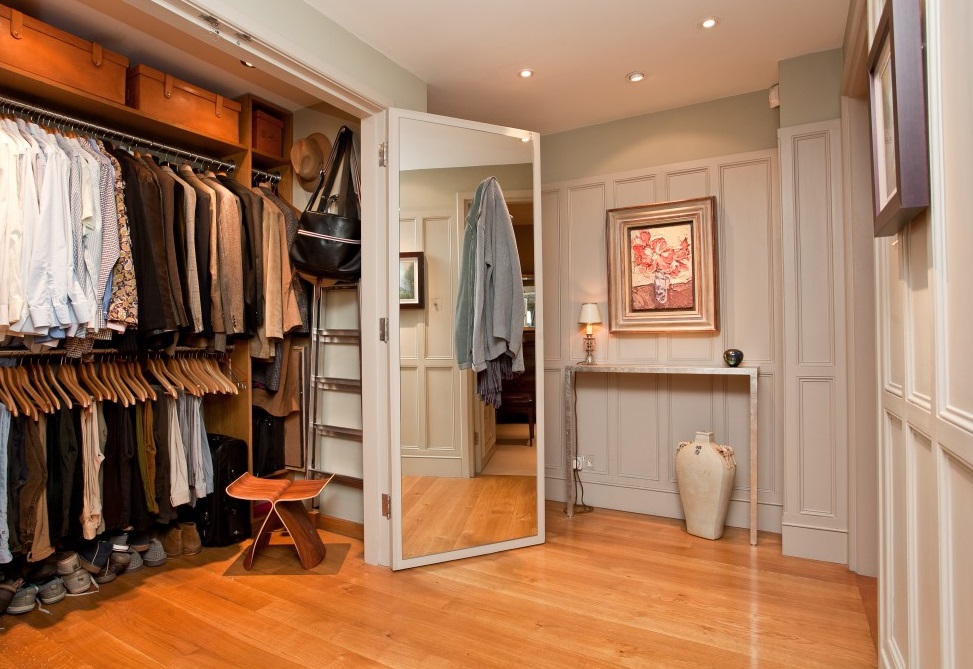
If you have a spacious apartment, you can afford to build a large dressing room. You can install a clothes dryer, lighting, and even hang a mirror inside. However, even in a small room (even 2 sq. m. and 5 sq. m.) all this is possible, you just need to plan it correctly.
The advantage of a small room will be the ability to easily and quickly find any thing, because everything is always at hand. Cleaning is also not difficult, it will be quick and easy. Creating a home dressing room with your own hands is shown in the video below.
What types of dressing rooms are there:
- Angular. Here you use the space of the room with maximum rationality and save a lot of space. To create this design it will be sufficient to select small place up to 2 sq. m in the corner of the room and carefully consider the location of the partitions. The material used is drywall, it is lightweight and leaves almost no dirt after installation. In this case, it is better to make the shelves open for economical use of space.

- Linear. Such a dressing room, created with your own hands according to drawings and diagrams with photos, is most often installed along one wall and resembles an ordinary niche in appearance. To organize the entrance, you can use a screen or an accordion door. In this case, it is also recommended to do without partitions, as well as install retractable hangers, which will make access to clothes easier and more convenient.

- Parallel. This type of wardrobe is installed along both walls parallel to each other. The best option is walk-through rooms; you can use one partition for zoning. The desired width of the room is from 1.6 meters, this is necessary for free movement in the room. It is recommended to place racks with things at a distance of 80 cm from each other (opposite). For interior design You can use end hangers, retractable structures, and chandeliers and floor lamps for lighting.

- L-shaped. Such a dressing room can become an extension of the room, so it is not always necessary to use partitions.

- U-shaped. This is a whole dressing room where you can fit anything you want. Here you can place closed cabinets or drawers, shelving, and separately installed sections. The area of the room can be filled in different ways using design techniques. Ideal room for such a dressing room it should be elongated and slightly narrowed. Here you can equip mezzanines using wide upper shelves or drawers where you can store rarely used items, travel bags and sports equipment.

- Wardrobe-storage room. Such a dressing room, equipped with your own hands in a small room, is shown in the photo below. From the pantry you can get perfect place for storing U-shaped things. In this case, the entrance area can be decorated with a screen, a sliding partition, or doors can be installed.
- Bedroom zoning. This storage system is the most good idea for organizing a dressing room. If your bedroom is large, you can easily create a U-shaped design and make the most of the space. Sometimes one room is made into two using a partition, then from the bedroom you can immediately get into your personal storage and quickly choose a casual outfit. An interesting solution is to install a dressing room at the head of the bed. In this case, the space can be zoned with a screen or simply install a wardrobe.

Proper organization of lighting and ventilation systems
Most often, there is no window in the dressing room, and, consequently, daylight. Therefore it is necessary to install additional sources artificial light, giving preference to the warm spectrum.
Types of dressing room lighting:

How to properly make a dressing room with your own hands at home, using photos and drawings, is shown in the video below.
The ventilation and ventilation system should also be well organized and thought out in the dressing room:

How to choose doors
The design of the doors should be suitable for the overall interior design, as well as be comfortable and reliable. Types of doors for storage systems:

How to make a dressing room with your own hands from a pantry is shown in the video.
Internally filling a dressing room is the most enjoyable process in its creation. The modern market offers all kinds of models of cabinets, shelves, cells, drawers, chests made of various materials. A rational approach is important here:

Do it yourself
Today there are many ideas on how to make a dressing room with your own hands in the bedroom, hallway or living room. Where to start:


Make sure you have all the necessary tools and quality materials:
- Guides and rack profiles to create a reliable frame.
- Drywall sheets for covering partitions and frames. In this case, the material must be waterproof.
- Mineral wool for filling gaps in the frame.
- Putty mixture and metal mesh to strengthen the putty layer.
- Paint, plaster, wallpaper, varnish, Wall panel etc. for finishing.
- Sockets, a set of switches, wiring, wires for organizing a lighting system.


Method 1 - Corner made of plasterboard
Let's start creating a storage system at home:

Creating a dressing room from plasterboard with your own hands is shown in the video.
Method 2 - In the pantry
If you have small apartment, it is important to make the most efficient use of all space. Therefore, you can independently convert a storage room into 2 or 5 square meters. m. to the dressing room. You can remove part of the partition, slightly expanding the area of the future storage system. However, it is important to understand that this will slightly reduce the area of the main room or corridor. Let's get started:

What we need:
- Damper tape.
- Guide profiles.
- Self-tapping screws.
- Plastic corners.
- Metal pipes to create a frame.
- Set of furniture handles and hooks.
- Chipboards.
Let's start the assembly:

Remember that light shades visually enlarge the space and lengthen the walls. This is especially true in small dressing rooms and storage rooms. You can also use glossy or mirror surfaces, as well as decor.

Today, a dressing room in a house or apartment is most often a necessity. This makes life more convenient and enjoyable, because you spend less time looking for things, everything is located in one place. By following the instructions and video master classes with photos and drawings, you can create the storage system of your dreams.
How to make a dressing room so that things are stored in one place and you don’t have to look for them in different rooms and closets. It is not required for installation large area, even in small apartments, if desired, there will be a suitable place.
The advantage of a dressing room made by yourself is that it will be made in a way that is convenient for you to use, it will cost much less, because the work will be done using the material found in the house. Another one positive side- its presence will relieve unnecessary furniture in the apartment.
Where to start making
There are many ideas for equipping a dressing room. There are all kinds of systems and devices for storing things. When getting started, you should think about and plan the progress of the work in advance.
Layout and drawing
You should start by determining the location, dimensions of the dressing room and a drawing of the plan, indicating the dimensions. A drawing is drawn on a reduced scale, the planned systems, fixtures, and drawers are inserted. Systems should be distributed ergonomically without overloading the space.
When planning, it is necessary to take into account the distance between the shelves:
- for storing things - at least 30 cm;
- for shoes (without heels) - 20 cm;
- for shirts, jackets, jackets - 120 cm;
- trousers - from 100 – 140 cm;
- dresses - 150 – 180 cm;
- coat - 180 cm.
On top, it is more practical to make shelves for things that are not used often. And below, a place for a vacuum cleaner is recommended.
The dressing room is not located in a walk-through room; it is better to place it between the bedroom and the bathroom.

Filling
With limited space, it is not recommended to make furniture from wood, MDF, or chipboard in the dressing room. This material will reduce the small area. Today, storage systems made of metal are popular; they are lightweight and modular. They are installed on special racks that are mounted on the wall, floor, or ceiling. The racks are equipped with many notches, with the help of which the height of the shelves can be quickly adjusted. Material for making shelves - wood, metal, plastic. The shelves are of the pull-out type.
These storage systems are sold, but are expensive. It’s more economical to make it yourself, from chrome-plated furniture pipe.

There are many options for arranging dressing rooms: rods for trousers, skirts, all kinds of shoe stands, drawers for small items. They are retractable - convenient and functional
Material selection
Suitable for production:
- Wood (chipboard) is a common material, able to withstand the load of things, absorbs moisture, and is economical.
- Plastic - used plastic panels different sizes.
- Metal - aluminum is most often used, it is light and durable. The structure is well ventilated. The cost is more expensive than chipboard.
- Glass - contributes to the visual expansion of space. Suitable for high-tech, modern style.
The finishing is made from any material: wallpaper, glass wallpaper, ceramic tiles.
When finishing, you should take into account the location of additional lamps for the shelves, making holes in advance. The built-in mirror in the door looks original
How to make a dressing room: open and closed type
When choosing a type, you should take into account all the nuances: location and rational use of space.
Open view
An open dressing room is a structure for storing things, not separated from the living space by a partition. It must correspond to the general style of the room. Recommended for use when there is a shortage of free space in small apartments.

Plus open design- everything is at hand. Minus - clothes gather dust, they should be placed carefully so as not to spoil the appearance of the room
Closed view
A closed dressing room is separated from the room by a wall and has doors. It ensures order in the room, since the contents of the cabinet are hidden.
The closed dressing room has a large area and has a well-thought-out organization of the storage system.

A closed wardrobe is convenient and allows you to try on and care for clothes right in the dressing room. The arrangement requires a large space, which is not possible in ordinary apartments.
DIY dressing room example
The first step is to note the height and width of the shelves and sliding doors in the niche of the future wardrobe. In our case, the depth of the niche is 1.4 m, taking into account the protruding box

The box is necessary to hide the pipes and install the water meter. Let's not forget to leave space between the shelves, because... titanium will be present in the dressing room. We also provided space for an outlet between the shelves.
- We purchased a 5x5 block to solve the problem of placing the rolling door. Reason: the ceiling height is 275 cm, but the suspended ceiling takes another 10 cm;
- We will install aluminum rails at the top and bottom for door mobility;

- In the Leroy Merlin hypermarket, where we shopped, there is a service for cutting shelves using a large machine. Having previously measured the length and width, and estimated everything on paper, we ordered shelves with a width of 30 cm and 60 cm. The service is very convenient, because shelves ready for installation will be delivered to your home. You will only have to use a hacksaw if the corners are uneven;

- Don’t forget about the addition for finishing the cabinet on top, which we buy in wenge color. The width of the extension is 10 cm. To attach the hangers, we purchase two round metal holders. We check again: the distance between the shelves is 40 cm, we fix the small corners 5 cm from the edge of the board. We place large corners immediately below them, so that later we can attach the end guide to the floor and wall (it will have to withstand a large load);
- We fix two large corners in width, and 4 in height. For this stage of work, we will take care of purchasing a level;
- We recommend using a long level. To install the end guide without any problems, you need to tighten the corners on the floor in advance. Don’t forget to measure the distance on the wall with a level. Then we proceed to installation;
- We initially planned to create a dressing room, although the box is made of plasterboard. Previously, aluminum guides were passed inside, which are attached using corners;
- We adjust the length of the aluminum guide using a hacksaw. On the right side of the wardrobe there is a rolling door that can slide to the side, and on the left there is a large shelf 60-2.70. Internal shelves are attached to the latter;
- Let us repeat that the top is trimmed with an additional 10 cm of wenge color;


- Inside the wardrobe, but on the left side, there is space at the bottom for boots and other shoes. There are also a lot of shelves installed here and a power outlet. We left room for titanium. Even further to the left is a niche with a depth of 25.5 cm. During installation, we used shelves 30 cm long so that more boxes could fit here;

Wardrobe type
Arranging a dressing room is an important point; you should take into account the installation location, and based on this, choose the type of model.
Angular
An excellent option if you have a free corner in the room. A corner cabinet is more practical than a straight one. It can accommodate: shelves, drawers, rods.

Zoning corner cabinet carried out different ways. Finish the corner with plasterboard and make doors, hinged or sliding. It is possible to fence off a corner with doors, like a coupe
Linear
Linear - similar to a large wardrobe. Mounted along a wall that does not have windows or doorways. It is fenced off from the room in several ways:
- plasterboard wall with sliding doors;
- sliding doors on the entire wall;
- cornice on the ceiling with a curtain.

A linear model with open shelving, looks great in a loft style room. The main thing is to choose the right one for general interior material and color scheme cabinet
U-shaped
U-shaped - ideal for long room. On one side there is a bed, on the other there is a dressing room. It can be in the form of closets or as a full room.

Having fenced off the space, you should think about the lighting, divide it into 4 zones: for outerwear, shoes, short items and for trying on
Parallel
Designers recommend using this type in wide, long corridors. Consists of two cabinets facing each other.

A parallel dressing room can be closed, in the form of cabinets, or open, with racks and shelves
Wardrobe dimensions
The dimensions of the dressing room are determined taking into account its location and use. Ideally, it should have space for storing clothes and an area for changing clothes.
The optimal size is calculated individually, it is necessary to take into account:
- size, location, shape of the room;
- presence of a niche;
- location of windows and doors.
Measurements must be taken accurately so that no difficulties arise during the installation process.
The width varies and is calculated as follows:
- if the cabinet is on one wall, the width is its depth, plus the width of the doors;
- if there are no doors, but there are drawers, the width is two depths;
- when two cabinets are located opposite each other, the width is two cabinet depths, plus two door widths and a passage.

A prerequisite for size is that the doors must open freely and not interfere with unhindered entry into the room. If the dressing room is narrow, you should not make large cabinets
Ventilation and lighting for the dressing room
In the dressing room, ventilation is required, since closed space smells will appear. It should be planned in advance. There are two types:
- Natural - air comes in from below and comes out from above. To arrange ventilation, it is necessary to make holes in the closet, at the bottom and at the top, for air movement. This method does not always give full results.
- Forced - means installing a fan in the hole. It's better to put forced exhaust- will provide a suitable atmosphere for storing things.

The exhaust hole is made on the opposite side from the inlet. It’s great if the exhaust vent goes into the ventilation
The dimensions of the holes must be determined in accordance with the area of the dressing room.
A wardrobe is not a closet, but a room with shelves and drawers. To quickly find the right thing, you need good lighting. Better, multi-zone:
- on the ceiling - general lighting;
- for illumination of shelves - additional rotating lamps.

The ideal solution is to install a motion detector to turn on the lighting. It's economical and convenient. And the lighting of the shelves looks beautiful and stylish
Doors for dressing room
When making a wardrobe with your own hands, it is important to choose the right doors. The comfort and ease of use of the room depends on a well-chosen model. Common types are:
- Swing doors are practical, but require space. Protect from sunlight, dust, with a high degree of sound insulation. They are the most affordable in terms of cost.
- Accordion doors are compact and fold like a screen. The structure is fragile and consists of many slats.
- Compartments are popular, the movement of the doors is carried out along the cabinet, no additional space is required.
- Roto door - non-standard solution. Suitable for loft and hi-tech style. The door is installed on a special mechanism, which allows it to rotate around its axis and open in any direction. Free space is required for installation.
- Pencil case - the doors are hidden in the wall, no extra space is required. Convenient for small apartments. But the installation of such a structure is complex; without experience, it is difficult to do it yourself.

Accordion doors look beautiful. They transform the room, adding some zest to the interior
The material for making doors is different:
- Wood looks aesthetically pleasing and is an environmentally friendly material. But wooden door heavy and expensive.
- Glass or mirror are popular today. Doors decorated with stained glass will decorate the room and make it larger.
- Plastic is light and cheap. Plastic doors less durable and not as beautiful.
To make the door to the dressing room look stylish, it should be decorated with inserts of mirrors with a sandblasted pattern or elements of relief glass.

The door looks original and unusual, giving the apartment a modern, fashionable look. But not suitable for classic style
Arrangement: filling and storage systems
For the practical use of a dressing room, you should properly arrange it and select acceptable options for storage systems. You should not come up with complex, intricate designs.
Clothes placement system
There are different designs for storing things, the main ones include.
| Storage systems | Hull | Modular design, consists of sections with walls: side, bottom, top. It is located close to the wall and fixed into a single complex. Made from chipboard. |
| Frame | A model made of metal racks attached to walls, floors and ceilings. The following are installed on it: rods, hooks, holders. Installation is simple, elements can be moved and things can be well ventilated. | |
| Panel complex | This decorative panels fixed to the wall, modular storage elements are attached to them. The system has no divisions on the sides; there is no floor or ceiling. The cost of the complex is not cheap. | |
| Mesh | The model is universal. A horizontal rail screwed to the wall onto which the slats are mounted. Brackets, shelves, and hangers are installed on them. |

There are attachments for skirts, trousers and tie hangers, and clips on them allow you to secure the item. Very convenient if the hanger extends
Shoe storage system
There is always a lot of shoes in the house, it is important to organize a system for storing them, compact and convenient. The ideal solution is to place shoes on shelves or in special cabinets. It’s good if there is a compartment of the appropriate size for each type of shoe. And when using pull-out shelves, space is saved.
If space allows, it is worth equipping a full-fledged built-in shoe storage system. It has special shoe sections - convenient to use, shoes do not gather dust. Shoe racks are available in different sizes and have different installation methods, so they are easy to match to any dressing room.

An original design for shoes - it looks like pins with modules on a retractable frame. Compact and convenient system
Shelving
Rack - a structure consisting of racks and attached open shelves. Usually it is metal. Access to things stored on racks is free. Their main advantage is modularity. They vary in size and number of shelves.
Where to make a dressing room
Not every apartment has room for a full-fledged dressing room; you have to arrange it in the most suitable premises.
Dressing room in the hallway
It’s convenient to make a dressing room in the hallway; you don’t have to clutter the room with large wardrobes. A dressing room in the hallway involves storing outerwear, but if the space allows, you can arrange storage for all things. A good option is a built-in wardrobe, finished to match the walls of the hallway itself. A mirror is a must-have detail; you can’t do without it in the hallway.
You can do:
- Closed - a large wardrobe, often with compartment-type doors.
- Open - racks, shelves, hooks for clothes. The option requires maintaining order, since all things are in sight, but takes up less space.
- Combined - consists of closed cabinets and open shelves. Convenient, things that are not used often are put away in a closed part.

The dressing room in the hallway should be installed along a large wall. If the area is small, ideally - corner, from floor to ceiling
Arrangement of a dressing room in the bedroom
The bedroom is the room most suitable for a wardrobe. The models are different - with a large area, it is possible to make an entire dressing room. If the bedroom does not allow it, then it is better to use:
- open shelves and mobile hangers, decorated with decorative drawers;
- small built-in wardrobe made of plasterboard;
- partitions made of mirror or glass, which will visually enlarge the room.

A dressing room in the bedroom separated by a screen or curtain on a curtain looks good. This storage system is convenient in a small room
Design of a dressing room from a pantry
Making a dressing room in a pantry - good decision, especially for small apartments. It’s simple to do - you need to remove everything unnecessary, decorate it in a light color scheme (this will increase the space), replace the doors (preferably a compartment type) and fill it with: racks, racks, shelves.
Since the closets are small, you should equip them with mirrors, thereby making more space.
Dressing room in Khrushchev instead of a storage room
Khrushchevka is a small apartment with a standard layout. The only advantage is the presence of a storage room; it can be easily converted into a dressing room yourself. Depending on the size, you can make it into:
- built-in wardrobe - the niche already exists, all that remains is to install doors and install shelves and hangers;
- equip it with a full-fledged system for storing things - dividing it into zones and filling it with functional systems.

It is important to think about the arrangement of furniture and shelving. For rational use, space should be used from ceiling to floor
In the attic
The advantage of an attic dressing room is saving living space, the ability to collect things in one room, making them easy to find. In such a room there is room for all types of clothes and a fitting room.
The layout should be done based on the shape of the attic. If the attic is on a slope, then the dressing room should be located along the lowest or highest wall. Rational use of the attic is achieved with a corner dressing room.

Attic dressing room - the ideal solution, trying on in front of the mirror, choosing the right set of clothes in comfortable conditions
It is possible to organize convenient storage for things almost anywhere. It’s not difficult to make your own dressing room by separating part of the room with doors, chipboard leaves, and drywall. But this method is not acceptable in standard apartments, but in them there are often niches - an almost ready-made dressing room, the main thing is to arrange it correctly.
It’s easier for the owner of private houses, if space allows, you can give a whole room for a dressing room, especially suitable attic room. Experts recommend zoning the space.
The advantage of a do-it-yourself dressing room is the opportunity to design it for yourself, providing for the zones and elements that will be needed. In addition, the opportunity to show your design skills and create a one-of-a-kind dressing room.


Video
Are you tired of constantly cleaning up scattered things? Are you dreaming of arranging a dressing room? Don’t rush to give up on this idea, even if your funds are limited! After all, in fact, you can make a dressing room with your own hands without any special financial expenses.
Considering the size of the living space, a separate room or a corner of the bedroom can serve as a dressing room. You should not think that such a separate room is of interest only to beautiful ladies; men like it no less when all things are neatly hung and placed in their places. It is convenient to store things in such a room for a long time. Here they will not deteriorate, will not wrinkle, will not fade and will not be damaged by pests.
Main requirements for the premises
Even if you cannot allocate a lot of space for a dressing room, you can equip it with many shelves. Minimum dimensions Such a room is 1x1.5 meters. Hangers, shelves and drawers will fit here quite compactly. It’s great if you can allocate space in the dressing room for changing clothes with a mirror. If your dressing room is very small, then provide ventilation in it, because otherwise there is a high probability of air stagnation, which will lead to things becoming saturated with a musty smell.
The area allocated for storing outerwear, as well as dresses, can have a depth of 0.5 m and a height of 1.5 m. The area in which short clothes will be stored may have a slightly smaller size - 0.5x1 m. Upstairs Place additional shelves to store things you don't use very often.
Making a dressing room in a closet, niche or corner of the room

Equipping a quality space for a dressing room does not necessarily have to include a special separate room designed for these purposes. Believe me, it is possible to allocate an area for a dressing room in an ordinary apartment. Do you have an unusable niche in which nothing else fits except an unnecessary pile of things? Then clear it of the clutter immediately!
First of all, refuse cabinet furniture that takes up a lot of space in a small area. You can make or buy special “boiserie” and “loft” designs. They have mobile cabinets and no extra walls. This approach will make the process of creating a dressing room easier for you. Pay special attention to the choice of door. If the niche is located in the bedroom, then to increase the space it is better to use translucent or frosted glass. Are you setting up a storage room in the hallway? Then choose a door that matches the tones of the wall or design a doorway, because there are always several doors opening into the corridor.

In small apartments, a dressing room arranged in the corner of the room is the most reasonable solution when allocating space.
The fact is that placing standard typical furniture in this case is simply unacceptable. A corner dressing room can accommodate a lot of necessary things, often much more than in closets.
The functionality of the wardrobe room, namely its internal structure, must necessarily meet the requirements of practicality, convenience and spaciousness.
A storage room for a small wardrobe can be in the shape of a triangle, trapezoid, letter “L” or five-walled. Place the bar in the center, with shelves on each side of it. Accessories and small items can be placed in specially designated baskets, lattice containers and mobile cabinets. As for shoes, it is more practical to store them by installing special design on the door or at the bottom of the closet. Boxes for storing all shoes, available in both closed and open type. In addition, the bottom is convenient for storing household appliances intended for frequent use. On the upper shelves it is better to place those things that are in Everyday life used infrequently.

Small wardrobes placed in the corner of the room have many advantages. For example, in small rooms they are irreplaceable. In appearance, they resemble a wardrobe, but are placed in a place where its conventional counterpart will not fit. This way, you can distribute the space as usefully as possible, for example, in the bedroom. The dressing room is incomparably functional, stylish and spacious!
For hangers, you can build a tubular structure from chrome-plated products. You can buy them at any hardware store in the city. You will need pipe for the horizontal hanger and the vertical rack. In addition, buy a connector and 3 pipe fittings for wall, floor and ceiling pipes.

If the allocated space allows, then place the bar on the right or left side of the entrance to its entire length. As practice shows, this arrangement is optimal. Build corner shelves - they will occupy the space of the straight far wall and one of the sides from the entrance. When constructing shelves, you can also use chrome pipes, as this is perhaps the most economical option. Besides, air structure This type will allow you to easily reach each shelf. Chrome pipes must pass through all shelves. They will be attached to the ceiling and to the floor.
Leave a small space opposite the entrance. This will allow you to move freely around the room during operation. You can attach a large mirror to the door, which will give you the opportunity to change clothes.
Installing a plasterboard structure

- Before you begin assembling the frame, mark the profile and cut blanks from it for the ceiling, floor and walls. You can do this using specially designed scissors, which can be purchased at a hardware store.
- You can install the floor profile using self-tapping screws and a screwdriver.
- Now proceed with the installation of the vertical wall profiles, and then the horizontal ceiling profiles.
- To improve the rigidity and strength of the structure, secure the transverse profiles using self-tapping screws. Be careful when carrying out work to avoid damaging the existing wall covering and don't hurt yourself.
- After you assemble the profile frame, cover it with plasterboard in two layers, between which lay insulation.
- It is appropriate to lay electrical wiring in the same space. Instead of drywall, you can use chipboard or MDF board.
- After finishing covering the frame, apply a primer to the plasterboard walls and glue the seams. The simplest finishing method plasterboard walls– wallpapering, but if you wish, you can finish it with wood or use decorative panels. Experts agree that the most durable finishing option is to paint the walls, but to do this you need to carefully putty and sand the walls.
- The most practical way to lay a floor in a dressing room is with tiles. But you can also cover the floor with linoleum, carpet or parquet.
A plasterboard dressing room must have doors, for example, sliding doors. Their main advantage is that they take up little space compared to the swing model. As for lighting, it is better to place it inside, and just one spotlight will be enough. Additional lighting is usually located next to the mirror. Lovers of comfort will appreciate the special lighting fixtures built directly above the shelves and hangers.

If you select things with taste, carefully arrange and hang them, and also maintain cleanliness, then the wardrobe-rack will become aesthetically pleasing and stylish decoration your home. There is a strict condition here - the frame and shelves must be inconspicuous against the background of the contents.
The design solution for a wardrobe shelving unit is extremely simple: the supporting frame is made of perforated profiles that are attached to the wall, and shelves for clothes can be made of regular laminate dark color. For aesthetic reasons, it is better to install a mesh exclusively for storing shoes. And it must be secured to metal struts.
Rods for storing hangers can be attached to the struts or to the underside of the shelves. Metal fittings used for arranging wardrobe shelving usually have a fairly high cost. However, you can save money. How? Pieces of rod having a diameter of about 0.6 cm can be used as struts.
They may even be rusty and not very smooth. For refining rods, heat-shrinkable tubes, which are used for electrical insulation, are suitable. They are made from polyisopropylene different colors. The diameter of the tube should be 2 times the diameter of the rod. Heat the heat-shrinkable tubes with a household hairdryer to 70-80˚. In this case, the plastic layer will be about 2-3 mm. You can remove the markings on the heat-shrinkable tube by wiping it with a cotton swab containing alcohol or cleaning powder intended for stoves, or dishwashing detergent. The tube will hide all the irregularities and roughness of the metal.
As for the shelves, you can make them from ordinary cheap laminate, which must first be cut to the specified length. To ensure that the width of the shelves is appropriate, the laminate is connected with locks. Now you can start arranging things.
Assembling a wardrobe-pencil case

A wardrobe-pencil case is a rectangular high case equipped with a retractable frame-hanger, which is also equipped with shelves. For a long time people have made unsuccessful attempts to create such a structure. All failures were related to the guiding mechanism. In all cases, the hanger, extended to its maximum or only half, became warped and jammed. But, not so long ago, the problems were solved. Nowadays, the side ends of the shelves, which have a PVC edge of 2 mm, are used as guides. You will also need paired guide rollers. They are secured to the side walls of the case from the inside, so that they are moved as far forward as possible.
This design goes inside the pencil case with a slight push by hand. Shelves on which small items are stored are equipped with small sides made of PVC sheets. This is provided so that any laundry that hangs out randomly does not fall under the rollers, which can put the wardrobe-pencil case out of order.
During the installation process you should:
- Assemble the hanger first.
- Attach the rollers to the sides of the case.
- Check that the rollers are positioned correctly in height.
- Now you can attach the back and top walls to the side panel, which will be adjacent to the wall.
- Push the hanger in and attach the opposite side.
- The lower part of both sidewalls is fastened from below using a U-shaped galvanized strip. It will be a stopper that prevents the hanger with shelves from spontaneously rolling out.
Photo


Today, you can arrange a dressing room in different ways, which often depend on the availability of space in an apartment or house. It all comes down to a matter of taste. If you have already been designing and arranging a dressing room, then share your ideas! Perhaps you had any difficulties during the work process? How did you deal with them? Maybe you were able to apply innovative technologies? Which ones exactly? Write us your comments, we are always ready to expand our knowledge!
Video
If you still decide to order ready-made cabinets, then first of all pay attention to the quality of materials and components (compartment doors for the dressing room, storage systems, rods).
Hallway - business card each apartment or private house. The room not only optimizes the living space, but also carries an aesthetic and functional load. Standard furniture does not always accommodate the necessary things if the room is small.
Open-type hallway design with more functional content.
The dressing room has a number of advantages:
- Unity – the storage system takes into account rational arrangement all planes;
- Conciseness - the use of built-in modules for a small room;
- Cost-effectiveness – the ability to save money through the use of a facade;
- Reconstruction of surfaces – leveling of minor irregularities.
There are also disadvantages:
- Lack of mobility - embedded systems cannot be moved to another location;
- Repair - after completion of dismantling work is carried out redecorating individual areas or the entire room;
- Complexity of assembly - to arrange the structure, certain knowledge and skills are required.

Design of a dressing room in the hallway.
Kinds
All furniture for the hallway should be as spacious and functional as possible. Suitable for small accessories drawers, containers or boxes. Everyday items are located with easy access to them. Seasonal clothing is placed on top. High long pencil cases are installed for shoes. Shoes and summer footwear are placed on special hangers. A mirror in the full height and a small, comfortable pouf.
Corner
Ideal for small rectangular corridors corner option dressing room. Rational design maximizes the space for the whole family's belongings. The configuration in the hallway is most suitable for small apartments. The modular design implies a capacious storage system:
- Open shelves;
- Pull-out drawers;
- Metal crossbars.
The bulkiness is significantly reduced by the mirror side, visually enlarging the room. A corner multifunctional dressing room is an alternative to a dressing room.

Corner dressing room in light colors with a small mirror will fit perfectly into the space of a small hallway.
In a niche
A wardrobe in a niche is a budget-friendly way to place things without disturbing the unity of the space. Compliance is important stylistic decision home design. Doors can be:
- Swing;
- Folding;
- Sliding;
- Pendulum type.
The fabric used is:
- Tree;
- Glass;
- Plastic;
- Laminated surfaces.

Design of a dressing room in a niche.
Glossy, reflective surfaces will help to increase the space in small hallways. The dressing room is usually quite spacious in the niche. Used as a closet and changing area.
Open type
The illusion of a spacious hallway is given by an open-type dressing room. Variation involves the arrangement of all things in the field of view. It is necessary to maintain order. The design of the system consists of metal or wooden dividing walls and fairly spacious shelves. The compartments at the top and bottom are closed with doors.

Small items and things are stored in decorative containers and boxes. It is recommended to place a comfortable pouf or small couch along the shoe racks and with things. The dressing room assumes the continuation of the room, so it does not deviate from the unity of style.
Closed
The parameters of a closed dressing room depend on the size of the hallway. In small, narrow hallways, installation of compact options is suitable. In both cases, the main advantages stand out:
- Isolation of things;
- No dust pollution.

Closed wardrobe hidden behind the doors.
The equipped room allows you to do fittings for any occasion. Installing an ordinary mirror will turn the dressing room into a real toilet room. Correct location involves choosing a location, ventilation and lighting system.

Arrangement, filling and storage systems
Sometimes it is not practical to use wardrobes made of solid wood, chipboard, or MDF. These are too cumbersome options. Remaking such structures is problematic. Metal systems are gaining popularity. Represent the modules located on vertical structures. Two types of fastening:

The fastening system depends on the decision of the manufacturers. Each suggests minor changes to the placement of what is needed.
Mobile modification systems are equipped with notches along the entire length. This allows each element to be moved independently of the other. Can be moved from row to row. The height of the shelves and the width between them are adjustable. To fasten components, racks with a straight section are selected. Grooves are cut on both sides.

Shelves and drawers are selected individually. Made from wood, metal, plastic or other materials. Installed on racks or pulled out.

This photo shows more varied contents for the dressing room.
To save money, it is not difficult to build a dressing room with your own hands. You will need round chrome furniture pipes and fasteners. The mobility of the structure will depend on the design methods.

For clothes, there are not only standard storage systems, but also interesting devices:
- Skirt hangers - strips with clips are attached to the guides, allowing you to hang skirts and trousers evenly;
- Hangers with crossbars;
- Retractable designs for ties;
- Retractable brackets;
- Pantograph - a lowering bar;
- Wall rod.

This photo shows different variants placing clothes in the dressing room.
Shoe storage systems
The main problem may be shoe placement. The abundance of pairs is not easy to arrange in one place. Typical sets of equipment for storing shoes can solve the problem:
- Practical retractable system. The modules are located on the mobile frame;
- Wall-mounted mini chests of drawers or hanging organizers;
- Ergonomic wheel;
- Swivel cabinet or drawers;
- Hangers with clothespins for winter shoes.

Cheap and practical storage method seasonal shoes– gratings with hooks. The mechanism is often used in shops. The hooks are attached to a mesh or perforated panel. Convenient adjustment of distance and pad type.

When arranging a dressing room, you can find interesting devices among commercial equipment. All shoe stands are designed for maximum occupancy with minimal space.

Decor
Natural wood is used to create expensive, luxurious wardrobes. For economical options apply MDF materials, laminated chipboard. Compartment doors are often wooden or made of durable glass. Storage systems in the form of baskets and boxes are usually made of plastic, rattan or wicker.
Wardrobes in dark shades are suitable for spacious rooms. Bed shades are suitable for small areas. In both cases, the overall design concept of the apartment is taken into account.

If there is insufficient natural light or its complete absence, it is important to pay attention to artificial lighting. Ceiling chandelier does not reveal a full overview of the entire storage system. Illumination of individual zones is required. LED strip and spotlights create soft, diffused light. Proper design organizes the space, creating maximum functionality and comfortable storage.

Making a dressing room project
Making your own dressing room requires advance training in the intricacies of the work. It is recommended to watch the training video or study the necessary literature. This will eliminate errors during the manufacturing process.
The first step is to create a dressing room project. The circuit implements the subsequent execution of actions. How to make a dressing room in the hallway with your own hands, important points sketch formation:
- First, a drawing of the compartment is created;
- The data is transferred to paper or to a special program on a PC. Without sufficient experience and skills, difficulties often arise;
- The dimensions of racks and shelves are formed. A depth not exceeding fifty centimeters is taken into account.
- If difficulties arise in the selection, the finished drawing is taken as a basis.
- The presence of doors, sizes and configurations are determined: standard, swing, sliding types.
- Reliable fasteners for all elements are thought out.
The completed project contains necessary calculations and a visual visualization of the dressing room. Additionally, an estimate of the required material is drawn up.
Materials
To make the structure you will need some tools and materials for the work. The list is compiled based on the information from the compiled project:
- The frame is created from guides and rack profiles. It is important to consider the thickness of the partitions. Thick ones take up a lot of space, limiting space;
- The partitions are covered with plasterboard up to fifteen millimeters. It is advisable to choose moisture-resistant varieties;
- The frame is filled with soundproofing materials, for example, mineral wool;
- For finishing work: putty, mesh that strengthens the putty layer, finishing in the form of wallpaper, paint or wall panels;
- Lighting devices, sockets, switches, wires for electrical wiring;
- Accessories for storage systems, doors and other possible elements;
- Shelves, racks, mirrors, other filling elements. When choosing, they rely on the layout, individual wishes and financial capabilities.
Work plan
Self-production of a plasterboard dressing room is easy to implement if all steps are carried out sequentially.
Installation of the structure:
- Apply markings to the walls using a building level;
- Make holes for the dowels according to the markings;
- Secure the profile with screws;
- Mount the ventral posts into the guides, taking into account a distance of sixty centimeters;
- Assemble the structure;
- If available in wardrobe doors strengthen the structure with special jumpers.
The resulting device must have a strong foundation. Avoid deflections, distortions, and instability.
Rack
The wardrobe rack is able to embody all the ideas of the owners. Increases capacity, functionality and appeal. Made from affordable and easy-to-process materials. Sequence of stages:
- Apply markings to the walls and floor;
- Install the guides, taking into account the formation of a groove for attaching the racks;
- Carry out the cladding based on your overall style and preferences.
Pencil case
Narrow cabinets are used to store clothes and small items. The pencil case can be equipped with retractable side hangers. The stages of creating a pencil case do not cause difficulties or problems:
- Choice necessary materials. Pay attention to the special side rollers;
- Assembling the hanger and securing the rollers;
- Fixation of the rear and upper walls;
- Hanger location;
- Side panel assembly.
Finishing
The type of dressing room is decided at the first stage when drawing up a sketch. If finishing is done on plasterboard sheathing, you can fix decorative elements. Finishing sequence:
- Fixing plasterboard sheets to the frame;
- Putty with the prevention of cracks due to self-adhesive tape;
- Applying a second layer;
- Primer with protection against excessive moisture;
- Painting or paneling.
Ventilation and lighting
The dressing room often does not have windows. There is no flow of fresh air and natural light. It is worth considering proper ventilation and installation of lighting fixtures:
- Construction of partitions and doors with technological gaps;
- Hole in the wall above the baseboard level;
- For private houses, ventilation holes are made directly in the floors.
For optimal lighting, several lamps are needed, taking into account the features of the dressing room. One or more lamps on the ceiling, LED lights in the volumetric compartments of the structure, mirror illumination.

An example of lighting in a dressing room without windows.
Wardrobe room - rational storage of all kinds of clothing items. Designing it yourself is not difficult. At the beginning of work, it is important to familiarize yourself with the teaching technique in detail and understand the nuances. Well-designed sketches and drawings will make the work easier. Quality materials will extend the service life.
Video: DIY dressing room
A dressing room is needed not only to make your beloved happy. For that matter, she is much more interested in the contents of it. A dressing room is needed, first of all, so that the things in it are stored for a long time and reliably: they are not spoiled by pests, do not gather dust, do not cake, and do not fade. How to arrange storage for clothes, shoes, and linen with your own hands? Let's see.
Storage conditions
As you know, suits are never washed. They are periodically dry-cleaned, and in between they are cleaned with a brush, vacuum cleaner or household steam generator. In all three cases, particles of grease and dust, entangled in the fibers of the fabric during wear, mostly remain there.
Nothing wrong with that. Fabrics made from natural fibers, especially wool, have self-cleaning properties. Science has figured out the essence of this process (very subtle, by the way) only in our days, and nanotechnologists promise in the near future wearable things that will never need to be cleaned, washed or ironed. An experimental three-piece suit made of nanofibers, soaked in liquid pig manure and tightly crumpled into a ball, cleaned itself and sagged within an hour; its creation took several thousand man-hours of highly skilled labor.
Probably, the matter will not be limited to self-cleaning suits, but that will happen someday. In the meantime, the dressing room should, firstly, provide weak natural ventilation. One exchange of air in it should occur within three to four hours. With a more intensive exchange, the introduction of pest eggs and spores with dust cannot be ruled out.
The next moment is light. For information, the larvae of the most common clothes moth do not develop from eggs even in the weakest visible sunlight. Therefore, clothing storage, unlike wardrobes, should provide some natural light inside.

Finally, drying wet clothes. There is no need to dry it intensively until it turns “gunpowder” before hanging or storing it, as this will cause the fibers of the fabric or leather to dry out and become brittle. In general, the item soon loses its appearance of novelty and does not last long.
Wet clothing should first be “shaken out” - simply dried in a room, no closer than 1.5 m from heating devices, until their moisture ceases to be noticeable to the touch when wrung out. After this, they are placed in a wardrobe or room, arranged according to all the rules, but more on that below.
Then the following happens: the particles of contaminants in the fabric, interacting in the thinnest film with residual moisture, are completely decomposed chemically. At the same time, weak heat is released, providing increased air exchange. When things have been cleaned in this way, the dressing room automatically returns to long-term storage mode with very sluggish air exchange.
If there are no opportunities for ventilation, it comes to bacterial decomposition - rotting - not only of dirt, but also of the fabric/skin itself. As they say, things suffocated. The well-known “smell of grandma’s chest” is a sign of mustiness. Periodic airing does not improve the situation; things themselves still cake and then decay.
More about clothes. The wardrobe doesn't have to be completely sparse. The recovery process after wear takes several days, so outfits need to be changed regularly not only for the sake of elegance. M.V. Lomonosov, who went through all the stages from poverty to enormous wealth, once determined: 1 coarse-wool caftan wears out into a rag with holes in a year with the most careful wear. 5 caftans from the same cloth are enough for 10 years to maintain a certain decency in clothing. And 20 caftans made of thin double cloth, exquisite, but less durable, lasted him until the end of his life, and they remained like new. In any case, appearing at the court of a very demanding appearance Catherine II's retinue, he never caught a sidelong glance at his clothes.
How to make a dressing room?
First of all, what is a dressing room anyway? It’s easier for the oligarchs - they can allocate even a TU-95 hangar in the caponier for their wardrobe. What should we consider a dressing room? A wardrobe, a room, a rack (this, by the way, is a very useful option in terms of ventilation and light, as long as it goes with the design; we’ll talk about wardrobe racks later)?
The solution is simple - if you can move it without taking it apart, then it’s a cabinet. It is preferable - because the gaps between the sashes and, especially at the top and bottom, where the rails with rollers are, solve the problem of ventilation automatically, and space is saved. If mounted directly on the floor on permanent place- this is already a dressing room, even if only 1x1.5 m. Here, again, a wardrobe-compartment is optimal, but in corner dressing rooms you will have to make hinged doors and take care of ventilation. And finally, if attached to the wall, we have a wardrobe-rack. A special case is a wardrobe-pencil case with a retractable hanger, we will analyze that further.
Video: example of a wardrobe
Materials
Any furniture materials will do to build a dressing room. It only needs to be said that a homemade dressing room made of plasterboard is something that anyone can make to their heart’s content. Drywall, generally speaking, is not intended for furnishing; This is a finishing material, or a flat, lightly loaded floor. For furniture, drywall is too heavy and fragile; The plasterboard shelf sags under its own weight.
Plasterboard furniture is made on a spatial frame quite complex design, and after assembly the entire product requires careful finishing. On the one hand, for an actual utility room, the labor intensity and cost of arrangement are too high, and the capacity is reduced, because durable plasterboard shelf It is not possible to make it less than 5 cm thick.
But on the other hand, it is for the dressing room that the presence of many blind cavities lined with vapor-permeable material turns out to be useful. They play the role of a heat and humidity buffer, eliminating sudden fluctuations in the indoor microclimate. Which, as you know, neither clothes, nor shoes, nor hats like.
Wood, laminate and humidity
No one can guarantee that the clothes placed in the dressing room have been “shaken” in moderation; Excess moisture can lead to mustiness. A wardrobe made of wood excludes this: wood, even painted, is still porous. It will absorb excess water vapor and then gradually release it in the optimal proportion.
Laminate has everything beneficial properties wood, except for porosity. But it has other advantages: low cost and low labor intensity, strength, durability. When the dressing room project is ready, any furniture workshop will cut the blanks to size and edge the PVC cuts to match the customer’s wishes. It will cost much less than buying sheets at retail, and all that remains is to assemble the product.
However, laminate does not breathe, and for a dressing room this is a factor of paramount importance. A cloth bag of silica gel in each section at the rate of 20 g per kilogram of weight of things can help out. Since you only need a little silica gel, it is better to buy a more expensive indicator gel; it becomes discolored when it loses its ability to absorb moisture. Restoring it is simple: you need to heat the used silica gel in a dry atmosphere (in the oven or with a household hairdryer) to 70-80 degrees. After 5-20 minutes, the color appears again - the moisture absorbent has dried and is ready for use again.
Dimensions
As for the configuration, style of design and finishing, the arrangement of a dressing room is purely a matter of personal taste and needs. You just need to follow some dimensions, it is important that the clothes breathe:
- The height of the compartment for coats, raincoats, jackets, suits is from 150 cm, to the level of the bar for hangers; from it to the top there is still about 10 cm.
- The height of the compartment for light outerwear on hangers is from 100 cm + 10 cm.
- The height of hat and shoe shelves is + 5-10 cm for the highest item.
- The height of the linen shelves is according to the contents, within 250-450 mm.
The height of the shelves is determined simply: we sort the laundry, maybe on paper, in a list, and divide the height of the dressing room by the number of types; We subtract the thickness of the material from the obtained value. So, if in the drawings below you see dimensions like 338 mm, 413 mm, etc., do not puzzle over what abstruse formulas it turned out to be. The authors calculated according to the assortment of their linen (or the customer’s linen), and no one is stopping you from calculating according to your own.
The depth of all compartments is the width of the widest shoulders + 10-20 cm; with one exception, see the section on dressing rooms in block Khrushchev buildings. As a rule, it turns out 45-65 cm. As for the width, it is determined as follows:
- 17-25 cm for each winter coat, jacket, three-piece suit.
- 12-17 cm for a raincoat without insulating lining, a demi-season coat and light outerwear stored hanging.
- 7-12 cm for a shirt and blouse.
- The length of the hat and shoe shelves is the width of the compartment, except for the mentioned case for block Khrushchev.
- The length of the linen shelves is based on the residual principle from the clothing compartments. You may have to re-sort; for example, combine your husband’s T-shirts, T-shirts and panties into one, and do the same with your thongs and bras (phew!)
Width and depth are interrelated. The minimum widths correspond to maximum depth, i.e. The compartment volume per respective garment is constant. It does not depend on the height of the compartment; A margin of 5 cm at the top and bottom is enough to ensure air circulation. 10 cm or more at the top can be given for ease of use.
Layout
As is clear from the requirements for humidity and ventilation, storage alone is not enough for a wardrobe. Need wardrobe system at least two components: an open hanger for “shaking” and a room or cabinet with an even, soft microclimate for storing and self-repairing wearables.
If there is some excess living space, a dryer is also useful. The easiest way to equip it is in houses with stove heating: according to the rules fire safety, the stove should not be adjacent to the wall. It is inconvenient to build it in the middle of the room, so in almost every house with stove heating with solid fuel there is a nook near the stove, colloquially called a trash room. By the way, according to legend, there lives a kind of authority among the brownies - Khlamushka. Khlamnik is an ideal place for pre-drying clothes.

In city apartments, clothes are “shaken out” on a hanger in the hallway. It is not at all necessary to buy it; it can be easily made by a novice craftsman from laminate, like the one in Fig. The decorative edging is made of metal pushpins. To make it smooth and beautiful, they are pinned according to a template from a metal corner, in one of the shelves of which holes are drilled slightly larger than the diameter of the button pins.
Only the outer holes should be on a line parallel to the corner flange. Intermediate ones can be used with variable steps, arcs, zigzags, waves, etc., achieving decorative effects. Use the template this way:
- The first set of buttons are placed by pressing lightly with your finger until the holes are visible.
- Carefully, pressing with a screwdriver, remove the template along with the buttons; you need to act carefully: although the buttons are pressed in a little, there are a lot of them and they all hold together quite tightly.
- The buttons, except the last one in the batch, are rearranged from the template and driven in with light blows of the hammer.
- The template is fixed in the next position with the last button of the first portion through its first hole; The button is not pressed in all the way.
- The next holes are marked, the template is removed again.
- The last button of the first game is hammered and all but the last button of the second.
- Then - again and in the same way until the end of the work.
The brackets for the shelf also do not have to be shaped forged or cast. The shelf can be hung in the same way as for a wardrobe shelving unit, see below. Then a hanger bar will be placed under it, the clothes will dry to the desired condition faster and will never suffocate even in humid air.
There is a significant nuance in the layout of the wardrobe complex. Many apartments have a storage room in the hallway. So, you shouldn’t equip it as a dressing room for the sake of simplicity and convenience: the microclimate is completely unsuitable for long-term storage of clothes. The storage room/wardrobe should be located in one of the living rooms, and away from the balcony.
Design elements

In order to properly equip a dressing room, you need to comply with certain requirements for some of its components. However, there are only two of these: doors and shelves. Doors, as already mentioned, should provide air exchange and let some light in, but not let in dust. The ideal option is doors in the form of blinds; These will look quite good in a colonial, country or similar style interior. Otherwise, you need either gaps of at least 2 cm at the top and bottom, or there and there along a row of holes with a diameter of at least 30 mm.
Shelves must provide ventilation, i.e. be perforated or mesh. There are two exceptions: firstly, open-type dressing rooms, designed to fit into the interior. Secondly, a wardrobe-pencil case, where the design of the retractable part should ensure strength. In both cases, ventilation is also ensured with solid shelves.

Special shelves for dressing rooms are available for sale, see fig. higher left. But you don’t have to spend money on them either. It will be cheaper and more convenient to bend it to your size from a metal mesh. What is needed, of course, is not a chain-link, but a welded fine-mesh one, see fig. on right. This one comes in galvanized, chrome-plated (the most expensive) and with PVC coating - in any color and is completely rust-free. Scraps that are just suitable for shelves will be happy to be sold at any hardware store for cheap.
Design
A dressing room is a utility room, aesthetically absolutely subordinate to the general idea of the interior, therefore there is only one requirement for its design: as God pleases, as long as it does not spoil the view. But from this arbitrariness, nevertheless, a consequence follows: the design of the dressing room should be organically woven from the general style of the room in which it is located.
That is, when starting a renovation or moving into a new building, the dressing room is designed in the most last resort, when everything else is already tied in. Initially, you just need to allocate a place for it. Otherwise, a certain dominance of a clearly secondary element cannot be avoided, and this is obvious bad taste.
In storage rooms
Design issues disappear if you make a dressing room from a pantry. Two questions remain here: technology and placement. As for the assembly technology, then best option– everything is applied to the walls with silicone. There is no need to drill or dust anything, but it holds tightly. If necessary, you can disassemble it - warm it up properly with a household hairdryer at full power and pry it off with a sharp screwdriver or a mounting knife.

It is better to place the hanger bar in places other than store-bought ones. plastic holders, and in homemade ones, it will be reliable for years and years. Material – plywood from 10 mm thick; shape - a circle about 10 cm in diameter with a U-shaped neckline. The shelf holders are made of the same plywood in the form of strips. Sloping mesh shelves can be nailed to the ends of the plywood with small nails to prevent them from moving; To do this, you need to cut the blanks with a margin for bending the side.
For those who like to tinker more with metal and plastic than with wood, we can recommend the design shown in Fig. It has only two wall mounting points; the shoe and hat racks made of mesh are glued with silicone, and the hat rack is inclined anteriorly so that the rod remains free. You can build a dressing room of this type from an old Soviet folding bed with a rotten tarpaulin bed in literally an hour. Leg frames covered with mesh (can be fishing net) will also provide linen shelves.
But here’s the placement – there’s a difference between pantry and pantry. "Pantry" dressing rooms in block houses, old and new, as a rule, turn out to be unimportant: the pantry in them is either too narrow a pencil case, or opens into the hallway, which is bad for the microclimate. Although you can still make a dressing room in a pencil case by placing clothing compartments on two floors, it will be inconvenient to use, and the kitchen and hallway are too close. Here, a built-in dressing room in some niche or at the blind end of a narrow long room would be more functional.
Looking through the options

However, the best option is a wardrobe corner in the living room. Why? There is no need to break the walls, floor and ceiling, buy expensive rails with rollers (remember: the best dressing room is open or compartment) and suffer with installation and adjustment of the entire system. In Fig. shows a diagram of such a “do-it-yourself mini-wardrobe”. The work required is subject to custom sawing of the blanks to size - in fact, only assembly on plastic dowels and installation of a mirror on silicone, which can be done in a day. Vertical metal rods in the shirt compartment are not necessary; you can take a ready-made chest of drawers and choose the laminate to match it. In terms of capacity, it’s quite enough for a young family, especially if the apartment has a mortgage (not a funny joke).
More options for small dressing rooms are shown in Fig. below. The first one on the left can be conditionally called a bachelor's room: it is, in essence, a wardrobe squeezed to the limit without doors. It will fit a coat, a jacket, two or three suits, a minimum of light clothes and underwear, but you can stick it anywhere.
For residents who still care about how their home looks, a miniature corner dressing room is more suitable: its surfaces easily fit into the design, and the contents do not catch the eye. If you make the door matte glass with a pattern, or glue the dressing room entirely out of glass, as in the beige inset in the figure, then it will even look like a significant piece of furniture.

There is no need to fence off an entire corner for a dressing room, as in the light gray inset. Firstly, in terms of capacity: per unit of occupied area it turns out to be one and a half times less than that of a rectangular one. Secondly, in terms of functionality: folding the filling of linen shelves into triangles is inconvenient, otherwise the tails will hang. Thirdly, in terms of labor intensity and cost: cutting out a triangle is more difficult, and you need very wide doors, and without them, things will always slide off the triangular shelves.
And, finally, aesthetics - a vast plane blocking the corner will draw the eye to itself, and visually significantly reduce the room. Those familiar with the psychophysiology of visual perception are well aware that a wide, tight angle “presses.”
It is more correct to make a corner dressing room in the form of a parallelepiped with one cut corner. Such a drawing is shown in Fig. in the center. According to visual perception, it no longer sticks out, but, on the contrary, seems to be pressed into a corner. In terms of capacity, it turns out to be equivalent to a triangular one twice the size, if you count along the wall.
Pencil case
Now let's see what a dressing room is. The essence is simple: it is a narrow, high rectangular case with a hanger frame that extends out from the side and is equipped with shelves. Attempts to create a dressing room in the form of a pencil case have been made for a long time; it has too many advantages, which are discussed below. But everything rested on the guide mechanism: the hanger, extended to the limit or at least halfway, wobbled, warped and jammed. Structures made from rail guides with rollers or pins in pipes at full output of the hanger also warped and jammed, and hydraulic cylinders and springs with levers or pantographs turned out to be too complex and expensive.
Recently, one of the furniture makers sold finished product an idea for a dressing room with a pull-out hanger, free from this drawback. He remembered one of the design commandments: if a knot just doesn’t work out as it should, do it the other way around.
Specifically, in this solution, the side ends of the shelves are used as guides, with 2-mm PVC edges, guide rollers are used in pairs, they are fixed from the inside to the side walls of the case and moved as far forward as possible, see fig. A fully extended hanger goes back in without jamming, simply by pushing it with your hand. Shelves for small items are equipped with low sides made of sheet PVC (not shown in the figure) so that accidentally hanging tails of laundry do not get under the rollers and stop the hanger.

Rollers are the cheapest, non-rotating (not self-aligning). When installing on site, first the hanger is assembled, then the rollers are attached to the sides of the case and their height position is checked. Next, the upper and back wall, the hanger is retracted and the remaining sidewall is mounted. The assembly is completed by fastening the sidewalls at the bottom in front with a U-shaped galvanized strip 0.4-0.6 mm thick lying on the floor, as shown in the inset at the top right of the figure; it also serves as a stopper that protects the hanger from spontaneously rolling out.
The options for installing the pencil case implemented to date are shown in the following figure. On the left - in the sleeping niche. The designers give the length of the bed niches in one-room apartments with a reserve, and the result is a nook-like garbage bin. Most often, residents leave it at the head of the bed, placing there a table or bedside table with drawers that slide out from the side.

The option is not their best: while fumbling for something with your hand behind your head, briefly knock over or break a vase, throw glasses on the floor, etc. But if the gap is left at the foot, the wardrobe-pencil case becomes there “like a native one,” and in custom production, all modifications come down to changing the width of the shelves, ends and top. With computer-controlled sawing, additional costs compared to standard series- zero.
In the center is a pencil case in the bedroom of a small apartment. This solution, according to the first customer, is conventionally called the “lazy coquette corner.” Having barely cleared (sorry, wiped) her eyes and dangling her legs to the floor, she immediately finds herself in front of the dressing table and the mirror glued to the side wall of the pencil case.
On the right is a more serious option, for a child’s room. It comes down to the organization of lighting. Children's eyes are easy to spoil, and for correct setting For vision, it is necessary that the light falls obliquely from the left at an angle of approximately 45 degrees. If the table is pushed into a corner close to the wall, the light will fall too shallowly. The closet in the corner forces the table to be moved almost to the center of the window, and the light turns out to be direct and sharp. Leave an empty space in the corner? There is no need to explain to your parents what will come of this; they were like that themselves. A custom-made pencil case fills just the required width usefully, and its side facing the table can be decorated or bookshelves can be hung there.
At self-production the work can be further simplified and made cheaper: we completely abandon the sidewall adjacent to the wall, and attach the rollers intended for it directly to the wall. There is no need to align it: the rollers will not move anywhere from their place. The gap between the hanger and the wall will be uneven, but so what? It is not visible, and the structural height of the rollers is at least 4 cm. Such humpbacked walls do not exist even in slums.
In Khrushchevka
The demand for secondary “Khrushchev” apartments is growing steadily due to their low cost, and apartments in brick Khrushchev apartments with ceilings more than 3 m high and walls of two bricks, they generally get away with it instantly, realtors just lick their lips. Therefore, it is impossible not to touch upon the issue of a dressing room in Khrushchev.
In the blocky relics of the housing boom of the 60s, the prospects, it must be said, are deplorable: everything is so squeezed out that it is very difficult to find a suitable place for a separate room. A more or less successful way out of the situation is found only in projects with a narrow and long hallway. Its passage, which closes with the door to the living room, is suitable for the microclimate, but the width of the corridor is only 1.25 m.

In this case, it is not the dressing room itself that decides the matter, but the clothing accessories. Namely, hangers with a swivel hook. Things are hung as shown in the figure; such hanging does not interfere with their self-restoration. If the hat and shoe shelves are made inclined, then the depth of the “ultra-compact” dressing room, including the thickness of the sliding doors, can be reduced to 0.4-0.35 m, and the passage remains sufficient.
As a rule, there are no difficulties in brick Khrushchev-era buildings. There will almost always be a closet suitable for a dressing room in a suitable location. Layouts of some common projects are shown in Fig. 44/31/5.8 is especially good, the author had the opportunity to live in such a dozen years. It’s a small but very cozy apartment, and the large closet perfectly houses a wardrobe (highlighted in green), a rack for jars (blue) and a workshop corner (brown).

A secret for the guys: must be placed exactly as shown. At the same time, in the workshop you can arrange a secret wine cellar and a secret safe for stash. The missus, suddenly planning a “bustle,” will immediately see home preparations before her eyes, and in her right lateral vision, much stronger than the left, her outfits. She immediately gets distracted and goes through something completely different from what she had in mind. Infinitely more reliable than a drawer with dirty socks.
In projects 58/42/6.2 most likely, and in the one highlighted in Fig. yellow improved 41/27/6.2, for sure, you will have to move the door to another room - the closets are so inconvenient that at the slightest filling you have to reach out to your things from the threshold. In the original 41/27/6.2 (bottom left) there is no closet at all, but a niche is provided in the hallway. It would be quite suitable for a dressing room; the microclimate in that place is favorable. It’s just too small for a compartment, you’ll have to make a shelving unit, which is discussed below.
Just in case: the numbers in the project designations mean the first - total area; the second is residential; the third is the kitchen area.
Video: example of the interior arrangement of a dressing room
Rack

A shelving wardrobe can look quite stylish and aesthetically pleasing if things are tastefully selected, neatly arranged/hung and kept clean, see fig. An indispensable condition for such a solution, the shelves and frame of the rack should be lost against the background of the contents. Structurally, a wardrobe shelving solution is simple: a supporting frame made of perforated profiles attached to the wall, clothing shelves made of dark laminate (the mesh here is aesthetically suitable only for shoes) on metal struts. The hanger rods are attached either to the underside of the shelves or to the struts.
Metal factory fittings for wardrobe racks are quite expensive, but a DIYer can avoid unnecessary expenses. Any pieces of rod with a diameter of 5-6 mm will be used for struts; perhaps not very smooth and touched by rust. But how can you easily and cheaply decorate them so that they look good? And at the same time, securely attach the rods?
Heat-shrinkable tubes (HERE) usually used for electrical insulation will help out. They are made of durable polyisopropylene and are available in white, black and all colors of the rainbow. Shrink by heating to 70-80 degrees with a stream of hot air from a household hair dryer. The diameter of the unshrinked (fresh) tube should be taken twice as large as the diameter of the rod, and the plastic layer will be 2-3 mm with its greatest strength.

The design of the shelves for the wardrobe is shown in Fig. on right; There is also a method for mounting the rods. There are some peculiarities in execution. The fact is that when they shrink, not only do they shrink in diameter, but they also slide a little along their length. Therefore, we cover the metal with plastic in the following way at home:
- We first put a piece of tube on the lower part of the bracket, according to the drawing, with a margin in both directions.
- We sit it down, evenly heating it with a hairdryer in a circular motion, this will give the greatest strength to the part of the plastic frame that bears the entire weight of the barbell with clothes.
- Once cooled, cut to size.
- We put a rod on the rod with holes drilled in advance in the angle stop, exactly parallel to each other.
- We put on the upper section of the tube, push it with force towards the bar, and keep it pressed against it.
- Using a hairdryer, we place the tube near the rod by 2-5 cm (as long as it doesn’t burn your fingers), without loosening the pressure.
- Once cooled, shrink the remainder and cut the top to size.
It remains to decide what to do with the markings on the tube, volts, amperes? She has no use in the dressing room. Here again, the cheapest option turns out to be the best - HERE, made in China, of uneven thickness in a “fresh” form and with a not very smooth surface. The markings are washed off from them either with a cotton swab with alcohol, or dishwashing detergent, or cleaning powder for kitchen stoves on a damp cloth.
The shrink tube is very durable and hides roughness and unevenness of the metal. It holds the weight of the rod with a load without any problems, but for the “China” it would be a good idea to drip the connections with superglue after assembly.
What if you just order?
Is it possible to order a dressing room for the apartment? Not everyone knows how to make things and determine a suitable place, right? Can. The world's leading brand for wardrobes and household items in general is the Swedish-Dutch company Ikea, whose branches are scattered all over the world. In the Russian Federation they are found in almost every regional city and in many more or less large regional centers.


