In an effort to effectively use all available space country house Many owners equip the attic. When doing this, you need to be prepared to arrange the roof in a certain way. At its core, an attic is a converted attic and requires certain design solutions and some alterations in thermal insulation and roofing. In general, the construction of an attic roof for a country house is not much different from the construction of other types of roofs. But due to the operational characteristics of the attic roof and the requirements placed on it, it is necessary to have knowledge and understanding of the specifics of the arrangement of this type of roof.
Types of mansard roofs
Like any construction work, the construction of an attic roof begins with the design stage and selection of the most suitable attic roof for the structure, its type and type. For the attic, shed roofs or regular and sloping gable roofs are used. In addition, the appearance of the roof is influenced by the materials used and the design features of the roof itself.
Depending on the structural features of the building itself, several standard roof solutions are used during the construction of the attic. Mansard roofs: photos and description
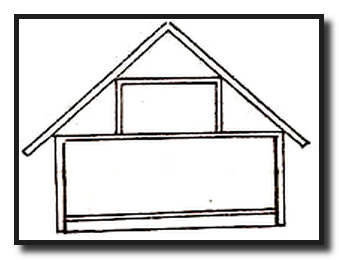
- Gable roof for a single-level attic. This option is a regular gable roof, under which an attic is located. During design and construction, no major difficulties arise due to the simplicity of calculations and the ease of construction of the truss structure. The main disadvantage of this roof design is the small interior of the attic with rather low ceilings.
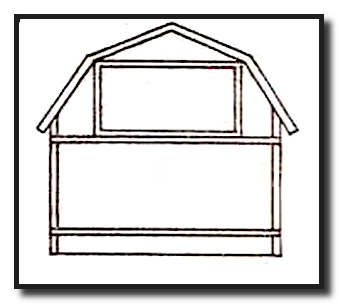
- Broken gable roof for a single-level attic. Unlike a conventional gable roof for an attic, the broken structure uses 4 pitched planes located under different angles. This type of roof structure is somewhat more complex to design and construct, but its undeniable advantage is the full-size interior space.

- Single-level mansard roof with remote consoles. The design of this type of roof is more complex compared to the previous ones. But spacious room and full-fledged vertical windows compensate for the disadvantages in the complexity of design and construction. The design feature of an attic with such a roof is its displacement and extension beyond one of the sides of the house, and the roof is more like a pitched one.
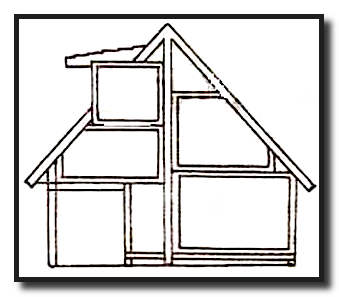
- Two-level mansard roof with mixed type of support. Roofs of this type are the most difficult to design and construct. Such roofs are designed in conjunction with the house, as one whole, due to the multi-level placement of rooms.
Various mansard roof designs are not much different in design from conventional pitched roofs. Of course, there are certain design features, but in general they are the same as gable or single-pitch, and consist of the following main elements:

. Roof. External part roof, which serves as protection from various atmospheric phenomena.
. Lathing. More often wooden boards, to which the roof is attached, as well as insulating materials.
. Ridge run. The upper part of the entire truss structure.
. Rafters. These are the stiffening ribs of the entire roof structure; they can be layered or hanging. Layered rafters are used for the attic roof.
. Mauerlat. This structural element consists of beams laid around the perimeter external walls and connected to the walls using special fasteners. The entire rafter structure is attached to the Mauerlat.
.Diagonal connections. To ensure the reliability and strength of the entire rafter structure, the rafters are connected to longitudinal beams and vertical posts using diagonal connections or bevels.
. Internal supports. To stabilize the roof, rafters and/or ridge run supported by vertical beams.
. Insulation layer. Due to the fact that the attic roof and the interior premises are practically one whole, to maintain temperature and humidity conditions, a multi-layer insulation cake is laid between the roof and the walls of the room. The insulation consists of hydro- and vapor barriers, sound and noise insulation, as well as a thick layer of thermal insulation. In addition, proper insulation of the attic roof is important for the safety of the roof itself.
Mansard roof construction technology
When designing and constructing an attic roof, many builders and designers, either out of ignorance or doing their work poorly, make serious mistakes in insulation, ventilation and truss structure. The result is an attic roof, which literally after a couple of seasons becomes unusable, fungus and mold appear, and the roof begins to leak or completely collapse. This happens due to a violation of the mansard roof construction technology.
Due to the fact that the attic roof is maximally drawn to the walls of the interior, and in this case it is quite difficult to obtain excellent heat transfer performance, the entire attic roof structure must have excellent thermal insulation, ventilation and a properly constructed rafter structure using wood treated with fire-bioprotectants.

To make your attic roof reliable and durable, you need to know the following:
- The thickness of the rafters must be more than 250 mm. For such rafters you can use laminated veneer lumber;
- Use materials as thermal insulation that will not lose their properties in the event of increased humidity. For example, extruded polystyrene foam or foam glass;
- between the roof and the thermal insulation layer we make full ventilation with vents and hoods, through which air will circulate under the entire surface of the roof;
- on the inside, along the entire surface of the thermal insulation, it is necessary to install a vapor barrier layer;
- On the outside of the rafters, a layer of waterproofing and, if necessary, a layer of sound insulation are laid under the roof.
Such requirements are determined by certain natural and physical phenomena. But first things first:
A large thickness of the rafters is required to be able to lay a 20 cm thick layer of thermal insulation between them, and this in turn entails an increase in the mass of the entire roof structure, which is supported by the rafters.
The wood for the entire structure is processed by special means for protection against fire and microorganisms, which is a strict requirement of SNiP. This will protect it from damage by fungi and increase its service life.
If you use such popular materials as mineral and glass wool for thermal insulation, you can only gain in ease of installation and lightening of the entire structure as a whole. But cotton wool, no matter what it is, is cotton wool that absorbs water like a sponge, cakes and loses its insulating qualities. If you choose a material other than polystyrene and foam glass, you should focus on complete resistance to moisture, low heat transfer coefficient and relatively low weight.
A thermal insulation thickness of 20 cm is necessary because in our latitudes it is very cold in winter and very hot in summer. A feature of the attic design is large heat losses in winter and rapid heating of the room in summer. A large layer of thermal insulation will prevent heat loss and penetration inside. But this is only one of the reasons, the second is the safety of the roof. The fact is that the heat that escapes from their premises in winter warms up the roof, on which there is a layer of snow and partially causes it to thaw, and snow is a natural insulation. Melted snow at sub-zero temperatures turns into ice, which has no thermal insulation properties, it makes the roof heavier and ultimately destroys the roof itself. And since up to 100 cycles of thawing and freezing can occur in one day, the roofing material will fail in just one season. In summer, the room becomes incredibly hot and stuffy, and you need to install an air conditioner, or even two. But these inconveniences can be avoided by installing a thick layer of proper thermal insulation.

Equally important is proper roof ventilation. It will help cool the roof, both in summer and winter, and also remove excess humidity from under the roof. All this will ensure comfortable living in the attic, protect against the appearance of mold, fungi and rot, and in addition will protect the roof from destruction in winter.
Regarding steam, hydro and sound insulation, everything is simple. Vapor barrier passes through excess moisture from the premises and prevents its penetration from the outside, waterproofing protects thermal insulation materials and the premises from accidental ingress of moisture. And sound insulation reduces the noise level from impacts of rain, hail and wind on the roof surface.
Phased construction of an attic roof
Carrying out all the work to create a roof for an attic requires builders to have some experience in this area. Unlike ordinary pitched roofs, building an attic roof with your own hands is somewhat more difficult due to the installation of angled windows in the roof itself and the broken structure of the slopes. To build an attic roof with your own hands, you must adhere to the following stages of work:
Design

The first thing you have to do is develop a roof project. To do this, you can turn to specialists or, if you are good with a computer, do everything yourself in an architectural program. Also at this stage, all the necessary calculations of loads, the angle of inclination of roof slopes, etc. are carried out. To do everything correctly, you should turn to a document such as SNiP “Loads and Impacts” for the necessary information.
Construction of the rafter frame
This stage of work is the most labor-intensive, and for a do-it-yourself attic roof to be made with high quality, the combined efforts of 3 to 4 people will be required. We begin the construction of the attic roof by laying and securing the mauerlats along the entire perimeter of the house, using timber with a section of 100x100 mm.
Construction of an attic roof photo:

After this, we install a frame for the attic space, the racks of which will also serve as supports for the rafter structure. To do this, we use a beam with a cross-section no smaller than the cross-section of the longitudinal beams on which the racks will rest. First of all, we install vertical posts at the beginning and end of the building. We fix them to the longitudinal beams using special stamped metal corners and self-tapping screws. To facilitate all fastening work, we use a screwdriver. Now we lay the jumper over the racks and secure it.

We stretch the cord between the two resulting arches, and if everything was done correctly, it will be strictly horizontal, if not, you will have to disassemble one of the arches, trim it a little and reinstall it. Now, using a stretched cord, we install similar arches with the step provided for the rafters. We connect the resulting arches with jumpers, which we secure with stamped corners or nail plates.

Having assembled the frame of the future interior space, we proceed to install the rafters. We start with those that have the greatest angle of inclination and are on the same level with the frame of the attic room. There are no particular difficulties here. The beam for the rafters is cut to the required design length, a groove is cut at the base of the beam for installation on the Mauerlat, and the top is cut at a certain angle. After which each rafter is installed in place and fixed to the main structure.

The next step is a little more difficult, since you will have to install the upper rafters. The difficulty lies in maintaining a certain angle and centering of the entire structure. To make the task easier, you can first make a template from two long boards that will exactly repeat the future connected rafters. Using this template, we cut the rafters on the ground and then install them in place. The rafter installation algorithm is the same as for the interior frame arches.

To complete the installation of the rafter structure, we nail the sheathing. For lathing, both ordinary boards and sheets of plywood or chipboards can be used. This will depend on the type of roofing materials.
Creating an Insulation Pie
Having installed the rafters and sheathing, we begin to create the insulating layer. To do this, first of all, we lay a vapor barrier on the inside of the rafters and fix it to the rafters with staples. Next, we lay the thermal insulation material and carefully ensure that it fits closely to the rafters and does not leave any gaps. On top of the thermal insulation, in increments of 50 cm, we fill the lathing, which will hold all the thermal insulation.

On the outside of the rafters we lay a layer of waterproofing, which will protect against accidental penetration of moisture. Finally, we lay the roof on top of the waterproofing.
Construction of an attic roof: video tutorial
The variety of ready-made attic roof projects is very extensive. They can be with or without windows, rounded or strictly straight, with one slope or several. But no matter what the attic roof is, its construction will require the knowledge and skills of a construction master.
Surely, sooner or later, every owner of a private house comes up with the idea of arranging an attic roof - the so-called attic. It allows you to expand the space of the building, thereby preserving the treasured meters of the site itself. In addition, if you show a little imagination when building and decorating this part of the house, then the non-standard and attractive appearance will delight not only guests, but also ordinary passers-by. You can learn how to correctly combine all construction safety requirements and an individual design concept from this article.


What it is?
Many people associate the image of an attic with the bohemian creative life of Paris, whose representatives - writers, musicians and artists - lived on the highest, dimly lit and unheated floors. In the literal sense they were utility rooms, which only the poor could afford.
Today, the presence and design of an attic roof speaks of the owner’s wealth and sense of taste. Architectural roof geometry, unusual combinations window openings and balconies will not only be highlighted a private house among others, but will also functionally increase the living space, eliminating the cost of another floor.


The room can also affect the reduction of heat loss in the building. Officially, according to all standards, the attic must have a height of at least 2.5 m from the floor level, otherwise it will be considered an attic.
When building a mansard roof in Russian conditions, you should remember the features natural conditions– rather frosty winters with frequent temperature changes require special attention to the quality of insulation of the attic room.


Device Features
The design features of the attic require adherence to certain rules:
- soundproof;
- reliable insulation and vapor barrier;
- no stretch marks or bevels;
- ventilation gap;
- functional and aesthetic combination with the overall exterior of the house.


At the same time, compliance with all the rules does not limit the choice of various designs of the structure itself: single-pitched, gable, broken, two-level, conical roofs, with or without a balcony, mid-turn or balcony dormer windows. There are many variations. For reliability and safety, it is important to choose the type of roof, calculate the dimensions, and the amount of insulation and roofing materials.

Comfortable living in the attic directly depends on thermal insulation, which will allow you to enjoy a slight coolness in the summer and keep warm in the winter. Let's consider the method of laying the “pie” of the attic roof, which will serve not only as insulation and the base of the roof, but also as protection from the All surfaces inside the attic floor - the ceiling, floor and walls - must be insulated. It is important to first draw up a plan for the attic with all communications and an indication of the thermal conductivity of the materials from which the building and load-bearing coverings are constructed. Only after this is the selection and calculation of insulation made.


Particular attention should be paid to the indispensable presence and exact sequence of each layer of the attic insulation “pie”:
- vapor barrier layer;
- insulation;
- ventilation gap;
- waterproofing material;
- roof covering.
In this list, a layer of insulation and ventilation are especially important. The following materials can be used as insulation.
Styrofoam
A modern, sought-after material with low density but high strength. It is soundproof, does not corrode and does not attract dust. However, a significant drawback is the high flammability and release of toxic substances. If we choose this insulation, then the foam layer must be protected by at least 3 cm of a fire-resistant structure, for example, two-layer plasterboard. In addition, polystyrene foam is susceptible to rodent influence.


Mineral wool
The most common material for attic insulation. Among her characteristic features– resistance to temperature changes, fire safety, high sound and heat insulation, harmlessness from an environmental point of view. You can purchase it in the form of a roll, slab or mat. The latter is recommended as attic insulation. The material definitely needs good ventilation.


Polyurethane foam
The main advantages are strength, long-term use, not susceptible to moisture, mold, suitable for any surface, non-toxic. But all the advantages hide the high cost and the work of exclusively specialists with the equipment.


It must be remembered that the thickness of the insulation layer is determined depending on the climate zone.
To insulate the attic you will need:
- waterproofing film;
- insulation material;
- vapor barrier;
- mounting tape;
- cord (nylon);
- nails;
- hammer;
- pliers;
- sharp knife.


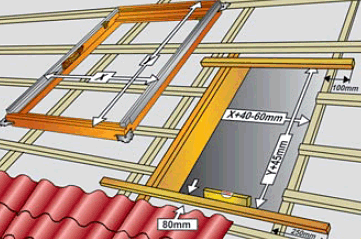
Thermal insulation of a room is directly related to quality, type and size skylights, their structures are usually placed between the roof rafters to avoid expensive reconstructions. Therefore, when choosing, it is important to focus on the available dimensions. Among other things, you need to take into account the height of the slopes, the total area and purpose of the room.
Standard sizes Dormer windows are considered to be 78x118, 78x140, 78x160 cm and larger ones - 94x140, 114x118 and 114x140 cm.


If the rafters are set closer than the established frame standards, it will likely be necessary to have the window made to order, which will of course have an impact on costs.
According to the method of opening, roof windows are divided into:
- mid-rotation structures;
- with side axis;
- raised axis of rotation;
- with lower axis;
- a combined axis that allows you to rotate the sash 180º.
The most popular option among Russian summer residents is with a central axis of rotation. The advantages are ease of use (such windows are easy to clean).


A separate variety is represented by windows on remote control, which will be convenient if the location does not allow you to reach them yourself. They are often equipped with rain sensors.

Depending on the model, several types of windows can be distinguished.
- Vertical. They are mounted in a special so-called attic “birdhouse”, which is why you have to slightly change the roof structure. However, they guarantee a large amount of light.
- Balcony attics. They are two doors, when opened, one rises, the lower one moves forward, forming a miniature parapet. Just like the previous model, they require high costs.


It should be noted that, if load-bearing walls are possible, you can also make a hanging balcony, which can be located either on columns that serve as a decoration in front of the entrance, or you can move the pediment (part of the end wall between the roof slopes and the eaves) of the attic floor from the load-bearing wall, and the roof of the ledge done by extending the roof to the level outer wall.


- Extensions. Decorative window top elements. They fit perfectly into the design and most often have a round, semicircular or triangular shape.

- Light tunnel. It combines a reflective tunnel into the room and a lampshade directly in the room itself, which evenly diffuses the light.
- Cornice models. They are located at right angles in the gap between the wall and the roof.
- Glazed bay window. Quite an exotic and expensive glazing model. The structure extends beyond the plane of the wall.


Presenters Russian manufacturers high-quality roof windows - Velux, Fakro, Roto. Velux models are slightly more expensive. For example, a window measuring 78 cm will cost 21-24 thousand rubles, a wider window will cost from 26 thousand.

Also, don’t forget about some additional useful accessories:
- blackout curtains;
- roller shutters, blinds;
- heat-absorbing mesh;
- mosquito nets.


According to established standards, the glazed area must be at least 10% of the floor area.
Advantages and disadvantages
The advantages of the attic floor can rightfully be considered:
- Economical. The attic allows you to reduce the cost of heating the room. Air space between floor and ceiling attic space prevents generated heat from escaping through the roof. The low thermal conductivity of air allows more heat to be stored on the ground floor.
- Savings on adding another floor or increasing living space by expanding the foundation are also obvious. The attic allows you to minimal costs gain constructive additional space.
- Aesthetic appeal. Undoubtedly, the attic, with its complexity and expressiveness of the roof, gives the building a harmonious, architectural and complete look.
- Construction speed. Such an extension will not last for several years, as often happens with the expansion of the foundation. Installation can be completed within a week.


In addition to the advantages, there are also disadvantages.
- Savings on heating and replacing the second floor with an attic will cost a pretty penny in the future. The premises require the installation of specialized windows, which are much more expensive than regular ones.
- Sloping ceilings reduce the height of walls.


- The vulnerability of the structure is due to the fact that the attic takes on all the main “blows” of nature, and therefore requires increased attention and periodic inspection. If repairs or replacement of insulation are necessary, damage to the finish along with the vapor barrier cannot be avoided.
- A complex coal roof leads to the formation of difficult-to-ventilate areas, which negatively affects the quality of the coating.
- Individual requirements for hydro- and thermal insulation.

Problems that you may encounter when building an attic:
Undoubtedly ideal option for the attic it will be included in the project drawing even before the start of construction work on the house. But often the idea of an attic comes with the need to expand useful living space after a certain period of use. In this case, one has to face the choice of the type of structure. There are different types of mansard roofs.

Single-pitch
An ordinary, simple attic with one roof corner and one full wall, which allows you to expand the area. The most successful tilt angle in this option is in the region of 35°-45°. Otherwise, this may lead to accumulation large quantity snow. The ramp is placed on the windy side. Window frames in this case, it can be positioned either on an inclined roof surface, and on the main vertical wall. However, this design is not used so often, since due to the norms for wall heights of more than 2.5 m, the slope turns out to be very steep. And this requires strengthening the rafter frame and, therefore, extra costs. However, such a roof looks rather unconventional.


Gable
A more rational and optimal option due to the uniform rise of the ceiling, in contrast to the lean-to model. The two roof slopes are located at the same angle to the walls. For a rational distribution of space, 45° is enough. It is also divided into subtypes: symmetrical with a ridge above the middle of the house and asymmetrical with an offset relative to the center. The pediments in this version are straight, and the room takes the shape of a trapezoid. Such an attic can be equipped with a balcony at the end, and the design of the structure itself allows you to get rid of the “cubism” typical of a house. However, this also seems to be a significant disadvantage, limiting the area of the attic space on the sides. As an exit, you can provide this space for storage rooms or cabinets.


Broken
The most common type when building an attic without the involvement of specialists. In fact, it is the same gable structure, but constructed from two parts located at different slopes. An advantage of the broken shape is the ability to avoid the formation of uninhabitable “dead” zones at the junction of walls and ceiling, as in a gable structure. By reducing the angle of inclination, the height of the walls increases. And the presence of two slopes allows you to reduce the load on the roof.

When choosing this option, it is important to pay attention to the special fracture rafter system.
With remote consoles
This design provides for the displacement of the vertical wall of the attic to the edge of the facade of the house or beyond. This feature allows you to significantly expand the area of the room. The rafters are reinforced with struts and rest on floor beams that protrude beyond the load-bearing walls. vertical wall provides flight for imagination in choosing window design.


Two-level
This type of attic is designed exclusively together with the dwelling and is considered the most complex structure. It consists of several rooms at different levels and is not some separate part of the building, but a full-fledged room in the structure of the whole house. With this design, you get not a one-story attic, but two additional mini-floors. A preliminary calculation of the load on the walls and rafter system requires special attention.


Multi-gable roof
The intricacy of the design is expressed in a whole complex of angular protrusions. The non-standard appearance, the strength of the truss structure and the absence of sediment accumulation take precedence over design difficulties and increased calculations. However, such characteristics require the work of exclusively specialized personnel. And the cost of such a mansard roof significantly exceeds the prices of other types of structures.


Four-slope
This type of roof design is considered the most attractive. In addition, it is very convenient to maintain - almost no precipitation accumulates on it, and due to the inclined structure, the wind does not carry a large load, as a result of which such a roof will last longer. However, during construction you will have to spend a lot of money on insulating such an attic. But there will not be so much useful living space due to sloping ceiling from all four sides.


hip
Are typical option hipped roof type. A comfortable and spacious space is obtained by increasing the area of the two facade slopes of the house, made in the shape of a trapezoid. Hips are the slopes from the end of the building in the form of triangles. The half-hip design consists of slopes that do not reach from the ridge to the cornice. This type of roofing is used infrequently, since the rafter system is one of the most expensive and complex.


Tent
A suitable option for a square shaped house. The roof in this design consists of slopes with identical parameters and requires installation by specialists. Among the options are 4 or more slopes, in the shape of a dome or pyramid.

Asymmetrical
It is obtained by lengthening one of the roof surfaces. This attic looks very unusual both outside and inside. Behind the seemingly simplicity of shifting the roof lies a detailed calculation of the load parameters on each wall. The living space in such a room will be distributed unevenly depending on the side and angle of the roof.


With "cuckoo"
“Cuckoos” in this case are small protrusions in the shape of a triangle, where windows are most often located. Moreover, on one slope there may be several such structures with individual rafter systems. The shape of the structure can be completely different, both single- and four-slope.


L-shaped
Quite inexpensive option roofs with a non-standard appearance. Most often, two gable roofs are used for this, joining each other at a right angle, which is the most difficult part of the structure. Of course, such models are mainly used in buildings of a similar shape.


Having listed the main forms of attic structures, it should be added that combinations of such roofs are also possible. For example, a single slope can be erected as a broken line. The most important thing is to comply with all operational and design requirements during construction.
Shapes and sizes
The construction of the attic floor also has variability in terms of implementing a variety of architectural forms the premises itself. The geometry of the attic room can be triangular or broken, cubic or L-shaped, symmetrical or asymmetrical, one-story or two-level, occupy the entire space of the house, only part of it, or even moved beyond the load-bearing walls with support on columns. There are many alternatives. A complex design requires correct calculations of dimensions and drawing up a construction plan.


Calculating the exact parameters of the attic floor area involves a number of preliminary calculations. To draw up a project, you need to schematically divide the space into simple geometric figures: trapezoids, rectangles, parallelograms, squares, triangles and, having calculated the area of each of them, add up the results. This principle applies to almost all attic structures. And if all height standards (at least 2.5 m) for the attic are met, then the floor area must be at least 16 m².

It should be noted that in addition to the established height parameters, where such calculations are possible, there are attics of other sizes:
- attic ranging from 0.8 to 1.5 m;
- semi-attic less than 0.8 m.
In such cases or when the slope of the roof is quite significant, the following formula is applied:
P = AxL+2Bx0.7L
P = L (A+1.4B),
where P is area;
L – length of the attic plane;
A – floor width for walls above 1.1 m;
B – floor width for walls above 0.8 m.
Useful living area is calculated by points on the ceiling located 90 cm perpendicular to the floor. The remaining part is considered a “dead” zone.

Such formulas allow you to both calculate the strength and weight of the structure and determine the amount and type of material used.
Thanks to modern technologies, today it is quite possible to calculate the parameters of a mansard roof online. To do this, you will need to enter data about the type of attic, a diagram rafter frame, roofing and insulation materials.


Rafter system
The transformed rafter system is the key difference between mansard roofs and others. This already heavy structure can withstand the weight of the roof, floor beams, the load of the attic floor, and precipitation. Therefore, only one that meets all requirements can be considered a reliable and durable system.


One of the basic rules is that the system must provide for uniform distribution of pressure on the base and load-bearing walls.
Only high-quality, well-dried and antiseptic-treated wood is used. The optimal parameters of the rafters are 100x100 mm in cross-section; they will create a structure resistant to weather conditions.


Inserting a tree into the lower crown is strictly prohibited. The slope of the rafters is in the range from 30°–60°. To secure them, exclusively hard metal materials (corners, staples, nails) are used.
Particular care should be taken to calculate the pitch of the rafters, since the choice of the width of the insulation and the size of the windows located between the two rafters depend on this. It is worth adding that the width of the step between them should be 3 cm less than the width of the insulation to reduce waste.
All of the above requirements are met regardless of the choice of one of the types of construction rafter system, which comes in the following types.
Hanging
It is economical and practical. This design rests on the side walls of the structure, and rafter legs They are fastened with horizontal jumpers for rigidity - crossbars, which also serve as the basis for the ceiling. The advantage is the location of the main elements of the system outside the used part of the room, which allows you to expand the usable space.

When installing such a system, you should pay attention to the following:
- the supports of the roof overhang should not fall on the bottom, extended beyond the load-bearing walls, rafters;
- to stiffen the roof, a wind board should be nailed between the ridge and the mauerlat;
- The moisture content of the rafter wood should not be more than 15%. Otherwise, the system may lose stability. If such material is still used, then it is better to connect it using bolts, which can be tightened if necessary.
Layered
Used in attics with load-bearing partition in the center of the room, which provides additional support. Most often, this system is used for large areas of the house and heavy roofing materials. The design principle consists of laying a plank on the internal walls, protruding instead of a mauerlat, and installing a special rack to support the ridge girder.

Features of the arrangement of the layered system:
- the thickness of each element is from 5 cm;
- all nodes are smooth and located exclusively in the proper places according to the design;
- the connection of the Mauerlat and the rafter leg is strictly horizontal;
- symmetry in the position of racks and struts;
- reliable and high-quality ventilation;
- waterproofing at the junction of nodes and masonry;
- the length of the rafter leg without support is up to 4.5 m.


The independent design of the rafter system requires the fulfillment of a certain order and requirements:
- Fastening the mauerlat (the base of the rafter system according to the area of the house). The strength of the fastening with the lower slings will protect against “roof failure” in the literal sense of this expression. The material used is dry treated timber with a cross section of 150x100 mm. The Mauerlat transfers some of the load of the rafter system onto the walls.
- The base of beams is laid horizontally, always using a level. Attaches to walls using bolts or staples.
- The waterproofing layer is located on the crowns, columns of the frame building or on the brickwork. You can use roofing felt, roofing felt, bitumen.


- Frame supports. Ideally even vertical and horizontal posts are fastened with staples or nails to long beams, and insulation is laid between the vertical ones. Before continuing work, it is necessary to check the racks for mobility - they should not become loose. Otherwise, they are strengthened using braces or ties.
- The purlins hold the rafter legs together. There is a ridge girder on top, and side girders on the side. If the length of the rafter legs is less than 8 m, it is not necessary to install a ridge. An element that performs its functions can be guy ropes that secure the attic ceiling.
- The final stage of constructing the system is attaching the sheathing.
Of unconditional importance for the roofing system is the sheathing, which takes on its entire load.
It consists of beams laid perpendicular to the legs of the rafters. And it is used here various material depending on the type of coating: boards, timber, plywood, timber. Although usually a 40–50 mm edged board is used for this. Soft types of cover require a continuous sheathing, and with harder materials a distance between boards of 25–40 cm is provided.


All rafters are connected at the highest point of the roof - the ridge. The ridge gives the entire structure rigidity and stability. Therefore, it is obvious that the duration of operation of the entire roof depends on the reliability of this part of the system.
The connection of the rafters, and, consequently, the formation of the ridge, occurs using the following fasteners:
- overlap is formed by laying rafters on top of each other and connecting them with through fasteners;
- cutting into half a tree as a result of laying rafters, in which half the thickness and fastening are selected at the edges;
- trimming the end sides of beams involves placing rafters on top of each other and trimming in mirror image at one angle.


In the ridge area, the rafters are secured with plates made of wood or metal, metal corners, staples, staples, wooden wedges, and nail plates. During the construction of the rafter system, such an important part of the house as the cornice is installed. To do this, either the length of the rafters is increased, or a filly is used.
Among his primary tasks:
- protecting walls from moisture and dirt;
- partially eliminates the ingress of water and snow from the roof onto the foundation of the building, preventing erosion;
- harmonious and finished look of the overall roof structure of the house.


Construction requirements
Designing an attic floor involves meeting the following requirements:
- the relationship between the communications of the attic and the whole house;
- the selected material for the attic must be technically and harmoniously combined with the building material;

- plan compliance additional floor building project;
- compliance with safety rules when carrying out work with the presence of people in residential premises;
- strict adherence to fire safety regulations;
- compliance of the light-transparent fencing with the general concept of the building style.
Installation technology
The assembly of all elements of the attic room occurs in the following order:
- It is better to calculate the strength of a building with the assistance of specialists;
- preparation of the attic and roof project can also take place with the participation of qualified people or on the basis of a ready-made option;
- dismantling the old roof if the building is no longer being rebuilt;


- manufacturing a wooden rafter frame is one of the most difficult points in the construction of an attic;
- it is necessary to ensure the accuracy of the construction using a cord stretched between the arches, which ideally should be in a horizontal position;
- fixing the arches to each other with nail plates or stamping corners;
- vapor barrier material on the inside of the rafter system, secured with construction staples;
- a layer of insulation that fits tightly to the rafters;
- installation of the sheathing on the insulation material is carried out using wooden blocks;

- waterproofing is laid on the outside of the rafter system - often used for this plastic film, and on top of this layer another layer of boards is packed;


- for natural ventilation of the space under the roof, special cavities are installed between the hydro- and heat-insulating layers in the eaves area, which are located in the upper part of the ridge;
- covering the frame with roofing material depending on the preferences of the home owner.
Among the options finishing coating The following options can be considered:
- Metal tiles are used not only because of their attractive appearance. This material is excellent value for money. Durable, light both in installation and in weight. Reliably withstands impacts, but at the same time transmits all sounds well, which is the main drawback.

The cost of erecting a roof is 25-35% of the cost of building the entire house, and the cost of work is 50-80% of the price of materials, so if you build an attic roof with your own hands, the savings can amount to 15% of the entire estimate.
An attic roof is any roof under which there are rooms suitable in height for habitation (attic, or attic floor).
Installing an attic roof is a complex and painstaking job.
In industrial construction, roof installation is carried out when the drawings show each component, fastening parts and the parts themselves with their dimensions taken out.
Builders do not think about the structure of the roof, whether the load is calculated correctly, their task is to build a frame, cutting out templates of parts and fastening them together, while the system for fixing the roof elements is also indicated.
To figure out how to make a mansard roof, you will have to study videos, photos and master the theoretical part.
Comfortable ceiling heights for living spaces are from 2.5 m and above. The walls of the attic floor are most often the roof slopes, so it is necessary to ensure their thermal insulation.
The top of the attic roof is the ridge, a beam that lies parallel to the plane of the floor of the house, and is the highest point of the roof. The ribs of the roof are called rafters.
Ridge (upper) rafters descend from the ridge. Beams attic floor connect the bases of the left and right ridge rafters of the same roof section.

Racks (beams with a cross-section of 100x100) are fixed to interfloor ceiling at a right angle at a distance of 0.8-1.5 meters from the external wall.
The higher the racks and the closer they are placed to the walls of the house, the larger the attic living space will be.
The side (bottom) rafters go from the attic beam attachment point to the mauerlat. Each section of the attic roof consists of two ridge rafters and two side rafters on each side.
The system of rafters of the same name forms a slope - ridge or side.
The most used version of the attic roof is a sloping gable roof. In this case, the ridge and side rafters form an obtuse angle at the connection points.
If they lie on the same straight line, then outwardly it looks like a classic gable roof.
When calculating the slope of the slope, the materials of the future roof and climatic conditions are taken into account; it can range from 15 to 45 degrees. The greater the slope, the less snow will be retained.
In regions with little snow, the sloping roof of a house can be quite flat.
The standard slope of the slopes is 30-35 degrees.
Preparatory work
The attic-type roof is planned even before laying the floor between the first and attic floors.
If you use wooden beams, then it is necessary to provide the cross-section of the beam and the distance between the beams so that they can withstand the permissible load for a residential second floor.
Typically these are beams with a cross section of 150 cm and above and a length of 6 m. Such beams are located at a distance of 80-90 cm from each other.
The system is such that the longer the beam, the greater the load it will experience in the middle. The pressure will be created by the floor of the attic floor itself, the furniture and, in fact, the residents.
Even if the attic is planned for unfurnished lounges, floor beams with a cross-section of less than 120 cm, laid at a distance of 100 cm from each other, are undesirable.
A reliable device will be ensured by the materials correctly selected for the attic roof.
The heavier the roofing materials are, and the longer the frame of the sloping roof, the larger the cross-section needed for the timber from which the frame can be built.
Typically, sections of 60x120, 60x100 cm are used.
In many photos there is no reinforcement belt installed on external load-bearing walls when a sloping roof is planned.
The weight distribution system is such that the entire weight of the roof falls on the floor beams, and they, in turn, transfer this and their weight to the walls.
A gable roof of a one-story building is much lighter than a broken attic roof, so a mauerlat (wooden sheathing along the perimeter of the walls below the floor beams) is quite sufficient.
If the walls are made of timber or brick, then the Mauerlat will cope with ensuring that the structure of the attic roof is reliable. It is important at the stage of wall construction to provide a device for fixing the Mauerlat.

The system must be reliable. In the case when a hollow cinder block or porous foam concrete is used as a wall material, it is difficult to secure the Mauerlat to the wall.
A good solution would be a reinforcing concrete belt, into which, at the pouring stage, rods are placed level to install the Mauerlat.
It is placed on a backing made of roofing felt or other insulating material and aligned along the inner edge of the wall.
Before fixing, make sure that the bars forming the mauerlat lie strictly parallel. Even a deviation of 2-3 cm will cause the slope to sag.
If the house is up to 6 meters wide (the maximum permissible size of an unsupported interfloor beam), then the floor beam rests on the Mauerlat at both edges.
If the width of the house is more than 6 meters and the house has load-bearing walls perpendicular to the floor beams, then the floors are installed according to next system: one edge of the beam is attached to the Mauerlat, and the second - to the internal load-bearing wall, on which the Mauerlat is already installed.
In continuation of this line, the next beam is laid from interior wall to the opposite outer mauerlat. The gap between the beams should be at least 3-4 cm.
If preliminary work done correctly, then you have a completely finished floor between the first and attic floors. Now it's time to draw the future frame.
Start learning the theory with a photo of a sloping roof and a video showing the installation of a mansard roof.
Draw the house from the front, the pillars on the left and right, draw the rafters and calculate the angles of inclination. To change the slope of the slope, increase or decrease the height of the posts.
Calculate the length of the rafters (cosine of the angle of inclination, multiplied by the distance from the post to the projection of the ridge - for the ridge slope, and cosine of the angle of inclination of the side slope, multiplied by the distance from the mauerlat to the ridge - for side rafters).

Watch the video various options fastening the beams together. High quality mount will provide a reliable frame.
If climatic conditions excessively overload the high sloping roof with winds, and the width of the house does not allow for a lot of space to be allocated for unused space behind the racks, then you can reduce the height of the racks and, after construction is completed, install built-in cabinets along the entire perimeter of the side walls of the attic.
Frame assembly procedure
Make the roof frame only from high-quality wood. The main sign of a “stale” tree is its dark color.
If you cannot buy dried drying chamber wood, then purchase raw wood, but still at the stage of wall construction.
Fresh wood cannot be used for a frame - under the influence of loads it will lose its shape and bend.
Raw timber can be dried naturally in one and a half to two months.
To do this, we lay it out clearly on a level with a distance between the beams of up to 5 cm. No two beams should touch. Every 75-100 cm the beam should rest on a flat surface.
You can use cinder blocks laid out on a flat area as support points, but in no case should you use another timber intended for the frame.
In sunny and warm weather, the beams dry naturally, but in rainy weather they need to be covered. Making a frame is allowed only from completely dried wood.
Begin installation, making sure that the posts and rafters are level. wooden beams and there are no cracks or knots in them.
Wooden blanks of the same type sawn according to a template must be treated with a fire retardant and a mixture that prevents the formation of fungus.
Treatment should be done twice with an interval of 1-2 days. Installation can begin when the wood has dried after treatments.
The procedure for assembling the frame step by step:
- Installation of racks. On top of the floor beams we place 5-6 boards, 5 cm thick, without fixing them. They form a floor on which you can safely move. The same size beams are installed on the floors according to the level. The extreme ones are placed first. Be sure to make sure that the opposite distances between the posts are equal. Then a cord is pulled between the outer beams. It serves as the level by which all others are set. The harness is placed on top of the posts and secured. Now we have a rectangle into which all other supports are mounted. To reduce the instability of the structure, the racks must be secured with jibs to the floor beams. It is the racks that are the weakest point in the frame system, so we will pay attention to Special attention their fixation. The post with the floor beam must be secured using a size 12-14 construction staple. When all the racks are installed, wedge them together with the overlap using a beam with a cross-section of 50-60 cm. It is worth additionally fastening them along outside between each other using unedged boards;
- Installation of upper slopes (gable roof). IN top point the rafters are fastened together with brackets. The ridge rafter rests on the frame of the posts and is fixed to the attic floor beam. Installation of the upper triangle of the attic should be done only on the ground and the completely finished structure should be raised. The triangle is laid on the posts and attached to them with staples. As soon as the installation of the second triangle is completed, it is necessary to connect them in several places to each other. When all the structures are exposed, you can fix them with lathing;
- At the top of each side rafter, a groove 3-4 cm deep is cut out, and the rack trim is inserted into it. The angle of the groove is equal to the angle of inclination of the slope. A groove is also made at the bottom of the side rafter for installing it on the Mauerlat. Due to these two grooves, an unloaded rafter can stand without fixation. Before applying the load that the sheathing will carry, you need to secure the side rafter with a bracket to the frame and to the mauerlat. Additional fixation should be carried out with self-tapping screws twisted at an angle at the rafter attachment points;
- Lathing - edged or unedged board or OSB board– fixed to the rafters using self-tapping screws. The edges of the slopes should be smooth. The distance between the components of the sheathing depends on the roof. For slate, a distance of 3-4 cm is allowed, and for bitumen shingles continuous sheathing required;
- All that remains is to build the gables and insulate the slopes and the sloping mansard roof is ready.
Take photos and videos as you implement each step. This will help you understand errors if the result does not satisfy you.
To work you will need tools:
- hammers of different sizes;
- screwdriver;
- a circular saw;
- pliers and small carpentry tools.
You will also need consumables:
- staples size 12 or 14;
- wood screws 45-50 cm long for lathing and 150 cm long for additional fixation of rafters;
- hydrobarrier;
- construction stapler;
- as insurance - the installer's belt.
It’s better to call 2-3 assistants for help (it’s possible to do the cutting yourself on the ground, but installing structures at height cannot be done alone).
The attic roof makes it possible to significantly increase the total living space, while the financial investment will be minimal. The most common option is a gable broken structure, which is easy to build yourself.
How to make a mansard roof yourself
Living rooms can be arranged under the attic roof. The shape of the building can be different, but in most cases the attic is built under a roof with two slopes. The optimal solution, which allows you to obtain a significant area of living space, is a broken structure.
A sloping roof is the best option for arranging an attic
Drawings and calculations of a mansard roof
The first step is to decide on the frame diagram. Rafters can be layered or hanging type. Layered ones rest on the walls of the building. They are mounted in structures where the distance between the walls is less than 6.5 m. Hanging rafters are placed on fillets and a mauerlat. If the width of the spans is large, then the rafter system will need to be reinforced with auxiliary ties.
The main condition for the comfortable construction of an attic is the ceiling level - it must be higher than 2.5 m. To ensure a similar height, the break line must be placed at a height of more than 2.8 m, taking into account the thickness of the layer of material for insulation and cladding of the structure. It is also important to consider the thickness of the floor.
An example of a drawing can be seen in the image:
 Minimum height the ceiling of the attic roof is 2.5 m
 To calculate the expected snow loads, you will need to apply this formula: S = Sg x µ, where S is the snow load, Sg is the weight of the snow cover per 1 m 2 area, µ is the value that depends on the roof slope (1.0 - for a flat structure with a slope of 25°, 0.7 for a structure with a slope of 25–60°).
Parameters Sg and Wo can be found in the relevant SNiP, in the “Rafter systems” section. If the roof has a steep slope, then the snow load can be ignored.
Roof structure
The frame structure includes the following parts:
- Mauerlat - a support bar that transfers the load from the rafters to the walls of the building;
- racks - supporting parts that support the rafter system in a vertical position;
- floor beams - planks that form half of the attic and the ceiling of the lower floor;
- rafters - slats that form the main contour of the roof;
- purlins - horizontal supporting parts for rafters;
- sheathing - slats or plywood sheets that are intended for laying roofing material;
- fillies - strips that are attached along the axis at the bottom of the rafter legs.
 The frame consists of a mauerlat, racks, purlins, floor beams and other elements
 A sloping roof differs from an ordinary structure with two slopes. The difference is that the slopes, which are placed opposite each other, have a special shape: they do not form a straight line, but consist of several slopes that are fastened to one another at an obtuse angle. The design is also symmetrical.
The extreme part of the rafters is generally set at an angle of about 60°. The support posts that support the rafters form the frame structure of the interior walls. The upper part of the rafters is mounted at a small angle, it can be from 15 to 45°. This makes it possible to reduce material consumption, while maintaining the functional properties of the roof and resistance to loads from snow.
Vertical racks, which abut against the floor planks, purlins and crossbars fastening them, form a parallelepiped. The design limits the dimensions of the attic from the inside. To give the product additional rigidity, struts should be installed between the floor slats and the lower rafters.
 If the roof span is more than 8 m, then you will need to install struts
 After installing the upper elements, to fix the truss and prevent sagging of the crossbars, you should install hanging support elements - headstocks. For auxiliary fixation of the lower rafter legs, they must be pulled together with the uprights using tacks. The parts are fastened using nails and bolts.
Stages of self-construction of an attic
If you decide to make such a structure yourself, it is important to provide for the use of the following materials in the project:
- roofing material;
- vapor barrier;
- waterproofing;
- insulation material.
The choice of insulation affects such a parameter as the pitch of the rafters. To reduce the amount of insulation, it is best to place the rafters so that the slab or mat fits tightly between them. The type of sheathing and its pitch will depend on the choice of material for roofing. You need to pay attention not only to choosing high-quality material for insulation, but also to creating an effective ventilation system.
 Ventilation is arranged by preparing technological gaps
 The construction of the rafter system must be carried out using fireproof materials. All parts should be treated with fire retardants. You will need to prepare the following elements:
- wooden blocks cross section from 100x50 mm;
- slats 50x150 mm;
- unedged boards;
- building level;
- self-tapping screws;
- nails;
- steel wire with a diameter of 4–5 mm;
- plumb line;
- roulette;
- hacksaw;
- axe;
- hammer;
- sharp knife.
Drafting
One of the most important parts of the work is drafting the project. It is very important to analyze the layout features of a private house. It is necessary to determine the dimensions and shape of the structure being built, and also provide for the placement of windows and a balcony.
 All structural elements should be marked on the project
 In the process of drawing up a project, the following requirements must be taken into account:
- It is important to decide in advance what the height of the attic should be. It should be remembered that the distance from floor base to the highest point of the structure there should be a minimum of 0.5 m.
- It is recommended to take into account the heating area and the main interior elements.
- The attic layout should be expanded. If you plan to install windows, they must be indicated on the drawing.
Drawing up a drawing must begin with choosing a shape, determining the cross-section of the rafter legs and the step of their placement. To determine the size of the rafters, you need to take into account the following parameters:
- slope;
- roof roofing material;
- climate features in the construction region.
It is also important to provide the required number of rafters in the project. They can be layered or hanging type.
 Rafters can be hanging or layered
 At the end, you should determine the number of parts to fix. In the figure below you can see some of the data necessary for the calculation, however, drawing up the project is complex process. This work It is recommended to entrust it to qualified specialists.
Mauerlat installation
The design of the attic roof rafter system should be selected based on the type of roof, as well as the prepared attic design. A simple option is a design with two slopes.
The main details of a roof rafter system with two slopes are:
- linear elements (column, rod system, beam);
- flat parts (slab, flooring, panel);
- spatial elements (vault, shell, volumetric part).
Before carrying out work, you will need to thoroughly dry the wood. The first step is to mark and install the Mauerlat. It is fixed to the walls of the building. The part can be made from a block or a powerful lath. If you plan to build a roof with two slopes, then the Mauerlat is laid on the long walls of the building. The element is necessary not only for reliable fixation of the lower part of the rafters, but also for the correct distribution of the load on the walls and the main part of the building.
To fix the Mauerlat, you should use metal pins that are attached to a beam made of monolithic concrete.
 To fix the Mauerlat, you need to install metal pins
 The beam should be placed at the top of the wall. It is also possible to use steel wire embedded in brickwork.
To secure the Mauerlat to the upper rim of the wooden wall, you need to use wooden dowels. Auerlat requires high-quality waterproofing of timber timber. Therefore, it is necessary to use roofing felt or other material with water-repellent properties.
 Before installing the Mauerlat, the base must be covered with roofing felt.
 The installation of a Mauerlat is required if it is planned to construct a roof frame, the rafters of which rest against the upper part of the wall with beveled ends or prepared cutouts.
If you plan to make an attic, the width of which corresponds to the width of the building, the rafter legs should rest with their lower ends against the external supporting parts. It is possible to use powerful beams laid across long walls as supports. Quantity supporting elements corresponds to the number of rafters. The beams must be secured to the walls in the same way as the Mauerlat.
Sequencing:

Frame construction
 The frame of the attic roof consists of floor beams, rafters, purlins and racks
 The material used is often 200x100 mm softwood bars. The floor slats are placed on top of the mauerlat with an indentation of 30–50 cm beyond the surface of the walls or into prepared grooves in the masonry. In the first case, the parts are fixed using angles and self-tapping screws.
 Fixing the timber to the mauerlat can be done using steel corners
 To make an even floor, the planks should be installed in this sequence:
- First of all, the outer parts are placed level.
- Next, you should tighten the cord and install intermediate elements along it.
- The pitch of the beams should be from 60 to 100 cm. A distance of 60 cm makes it possible to install insulation boards without cutting.
- To level the beams in height, they can be trimmed. Another option is to use plank underlays.
- If beams are inserted into prepared pockets, their outer parts must be treated with liquid waterproofing and wrapped with roofing felt.
You need to place the racks on the outer planks:

After installing the racks, crossbars and purlins, you can get a reliable structure that will limit the interior rooms of the attic. To increase its strength, it should be secured in the future with struts and tacks.
Installation of rafters
At this stage, the installation of the lower rafters is carried out:

After this, the upper elements are installed:
- The first step is to mark central part roofs. This can be done using a stand that was previously attached to the Mauerlat and a tie from the end of the roof. The outermost part of the board should run along the center of the roof. The rafter legs need to be aligned along this board.
- Next, you need to prepare a template from a 150x25 mm slats. It should be applied to the extreme part of the mounted batten at the required level and to the purlin on which the lower rafter legs will rest.
- You should mark the upper and lower cuts and cut out a template. The device is applied in turn to two sides of the roof. This will make it possible to check the accuracy of the marking of the central part. If the rows of racks are placed in parallel, then there will be no difficulties in securing the upper elements - they will have identical dimensions.
- According to the preparation it is necessary to prepare required quantity rafters The parts are placed on purlins and tied together in the upper parts using iron plates or trim strips. In the latter case, self-tapping screws are used as fasteners. In the purlin, the rafter strips rest against the cuts and are caught with iron corners. To ensure that the parts stand straight, they are secured using struts, mounted with the lower part on ties. All rafters are installed using this method.
- The hanging racks are fixed - pieces of 150x25 mm planks. The upper part of the batten is attached to the place where the rafters are fixed, the lower part is attached to the tie.
Video: mansard roof rafter system
Installation of struts and gables
Sequencing:

Sheathing of the structure
The sheathing is needed for:
- distribution and transfer of the weight of the roofing material to the rafters;
- performing additional fastening of the rafter system;
- bases for fixing roofing material.
The sheathing can be made in one or two layers, continuous or with vacuum.
 The sheathing can be solid or with relief
 The installation method depends on what material is planned to be used to cover the structure. If a roof is being built from slate or metal tiles, the sheathing should be made of slats that are attached to the rafters with nails. In this case, the installation step of adjacent planks can be 27–30 cm.
Continuous lathing is used when fastening soft material in rolls.
Solid sheathing is necessary for a soft roof
In this case, you can use moisture-resistant plywood sheets or particle boards. It is allowed to use pine wood material- trim strips.
It is important to take into account the fact that when installing such a sheathing, the material that will be laid must follow the contours of the external base. Therefore, the frame structure must be strong and level.
When laying out the material, you should use a cord, with which the slats or slabs will lie flat. The parts must be placed parallel to each other. Before fixing, the material must be treated with an antiseptic composition to protect it from rotting, fungus and dampness. The workpieces must be smooth and of high quality. It is recommended to give preference to wood grades 1 and 2. There should be no knots on it. To prevent the boards from warping, they must first be dried.
Sequence of actions for installing the sheathing:

Waterproofing a mansard roof
The roofing material does not have thermal insulation properties, so you will need to prepare quality material, which will be environmentally safe for human health. Quite often mineral wool or glass wool is used. Both materials have excellent sound and heat insulation parameters. It is also important to take into account that if the roof is made of metal, if the insulation gets wet, all its qualities can be reduced to zero. Therefore, it is important to carefully consider the design.
It will not be possible to insulate an attic without laying waterproofing material, so the process should be considered in its entirety. Step-by-step guide to waterproofing a structure:

Practice has shown that it is better to protect insulation with modern materials, for example, Tyvek or Izospan. The use of ordinary polyethylene film gives poor results, as condensation may appear. Experienced craftsmen believe that it is not necessary to waterproof the structure with roofing felt.
Before proceeding with the work, you need to decide thermal insulation material.
 Mineral wool is a fairly popular material used for roof insulation.
 The most commonly used heat insulators are:
- glass wool;
- mineral wool;
- Styrofoam;
- foam glass;
- wood shavings;
- straw.
The material must be selected taking into account four parameters.
- Thermal conductivity index. For roof insulation, 0.05 W/m*K or lower is optimal.
- Water resistance. The higher the score, the better.
- Fire resistance.
- Environmental Safety.
The insulating qualities of mineral wool deteriorate significantly after some time. The material can also be damaged under the influence of mechanical loads. However, mineral wool has a low cost, so the material is used quite often. Polyfoam is not afraid of water and has excellent thermal insulation characteristics. If you plan to build a house only from environmentally friendly materials, then you can use foam glass or straw.
Step-by-step guide to roof insulation:

Laying roofing materials and installing window openings
As an example, we will consider the installation of metal tiles, since this material is used quite often:

The number of windows is determined by the relation usable area glazing to the base of the floor 1:10. For example, if the attic area is 100 m2, then the glazing should be approximately 10 m2. When installing windows, you need to consider the following nuances:
Attic finishing
The interior decoration of the attic can be done using wood or plasterboard sheets. If the latter option is used, then after installation the sheets must be covered with wallpaper or painted with water-based paint. In some cases, the attic is divided into several rooms. This can be done using plasterboard partitions.
If you plan to use the attic frequently, then the floor and walls can be additionally insulated. This can be done using, for example, mineral wool.
Interesting attic room design options
The attic can be made cozy by symmetrically arranging sofas on both sides. In the attic you can place a long sofa. In the attic you can create a place to relax by hanging a hammock. In the attic you can make not only a living space, but also a bathroom. On the attic floor you can even make a kitchen. If on the territory it is not possible to place a hammock, then this can be done on the attic floor. One of the parts of the attic can be completely glazed. The attic can be great place for creating home library The walls of the attic can be lined with brick. In the attic you can arrange a full-fledged living room. On the attic floor you can arrange a rest room. If the house is located in a beautiful area, then the roof can be made panoramic. The bed can be placed facing the window. In the attic you can make a bedroom with high ceilings In the attic you can place a hanging chair. This will make the roof more comfortable
Video: making a mansard roof
Recently, the mansard-type roof has become quite popular among owners of private houses. To experience all the positive aspects of living in a building of this type, you need to pay due attention to the insulation of the building.
Construction of the attic individual house- a fairly common occurrence. This construction method allows you to reduce the cost per square meter and create a rather interesting room in the under-roof space. In order to properly install an attic floor, you need to study the basic requirements for it and choose the right type of roof and its slope.
What is an attic
According to regulatory documents, the attic floor is the volume under the roof that is used to accommodate residential and utility rooms. In this case, the height of the external walls should be no more than 1.5 m in the general case, otherwise the space will be considered a full-fledged residential floor.
A do-it-yourself attic is beneficial both during the construction and operation of a private house. In the first case, costs are reduced due to the fact that the height of the vertical enclosing structures is reduced. The roof takes on this function without ceasing to fulfill its original purpose.
An attic is an under-roof space that can be converted into a separate room for living.
During operation, cost reduction may include the following:
- The heated volume of premises is reduced, as a result, there is a reduction in heating costs, which are an impressive item of utility costs.
- After completion of construction, the house must be measured by specialists from BTI, after which a passport of the object is issued. It is based on the area values given in it that taxes are calculated and payment is made utilities(subject to connection to centralized systems and the absence of metering devices, which is now practically unheard of). The area of the marsard floor is included in the area of the entire house with coefficients of 0.7 or 0.8 depending on the height of the outer wall and the angle of the roof, which allows significant savings throughout the entire life of the facility.
Preparatory stage
Construction should begin with the development of a project or diagrams on which the future structure will be drawn. Most often, the roof that is used for the attic floor is a gable roof, but it is also possible to use a four-slope hip roof. Gable design allows you to provide full windows in the gables.

In the case of using a hip for lighting rooms, it is possible to install only attic window openings. This option may become more labor-intensive in terms of installing roof elements and developing interior interiors. Reduced costs with hip roof achieved due to the absence of gables (savings will be especially noticeable in brick house, where the cost of materials and the work itself for installing wall fences is quite high).
Do-it-yourself attic construction begins with determining the geometric dimensions and shapes of the roof. We have already talked about choosing the type of rafter system for a house (gable, hip), after which you will need to decide whether the slope will be straight or broken. The broken design has such disadvantages as increased cost and labor intensity. Its use is justified by the need to increase the height of the room by changing the angle of the roof.
At the design stage, the optimal roof slope is determined. Its choice depends on ergonomic considerations and the type of roofing material, which imposes restrictions.
Before making an attic, it is also necessary to calculate all its load-bearing elements for strength and bending, select the composition of the roof pie, perform thermal calculations and decide on materials. More on this below.
Main load-bearing elements
The design includes the following components:
- Rafter legs, which transfer the load from the weight of the roofing and the wall to the walls of the house. The section is selected depending on the angle of inclination, span, pitch and design load. A professional can perform detailed calculations correctly. For private construction, you can use approximate values, but it is best to provide a small margin.
- Narozhniki- These are rafter legs that rest on the slopes on one or both sides. The cross section is calculated in the same way as for rafters.
- Sloping legs- a design that is used in hip roof. This element serves as a support for the narodniks. The cross-section is taken depending on the load and span; in any case, it should be larger than that of the rafter legs.
- Mauerlat- an element that serves as a support for the footrails and transfers the load from the roof to the walls, distributing it evenly. It would be correct to choose a section with dimensions of 100 by 100 or 150 by 150, depending on the complexity of the object. Installation of the Mauerlat is not carried out during the construction of frame and wooden houses, since in this case its role is played by the upper crown of the walls or trim.
- Rigel- a beam, which also serves as a support for the rafters, but in the upper part. The crossbar is installed at the ridge of the roof or at a break in the slope, in the case of a broken structure. The cross-section should be taken depending on the conditions; the recommended value is 200 by 200 mm.
- Struts, racks, contractions– additional elements for securing elements. They are used to reduce the cross-section of load-bearing structures. Their cross section is most often chosen constructively. It is important to consider the convenience of making connections.
A do-it-yourself attic roof must be erected starting with the selection of sections of all elements of the roof frame. The material for manufacturing is selected taking into account the following conditions:
- the wood must be coniferous (pine, spruce, larch);
- material grade – first or second;
- humidity no more than 15%.
Be sure to treat all boards and bars with antiseptic compounds before starting construction.
Thermal calculations

To keep the house warm, you will need to select the thickness of the insulation. Most often for attic premises mineral wool is used (more often in slabs than in mats). It is also possible to use polyurethane foam, polystyrene foam, extruded polystyrene foam and ecowool. Having determined what to make the thermal insulation layer from, select its thickness. It is important to consider the height of the rafters. It should always be equal to or greater than the thickness of the thermal insulation. For mineral wool, you will also need to provide a 50 mm thick ventilation gap between the top surface of the thermal insulation and the roofing. If the cross-section of the rafters is small, then in order to fulfill this requirement, a counter-lattice is installed.
Before you build an attic roof with your own hands, you can calculate it using heating engineering manually, guided by the joint venture " Thermal protection buildings." But it’s better to turn to special programs for help. To correctly calculate the thickness in the Teremok program (freely available on the Internet), you need to know the thermal conductivity of the insulation and the area where the house is being built, the program will find the rest itself.

A do-it-yourself mansard roof differs from a conventional pitched roof only in the presence of thermal insulation. More layers are also added to the cake to protect the insulation. Below step-by-step instruction will allow you to correctly install the elements of the attic roof.
The procedure is as follows:
- fastening the Mauerlat to the wall;
- installation of rafters and systems of struts and racks;
- installation of waterproofing and wind protection;
- sheathing;
- roofing;
- insulation;
- bottom trim.
Assembling the roof frame
Installation begins with the Mauerlat. It is laid on the inner grant of the outer wall. Fastening depends on the material of the load-bearing walls, but in general it can be done in several ways:
- on staples;
- on stiletto heels;
- on the anchor.


For fragile house wall materials, such as aerated concrete and foam concrete, a monolithic belt is made along the edge, which will prevent the destruction of the walls. For wooden and frame houses Mauerlat is not provided.
Next, you need to install the crossbars, if provided. After the supporting structures are laid, the rafter legs are laid out. The fastening of the rafters to the mauerlat can be rigid and hinged. It is better to do it using a notch and fixing it with metal corners on both sides.

This is a fairly old album, so all the drawings in it use nails as fasteners. It is better to replace them with studs. The design of the roof of the house in this regulatory document shown in great detail, so it is recommended that you familiarize yourself with it before starting work.
Before you begin installing insulation in the house, it is necessary to ensure its protection from negative impacts environment. To do this, spread a moisture- and wind-proof membrane over the surface and secure the sheathing. After this, the roofing covering is installed, taking into account the recommendations for the selected material. For example, bituminous shingles require a continuous sheathing, which is most often made of moisture-resistant plywood.

Installation of thermal insulation
To insulate a house, you need to install insulation without gaps or cracks. For mineral wool, it will be easier to install if the clear distance between the rafters is 580 or 1180 mm. This will allow the material to be laid with a slight spacer, which will prevent cracks from occurring.
When using expanded polystyrene, the distance between the slabs and rafters is filled with sealant or polyurethane foam.
After laying the insulation, you need to attach a vapor barrier to it from below. After this, the lower sheathing and ceiling lining are installed. For an attic, it is best to cover the frame with two layers of 12.5 mm thick plasterboard followed by finishing.


