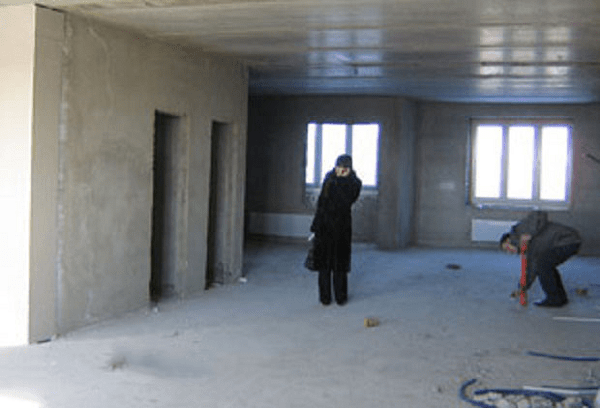
When you receive the keys to a new apartment, euphoria gives way to panic. Where to start? We answer this question based on 10 years of, sometimes bitter, experience.
For those brave souls who decided to do the renovations themselves, we organized an online school for renovation and decoration. To receive fresh and useful posts - subscribe to our pages on social media. networks. There we share our experience for free :)
Publication date: 2018-03-27 17:19:00
Stages of renovation in a new building from scratch
Where to begin?
The more detailed the stages of apartment renovation in a new building are defined, the easier it will be to carry out. Knowing all the basic steps, you will be prepared for what kind of work awaits you. The easier it will be to determine the budget for each step.
Step 0. Let's start with the fact that any repairs need to be organized in advance. It is not necessary to establish an “iron” framework with a rigid schedule; it is enough to determine the basic facts that will affect the entire schedule and the stages of apartment renovation as a whole.
Take one evening and discuss with your family what will happen and where:
- Is redevelopment necessary?
- What kind of furniture is planned (its approximate dimensions and location)?
- What kind of finishing will be in each room: finishing of the floor and walls
- Do you need pipe boxes?
It’s hard on your own - order a design project from, it’s not as expensive as it seems at first glance (from 350 rubles/sq.m.) and will save you from alterations in the process.
Before planning renovations in a new building:
Sequence of apartment renovation in a new building
Starting an apartment renovation in a new building always means purchasing basic equipment. If you decide to do-it-yourself repair- then the purchase of a tool is also added to this item.
Step 1. Construction equipment and temporary bathroom. Buy the cheapest toilet and sink so that workers or you yourself can use them without fear of ruining them. Install temporary lighting in all rooms and, if the house is already occupied, agree with the neighbors on a work schedule.
Step 2. Redevelopment (if required). This also includes the removal of dismantled material, as well as the construction of new partitions.
Step 3. Replacement of windows, heating radiators and entrance door (if required). Don’t forget to read our post about windows; it will be useful to you when choosing a manufacturing company.
Step 4. Plastering works. Remember that the drying time depends on the layer of plaster and weather conditions. In this matter, it is better to wait it out than to repaint the walls or re-glue the wallpaper later.
Step 5. Electrical wiring, ventilation and air conditioning (laying all wires, installing socket boxes). And yes, there is a separate post about electrics, which would also be useful to read.
Step 6. Installation of plumbing and heated floors (if any). Be careful here: heated floors can be laid both in the screed and on it. Depends on the manufacturer.
Step 7 Floor screed. Make sure that in places where built-in furniture and the kitchen will be located, the difference is minimal.

Step 8 Bathroom and toilet. This includes absolutely all the work that is required for finishing, except for the suspended ceiling (if you chose it): waterproofing, laying communications, installing a heated towel rail, bathtub, installations and Finishing work.
Step 9 We are working on the ceiling. If you chose tension, skip this step.
Step 10 We prepare the walls for finishing: puttying, grouting, sanding. We decide what kind of apron will be in the kitchen: if there is tile, now is the time to lay it.
Step 11 Pouring the finishing layer of the floor (self-leveling floor, if required), insulation and laying floor tiles.
Step 12 Finishing slopes and installing window sills.
Step 13 Installation of ceiling moldings (fillets) and painting of the ceiling
Step 14 Clean finishing of walls.
Step 15 Installation of sockets and switches.
Step 16 Preparing the base and laying the floor covering.
Step 17 Installation interior doors.
Step 18 Installation of floor plinths.
Step 19 Installation of stretch ceiling.
Almost always, new housing is purchased by a happy new homeowner from a developer company without interior decoration and renovation, but with communications installed in the apartment. Firstly, such housing in a new building will cost less, and secondly, almost always the renovation and furnishing of an apartment by the developer is carried out extremely carelessly, using cheap materials. Thirdly, there is a desire to complete some stages of apartment renovation with your own hands or with the hands of good craftsmen.
Where to start renovating an apartment in a new building
First you need to make an audit and inspection of the apartment, install problem areas walls, ceilings and floors. Next we proceed in the following order. We determine what needs repair and finishing first. If there is not enough time and money to completely renovate the apartment, you need to put in order first of all:
- Entrance door and windows, apartment ventilation;
- Carry out complete and high-quality electrical wiring and distribution of sockets throughout the apartment. This stage must be thought out in as much detail as possible, drawing up a connection diagram and a circuit for laying wires in the walls;
- Connect the water and assemble the sewer system in the bathroom and toilet, install a toilet, washbasin and shower;
- If the start of renovation of an apartment in a new building coincides with the heating season, be sure to check the degree of heating of the aluminum registers using a remote thermometer.
Advice! Before starting repairs, a list of claims for defects or defects must be presented to a representative of the selling company. You may be able to receive compensation for repairs in a new building. Do not agree to rework by the company.
In the process of carrying out the above preparatory work You can calculate the sequence of repairs in a new building.
What influences the sequence of repairs in an apartment in a new building
Much in home renovation in a new building depends on the availability of time and money. Having bought a “bare” apartment and decorated Required documents on the right of ownership, you automatically start paying rent and house fees for use local area, for the removal of household waste and construction waste. After connecting electricity and water, the new apartment in the new building began to bring you a loss in the form of costs for its maintenance and decoration. The longer it takes to renovate an apartment in a new building, the more it will cost you.
There are two main options for approaching the issue of finishing a new apartment in a new building:
- Planned renovation and finishing of the apartment. In this case, the owners are detailed map and a schedule for finishing work, which describes all the main types of finishing and installation of devices step by step. Such repairs are usually carried out from scratch until completion by one team of craftsmen. The delivery time for the repaired facility may take several weeks or months. The disadvantages of this approach include the ever-increasing price and cost of work, sometimes exceeding the cost estimate by more than twice. As a result, if due to unforeseen circumstances there are not enough funds, repairs may drag on for an indefinite period.
- Quick repair from scratch. In this case, all of the above stages of repair in a new building are carried out by hired craftsmen with direct control of the quality of work on your part. The apartment in the new building will be prepared for further finishing of the rooms within a week. In addition to communications, the smallest room of the apartment is finished and furnished with the installation of temporary linoleum and wallpaper. Such a room does not yet have amenities, but it can be used as housing, a temporary shelter and a warehouse for building materials. We carry out all other work as available funds and time become available.
The first option is well suited if the family has small children or elderly people who need to provide certain comfort and convenience. The second option is considered more economical and faster, especially if, after finishing the kitchen, bathroom, toilet and one room, the housing is rented out, with the remaining rooms of the new building being consistently brought to condition.
We carry out apartment renovations with our own hands and head
Among the most popular horror stories for new buildings are stories about the shrinkage of the walls of the house and its foundation. In reality, a similar process for a multi-storey building should be finally completed by the time the building is put into operation. This period averages no more than 18 months. If after 1.5 years in the corners, ceiling or cracks form at the joints and in the masonry of the walls, tiles in the bathroom fall off, doors are deformed with skewed doors - this means that the new building has certain problems with the stability of the foundation. It is worth waiting for the renovation until the main thing is clarified - what is happening with the new building.
Where to start renovations in a new building
Before starting work, first inspect the lock on the front door. The model and standard equipment of the door may be the subject of a separate agreement. Specify in the addendum to the contract which model of door and lock needs to be installed. If there is a need to take additional security measures, first of all change the lock installed when the new building was delivered.

At the next stage, it is necessary to resolve the issue of installing a distribution electrical panel, connecting the electric meter. This will give you the opportunity to start using power tools when renovating your apartment. To eliminate the need to use a large number of carriers and extension cords, plan the layout of the electrical wiring in the apartment. The following should be taken into account:
- For the kitchen and bathroom, the wiring must be laid in sealed hoses and sleeves;
- Lay a separate wire into the bathroom to connect the boiler or washing machine. The cable cross-section must be designed for a current of at least 25 A;
- An additional wire must be laid to the installation site of the air conditioner;
- It is necessary to run a wire into the bathroom, kitchen, and living room, which will be connected and used in the future when organizing additional grounding.
Advice! When installing wiring, use only copper cable without twists and adhesions.

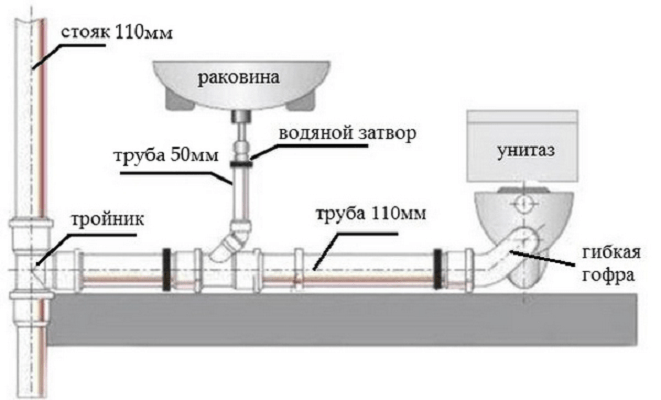
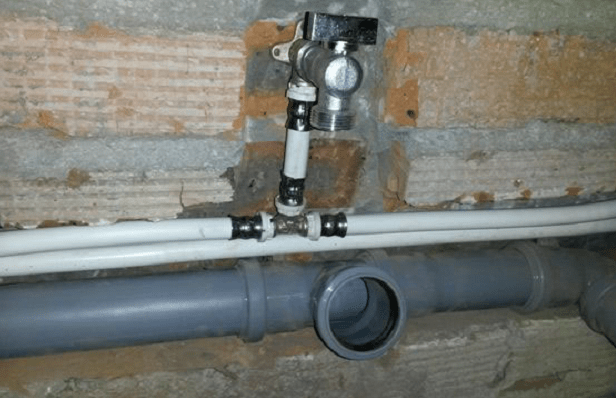
In addition to electricity, to create more or less normal conditions it is necessary to connect hot and cold water meters cold water and collect sewerage in the bathroom and toilet. You need to start work by installing the toilet and washbasin.

Considering that good plumbing it's expensive, you can install it for the first time inexpensive option toilet, assemble and connect plastic sewer pipes, bellows and washbasin. During the renovation of an apartment, plumbing fixtures can be replaced at any time. Installing expensive plumbing increases the risk of damage during renovation; it must be installed at the final stage of renovation of a new building.

To lay a plastic water supply, using a hammer drill, we will drill channels in the walls of the bathroom, toilet, and kitchen with a depth of 2.5-3 cm. Next you need to solder water pipes and connect the leads to cistern and a washbasin. IN last resort We will install and connect water meters for cold and hot water to your home water supply.
Rough operations
Before starting work, you will need to do a large amount of cleaning up the remaining concrete and mortar. The main part will be spent on rough cleaning of walls, floors, ceilings, gating them, leveling and trimming seams. Such work produces a large amount of dirt and dust, so it will be necessary to organize good ventilation And wet cleaning inside a new building.

A separate point is necessary to highlight the preparation of floors in each of the rooms under finishing. During the renovation of the apartment, it will be necessary to repair all the cracks, holes in the seams between the slabs, in the floor, and in the interior walls of the new building. The most difficult will be leveling the floor using a screed made of cement mortar and reinforcing mesh. This procedure will need to be performed upon completion of the preparation of the walls and ceiling for finishing.
We will perform similar work in the kitchen, bathroom and toilet.
Carrying out finishing work
After rough cleaning, it will be necessary to prepare the walls in the kitchen and toilet for laying tiles on the walls and floor. You can lay facing tiles with your own hands, but this is a troublesome task and requires large quantity time. Therefore, it is better to entrust the laying of tiles to craftsmen who specialize in this type of finishing. While the tile laying work is going on, you can do the renovation yourself in one of the rooms of the apartment. Most the best option will lay decorative plaster or liquid wallpaper on the walls. If at the time of the start of repairs in the apartment of a new building, the double-glazed windows in the windows were in satisfactory condition, then you can begin applying plaster to the walls of the room immediately.

Upon completion of laying tiles on the floors and walls in the kitchen, bathroom and toilet, you need to lay inexpensive linoleum in the corridor connecting these three rooms and the room in which the renovation was carried out using decorative plaster. This will reduce the amount of dust raised and simplify cleaning in the apartment.
The most critical stages of repairing a new building
Before finishing the walls in the apartment, it is necessary to level them, and if a defect is found, repair the interior doors. If your future plans involve wallpapering, normally closing doors are simply necessary for high-quality wallpapering work. After the finishing of the walls is completed, we proceed to laying linoleum, laminate or carpet on the floor of the apartment. The most practical is considered to be laminate for living rooms, for the corridor, an office version of linoleum with increased abrasion resistance. Similar view The work does not require special qualifications and can be easily done with your own hands during the renovation of a new building apartment.

Conclusion
The final stage of repair is connecting the lamps and installing furniture in the apartment. Approximately 70% of the work involved in renovations in a new building can be easily done with your own hands. And only when performing special types of finishing - laying parquet, installing suspended ceilings, installing double-glazed windows or entrance doors in a new building, you will need the services of specialists.
Each of us tries to arrange new apartment to your liking. Therefore, before moving into a newly purchased apartment, we have to endure the difficult test of renovation. As a rule, the matter is not limited to wallpapering, so this process often drags on for several months. After reading this article, you will learn how to make one from scratch in a new building.
A few words about shrinkage
The most important feature of any new house is that in the first few years of operation it will shrink slightly. Therefore, when using incorrectly selected building materials, cracks may appear on the ceiling and walls of the apartment.
To ensure that your efforts are not in vain, you need to follow the first and basic rule of renovation in a newly completed house. The initial renovation of an apartment from scratch in a new building should be the cheapest. It is recommended to bring your home to perfect condition no earlier than a year and a half after construction. During this time, you will have time not only to carefully consider all the details of the future interior, but also to accumulate sufficient quantity money. In addition, it is possible that in a year and a half you will identify certain nuances that will force you to completely or partially abandon your original plans.

In what form do developers rent out housing?
Depending on how ready the apartments are to move in, they can be divided into three categories:
- Without finishing (for an open plan). Such housing is an uncomfortable room with bare walls. When purchasing such an option, you should be prepared for the fact that you will have to bring it to fruition yourself. Such apartments have an entrance door and windows, as well as electrical, gas and water communications.
- Rough repairs. Apartments from scratch in a new building belonging to this category are prepared for decorative finishing. As a rule, they have heating devices and inexpensive plumbing. Such housing is rented with already plastered walls and floor screed.
- Finishing, which includes inexpensive decorative finishing. In such apartments, budget wallpaper has already been hung and linoleum has been laid. All that remains for the happy new residents is to install plumbing, lighting and bring in furniture.
Before buying a home, you need to inquire in advance about the condition in which it will be rented. Consider all the proposed options and choose the one that best suits your requirements. This is the only way you can make renovating an apartment from scratch in a new building less expensive.

Who will do the repair work?
Ideally, to speed up the process, it should be entrusted to professionals. They will do everything at the proper level and in the shortest possible time. In this case, the happy owners can only move into a new, fully finished home.
However, in practice, people often spend all their savings on purchasing an apartment. Therefore, they have no money left to pay for services professional craftsmen. This is especially true for those who took out a mortgage. In this case, you will have to independently renovate the apartment from scratch in a new building. Moscow is a very large city, so its residents should not have problems finding and purchasing the necessary building materials.

When is the best time to start renovations?
To successfully complete this important and responsible activity, you need to carefully plan the timing of it. It should be understood that each season is characterized by its own advantages and disadvantages. Thus, in winter there is a decline in activity construction market, so at this time you can significantly save on materials. But before you start renovating an apartment from scratch in a new building, you need to carefully weigh the pros and cons. After all, it’s unlikely that your neighbors will be delighted when you start turning off the risers to replace batteries and plumbing.
In the spring, there is a gradual activation of the construction services market. Crews are starting to schedule work, but prices are still fairly low. This is the best time to start renovation work so that you can celebrate your housewarming by the summer.
In summer and autumn, prices for building materials remain quite high level. In addition, in the first case, in order to renovate apartments from scratch in a new building, the price of which will reach sky-high heights during this period, you will have to give up your summer vacation. Well, in the fall there is no time to do such work, because at this time it is necessary to supervise the studies of schoolchildren and clear away the accumulated office problems.

Main stages
Renovating an apartment from scratch in a new building is carried out in the same way as a major renovation. In most cases, the main work falls on the shoulders of the owners themselves. The approximate list of work required when purchasing a home with an open plan includes the following steps:
- installation of walls or interior partitions;
- cutting grooves and holes for electrical wiring and pipes;
- wiring and installation of all engineering and technical communications;
- and gender;
- plastering walls;
- installation of interior doors;
- finishing of window slopes;
- performing final decorative finishing;
- final work, including switches, connecting lighting fixtures.

Benefits of working with a contractor
Renovating an apartment from scratch in a new building is quite a troublesome and time-consuming task. Therefore, it is better to entrust it to experienced workers. The contractor’s responsibilities include keeping records of the building materials used, drawing up a clear work schedule and forming a professional team. If necessary, he can also organize delivery of the necessary construction materials to the site.

Features of cooperation with hired organizations
Many unscrupulous contractors seek to deceive customers. To avoid such problems, you need to have a record sheet with you. finishing materials, used for work. This will help you completely control their consumption.
It is important to agree in advance on the transportation of building materials using an elevator. Massive renovations in new buildings often lead to the formation of entire queues of people wishing to take advantage of this benefit of civilization.
In addition, before signing a contract, it is recommended to clarify in advance the time for performing work that is associated with increased noise. Thanks to this, you will be able to adjust the timing of repair operations and minimize possible economic risks. If you are planning to install a system in your home fire safety, then it is advisable to discuss this point with the contractor in advance.
Apartment renovation from scratch in a new building: cost
Before starting work, you need to carry out comparative analysis market prices for building materials. In addition, due to the complexity of the repair, you need to figure out whether it would be easier to entrust it to professionals. So, the average cost complex repair in a new building located in a region with well-developed infrastructure, varies from 2,400 to 6,000 rubles per square meter. Please understand that these are only approximate figures and depend on many factors.
The cheapest is economy class repairs. It includes automatic meters, switches, sockets and ceiling lamps. The floor is covered with linoleum, and the putty walls are covered with wallpaper.
The so-called basic repair. In this case, the list of works will be supplemented by leveling the floor, covering walls, laying tiles, and insulating the front door and windows.
When you sign a contract for an expensive complete renovation, you can expect to receive a home that is ready to move out of the box.
For those who do not have huge sums of money, but still plan to renovate an apartment from scratch in a new building, we can recommend doing a budget one. In this case, the linoleum you have chosen can be laid not on the screed itself, but on a layer cork backing. This way you will get a warmer floor without spending huge sums on it. The walls can be painted or covered with inexpensive paper wallpaper. The bathroom can be laid out on a budget ceramic tiles domestic production.
Stages of finishing an apartment in a new building
The vast majority of apartments in St. Petersburg new buildings are for sale. Especially for the owners of such housing, we have written a large and detailed article-instructions: how to turn a bare concrete box into comfortable housing and spend a minimum of money, time and nerves on it.
Finishing can be ordered from specialized companies that provide a full range of services, including dismantling walls, installing plumbing, air conditioning and replacing windows. Some work can be done independently, while others can be entrusted to specialists. The article will be useful to everyone, regardless of the chosen option.
When to start repairs
It is best to purchase building materials in winter, when market activity is down. We recommend starting work in the spring: crews are not so busy, and prices are lower than usual. If you are planning to replace heating radiators, plan repairs taking into account heating season. You will need to turn off the risers, and winter time the management company will not give you permission to do this.
Full finishing apartments with an area of 60 sq. m will take from 6 months to a year depending on the complexity. Allocate plenty of time and energy, because repairs are unpredictable and unexpected delays and difficulties may arise.
Getting ready for repairs

1. Assess your budget
Decide on the amount of money you can allocate. Standard studio finishing inexpensive materials will cost at least 100 thousand rubles. When calculating, you need to be flexible: some things are worth investing in fully, because alterations will cost more, but something can be done on a budget. Be sure to set aside money for unexpected expenses.
What you can't save on
- Floors and walls are major long-term investments. The floor must be level flooring- high quality. Pay attention to the preparation of the walls, finishing coat(wallpaper or paint) can be inexpensive.
- Engineering Communication: plumbing, sewerage, heating, electrical. These are expensive and labor-intensive objects that should serve you for a long time and with a minimum number of breakdowns.
- Redevelopment. From proper organization space depends on how comfortable it will be to live in a new apartment.
Demolition or construction additional walls, the transfer of communications must be carried out in accordance with construction and sanitary standards. Some alterations need to be approved by the relevant organizations. This will also take money and time.
2. Make a detailed project for your future apartment
Based on your budget, consider the equipment and interior of the apartment. Draw a plan for each room: what and where furniture and appliances will be located, what and where light sources will be located. Mark additional partitions, windows, air conditioning, heating radiators, and decorative elements. Try to make the plan as detailed as possible, because the size of the sofa, for example, determines at what height the sockets should be placed.
Ideally, the project should contain working drawings, a decor sheet and 3D visualization. It is better to entrust the preparation to a specialist. If the budget is small and the project does not provide non-standard solutions or complex redevelopment, order only drawings with electrical and communications wiring diagrams.
3. Select materials
We have decided on the type of finish. Now let's make a list necessary work and required materials. With all this in mind, choose:
- tiles for the bathroom;
- coverings for floors, walls and ceilings: leveling mixtures, plaster, paints, wallpaper, decorative elements;
- entrance and interior doors.
Pay attention not only to the cost of materials, but also to consumption. As a rule, quality materials it is lower, and ultimately, finishing with expensive materials can be cheaper than with budget ones.
4. Prepare the apartment
- Install a temporary toilet and sink and supply water. Choose the cheapest options that you won’t mind throwing away when finished.
- Provide temporary electrical supplies: outlet, extension cords, light sources.
- Purchase the necessary equipment: brushes, rollers, spatulas, containers for building mixtures and paints, cleaning supplies, stepladder, trash bags and protective film.
5. Dismantle unnecessary things
If this is assumed by the project, demolish unnecessary walls and partitions, expand door and window openings. It's best to entrust this construction team: she will carry out the work within the time allowed by law and remove the garbage. For turnkey repairs, dismantling is included in the cost of services. Before buying an apartment with a rough finish, evaluate your capabilities - self-execution All work is not always cheaper than the turnkey option. You can see the finished housing from the developer in this selection:
6. Take measurements
If you are going to replace windows and doors, take measurements and order necessary materials.
7. Relocate pipes and meters
Change the pipe layout and move meters to more convenient points, if this is provided for in the project. Be sure to go to first management company(UK) or homeowners association (HOA) and agree on the time to turn off the risers. It’s better to do this in advance, because housing offices have their own shutdown schedule for preventative work, and you will need to adapt to it.
Let's start the renovation

1. Prime the ceilings
The basic rule of any renovation: finishing work is carried out from the ceiling to the floor. If there are uneven spots on the ceiling, the surface needs to be plastered; if not, it is enough to prime it. Finishing- wallpapering or applying paint/decorative plaster - we will do it after we finish everything dirty work in the apartment.
2. Choose your kitchen and kitchen appliances
From the size of the kitchen set, quantity and type household appliances The number and location of sockets, the connection of water supply and drainage pipes depend. Therefore, the kitchen and equipment for it need to be selected before we start laying communications.
3. Install the necessary partitions
If the project involves zoning the apartment using partitions, install them now. It is best to use gypsum or silicate tongue-and-groove slabs- they are laid according to the principle of the designer. The surface of the partition turns out to be even and smooth, there is no need to plaster, just a layer of primer is enough - and the wall is ready for wallpapering.
If you bet aerated concrete walls, electrical wiring in them can be carried out together with the general one. If you choose frame partitions, the wires must be laid in them immediately.
4. Prepare for air conditioner installation
Installation can be ordered from the company where you purchased the air conditioner. We are not carrying out any work yet, we are simply inviting a specialist to determine how the ventilation routes will be routed and how the internal and external blocks.
5. Waterproof
Waterproofing must be done in all “wet” areas: bathroom, toilet and kitchen. In the rooms it is performed at will. During repairs, we recommend laying waterproofing material (for example, roofing felt or a special film) throughout the entire apartment. This will protect you and your neighbors below from accidental leaks.
6. Plaster the walls
Carefully inspect the walls and note any major irregularities. The bulges need to be cut off, and the recesses need to be sealed with plaster. This way you won’t have to apply too thick a layer, you will save material, and the plaster will dry faster. First, plaster the rooms that will be finished first.
If you want perfectly smooth walls, you need to plaster along the beacons - guiding landmarks. Plasterboard strips, pipe fragments, wooden or metal slats are used as beacons.
Sometimes the so-called “dry plaster” is used: the prepared walls are covered with sheets of plasterboard. This is faster and easier than conventional plastering, and there is no need to trench the walls for electrical installations - all the wires will be hidden under the drywall. “Dry plaster” cannot be used in damp rooms; it will swell, while ordinary plaster it will just dry out.
7. Prepare the floor for screeding
Inspect the floor and get rid of large bumps - they need to be cut off. Further preparation depends on the type of screed. For a dry screed, simply sweep and wash the concrete. If you level with mixtures, you need to process the seams, seal cracks, remove dust and prime.
8. Install the front door and windows, glaze the balcony

It is most convenient to replace doors, windows and glazing a balcony between the rough and finishing stages of work. If you do this before rough finishing, you will stain the doors and windows with construction dirt, if after finishing, you can ruin the finishing. The work must be carried out by specialized specialists.
9. Decide on the laying of communications
Apartments in new buildings, as a rule, are already connected to the Internet, satellite television, alarms, surveillance cameras and other low-current systems. Draw up a wiring diagram for them to determine how and where the routes will go. We won't be building walls for now. If you need to install atypical equipment, consult a specialized specialist.
10. Screed the floor
Prepare the floor for pouring the screed: clear the surface of debris, cover the lower part of the walls with damper tape (it protects the screed from cracks), apply waterproofing and install beacons.
By building regulations The thickness of the screed should be at least 2 cm; if there is a rough fill, a layer of up to 1 cm is allowed. In rooms where heavy furniture or large equipment will be placed, the screed is made thicker.
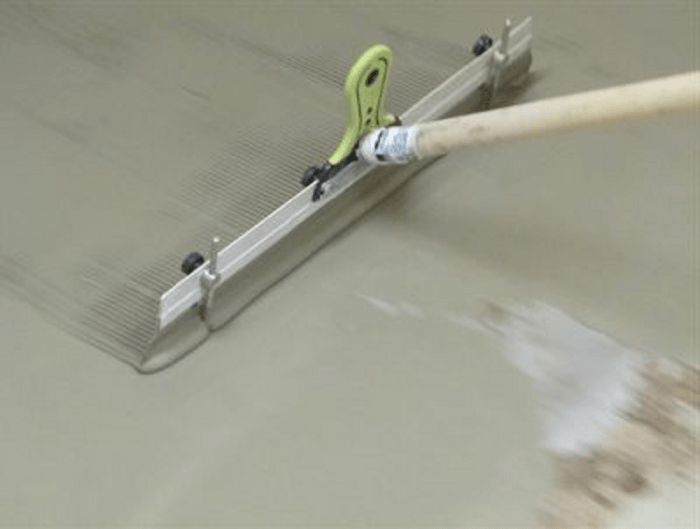
Wet screed
Wet screed- verified classic version, the cheapest, most reliable and durable. A reinforcing mesh is often installed underneath the waterproofing layer for greater strength. The downside is that there will be a lot of dirt in the process, and the repair will take time: it takes a month to a month and a half to dry a layer of 3-4 cm. You can walk on the floor on the third day after pouring.
Semi-dry screed
Semi-dry screed differs from wet screed in less water and installation technology. The solution is prepared automatically, entirely in one step for the entire floor. Reinforcing mesh is not used; its role is played by fiberglass, which is added to the solution. The floor is sanded immediately after pouring.
Semi-dry screed cannot be done manually: the work is carried out by specialists using a pneumatic blower. A square meter of floor costs from 850 rubles. But such a screed dries on average in three days, and you can walk on the floor after a day.
In terms of time, money and labor costs, semi-dry screed is the most profitable.
Dry screed
Dry screed is an expensive, but quick and least dirty option. The base is covered with an even layer of expanded clay, plasterboard slabs are laid on top metal profiles. The plates are held together construction glue and self-tapping screws for gypsum fiber sheets (GVL). The work takes 1-2 days.
Dry floor screeding is done only in rooms and hallways; it is not suitable for wet rooms.
Should I use screed levelers?
If repairs need to be done quickly, use quick-hardening levelers in the screed. You can walk on the floor in 2-4 hours, and lay the covering in 1-5 days. Another a good option- self-leveling mixture. It is poured onto the base over the rough screed, and it spreads out in an even layer. The coating can be laid in 1-3 days. Both options are quite expensive, but the repair will take much less time.
For bases with a slope greater than 0.5 cm, self-leveling floors are used. These are liquid mixtures that are poured onto the base and smoothed with a roller; no sanding is needed. Self-leveling flooring is perfect for laminate, linoleum and carpet. It is not profitable to use it under tiles - it is cheaper and faster to level the floor with glue.
11. Install heating radiators
As a rule, heating radiators in new buildings leave much to be desired, so they are often replaced. It is best to do this after rough finishing, otherwise you can hopelessly stain the batteries with construction dirt. Before installation, you will have to go to the management company again and set a date for turning off the risers.
12. Measure the kitchen for installation of furniture and appliances and make corrections to the project
Manufacturers of kitchen furniture and appliances have certain requirements for the premises, so the kitchen must be prepared for installation. Invite a measurer from the company where you chose the furniture and find out these requirements: ceiling height, electrical location, sewer pipes and waterways.
Why didn't we do this earlier? Because after leveling the floors and plastering, the dimensions of the rooms changed. Why not later? Because kitchen furniture It takes about a week or longer to make. This way we will save time and get a ready-made headset by the time of installation.
FIND OUT WHICH APARTMENT IS RIGHT FOR YOU
13. Install rough electrical wiring
As soon as the walls are dry, we begin to groove and lay channels for the electrics. Before starting work, mark the walls with a felt-tip pen or marker. A pencil will not work: a layer of dust will quickly hide the marks. Remove excess from the premises and cover the floor plastic film- It will be easier to remove dirt.
Make the grooves with a small margin so that later you don’t have to expand the channel. The furrows will be filled with putty and nothing will be visible. Immediately make holes for sockets, switches and ventilation pipes.
14. Prepare the location for installing the air conditioner
The grooves are prepared, you can call a specialist to install the air conditioner. At this stage, the master must install the routes, internal and external blocks. If you do this after finishing, then in the process you can damage the cladding of the walls and ceiling. We are not hanging up the device itself yet.
15. Install heated floors
Water-based floors can only be installed after the screed has completely dried. Placed on the floor surface flexible pipes, through which it passes hot water from gas boiler or systems central heating. Installation can be simplified: many manufacturers have special plates with markings for laying pipes.
It is even easier and faster to install electric floors. In this case use infrared film in rolls or heating mats. They are rolled out onto the screed. Sometimes a heating cable is used, which is laid like a snake in corrugated tubes.
16. Install low-current systems
The grooves for the wires and pipes are already ready, but the final finishing of the walls has not yet been completed - it’s time to install the wiring for the Internet, alarm systems and CCTV cameras.
17. Install false walls, boxes and mortgages
Now it's time to hide ugly pipes and heating radiators, close unnecessary niches or install partitions in rooms. All this is done using lightweight plasterboard walls. They also provide additional insulation and sound insulation.
At the same time, install platforms (mortgages) for attaching lamps and cornices to the ceiling. Don't forget about boxes and niches for meters and electrical panels.
18. Treat the walls for a final finish

Prime the surface, install metal corners To level slopes and corners, putty, sand and sand the walls. Final painting Or we’ll put off wallpapering for now.
19. Call a specialist to take measurements for suspended ceilings
That’s it, the size of the rooms will no longer change, so you can invite craftsmen to take measurements for suspended ceilings. This cannot be done in advance, because it is very important for installation high accuracy calculations.
20. Take care of the balcony
Before finishing the rooms, arrange a balcony. If size and budget allow, you can make it out of extra room. Just don't forget to include all this in the project on preparatory stage.
21. Tile your bathroom
Install a bathtub and toilet installation in the bathroom, mount drain elements, siphons, meters, filters and other fittings. After this, you can lay the tiles. To speed up the process, make a laying diagram.
Why did we install a bathtub and leave the toilet and sink for later? Because laying tiles is a pretty dirty job, and you can ruin expensive plumbing fixtures. Installing a bathtub will save tiles: part of the wall will be permanently closed, there is no need to spend money on these places facing material.
22. Prepare the floor for flooring installation
Clean the surface from construction debris, prime it and pour leveling solution onto the screed. Now the floor is smooth and clean, completely ready for covering.
23. Insulate windows, install window sills and countertops
Install sandwich panels on the windows - in cold weather they retain up to 35% of the heat in the rooms. Also install window sills, as well as countertops for the sink or washing machine.
24. Finish the walls
Prime the walls one last time to remove dust. That's it - you can wallpaper or paint.
At the same time, finish the work in the bathroom: you need to grout the seams on the tiles. If you were laying seamless tiles, then you don’t need to do anything.
25. Install a suspended ceiling
On average, installation of suspended ceilings takes several hours. It all depends on the shape of the room, the number of pipes and decorative elements. If you choose a polyvinyl chloride (PVC)-based coating, the room needs to be heated, which means installation will take longer. For fabric sheets no heating required.
26. Lay flooring
If required, first lay the underlay and insulation layer on the floor. A substrate is required for laminate and parquet; it is advisable for linoleum and any other thin coating. It protects against moisture and retains heat.
Pay special attention to floor installation. You cannot save on materials or violate technology. You can speed up the process only by choosing a coating. It takes the longest to lay parquet board, easier and faster - padded laminate. If you need it very urgently, choose linoleum or laminate with locks.
27. Install doors
The installation is carried out by a specialized specialist, most often a representative of the company from which you ordered the doors. First, the doors are installed, then the openings and slopes are designed. With the help of the latter, they close the cracks and gaps between door frame and the opening. This protects against drafts and provides additional heat and sound insulation.
28. Install the kitchen unit and mount the baseboards
It is assumed that kitchen set will stand in one place; usually there are no plans to move it. Save money on this: let craftsmen assemble the furniture first, and then attach the baseboards. They are not required in places covered by the headset. If the furniture is still movable, install baseboards around the entire perimeter of the kitchen.
29. Install the toilet and sink in the bathroom, as well as all the fittings
We've finished all the dirty work, so you can throw away the temporary toilet and sink and install new ones. Also install sockets, switches and panels for alarm and security systems.
30. Adjust the air conditioning and decorate the windows
If you remember, the air conditioner has not yet been installed. The time has come to do this: let the master hang the device, connect it and set it up. The work is light and clean, so there is no threat to the finishing.
At the same stage, install plastic corners or, as they are also called, closing profiles on windows. They protect the ledges from impacts and give the windows aesthetic appearance.
The renovation is complete! But there's still some left final stage.
Subscribe to new articles about apartment sales
Last update: 12-10-2019
Also take into account, due to currency fluctuations, seasonal discounts, etc. it might turn out to be the same Construction Materials in a couple of weeks they will cost significantly more.
Don't forget to get discount cards construction stores, this will save money.
Wiring
If there is no shield in the apartment, then install it.
Make a separate line for the refrigerator, a separate line for the boiler, a separate light, separate sockets, a separate stove. This is done for convenience in the future.
Eg, when the water is turned off in the summer, I cannot use many appliances at the same time. Either a boiler + kettle, or a kettle + iron, etc. Otherwise it knocks out.
In an apartment with a rough finish, this work will be cheaper and faster.
Making floors in the bathroom
Door installation
It is best to order in advance, along with the entrance tickets. So that you don’t have to choose by color later.
My wife and I somehow didn’t think about it and first bought a reddish-brown laminate. When we started selecting doors, we realized that it was easier to change the laminate than to find desired color doors.
Gluing wallpaper
It takes a long time to glue wallpaper 0.5 meters wide; it’s better to immediately take meter-long ones. Some vinyl wallpapers can smell strongly and for a long time (some wallpapers had a smell for almost a month), and some are very soft and dents remain on them and can be easily damaged when stickers are applied. Keep this in mind when choosing.
Now there are many alternatives to wallpaper (paintable wallpaper, decorative plaster, decorative rock etc.), it all depends only on your financial capabilities.
Where there is a risk of damaging something due to inexperience or taking a long time to transport, you should order it for money. Eg, bought furniture for the room and decided to assemble it myself (it was interesting). In fact It turned out that the assembly instructions were not at all informative and I had to fiddle around for 2 days, although if I had ordered the assembly, then everything would have been done in 3 hours. Draw conclusions.
This is what the sequence of renovation of an apartment in a new building looks like with us, but in an apartment with an existing old finish the following items may be added (dismantling old decoration, garbage collection). Although many types of work most likely will not have to be done.
For those who are planning to order repair services, you can save time.
You can also plan your apartment and see what it will look like after renovation., I found the program useful Sweet Home 3D, you can download it for free (the link leads to the Russian-language page of the site).
That's what my wife and I planned one evening.
If you know any other useful programs for repairs, write in the comments, I think it will be useful to many.


