It is difficult to imagine a wedding ceremony and celebration without flowers: they are an obligatory component of the bride’s bouquet and the groom’s boutonniere; they are used to decorate cars and the banquet room. But sometimes living plants are not able to withstand too hot or cold weather, and temperature changes negatively affect their appearance. In the article you will learn what an alternative is, how to make flowers from fabric with your own hands so that they look beautiful on your wedding day and are preserved in memory of happy day without losing its original appearance.
Master class on making artificial flowers from organza
Artificial flowers made using organza look charming. This is due to the frequency of use of the material when sewing wedding dress, which means the accessory will go perfectly with the bride’s outfit. In addition, the fabric is very comfortable and pliable to work with, which will facilitate the process of creating a masterpiece, and the variety color shades provides the opportunity to choose colors that best suit the decoration of the celebration.

Necessary materials
To make organza flowers you will need:
- Organza. The color of the fabric depends on the preferences of the bride and the theme and style of the wedding. Materials of different shades can be used to create an interesting composition. If it is impossible to find organza, chiffon or satin will do.
- Sewing accessories - needle, thread, wire.
- Beads, beads for decoration.
- Candle, matches.
- Paper needed for drawing patterns and sketches.

Stages of creation
A detailed master class will help you learn how to make fabric flowers with your own hands:
- We are preparing patterns for future buds. To do this, draw several circles on paper different diameters. To make the circles as even as possible, you should use glasses of different sizes or other objects round shape. After drawing, we cut out the elements and transfer them to the fabric. Using ready-made templates, cut out several circles of each diameter from organza - we get blanks of petals.

- Light a candle. As you hold each petal, melt the edges a little. In order to determine at what distance from the fire to keep the fabric, practice on unnecessary sections. Small parts should be scorched, holding them with tweezers so as not to burn your hands.

- Let's start assembling. It's better to start with the lower petals big size, gradually adding the rest. The middle needs to be decorated with beads or seed beads, sewing them on or stringing them on wire. The organza peony is ready.

- To create a rose from organza, during the first stage you need to make five shallow cuts on the finished fabric mug. When processing parts with fire, it is important to ensure that all the petals curl in one direction, then the bud will look neat and beautiful.

Simple decorative flowers made from ribbons
Many brides on the eve of the wedding are thinking about how to sew and make flowers from fabric so that they look beautiful, complement existing accessories and decorations, and blend harmoniously with them. Often the problem is the lack necessary materials, skills and experience in creative work. But in order to create amazing exclusive flowers from ribbons, you don’t need special equipment or great skill. The main thing is a little patience and imagination, and detailed master class will help you realize all this, create a real masterpiece with your own hands.

Necessary materials
In order to make buds from ribbons, you will need:
- Satin ribbons of two colors (main and for leaves). Special attention It is worth paying attention to the width of the ribbons - the wider and longer it is, the larger and more voluminous the product will be.
- Threads, needle.
- If desired, beads or rhinestones can be used for decoration.

Stages of creation
Let's consider two options on how to do it beautiful flowers made of fabric, both are simple, but the result will definitely please you, and the finished accessories will serve as an excellent decoration. Master class No. 1:
- Cut a satin ribbon of the required width, 50 cm long. Fold one edge to form a triangle.

- We fold a small corner and secure it with a needle and thread.

- We collect the ribbon onto a thread, folding it to form a beautiful “accordion”. How to do it correctly, look at the photo.

- Having collected the entire ribbon, it must be wrapped around the base, forming a beautiful rose. Secure everything with thread so that the composition does not fall apart.

- To create a leaf, cut a ribbon 10 centimeters long, fold both ends into the middle, forming a triangle. Sew and tighten the triangle at the base. The leaf is ready. For creating beautiful composition, one flower requires at least two leaves.

- We combine the flower with the leaves - the masterpiece is ready.

Master class No. 2:
- Cut a satin ribbon 35 centimeters long. We bend the edge away from ourselves and begin to twist the flower. We secure the base with a thread, not reaching the fold line.

- We bend the ribbon towards itself, forming a petal. We continue to twist the rose, wrapping the ribbon towards ourselves.
- We sew the end of the ribbon from the inside out, fastening all the layers with thread so that they do not fall apart.

- By analogy we do required amount flowers from which we will make an accessory or decoration. Such textile accessories are perfect for creating a wedding topiary.

Large flowers made of fabric using the kanzashi technique
Fabric flowers made using the kanzashi technique are original and beautiful. Such accessories can be small in size and used to decorate a wedding dress, a headband for the bride’s hair, or boutonnieres for guests. If desired, in this way you can make a large flower, which will decorate the wedding procession or banquet hall. The advantage of this technique is the ability to make a flower of absolutely any color, size, without spending a lot of effort and money.

Necessary materials
To make a flower using the kanzashi technique you will need:
- Satin ribbon. For big flower a wide tape is required. In order to get a multi-colored masterpiece, it is worth buying material of different shades; the golden elements in the product look good.
- Glue gun, Moment-Crystal glue.
- Threads, needle, scissors.
- For decoration - beads, beads, rhinestones, small decorative ornaments in the form of insects (butterflies, ladybugs).
- Cardboard or ball, plastic bag.
Stages of creation
To create large flowers in the kanzashi style, two methods can be used; we will consider both so that everyone can choose the most suitable and simple option for themselves. Master class No. 1:
- We cut the satin ribbon into 7 cm lengths. Fold it in half and cut it at an angle using a soldering iron.

- On the other side we wrap the tape in reverse side, singe the edge, due to which the two ends of the tape are connected. We make the required number of blank petals, which depends on the desired size of the flower.

- We take cardboard and draw a circle along which we will glue the petals. The larger the diameter, the larger the resulting accessory. Glue all the petals in a circle.

The second option for creating kanzashi involves creating a large, round, convex flower:
- Cover the ball with a plastic bag. The size of the finished product depends on the diameter of the ball.
- We make petals that will serve as the basis of the product.
- Using a thread and a needle, we connect the seven finished petals into a circle and secure them. A small flower comes out, which we attach to our ball in the center.
- Next we glue the petals, placing them between the elements of the previous row.
- We glue one more element to the petals of the first row, and two on each side to the parts of the third.
- By analogy, we glue the remaining petals until we get a flower of the desired size.
- We remove the ball and plastic bag, our masterpiece is ready.

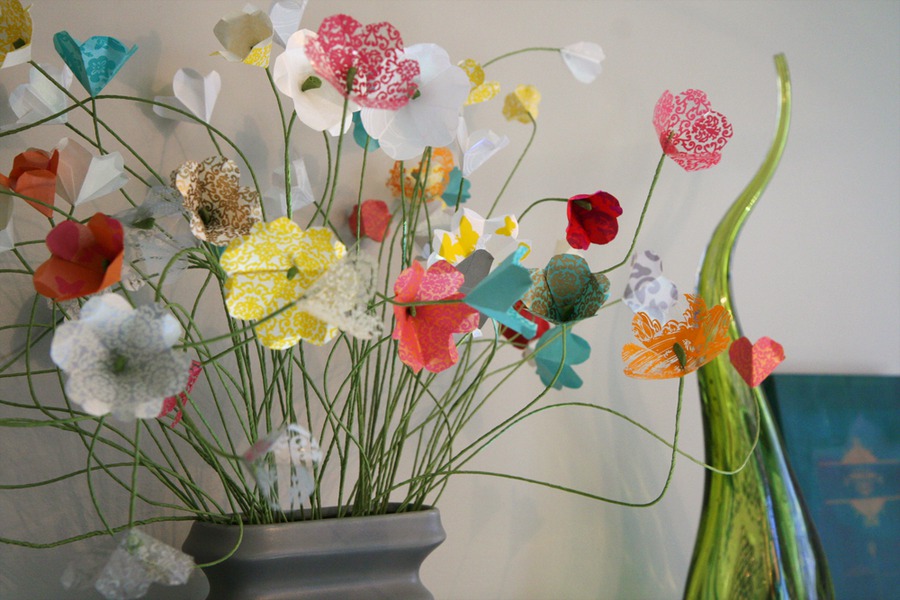
Floral motifs can be seen almost everywhere. They saturate life with colors, light and good mood. Flowers are used in interior decoration and are very fashionable to wear. jewelry in this style. In addition, they are used to create clothing, shoes, and accessories. Due to the fact that artificial flowers do not require special care and delight others for a long time, they are becoming more and more wide application. They are made from a variety of materials. Learning how to make artificial flowers is quite simple.
No bride is complete without a bouquet. Included in fashion non-standard options this accessory, for example, from artificial flowers. It will not wither and can be stored for a long time. It will become a kind of family amulet, especially if the bride does not want to trust its production to anyone and will make it herself. It can be very original, and its cost will be slightly lower than that made from fresh flowers.
Another advantage of a bouquet of artificial flowers is that, for your own peace of mind, you can make it in advance. While with a bouquet of fresh flowers that is picked up on the wedding day, all sorts of unpleasant things can happen.
What materials are artificial flowers made from?
What materials are used, what are compositions and bouquets made from? The most suitable different materials. For example, fabrics of different densities and textures, silk, paper, satin ribbons, porcelain Pearls, beads, feathers, and stones are also used.

If you want to make something from artificial flowers yourself, but don’t have the skills, it’s worth attending a master class, where they will talk in detail about all the stages of creating a product, explain difficult points and answer questions.
Modern materials are so perfect that a bridal bouquet made from artificial flowers can look the same as if made from real flowers. None of the guests even realizes that this is not so. In addition, you can rest assured about the integrity additional elements decorating a bouquet. Pearls and stones will definitely not fall off at the most inopportune moment.
DIY artificial flowers for the bride's bouquet
If the wedding is held in the cold season, then under the influence low temperatures And strong wind fresh flowers will quickly lose their appearance. Therefore, to do beautiful photos outdoors in difficult weather conditions, it is recommended to order a duplicate bouquet of artificial flowers. In addition, you will need a similar boutonniere for the groom.
Also, the second bouquet is useful for throwing the bride over her head to her unmarried friends. If, for example, the main bouquet has an intricate shape, hanging down and heavy, then throwing it will be inconvenient and dangerous. Therefore, you will need a backup, which will be quite simple and easy.

Sometimes the chosen outfit is so complex in color, texture or silhouette that it is not possible to create the optimal floral headpiece and bouquet of fresh flowers. Artificially created compositions allow you to choose the appropriate shade, combine different materials, and introduce additional elements.
DIY artificial flowers for wedding decoration
Ribbons and flower wreaths are used to decorate the bride and groom's cars. Due to the cost and requirements for their reliability, preference is usually given to artificial materials.
The design assumes the presence of a flower photo wall and compositions decorating the tables. Artificial plants can completely replace living ones, which will allow significant savings. But often they are used together, creating the most fantastic works.
A garland of artificial flowers can be used as a beautiful element that can decorate any room. It can be used repeatedly for various holidays.

In order to make it, you will need to disassemble the purchased plants into leaves and flowers; stems are not required. Thread the thread into a needle and string flowers that are pierced in the sepal area, and leaves that need to be unfolded into different sides. This garland can be hung vertically or horizontally. If you want to make an arch, then the flowers need to be strung on flexible wire, so that you can then easily wrap the garland around the frame.
Heart made of artificial flowers
It's easy to make a heart out of artificial flowers that can be used as a wedding decoration or for Valentine's Day. You need to make a heart pattern out of paper. To keep it consistent, it is recommended to use a large sheet of paper.
When the pattern is cut out, it needs to be transferred to foam rubber. To do this, the paper heart is fixed in several places with tape and outlined with a pencil. Then you need to cut out the heart with scissors or a knife, depending on its thickness. Flowers need to be stuck into the foam rubber at such a distance that the base is not visible. It is advisable to have several flowers on one branch. If the flower heart is intended to be hung, then a satin ribbon should be attached to the two halves.
To make your own room decor, a variety of instructional videos will help.
Video on the topic of the article
(2
ratings, on average: 4,50
out of 5)

It is difficult to imagine a person who would not love to enjoy the charming petals of roses, azaleas, inhale the smell of lilacs or tulips, and even just enjoy the first dandelions. There have always been flowers the best decoration, a gift or just a pleasant sign of attention. If for some reason you cannot tolerate fresh flowers indoors (allergies, for example), then they can be replaced with no less beautiful ones artificial plants made by hand. The following tips And possible ways making flowers will help you in this exciting and creative business.
First, let's look at the materials that are best used to create extraordinary compositions. Basically it is either fabric or polymer clay (plastic).

Working with polymer clay is easy, the material resembles children's plasticine different colors and shades. You can buy it at any art store (they also sell a special varnish that is used to open the products). Before starting the creative process you need to prepare workplace. It is best to cover the surface on which the clay bars will lie with paper (you can use old newspapers), since some types of plastic can stain the surface.
After you have equipped your workplace, it’s time to start making flowers. Let's take the production of chamomile as an example.
First, let's make the shapes of the petals. For this, ordinary cardboard is ideal, cut out a couple of petals from it (you don’t have to make them identical) and put them aside, we don’t need them now. After that, cut off required quantity clay and knead it until it becomes soft to the touch. Roll out the clay that will be the petals (like dough) to the thickness you need (about 1-2mm).
Place the same blanks for the petals on this resulting white “pancake” and trace the shape with a stationery knife. In the same way we make the required number of petals for the future chamomile. After all the petals are ready, they need to be secured around a pre-prepared small yellow ball, which serves as the center of the chamomile. You will end up with a lot of excess clay underneath, but don’t rush to cut it off. Simply twist the leftovers into a long rod. Using a similar scheme, make the number of daisies you need and leave them to harden.
 Rose from polymer clay
 The disadvantage of polymer clay is that products made from it are quite heavy and flowers absolutely do not want to stand on legs. But there is a way out and it’s quite simple. Let's take a pot in which you would like to “plant” your wonderful daisies and instead of soil, put a foam ball there, which would occupy the entire space of the pot and protrude slightly beyond its limits, resembling a kind of mound. Now take your daisies and stick them firmly into the foam, using the very rods that you twisted from excess clay (the foam will not be visible behind the petals). Voila! The pot of charming daisies is ready.
 Bouquet made of paper and wire
 Another material option for your flowers is fabric. It is best for novice craftswomen to purchase products dense material, which itself holds its shape very well. Thick shiny silk, plain satin and velvet are best suited. Perhaps you have unnecessary scraps lying around somewhere from previous works, do not throw them away, they will definitely come in handy for emphasizing any details.

After you select and collect all the material, it will need to be processed in a special way. To do this, you will need the following solution, which can easily be made at home. Pour a few teaspoons of gelatin (recommended 3 tablespoons) into one glass warm water and let the solution brew (until the gelatin is completely dissolved). Then pour this onto the fabric and let it dry; there is no need to wring out the material. After the fabric has dried, it is completely ready for use.
 Fabric flower
 Any flower needs petals; they can be drawn on fabric by hand or using special stencils. Do not apply the outline with a pencil or pen; the product will be ruined! Use a special chalk or a regular bar of soap. After the petals are transferred to the fabric and cut out, they need to be connected to each other. It would be a mistake to use glue; it can spread too much, leave stains and cover the flower with a crust. To avoid this mistake, take a needle and thread and connect the petals in a circle. To make the bud look voluminous, it is best to make several layers of petals, placing them one after another. You can sew into the center of the flower fake diamond, which will shimmer wonderfully in the sun.
 Bouquet of artificial flowers made of fabric
 Flowers from artificial materials give complete freedom imagination. With your own hands you can create unusual flowers or even entire compositions. Just think, the interior of your apartment can be complemented by blue roses, a beach hat by pink daisies, a child’s blouse can be decorated with a seven-flowered flower, you will not find such a variety of flowers anywhere. You can only make them yourself!
Master class: decorate your outfits with fabric flowers. Join us!
Now it’s even difficult to say when the very first artificial flowers appeared. It feels like they were popular always and everywhere. The first documentary mention of them dates back to the 3rd-2nd centuries BC. Archaeologists tend to think that the ancient Egyptians came up with them. Later this art was mastered in Ancient China, Greece and Rome.
Flowers were made from a wide variety of materials - fabric, porcelain, paper, metal, precious stones, clay, wood, feathers...you can’t list everything. Some specimens were real works of art. And they were very expensive. Just imagine the price, for example, of a bouquet of platinum and gold roses decorated with diamonds!
In the nineteenth century, the fashion for artificial flowers reached its peak. They began to decorate everything - from hairstyles and clothes to the interior. Since the demand was very high, flower making became a real profession. Special workshops, craft schools and courses were opened. In 1894, a manual for making flowers from paper, leather, wax and fabric was even published in St. Petersburg. Since then, anyone could learn how to make artificial flowers with their own hands.
The twentieth century made its own adjustments - it would seem that artificial flowers were forgotten. But already at the beginning of the twenty-first century they became firmly in fashion again. Today, these accessories occupy a worthy place in the collections of such recognized masters as Galliano, Valentino, Christian Lacroix and many, many others. And the art of flower making is again gradually moving from the category of a hobby to the category of professional skill. However, it is quite possible to make artificial flowers with your own hands - there is nothing complicated about it. And the materials can be very different. Let's look at a few simple ways create these elegant decorations.
Organza flowers
You will need:
- scissors;
- needle and thread;
- beads;
- candle;
- a sheet of thick paper;
- pencil;
- organza.
Take a sheet of thick paper and a pencil. Draw three flowers different sizes- small, medium and large. Each flower should have five petals. Using scissors, carefully cut out the drawings along the contour - you have templates. Take the fabric and using the resulting stencils, cut out the flowers from organza.
Light the candle and carefully burn all the petals over the flame. Just remember that organza is very flammable. Therefore, this manipulation should be carried out extremely carefully. In order for the flower to look like a real one, it is necessary that the material is wrapped in the right direction - inward. To achieve this, you should hold it with one hand so that thumb was from the inside. Move the candle flame in one direction.
When all the pieces have been processed, place them one on top of the other and fasten them together with thread and a needle. To make the thread knot “hidden”, first connect only two petals, and then sew the lowest one to them. Use beads or seed beads - they will represent the stamens of the plant. The last step is to secure the thread. In order for everything to work out neatly, pierce two layers of fabric with a needle and fasten the thread to the stitches so that a strong knot is formed. That's all! Original and amazing delicate flower ready. All that remains is to figure out what exactly you will decorate with this little miracle.

Paper flowers
Of course, the most important thing is festive table- This delicious dishes. But often beautiful design plays no less a role. If you are planning to surprise your guests not only with culinary delights, but also with original table settings, then flowers from napkins will help you realize your plans.
For creativity you will need:
- cocktail straws;
- scissors;
- glue;
- multi-layer napkins;
- threads that match the color of the napkins.
It is best to use plain tubes - white or black will do. But napkins should be bright and colorful. Then the decorations will be more noticeable. Take a napkin and carefully smooth it out. Fold in half and then assemble into an accordion. Tie the resulting “accordion” with a thread strictly in the middle. Take scissors and trim the edges of the napkin into the desired shape.
If you want the flowers to look more delicate and romantic, then cut the petals in a semicircle. If you prefer sharp edges, give the petals a triangular shape. Fluff each petal by carefully turning the paper inside out. Take a cocktail stick and carefully glue it to the base of the flower to create a stem. The flower is ready! It remains to make a few more of the same and decorate with these original bouquets festive table.
Felt flowers
Making these fluffy, cute and cute flowers with your own hands is very simple. They are perfect for decoration home interior- for example, curtains or decorative pillows. They can also be used to create various accessories - headbands, elastic bands or hair clips, brooches.
You will need:
- threads matched to the tone of the fabric;
- scissors;
- felt.
Take felt and cut it into pieces. The length of each piece should be ten and the width two and a half centimeters. Using scissors, create a fringe around the perimeter of the entire piece of fabric. Just don't overdo it - it shouldn't be too narrow! Otherwise, the felt will begin to crumble and all the work will go down the drain. After this, fold the fabric like an accordion and tie it tightly with threads in the center. Fluff the flower by carefully unfolding the petals. Ready!
Beaded flowers
Beads are a very fertile material for creativity. What kind of crafts and decorations can be made with its help! Some of them are real works of art. Of course, learning to work with this material will take time and patience. But you have to start somewhere! Why not make something simple to start with - for example, a cute and completely uncomplicated bouquet. Perhaps the easiest flowers to make from beads are daisies and forget-me-nots.
For this bouquet you will need:
- soft wire;
- green, yellow, white and blue beads;
- pliers;
- needle;
- threads;
- scissors.
Let's start with forget-me-nots. Take the wire and use pliers to cut a piece 8 - 10 centimeters long. String one bead onto this piece yellow color. Add five blue ones to it. Bend the wire and pull its end into the first bead blue color. Then - into the second, and then into the third blue bead. After this, pass the wire into the yellow bead and twist it together with the free end. The result was a forget-me-not with a stem. Make several of these flowers. Now we need to make a leaf. To do this, string green beads onto the ends of the wire according to the pattern: 1-2-3-4-4-3-2. Twist all the loose ends of the wire together - the bouquet is ready!
Forget-me-nots are sorted out. Let's move on to chamomile. In order to make the petals you will need 10 - 12 pieces of wire nine centimeters long. Take white beads and weave a petal. Make sure that the ends of the wire are directed towards each other. Making the middle of the flower is very simple - string seven beads onto a wire and roll them into a spiral. Carefully assemble the flower by twisting the center and petals together. To make a plant leaf, use the pattern: 1-2-4-4-3-4-3-2-2-1. During the weaving process, it is recommended to bend the sheet so that it looks like the real thing. Well last step- string green beads onto the stem of your chamomile and screw on the leaf. However, you can leave the stem “naked”. But only if your wire is silver in color - otherwise it won’t be beautiful. Chamomile is ready.

Tulle flower
This amazingly romantic and delicate flower can decorate any hairstyle or clothing. And it's very easy to do. You will need:
- tulle;
- velvet ribbon;
- feathers;
- velvet leaves;
- threads;
- needle;
- scissors;
- hair clip in the shape of a comb.
Cut the tulle into squares measuring 20x20 centimeters. You will need eight squares. Take one and fold it in half twice and then diagonally to form a triangle. Use scissors to cut off the wide end - the petals should have a triangular shape. Repeat this procedure with other tulle squares. Place the resulting pieces one on top of the other. Secure the middle with a few stitches. Firmly grasp the center of the flower and lift its petals up to form a bud. Secure its base at a distance of five millimeters from the edge using thread and a needle. Make sure the flower is sewn very tightly.
Take a velvet ribbon 25 centimeters long and fold it so that its ends meet in the middle. Secure with thread. You should get a bow. Sew three velvet sheets to its base. They can be purchased at a craft store or simply removed from ready-made artificial flowers. Gently straighten and smooth the feathers and secure them so that their base is hidden under the leaves. Secure the tulle bud on top using thread and a needle. If you wear the flower as a brooch, sew on a safety pin, if as a hairpin, secure it to the comb. The work is done.
Of course, these are not all the ways to make artificial flowers. We considered only the easiest of them. As you can see, such creativity does not require any special knowledge or skills. All you need is a little imagination, patience and a great desire to make this world brighter and more beautiful. You will definitely succeed. Just try it!
Discussion 2
Similar materials


It is difficult to find a person who does not love fresh flowers, their beauty and freshness, and delicate aroma. Unfortunately, plants created by nature are not suitable for every situation: each of them lives according to its own rhythm and does not always bloom at the time we need. Compositions made from natural flowers quickly wither and lose their attractiveness; they are not suitable for permanent decoration. It is not always possible to find bouquets made of fabric or polymer clay in stores. the desired shape and colors. The only way to get exactly what you want is to make artificial flowers with your own hands.
Imagine the envious glances of women and the admiration of men when you appear at a gala meeting in an elegant outfit, decorated with bouquets of delightful flowers. This decor will turn an ordinary hat into a flirty accessory; a single flower on a blouse will add piquancy to your entire look. Place bright flower arrangements in your apartment or office, or even just one flower, and the room will immediately come to life and become cozier.


When you admire a magnificent designer bouquet of artificial flowers, the thought may settle in your head: “I will never succeed.” Of course, it won’t work if you just look and doubt - get to work, and after a while your products will be difficult to distinguish from real flowers. It is not necessary to enroll in long, expensive courses; you can master this skill at home. It’s easy to learn how to create flowers from fabric; the master class will give you the necessary tips.

Basic materials used in flower making
To ensure that the work goes without annoying delays, prepare everything you need in advance. Let's start with choosing fabric. It is better for beginning craftsmen to use densely woven fabric; it holds its shape well. Please note that coarse, ugly fabrics will not make an elegant product; use shiny dense silk, satin or velvet. Try combining different types fabrics, this way you will better reflect the diversity of the floral world. Perhaps you have some beautiful scraps left from some handicraft - do not neglect small scraps, it is very convenient to work with them.

The material has been selected, but before cutting can begin, it must be treated with a special compound.
Pour 3 teaspoons of gelatin with a glass of water, let it brew and heat until completely dissolved.
Soak the fabric in the solution and dry without wringing. After completely dry, the fabric is ready for cutting.
Fabric flowers step by step
Pattern of the future flower
Before you start cutting fabric, remember two basic rules. Firstly, any part should be located at an angle of 45 degrees to the grain thread; secondly, when transferring the outline to the material, you cannot use pencils and pens; a trace from them will ruin the entire appearance of the product. There are special crayons that are also great for drawing small pieces of soap on fabric.
Start by making a flower with 18 petals. Draw a pattern of a large, medium and small petal on paper and see if you have calculated their proportions correctly. The shape depends on your imagination, but at first it is better to avoid too fancy configurations. Start by copying the petals of a living flower; when you gain experience, you will be able to come up with the most intricate options.

Cut out 6 pieces of each size from the fabric and label them immediately. Be sure to indicate whether this is a large, small or middle part of the flower and mark the right and left side. On the table everything seems clear, but after a while, if you don’t mark the cut, it will be difficult to understand the small shreds.
Making corrugated petals
Your fabric flower will look much more beautiful if the petals are made corrugated. To work you will need the finest fabric, and at the same time it must be very durable, for example, chiffon or organza. Place the piece folded in half on additional material so that the fold line is 45 degrees with the grain of the thin fabric.

Press the entire surface of the petal firmly onto a flat surface and pull the additional fabric, turning it counterclockwise. Strength plays a big role here thin material, if it breaks, you have to start all over again. Corrugated petals gain volume and look more natural.
Flower assembly
The finished petals need to be collected into a corolla. Sew the larger pieces to each other and close the circle. To give the petals a bulge, make small folds at the bottom of each of them. The next turn forms a medium-sized cut; the smallest details complete the work.
Final finishing
The main work is done, now you need to close the stitches holding the petals together. To do this, cut a circle out of fabric, fold it in four and secure the sharp corner in the center of the flower with an invisible seam. Glue another circle on the outside, it will cover all the threads, and the fabric flower will look like living plant. They can be used to decorate, for example, a baby’s hat.

Additional materials for making flowers
The choice of glue and paints is a responsible matter: these materials can ruin the entire work.
Paints and dyes
The color of the petals should be clean and even; when using low-quality dyes, stains and unpainted areas appear; such a product is unlikely to decorate clothes or interiors. To give desired color fabrics you can use aniline and food dyes, photo paints, ink and ink.
By mixing the three primary colors in various proportions: red, yellow and blue, you can get any shade. The color intensity can be adjusted by diluting the dye. For dilution, water is used, or preferably alcohol or vodka, they give the color brightness and freshness. Mascara is used to make black parts, and if you dilute it, you get a gray dye.

Consider fresh flowers; they are very rarely colored the same throughout their entire volume. Combine shades and color intensity, and the product will take on a natural look.
High quality glue
To create high-quality artificial flowers with your own hands, you need good glue.
The main requirement: after drying, the glue should not leave marks or change the color of the petals.
In addition, it must have sufficient strength so that the product does not fall apart on the second day after production. Trade offers a lot various types glue, but its properties may not always satisfy the buyer.
Glue at home
Prepare the glue yourself, then you will be sure of the quality of the material. To make flowers, only two types of glue are enough.
To cook flour paste, stir 2 tbsp. spoons of flour in water (the mixture should be as thick as liquid sour cream). The solution is heated, stirring, until the flour is brewed and the paste becomes translucent.
To prepare gelatin glue, soak 1 teaspoon of gelatin in a glass cold water. When it swells, add a teaspoon of granulated sugar and 2 tbsp. spoons of flour, place on low heat and, stirring constantly, bring to a boil.


