Specialization: facade decoration, interior decoration, construction of summer cottages, garages. The experience of an amateur gardener and gardener. He also has experience in repairing cars and motorcycles. Hobbies: playing guitar and much more, for which there is not enough time :)
General information
The combination of wallpaper within the same room has long been popular and is no longer considered something unusual. In particular, a technique called accentuation has become widespread among designers. Its principle is based on highlighting a part of the wall with wallpaper that differs from the main trellises in color and pattern.

But what if you go further and highlight the accent wallpaper with a baguette? The result will be a panel of wallpaper. Its installation does not require any special financial costs, however, such a decoration does not look like wallpaper, but as a spectacular element of decor.

As a rule, framed wallpapers are used in the living room, in the bedroom or in offices. Moreover, most often this technique is used in classic interior styles, however, if you choose the right tapestry, there will be a place for the panel in modern interior styles.

Nuances of choice
In order for wallpaper with a frame to look good in the interior, it is necessary to competently approach their choice. In principle, there is nothing complicated, the main thing is that the coating meets the following requirements:
- It stood out against the background of the rest of the tapestries. It is not at all necessary to make the panel bright and catchy. The frame itself will draw attention to the decor and make it stand out. But, at the same time, the canvas should not merge with the main trellis;

- The size of the pattern must match the size of the panel. If the panel is small, it is best to use canvases with a small pattern for it, since several fragments of a large picture rarely look good;

- The design should be in harmony with the interior. The color of the trellises for the panel, as well as the design style, should be combined with the main canvases and, of course, with the interior of the room.
In this regard, the requirements are the same as for any other decor. The same applies to the frame framing the panel.
I must say that photo wallpapers in a frame often look interesting, especially modern three-dimensional ones. True, such a decor will not resemble a panel, but a picture or a large photo.

Lovers of needlework can make a panel in the form of an applique from the wallpaper with their own hands. To do this, you need to cut pieces from different types of canvases, and then stick them on the wall.
Adhering to these simple rules, you can easily choose the best option for trellises and beautifully decorate the room with them.
Installation technology
So, we figured out what a panel is and how to choose the material for it. Now let's get acquainted with the nuances of installation. We will divide this work into three stages:

Preparation of materials
In addition to the wall covering itself, you will need the following materials:
- Baguette - can be made of plaster, polyurethane, wood or expanded polystyrene. The choice depends on the style of the interior and your financial capabilities. The lowest price is for frames made of expanded polystyrene, and the highest is for wood and polyurethane products;

- Frame glue - Styrofoam or gypsum frame can be glued with putty or gypsum glue. For polyurethane or wood frames, use liquid nails;
- Wallpaper glue - matched to the type of tapestry;
- Penetrating soil;
- Water-based paint for the frame.

As for the tool, a standard wallpapering kit is required. The only thing, if the baguette is heavy, you will additionally need a drill and self-tapping screws or dowels. In addition, it is desirable to have a miter box for cutting corners of a baguette.
Surface preparation
First of all, I note that the installation of the panel should be done before gluing the main tapestries. However, it is necessary to decide on their choice in advance, since the choice of canvases for decor depends on the main background, as I already said.
Surface preparation is carried out as follows:
| Illustrations | Actions |
 |
Markup:
|
 |
Padding:
|
This completes the preparation.
Mounting
As an example, let's look at how to frame a photo wallpaper on a wall. The work is carried out as follows:
| Illustrations | Actions |
 |
Frame preparation:
|
 |
Frame mounting:
|
 |
Filling the frame:
|
 |
Frame finishing:
|
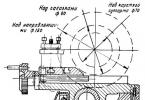
The assortment of companies producing interior moldings includes types of plastic of various configurations, which perform various decorative loads.
There are also baguettes of various widths, curbs, skirting boards, moldings, ceiling skirting boards, cornices, corners. How all these elements are used in the interior is shown in the photo above.
 |
|---|
 |
|---|
| Rice. 5. Assortment of interior moldings |
Baguette Easy to cut with a miter saw with a fine tooth blade for cutting plastic and aluminum. You can glue such a baguette with liquid nails.
Installation of interior molding
According to the instructions given, you can do the installation of an interior molding with your own hands.
Do not forget that, unlike the usual polystyrene ceiling cornice, which is in every hardware store, the interior molding is already finished, which cannot be damaged during installation.
If you started the installation, then you have a ready-made design solution, where and what kind of frame you will install, the picture above will help you.
Stages of installation of an interior molding
1. Before mounting the baguette, clean the wall surface from dust, because there will be no normal adhesion of glue to a dusty and dirty surface. It is optimal that the walls are leveled before installation, otherwise the money spent and the result of installation will be negative and there will be a desire to redo everything and spend again to do better.
2. Determine the required lengths of the baguettes and cut the blanks at the desired angle according to the project using a miter box and a hacksaw. If necessary, sand the cuts with fine sandpaper.
With the progress of progress, everything and even the purpose of things changes. The most common baguette in ours has more extensive areas of application.
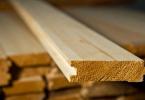
Even in the last century, wooden planks were used to create various types of frames and cornices.
But over time, the scope began to expand, and the products were named: molding, baseboards, fillets, platbands.

All of them rightfully deserve their unique name, because each product refers to a specific part of the room, such as the ceiling or floor.

What are baguettes?
Nowadays, there are no old manufacturing technologies and many substitutes from other materials have appeared. Baguettes can even be made of plastic and in the style of space wars.
Many models of baguettes are very necessary, for example, aluminum or steel allow you not to worry about mechanical stress and last much longer than wooden ones, but they are unlikely to be suitable for a room with a humid environment.

The best material for a baguette is still wood. Even nowadays there is no more acceptable material for the decoration of paintings. It is worth noting that many frame structures are created by hand and convey a touch of the craftsman's unique skills.

Country styles and Provence cannot do without wooden moldings at all, but its capriciousness and difficult conditions of detention leave the material behind its competitors.

Wooden baguettes are not only elegant and unique, but also emphasize respectability in the room. Yet this is not enough to lead the sales market. Even plastic baguettes can easily replace these leaders of their time.

In addition, they are very flexible and lightweight, which allows you to attach the structure yourself and to uneven surfaces. As for the assortment, all that remains is to enjoy an extensive color palette and a variety of models.

Plastic models are used to install stretch ceilings and other ceiling structures.

In appearance, they look like plinths with places for locks, most often in white tones. For special connoisseurs and those who do not regret money, there are even decorative models.

The most natural models of wood and plaster. The strongest models are made of aluminum, while the cheapest and at the same time the lightest models are made of foam.

Ceiling design
The baguette is used to hide the joints and complement the overall design of the room. Fastening the entire structure is short-lived and simple enough. In most cases, a special glue is sufficient.

You can even attach baguettes to a clock on the wall. Simply put, all work with baguettes is limited only by imagination and ingenuity. The main thing is to follow all the rules and be able to correctly join the baguettes, for example, in the corners.

If everything is connected correctly, then the whole room will have smooth transitions, and this is important for a comfortable design. But if you need to attract attention, then it is better to use contrasting models and curtains in addition to them.


Framing of small-sized elements
A designer who knows his business will not miss even such trifles as mirrors and posters on the walls.
Using baguettes correctly, you will create an interior with a twist that is rarely or never repeated in other design projects.

A decorative type baguette will allow you to change the accent and bring a new sound using old attributes.

We bring everything to complete perfection
Here are some more tips from experienced designers:
- a narrow ceiling molding visually increases the height of all walls, and this, in turn, creates the impression of a high ceiling
- vertical thin lines give the impression of austerity, and the horizontal model will add dynamics

- wide models are suitable for large rooms, and they make small rooms heavier. You may even feel cramped, and therefore discomfort.
- when choosing a color, you should not neglect white tones. They tend to fit in anytime, anywhere, but that doesn't mean that this particular color will look best.

It's always best to experiment before making your final decision. In addition, the palette of shades and types of models allow you to choose exactly what you like.


Combine all the moments competently so that you feel both measure and style and other design nuances. Then you will be able to achieve the most acceptable result for you.

Photo of baguettes in the interior


All photos from the article
Baguettes are used very widely and are suitable both for decorating the joints of the ceiling and walls, and for creating panels - wallpaper in a baguette on the wall can become the main highlight of the interior if their texture and pattern are well combined with the main coating. In this review, we will show you how to properly organize your workflow so that the elements hold firmly and look attractive over a long period of time.

What you need to work
Before starting the design, you need to stock up on everything required, the list may differ, but in general, the main elements are unchanged:
| Baguette | It is important to choose the option that best suits your situation. For example, for small rooms, you should not take massive options, the pattern on the surface should organically fit into the situation. In addition, you need to determine the configuration, it depends on the place of attachment, if the elements are located under the ceiling, then corner options are needed, and if on the wall, then flat |
| Components | Some product collections provide for the presence of corner elements, most often they serve as an additional decorative element, in addition, they save you from the need to cut the baguette and join it at the corners, this process is most often the most difficult for beginners |
| Adhesive composition | In order to securely attach the baguette to the wall to the wallpaper, you need to use high-quality glue. You should not save on this group of products, as you risk getting an unpleasant surprise in the form of peeling areas in a year or even earlier, a low price should not be a determining factor when choosing, it is best to consult with specialists on this issue and familiarize yourself with the information on the network the Internet |
| Tool | If there is a need for cornering, then you cannot do without a miter box, because only with its help you can make a perfectly accurate angle, and you can also make straight cuts perfectly even |
Important! Since a modern baguette is made of expanded polystyrene, it may differ in quality, when choosing, pay attention to the structure, it must be fine-grained and very dense so that particles do not fall from it.

Description of the workflow
We will talk about two options for carrying out work, the first, when the baguette is attached at the junction of the wall and ceiling, and the second, when frames for the panel are constructed from these elements on the wall.
Ceiling joint decoration
As for this option, the installation instructions are as follows:
- First of all, the surfaces should be cleaned, it is best to glue the wallpaper in advance, firstly, this way the workflow will be easier, and secondly, you will not need to make the top perfectly even, since the baguette will still cover at least a few centimeters of space;
- Next, you need to take careful measurements to cut the elements correctly, otherwise the result of the work will not be very attractive, it is best to measure no more than two elements at a time to make sure that they match... After attaching them, two more parts are taken, etc. So you will proceed from the actual situation, which is much more convenient than cutting the material into the entire room and then finding discrepancies;
- Cutting with a miter box will not cause difficulties, the only thing to remember when choosing this device is that the tooth should not be as small as possible, this will ensure the best cutting cleanliness;

- As for gluing, you need to apply the composition either to the elements themselves, or to the wall surface, based on what the manufacturer of the composition recommends... Be sure to lubricate the corner joints, since these places should be fastened as firmly as possible, some compounds should be left after application, and some are glued immediately, this nuance should also be paid attention to when working;
Important! Since the baguette is most often made of expanded polystyrene, if you press it with your fingers, grooves may remain on the surface that will spoil the appearance; to avoid this, press the elements with the edge of your palm.
- After fixing, the excess glue is immediately wiped off, and the seams can be smeared with an acrylic-based sealant, it is well painted and sanded, the question of how to glue the baguettes to the ceiling and wallpaper can be considered closed.
You also need to tell how to glue wallpaper on baguettes, since sometimes there are situations when the elements are already fixed. Everything is simple here: when gluing, take the material with a margin so that it goes onto the element, after careful leveling, the excess part is cut off at the joint.
With the help of a baguette, geometry is emphasized, which can be very diverse.
If earlier the joints between the walls and the ceiling were covered with a panel or a strip of embossed paper, now the curvature smooths out the baguette or baseboard better. It gives the room a unique look, hides some mistakes during renovation work. How to glue baguettes, how to cut and mount them in the corners, this article will tell you.
Features of use

Sticker. How to attach a baguette
When installing ceiling plinths, several of their advantages can be distinguished:
- A ceiling molding hides visible defects:
- slight irregularities;
- some roughness;
- differences in marks.
- Decorates.
- Simple and easy to install, no special skills required.
- The material is lightweight and sometimes flexible.
- Wide range of designs.
- Affordable price.
Tip: Before gluing, you need to know that different materials are used to make them. Products come in different textures, widths, smooth or patterned. This affects the cost, purpose and application features for different interiors.
For the manufacture of molding, ceiling plinth or frieze, are used:
- Styrofoam.
- Gypsum.
The most popular products are made of polystyrene and polyurethane. As for plastic products, they are used only for stretch and PVC panel ceilings. Wooden baguettes - with a wooden structure device.
What glue is used for installation
Before gluing ceiling moldings, you need to think about the adhesive composition. For each master, during installation, there is his own glue, tested in the work.
He might be:
- Polymeric... Such a composition has poor adhesion. In order to glue a foam baguette using polymer glue, it will need to be held in the required position for a long enough time, which is not very convenient for a two-meter product.
- Acrylic.
- Silicone based.
Acrylic and silicone adhesives allow quick and convenient installation of the ceiling plinth. They go on sale in tubes for a pistol. The composition is applied quite easily, and the diameter of the outlet spout controls its consumption.
How to glue a ceiling baguette with one or another composition, the detailed instructions attached to the material will tell you. The disadvantage of such adhesives is their high cost, which is especially noticeable when performing work in a large apartment or house.
Note: The cheapest option for DIY gluing is a regular finishing putty or glue used for drywall if used during renovation. Such a composition is more reliable, hardens faster, which allows you to paint the ceiling and baguettes in half an hour, without fear of damaging them with a roller.

The disadvantage of using putty as an adhesive is the lack of convenience when working with it. It is not very convenient to apply such building mixtures with a spatula in a thin layer on a baguette.
After gluing, the remaining putty or drywall glue will need to be carefully cleaned with a wet brush. Otherwise, clots of dry mixes will become visible from under the paint.
How to glue a skirting board to the ceiling
Tip: Installation of the skirting board should be started from any corner of the room.
The ceiling molding can be mounted in two ways:
- Over the wallpaper.
- Before wallpapering the walls.
Tip: Usually baguettes are white, therefore, before work, be sure to wash your hands well with soap and water to prevent contamination of the products. Or, you need to work with clean gloves.

The gluing process is quite simple, but problems arise with cutting corners.
Subtleties of work technology:
- Particular attention should be paid to cleaning the ceiling and walls from the presence of traces of glue. The acrylic and silicone compounds are removed with a rubber spatula and a damp cloth. When gluing the baguette to the putty, the excess is removed with a small brush well moistened with water.
- All gaps between the baguette, ceiling and walls must be carefully filled with glue. The same should be done with the joints in the corners of the ceiling plinth.
Tip: You cannot expect that such gaps can be masked with paint or gluing wallpaper on the ceiling, this will not work. Glue smeared on the ceiling and walls must be carefully removed, as shown in the photo.

- When joining straight sections, often when the glue dries, the edge of the baguette floats down and a step is formed. To avoid this, the joint of two adjacent skirting boards must be chopped off in the desired position with needles, or fixed with masking tape.
- After the glue dries, the needles are removed, and the resulting small holes and dents are carefully covered with the same glue or putty.
- Baguettes are painted several times. The first layer - a primer, allows you to hide all putty joints, and all other decorative layers are performed simultaneously with painting the ceiling. Finally, the excess glue on the baguette is trimmed.
How to glue baguettes on wallpaper

The order of work:
- A thin layer of glue is applied to the surface of the baguette, which is adjacent to the ceiling and wall.
- The plank is applied to the wall and held according to the instructions for the adhesive.
- Excess glue is removed with a clean cloth or sponge.
- All joints are carefully sealed with white sealant.
- If necessary, the entire surface is painted with acrylic or water-based paint.
Tip: Painting ceiling cornices should be done very carefully so as not to damage the glued wallpaper. This is best done prior to installation.

The main advantage of this method is that there is no need to adjust the wallpaper to the baguette. The framing will hide all existing burrs, distortions in the upper part of the wallpaper.
How to attach a baguette before pasting wallpaper

This option can be found quite often. It is preferred by many professionals.
The order of work is as follows:
- The walls and ceiling are carefully prepared, the surfaces are leveled with putty.
- With the help of a miter box, the ends are trimmed.
- A baguette is attached to a putty or drywall glue.
- All the gaps between the baguettes, the ceiling and the walls are rubbed with a putty.
- Excess material is removed with a clean cloth.
- Subsequent work is stopped before the putty dries.
- All surfaces are primed.
- They are painted in the chosen color.
- Wallpaper is glued. In this case, in the upper part, the overlap is removed by applying a spatula and cutting off the excess with a clerical knife.

Tip: Painting the baguette with the same color as the ceiling gives the visual effect of a monolithic structure.
The main advantage of this method is that all defects can be easily corrected, the frieze is painted at the installation site, while there is no fear of ruining the wallpaper.

How to glue the baguette in the corners

Preparing corners and joints is the most difficult and painstaking job of installing a frieze on the ceiling.
For work you will need:
- Small spatula.
- Sealant or putty in a suitable container.
- Miter box.
- Clerical knife or hacksaw for metal.
Tip: Fitting the last plank should be done from the corner cut to avoid material damage if an error occurs.
To correctly trim the ceiling plinth in the corners, you must follow some rules.
If in the room all the corners are even and are 90˚, then:
- Right angles must be all:
- between adjacent walls to each other;
- between the walls and the ceiling.
Only in this case it will be possible to accurately cut the corners with the help of a miter box.
- With the help of a miter box, the ceiling plinths that are joined in the corner are first trimmed.
- Their ends are brought to the desired size with an ordinary construction blade.
- The gap is evenly distributed over the two frieze sections to prevent tooth defects.

To cut corners:
- In the absence of experience in performing work, it is better to practice using small pieces of fillets.
- The plank in the miter box is placed in such a way as it will be located on the wall.
- The lower part of the baguette is tightly pressed against the wall of the miter box.
How baguettes are glued to the corners

The order of work is as follows:
- The end is cut at the desired angle. For this, a knife or a saw is used, strong pressing on the surface of the baguette cannot be done, this can crumble the material. Usually the angle is 45 °.
- The trimmed edges are attached to each other.
- The absence of gaps is monitored.
- With a knife, if necessary, the interfering parts are trimmed.
- Fillets are applied to the installation site.
- The final fit of the elements is performed.
- Installation of parts is in progress.
The corners of the ceiling plinth are glued, as indicated on the product label, in the same way as the main profile. For those who are interested in gluing baguettes to the ceiling, the video presented in this article shows in detail the entire process from start to finish. After mounting the baguettes, you can give them an original decorative look using spray paint.