There is no money to build a bathhouse from timber or brick, which means you will have to use cheap technology for constructing a frame building. And although a frame bathhouse is a small investment, it will still meet the objectives. Of course, if you approach the construction process itself correctly. So, for those who want to build a bathhouse with their own hands frame technology, we suggest you familiarize yourself with its main stages and some nuances.
Step-by-step instructions for building a frame bath with your own hands
Like any construction process, construction frame bath is divided into several stages. Each stage has its own moments and requirements.
Foundation construction
First of all, you need to choose a foundation for a frame bath. Since this structure is lightweight, we can offer two options:
- Columnar.
- Tape (shallow).

The construction of a columnar foundation for a frame bath is based on making the right choice places to fill them. Usually these are places at the corners of the bathhouse and several intermediate foundations on which they will rest load-bearing walls. The distance between the pillars is 80-150 cm. This indicator is determined by several factors:
- Pole dimensions;
- Soil condition;
- Weight of frame bath;
- Number of floors of the building.
If you make an expanded space at the bottom of the well under the foundation, which is called the fifth, then you can reduce both the number of pillars and their sizes. The thing is that this shape of the foundation pillar doubles its load-carrying capacity. To create this shape you will have to use a special drill.
So, the installation locations for the foundation supports for the frame bath have been determined; now it is necessary to dig holes for them. To do this, you can use a garden auger with a diameter of 200 mm. Even a teenager can perform this operation with his own hands. Well depth - 1 m.
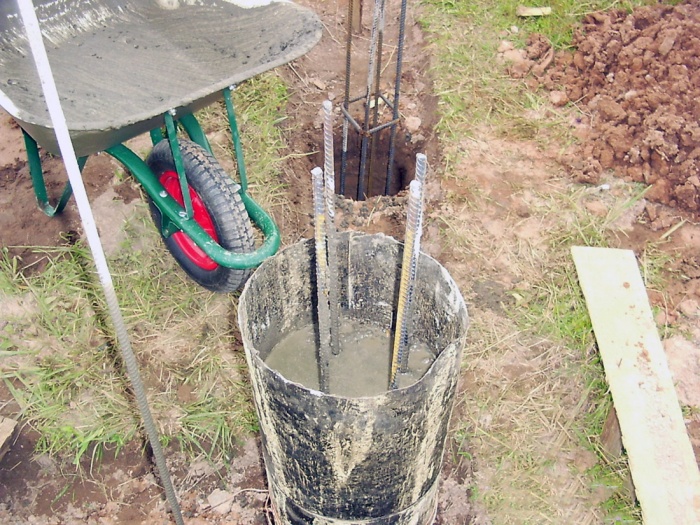
- Either sand or fine crushed stone 10-15 cm thick is poured into the prepared wells.
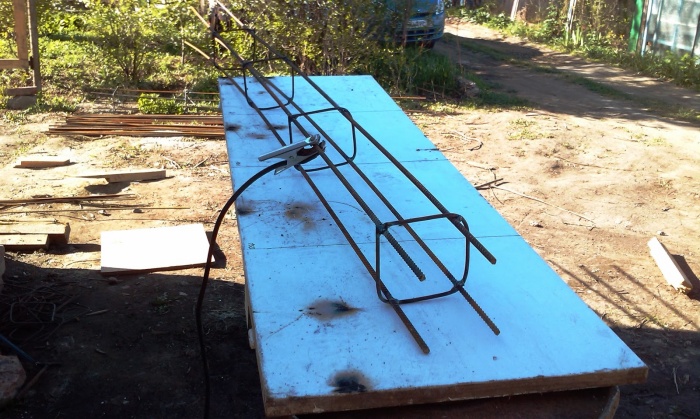
- A pre-prepared reinforcing frame is installed in the form of a structure with a triangular or rectangular cross-section from reinforcement. It should rise above the edge of the soil to a height of approximately 20 cm.
- A cylinder is made from roofing felt, which is lowered into the well. This is a kind of waterproofing layer and an element for forming a smooth support surface.
- On top of the well it is necessary to install a small formwork with a height equal to the height of the projection of the reinforced frame. It can be made from plastic sewer pipe with a diameter of 200 mm. By the way, this formwork can work as permanent.
Filled with your own hands concrete mortar, which is bayoneted in a piece as it is poured metal fittings or a pipe. Here it is important not only to compact the material well with your own hands, but also to remove the maximum amount of air that gets into it during the kneading process. It is the air after the concrete hardens that will determine the number of pores, and they negatively affect the quality of the concrete structure.
Attention! An anchor board must be installed in each pillar during concrete pouring. Its length is at least half a meter, and it should protrude 25 cm above the surface of the support.
At this point, the construction of a columnar foundation with your own hands for a frame bath can be considered complete. You can load it only after 28 days.

As for the construction of a shallow strip foundation for a frame bathhouse, this design works great on sandy and weak soils. To do this, a trench 500 mm deep and 300 mm wide is dug along the perimeter of the future building.
- The cushion is filled with coarse sand or small crushed stone. You can use gravel. The thickness of the pillow is 150-200 mm.
- A reinforcing frame is installed. In principle, these can be any metal profiles connected to each other by knitting wire. You can use a flat frame in one layer. It must be installed on supports, for example, on bricks. It is very important that the grating is inside the concrete layer and not between the pad and the foundation.
- If the soil is sandy, you will have to install full formwork. If it is clayey, then you can get by with formwork located above the ground.
- Concrete is poured using the same technology as with a columnar foundation for a frame bath.
Don’t forget to install anchors at the corners of the foundation structure and in the spaces between them.
Assembling the bath frame
First of all, the Mauerlat is installed (see video). These are beams with a cross section of 200x200 mm. They are installed on the foundation of the bathhouse, the upper plane of which is waterproofed. This can be done using roofing felt, laying it in two or three layers, or using bitumen mastic. Through holes are made in the beams for fastening with anchors, so it is worthwhile to accurately determine the location of these holes. The Mauerlat is secured with a nut and washer for each anchor. The beams are fastened together metal corners on self-tapping screws.

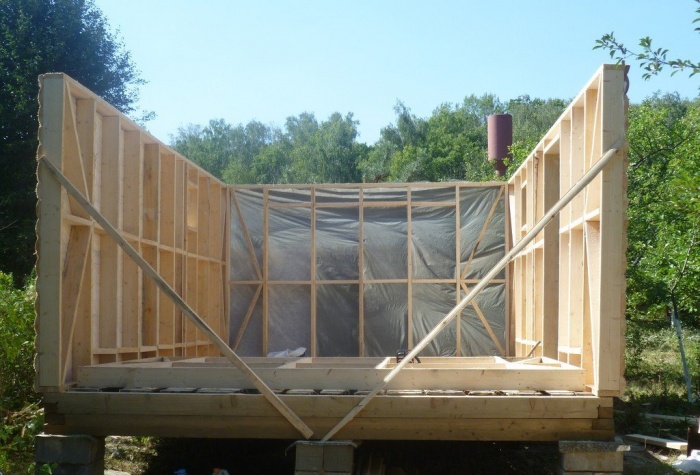
Now at the corners of the Mauerlat they are installed vertical racks from beams with a cross-section of 150x150 mm, and intermediate racks will also have to be made from them (see video). The risers are fastened with the same corners and screws. To ensure that the racks do not move away from the vertical position when assembling the top screed, they must be additionally secured with jibs and gussets made of beams with a cross-section of 100x100 mm or 80x80 mm.

Now you can install the upper Mauerlat from timber with a section of 150x150 mm or 100x100 mm. It is also fastened with corners. In principle, the bathhouse frame is ready. As you can see, it was not difficult to build a frame structure with your own hands.
Installation of floors in a frame bath
It is necessary to understand the point that the rooms inside the frame bathhouse carry their own specific loads, that is, each has its own purpose. Accordingly, the floors in different rooms will have to be constructed differently. For example, wooden floors will look good in the locker room, relaxation area and steam room. But in the washing room, where water flows in large quantities, it is better to install concrete base with a slight slope towards draining and discharging dirty water.
Frame bath- a structure in which you need to take care of thermal insulation, so wooden floors will have to be insulated.
- Logs are installed, whose ends will rest against the elements of the Mauerlat. Fastening - steel corners and self-tapping screws. As logs you can use boards with a thickness of 40 or 50 mm, or timber 50x100 mm.
- Along the joists along the lower edges, longitudinal slats are made.
- Installed on slats sheet material: plywood, moisture-resistant chipboard, metal, corrugated sheets and so on, can be used.
- Insulation (mineral or glass wool, polystyrene foam, polystyrene foam boards) is placed in the space between the joists.
- Lays along the joists waterproofing membrane, which is attached to them with metal staples, they are nailed with a stapler, you can use nails with a wide head.
- Installation of tongue and groove boards.
The concrete base in the washing room of a frame bath must also be insulated, so the soil in this place is removed and perlite (fine) is poured river sand, it is the insulation in this case), waterproofing is laid (membrane or roofing felt), concrete solution is poured, forming the floor in the washing room. By the way, this may not be done if the frame bathhouse will be used infrequently. You can simply lay boards along the joists, leaving 5 mm gaps between them. A small amount of water will be absorbed into the soil, but to avoid unpleasant odor, two through holes must be left in the foundation of the frame bathhouse, through which both moisture and odor will be removed outside to the street.
Construction of walls of a frame bath
As for the walls, their main task is not only to create conditions indoors, but also to do interior spaces warm with minimal heat loss. This is especially important for a frame bath; in addition, this is a way to save money by reducing fuel consumption.

You can start finishing the frame both from the inside of the bathhouse and from the outside. For external cladding For a frame bath, it is best to use sheet material: moisture-resistant plywood or chipboard, OSB boards. You can use lining, boards, and so on. For the interior decoration of a frame bath, the best option is lining.
For example, sheathed with outside bath frame, go inside, where the process of thermal insulation of the walls is carried out. In order to increase the strength of wall structures, sheathing can be mounted between the posts.
Attention! The insulation must be laid so that there are no gaps or cracks between it and the elements of the bathhouse frame.
These are one hundred percent cold bridges, which will affect the quality of the building in terms of heat loss. Let us add that for frame baths it is better to use insulation with a foil side. This is another characteristic that will help reflect thermal energy inside the bathhouse.

Do-it-yourself installation and insulation of the ceiling of a frame bath
The ceiling can be built using the same technology as the floors - using logs. The inside of the logs is lined with boards or moisture-resistant plywood. It is better not to use plywood in a steam room; it contains glue, which begins to erode at high temperatures harmful substances.
Insulation will have to be carried out from the attic. Before sheathing the ceiling of a frame bathhouse with boards from the inside, you need to lay a vapor barrier membrane on top of the logs with your own hands. The insulation is laid in the space between the joists without gaps or cracks, a waterproofing layer is installed on top, and then last layer the structure is covered with durable material - the same plywood, chipboard, boards, etc., can be used.
Do-it-yourself construction of a frame bathhouse roof
The shape of the roof of a frame bath can be any. The simplest one is single-pitched. Therefore, on the upper Mauerlat on the side of the façade of the frame bathhouse, you need to install several racks made of timber with a cross-section of 100x100 mm. They are attached to the Mauerlat with metal corners. The number of racks determines the length of the facade of the frame bath at the rate of every 1.2-1.5 m. The height of the racks is up to 1 m.

A beam is laid on top of the installed supports, on which one end will rest rafter legs, in fact, these are boards 40-50 mm thick. The second end of the rafters rests on the back of the upper Mauerlat of the bathhouse frame. All this can be secured with corners, nails, and wire. The distance between the rafters is 80-150 cm.
The next stage is laying the sheathing. The sheathing elements can be slats with a cross-section of 40x40 mm or 50x50 mm, or boards 30-50 mm thick and 100 mm wide. Fastening is done with self-tapping screws or nails. And the last thing is the installation of roofing material. The choice of coverage is up to the customer.
Conclusion on the topic
Like this step-by-step instruction How to build a frame bathhouse with your own hands. Let's face it, this process is simple when compared with the construction of baths from more fundamental materials. But in any case, you will have to familiarize yourself with all the nuances of building a frame bath. Therefore, we suggest watching the video that is posted on this page of our website. This path will be like a video instruction for you.
A frame bath is an excellent option for those who want to build inexpensive sauna with your own hands. If you make good vapor and heat insulation, it will not be inferior to buildings made of bricks and rounded logs.
A do-it-yourself frame bathhouse is a budget option, it does not require in-depth knowledge in construction industry and the use of special tools. Construction is quite easy and quick.
Construction of a frame bath: advantages and disadvantages
Advantages frame structure:
- saving. Construction frame construction will cost less than other materials. Frame structures do not require a particularly strong foundation, expensive materials or complex drawings;
- high speed of construction. Lack of complex design features reduces the time spent on building a bathhouse. You can do exterior and interior decoration at the same time. On average, construction takes only a few weeks;
- construction can be carried out at any time of the year;
- no need to hire construction team. Building a frame bathhouse with your own hands is a simple process that does not require special skills;
- good level of thermal insulation. In just 2-3 hours, the steam room will completely warm up; other types of baths need twice as long;
- fuel economy. Since a frame sauna warms up faster, it needs fewer logs;
- wide choice of finishes. The frame can be sheathed both inside and outside with a variety of materials, which helps give the building a unique look. For example, exterior finishing can be done using tiles, boards, siding and even plaster;
- no shrinkage, so you can immediately make and start using the steam room.
The disadvantage of the frame structure is low vapor barrier. During snowfall and rain, water can get inside the frame and accumulate, this leads to condensation. But if you know how to make a frame bathhouse and take care of the vapor barrier, then this unpleasant phenomenon can be avoided.

Do-it-yourself frame bath: step-by-step instructions
First of all, you need to choose the place where the structure will be erected, and also draw up a project.
Step 1. Creating a plan and diagram of a frame bath
The first stage in the construction of any building is design. First you need to decide on the size, keep in mind that the larger the building, the longer it will take to build, more money In addition, large steam rooms take longer to warm up. The most popular option is a 4 by 4 frame bath. It has enough space to accommodate a steam room, sink and dressing room.
If the plot is small and you want to build a small and budget building, then the best option make a 3x3 frame bathhouse with your own hands. It can fit 2-3 people. In this case, it is better to make a separate rest room on the second floor, combine it with a dressing room or build an attic.
You need to decide in advance on the size of the bathhouse, draw a construction plan, and decide in advance where the partitions between rooms, windows and doors will be installed.
The location for the stove should also be chosen before construction begins; if you plan to install it, then you need to make a strong foundation under it.
It is also necessary to decide on ventilation and sewerage.

Step 2. Selecting wood
When we build a frame bathhouse with our own hands, we must remember that the quality of the entire structure depends primarily on the quality of the materials used. For construction, you need to use well-dried wood, which has low thermal conductivity, does not deform and can last for many years.
Linden, aspen and larch are suitable for these purposes.

Step 3. Building a foundation
Before we talk about how to make a frame bathhouse with your own hands, you need to prepare the foundation. The frame bathhouse is lightweight, which eliminates the need to build a special strong foundation. It can be done using simplified technology.
The most popular option is a columnar foundation. The work order is as follows:
- Leveling the area, marking places for poles.
- Drilling wells with a diameter of 20 cm and a depth of 1.5 m.
- Asbestos pipes are inserted into the wells. Their diameter should not be less than 10 cm.
- The empty space on the outside must be filled with concrete.
- Measure the pipes using a level and make marks so that they are level.
- Cut the pipes.
- Fill the inner parts of the pipes with concrete.
You can also make a foundation from blocks, strip or pile-screw, the second is suitable for large buildings with a low depth of soil freezing.

Step 4. Strapping
Installation begins with the base trim. To do this, you need to prepare boards with a cross section of 5x10 cm, they must be treated with an antiseptic.
Before you start tying, you need to mark the future walls. Lay the boards with the outer edge along the outer contour of the walls, fasten them in the corners with nails. The strappings need to be connected on supports, in which case the structure will be stronger and more reliable. Using supports you need to assemble the base trim.

It is important that it is made as level as possible; check its correct installation using a level. The evenness of the walls themselves, and therefore the building as a whole, depends on this. If deviations are detected, you need to lay pads made of several layers of roofing felt or small pieces of boards. To give additional strength to the structure, it is recommended to fasten the beams with metal plates and fasten them to the foundation using anchor bolts.
For sheathing and thermal insulation it is necessary to make intermediate racks.
The piping must be treated with a special solution that will protect the building from rotting.
Strapping for a frame bath - video:
Step 5. Construction of walls
A more convenient option is construction and fastening frame walls on the ground. This method has several advantages:
- you can make the foundation and assemble the frame at the same time;
- you won’t get tired so quickly because you won’t have to raise your arms above your head;
- there is no need to use ladders and other devices to reach the top of the structure, so the option of assembling on the ground is considered safer.
When assembling, you need to ensure that the distance between the axes is 0.6 m.
In places where the frames will be connected to walls or lintels, additional racks must be installed in window and door openings. Fastening parts must be done using nails.
It is important to constantly monitor the evenness of the structure; in the end, the frame should be rectangular.
Assembling the walls should begin by creating one corner. First you need to assemble a wall that will communicate with the frame. Next, it needs to be checked for evenness and secured with temporary struts. After this, other frames are installed. Using boards, secure the straps and nail them.
After completion of construction, it will be necessary to cover all the boards on the outside with a special antiseptic to protect the building from exposure environment. The inside of the boards must be sanded and coated with two layers of furniture varnish.
When the frame is ready, you can move on to covering it. It is recommended to use plywood for it.
We are building a frame bathhouse with insulation, in which case it will retain heat better, which plays an important role for a steam room.


There is only one way to build a bathhouse quickly and inexpensively - frame. If you follow the basic rules, the construction will be in no way inferior to its brick and timber counterparts.
We design a bathhouse - different space options
We begin work on the bathhouse with design. At this stage, it is necessary to decide on the size and configuration of the future structure. If your requirements are minimal, you can build a 3x4 m bathhouse. It will have enough space for a steam room for several people with an area of 6 m2. The remaining space can be allocated to a rest room. If you sacrifice the rest room, there will be enough space for a locker room and a vestibule. And if you equip such a bathhouse with an attic floor, you won’t have to give up the rest room.
If the bathhouse will be used as a place to hang out with friends, it is better to make it larger, for example, 6x4. In this case, you can equip it enough spacious room relaxation area of about 14 m2, as well as a steam room of 5 m2 and a small bathroom.
And if you make a 4x6 bathhouse with an attic, then on the ground floor there can be a steam room and a washing room, as well as a relaxation room and a terrace. All attic floor, which is about 20 m2, can be allocated for a rest room.
If the size of your plot allows, and the budget is not very limited, make an attic bathhouse measuring 6x6 m so as not to deny yourself anything. There is room for all the necessary premises, as well as a terrace and a spacious balcony.
Large steam rooms are much more difficult to heat to the required temperature and then maintain temperature regime on the same level. Therefore, if there is no need for a large steam room, it is more advisable to allocate no more than 4-5 m2 for it. This will save fuel and time for heating the room.
In order not to rack your brains over the layout, you can take as a basis finished projects offered on our website. If necessary, adjust the layout as desired. When the plan is ready, be sure to draw up a drawing diagram of the frame of the walls and roof.
The frame of the walls is quite simple - it is based on racks, which are located in increments of 600 mm, if measured from the centers, or 575 mm, if measured between the racks. The top and bottom of the racks are connected by strapping - a horizontal beam or board. In the corners, the racks are reinforced with braces. There are horizontal lintels above doorways, as well as above and below window openings. Floor beams are calculated and laid in the same way as in the construction of ordinary houses.
Having such a drawing in front of you will prevent you from making mistakes during the assembly process. In addition, it will allow you to calculate in advance required amount lumber.
Columnar foundation - building the foundation
Since a frame bath is light in weight, in most cases a columnar one is quite sufficient for it. shallow foundation, provided that the soil is stable. On unstable soils it is better to make a pile-screw foundation. If you are planning a cellar or arranging other premises, you will need a strip foundation. In other cases, it is better to abandon it, since the construction of such a foundation is very expensive and labor-intensive.
Regardless of what kind of foundation you are going to build, first prepare the site - first of all, you need to properly outline it. Be sure to make sure that the diagonals of the site are the same length. Then get rid of the plant layer. To prevent plants from sprouting under the bathhouse in the future, treat the soil with fungicides.
Now you can begin building the foundation itself. If the base is columnar, you will need the following materials:
- sand;
- crushed stone;
- cement mortar;
- concrete foundation blocks(can be replaced with brick);
- bitumen mastic;
- roofing felt;
- timber 150x150 mm.
After preparing the materials, mark the area for the posts, which should be spaced in increments of 1.5–2 m. Then dig holes to a depth of about 40 cm. Cover the bottom of the holes with crushed stone and sand 10 cm thick. Compact each layer thoroughly. Level the surface of the embankment in a horizontal plane.

Place two concrete blocks in the holes, then apply the mortar and place two more blocks on top with a dressing. When laying blocks, make sure that the pillars are installed strictly vertically. Then work the blocks on top bitumen mastic and put a couple of layers of roofing felt.
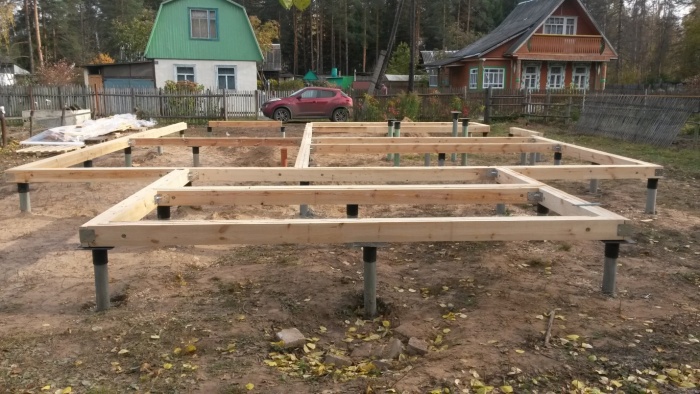
After this, you need to make a grillage, i.e. lay timber around the perimeter of the foundation and fasten it together. During installation, make sure that the angles of the grillage are 90 degrees. Gusset It is advisable to make the grillage beam “in the paw” or at least “in half a tree”. Then you need to lay the floor beams on the posts and cut them into the grillage.
A pile-screw foundation is even simpler - piles are screwed into the ground according to the principle of a conventional drill. Their depth must be at least two meters. During the deepening process, you need to ensure that the piles are positioned vertically.
Then the top of the piles is cut so that the edges are on the same horizontal level. After this, a grillage is welded to the piles, which is usually made from I-beams. The same beams are used for flooring.
On metal beams you need to secure a 150x150 mm beam with bolts. It will serve as a strap for the frame posts.
Assembling the frame - materials and installation
To build the wall frame you will need the following lumber:
- timber 150x150 mm;
- timber 100x150 mm;
- board 150x40 mm;
- steel corners;
- wooden dowels.
Be sure to treat all lumber with antiseptic impregnations. They will protect the tree from negative biological influences and also make it more resistant to moisture.
The work begins with the installation of racks in the corners of the building, which are made of 150x150 mm timber. At the end of each rack, drill a hole for the dowel with a depth of 80-100 mm. Make the same holes in the grillage at the corners of the building. Then hammer the dowels themselves into the grillage and place the racks on them. Additionally, strengthen the racks with steel angles and self-tapping screws.
Then the racks must be strengthened with braces, as shown in the diagram above. To make braces, use 150x40 mm boards. Cut the ends of the braces at the angle at which they will adjoin the frame and posts. To fix the boards, use self-tapping screws and corners.

Next, install intermediate wall posts with a pitch of 600 mm, made of 150x40 mm boards. To attach the racks, use steel corners, which should be located on both sides of the brace. In addition, connect the intermediate posts to each other as well as to corner posts using jumpers made from the same boards. Place the jumpers in a checkerboard pattern, i.e. at different levels.
Tie all the racks from above with a strapping, which is made from 100x150 mm timber, it will also serve as a Mauerlat for the roof. Then install horizontal strips above and below the openings. For the slats, use the same board as for the racks.
Then, using the same principle, install the racks of the interior partitions - connect them at the top and bottom with strapping, and also strengthen them with braces and jumpers. This completes the construction of the frame.
Now you need to lay the floor beams, for which you can use 100x150 mm timber. Place them with the edge on the harness and secure with the corners. The pitch of the beams must correspond to the pitch of the rafters - this is usually 900–1000 mm.
Installing an attic roof
As an example, let's consider a roof, since it allows you to get an almost full second floor with a minimal increase in financial costs. If you are interested in or, check out other articles on our portal.
For mansard roof you will need the following materials:
- timber 100x150 mm for racks;
- boards 150x50 mm for rafters;
- boards 150x20 mm;
- slats;
- superdiffuse membrane;
- roofing material.
The work begins with installation supporting structure. For each truss, two racks are installed, which are connected at the top by beams. Those. under each roof truss there is a U-shaped supporting structure.
When installing the supporting structure, it is necessary to correctly determine the position of the racks. Since the rack with the lower rafter and mauerlat (floor beam) forms a rectangle, the distance from the wall to the rack depends on the height of the attic and the angle of inclination of the lower rafter. Knowing the angle of inclination of the rafters and the height of the rack (determines the height attic room), you can calculate at what distance from the edge the stand is installed using the Pythagorean theorem, i.e. you need to find out the length of the smaller leg.

Secure the posts to the frame and floor beams with self-tapping screws and angles. Additionally, reinforce them with braces. Then connect both posts with beams. Using this principle, install U-shaped parts on all floor beams. All results load-bearing elements connect along the edges with purlins, as shown in the diagram above.
Now you can install the lower rafters. They are cut from below and attached to the harness, and from above - to the purlin, in which the grooves are pre-cut. Next, you need to secure the racks in the center of the jumpers of the U-shaped parts. The height of the racks determines the angle of inclination of the upper rafters. Connect all the posts with a ridge girder.
To complete the attic frame, install the upper rafters, which rest on the lower and ridge purlins. First, cut the grooves for the rafters in the purlins. Immediately waterproof the roof - secure the super-diffuse membrane to the rafters with a stapler. Place a special self-adhesive tape over the staples to ensure a tight connection. Please note that the membrane sheets should overlap each other by 20–25 centimeters.
A superdiffuse membrane is capable of transmitting moisture in one direction. Therefore it should be located on the roof smooth side outward, and rough - inward. If it is not secured correctly, moisture can penetrate deep into the insulation, as a result of which it will lose its thermal insulation properties.
Be sure to secure the slats on top of the rafters, which will serve as a counter-lattice. Then attach 150x20 mm boards perpendicular to the slats. As for the sheathing pitch, follow the recommendations of the manufacturer of the roofing material you purchased for the bathhouse.
The roofing covering is mounted on top of the sheathing standard scheme– sheets of material must overlap each other lengthwise and crosswise. Screws or nails are located at the crest of the wave.
We insulate the walls, roof and floor of the bathhouse
To insulate the walls you will need:
- basalt wool 150 mm thick and density 25-35 kg/m 3;
- vapor barrier film;
- moisture-windproof membrane (super-diffuse);
- wooden slats.
To vapor barrier a steam room, it is more advisable to use foil vapor barrier material. It will not only protect the structure from moisture, but will also reflect heat into the room.
Let's start with insulating the walls from the inside. To do this, apply self-adhesive double-sided sealing tape to the racks. Then glue the waterproofing film to the tape. Be sure to place the canvases with an overlap of at least 15 centimeters. Glue the joints on both sides sealing tape. Additionally, secure the foam with a stapler. The result must be an absolutely sealed circuit, otherwise moisture will penetrate inside the walls and the frame will quickly become unusable.

Then lay mineral wool slabs into the frame space. Make sure that the insulation fits tightly to the structural elements and to each other. Carefully fill all the resulting cracks with cotton wool scraps.
Next, you need to secure a moisture-windproof membrane on the outside of the walls. It is installed according to the same principle as a vapor barrier - a sealant is glued to the racks, then the membrane itself is attached using a stapler. On top of the film on the racks it is necessary to fix slats with a thickness of at least 20 mm. Place the same slats on the racks on the inside of the walls; they will serve as lathing for the lining.
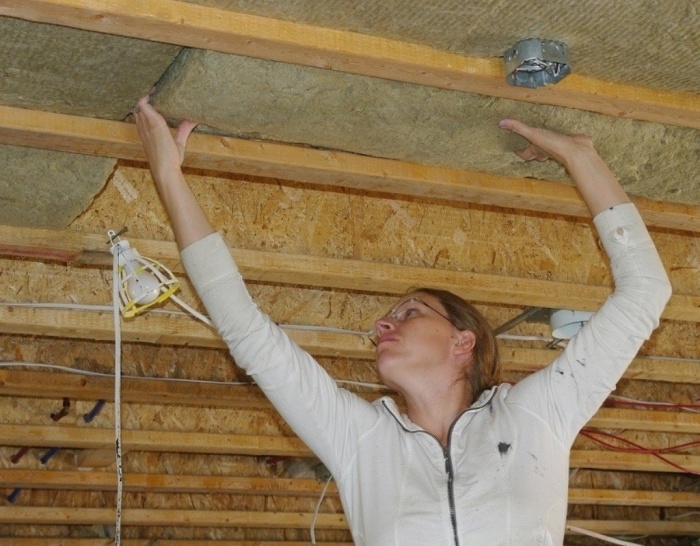
The same technology is used to insulate the roof - mineral wool is laid between the rafters, then covered from the inside with a vapor barrier. A lathing for lining or other finishing materials is mounted on top of the vapor barrier.
The floor is insulated a little differently - first of all, you need to make a rough flooring between the floor beams from the boards. Then it is laid on the beams and flooring waterproofing film(can be used regular vapor barrier). Logs are laid on top of the film as when installing a regular floor.
Insulation is placed in the space between the joists. You can use any material, both slab and loose, such as ecowool or expanded clay. Another layer of film is laid over the logs and then the flooring is made of boards.
To insulate the ceiling, attach a vapor barrier on the side of the first floor, and then make a rough ceiling from the boards. Then, on the second floor side, you need to fill the space between the beams with insulation. A vapor barrier and plank flooring are laid on top of the beams.
Sheathing the walls - the final stage
For exterior wall cladding, it is best to use OSB-4 with a thickness of 12-15 mm. The sheets need to be cut so that the edges fit on the rack. There should be no hanging edges. In the locations of window and doorways You need to make cuts using a jigsaw or hacksaw.
To fasten the sheets, use phosphated self-tapping screws 60-70 mm long. The distance from the edge of the sheet to the screw should be 10 mm. The fastener spacing along the edges should not exceed 150 mm. In the center of the sheets, the screw pitch can be increased to 300 mm.

Be sure to provide a distance of about 5 mm between the edges of the sheets, i.e. so-called expansion joint. If this is not done, the sheathing sheets may become deformed as a result of thermal expansion. All seams must be filled with foam.
Cover the gables of the building in the same way. Then the walls can be finished with any “dry” façade finishing materials, such as lining, siding, thermal panels, etc. Line the walls with clapboard on the inside. If you do not know how, dedicated to this topic.
That's all the main points. Even if you are a beginner, build a box small bathhouse you can do it in one to two weeks.
If you have your own plot, your own house or cottage, and at the same time you are an avid lover of the steam room, sooner or later you will start building your own own bathhouse. If you already have experience in building frame houses, then building a bathhouse with your own hands will be easier for you. If you have no experience, you will need a lot of theoretical information, and practical advice from the masters will never be superfluous.
Where to begin
So, you firmly intend to build a bathhouse with your own hands. First answer the following questions:
- Where on the site will your panel building be located. Consider everything: the presence and location of the necessary communications, is there enough space to build a frame structure, do you want the bathhouse to be close to the house or located far away? Or maybe you want there to be a free passage-corridor from the house to the steam room? In general, you should have a first idea of what you want, as there are a lot of options.
- Determine the quality of the soil, this will be useful to you when building the foundation. If you have already built something framed before, then you already know what kind of soil is on your site. Let me remind you that they can be sandy (with admixtures of rock and other rocks), fine sandy (loose and extremely unstable) and clayey (subject to swelling in the cold season). For the first type of soil, the simplest and lightest foundations are suitable, and for the second two, the foundation should be more reliable (although frame buildings rarely need heavy foundations).
- Plan what rooms your building will consist of. Usually baths have a dressing room, a shower and a steam room. However, you may want to have a terrace, a swimming pool, a loft or a more extended sitting area.
- Determine where the stove will be located, as this will affect the location ventilation system, pipes, chimney.
- Think about what you want the roof of the bathhouse to look like. The more interesting the solution, the larger the roof, the more reliable the rafters and frame floors will need to be made.
- Select a company or store where you will purchase building materials. Find out where discounts are available or free shipping- this helps you save a lot.
How to draw a plan for a future building?
Once you have decided on the basic issues, it is time to start construction. The first step is to draw it yourself or purchase ready plan. You can purchase a ready-made bathhouse plan from developers involved in frame construction. They already have several ready-made, proven solutions that they will be happy to sell to you. An additional advantage may be the help of company representatives with the purchase of building materials or practical advice on assembling it yourself.
However, if you want to do everything yourself, pay attention to the following tips:
- Determine how many people your bathhouse is designed for on average. If you often have guests, you can save on space by reducing the shower room and thereby increasing the dressing room or seating area. The shower room is traditionally the smallest room in a bathhouse.
- Even if you plan to steam alone or small company, do not make the steam room very small. The steam will be of poorer quality, and besides, you may not have room for a three-level bench, which is needed to steam at different heights.
- Consider creating a deck.
- It wouldn't hurt to have a bathroom at all.
- Place several outlets in the break room. Then you can use electric kettle, listen to music and even connect if necessary small refrigerator with soft drinks.
- Think about the location of the windows. The rest room should be the brightest, and the steam room can do without natural light. A do-it-yourself panel design allows you to make windows anywhere.
- Doors should be positioned functionally. From the shower you need to be able to immediately go to both the steam room and the relaxation area. It is better to place the bathroom closer to the shower - this will make it easier to lay communications.
Taking into account all these factors, having decided on the budget, you can begin to select building materials.
Building materials: choose and buy
So, you start building the best frame vacation spot. You need to determine what building materials you will need and calculate how much to purchase. To do this, you need to decide on the main stages of your work:
- Laying the foundation.
- Installation of the frame.
- Laying communications.
- Insulation and insulation of walls (internal and external).
- Construction of the roof and chimney.
- Interior decoration, installation of a stove, swimming pool, etc.
- External cladding.
- Construction of a terrace.
We discussed laying the foundation in a separate article, you can read about it. I can only say that it is best to stop at strip foundation– it is suitable for most soils, has good bearing capacity and reliably protects the building from distortion. You can easily build it yourself. To create this type of foundation you will need formwork and self-tapping screws for its assembly, concrete, reinforcement, stones, possibly crushed stone or sand. The foundation does not need to be deepened very much - under the lungs frame houses optimal height is 60 cm.
For further construction you need to purchase:
- boards or beams for constructing the frame
- materials for vapor barrier, waterproofing and windproofing
- materials for thermal insulation
- building materials for interior decoration
- materials for external cladding
- tools, screws, nails, etc.
Correctly made calculation of building materials helps you save money and not buy too much, and at the same time saves your time. Knowing the technology of frame construction, it is easy to calculate the quantity necessary materials. To do this, you need to find the total area of your building, from which we subtract the area of all door and window openings. We separately calculate materials for the floor and ceiling.
Pay attention to the instructions for insulating and heat-protective materials - they usually indicate how much material is needed to insulate a square meter. If such instructions are not available, check with your sales consultant. Frame buildings need good insulation.
Construction of the frame
Read about how to make a foundation for a frame bath. When it is ready, we make the frame.
Despite the fact that the construction of a bathhouse is similar to any other frame construction, it also has its own characteristics. The room itself is often in contact with moisture, and temperature fluctuations lead to faster wear of materials. Therefore, when constructing a frame, all wooden parts must be treated with special antiseptics, and preferably in several layers.
After you have made sure that the boards and beams are well dried and reliably protected with impregnations, we proceed to the construction of the frame.

To make a frame with your own hands, first of all we tie the base. We mark the future walls and line the outer building with boards (section 50×100 mm). We fix it with nails or self-tapping screws. Using a support made of boards or timber, the base frame is connected ( top part buildings are connected in the same way). The timber or boards are laid horizontally. Use a level to check for accuracy under a straight line.
If you notice a slight misalignment, correct it by placing small pieces of board under the lowered part. It is better to use several small boards, layered, rather than one wide board.
When laying the studs, note that you need to be comfortable with installing insulation and sheathing later. The distance between the axes should be no wider than half a meter, but if there is a doorway in the wall, make a gap of 0.4 meters.
The pitch size of the racks depends on the size of the openings into which the windows and doors will be installed. It is necessary to build an additional rack where the frame meets other walls.
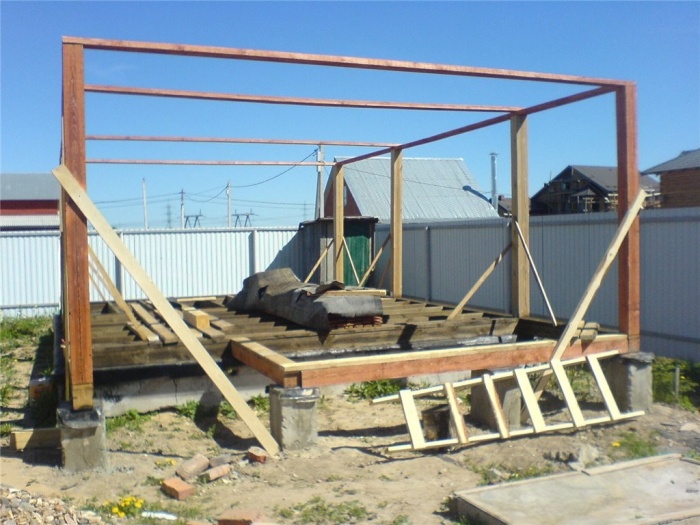
Usually the bathhouse begins to assemble from one of the corners of the planned room. After erecting one wall, it must be checked for verticality with a tool. If everything is in order, it is fixed using struts (temporary).
The remaining walls of the frame are installed in the same way, and later the angles are checked - they must be strictly 90⁰. Additionally, we fix the structure with nails and boards.
Steam, wind and waterproofing
Insulation is best done using synthetic materials. This type insulation is not so susceptible to changes under difficult operating conditions. These can be slabs of polystyrene foam, polyurethane foam or polystyrene foam. Slabs or a roll version of synthetic mineral wool or ecowool have proven themselves well. Installation of these types of insulation can be done with your own hands. The material is lightweight, does not require special skills and complex instruments for styling. Read more about insulating a frame bath.

Panel technology involves the use of windproofing materials. Provides wind protection external finishing structures consisting of special membranes or foam boards.
For frame construction, the following types of waterproofing are used: roll protective films and membranes.
An air gap is necessary for ventilation. Drainage system represented by drainage systems.
Water laying
Communications in the bathhouse are the conduction of water and electricity. One of the main features of this non-residential premises– the need to drain water during frosts. If water remains in the pipes, it will turn into ice and burst the pipe.
To properly design a water supply system, determine where the water distribution points will be located. You will most likely need to run water to a shower or bathtub, sink, hot water boiler, or toilet. Water can come either from your home, in which case the pipes will be connected to your home, or from a separate well or well. In the second case, the water heating tank will be filled using a pump. The pump is selected based on the height of water rise, the diameter of the well and the required pressure in the system.

It is better to purchase pipes from polypropylene. To install them yourself, you need to try, but they will last longer than metal-plastic ones, in which rubber gaskets quickly fail.
Consider a filter system. You will need a coarse filter and a fine filter. The ball valve is located on the supply pipe. From him to pumping station a filter is installed and check valve. After this, a connection is made to the pumping station, with a main line being drawn at the outlet. It leads directly to the water heating boiler, from which it will already supply hot water. The tee, which cuts in here, gives rise to a line through which cold water will flow.

The cold water supply taps of the planned water intake points of the frame building are connected to the tee. At the outlet of the water heating boiler you will have a hot water supply line. Hot water taps should be connected here.
Features of conducting electricity
Electricity can be supplied to the bathhouse in two ways:
- By air.
- Underground way.
The aerial method involves running the cable through the air, and the underground method involves hiding the cable in a trench in the ground. The first method is more economical, since it will require the installation of two supports (more supports will be needed if the wire stretches more than 25 meters). The second method will require additional costs for digging a trench.

For aerial installation, you should purchase a self-supporting insulated cable, and for underground laying- much more expensive VBBShV cable. Unlike insulated, it is armored with copper conductors.
Any type of wire requires the installation of a metal sleeve, which will protect the cable from deformation when entering the building. Without an iron sleeve, the cable may be damaged due to shrinkage and movement of the wall.
You will find more information about electrical wiring.
Which roof to choose?
The roof can be simple or complex. TO simple types include single-pitched and gable roofs. More complex ones have decorative and functional protrusions. These projections are constructed if there is an attic or attic. The roof may have one or more windows if there is a room underneath it.
A pitched roof does not imply the presence of an attic or attic, however, its flatness can be used by equipping a place for sunbathing or for drying fruits, berries and mushrooms.
The most popular is the simplest one gable roof– it almost does not accumulate snow in winter, makes it possible to equip an attic without being too expensive financially and easy to install. Access to the attic can be made using a staircase from the recreation area. You can store brooms there or set up a billiard room.
Interior decoration
Most often, interior decoration is made of wood. You can use the following species: larch, linden, oak. Do not use pine or spruce, which release resin when heated. If you want to use conifers, place them in the dressing room or relaxation area, away from the steam room.
The floor is best made of tiles; this is the most functional material for rooms with high humidity. Naturally, you need to choose a special tile - it does not collapse under the influence of water and has a rough surface, which reduces the possibility of slipping on a wet floor.
Under no circumstances interior decoration should not be used:
- laminate (it does not tolerate moisture)
- linoleum (releases harmful substances when heated)
- Fiberboard and chipboard (also emit harmful substances contained in the glue)
Exterior finishing
A beautiful bathhouse immediately reveals a good owner, so the owners always pay great attention to the appearance of this frame building. However, the external decoration of the bathhouse also has a protective function. It can be made with your own hands from:
Terrace construction
Having a terrace is a huge advantage for your bathhouse. It is installed quite simply, but as experience shows, it is used constantly. The terrace can be made of wood, but it is better to use special tiles.

To build a terrace, it is not necessary to make a foundation, just remove fertile layer soil and lay a layer of gravel for drainage, and a layer of sand on top. All this must be thoroughly compacted by sprinkling with water. The quality of compaction depends on the reliability of your terrace.
After laying the tiles, pay attention to the seams. It is best to seal them with special grouts that can withstand low temperatures. It is better to choose tiles from granite (the most common option), basalt or syenite. Such tiles are easy to clean, durable, and not subject to abrasion. Has proven itself well concrete tiles, clinker and some synthetic materials. But it is better not to use ceramic tiles for terraces - they heat up too quickly and can cause burns.
Such projects have many advantages, including the possibility of construction without the involvement of craftsmen, exclusively with your own hands. The article contains a description of the process, as well as photos and videos that will help you understand the construction of the building, from the foundation to the roof.
Frame bathhouses are preferred by people who want to get quick results for a relatively low price. You can do work at any time of the year, as soon as you want to get your own steam room, and the absence of shrinkage characteristic of wooden structure, makes it possible not to delay finishing. You need to start by choosing a project - you can create it according to an individual sketch or purchase a ready-made one. At this stage you need to consider:
- number of floors;
- the presence of additional buildings - attics, terraces, etc.;
- arrangement of rooms - including the steam room: it can be separate or built-in;
- the location of the heater in order to properly design the ventilation and chimney;
- the configuration of the roof and the type of covering for it - this will allow you to calculate the required capacity of the rafter system and floors;
- communication scheme;
- materials that you plan to use for the construction of the bathhouse, including for the final finishing;
- location of construction - including whether the structure will be a separate building or an extension of the house.
Advice. When planning to build a bathhouse, be sure to take into account the characteristics of the soil on your site. The choice of foundation type depends on this. For walls, prepare boards from aspen, linden or larch - these species hardly deform and retain heat well.
To use a frame bath even in the cold season, it must be insulated. This question should be asked in advance in order to select suitable material and include it in the cost of the project. Considered optimal mineral wool and fiberglass.
One of the most significant disadvantages of a frame structure is its susceptibility to weather conditions. During precipitation, moisture gets into the cracks of the building, which collects from the inside and gradually destroys the building, so before building a bathhouse you should think about a vapor barrier. Usually between internal lining and a special foil film or glassine is laid as insulation.
Attention! It is undesirable to use roofing felt for this purpose. When heated, it becomes a source of a specific and very unpleasant odor.
Laying the foundation: foundation, bottom frame and floors
Most often, for a frame structure that is light in weight, a columnar foundation is prepared. You can make one of the simplest options with your own hands - a base made of asbestos-cement pipes into which concrete mortar is poured. To complete this work you will need:
 Pile foundation for a bath
 - Drill holes about 1.5 m deep and 0.2 m in diameter.
- Insert pipes with a diameter of 0.1 m into them. Empty places cover with sand and compact it well.
- Determine horizontalness over the entire surface using a level. Make appropriate notes on each pipe.
- Prepare a solution of water, sand, small crushed stone and cement.
- Cut the pipes to the required mark and pour thoroughly mixed concrete inside each of them.
Advice. If you have never made a columnar foundation, but have dealt with a strip foundation, feel free to use the option you are familiar with. It will also withstand the frame structure well.
The strength and durability of the bath will be ensured by correct harness above and below. To make the bottom one, you need to lay a layer of boards or timber on the foundation and secure it firmly. This will become the basis for the floor and walls. You need to start installing the piping after the foundation is completely ready. For work, it is necessary to prepare boards with a cross section of 5x10 cm. They are pre-treated with an antiseptic.
The sequence of actions is as follows:
- Waterproofing the structure with roofing felt.
- Marking the walls and laying out along the outer contours of the boards (outside). You need to connect them to each other with nails.
- Connection using base frame supports. Control of horizontal laying.
- Insertion of logs for subsequent flooring. The distance between them is about 0.5 m.
- Treatment of the entire structure with a composition that prevents wood rotting.
Advice. The piping and logs can be attached to the foundation pipes using pre-walled metal plates. This will give additional strength to the future bathhouse. Expanded clay blocks can be placed under the logs to strengthen the entire structure.
At this stage it is advisable to start laying the floor. It can be wood or concrete, leaking or not. It all depends on whether you are going to use the sauna only for summer time or all year round. In the first case, you can get by with a simple wooden flooring, laid with intervals through which water flows out - this is a leaking structure. If you want to make a good-quality heated floor, you must first arrange a rough layer: stuff plywood onto the joists, put insulating film and insulation on top. Then you need to lay out the top, finishing floor covering and secure it with nails.
Advice. Boards for flooring it must be treated in advance so that the smallest roughness does not cause discomfort for those relaxing in the bathhouse.
Rules for building walls. Top trim and roofing
Before assembling the base of the bathhouse - the frame - you need to fulfill 2 conditions:
- dry the material well;
- make markings for future frame racks.
After this you can begin installation:
 Construction of bath walls
 - Install 2 corner posts and several intermediate posts. The distance between them directly depends on the dimensions of the windows and doors and should be: 40 cm - if you plan to join with other walls and arrange the opening; 60 cm - if adhesion to other walls is not provided.
- Check if the design is rectangular in shape.
- Sheathe the frame with particle boards (from the selected corner). Fasten with screws.
- Place a few more racks and cover them in a similar way.
- Make the top trim and attach it to the vertical posts.
Then you can begin installing the roof. Prepare beams 150x150 mm - these will be ceiling beams. Post them on top harness, maintaining a distance of 0.5x0.6 m. Mount a temporary boardwalk 5 cm thick on top. Assemble the rafters on the ground and install them on the roof. If the height of the roof ridge is small, then installation can be done directly at the top.
Advice. Before installing the last rafter structure, mark out the particle boards along it that will cover the pediment.
Depending on what material you are going to use as roofing, you need to decide appearance battens installed on rafters:
- for iron or soft roof(for example, roofing felt) you need to make a continuous surface;
- for metal tiles, gaps with a distance of 35 cm are acceptable;
- for slate or ondulin, you can take steps of 60 cm;
- using natural tiles The first thing you need to consider is its size.
 Assembling bath walls
 After installing the sheathing, you need to lay the covering, and then install the windows and doors.
The outside of the bathhouse can be plastered, covered with boards or siding, and the inside can be imitated to look like natural wood. It is better to line the wall that separates the steam room from the relaxation room with bricks - for the purpose of fire safety. Paint and varnish internal surfaces not worth it: because high temperature they will begin to release toxins. Take care of the construction thoroughly - and the bathhouse will serve you for many years.


