By laser level we mean quite useful device, used in any construction, which allows you to very quickly and at the same time accurately mark the level on any surface. You don't need any skills to use this tool. professional builder– just install the laser level on the floor or wall, turn it on and wait until the device projects lines in accordance with the horizontal or vertical level on the surface to be marked.
However, such a device in stores is not cheap and therefore it is advisable to learn how to assemble it yourself, especially since it will not be difficult.
Design features of laser levels
Visually, a laser level resembles a small device that can be mounted on various surfaces. The most popular methods of mounting the device are through the following elements:
- magnetic element;
- tripod stand;
- special fastening belts.
In addition to the mounting method, construction levels differ in projection laser beam to the surface: constructing a plane or direction. Instruments used to indicate direction create a point projection on the surface. In turn, the levels projecting the plane are equipped with special optical systems that turn the beam into the plane. Today, experts highlight several types of laser levels:
- A rotary type device that is capable of rotating around its own axis to form a clear line. Such a device is produced in a reliable housing, qualitatively protected from various external factors. This product is perfect for any construction project, from pouring the floor to constructing the ceiling.
- A positioning device consisting of two radiating sources allowing the creation of a visible plane. This device is mainly used when carrying out finishing works in room.
- A self-leveling device is a level equipped with internal pendulums and capable of emitting up to five beams. This laser level is additionally equipped with a cross-shaped sight.
The main disadvantage of such universal devices is their relatively high price. The cost of the simplest device is not always affordable; the average consumer is ten times higher than the price of a regular bubble or water level.
The simplest level from a laser pointer
If we consider the price of a homemade laser level, then a person will only have to spend money on buying a pointer. Other structural elements devices can be made with your own hands from scrap materials that can be found in every home workshop. The main task when creating a homemade laser level is pointer mount so that it can rotate freely around its own axis. But first you need to stock up on the following consumables:
- laser type pointer;
- wooden beam measuring 25 by 25 mm and half a meter long;
- construction cord;
- regular electric drill;
- support in the form of a stick for the finished laser level.
To assemble a laser level with your own hands you need perform a certain sequence simple actions.
- In a pre-prepared block, holes parallel to each other are drilled from both edges. One of them is intended for installation laser pointer, and the other for construction cord.
- After the laser emitter is fixed in place, attach a rope, which is designed to suspend the device above the level floor surface. A hole is drilled from the opposite end of the beam so that the cord can pass freely through it.
- A rope is passed into the prepared hole, which is tied to the block and tightened tightly.
- The support can be any convenient stick, including a shovel stuck in the ground.
The main thing is that the support used is securely and firmly fixed. If this rule is neglected, then it will not be possible to set the level correctly.
Checking the functionality of the laser level
 Using a laser level assembled with your own hands from a pointer, you can make markings on any surface, but it is better to do this in low light so that the light beam is clearly visible. To begin marking, the device is suspended with a rope in the center of the room in which the work is being carried out. The homemade level is turned in the required direction and the required distance along the length of the beam is marked, after which a stick is installed on which Convenient marking.
After carrying out such simple manipulations, the level can be directed in any direction where it is necessary to make marks. Moreover, if the position of the support stick remains unchanged, then all marks will be located at an identical height. After marking individual points, they can be connected with a construction cord, along which a marking line can be drawn using a construction meter.
Laser level made of foam plastic and a container of water
To create a laser level of this design with your own hands, you need to prepare a convenient container, a piece of plasticine or a patch, in general, any substance or material with which you can secure the main part. Naturally, you will need laser pointer and a piece of polystyrene foam. The procedure for assembling the device itself occurs in accordance with a certain action plan.

Despite the fact that such laser levels can hardly be called ideal, however clarity of markings quite high and so homemade designs have the right to exist.
Homemade laser cross design
This is another type of laser level that you can assemble with your own hands. This level is very convenient to use when hanging cabinets in the kitchen or paintings in rooms, as well as in many other situations. To make such a simple tool, a person will need video camera tripod, an old player and a couple of unnecessary discs.
- A cross made of laser pointers is mounted on a tripod so that it rotates around its axis. For this purpose, you can use the drive from the player.
- It is also important to ensure that the laser level can move vertically to the required height.
- The discs glued together are installed on the old player drive.
- At the finishing stage, a cross of laser pointers is attached to the discs. To attach it, you can use tape or any other material at hand.
Due to the fact that the device is placed movably on a tripod, it can be rotate in any direction without changing the marking height. Thus, by setting the necessary parameters for marking, you can accurately mark the level on any surface in the room without the need to adjust the device each time.
The main advantages of a homemade tool
 Naturally, you shouldn’t expect a laser level you assembled yourself to perform ultra-precise and complex marking operations. But for everyday use, such a device is quite suitable and will even surpass the factory water level in many ways. Plus, it will be able to provide the following functions:
- sufficiently long beam length;
- minimum level of error with comparative ease of use;
- increasing the speed of marking.
But the main advantage of a laser level is the ability of the device project rays along horizontal plane . Thanks to this, the builder can accurately control the quality of the vertical and horizontal levels when marking wall, floor or ceiling surfaces. In addition to construction, the level can be used for marking personal plot, facade finishing building or erecting a fence.
Therefore, when thinking about adding a laser level to your home workshop, you should not rush headlong to the store to buy an expensive device. With a little ingenuity and dexterity, anyone can assemble a level with their own hands from scrap materials. In this case, the maximum monetary cost will be the purchase of a regular laser pointer.
A laser level is a very useful construction tool, with the help of which you can very quickly and accurately tap the level, spending a minimum of time and effort on it. In order to use it, you do not need to have any special skills or knowledge - just put this device on the floor (or wall), turn it on and wait until the device provokes strictly direct horizontal lines on a specific surface.
However, all this precision comes at a price, and often a lot of money. Therefore, today we will look at the question “How to make a laser level yourself.”
Photo and design of a homemade device
First, let's figure out exactly what parts this consists of. building element. The most important thing in a laser level is a special emitter. If this happens homemade instrument, then its function may well be performed by a cheap laser pointer.

This can be purchased in almost any department. However, the emitter is not all that a laser level consists of. The entire list of materials required for the manufacture of a homemade level implies the presence of a number of elements:
- Laser pointer.
- A simple bubble building level.
- A peg with a round or square cross-section of 50-60 mm and a length of 100-130 centimeters. Here, a shovel holder is quite suitable as a peg.
A piece of thick plywood or board, as well as some foam rubber
Instructions
So, how do you make a laser level with your own hands? At the first stage you need to make an emitter. It, as we noted earlier, should be made from a pointer. The finished element will subsequently project a clear point onto the wall. However, one drawback should be noted here - a homemade emitter, no matter how good and high-quality it is, according to its characteristics, is not able to draw a straight, continuous line on a plane (this requires special lenses, and these are used only in expensive purchased instruments).
In order to make a laser level with your own hands (namely its main part - the emitter), you need to perform the following steps:
- Prepare a simple nozzle (without a picture).
- Cover it with cardboard.
- Punch a small hole in the center of the nozzle.
- Place the device on the pointer.
Thus, when the emitter is turned on, the device will “draw” a clear straight line on the wall in a vertical or horizontal direction.

How to make a laser level with your own hands? On next stage you will need to level the laser itself. To do this, you should take several clamps with which you can secure the pointer to the level. A small piece of porous rubber is placed between the first and second elements. This is necessary so that in the future you will be able to configure and adjust the position and angle of the laser.
We make a laser level with our own hands: we make a stand and assemble the elements of the level
Now let's make a stand. To do this, you need to take two stakes, one of them should be pointed, and the second should be aligned horizontally. Plywood is attached to this platform.
Next, we proceed to assembling the elements of the level. Here, the first thing to do is drive a stake into the ground. If this is a room, it is best to replace this element with a tripod. At the same time, use a bubble level to level the stand horizontally. Place the device on the pad and turn on the laser. At the point where the beam met the wall, a dot will be visible. Make a mark in it, turn the stand a few degrees to the side and place the next mark on the surface. After connecting these two points you will get a completely straight vertical line.
Important point
It is worth noting that you should proceed to drawing this line only after the tool has passed a certain test - laser alignment. This work is carried out each time after installing the stand with a level in a new place.
Stages of level adjustment
Level and set it correctly? This work can be divided into several stages.
- A screw is screwed into the stand so that its head coincides with the laser line. Next, the beam is turned on and the level is aimed at the wall. Another screw is screwed into the resulting point.
- Next, a thin strip is placed between the screwed elements ( metallic profile), on which the level is then placed. The level bubble should be placed in the center of the window. As soon as he indicates the level position, a new mark is made on the wall, and if you connect the head of the screw that was screwed into the stand with the one installed on the wall, you will get a perfectly straight line.
The device is mounted on a stand. In order for the level to work correctly, you must combine the point that is projected by the beam with the new one obtained using the profile. To do this, the position of the pointer is adjusted using clamps, and as soon as the laser points to the resulting mark, you can begin to work.

So, we found out how to make a homemade laser level and how to set it up correctly before work.
Laser level or the level is used in the construction industry and facing works for precise marking on any type of surface. The procedure is easy and quick, which significantly saves time in the work process. The tool may not even be used experienced master: Simply fix the device on a support (floor, ceiling, wall) opposite the marking surface and turn it on. On the surface where the marking occurs, a projection of the laser beam will appear horizontally and/or vertically.
The cost of the presented device in various retail outlets quite high. But, if you use certain instructions, show accuracy and some patience, it is quite possible to make a laser level with your own hands. This approach has a positive effect on saving financial resources that go towards the construction and renovation of various premises.
Device design features
The device is compact and ergonomic. It can be easily placed in a pocket, mounting case or bag. The case is equipped with fastening elements. They may be:
- magnet;
- fastening straps;
- tripod.
The beam projected onto the marking surface is constructed along a plane or in a direction. Construction levels, used to indicate a certain direction, produce a projection in the form of a point. Devices for marking the plane are equipped special kind an optical instrument that turns the beam into a straight line. Levels are divided into types:
- Rotary devices, due to rotation around their axis, are capable of producing a clear line (used when pouring floors and constructing ceilings);
- positional levels consist of 2 laser radiation sources to create a visible plane (used during finishing work indoors);
- self-leveling (can emit up to 5 beams and are equipped with a sight in the form of a simple cross and pendulums located inside the device).
The price of the presented equipment is several times higher than the cost of a conventional level based on liquid and air bubble.
Making a simple level from a laser pointer

Of the entire list of elements of such a level, you only need to buy a pointer. It is quite possible to make the remaining auxiliary parts yourself. The task of the presented process is to build a reliable fastener that will allow the device to rotate around an imaginary axis completely unhindered. The tool consists of the following parts:
- laser pointer;
- wooden beams (length - 0.5 meters, width and thickness - 25x25 mm, respectively);
- cord intended for construction work;
- drill for drilling holes;
- support (an ordinary stick will do).

To assemble the equipment, just follow the simple steps described below.
- The block is drilled on both sides. As a result, neat holes are formed, which must be parallel to each other. One of the holes made will be used to securely fasten the pointer, and the other will fit the construction cord.
- The pointer is securely fixed in the hole and a rope is secured, making it possible to install the device above the floor surface. The hole drilled specifically for the cord must be of the optimal diameter so that the cord can pass through it freely.
- A rope is threaded into the hole that was prepared in advance and secured as securely as possible.
The support should be fixed. Otherwise, it will not be possible to adjust the level correctly. The pointer must be of high power so that the beam can be clearly displayed on any surface. If the presented parameter is insufficient, the equipment will only be comfortable to use in a darkened room.
How to check if a homemade level is working properly

Using a simple rope, the device is suspended from a support in the center of the room. The equipment is turned on, directed in the desired direction, and the required distance along the length of the beam projection is noted. After this, a special stick is installed to ensure ease of marking.
After such important events, you can begin to use the device and point it in any direction. If you leave the position of the stick unchanged, the same height of marks will be ensured. After marking the laser dots, they are connected with construction cord. Next, using a measuring meter, preferably a hard one, draw a marking line.
Level made from a container of water and polystyrene foam

You will need the following items:
- convenient container;
- plaster or plasticine;
- laser pointer;
- Styrofoam.
Before you begin how to make a laser level with your own hands from the presented parts, you need to make sure your hands are clean and dry. If these rules are neglected, the materials will lose the desired properties. Next, actions are performed that do not require particularly large material and time costs. All of them are described below.
- A clean container (a large saucepan, bucket or bowl made of any material) filled to the brim with water.
- A laser-type pointer is attached to a prepared piece of foam. As a nozzle you need to use a regular point. The fastening can be a thick rubber band, plasticine or a clamp. The device should be mounted as evenly as possible, parallel to the mounting surface.
- Select the height required for marking and place a container of water there.
- The pointer, fixed to the foam, is placed in the reservoir.
- Turning on the pointer.
- By changing the position of the device on the surface where the marking is made relative to the axis central view points are indicated. They will be at the same level relative to the established horizon.
The elements must be High Quality and strength. This will ensure the longevity of the equipment. The presented design is far from ideal, but it gives fairly clear marking results. Thanks to this, such equipment is quite popular among budget or private builders.
Making a laser cross with your own hands

This tool is convenient to use when various works facing type and installation of hanging furniture. For this reason, it is not only popular among professionals, but is also often an integral element in the toolkit of the owner of a city apartment or private house. To manufacture the device, the following parts are required:
- laser type pointer;
- tripod from a camera or video camera;
- outdated player;
- several unnecessary disks.

You will be required to follow the steps below.
- A rectangular cross is made from pointers, which is attached to the drive from the player. This ensures free rotation of the tool around its axis.
- Ensuring free lifting of the device to the required height.
- The discs are carefully glued together and installed on the drive from the player.
- A cross made of pointers is attached to the disks. You can use tape or other sticky material.
Advantages of a homemade tool

Although high accuracy cannot provide such a tool, it is quite profitable to use it in everyday life. In any case, the marking will be more accurate, and the process itself is much simpler than when using a water level. It is for this reason that such equipment is in demand among household consumers. TO positive characteristics instruments include:
- long beam length;
- minimum error;
- high marking speed.
The use of the equipment is fully justified for walls, floors, ceilings and other supports of a similar type with any type of surface. Alternative applications include marking the following objects:
- personal plots;
- fence structure;
- facade finishing.
Ingenuity, accuracy and strict adherence to the instructions described above will help to significantly save money and time. Before spending money on expensive equipment, a thrifty person should think about whether it’s worth making the device yourself, saving money? Moreover, its quality and ease of use in everyday life corresponds to an expensive device.
Video on the topic
For many people, repairs have become a very unpleasant, difficult and lengthy process. And construction is simply an impossible task. After all, building this or that object on your own is quite difficult and quite problematic for non-professionals. But with proper time management and a reasonable approach to the selection of tools and materials, as well as compliance with safety regulations, you can save a lot. The most important thing when constructing new objects is to make a perfectly flat horizontal surface. After all, even a slight curvature can not only visually spoil the impression of the renovation, but also cause physical inconvenience, for example, a door that is placed askew.
| http://piknikrai.ru/ |
What is a water level?
To make it easier and simpler various processes were created during construction various devices and devices. For example, water level or construction stapler. And if the first one can be done with your own hands, then it is better to buy the second one. Adviсe how to choose the right construction stapler will help you purchase it. A water level is a device consisting of a long hose and two sealed vessels filled with liquid. His work is based on the principle of communicating vessels, known from school. The water level can also be in the form of a wooden block, in which a cone is soldered in the middle. The air bubble in this flask shows the level. This type is convenient when measuring level on horizontal surfaces. And to measure it on vertical ones, it will be more convenient to use a water level from a hose and cones.
| http://alaskatour.ru/ |
Advantages of a DIY water level
In addition to the very obvious cost savings, such a device has other advantages that are very significant:
- Availability of materials necessary for its manufacture.
- High accuracy and ease of measurement.
- You can determine the ratio of the planes to the horizon if the length is up to 10 meters.
Disadvantages include the sensitivity of water to a decrease or increase in air temperature. It freezes in winter and evaporates in summer. If you change the water to a non-freezing liquid, this problem can be avoided. Also finished products There is a significant disadvantage, their length is limited by footage. If you make the level yourself, you can calculate the required length, ideal for a particular case. If the room is very large, then working with such a device will be very convenient. In addition, the finished device weighs very little.
| http://autoprofispb.ru/ |

How to make a water level with your own hands
Even a child can make a hydraulic level, of course, under the supervision of an adult. To do this, you need the following items: a flexible hollow hose and two transparent vessels. Features of the store-bought product are special flasks. But when working in conditions low temperatures the hose may break off. Therefore, in the process of self-manufacturing, they are replaced with vessels. One of the most important features The water level is the movement of water in the hose. It should move smoothly, without problems. The optimal diameter would be 1 - 1.5 cm. It is important to remember that when exposed to sunlight, the hose may become cloudy, so it will be difficult to see the water level. Self-production water level requires the use of a hose of the required length. Having measured the required length of the cord, you need to cut it. Then attach the vessels to both ends. They should also be marked with a scale in advance. If there are no suitable flasks in the house, then you can use syringes. They need to pull out the pistons, but the markings are already there. Plain water can be used as a liquid. This way you can make a water level quickly and economically. And the ability to independently make a device of the required length will be a pleasant bonus.
Using the level in practice

Back in physics class they showed an experiment with communicating vessels. Therefore, any student can use the water level high school. It is necessary to place one end of the level at the required height, for example at the level of a meter from the floor. And gradually move the second end in the intended place so that the water level in both vessels is at the same level. After finding the optimal position of the fluid, both points are marked. The level is used in the process of many preparatory work, for example, for screeding a floor or installing batteries. Correctly taken measurements will help you get everything perfect the first time, saving time and money. It will be especially important correct use hydraulic level during foundation laying work. After all, the strength, stability and reliability of the entire structure depend on it.
Making your own simple device As a water level, it greatly simplifies the construction process, while at the same time making it high quality.

Expert advice
Prev Next
To Oil paint does not dry out during storage and so that a film does not form on it, place a circle of thick paper on the surface of the paint and “fill it thin layer drying oils
" Polyethylene film, covering a balcony or greenhouse, is protected from being torn off by the wind by a string stretched on both sides at intervals of 10-15 cm."
"To work with concrete mixture it was easier, clay is usually added to it, but clay reduces the strength of the mixture. Add a spoonful of washing powder to it per bucket of water. "
"To prevent the screw, the head of which is hidden behind the obstacle, from rotating along with the tightened nut, you need to throw several turns of thread or thin wire over it and lightly tighten the ends. Due to friction, the screw is held well in place. The ends of the thread can be cut off after tightening."
"You can cut out a birdhouse entrance without a brace. It is enough to split front side boards in the center and cut out half holes with a chisel or hatchet required size, and then reconnect the halves. "
Wooden plugs for screws, they crumble and fall out of the wall. Take your time to cut out the new plug. Fill the hole in the wall tightly with nylon from an old stocking. Using a nail of a suitable diameter heated red hot, melt a hole for the screw. The fused nylon will turn into a strong cork.
"It is not difficult to turn a carpenter's level into a theodolite by equipping it with an aiming device from a slot and a front sight."
"In order for two strips of linoleum to lie end to end, it is convenient to use a self-adhesive decorative film, placing it under the base of the noleum."
"To ensure that the nail goes in the right direction and does not bend when driven into a deep hole or groove, it should be placed inside the tube, secured with crumpled paper or plasticine."
Before drilling a hole in concrete wall, secure a piece of paper just below. Dust and concrete fragments will not fly around the room.
"To cut a pipe exactly at a right angle, we recommend doing this. Take an even strip of paper and screw it onto the pipe along the sawing line. The plane passing through the edge of the paper will be strictly perpendicular to the axis of the pipe."
"Roll over logs or wooden beams A simple device will help - a piece of motorcycle or bicycle chain, supplemented with a hook on one side and secured to a crowbar on the other side. "
"In order for one person to be able to work with a two-handed saw, we recommend using a simple technique: move the saw handle from the top to the bottom position."
You can cut a piece of slate of the required size with a saw, but it is better and easier to punch holes along the line of the intended cut with a nail at a frequency of 2-3 cm, and then break off the slate on the support.
" The best way glue the tile to the wall: take bitumen, melt it and drop just four drops on the corners of the tile. Stuck on dead. "
When making shaped window casings, it is most convenient to cut shaped holes with a hacksaw with a sharpened blade.
"Making stained glass is a long and difficult task. You can make a quick imitation of stained glass. To do this, take thin slats or rods of vines, glue them to a sheet of glass, and then paint the glass and cover it with varnish."
"If you don't have a dowel at hand, you can make one from a piece of plastic tube. The body of a ballpoint pen can also be suitable for this. Having sawed off a piece of the required length, make a longitudinal cut, about halfway, and the dowel is ready."
"It is known how difficult it is to hang a door when working alone. But just shorten the bottom pin by 2-3 mm and the work will become much easier."
"A very durable, non-shrinking and fairly waterproof putty is made from bustylate mixed with any powder - chalk, gypsum, cement!, sawdust, etc."
"If you need to screw into the end particle board screw, drill a hole slightly smaller than the diameter of the screw, fill the hole with Moment glue (not epoxy!), screw in the screw after a day. The plate does not delaminate. However, the resulting connection can be placed under load only after a day. "
"It is more convenient to secure portraits, photographs, paintings in wooden frames with glass not with nails, but with the help of pushpins bent at right angles. The pins are gently pressed with a screwdriver. Compared with nails, the danger of splitting thin frames is reduced to a minimum."
"It is not so easy to screw a screw into hard wood. If you poke a hole for the screw with an awl, and rub the screw itself generously with soap, then after such an operation the work will go like clockwork."
To save time, the edge of the wallpaper can be trimmed with a sharp knife without unrolling the roll. To do this, you must first align the end of the roll and with a simple pencil outline the edge border on the outside. Working with a knife, the roll must be gradually turned in the direction of rolling.
To carry large sheets of plywood, glass or thin iron at home, it is convenient to use a wire holder with three hooks at the bottom and a handle at the top.
IF you need to saw a round stick into the distance, this work is most conveniently done using a template. It is made of a metal tube with a groove in the middle. The diameter is chosen so that the template slides freely along the stick.
It will be better and easier to work with a hacksaw if in the middle part you increase the height of the teeth by 1/3.
If you attach a weight weighing about a kilogram to the front of the bow saw machine, the work will become easier. The load must be made removable so that the saw can be used to perform other work.
"A wax-like coating can be obtained by painting the surface with diluted PVA glue. To obtain the desired color, you need to dilute the glue with water tinted with watercolors."
"Making a cover for an ax blade is as easy as shelling pears. Take a piece of rubber tube, cut it lengthwise and put it on the blade. It is protected from slipping off by a ring cut from an old car camera."
" Avoid using clamps when gluing wooden frames A laundry cord will help. You should put four short loops on the corners of the frame and two long ones to tighten the frames diagonally. The angles are adjusted using sticks that twist the middle loops. "
"How to silence a creaking floorboard? Between the floorboards you need to drill a hole at an angle of 45° with a diameter of 6-8 mm, drive a wooden pin into it, lubricated with wood glue, cut off the protruding end with a chisel and putty on the floor surface."
"To make it easier to sand a floor covered with varnish or paint, iron it with an iron through a damp cloth - and the work will become easier."
"Slight rotting on wood can be eliminated as follows: the affected wood is removed from the healthy layer, and then soaked in a 10% formaldehyde solution. After drying, the area is puttied and painted over."
It is impossible to imagine carrying out any construction and repair work without using a level. Good level- a guarantee of the quality of work performed. It is thanks to the construction level, of course, combined with the conscientiousness of the builders themselves, that the results are perfect. right angles in the rooms, smooth walls, smooth horizontal floors, correctly installed door and window openings. It is impossible to imagine repairs, even basic cosmetic ones, without using a level. The level is used when gluing wallpaper, while laying tiles. However, it is not at all necessary to buy it. Building level easy to do with your own hands.
Types of building levels
A building level is a device by which the vertical and horizontal position of planes is determined. It is thanks to the use of the level Construction Materials, used in finishing and repairs, are installed as accurately, evenly and correctly as possible.

Modern industry offers users building levels for every taste. Various lengths, from different materials. When selecting a device for a particular type of work, it is necessary to pay attention to Special attention on the ease of use and, of course, accuracy.
The following main types of building levels are distinguished:
- Water level.
- Bubble level.
- Laser level.
- Pipe level.
- Magnetic level.
Let's consider each of listed types levels, their disadvantages and advantages in more detail.
Water level
The water level allows you to determine whether the surface deviates from a horizontal position. It consists of two flasks connected to each other by a tube. The length of the tube ranges from 5 to 25 m. A scale is applied to the flasks. The weight of the water level depends on the model and ranges from 300 to 1100 g.
Main advantages of a water level:
- Lightweight and convenient to use.
- Long hose length.
- Low cost.

During the operation of the water level, a number of problems arise:
- When filling the tube with water, do not allow air bubbles to get into it. Air in the tube will cause significant measurement errors.
- Do not use the device near heat sources. Place the measuring device at least 1.5 m from heating devices.
- The device is designed to work exclusively with horizontal surfaces.
- Using a long hose small room not very convenient.
Bubble level
One of the most popular types of building levels is the bubble level. It consists of a solid body with one or more ampoules built into it. Maximum amount ampoules - 3.. They are filled with liquid, usually alcohol. The liquid must contain an air bubble.
The purpose of the device, equipped with one ampoule, is to work with horizontal surfaces.

But with the help of a device equipped with two ampoules, it becomes possible to work with vertical surfaces.
Thanks to the third ampoule, it became possible to display rotary levels.
Most often, bubble levels are made rectangular shape. The range of sizes is very large. The length of the device ranges from 0.2 to 2.5 m. There are models reaching 4 m in length.
The materials for the production of the housing of these measuring instruments are aluminum, wood, impact-resistant polystyrene and many others. The main filler for ampoules is alcohol.
Among the main advantages of the bubble level I would like to highlight:
- High accuracy.
- Ease of use.
- Acceptable price.
- Huge variety of models.
The price range for such measuring instruments is very wide. The cost of the device depends on its size, manufacturer and many other factors. It is not advisable to purchase the cheapest devices. They are neither accurate nor durable. Even if you plan to use the level very irregularly, a professional construction device will become best choice. It is made from more durable material, withstands impacts better, and has the highest accuracy.
When purchasing a bubble level, pay attention to the following points:
- The flasks must stand very firmly. Wobbling is unacceptable. You should not choose a model with fastening the flasks with screws. Opportunity self-adjustment brings only unnecessary worries and problems to the consumer. The adjustment goes wrong almost immediately. You have to configure it again. The best option- tightly mounted flasks.
- The divisions on the flask should be clear, the bubble should be clearly visible. The smaller the gap between adjacent divisions, the more convenient it is to work with the device.
- It has long been noted that the heavier the bubble level, the more accurate it is. When choosing a tool, pay attention to models whose body is made of aluminum.
- The most popular among consumers are models made in the shape of the letter “X” and equipped with rubber handles. Their ease of use has been repeatedly noted.
Magnetic building level
One type of bubble level is a magnetic building level. Its main difference is the presence of special magnetic fastenings. Thanks to them, the level can be easily attached to metal surfaces. It doesn't fall or slide.

Pipe building levels
Another type of bubble level is the pipe level. Distinctive feature pipe building levels - small size and weight. As a rule, they are made in the form of a rectangle. A less common option is folding pipe levels. The main area of use is working with profiles and pipes.
For reliable attachment to the pipe similar look measuring instrument equipped with additional accessories:
- Magnets.
- Perforated tape.
- With a cord.

Laser level
A laser level is a small device that can be attached to any surface. Among the most popular types of fastening I would like to highlight:
- Magnets.
- Tripod.
- Fastening with straps.
There are laser levels used for the purpose of constructing a direction and constructing a plane. The level designed to build a direction simply picks off points. But the device for constructing a plane is equipped with an optical system that turns the beam into a plane.
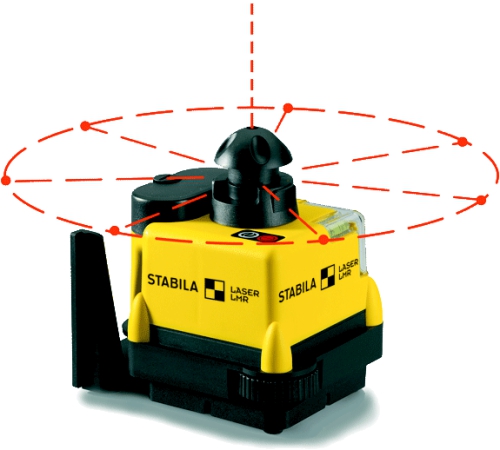
There are several types of laser levels:
- Rotary. This device rotates around an axis. This creates a line. It features a very durable body and good protection from external influences. Perfectly suitable for many repair work, for example, for installing suspended ceilings.
- Positional. Two radiation sources allow the formation of visible planes. The main application is finishing work.
- Self-leveling. The laser level is equipped with an internal pendulum that emits five beams and a cross-shaped sight.
Main advantages of a laser level:
- High range. Some models operate at a distance of 100 m.
- Highest precision.
- A number of models are equipped with cross lines.
The main disadvantage of laser levels is their very high cost. The price of the most ordinary and very unpretentious laser level is the same as the cost of a professional bubble device.
How to make a water level with your own hands
Most simple variety level - water level. And it’s very easy to do it yourself:
- Take two 20 ml syringes without needles and a thin hose of arbitrary length. An ordinary dropper is perfect as a hose.
- Remove the plunger from one syringe and connect it to one end of the hose.
- Prepare liquid to fill the level. Use ordinary liquid as liquid. tap water, slightly tinted with tea leaves.

- Using a second syringe, fill the system with liquid. Not only the hose must be completely filled, but also the first syringe.
- Remove the plunger from the second syringe, having previously connected it to the hose. The water level is ready. This is a liquid-filled design of two syringes connected to each other by a hose.
The device operates on the principle of connecting vessels. To mark a horizontal surface you must:
- Measure and mark the desired height on one of the walls.
- Apply one of the syringes to the mark so that the water level coincides with the mark. Secure the syringe to the wall with tape. When working together, there is no need to attach the syringe; a partner will hold it.
- Apply the second syringe to the walls and note the water level. All received marks will correspond to the same level above the sea surface. When they are connected, you will get an ideal horizontal surface.
When storing a homemade water level, the syringes are closed with pistons.
The main advantages of using a homemade water level are:
- Low cost of the device.
- Ease of manufacture.
- Ease of operation of the device.
How to make a laser level with your own hands
The purpose of using a laser level is to mark a plane, both vertical and horizontal. They are indispensable in the process of pouring the floor, during installation interior partitions, laying tiles, gluing wallpaper and many other works. Even for evenly arranging furniture, a laser level will come in handy.
There are two ways to make a laser level with your own hands.
First manufacturing method:
- Take a laser pointer. Seal the hole in the nozzle with a piece of cardboard. It is better to take a nozzle without a pattern. Pierce the middle of the nozzle small hole. Attach the attachment to the laser pointer. Turn on the pointer and point at vertical surface. If a small bright dot appears on the surface, everything is done correctly.
- Take wooden block. Its length is about 130 cm. Using an ax, trim one end. The result is a stake pointed on one side.
- Take flat piece plywood or boards. The shape of the piece is square. Side size 10 cm. Attach to the flat end of the peg.
- Use a screw or nail to attach the strip to the center of the plywood. The length of the bar should match the length of the bubble level. The bar should be able to rotate in a circle.
- Attach a bubble level to the bar.
- Place a piece of thick rubber on the level. Attach the laser pointer to the rubber using a clamp.
- The device is ready.
The method of using such a laser level is as follows:
- Place a stake on the site. Level it using bubble level. At correct installation The level bubble is in the center and does not move when the bar rotates.
- Turn on the laser pointer. Mark where the beam is reflected on the wall.
- Rotate the bar and mark other points where the beam hits the walls. All received marks lie on the same horizontal surface.
Let's look at how to make a level using the second method:
- Take a small container and fill it to the brim with water. This can be a basin, a bucket or a regular pan.
- Attach a laser pointer to a piece of foam. Use a nozzle without a pattern, in the form of a dot. Try to keep the pointer lying flat on the foam. You can attach it using an elastic band or a clamp.
- Place a container of water at the height required for marking.
- Dip the foam into the water.
- Turn on the laser pointer.
- Rotating the foam around its axis, mark the points of intersection of the laser beam with the surfaces. The resulting marks are on the same horizontal surface.
Of course, the homemade levels considered are far from ideal. However, they are quite functional.
How to make basic instruments for determining horizontal and vertical
- The most basic device for checking verticality is a plumb line. It is widely used during renovation, for example, in the process of wallpapering: Take a small, heavy object. A fishing weight is perfect. In a pinch, even scissors will do.
- Tie a thick thread or fishing line about 2 m long to the weight. The length of the thread depends on the height of the room.
- Place the end of the string against the top of the wall, releasing the weight. The load must not touch the floor.
- Use a pencil or marker to make marks on the wall along the stretched thread. As a result of connecting the marks, a perfectly vertical line is obtained.
Checking the horizontal surface is also very easy:
- Take the most ordinary wooden isosceles triangle.
- Drill a small hole in the top opposite the base.
- Attach a thread or fishing line with a weight to the hole. A lead fishing weight is ideal as a weight.
- Mark the middle of the base of the triangle with a line.
- Place the base of the triangle on the surface to be tested so that the load falls freely down. The coincidence of the thread with the line on the base means that the surface is horizontal.


