Home minibar, like wine cellar at home, this is often not a whim, but a necessity for hospitable hosts who often have guests. It is also worth equipping for true connoisseurs of high-quality alcohol, because the nearest bar does not always have really worthwhile examples. The compactness and at the same time spaciousness of the minibar is its main distinguishing feature.
Why do you need a minibar in the house?
When you hear the word bar, many people imagine a huge stand with high chairs and the entire wall with all kinds of alcoholic drinks. Naturally, there is no point in equipping something like this in a home, and besides, there won’t be enough space. A home minibar for drinks is compact furniture for storing alcohol reserves, and it is often styled to resemble familiar or not so familiar objects in the house. It could be a globe, a barrel. Transformable bars can be turned into a mini stand with a slight movement of the hand.
The models presented in stores are often comfortable low tables on wheels or shelves up to 1.5 m in height. They have special shelves and holders for glasses.
Reasons why you should get a minibar:
- It is compact and most can be easily moved. This allows you to put it even in, without sacrificing useful space.
- The cost is low, even if you buy the materials and assemble a suitable bar for yourself.
- It decorates any home. Brings a touch of originality to the design.
- This alcohol storage system frees up a lot of space in and out, as it is designed specifically for storing bottles, and has suitable shelves for this.
- The presence of such an attribute in the design will give functionality to the interior and will certainly decorate it.
- It symbolizes the richness of style and emphasizes the image of the owners, because ordinary vodka is not served in such bars; it is often something more refined and more expensive.
Once upon a time, bar counters were used only for their intended purpose: to sit down and have a drink in a drinking establishment. Somehow they migrated to the kitchen and took root there. It turned out to be a very convenient detail, especially since it has undergone noticeable changes and the modern bar counter for the kitchen has varied design. Its options may vary greatly in design and style, and functional purpose it may be different for them too.
Purpose and types
If the kitchen area allows, a bar counter is placed in the kitchen for its intended purpose: to sit down for a cup of coffee or something stronger, or to have a snack. Then its “equipment” is appropriate: holders for glasses, wine glasses, glasses, next to it is a shelf/holder for juices, bottles, etc. They place it with one edge resting on a wall or edge, sometimes they place it in the form of a skeleton - in the middle of a free zone.
On small kitchens it is often multifunctional. It can also be used as a divider into zones - dining room and kitchen; in very small areas it is often used as dinner table. Moreover, it can be located non-standardly - against the wall.

In medium-sized kitchens - 10-12 meters - it is often made in the form of a peninsula - a small protrusion on the side. In order to more rational use The space under the countertop is occupied by shelves or a cabinet. This design is very simple - the bar top is often supported by several pieces of straight or inclined pipes fixed to the cabinet table.

Bar counter in the kitchen - peninsula
Similar multi-stage kitchens in Lately became popular: different operations in the kitchen it is more convenient to perform on surfaces with different heights.


But, nevertheless, more often a bar counter for the kitchen is present in studio apartments to delimit two zones: or from the hallway - who has something combined. Moreover, it is often a continuation of the desktop island or peninsula.

They also make it in the form of a partition. In this case, the base is most often made of plasterboard, and a surface is “attached” to it - from above or to the side.


In general, options, variations and different types a lot of. You adapt the idea that you like to your conditions, and you can begin to implement it.
Dimensions and dimensions
There are no strict rules in this regard. There are some recommendations that are violated in about half of the cases. The recommendations relate only to the height and width of the tabletop:
- The height of the bar counter is usually 1.1-1.2 meters. Then special high chairs are placed next to her.
- The width is at least 30 cm, optimally 50-60 cm. You shouldn’t go less than 30 cm: even a small plate on such a tabletop will be in danger. And it’s just inconvenient: you can’t put your elbows down, you can’t really lean on your elbows.
The length, shape, number and shape of the legs are all at your discretion. Speaking of legs. The traditional counters that were in drinking establishments are a table top on a cabinet. But for a kitchen, for some reason, a tabletop with one pipe from floor to ceiling is considered a “classic”.

By the way, in this form it is practically not used anymore. More functional analogues with cabinets and cabinets predominate.
Bar counter for the kitchen: stages, manufacturing methods, photo reports
The simplest option to implement is the classic one: a tabletop attached with one edge to a wall or furniture, and the other resting on a pipe. There are options with the tabletop:
- Make it from a wide board, preferably not coniferous- their wood is too soft.
- Order from the same company where you made it kitchen set. If you bought a ready-made one, you will have to look for similar material from a photo or carry a small spare part with you to workshops to demonstrate what you need.
- Make it out of thick plywood, then decorate it with something - stick on plastic, tiles, mosaics.
Everything else is better to choose in a store selling furniture fittings. The choice is very wide, and the range of prices is absolutely amazing. For example, a pipe of the same diameter can cost three times more. But this difference is not without reason. With cheap Chinese pipes/grids/baskets, the chrome plating begins to flake off after some time. German fittings have a very high price tag, but have a lifetime guarantee; Poles are in the middle in both price and quality. The choice is yours.

The photo above shows a homemade bar counter made from a thick board. It rests on one side on a shelf attached to the wall (also made of inch boards). Second support - traditional trumpet. A hole of suitable diameter is drilled in the body of the tabletop for the pipe. A “fastening ring” stop attachment is installed on the pipe under the table top, and the hole is closed on top with a decorative ring. There is also a “thrust bearing” or universal fastening of the pipe to the floor and ceiling, as well as various holders and shelves for it.
If the tabletop is attached directly to the wall, corners are usually used for these purposes. You can take reinforced ones, and choose the color based on the finish. But this type The fastener is installed so that it is not visible - stepping back from the edge a few centimeters. You can put several small corners, or one solid one.

If you decide to make a bar counter in the kitchen along the wall, you can use decorative brackets for shelves. Their load-bearing capacity should be enough for a tabletop, especially since you can put several of them. An example of assembling a bar counter of a simple design with a pipe in the photo below.
Photo report No. 1: homemade stand made from tabletop and pipe
The tabletop was cut out from a window sill (solid wood), the edge was rounded, sanded, tinted and varnished. Spare parts - bar leg, brackets and a fixation to the floor - were purchased in the furniture fittings department.

We screw the stop to the tabletop and the corners to the edge. Everything sits on self-tapping screws with a flat head. The work takes about 7 minutes.

Having placed the assembled stand against the wall, mark on the wall the places where dowels need to be installed. We trace the pipe on the floor with a marker: we will set the thrust bearing according to this mark. Using the marks, we mount the support for the rack and install dowels in the wall.

We put the stand in place and secure it with screws. All. Ready.

Bar counters with shelves
If you don’t like the design with the pipe, you can do without it, but you’ll have to remove it top part, which is located under the ceiling. Instead of a leg, for example, you can make the same shelf as near the wall. The look will immediately become more dynamic and modern.

And in general, the entire structure can be assembled from wide boards, joining them at right angles. Looking at the photo below, you will understand what we are talking about.

Bar counter for kitchen in modern style(for minimalism and high-tech too)
IN modern interiors In general, broken lines fit better. If the kitchen is in the style of minimalism or high-tech, then it is difficult to fit the classics there, but something consisting of broken lines will look very good (several sketches in the picture below).

A slightly more traditional version is shown in the photo. This didn't make him any less interesting. A non-standard approach, even in small doses, significantly changes perception.

Bar drain-table option
Bar counter on base
We considered all these options without reason. But the tabletop can be attached to some kind of cabinet. If the tabletop is located exactly above the table surface, we take a pipe and standard fasteners to horizontal surfaces. If, as in this case, the surface of the bar counter is offset, there is a special inclined fastener.

Attaching the tabletop to the cabinet is easy and simple
You can make a cabinet yourself. Actually, the main thing is to assemble the frame. It can be covered with furniture plywood or some other finishing material- it depends on the style of your kitchen. The frame can be made from wooden (dry) slats, or you can weld a metal corner.

An alternative is to assemble it from plasterboard profiles and sheathe it with it or with gypsum plasterboard. Another option is to build a brick base. But this, if it allows load bearing capacity ceilings

With a plasterboard base: photo report No. 2
Often a plasterboard base is chosen. The material is inexpensive, the technology has been tested, the mechanics are familiar, and the result is at least good. There is no news regarding the order of work: we are assembling the frame. In this case we used wooden blocks, but it’s also possible using profiles.

The main thing is to maintain vertical and horizontal planes, place the racks exactly at 90°. Everything is checked good building level, it is better to track verticality with a plumb line: it has no error. When the frame is assembled, it is sheathed on both sides with plasterboard or gypsum board.

We fill the marks from the screws, corners and joints with putty. Then it depends on the chosen type of finish: some require putty (painting with water-based emulsion), others do not. In our case, we chose textured paint, it is applied in a thick layer, and can be done directly on drywall.

All that remains is to install the tabletop on the bar counter. Choose which one matches the rest of the furniture in your kitchen.
Photo report No. 3: Bar counter with sink
This was the first experience in creating furniture (and anything worthwhile in general) with my own hands; as a result, some design flaws were made. The design was not the most successful, although there is no arguing about tastes.
Source materials:
- inexpensive countertops bought on sale;
- remnants of a cabinet from ;
- bars;
- a couple of additional doors purchased;
- plumbing filling: sink, siphon, mixer and the required pipes, hoses, fittings.

Tabletops are folded in the letter “L”, connected by steel plates, sidewalls are attached
On the floor front side The tabletops are laid down. They are connected in the shape of the letter “L” using glue, which coats the ends and a steel strip with perforations into which the screws are screwed. The strip, of course, is fixed at the bottom.
The sides were supposed to be refined (presumably with laminate), so the remains available on the farm were used - old door and a piece of cabinet. They are screwed using corners, aligned along the edge of the tabletops. And this is the first mistake. And visually such a cabinet looks heavy, and it’s uncomfortable to sit on. The sides must be moved from the edge by at least 10 cm.
After the sidewalls were installed, the cabinet was turned over and placed on permanent place. All other work was carried out on site. A hole for the sink was cut, the plumbing was installed and connected.

Slats are nailed along the floor - along the walls and slightly retreating from the outer edge (an indentation of 5 cm is made, 10 cm is more convenient), shelves are made. The cabinet on the sink side is closed with a door, the shelves on the left remain open. The space is partially finished with wooden slats.
At first they thought of putting several different “bells and whistles” on the pipe, but semicircular edges remained from the tabletops. It was decided to use them on the pipe. As exterior finishing cabinets used panels for decorating balconies (purchased in Leroy). They almost fit, and the remaining gaps were closed with a twisted cord. See the photo below for what a homemade bar counter with a sink cabinet looks like as a result.

There are also some comments on finishing. First, the cord will soon be saturated with various liquids, will have a pale appearance and a strong “aroma”. To delay the appearance of the smell, you can cover it with something, even the same PVA glue. Secondly, the tabletops are simply joined together. Water will get into the gap and various small debris will accumulate. Even at the “joining” stage, the edges must be coated with sealant (transparent, silicone, not acrylic). You can and should also process the edges of the cutout for the sink. Then the tabletop will not swell. The joints of the countertops can be finished with furniture pads, and the same or similar ones can be used instead of a cord. More a budget option — plastic corners and the same T-shaped strips.
Bar counter for the kitchen on the remains of the wall
If the kitchen is combined with a balcony, a piece of the wall remains. The place where the window used to be. If you don’t want to destroy it, you can make a bar counter.

There are two options:
- Place the tabletop at the existing height. This will be another one working surface or shelf. Above it, on the pipes at a height of about 1.1-1.2 m, secure another plane, which will actually be the bar counter.
- Add/extend the wall to required height and install the countertop.

Both options are good, but the one in the photo on the right is more practical: two surfaces in the kitchen are always better than one. Please note that the dimensions of the tabletop are larger than the width of the “leg”. This is no coincidence: this way you can sit more or less comfortably without turning sideways.
And if you’re not too lazy to remove this wall, you can make something more convenient - so that you can put your feet up. An example is in the photo.

Photo design ideas


Desktop as a basis


Bar counter made of brick or stone - stylish


Video on the topic
If you want to place the bar counter open, you can borrow the idea from this video. The guy built an interesting stand using driftwood and a thick board found in the forest.
Most often questions arise about how to make a countertop for a bar counter. You can decorate it with mosaics. And how - look in the video. In general, the technology for laying mosaics is simple: using special glue white followed by grouting the joints between the tiles. It can be difficult to create an uneven edge. Here's how to do it - watch the video.
Tabletop glued from bars
It is convenient to store bottles of your favorite wines, and glasses and necessary accessories will always be at hand.
Don't be intimidated by the apparent complexity of making this stylish project. Hull structures and drawer are simple and will not cause difficulties, and thanks to the templates for forming the legs and the simple technique of sawing out the holders, you can quickly get the job done, and you will have several reasons for toasting at once.
Start with the body
1. Cut out the side walls from 19mm plywood lined with cherry veneer A, top panel and shelf IN, as well as the bottom WITH according to the dimensions specified in the “List of Materials”.
2. On inside side walls A cut grooves and folds 19 mm wide and 10 mm deep (Fig. 1) for inserting top panel and shelf IN. Then, on the same side of both side walls, cut a 6x10mm fold along the back edge to insert the plywood back wall I.
3. Cut racks from a 19 mm thick cherry board D. Mill a 6mm wide chamfer along both edges on the front side of the posts, not extending 50mm to the ends. How to do this carefully, avoiding chipping, is described in the “Tip of the Master” on the next page.
When milling partial chamfers, avoid burns
Surely you have already encountered chips and burns when milling incomplete chamfers. Chipping usually occurs when you try to rout an entire bevel in one pass. Burns occur when the rotating cutter becomes stuck in one place, so it is necessary to quickly move the workpiece away from the cutter at the end of the pass. There is an easy way to avoid these problems. Having placed the workpiece on the edge and resting its rear end against the stopper, move it towards the cutter with a rotating motion, as shown in (left photo below). Without worrying about chipping or burning at the end point, mill about two-thirds of the bevel length. Then turn the workpiece 180° with its ends and turn it face down so that the partially chamfered face is facing the longitudinal fence (right photo below). Mill again, finishing the pass on the already finished area.

4. Glue the posts D to the side walls A (Fig. 1), aligning the ends and external sides. Once the glue has dried, sand the parts using 220 grit sandpaper.
5. In the top panel IN make a pair of mounting holes, countersunk from the bottom, and two slotted holes (slots) 4x10 mm for attaching the cover G (Fig. 2). To form each slot, drill a series of overlapping holes.


Insert a spacer between the D posts and press the bottom with the C/E/F pads against the body, aligning it in the middle.

Using a 4mm pointed drill bit, mark the centers of the holes in cover G through the slots and mounting holes of top panel B.

Tackle the foundation

Drill overlapping holes to make sockets 32mm long by 14mm deep on two faces of each piece as indicated on the template.
1. Glue two blanks measuring 38x51x240 for the legs J. Each piece will make two legs.
2. Make two copies of the leg template. Using spray adhesive, attach them to the blanks by bending them along the fold line. Install into the chuck drilling machine drill with a diameter of 6 mm and form sockets 32x14 mm in the places indicated on the template (photoD). Then use a sharp chisel to level the walls of the nests and trim the corners.
3. Saw out the legs along the contour lines using band saw and sand, but do not separate them. Insert a rounding cutter with a radius of 3 mm into the collet of the router installed in the table and process the workpieces on both sides as indicated in template And rice. 1. Sand the workpieces smoothly.
4. Using a saw machine, using a crosscut (angle) stop with a wooden pad and an end stop-stop that ensures the parts are the same length, saw off two legs 114 mm long from each workpiece.
5. You are sawing the drawers TO. Using a groove disk, form 6×13 mm tenons at the ends of the frames that fit snugly into the sockets of the legs (Fig. 1 And 1a). Before sawing tenons on parts, check the settings of the sawing machine on scraps of the same thickness. Having cut out the cheeks of the tenons, place each drawer on a narrow edge and reduce the width of the tenons to 32 mm.
6. Install a standard 3 mm thick blade into the saw machine. Make a couple of shallow cuts on the top side of each drawer (Fig. 1a). The cuts will serve as traps for excess glue when attaching the base to the body. Sand the sides smoothly.
7. Dry assemble the base by connecting the drawers TO with legs J, and make sure the parts fit exactly. Then glue the base (photo E).

Glue legs J and drawers K together, aligning the pieces along the top side. Check the squareness of the base by measuring its diagonals.

Glue the J/K base to the bottom of the C/E/F body, lining up the side gaps. The legs J should be flush with the back of the cabinet.
8. Place the case on the floor with its bottom upside down. Apply glue to the upper edges of frame K between the cuts. Level the base J/K on the body and secure with clamps (photoF).
Now make a drawer
1. First, cut out the front wall from an 18 mm board L, and then sharpen the workpieces to a thickness of 12 mm and cut out the back M and lateral N the walls of the box.

2. Install a 6 mm thick groove disc into the saw machine. Then form grooves, tongues and folds (Fig. 3; 3a And 4). For sawing tongues at the lower edge of the front L and lateral N walls, make two passes with a standard 3 mm saw blade to precisely adjust the width of the tongue for inserting the plywood bottom ABOUT.

3. Insert a 45° chamfer cutter into the collet of the router installed in the table and make chamfers 3 mm wide along the edges and ends of the front wall L from the front side (Fig. 3). Then drill a 5mm hole in the center for the handle mounting screw.
4. Cut out the bottom from 6mm plywood lined with cherry veneer. ABOUT. Sand all the drawer parts. Glue the front together L, back M and lateral N walls, aligning the upper edges of the parts, and secure the gluing with clamps. Make sure it is square and not distorted. Then insert the bottom into the tongues ABOUT without gluing it, and secure it with 20 mm long finishing nails, driving them into back wall.
 5.
Cut out guide rails from a cherry board R and emphasis Q. Insert the slats into the body (without glue), pressing them flush against the side walls A and racks D. Slide the drawer into the opening to check that it moves smoothly. If it gets stuck, lightly rough the slats with a plane or sandpaper. Once the drawer opens and closes smoothly, glue the slats in place.
5.
Cut out guide rails from a cherry board R and emphasis Q. Insert the slats into the body (without glue), pressing them flush against the side walls A and racks D. Slide the drawer into the opening to check that it moves smoothly. If it gets stuck, lightly rough the slats with a plane or sandpaper. Once the drawer opens and closes smoothly, glue the slats in place.
6. Temporarily attach the stop Q to the shelf IN flush with its back edge, aligned in the middle of the width. Slide the drawer into the frame opening until it touches the stop. At the same time, the front wall E the drawer should protrude 3 mm beyond the lining N shelves (Fig. 5). If it protrudes further, reduce the width of the stop to the required width, and if less, then install a drawer with a protrusion of 3 mm and glue the stop to the shelf, placing it close to the back wall M box. Remove the drawer from the housing.
Add glass holders
1. Cut out the middle and outer holders from the cherry board R, S. Using standard saw blade make folds 38 mm wide and 12 mm deep in two passes (Fig. 2). Then file a 3 mm wide chamfer at an angle of 45° on the longitudinal edges of the holders. (Formation of folds and chamfering is shown in photo us. 20.)
2. Make chamfers 3 mm wide along the front ends of the holders R, S using a file (Fig. 2).
3. Drill into the holders R, S mounting holes and countersink them from the bottom. Holes in the outer holders S make the floor an 8° angle (Fig. 2a). Sand the holders.

Pressing the middle and outer holders R, S with clamps and inserting spacers 27 mm wide, drill guide holes in shelf B and screw in the screws.
4. To install holders R, S turn the body over in place and place it on blocks made of blocks to make it easier to work with clamps (photoG). From a scrap of 19mm board, cut a 27x305mm strip and saw it crosswise into 45mm lengths to use as spacers. Place the holders on the underside of the shelf B flush with its rear edge and install 27 mm wide spacers between them. Secure the holders. Drill guide holes in the shelf through the mounting holes of the holders and screw in the screws. To simplify further finishing, remove the screws and holders, marking their positions, and set them aside.
It's time to make shelves for bottles
1. Cut shelves from 19mm plywood lined with cherry veneer T and partitions U. Then sharpen the cherry wood to the thickness of plywood and cut out the edge trims from it V,W for shelves and partitions.
2. Same as on the sides TO, do along the top edge of the partitions U two shallow cuts that serve as glue traps (Fig. 1).
3. Glue the edge trims V to the shelves T, and the linings W to the partitions U, carefully aligning the parts, and sand after drying. Then glue the partitions U/W to the bottom of the shelves T/V, aligning the parts along the back edge. (At the front, the shelf should protrude 6 mm beyond the partitions.)
Finishing
1. Additionally sand all areas that need it with 220 grit sandpaper and thoroughly remove dust.
2. Apply stain if desired, followed by clear coat. (We used Varathane Premium No. 245 Traditional Cherry stain and semi-gloss polyurethane varnish Aquazar on a wave base with intermediate sanding with sandpaper No. 320.)
3. When the varnish is completely dry, reinstall the glass holders R, S. Then attach the back panel to the cabinet using 3x16mm countersunk screws. Attach a knob handle with a diameter of 32 mm to the front wall of the drawer using a screw. To make the box move smoothly, apply to its side walls. N and guide rails R thin layer paraffin Insert the drawer and shelves into the cabinet. Now fill your cabinet with your favorite wines and glasses, uncork a bottle and celebrate the completion of your next project!

Leg template


A home minibar is an integral part of the furniture, especially in a home where guests often visit. It stores the alcohol that you are already used to. Since it is not always possible to purchase the required type in the nearest stores.
The minibar is characterized positively due to its small size.

Functionality
For most people, the word bar evokes an association with something big and bulky. Pictures of large and tall counters with glass shelving, which are usually installed in restaurants, immediately pop into my head.

This option cannot be implemented in apartments. In residential premises you need to install compact furniture for storing alcoholic beverages.

Many people choose a minibar, which looks nothing like storage for drinks. They can look like a regular bedside table, a barrel or a globe. All of them easily and quickly turn into a small stand.


Most models are no higher than 1.5 meters in height, and their weight is not too great. They make niches for bottles, as well as special devices who hold glasses.


Minibar benefits:
- Small size, which gives such furniture mobility. Because of this, it can be installed in apartments of any size.
- Their price is not too high, which makes it possible for any citizen, with any income, to purchase it.
- This piece of furniture will decorate any interior. Emphasizes the wealth of the owners.

Characteristics
The appearance of the minibar depends on the style chosen in the interior of the room. The bar should fit perfectly into the overall design.

To install a bar, you do not need additional space, you do not need to remove anything from the room.

However, you should not place it under hanging shelves. Because it's not safe. There is always a risk of the shelf collapsing, which can damage the bar. And all alcoholic products are produced in glass bottles. Their fragments can cause injury to others.

Types of minibars
- Open are racks or shelves where all alcoholic products are on display. This furniture is similar to what is installed in cafe bars, but is small in size.
- Closed. The same racks, but have doors. This type is considered the safest if there are small children in the house.
- Portable. This is a mobile version of a minibar, which is produced on wheels. This makes them easy to move from place to place.

Location of the minibar in the interior
The overall atmosphere of the room depends on how and where the structure is placed. The ease of use also depends on it.

Here are examples of the most appropriate location options:

For the Art Nouveau style, bars are made floating. The play of light is important here.

For convenience, the bar is installed between the living room and the kitchen area. It’s extremely convenient when there are a lot of guests and you find yourself in two places at once.

You need to consider what kind of alcohol you plan to keep in the bar. So, for example, wine cannot be stored in a room where there is high humidity, a lot of sunlight and too warm. This will spoil the wine. Ideal place There will be installation of a minibar in a closed closet.


The minibar is the face of the owners. It is important to follow the rules for storing all alcohol, as it tends to spoil if stored incorrectly, which will lead to the fact that you may be left without high-quality alcoholic products at the event.

A minibar will allow you to look like a cordial and hospitable host in the eyes of your guests. It can store completely different drinks for every taste. And there are a lot of design options for such structures.

Photo of a home minibar


If you are a wine enthusiast and you already have some... a large number of bottles of wine, then you need to find a place to store them. An original wine rack in the dining room, kitchen or even living room will give the interior even more organic decorative element. You might prefer to go with a wall-mounted shelf, while others opt for floor-standing cabinets, which are ideal for those who don't like running to the store every time they need a bottle of wine. A wine rack is a functional element in your home, but that doesn't mean it can't also be decorative. The selection of wine shelves is rich, but their prices are also steep. Do interesting shelf and DIY wine bottle storage for less. Not everyone loves wine, but let's face it, almost every home has a bottle or two in it, gifted for some special occasion. Therefore, if you want to save these gifts for certain holidays, then you should store them properly. Keep your favorite wines within reach for dinner parties and special occasions with one of these thoughtful wine racks. Next 18 ideas homemade shelves You will definitely need them to create an original and functional wine rack. Take a look and make your choice!
1. Old board and several cast iron bolts from the railway
Ideal for storing large bottles. It will fit both into the living room and kitchen interior.

2. A unique wine rack that will decorate the wall
Another one good idea wall shelf for wine

3. Modern wine rack
This shelf is ideal for the dining room or kitchen, on which you can store your favorite wine collection

4. Rustic shelf
This shelf will save space. Simply find the nails and remove part of the fence.

5. Stylish shelf
It will save space and add style to your living room.
6. Curved shelf
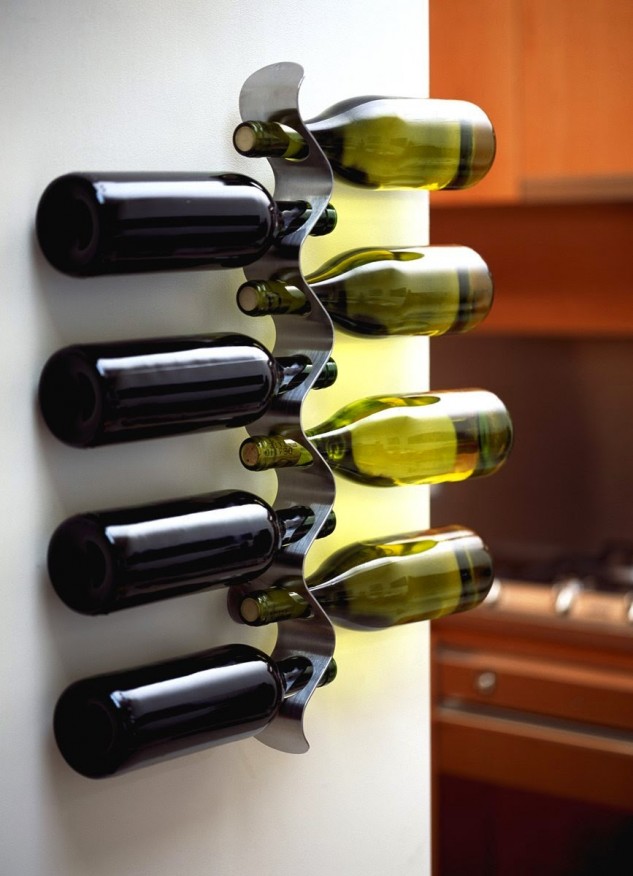
This small piece of aluminum can hold your bottles perfectly. In addition, it takes up so little space.

7. Industrial style shelf
This wooden frame with pipes adds character to the interior

8. Another industrial style shelf
Make a new wine rack out of old pipes

9. Unusual shelf made of pipes
An unusual, but very practical shelf that will also save space

10. Wall table with wine bar
Nice bar under the table. Great way store wine bottles without wasting space

11. Shelf made of cylindrical building blocks
Ideal for a rich collection, it will become your personal bar, which will give you the freedom to choose your favorite drink without leaving home

12. Wooden shelf with leather straps
Another original one, but cheap way make a shelf

13. Acrylic shelf
A unique shelf that will add even more elegance to the interior

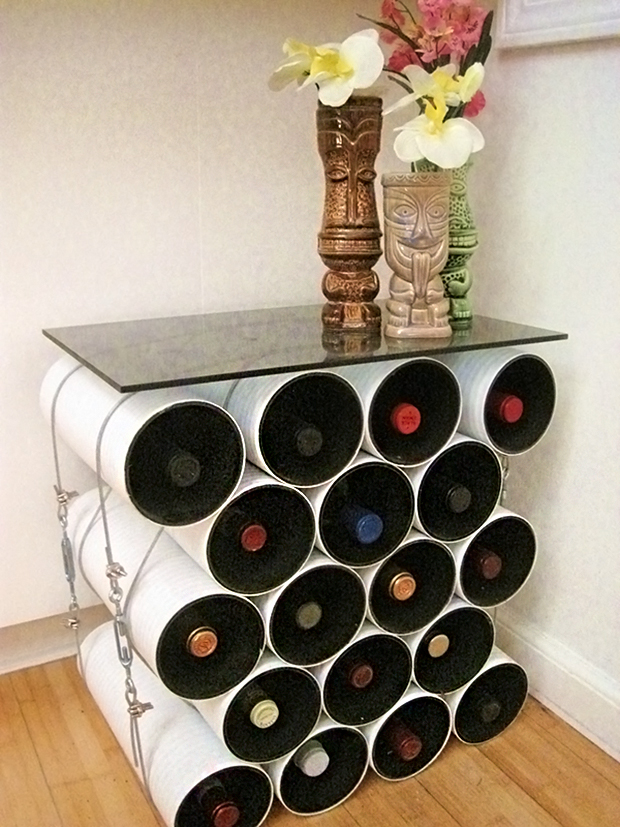
14. Shelf made of cardboard tube used for postal shipments
This charming shelf is suitable for the kitchen or living room, because it does not take up little space.
15. Table-cabinet made of pipes
Use yours Creative skills, make such an original table-cabinet from polymer pipes

16. Minibar made from a wheel
This shelf will also decorate the interior of your home.

17. Wooden box shelf
Take wooden box and simply drill holes of the required size

18. Barrel shelf
Recycle a wine barrel by punching holes in it and turning it into a stunning wine rack


