This kind of useful furniture like do-it-yourself wood table Is not only a way to save money or show others your carpentry skills. First of all, such a home or is an opportunity to make a thing that is ideal for the tasks assigned to it, both in size and in configuration, in material and strength. And, if everything is done according to the instructions and recommendations of the masters, then making a new table will not be much more difficult than assembling a finished one, brought in a box from the store.
How to make a wooden table with your own hands
Before disassembling specific items and recommendations for how to make a wooden table with your own hands, it is worth deciding whether you need to get a wooden product at the output and what exactly its design will be. Ideally, such a texture is suitable for, because the naturalness and environmental friendliness of wood is perfectly combined with the dacha concept.
But even in city apartments, especially in those whose design is solved in the Provence, rustic, Scandinavian styles, small wooden, as if deliberately aged tables, fit perfectly. Yes, and a loft or other modern varieties cannot do without a wooden texture, however, rather, board pallets can act as the main material there. This type of furniture is more likely to be spoken of as about, since its assembly resembles the assembly of a designer. If you want just such a coffee table, then keep in mind that the pallets must first be dried well (so that they do not change their shape, they are not "led" after one season of use), bring all the boards to an absolutely even shape using a power tool, and after that paint. Therefore, think, maybe the same efforts can be spent on making even a small do-it-yourself table made of wood, video with a master class for which you will find on the network, but it will be durable furniture that will probably not go out of fashion for a long time and will serve its owner faithfully.
Do-it-yourself table for a summer residence made of wood
In most cases, we need advice on how to create exactly tables for giving with your own hands made of wood... There, for this piece of furniture, there is a huge number of tasks, we can safely say that there are never too few tables at the dacha. Therefore, there is a dining table, a kitchen table, and a picnic table, round, for a gazebo or folding, with which you can sit on the terrace or on the river bank while fishing. And for each option, there are individual creation tips.

However, there are general guidelines to keep in mind when creating do-it-yourself wood table, photo which you see in our today's article. This applies to the selection of wood, for example. It is believed that the countertop, especially the product that stands on the street, should be hardwood, such as oak or walnut, but today, with the availability of a large number of high-quality protective products and varnishes, you can easily use pine boards, which are much cheaper in price and , with proper processing, they will serve you for a very long time. If you want to practice carving intricate elements or creating carvings, then look for soft rocks such as linden, but be prepared for scratches or dents if used too much.

The second important general point in creation is the choice of a suitable configuration for it. You can pay attention to finished projects do-it-yourself wood tables, drawings which are, including, in our article. They already have affixed dimensions, but this should be treated only as a recommendation. After all, what is good about independent work is that you have the right to make your decision on the size and shape. It is for the number of members of your family that you can choose the width and length of the countertop, and the shape is selected for the height or parameters of the terrace, the gazebo, inside which the furniture will stand. The standards are considered to be a height of 75-85 centimeters and a rectangular tabletop 120x70 centimeters.

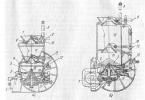
Based on all of the above, the first stage can be called the creation of a drawing, in which you not only mark all the necessary dimensions, but also make an approximate cut of the parts that you will need for assembly. You can use illustrations as an example. do-it-yourself wood tables, drawings, photos which you see above. The diagrams indicate the sequence of actions that must be followed in order for the product to be stable. In general, the stability of the legs and the flatness of the surface of the table top are two prerequisites for this. For evenness, you must keep the exact lengths of the legs and trim their bottom surfaces well. The finished product can even be checked with a level to see if it will stand in the correct plane. But there are different ways about sustainability. For some, this is achieved using a different number of legs, that is, not the classic four in all corners of the rectangle, in three or even one, strictly in the center. If there are four legs, then they are additionally supplied with stiffeners, supports and bridges between themselves. By the way, it is very convenient to put your feet on such supports during a feast, this can be called another pleasant bonus.
Tables and chairs made of wood with your own hands
Set tables and chairs made of wood, do it yourself made, will be an excellent option for filling a summer terrace, where you can have lunch and dinner in the fresh air. Even if there is a canopy or roof above the headset, in this case, timely care and processing of the wood before starting work is very important. Boards should not have irregularities, knots, holes, they should be completely dry, so that later you do not get deformation during operation, because there will be plenty of humidity in the surrounding space. It is also a good solution to make the tabletop and the tops of chairs or benches not solid, but with gaps between the boards, which will allow rainwater to drain from the surface without stagnating.

One variant of that, you can see in the photo. For this, boards are taken, they should not be too thick, since on such a surface deformation can be stronger, but not thin, so that enough heavy pots or other utensils can be placed on the surface. If you cannot afford the entire product to be completely made using hard, valuable woods, then you can combine, making the tabletop itself durable and resistant to damage. The model that we offer you is made on four points of support, so it is perfect for a stationary table, which is fixed in one place. For fastening, metal pipes are used, which are deepened into the ground and, if necessary, are concreted.

At first, the boards get confused with each other, while special self-tapping screws are used, since ordinary metal nails can lead to damage to the material. The assembly takes place on two boards that are below, all the rest must be screwed onto them. After that, the surface must be processed using a manual or electric planer, of course, if you use an electric one, this will save you much more time. In the same way, the boards are cleaned, which will create the frame of the tabletop, as well as the timber for the legs. Final sanding with sandpaper is carried out after the product is assembled. You can trim the edge with a router both on a ready-made, assembled tabletop, and on boards, you just need to mark the borders if you want to repeat the rounded shape, as in our example.


In another example, the step-by-step production of which you see above, the countertop is literally assembled from scraps of boards that were previously used in repairs or construction. In this case, it is very important only that their thickness is the same, because they will be assembled with ends. An interesting visual effect is provided by the assembly technology, because the boards are literally strung on metal pins and additionally glued. Then the legs are nailed to the surface, made at an angle of 45 degrees.

Diy wood gazebo table
If we single out the models that are the most complex and require special attention, then among them a table for a gazebo made of wood. With your own hands it is not so difficult to make it, but it is very important to correctly calculate its dimensions and fit into the existing space of the gazebo as efficiently as possible. When we, after all, care more about its functionality than about some decorative properties. In the case of a gazebo, a place that attracts the increased attention of guests, you need to take care of the visual decoration of the table top. Both carving and interesting design using cuts will be appropriate here.

As for the shape, you need to be guided by the shape of the structure itself, inside which the furniture will stand. That is, in a rounded gazebo, a square or round tabletop will not only look ugly, but also the space will be used extremely irrationally. That is, most often they use a simple rule - a round table is placed in a round gazebo, a hexagonal table in a hexagonal one, a rectangular one in a spacious and wide rectangular one.
DIY round table made of wood

Since the round gazebo is the most popular variety, we can say that it is round table with your own hands made of wood and is the # 1 model that DIYers want to make. A particular difficulty that distinguishes this particular shape is cutting out the shape, you need not to spoil the material and try to get a perfect circle.

For those who doubt their abilities and the evenness of their hands, we can advise a compromise option - buy a round ready-made tabletop and already make furniture on its basis. For a round top, it will be relevant to use the tripod system, which is shown in the photo above. First, a base is created, three boards are connected to each other, legs are nailed to them. The last step is to fix the tabletop to the self-tapping screw in the center.
Friends asked me to make a table that can be placed in the gazebo in the country. I did not choose a special version of the project to make a table from a bar with my own hands, but suggested a simple scheme for assembling furniture from standard timber lumber: a bar and a board. The main idea was that the table was low and could serve as a bench at the same time. In the workshop I had all the tools and devices. It remained to check everything and prepare the workplace in order to make a table from a bar with our own hands.
Instruments
Since the structure must be made of wood, the tool was mainly needed for woodworking. Here's what I used when making a table from a bar with my own hands:
- jigsaw;
- saw;
- gas-burner;
- drill screwdriver;
- a wrench with a socket nut head;
- chisels;
- reamer drill ø 2 cm;
- hammer;
- hacksaw;
- clamps - 2 pcs.;
- die for cutting external thread ø 6 mm;
- grinder;
- roulette;
- brushes.
Materials (edit)
I went to a construction supermarket and bought the following:

- PF 170 varnish - 0.5 l.;
- joiner's glue;
- screws 7 cm, 50 cm, washers and nuts, plastic plugs.
Step-by-step instructions on how to make a wooden table from a bar with your own hands
Initially, I wanted to make a table with my own and my own hands from 50 x 50 mm bars. But this idea had to be abandoned. Friends asked me to make massive loft-style furniture. Therefore, I used larger lumber. I decided to make the table in two stages: the assembly of the supporting structure and the formation of the table top.
Countertop manufacturing
- I cut the wood 10 x 15 x 600 cm with a saw into 6 pieces.
- I cleaned the upper corners around the perimeter of each element with an abrasive wheel at an angle of 45 ° and a width of 0.5 cm.
- To make 2 through holes ø 6 mm through the tabletop, I clamped 3 pieces each with clamps and drilled with a drill. Then I left 2 lines and added a new element and drilled again. I did this because there was no long drill.
- Outside, the holes were expanded with a reamer ø 2 cm to a depth of 1 cm.
- I sawed the reinforcement ø 6 mm into 2 pieces 0.9 m long.
- At the ends of the pins, I cut the thread with a die.
- I smeared the lateral adjacent sides of the wooden elements with wood glue.
- I inserted 2 pins into the holes. I put washers on the ends of the rods and screwed on the nuts.
- I closed the nuts with plastic plugs.

- All lateral and horizontal surfaces were sanded with a fine abrasive wheel mounted on a grinder.
- The gas burner slightly burned the surface of the countertop. This gave the wood a noble look, emphasizing the structural pattern of the cut of the wood.
- The entire tabletop was stained with a brush.
- The property of this tool is characterized by the fact that it penetrates deeply into the structure of the wood, strengthening and disinfecting it. But fine fibers create hairiness on the furniture surface. Therefore, I re-polished everything.
- The surface of the countertop was covered with PF 170 varnish for 2 times.
Assembling the support structure
Before making a table from a bar, I drew drawings of the supporting part and the table top of the future furniture. According to the dimensions and dimensions specified in the drawings, he started making the supporting structure of the table with his own hands.
- I made the legs for furniture by sawing a 10 x 20 cm tree into 2 pieces 86 cm long + waste.
- At the top of the supports from the outside, I fixed bars of 30 x 30 mm on screws.
- I made a crossbar from a board 20 x 150 x 660 cm, fixing it with screws to the centers of the lateral sides of the supports.

- He burned the entire outer surface with a gas burner, covered it with a stain, sanded it.
- The supports were varnished with PF 170 in two layers.
- I installed the tabletop on a support frame.
- I fixed the tabletop through the slats of 30 x 30 mm with screws.

Cost of materials
- timber 100 x 150 x 6000 mm = 1500 rubles;
- timber 100 x 200 x 2000 mm = 440 rubles;
- timber 30 x 30 x 2000 mm = 50 rubles;
- board 20 x 150 x 740 mm = 20 rubles;
- abrasive wheels for a grinder = 50 rubles;
- reinforcement with a diameter of ø 6 mm and a length of 2 m = 20 rubles;
- nuts and washers, 4 pcs. in stock;
- sandpaper = 10 rubles;
- stain - 0.5 l. = 100 rubles;
- PF 170 varnish - 0.5 l. = 50 rubles;
- wood glue 250 g = 160 rubles;
- screws 70 mm, 50 mm available.
Total costs were: 2400 rubles.
Labor costs
The time spent on making a table from a bar with your own hands according to the drawings is combined in the following table.

Taking into account the technological breaks in work, it was possible to make the table in 3 working days. A country table from a bar, made by me according to drawings, can play a role not only as a plane for arranging objects, but also be comfortable furniture for sitting. Such a model attracts with its simplicity of manufacture, low labor costs and practicality. When assembling furniture, you must comply with all safety requirements and use personal protective equipment.
We often need other people's advice to create something new. Have you ever made home furniture yourself? Today we'll talk about how to make a wooden table for a summer residence with your own hands. The variety of tables is so great that in the manufacture of a writing or dining table, there are their own nuances. But there are general tips that can come in handy when creating this piece of furniture. There are several important aspects that should be considered in the first place in this work.
- choose the right wood;
- choose the correct configuration for your table;
- create a drawing and mark the necessary details and features on it.
The tree classification can be structured as follows:
- Soft type: pine, spruce, fir, cedar and other woods.
- Hard type: oak, birch, beech, ash, maple, walnut, fruit tree wood.
- Very hard type: boxwood, yew, dogwood, birch wood
For the needs of different people, as well as in the case of individual distinctive situations, different characteristics of wood or its features are important:
- Resistant to decay.
- Material texture.
- Raw material price.
If your goal is to make living room furniture (and not a simple skill practice), then you need to take into account the quality of the materials, without neglecting it. You must use dry lumber. How it will be dried is up to you. Evaluate in advance whether you can dry the wood with high quality at home, but if this is not possible, it will be more profitable and wiser to order ready-made material. During shrinkage, the wood will deform, this must be taken into account, but the purchase of already dry wood is much more expensive. For high-quality shrinkage at home, you will need:
- constantly stable temperature regime, otherwise the material will dry out in waves;
- good ventilation in the room, no draft;
- it should be remembered that this process is very long, the material should be dried, without shifting from place to place, for about six months.
- Table top.
Strength plays an important role here, as well as the absence or low absorption of moisture by the wood. Optimal material: pine, oak. For a pine countertop, choose a cheap, but high-quality material - without rotten areas, cracks, protruding knots and other unnecessary defects.
- Table legs.
Optimal material: birch, it is she who is strong enough for constant load, boxwood and acacia are also suitable.
To make a table made of wood, the material must first be processed with sandpaper. If you are just starting your carpentry career, you should use birch, pine, oak, acacia and boxwood in your work.
There are several advantages to using wood in construction:
- easily undergoes various processing;
- sufficiently resistant to changes in temperature and humidity;
- good shock absorption: practically no chips and scratches;
- just undergoing restoration;
- environmentally friendly material;
- the cost varies depending on the type of wood and processing methods;
- the material is easily sawn, cut, chipped off with special tools;
- careful and constant care is not required
- external aesthetics.
That being said, there are some significant disadvantages to bear in mind:
- the cost in comparison with other materials is much higher;
- the tree can deform under the influence of weight;
- not resistant to mold and mildew, corrosion without the use of special coatings;
- wood cannot be called a moisture resistant material;
- over time, the above aesthetic appearance can be significantly lost.
Wooden tables: assortment of shapes and sizes
It is important to determine in advance what shape and configuration the table is required. Professionals advise you to pay attention to several points:
- the table should fit well into the room where it is planned to be installed;
- consider how many people will constantly be at this table and what it will be used for, calculate the size of the product from this parameter;
- choose a folding table option if from time to time it will be needed for a larger number of people;
- take into account the age and capabilities of the people (for example, the table for children will be different).
The table can be of different shapes. In addition to different shapes, the table can also have different support under the tabletop itself, in other words, a different number of legs.
- table with one leg - this type of installation is suitable only for a small product, it can be used, for example, for making a children's table;
- a table with two stable legs - this type of table is good for a rectangular or oval tabletop, but it is rather uncomfortable and unstable for constant use in everyday life;
- a table with four legs - this is the most common type, has the greatest (in comparison with the rest) stability, is suitable for both dining and writing, and a coffee table - is the most versatile type of this type of furniture.
In order to guess the most successful table size for any room, you should take into account and keep in mind constantly the area of the room itself and that part of it that is the maximum allowable for placing this piece of furniture, and, of course, the wishes of the owners should also be taken into account.
Features of the assembly of wooden tables
There are several types of hand-assembled wooden tables.
- o on dowels (attached with glue);
- o on tsars (necessary on tables that are periodically disassembled);
- o bolted (similar connections are used mainly for garden furniture).
Workshop and tools for woodworking
- Premises
There are several characteristics that are necessary when organizing your own workshop:
- work should be carried out under some kind of canopy, ideal: a garage or a shed (otherwise there will be too much dependence on the weather);
- you need to make a high-quality hood, otherwise the dust will constantly settle on the finished product and you will not achieve straight lines or high-quality finishing of the material. In addition to dust, the hood eliminates the toxic odor of varnishes and wood paints.
Instruments
- an electric jigsaw gives greater precision in cutting wood than a saw;
- rotary miter box facilitates corner cutting;
- a sander is universal in use and is clearly required for the manufacture of wooden furniture;
- a manual router is required when machining holes;
- impregnating and other compositions.
Consumables for working with wood: varnishes, paints, impregnation, glue
- used engine oil is a great option for impregnation, but unfortunately not suitable for the dining table;
- the optimum will be impregnation with a water-polymer emulsion two times, with a break of three to five days;
- water-based acrylic varnishes are superior to older nitrocellulose furniture varnishes;
- PVA is proven to be superior to bone carpenter's glue.
Wood table options
- Wooden table with benches.
- It is required to assemble the table cover: the boards are attached to the crossbars with self-tapping screws (it is important to use self-cuts as opposed to nails, since the latter contribute to the destruction of the wood surface).
- After that, the legs are fixed to the crossbars, which must be strong and durable in order to withstand the weight of the table itself and the people sitting behind it, so the minimum thickness will be 4 centimeters).
- Then it is required to fix the side crossbars to the legs, on the basis of which the benches should be built, fastening them with bolts, and not with self-tapping screws for greater strength.
- Next, we fix the benches and proceed to the subsequent processing of the furniture.
There are several disadvantages to this invention that must be borne in mind:
- If a person stands up sharply on one side, then all products will literally fly towards the other.
- It is also not very comfortable to sit at this type of table.
You can improve this design so that its quality becomes unsurpassed, but we invite you to evaluate the idea and project!
- Pallet board table.
If you have at your disposal boards of different sizes, colors and, possibly, even tree species, you can make an interesting structure out of them, organizing the elements in a special way: alternating, grading, creating your own logic for building boards. Among other things, also use discarded dry boards. The side parts of the pallet can act as a good frame, and the assembled tabletop from the rest. We recommend that you carry out this work in a courtyard or garage with an exhaust hood due to the large amount of dust accumulating everywhere.
- For the legs, use a block that is more than five centimeters thick. Prepare all the tools and parts necessary for the work in advance: the wood needs to be sanded precisely along the fibers with sandpaper, starting with a coarse one, and then moving on to a finer grain, carefully removing dust. Next, you need to paint the boards with acrylic or oil paint, apply the desired stencils, symbols or paintings. After that, carefully cover with varnish, repeating this procedure several times and dry.
- An attractive rustic table should be assembled from pallets (also called wooden pallets). In the event that a non-aqueous varnish is used, it will be enough to apply two or three layers, in the other case, it is required to apply more times, up to approximately ten. After finishing the varnishing of the elements, it is worth moving on to the installation, which consists of several steps.
- We fix the tabletop with planks, connect the boards tightly to each other and fix with self-tapping screws. It is imperative to use a drill so that the wood is not damaged when using self-tapping screws. Then we coat the joints with glue, treat the entire countertop with special means that protect the tree from decay.
- Lastly, we put the legs: you need to fasten them with self-tapping screws in order to learn the structure, at the bottom we install jumpers.
- Wooden table with glued top.
For a glued tabletop, you need to take boards of the same width. For this experiment, you will need grooves (and therefore a milling machine). On old floorboards, grooves are already present, if the appearance of the table is not important and its purpose is not for home, it is worth using them.
- The boards need to be laid out on a completely flat surface, this is important for the further collection of the countertop.
- Thoroughly coat the sidewalls with glue, join, avoiding gaps between the boards, then tighten the resulting invention with special tools. Leave the product to dry for one to three days. If the gluing operation of the new tabletop was carried out correctly, then the gaps will not appear. If cracks appear, then the tabletop will further creep even more.
- It is required to process the ends - first, trim them with a jigsaw, and then grind them. If there is no belt sander, replace it with manual processing - first with coarse sandpaper, then with medium grit. Then carefully varnish the resulting furniture in several layers (about ten layers of varnish, after every third layer it is required to process the surface with sandpaper and remove the dust with a damp pin), in no case do not rush at this final stage, then the installation of the product is required.
- It is required to make massive L-shaped legs. Take boards with a thickness of at least two and a half centimeters such that their thickness coincides. Join them at a ninety degree angle.
- Make a selection on the boards to be connected, coat the joint with wood glue, and then install the screws. After the glue dries, coat the parts with varnish and bring them together to form the final composition.
Get creative and create a functional, practical and great looking table in your own home! Such a standard piece of furniture can create a certain mood in the premises, ennoble your home with a special comfort! Choose the material and embark on a new adventure - inventing your own table, which, perhaps, will become a messenger for generations to come! If you still doubt that you can create your own table, you can imagine new furniture in your head, and then give it to professionals for execution, and then, of course, also enjoy the work of art you received!
Video: How to make a table with your own hands
Photo gallery: Tables with their own hands made of wood
A wooden outdoor table for a summer residence can be made with your own hands. For this, ready-made or independently developed drawings are used. To make a beautiful wooden table for use on the street yourself, you need to purchase high-quality material and follow the manufacturing rules.
A beautiful and comfortable country table is an indispensable attribute of a summer vacation. When choosing a finished product, you need to decide on the dimensions, as well as with the following parameters:
- using a piece of furniture outdoors or indoors;
- the maximum number of people able to sit at the table;
- the budget allocated for the acquisition.
The tabletop and body of an outdoor piece of furniture can be made of different types of material:
- plastic models are ideal for use in the country. The advantages are affordable cost, relative compactness and lightness. They are usually round or oval in shape and can accommodate about six to eight people. Despite the stylish appearance, they are characterized by not too long service life. The disadvantages include the tendency to destruction as a result of the negative effects of direct sunlight. Also, a lightweight structure can turn over in case of strong gusts of wind, the need to use the most flat surface for installation and susceptibility to damage, which is accompanied by a rapid loss of the original aesthetic appearance;

- wood models look very organic even in a modern suburban landscape. Such pieces of furniture perfectly complement the garden plantings. Such models belong to the category of rather expensive ones. The disadvantages of natural wood include the ability to collapse and be warped under the influence of water and temperature extremes, and the legs pressed into the soil can rot, therefore, it is required to regularly carry out treatment with antiseptics;
- graceful metal models are of high quality and incredible durability. Such furniture looks especially beautiful against the background of forged fences and decorative elements. Such tables are notable for their considerable weight, as well as very high cost. Very often, modern models are a very successful combination of metal with wooden or glass countertops.
If you plan to use the table in suburban conditions all year round, then the best option would be a metal structure, which is very resistant to any unfavorable external factors. The legs of the metal structure can even be concreted, which will give additional stability to the piece of furniture.

How to make a wooden table for a summer residence with your own hands
Tables made of wooden planks are very often self-made. Of course, this option will require sufficient care throughout the entire period of operation, but it will give the adjoining territory in the country a bright style and originality. Among other things, you can build the simplest models with your own hands with little time and money, even in the absence of professional skills and special tools.
Making a drawing of the table with dimensions
The self-assembly scheme may already be ready, but in order to get an original table with the most suitable dimensions and shape of the tabletop, you need to complete the drawing yourself. When drawing up a drawing, it is recommended to focus on the standard dimensions of such a piece of country furniture 178x95x77.5 cm.

Required tools and materials
To make a beautiful and practical wooden table for a summer residence, you need to prepare:
- roulette;
- pencil;
- saw;
- drill or screwdriver;
- building level.
Work must be carried out in standard goggles and gloves. When making you need to use the building materials presented:
- a pair of boards with dimensions 85x10x2.5 cm;
- a pair of boards with dimensions 153x10x2.5 cm
- four boards with dimensions of 168x10x2.5 cm;
- four boards with dimensions of 75x10x5 cm;
- board 95x10x2.5 cm - 17 pcs;
- fastening tools in the form of nails, screws and bolts;
- glue for woodwork.
It is also necessary to purchase antiseptic compounds for wood processing, varnish for wood or special paint and brushes in advance.
How to make a table with your own hands (video)
Getting Started: Making Wooden Outdoor Table Parts
All elements in the form of wooden planks must be flat, of natural moisture, from high-quality hardwood. If necessary, before assembly, the boards must be aligned and, if necessary, sanded. To obtain a durable structure, you should carefully treat the wood with antiseptics.
It is not recommended to impregnate wood with oil compounds., which have proven themselves very well when operating in high humidity conditions, but increase the level of flammability and give the structure an unpleasant and fairly persistent odor that lasts for a long time. After applying water-soluble impregnations, it is imperative to apply a layer of a special glazing antiseptic, which makes it possible to impart high decorative properties to the product and contributes to additional protection.

Assembling and fastening the main elements
At the first stage of the independent manufacture of a wooden outdoor country table, the frame base of the piece of furniture is assembled. It is to the frame base that the boards will subsequently be fixed to create the table top and, as well as the table legs. The frame base traditionally consists of four rounded and even, longitudinal boards measuring 168x10x2.5 cm and a pair of end boards measuring 85x10x2.5 cm.
The assembly must be carried out on the most even surface, fixing the end elements to the longitudinal boards with the help of galvanized self-tapping screws and an adhesive. Very important prevent the base from skewing during assembly and fastening. After checking diagonally, additional boards of 153x10x2.5 cm are necessarily fixed, which will make it possible to give the assembled structure additional rigidity, as well as hide the areas of attachment of the legs.
The table top is assembled from boards measuring 95x10x2.5 cm. The boards can be fixed with either galvanized nails or self-tapping screws. It is imperative to leave a gap of 0.5 cm between the elements of the countertop. The legs are attached with self-tapping screws or bolted connections. The second option is more preferable and allows you to get a removable model, convenient for transportation and storage.

Installation of amplifiers - a guarantee of the durability of the table
If there is a need to obtain the most massive and durable structure, then amplifiers are used. To install such parts, it is necessary to turn the product upside down. The transverse reinforcements in the middle of the tabletop are nailed, and the corners of the reinforcements are sawn off to save space. A pair of reinforcements with a notched cutout that follows the shape of the countertop crossbars is nailed to the sidewalls.

How to protect the table from external factors
Unfavorable weather conditions, represented by sun, rain and temperature changes, are an aggressive environment for wooden structures used in outdoor conditions. To protect wooden products and extend their service life, special film coatings and various impregnating compounds are used. The most commonly used protective films are based on polyurethane. The disadvantages of such a film coating are loss of appearance, decrease in efficiency and wear after a certain time. Impregnants for wood protection are represented by a mixture based on oils and repellent solutions. Both the one and the other option of protection from external adverse factors has proven itself well, but requires periodic updates.
Wooden outdoor table: drawing (video)
We make a wooden country table from what is at hand
As a material for creating a wooden country table, a variety of improvised means are very often used. Incredibly stylish and very reliable slab tables - an option that you can make yourself with some woodworking skills. In this case, you need to be prepared for the fact that the technology for manufacturing tabletops based on saw cuts is distinguished by its characteristic specifics and is quite time consuming, but the resulting finished product will be unique and inimitable.
Designs look very original in garden design:
- from a wooden bar for true fans of natural materials;
- from several stumps or bobbins;
- from old window frames with glass top;
- from boxes, complemented by various decorative elements;
- from an old wooden chest with forged items.

Tables made from pallets are also widely used. The fashion for such products came from Asia, where such furniture items are very often made for lack of free funds. When creating such an option, you can show all your imagination, but it is very desirable to replace the nails from the pallets with self-tapping screws, and all fastenings of the frame and boards must be reinforced with special furniture corners. If desired, the structure can be supplemented with ordinary furniture wheels, which make the table mobile and easy to use.
How to make a metal table with a wooden top
One of the interesting and durable options for garden furniture. For self-production you will need:
- metal pipe or high-quality rolled metal of sufficient cross-section;
- primer for working with metal surfaces;
- paint on metal surfaces and brushes;
- chalk or light marker;
- flat surface for the stencil;
- wooden tabletop;
- bars and adhesive for fixing the countertop.

The tool can be represented by a welding machine, a grinder, a metal saw, a hammer, a screwdriver, screws and bolts. The metal is pre-cleaned from rust and dirt with a steel brush, after which a frame is created in accordance with the stencil.
Welding must be done carefully to avoid the formation of welding build-up. The entire structure is cleaned with a metal brush, after which it is primed and painted. After the paint has completely dried, the tabletop is fixed, which also needs to be treated with special antiseptics, and then varnished or painted.
Diy log table (video)
Self-production of country furniture from wood is a very interesting and creative process, accessible even to beginners. Such a natural material goes well with metal, glass, and plastic, which allows you to create original, unusual and very decorative solutions with your own hands.
Of course, today everyone has the opportunity to buy any furniture in the store, including a table. But why not make it yourself, with your own hands?
This is not as difficult as it might seem at first glance. In addition, you have the opportunity to make a table that will ideally fit in size and appearance to the interior of your kitchen or other room.
In addition, do-it-yourself furniture is not only money saving, but also some kind of one, but a reason for pride, since nowadays not every man knows how to make something.
What are the tables
If you decide from the boards with your own hands, then you need to figure out what types of tables there are, and decide what exactly you need.
The simplest is a regular table with four legs, a table top and a frame. It will not be difficult to make it even for someone who is not experienced in woodworking.
If you are experienced enough in this matter, then you can make the dining table round or oval, decorate it with carvings, painting or burn patterns and patterns on the surface.
A more difficult option is from boards. In fact, this is the same ordinary table, but rather thick and long crossbars are attached to its legs, on which the seat boards are laid on top. This gives us a table with benches on both sides. Such furniture is well suited both for the kitchen and for installation in the courtyard of a private house or summer cottage.
If the room only has free space in the corner, make a corner table that fits perfectly into this unoccupied space. It may not be as convenient to dine at as at a classic table, but you can put a TV, microwave or kettle on it - there will be enough space.
 Another interesting option can be a window sill table.
In fact, this is the same window sill, but significantly expanded and adapted, for example, for a comfortable workplace for a student.
The advantage of this solution is that the table will be well lit most of the day.
There is also a minus: sitting at such a table in winter, your feet will have to rest against a very warm, even hot radiator, which is not very convenient.
Materials and tools
 Buying everything you need to make a table with your own hands is quite simple and will not be difficult or costly. The main material for the dining table is wood, or rather:
- Planks 25 to 50 millimeters thick, 100–150 millimeters wide, rather long.
The thicker the material for the table top, frame and legs, the heavier, but also more durable they will be.
Choose planks made of good wood, free of any defects. - Bar. It is necessary for making table legs, so choose thick and sturdy samples. The timber can be replaced with the same planks by positioning them with the letter "G", or using commercially available aluminum table legs. You can also use balusters as legs (curly carved wooden posts that support the railing on some stairs).
- Chipboard or plywood sheets, which can be used as materials for countertops. Choose specimens that are thick and sturdy enough to withstand daily stress.
 As with materials, and DIY tools and fasteners are easy to get, they are in most homes. If something is missing, you can buy it at the nearest hardware store.
- pencil, corner, roulette and a ruler;
- jigsaw or hacksaw on wood;
- screwdriver with a set of attachments and drills;
- plane, if it is necessary to pre-process the boards from irregularities and defects;
- kit self-tapping screws, furniture bolts and nuts;
- sandpaper or Sander;
- varnish or stain, roller or tassel for processing the finished table.
Attention! When working with the jigsaw, always remember the safety rules and do not allow small children or pets to be near!
Simple kitchen table made of boards
 First, we need to make a tabletop.
There are several options here:
- Cut a piece of the desired size from a sheet of chipboard or plywood using a jigsaw;
- Lay several planks that are wide enough and subsequently fix them on the frame;
- Take a large number of relatively narrow boards, place them sideways up and glue them together with wood glue.
The end result is a fairly thick, heavy and sturdy tabletop.
Stages of work
Step 1. We collect from boards countertop.


Step 2. We make a frame from boards or their wooden blocks. In size, it can be made equal to the table top or with a slight indent, about 2–2.5 centimeters on each side of the table. Having fastened the parts of the frame with screws, connect the frame with the tabletop with them.
Step 3. After we with put the frame and the tabletop together, half of the table is already ready. It remains only to make his legs. If a timber is used for this, drill two holes for the furniture bolts in it. Moreover, they can be made both on one side, one above the other, and on two different sides for a more reliable attachment to the frame.
Important! Carefully check the length of the table legs, they should not differ from each other. Otherwise, the table will stand unevenly and wobble. If you do not want it not to spoil the floor material, attach rubber "shoes" to the lower part of the legs.
Then make similar holes in the table frame and fasten the legs and frame with bolts and nuts. Also, the legs can be fixed from above using screws, but over time, such fastening may weaken.
 If you want to make table legs from planks, fold two planks with the letter "L" on the outer or inner corner of the frame and fix them using the same furniture bolts or screws.
To prevent the legs from loosening, connect the folded boards to each other in the lower and middle parts using screws or nails.
That's it, simple and reliable, DIY, ready!
Advice: Before you start, make a simple drawing, preferably from several sides. Check the dimensions of the parts constantly. Some parts of the same size can be cut at the same time if you fix the boards or timber with clamps.
Pallet table
 Wooden pallets are widely used in shops and warehouses as cargo pallets.
If you wish, you can get several pieces for free and use them as a basis for making an original and unusual kitchen table.
If at least one side of the pallet surface is solid, then you no longer need to make a tabletop, it is ready.
You just need to process it and, if desired, round the corners.
Note! Since the pallets are originally intended for warehouses, no one is involved in grinding and cleaning them. Therefore, before you knock a table out of them, carefully sand them and remove all burrs. Irregularities and defects of the boards can be hidden with putty.
Stages of work
Step 1. Most pallets are open and there is a large enough space between the boards. distance, because of which to use the surface of the pallet as countertop not very convenient. There are two ways to solve this problem: either make boards appropriate size and anchor their screws between the pallet boards, or install a sheet on top plywood or chipboard.


Step 2. As for the usual table, table legs from pallets can be made from timber or boards. The best thing to fasten them with thick enough and strong with a bar of a pallet with nails, screws or furniture bolts.


To prevent the legs from loosening, connect them with crossbars.