Tsugunov Anton Valerievich
Reading time: 5 minutes
Alignment various surfaces using ─ one of the popular ways to prepare walls and ceilings for painting or wallpapering. However, the plaster does not always lie smoothly without defects. Some surfaces have low adhesion, so the solution applied to them begins to crumble and peel off. The destruction of the protective and decorative layer is especially rapid on the facades of buildings that are exposed to negative impact climate and moisture. Using a mesh for plastering walls, you can ensure strong fixation of the mortar to the surface and improve the quality of the finish.
Application
The mesh is used for external and interior work, and helps achieve the following results:
- Increase durability decorative finishing due to proper load distribution and reducing its impact per 1 m2. The mesh is point-fixed to the base, and with its help the weight of the solution is supported.
- Avoid cracking of the plaster by reinforcing the surface layer. Walls and partitions made of blocks and bricks are prone to shrinkage and deformation. The reinforcing fabric gives the finish plasticity and prevents the appearance of cracks and other defects on the surface.
Types of mesh
To make the mesh, use different materials, which, along with other parameters, determine its type, characteristics and scope of application.
- Chainlink. It is made of low-carbon steel wire by weaving and is a fabric with square or diamond-shaped cells and a size of 20x20 mm2. To protect against moisture and aggressive substances, the mesh is coated with a layer of zinc or polymer. The chain-link is used for working on surfaces large area, including wooden or brick.
- Welded. It is made from steel wire, which is laid at right angles to each other, and then fixed at the joints using spot welding. The result is a strong mesh with square cells. different sizes. It is used to strengthen plaster in case of strong shrinkage of walls, which is important for finishing new buildings or houses located on unstable soil.
- Expanded metal. Represents sheet material with diamond-shaped cells and is intended for reinforcing walls with low plaster consumption. Expanded metal is made by cutting holes of the same shape and size into a sheet of metal, which is then stretched and formed into a mesh for plaster.
If necessary, apply the solution as much as possible thin layer It is advisable to use a plastic or fiberglass mesh.
- Fiberglass. Indispensable for finishing ceilings, facades and walls if there are depressions, grooves and depressions on their surface. It is lightweight, durable and resistant to temperature changes, and can be used for facades. Fiberglass mesh is not susceptible to moisture, so it is used to reinforce roofs and plaster bathrooms and swimming pools.
- Polymer mesh. It is produced by extrusion from polymer raw materials, which is most often polypropylene. By using molding machines The plastic melt is converted into a mesh fabric, the cell size of which is determined by the modification of the material. Plastic mesh serves for carrying out plastering works on the surface of facades and internal partitions. Since over time, a mixture of sand and cement destroys the polymer canvas, it is advisable to use it for finishing. A mesh with 2×2 mm2 cells is indispensable for applying finishing putty.
Mesh laying technology
For finishing works several types are used plaster mixtures, which differ in composition, nuances of application and degree of impact on various materials. In addition, when choosing a grid you should consider:
- thickness of the applied layer;
- base material;
- conditions for finishing and operating the coating.
Metal
When choosing a metal mesh for reinforcement, you should give preference to galvanized mesh: it prevents corrosion and prevents the occurrence of rust spots on the walls. In addition, it is easy to cut and quite simple to attach to the surface. Before work, the metal mesh should be degreased, and the galvanized mesh should simply be washed with water. The formation of the reinforcing layer occurs as follows:
- Using metal scissors, the mesh is cut into separate sheets, the size of which depends on the orientation of the material on the surface. If there are rusts, the reinforcing layer for plaster is placed along each seam as a single piece.
- Drill holes with a diameter of 6 mm using a hammer drill. Their depth should exceed the length of the dowel by 2-3 mm, and the pitch should be 25-30 cm.
- Insert dowels into the resulting holes, and then secure the mesh to the surface of the walls using mounting tape and screws. For reliable fixation, the canvases are overlapped, overlapping each other by about 10 mm.
- The beacons are installed and the first layer of plaster is applied using a trowel. In this case, the solution must be pressed in such a way that it passes through the reinforcing fabric and is fixed on the surface. After which the finishing layer is evenly distributed over the surface of the wall or ceiling.
- The second layer of plaster is applied when the first one has dried. If the basis is a façade with insulation, then it is advisable to use chain-link to reinforce the surface. It is also necessary when finishing wooden walls.
HELPFUL INFORMATION: Bathroom: budget renovation options

Knowing how plastering is done on a grid allows you to act skillfully when there is a risk of the mortar slipping. To prevent this from happening, the wall is reinforced with reinforced material. Is mesh needed when plastering? It is simply necessary as a reinforcing layer.
The solution on the walls is retained in the cells of the canvas and does not flow down. After the applied mixture hardens on the surface of the walls, a durable, durable coating is formed. A layer of plaster 10 mm thick can be dispensed with without reinforcement. For thicker coatings, installation of reinforcement is required.
 Modern mesh plastering technologies use several types of reinforcing materials:
- fiberglass;
- polymer;
- metal.
Fiberglass
 Similar fine meshes are used on surfaces with non-critical defects
 Fiberglass mesh for plaster is a thin, fine-mesh fabric.
Wall plaster using a grid of this type is applied to indoor walls. Fiberglass sheets are attached to surfaces that do not require special leveling.
Typically, such a mesh is covered with a thin layer.
Polymer
Recently, plastic has become very popular. Polymer fabrics in their own way bearing capacity in some cases they are equivalent to metal reinforcement, and the cost is an order of magnitude lower.
 Polymer mesh does not weigh down the structure
 On sale you can always find a polymer mesh with various sizes cells and thickness. With its help, you can level walls with surface deflections of up to 20 mm per 1 linear meter.
Metal
 It is recommended to use metal mesh on surfaces with large defects
 Metal mesh for plaster is used mainly for finishing facades. Metal fittings strengthen the surfaces of fences with complex geometry, deflections of more than 20 mm per 1 linear meter.
When working on metal, cement-based mixtures are mainly used.
Metal coatings are produced in several modifications:
- The woven structure of the coating is made from thin wire. Woven fabric covers the walls both inside and outside of buildings. Regular size cells - 10x10 mm.
- Wicker reinforcement is also called chain-link mesh. It is very convenient to use when reinforcing large areas. Standard size cells - 20x20 mm.
- Welded sheets are made by spot welding metal rods. Welded reinforcement is used for significant shrinkage of buildings and structures. The cells of such reinforcement are made in sizes from 20x20 mm to 30x30 mm.
- Expanded metal reinforcement is made by stretching metal sheet, previously cut through with transverse cuts. When the sheet is stretched on a special machine, the sheet forms diamond-shaped cells. Reinforcement of this type not only withstands a thick layer of plaster, but also significantly increases the load-bearing capacity of enclosing structures.
Plastering over metal mesh forms the most reliable and durable layer of wall finishing than using reinforcement made from other materials.
Installation of grids
Each type of reinforcement, taking into account the characteristics of the material. More about types construction mesh watch in this video:
 Attach the mesh to the solution
 Lightweight plaster mesh does not require special fixation.
Fiberglass mesh for plaster is secured around the perimeter with a mortar rubbed in with a spatula.
The strips are connected to each other with an overlap of 150-200 mm, for which, before starting work, the mesh is cut into strips taking into account this overlap.
When especially complex configuration The surfaces of the walls are additionally secured with dowels. If the stripes are placed on wooden surfaces, then it is convenient to do the fastening with a stapler.
Coating with polymer sheets
Plastic sheets are attached in some cases in the same way as. In other fastening options, they resort to the use of dowels and self-tapping screws. The material is attached with an overlap, placing one strip over the other by 150-200 mm.
Metal coatings
 Strengthen the metal mesh with dowels
 Metal plaster mesh can withstand fairly thick layers of finishing. Due to the fact that such reinforcement has a significant specific gravity, the fastening of metal reinforcement must be especially reliable. Installation metal coating walls are performed as follows:
- The pre-reinforced coating is cut into fragments of the required size, not forgetting about overlaps when connecting the mesh overlapping.
- If the canvases have been stored in a warehouse for a long time, they are treated with a solvent or rust reducer.
- Thin coatings are cut with metal scissors. Welded and expanded metal sheets are cut with a grinder equipped with a metal cutting wheel.
- The mesh is fastened with dowels. To do this, holes are drilled in the wall (if the wall is concrete, then this is done with a hammer drill). Plastic dowels are inserted into the holes.
- Reinforcement begins with one of upper corners walls. Having attached the mesh to the wall, screw the screws and washers into the dowels. The washers act as fasteners.
- A distinctive feature is that during such work the canvases are fixed in such a way that there is a small gap of 3-5 mm between the reinforcement and the wall. This is necessary to place reinforcement in the body of the plaster layer, which gives the wall decoration greater solidity and high load-bearing capacity. Detailed description Watch the process in this video:
The reinforcement must be secured in tension and not bend. Otherwise, voids may form in the body of the finish, which will negatively affect the load-bearing capacity of the plaster.
Installation of beacons
 When the reinforced sheets are fixed to the fence, guide strips (beacons) are installed to move the rules along them. The rules are made from a piece of metal profile 1 to 1.5 m long.
The guide strips are fixed with gypsum mortar. The ruler controls the level of the beacons.
Plastering walls
Fences with mesh are plastered in 2-3 layers.

 The walls are plastered in several layers
 The work is carried out in the following order:
- The first layer is applied using the cape method. The mortar collected on a trowel is thrown onto the fence with a sharp movement of the hand. To do this, use a mixture with a consistency reminiscent of liquid sour cream. This method of applying the solution allows you to obtain a dense, durable layer of plaster.
- After the first layer has “set”, the next layer of plaster is applied. The second layer is made from a denser mixture - a dough-like consistency.
- Plastering is done from bottom to top. The thrown solution from below is picked up with a rule and brought up. As the rule moves, it is slightly alternately shifted from side to side. This helps to distribute the mixture evenly over the wall surface.
- After the plaster has dried, the beacons are removed. The remaining clearings are sealed with mortar.
- At the end of the work, the surface of the walls must be grouted. To do this, take a liquid mixture. Using circular movements of a wooden grout or trowel, the liquid solution is rubbed onto the plastered wall, thereby finally forming the finished surface of the wall.
We’ll talk further about how to install a mesh for plaster with your own hands.
Current tools and materials
Many people are interested in the question of how to secure the mesh for plaster. To do this you need the following tools and materials:
- dowel nails for fixing the material to the base;
- drill for making holes in the wall for dowels and nails;
- beacons to create the most even surface;
- metal scissors for cutting metal mesh;
- rule for leveling the plaster mortar on the base;
- spatula for applying plaster to the wall surface;
- a container for diluting the plaster mortar, you will prepare it yourself, rather than purchasing a ready-made composition;
- level for analyzing the surface for curvature.
We carry out reinforcement
Whether it is worth reinforcing the surface of the walls and ceiling is up to you to decide. However, it is important to understand that if the technology and recommendations are strictly followed experienced specialists a surface reinforced and covered with plaster mortar acquires quite high resistance to the effects of negative factors in the environment.
Reinforcement can be done with your own hands and without the help of a professional team of builders, whose services can be quite expensive.
All the work can be done with your own hands in the following sequence of operations.
Preparing the surface for finishing
Before attaching the mesh under the plaster, it is necessary to prepare the surface for subsequent leveling and finishing. Only then will the results of your labors have high quality and will be durable.
Clean the surface of the base from any dust, dirt and greasy stains. Next you need to examine the wall for the presence of bumps and protrusions on it. They will need to be carefully cut or chopped down with a sharp hatchet so that the base acquires a more or less flat surface.
If the wall has depressions, they will need to be covered with putty. This will reduce differences on the base to an optimal state.
Then prime the base using special means to increase adhesion. Only in this case plaster mortar It will stick well to the base and will not swell or crack over time.
.jpg)
Attaching reinforcing mesh to the wall
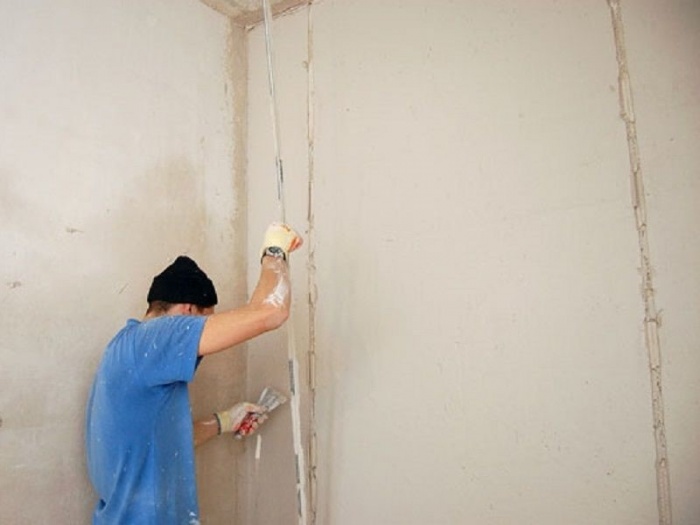
To begin, take a drill and arrange holes in the wall for dowel nails so that 1 sq. m accounted for 15-20 holes. Next, you need to cut a piece of mesh to the height of the wall surface and attach it to the base using dowel nails, moving from bottom to top. Stretch the mesh well and press it as tightly as possible to the wall surface to prevent bulges larger than 1 cm. Sheets of material must be overlapped so that the joints do not move apart.
And in the corners of the door and window openings It is worth performing additional reinforcement with pieces of mesh measuring 30x50 cm.
Only then do they move on to placing beacons and plastering the wall.
Plastering the base
The initial layer of plaster should be applied with a thinner solution, making sharp movements. Then the material will seep through the small mesh cells and adhere well to the wall surface. Next, the base should dry out a little. Be sure to check the wall for deviation from the horizontal using a building level.
.jpg)
The second layer is poured with a thicker solution and evenly stretched with a spatula from bottom to top. After the second plaster layer has dried, it is worth carrying out subsequent finishing of the wall or ceiling surface in the house.
We continue the theme of plastering walls. Today is the sixth lesson, and we have to learn what a plaster mesh is, why it is needed and why it needs to be attached to the wall even before the beacons.
The fact is that plaster is an excellent material for leveling our crooked wall. But in addition to obtaining a flat and smooth surface, it is necessary to make the wall strong and reliable. And this is exactly what the plaster mesh will help us with.
Types of plaster mesh
There is quite a variety of it in nature, but for home purposes, especially for those new to renovation, it is enough to have an idea of the 2 main types of plaster mesh:
- metal plaster mesh;
- fiberglass (plastic) plaster mesh
Below, in the picture you can see these 2 types of mesh:
Which one to choose for working on the wall?
You need to look at the wall carefully. If, even after the failure of large mounds, your wall is still very uneven and the differences reach more than 5 cm, then it is wiser to secure a metal mesh in such places (holes or depressions). If the wall is lumpy, but the convexities and concavities along the wall fluctuate within 2-3 cm, then it is enough to use a fiberglass mesh.
Now let's talk about fastening. The mesh must be attached over the entire area of the wall. Usually the mesh is sold in rolls. You unwind the roll and, just like wallpaper, which you glue from the ceiling to the floor with paper sheets, here you, on the contrary, attach the first strip horizontally from one edge of the wall to the other under the ceiling. Then lower, under the first piece, roll out the next one. For a room height of 3 meters you need to secure 3 such strips.
Fiberglass plaster mesh
Fastening fiberglass plaster mesh is much easier than metal mesh. And that's why. It is enough to hang the fiberglass mesh on a few screws, and it will simply hang down under its own weight. Naturally, the screws must be screwed into the wall up to the caps.

I specifically showed you the lighthouse here so that you would understand why you need to first attach the mesh and then the lighthouse. The wall will be much stronger if the mesh that forms the basis of the future plaster is a single monolithic piece. That is, it is better to first roll out the mesh in one piece on the wall, and then install the beacons, rather than install the beacons, and then cut the mesh in pieces from one beacon to another.
Why is it enough to hang the mesh under its own weight on self-tapping screws? Because when you dilute the plaster solution and throw it on the wall, the slaps of the plaster will seal the mesh directly to the concrete. Since the plaster sets quickly enough, the mesh will stick securely to the concrete. And due to the fact that the mesh is a single monolithic piece, the entire plane of the thrown plaster will gain sufficient strength.
Metal plaster mesh
Metal plaster mesh is another matter. It is more capricious, and it will not be possible to secure it under its own weight. Among other things, the mesh cells are quite large and larger than the screw head. To attach it, I would like to recommend that you use mounting tape, which is ideal for this. To make it easy to cut the tape, you will need special metal scissors.

We take scissors and cut slices of the mounting tape, and then attach the metal plaster mesh using such slices as shown in the figure:

Here you will have to work hard and cut a lot of such slices so that the entire metal plaster mesh fits tightly to the wall and does not sag!
Important Notes
We got carried away with the plaster mesh before installing the beacons, but there are additional works that need to be done even before attaching the plaster mesh. Can't you guess?
Remember where lesson #4 ended? You and I knocked down the biggest bumps on the wall. But at the same time, our wall became very dirty. And if we stretch a plaster mesh over this dirty wall and start throwing plaster on it, it will immediately fall off, therefore:
- After all the bumps have been knocked off the wall, we take an old vacuum cleaner in our hands and vacuum the wall, or use a wet rag and wash our wall. The wall must be clean. After the dirt has been removed and the moisture has dried, we dilute the primer and prime the wall once, and after 2 hours a second time. If you have forgotten how to do this, take a look at the article: .
- When attaching any of the meshes, try to use the shortest screws possible. Why? Because we remember that the screw in concrete wall If you don’t wrap it, you’ll have to install a dowel, see article. And any installation of a dowel is dust, which is described in detail in the article:. So it turns out that we primed the wall and then started drilling! Of course these are microparticles, but they will again be all over the wall. Therefore, we take small, short self-tapping screws and “5” dowels - no more. And we slowly drill holes, install dowels and attach the plaster mesh. It is advisable to carefully sweep it downwards in the drilling areas, without spreading dust.
- Some people prime the wall through the plaster mesh after drilling. I don't really like this method. The fact is that when priming, it is necessary to ensure that there are no formation of soil puddles on the wall, but if there is a mesh, this cannot be guaranteed, especially for fine-grained fiberglass mesh. Therefore, this is a double-edged sword, and it’s up to you to decide how to prime it more conveniently. But it is necessary to prime it before plastering, and definitely twice.
So, today we learned how metal and fiberglass mesh is attached to the wall when performing plastering work. Ahead of us is a very long-awaited lesson on setting up the first plaster beacon.
Step-by-step lessons on plastering walls
Lesson 06. How to attach plaster mesh
Anyone who has worked on wall finishing knows that when applying a thick layer of plaster, the material may not be able to withstand its own weight and begin to peel off from the wall surface. To prevent this from happening, a reinforcing mesh is used. It is mounted on the wall and takes on part of the load.
In what cases is a mesh needed?
If the walls are plastered without a mesh, there is a possibility of the material peeling off under the influence of its own weight. Thanks to the reinforcing mesh, it is created monolithic slab, which can withstand any load. For plaster of different thicknesses, different meshes are created, designed for a specific load.

The use of a mesh makes it possible to form a durable layer of mortar, on which cracks will not appear even with prolonged use of the room. This result cannot be achieved without the use of the described products.
It is worth noting that even with improper mixing or non-compliance with the temperature level, the mesh helps maintain the integrity of the plaster. There are special meshes for facades that are not subject to corrosion.
Types of grids
On the market building materials You can find many varieties of meshes on which plaster is applied. In order not to make a mistake when choosing, it is worth considering the main types of such products and their features:

To choose from the proposed options, it is enough to determine in what conditions the mesh will be used. If you need to plaster the facade, it is better to buy metal or fiberglass products with large cells. When applying the compositions to interior walls You can use a plastic mesh.
How to attach the plaster mesh
To understand how to properly attach the mesh to the wall, it is worth considering the two most popular types of mesh - fiberglass and metal. It is much easier to secure the first named type of product, since for this you only need to screw in several screws at an equal distance from each other. Such fastenings are sufficient to securely hold the mesh.

To keep the mesh more securely, you should roll it out across its entire width in one piece, without dividing the product into several. Vertical beacons are installed at a distance of about two meters from each other during installation. After the mesh is hung on the screws, the thrown plaster seals it to the wall, so additional elements no fastenings needed.
The installation process for metal mesh is slightly different. This is due to the fact that under its own weight such a product is not able to be securely held on the mounts. Also cells metal mesh are big and need additional fastening mounting tape.

To secure it, you only need to cut off part of the mounting tape so that it can completely cover one cell. After cutting the mounting tape, it is fixed to the wall with self-tapping screws. You need to calculate the distance between the fasteners in such a way that the mesh does not sag on any section of the wall.
Surface preparation
Before you start plastering the walls, you need to clean the surface of dirt and old finishing materials. After finishing work there should not be any additional materials, as they can cause peeling of the plaster.

After cleaning the surface of the walls, it is necessary to apply a primer. Such compositions increase the strength of the wall and improve the quality of adhesion. They also prevent mold and corrosion. The primer helps the surface dry quickly and promotes better absorption of compounds that are applied after it.
Applying plaster
After preparing the surface and fixing the reinforcing mesh to it, plaster is applied in several layers. To properly apply the composition to the surface, you should consider the features of creating different layers:
First layer. Plaster is usually applied in two or three layers, depending on the material of the walls. Concrete, for example, requires three coats. The first of them is called “spray”. The plaster at this stage has a creamy consistency and is thrown onto the wall surface in any order. The composition can be spread, but throwing it on allows you to speed up the process. After applying plaster to specific area the walls need to be washed with a tool. After casting, the composition is leveled with a two-handed spatula from bottom to top.

Second layer. After the first layer has completely dried, you need to knead the plaster, the consistency of which should resemble dough. Then you need to throw the composition on the wall and, taking a trowel, spread it in the horizontal and vertical directions. It is after applying the second layer that the reinforcing mesh is completely covered with plaster. If it still protrudes to the surface, you need to apply the plaster again.

Third layer. At this stage, you need to level the composition more carefully so that no errors remain on the surface of the walls. Before applying the finishing layer, you need to wet the surface of the plaster.
This mesh plastering technology is universal and can be used when working with walls made of various materials.
The final stage of work
After the plaster has completely dried, it must be prepared for fixing finishing materials. To paint and wallpaper, just sand the surface with sandpaper. If there are noticeable unevenness on the wall, you need to start using the largest brand of paper. For ease of work, a piece of product is clamped on a grater. Grinding is done in a circular motion with little effort so as not to create new defects on the surface.

When the wall becomes uniform, you need to change the brand and continue grouting. If the surface will be painted, you need to take P120 paper. During the entire process, you should use goggles and a respirator to protect yourself from dust.
Since it is quite difficult to sand the surface in the corners, it is worth working either without a grater or using bars with sharp corners. If you want to make the work process easier and faster, you can purchase an electric grater. But to treat the walls of one apartment, it is not profitable to buy such a product. After sanding, you need to sweep away the dust with a brush.
Applying plaster under wallpaper and painting
Before starting work, you should determine exactly how the room will look and what will be used as finishing materials. If you choose wallpaper, you need to determine its type and thickness in advance. If they are thin, you need to apply several layers of leveling plaster. This will allow you to hang the wallpaper without any unevenness or bubbles.
For the room in which wallpaper will be hung, it is better to purchase ready-made dry mixtures, since using them you can prepare higher-quality plaster.
If plastering the wall surface occurs before painting, you should carefully prepare the wall, without leaving even small irregularities on it. The whole process is carried out in several stages:
- first, a leveling layer is thinly applied;
- then, if necessary, two more layers are applied to eliminate defects;


