Laminate is a demanding flooring, so its installation requires a strong and level base. Laying laminate flooring on an uneven floor is a problem that many people face before purchasing the material. Surface imperfections such as pitting, cracks, bumps and elevation changes can reduce quality flooring. One laminate failure will be followed by another, and this can lead to the replacement of expensive finishing material. Is there a way out of this situation? The answer is simple - of course, all of the above unevenness can be corrected before laying the laminate. In our article you will learn about ways to solve this issue. Using an example, we will look at several basic options for high-quality base leveling.
Consequences of laying laminate flooring on an uneven floor
It often happens that after removing the old floor covering (linoleum, parquet), we discover rather unpleasant moments in the form of an uneven floor. Many people have the following question: is it possible to install laminate flooring on such defects? Before laying laminate flooring on an uneven floor, we recommend that you familiarize yourself with why this coating cannot be installed on a surface with obvious flaws.
Here is a list of the consequences of such laminate installation:
- Material laid on an uneven base may be unstable, sagging and deformed under the weight of a person. This is due to the fact that when a person interacts with the panel, it bends into voids due to the fact that there is no flat and stable surface under the material.
- After a certain period of time, slabs on an uneven floor may “come apart at the seams,” and all connections may become loose, compromising the integrity of the laminate.
- If there is a significant difference in heights, the locks of this type of coating may be damaged.
- If you have a large concrete slab under the laminate slab, then there is a risk of a large crack forming in the panel, which over time will lead to damage to all other components of the laminate.
We hope that this list of consequences will provide a complete answer to the question of whether it is possible to lay laminate flooring on an uneven floor.
Types of underlays for laminate
Uneven floors and other base defects can be corrected with one little trick - installing a leveling underlay. Let's look at its main types:
- Cork backing.
- Cork-bitumen substrate.
- Polyethylene backing.
- Polyurethane backing.
- Backing made of wood fiber material.
All types of laminate underlays are laid directly on the base of the floor before installing the covering on a leveled surface. It should be taken into account that the laminate is not attached or glued to the installed substrate - it is simply in its free state. With the help of substrates you can hide only minor irregularities, but differences in height require special leveling.
Important! In most cases, instructions are included with the underlay about the possibility of maximizing the size of the unevenness without compromising the characteristics of the floor covering (laminate).
Leveling the floor when laying laminate correctly
This method should be used precisely in the case when the substrates are powerless. The most popular base for laminate flooring is concrete or wood floors. Now we will look at the most common method - leveling the surface using concrete pouring.
Step-by-step instruction:
- Let's prepare the base. We remove the previous coating and clean the concrete slab from dust and debris. Close up cement mortar deep chips, holes and cracks.
- Prime the surface. This will improve the adhesion of the final screed and concrete slabs.
Important! It is better to use not an ordinary primer, but a waterproofing one, if you need to level the floor in the kitchen of the first floor, located above a damp basement.
- We perform the alignment. If you have a problematic foundation with large differences in height, then use a cement screed. You can prepare it yourself (the ratio of cement to sand is approximately 1:3) or buy it already ready solution. It is important to monitor the water level so that the consistency of the screed resembles thick sour cream.
- We install rack beacons (you can take metal profiles, which will remain in concrete slabs after completion of work) at intervals of 0.5-1 meter.
- We spread the cement mixture between the slats, trimming the screed with a long rule. We wait for the solution to completely harden (2-3 hours).
- Level the cement screed with a wooden or foam trowel. Allow time for complete formation and hardening. concrete flooring(about 2 weeks), and then boldly install the laminate.

If you don’t have time to tinker with a concrete base, then use a more modern method of leveling the floor covering - using a self-leveling base, which is installed in this way:
- Dilute the dry mixture with water according to the instructions on its packaging.
- Pour the resulting solution onto the floor, leveling it with a spatula.
- We roll the surface with a roller with special rubber spikes. These manipulations will make the base smooth, without small air bubbles on the floor.
- Let's get started finishing laminate within 2-3 hours, since ready mix hardens faster cement screed.
How to lay laminate flooring on an uneven wooden floor?
We carry out the work according to the following instructions:
- Putting what we have in order wood covering. We examine wooden boards, revealing gaps, cracks and other flaws. We eliminate all these defects using putty.
Important! If some boards creak, then in this case we replace them. We fix the boards on the joists using self-tapping screws.
- Grinding wooden surface due to the fact that there are bumps and unevenness on our floor. Since a new scraper is expensive, we rented one to save money on purchasing new equipment for one-time use.
- Align wooden base.
- Check the base level. So, if everything is in order, then at this stage you can complete the process of leveling the floor. If you still notice significant unevenness, then lay sheets of plywood or OSB boards 20 mm thick on top of the boards.
The installation of laminate flooring on uneven wood floors is complete!
Before laying laminate flooring on an uneven floor, you first need to ensure that the base is even. Although knowledge of some nuances will also not be superfluous in this matter. The first thing you need to do is choose quality material. In other words, choosing a too “budget” option makes no sense. Especially if you plan to lay the laminated surface in a room with a high degree of traffic and humidity.
In such a situation, the results of savings will not take long to arrive. Considering the high number of counterfeits and products of dubious quality, navigate the market building materials it can be quite difficult. But if you show some interest in the documents for the goods, then with a high degree of probability you can protect yourself from low-quality products.
However, preparation is not limited to just one choice. After delivering the laminate to its destination, it will need to undergo a small acclimatization procedure. Why the material is kept indoors in a horizontal position for a period of 2 to 3 days. In this connection, the geometry of the panels is normalized in accordance with specific microclimatic conditions.
After the acclimatization period, it will be possible to lay the laminate. But whether an uneven floor is suitable for these purposes, we suggest you find out.
Read also:
How to lay laminate on a surface that is not too flat?
Some home craftsmen who are trying to do the installation on their own do not even worry about whether it is possible or not to lay laminate flooring on a surface with large differences in height. The opinion of professionals in this matter is unequivocal - it is impossible. Preparation of the base (leveling the existing rough surface) is mandatory.
What if you don’t level the surface and leave it as is? In this case, you can forget about the long period of operation of the new laminate flooring. Panels glued to the base will withstand such “harsh” conditions for no more than a year, and a laminate laid using the interlocking method will “last” even less (about 2 months), since regular excessive load will contribute to their cracking. Naturally, the floor will be very “musical” on uneven surfaces, squeaking after every step on it.
Before laying the laminate on an uneven base, you need to not only level the subfloor, but also install the underlay in order to provide an additional layer of heat and sound insulation. Some believe that you can get by with laying a layer of chipboard over the existing surface to make it smoother. Only particle boards(especially low-quality production) are not recommended for use in residential premises, since when heated they release toxic formaldehyde vapors into the internal atmosphere of the home.
Most best option– installation of the laminate on a perfectly leveled base. Only in this case, the stress from the inside in the assembled coating will be small. If we outline all the requirements for the surface in numbers, they will be as follows: no more than 2 mm of height difference per linear meter of length.
Key points for leveling a concrete surface
Often, a concrete screed acts as an uneven floor under the laminate. First, the base is checked for evenness, determining the degree of severity to correct repair errors. An excellent option for floor leveling is the use of self-leveling mixtures.
In situations where excessive differences in height are detected, a pre-grinding operation is performed.
If the foundation requires more thorough repairs, then you will need cement compositions special purpose. Such mixtures are more economical option, since their cost is several times cheaper than self-levelers. They are used as finishing coatings.
Working with such solutions requires some skills, but the leveling procedure is carried out with a minimum of cost. After which it is left for some time (indicated on the packaging of the mixture) so that the new screed becomes strong. And after the screeds have dried, they move on to directly implementing the technology of laying laminated products.
The main points of leveling a wooden base
Standard modern apartment, as a rule, has a concrete floor. But in older apartments and private houses there are wooden boards on the floor. Naturally, old floors become deformed over time. Therefore, for a wooden floor it is required preliminary preparation for subsequent laying of laminate.
The first step is to assess the condition wooden floors and then carry out repairs. It is imperative to eliminate bending and kinks in the boards, visible cracks and swellings, and their creaking. The wooden floor is leveled by sanding after all loose boards have been securely secured.
The leveling of a wooden floor can also be ensured by laying a plywood layer. However, the need for repairs due to this still cannot be ruled out. The use of cement or gypsum compounds for leveling is also appropriate here. Their selection is made based on the recommendations of the manufacturers.
Let's return to the actual laying of the laminate: it is carried out after the preparation work has been completed base surface.
A smooth and high-quality base surface will allow you to veil even minor errors of incompetent installation.
The use of a substrate is mandatory in all situations, both for the base surface made of wood and for that of concrete. If you plan to install the laminate in a room with a high concentration of moisture in the air, then a layer of waterproofing is also applied. It will prevent condensation from accumulating under the laminate. On a concrete base, it is a good idea to apply an additional primer.
Having set the markings in advance, they begin to lay the panels. Particularly careful markings should be provided for laying out the first row. Based on the color and texture of the purchased material, the interaction of light and panels and the method of their placement are determined. Easier to install are products that have a tongue-and-groove installation system. It is important to provide a compensation gap between the wall and the coating, since lock system laminate allows you to get a “floating” coating. The final cycle of work is attachment floor skirting boards and thresholds at joints with walls and other types of coverings.


Laminate is a modern, aesthetic and durable floor covering, presented on the market by a large number of manufacturers and options that differ in design, appearance, performance characteristics and price.
Why you can't lay laminate flooring on an uneven floor
Buyers often ask whether it is possible to laylaminate flooring for uneven floors. The answer is unequivocal - it’s impossible, and for several reasons:
- at minor irregularities the laminate can “play” under the weight of a walking person, and in the best case, the panels will simply separate at the joints, forming cracks, and the lamellas will have to be constantly additionally adjusted to each other;
- deflection over larger irregularities can lead to fracture of the laminate locks, and then the gaps that arise during operation can only be eliminated by replacing damaged panels;
- significant defects in the base, such as large chips, cavities or swelling, lead to fracture of the panels themselves, which irreversibly damages appearance floor covering and may be hazardous.
How to prepare floors for leveling
Before how to lay laminate flooring on an uneven flooror level it, make sure there are no serious defects: large cracks, cavities, swelling and chips on the concrete base, significant deflection of the joists wooden structure, traces of dampness or mold, as well as other damage. The use of damaged floors can lead to the appearance of extraneous sounds when walking, damage to finishing coating or prove to be dangerous to life and health.
Preparing floors for leveling
Universal methods of floor leveling
Before how to lay laminate flooring on an uneven wooden flooror concrete base, you should get rid of the detected defects, however, leveling methods vary depending on the design and material of the floor, as well as its curvature. Modern technologies provide and universal methods leveling floors for laying laminated panels.
Laminate underlay is an easy way to deal with minor unevenness.
Underlay for uneven floors for laminate flooringPerfect for those who are faced with minor flaws in the base. Modern roll materials made of polyurethane, polyethylene foam, natural cork, as well as bitumen-cork and bitumen-rubber mixtures, depending on the thickness of the coating, make it possible to level out unevenness up to 5 mm per linear meter (with an acceptable value of 2 mm/lm).

Underlay for uneven laminate flooring is perfect for those who are faced with minor flaws in the base
It should be noted that with an increase in the thickness of the bedding layer, it is necessary to increase the thickness of the lamellas in order to ensure the reliability of the locks and their strength. Iflaminate underlay for uneven floorsis not able to cover existing flaws, other alignment methods should be used.
Dry screed: how to level floors quickly and without unnecessary dirt
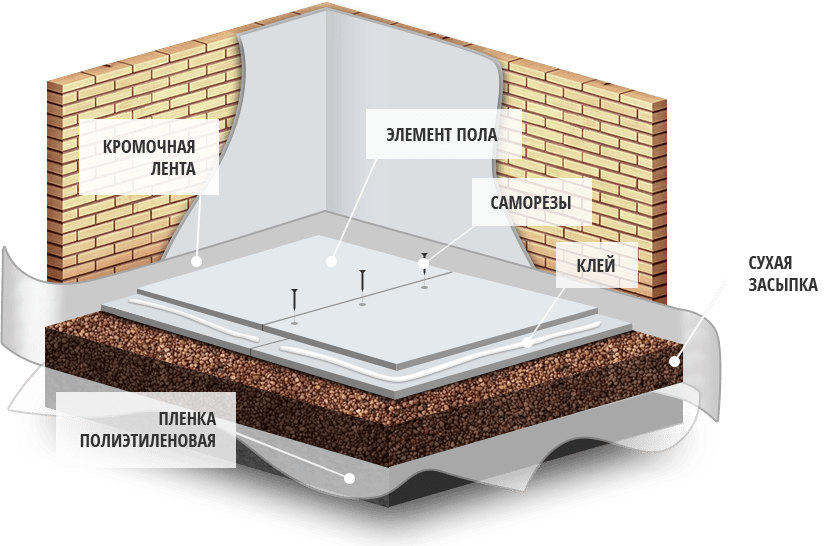
Installing a dry screed is a more complex and time-consuming method than using a substrate, but it allows you to bring even a very uneven floor to one level and get rid of constant slopes. Bulk materials The materials used in this method (usually expanded clay) have excellent vapor and moisture permeability, which will prevent dampness from lingering in the structure for a long time.
Dry screed is suitable for both concrete and wooden bases, but the methods for preparing them are different. On concrete floor Large cracks, chips and depressions are repaired. The wooden base is cleaned of excess debris and then covered chipboard sheets. At the end preparatory work by bubble or laser level Beacons made of metal profiles are set to mark the height of the backfill, and then granular material is poured and distributed flush with them. Subsequently, gypsum fiber sheets, plasterboard or plywood are laid on the already leveled surface in 2 layers with offset joints, after which they should be glued with a special adhesive composition and connect with self-tapping screws.
Dry screed is suitable for both concrete and wooden bases
Methods for leveling concrete floors
There are 2 more methods suitable for leveling a concrete base, however, their significant disadvantages are the inevitable use of water and the need to wait for the composition to set and gain strength. Depending on the mixture used and the method chosen, this time ranges from several hours to several weeks.
Cement screed - a time-tested method
The installation of a cement screed is a method known for many decades to obtain an ideal floor level in premises of any purpose, even with significant differences in base heights.
Slatted beacons are set according to the desired floor height (it is recommended to use thin metal profiles, which will not need to be removed later), the original surface is cleaned of small debris and dust, and then filled with cement mortar (you can make the mixture yourself or purchase a ready-made one), which is distributed evenly with lighthouses. When the solution has set, you can additionally level it with a float to obtain a smoother surface. Depending on the brand of cement, installation of the finishing coating can begin after 14-28 days, when it has gained strength.

Cement screed - a time-tested method
Self-leveling screed - a modern method for those who don’t want to wait
Self-leveling screed is a more modern, faster and easier way to make the floor level. The algorithm of actions differs slightly from working with cement mortar: it is recommended to pour the leveling mixture from the highest point of the base, and after pouring and distributing it throughout the room, it must be rolled with a special aeration roller to remove air bubbles and avoid the appearance of cavities.
A significant advantage of this method is the relatively short drying time of the mixture, which is several hours (indicated on the packaging of the mixture).
The principles of leveling a wooden floor are fundamentally different from how a concrete base is leveled to the required level. Wooden floors can be leveled using materials such as plywood, OSB or chipboard. The safest, strongest and most durable is the first of them. For residential premises, sheets with a thickness of 13 mm or more are used. Algorithm for performing the work:
- Wooden floor is checked by long bubble level. In areas where the boards stick out especially strongly, it is worth tightening them to the joists with long screws, and hammering back the nail heads that have come out. You can also trim off protruding elements with a hand plane or power tool.
- sheet material is laid out over the entire area of the room to try it on, cut off excess parts, make cuts for risers and other obstacles.
- Sheets are marked around the perimeter and in the center. It is recommended to place the points where the screws will be screwed in at a distance of about 2 cm from the edge of the sheet, 15-20 cm apart. In the marked places, holes are drilled with a diameter smaller than the diameter of the screws.
- To avoid squeaking and other extraneous sounds that appear due to small debris (shavings, splinters, etc.) under the plywood, it is recommended to thoroughly sweep or vacuum the floor before installing the sheets.
- The sheets are attracted to the base sequentially; it is more rational to start from the corner of the room farthest from the entrance.

How to lay laminate flooring correctly
Even when installed on a perfectly flat floor, it is necessary to lay a backing underneath the laminate, which will significantly reduce the noise when walking, and will also allow you to distribute the load on the coating in a more gentle manner. On plank floor the substrate is laid along the floorboard, and the panels themselves, on any base, are laid across the substrate. Sheets of underlying material are connected to each other with adhesive tape (either fastening along the entire joint or pointwise is allowed), and do not require additional fixation on the existing floor.
When the leveling layer is completed and the underlay is laid, you can begin to lay the laminate. Recommendations for correct installation panels:
- thoroughly clean the floor before starting work;
- between the walls and the surface of the flooring it is necessary to leave a temperature gap of 10 to 20 mm so that the laminate can “float” freely during thermal expansion;
- in rooms of significant size, gaps for thermal expansion must be arranged every 10 m along the direction of the panels and every 8 m across;
- wedges for fixing gaps can be purchased in specialized kits for laying laminate flooring or made with your own hands from leftover boards or plywood;
- For lamellas that will be laid along the wall, it is worth carefully cutting off the locks on the side of the temperature gap; for this, manual and electric jigsaw, or a hacksaw with fine teeth;
- the panels are laid in strips and connected at the sides in a manner appropriate to the type of lock;
- the seams on the short sides of the lamellas are spaced at a distance of at least 30 cm from each other to avoid joints in the shape of a cross - this increases the strength of the joint, helps to avoid breakage of the locks, and makes the connection more durable;
- ready-made strips of panels are usually connected in assembled form, but some manufacturers use locking designs that allow several rows to be laid in parallel, which greatly facilitates installation, and the possibility of this method of assembling the coating is indicated on the packaging;
- To connect the final elements of each row, as well as all panels in the last row, it is recommended to use a mounting bracket designed for laying laminate flooring.


One of the most common problems when installing laminate flooring is an uneven subfloor. Laying laminate flooring on an uneven floor is, in principle, possible - but there are a number of nuances that will have to be taken into account during the installation process.
But it’s still better not to reinvent the wheel, but to prepare the base for installation. Precisely in ways from different materials and a significant part of our article is devoted to this.
Laminate and uneven floors: looking for compromises
Why you can’t lay laminate flooring on uneven floors
Often during renovations, having removed the floor covering (parquet, linoleum, etc.), we discover, to put it mildly, a not very smooth floor underneath. Moreover, this can be either a floor with unevenness - chips, depressions and sagging in the concrete, uneven boards, or a floor with a level difference. And here the question becomes relevant: is it possible to lay laminate flooring on an uneven floor?

The experts answer unequivocally - “No!” And in many ways they are right, because The consequences of laying laminate flooring on an uneven floor can be very different (but always unpleasant):
- Laminate laid on an uneven floor can “play” and sag under the weight of a person. This is due to the fact that when there is a difference in height, some of the laminate panels hang above the void - and when we step on such a panel, we bend it with our weight.
- Some time after installation, laminate flooring on an uneven base may begin to “come apart at the seams.” Connections can become loose, compromising the integrity of the floor covering.
- Over significant differences in the base, damage to the laminate locks is possible.
- If there is a large ripple on the concrete floor underneath the laminate panel, there is a risk of a crack forming in the panel.
You can see some of the consequences of this installation in the photo:

As you can see, laying laminate flooring on an uneven floor with your own hands is a thankless task. That is why, in a situation where the base of the laminate has significant defects, or its difference exceeds 2 mm per 2 m (we check using a level), measures must be taken.
Leveling underlay for laminate flooring
One of the easiest to implement ways to eliminate the problem of an uneven base is the use of leveling substrates.
The following types of substrates are available on the market today:
- Substrates made of natural cork;
- Cork-bitumen substrates;
- Foamed polyethylene substrates;
- Polyurethane substrates.
As a rule, the instructions for the substrate contain information about what maximum size it can compensate for unevenness without damaging performance characteristics laminate

Let's start with the concrete floor. We will perform the alignment according to the following scheme:
- To begin with, we check the floor using a level, identifying differences in the base plane. We also visually determine the presence of cracks, sinkholes and sagging in the floor. All these defects can interfere high-quality installation laminate
Note! If there is another coating applied to the concrete floor, it must be removed. Before starting leveling work, we must be left with bare concrete.
- Then we start leveling the floor. The easiest way to do this with your own hands is using a self-leveling mixture.
- Mix the components of the self-leveling mixture in a special container using.
Note! When mixing the self-leveling mixture, strictly follow the manufacturer's instructions.
- To get a perfectly flat floor, you can place beacons on it using a level. However, when preparing the floor for laminate, such efforts are perhaps unnecessary.
- Pour the prepared mass onto the floor, starting from its highest point.. Distribute the mixture over the floor with a spatula or a special mop.

- To remove air bubbles from the mixture, roll it with a roller with rubber spikes.
After the mixture has dried and gained strength (and this period depends on the brand of the mixture), we lay a substrate with a waterproofing effect on it, and then proceed to laying the laminate. Well, you can find out how to lay laminate flooring on an uneven floor (or rather, on a leveled concrete base) by carefully watching the video instructions in this article.
Leveling wooden floors
WITH wooden floors the situation is almost identical: before laying laminate on an uneven floor, the floor needs to be tidied up. We begin leveling by inspecting the floor, identifying gaps, cracks, creaking floorboards, unevenness and other defects. They all require correction.
- We correct the creaking of floorboards by securely fixing them on the joists. This may require partial disassembly of the rough wooden floor with replacement of boards or fastening of joists.
Advice! It is better to fix floor boards to the joists using self-tapping screws rather than nails. At the same time, you should not tighten the screws too much, as the floor may become skewed.
- We putty the cracks and cracks in the floor.
- If the wooden floor has more significant unevenness, sanding will help correct them. You can scrape the floor manually (it is time-consuming, labor-intensive, and it is not always possible to do it well enough), or you can use a scraping machine. As a rule, the price of such a device is very high, so it is not worth buying it - it is better to rent it.

- If the unevenness of the floorboards is quite significant, you can lay plywood sheets or OSB boards. Optimal thickness laid material – 15-20 mm. However, this method is not the best for laying laminate flooring - it is more suitable when we are preparing the floor for linoleum or carpet.

- Most radical way leveling a wooden floor - place a self-leveling screed on top of it cement based. As in the case of concrete, such a screed guarantees flat surface, on which the laminate will fit perfectly!
It is better to lay a substrate on both concrete and wooden bases. There will not be a significant increase in the price of the entire floor, but the quality of laminate installation will increase significantly! (details in the article)
We hope that in this article we have answered the question “Is it possible to lay laminate flooring on an uneven floor?” in as much detail as possible. And if during the renovation you encounter the problem of an uneven foundation, then you will know how to deal with it!
Very often, during renovations after removing the old floor covering, you discover a not entirely smooth surface underneath. What to do next? Is it possible laying laminate flooring on uneven floors or does it need to be leveled? Let's figure it out.
All manufacturers recommend laying laminated panels on a perfectly flat floor. Only in this case can they guarantee a long service life of the floor covering. We claim that laminate flooring uneven surface it can still be mounted, but it all depends on the type and size of the unevenness. Under certain conditions there is a own way solving the problem.
What types of unevenness on the floor can be
Depending on the type of unevenness, we will decide what to do next for laying the laminate. The following types of floor defects can be distinguished:
- Surface cracks and crevices;
- Elevation differences along the perimeter of the surface and sagging.
In the first case, such irregularities will not cause problems with the laminate flooring, so you can safely begin installation. In the second case, everything is a little more complicated. It is necessary to determine the difference in surface heights and the height of the sagging. You can do this as follows:
- Using a water level. We fill the level cavity with water and draw a mark on the wall at an arbitrary height (about 1 meter from the surface). Next, we apply the second end of the level every 2-3 along the entire perimeter of the room. We align the water level at the first end with the previously drawn mark and draw the mark of the second end. As a result, on the walls we get a lot of marks at the horizon level, but not a rough surface. We measure all distances from the marks to the floor. Subtracting from the resulting highest value the least we get is a height difference in the room.
- A laser level is used to obtain more accurate results. Otherwise, the essence of the measurement process is the same as with the water level.
- Can also be used building level, the length of which is equal to or greater than 2 meters.
What consequences can occur when laying on an uneven base?
There are a number of reasons why laminate flooring should not be laid on defective floors. You must know them to understand the seriousness of the problem.
- Laminated panels, due to the gravity of the furniture or when walking, will “play” on uneven surfaces. Part of the board will hover over the void and at the same time pull neighboring boards along with it. Over time, laminated panels will deform and break down.
- If there is sagging on the floor, after a certain time after installation, the laminate will move apart at the seams and break the joints, trying to find a place without unnecessary stress.
- Differences in the base plane exceeding 3 cm cause deformation lock connections and destruction of the entire laid structure.
- Cracks right in the middle of the board will not be uncommon with significant sagging on the floor.
Everyone understands that installation on such an uneven floor is impossible. It should be done once, but efficiently, to avoid unnecessary financial costs and nerves in the future. You need to find it first optimal solution this problem.
Leveling with underlay
If not large differences height of the base, it would be most rational to use a special leveling substrate. The maximum leveling distance for each substrate is different and it is indicated on the label by the manufacturer, but on average it is 3-5 mm. In addition to leveling properties, it will also provide the laminate with hydro- and sound insulation. It is attached to an uneven floor using glue or a self-adhesive base, and only then the laminate is laid on it without connecting to the substrate.
The following substrates are available for sale:
- Made from foamed polyethylene or isolon polymer.
- Polystyrene, consisting of two layers. The bottom layer is made of direct polystyrene, and upper layer from aluminum foil.
- Cork substrates that require additional moisture insulation.
- New types of substrates: polymer solution, polystyrene foam, wood boards.
Leveling floors with significant unevenness
For more serious irregularities, more serious work will have to be done to lay the laminate flooring. The first of these methods of eliminating floor unevenness using concrete screed. It is used for very large elevation differences. For this purpose it is prepared sand-cement mortar, is leveled on an uneven surface, and equal to the horizon level. The concrete hardens and the robot is ready to begin installing the laminated panels.
For smaller differences you can use building mixtures using self-leveling floor technology. It bears this name due to the ease of its use. You prepare the solution according to the manufacturer's recommendations and pour it onto the prepared surface. To speed up hardening, a needle roller is passed over the solution layer.
Another way is to install OSB plywood sheets. The logs are installed on the prepared joists and sheets of plywood are attached to them using self-tapping screws. OSB boards can be glued directly to the floor with minor unevenness.

Laminate installation process
Whatever method of leveling the uneven field for laying the laminate you choose, then you should proceed directly to installation. The process itself is not anything special and does not depend on the initial unevenness of the base. If you are gluing laminated panels, take breaks after 3-4 rows to allow the glue to dry. If you have laminate flooring with a click system, then gradually assemble the boards between failures, gently tapping them to prevent damage.
We hope that we have helped you and helped you understand such a serious issue. We hope you understand everything possible consequences unevenness of the base and accepted right decisions. Good luck!
Video: leveling the floor
Post Views: 3,211


