Everyone, even the most organized and responsible person, probably knows what it’s like to forget your keys. Without keys, you may not be able to get into your own country house, into the garage, which is often not too close to the house, into your office, even into own apartment, if you leave and return before other family members. And how nerve-wracking it sometimes is when you are very late, but you can’t leave the house only because your set of keys has disappeared somewhere!
The time has come to get rid of such problems and finally make a wall-mounted key holder - a very convenient and extremely practical thing, which, moreover, can look original in the interior of the room. Of course, you can buy a ready-made item, however, if you are reading these lines, then this option is not suitable for you and it’s time to take up the tools. In this case, we will try to help with ideas. Moreover, it is always more pleasant to use a good-quality thing made with your own hands.
Key holders are usually pocket and external - wall-mounted, cabinet-mounted and table-top. The first type is a leather or other suitable material case, similar to a regular wallet or glasses case, but its purpose is to conveniently store keys in one place, while simultaneously protecting nearby fragile items from scratches and other damage. The keys themselves are securely attached to the case using metal snap hooks.
External key holders are arranged according to a general principle and differ, by and large, only in their location - a separate element on the wall, using the surfaces of corridor furniture, in a desktop version. What they all have in common are hooks or other alternative types of fastenings, located locally on a special surface, open or in the form of a lockable cabinet. 
Often, through the efforts of craftsmen, the key holder turns into a general storage place for all frequently lost items - in addition to keys, these can be glasses, lighters, flash drives, mobile phones, etc. In this case, in addition to standard hooks, the key holder is equipped with special shelves, pockets, cells, etc., as the imagination and personal preferences of the home craftsman dictate.
Below are illustrations of the finished products: the procedure, materials and tools, design, as well as the dimensions and type of key holder itself, depend only on your personal skills, abilities and tastes - in any case, it is much more interesting to draw, draw with dimensions and choose the mounting methods yourself and finishing of parts rather than assembling according to drawings and other people’s instructions. We hope that from the variety of options you will find one that suits you, or you will be inspired to create an original item.
1. Wooden frame 13x18 cm or larger. The key holder in the photo is 17x22 cm. The width of the baguette profile itself should be at least 2.5-3 cm.). If we take a plastic frame, then the width of the baguette should be at least 3 cm and it cannot be overloaded with keys. It’s best if the frame has its own d-ring hanger, rather than a regular photo backdrop.  If they are not available, you can purchase them at a framing shop or some hobby stores.2. A beautiful napkin or picture with the desired image, or a ready-made decoupage krata.3. A standard set of materials for decoupage - glue, white primer, acrylic lacquer, brush.4. Hooks for keys (see the photo for options - half-ring screws, buttons or classic hooks) - they can be purchased at hardware stores5. Knife, ruler, pencil, screwdriver, awl or drill, several self-tapping screws 3.5x16 cm.
Subsequence
 The master class consists of two stages - performing decoupage and assembling the key holder. I start with decoupage.1. I disassemble the frame, take the backdrop out of it and apply 2 layers of white primer. I wait for it to dry or blow dry it.2. I glue the selected fragment of the decoupage card onto the glue.3. After drying, I coat it with varnish in 2 layers. Again I wait for it to dry, then I put it in the frame. In general, nothing complicated. Now the master class comes to the most interesting stage with different options - attaching hooks.4. If the frame is wooden, then select directly on it where the hooks will be screwed and mark
 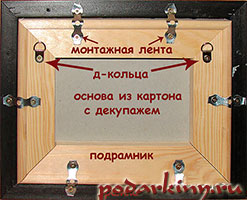 holes for self-tapping screws with an awl or a pencil, drill and fasten the hooks. That's all. It's worse if the frame is plastic. Then either, at your own peril and risk, we attach hooks to the sides of the baguette itself, or we make more reliable design, as in the example in the photo. To do this, we assemble a wooden subframe inside. You can either order it ready-made from a framing workshop, or assemble it yourself from timber 2-3cm wide. and attach it to the frame using mounting tape. To show how all this can be done, I made my master class using a plastic frame. How to do this is shown in detail in the photo of the reverse side.
 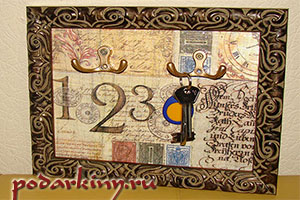 If you don’t want to tinker with the stretcher, then you can go the other way - at the very beginning of the work, remove the backdrop from the frame, measure with a ruler and cut out exactly the same piece of plywood or chipboard on which to decoupage, and then insert it into the frame. And attach the hooks directly to the plywood.5. I hang it on the wall with 2 self-tapping screws, onto which I attach the d-rings of the frame. We don’t hang it on a rope or cable, it will dangle and the keys will start to fall off. The master class is over. The key holder is ready!
This master class shows, perhaps, the simplest and most cost-effective way to make a key holder with your own hands. It is simple in materials, manufacturing techniques and does not require much time.
Other ideas for making a key holder
There are many different ways and ideas for making such a wonderful interior gift - from embroidery, with photos, comic and others. I will share my ideas with you.
With embroidery
One of the most cozy and warm options is making a key holder with embroidery. The photo shows three examples of such solutions, and in each of them the embroidery is framed not just in a frame, but in the form of an opening box with hooks attached inside. The inside of the box can be painted with acrylic paint or lined with velvet mat. Making a gift will take a lot of time, but the result is worth it! An easier way is to frame the embroidery and attach the hooks directly to the baguette, as in the next photo. Another idea with embroidery for a wedding or housewarming is to make a metric on the embroidery for the newlyweds or housewarmings with their names and the date of the important event. Such a gift immediately becomes personal and even more precious to its recipient. 
With photo
If you don’t have time for embroidery, then why not frame it? finished photo? Then you can simply screw the hooks onto the baguette as described in our master class. The idea is simple to implement, but it will be possible to preserve the personality of the gift, especially if, instead of a simple photograph, you make a small photo collage and decorate it using the digital scrap technique.
With humor
The wall-mounted key holder can be decorated in a comic style. Here is a short master class: take the backdrop out of the finished frame, sew several objects onto it - banknote, vintage keys or any other suitable items.  Attach a printed sign on the bottom that reads “in case of urgent need, break the glass!”, then put it all back into the frame under the glass.
From the thread
A rather extravagant option for fans of eco-style can be made from a thick branch. The wood will have to be thoroughly dried and thoroughly saturated with furniture varnish, after which you will have to attach the hooks and get this rather non-standard solution for the interior.
From a ready-made base
The easiest option is to make a key holder from ready-made decoupage bases, which are sold in hobby stores. A plywood blank can be made in any shape, for example, in the form of a house. It will have to be decorated using decoupage technique.
From old furniture
Another mega-creative option is to make a key holder from the door of an old locker. The following video master class explains in detail how to bring it to life:
Desktop key holders
If your hallway has bedside tables or shelves, then you can easily place a table-type key holder on them. If purchasing a finished product turns out to be problematic, then you can take an ordinary vase or box, which will be convenient for taking keys. There are also a lot of ready-made products of this type; just visit the stores. 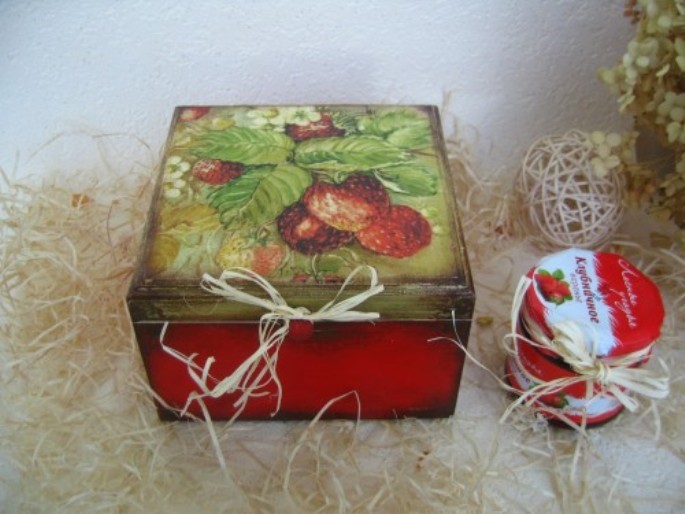
Wall-mounted key holders
 The simplest and most popular option for key holders are wall-mounted models. They are a rigid base on which there are several hooks. This option is often used by home craftsmen; just use your imagination, and your apartment will be decorated with an original piece of furniture.
Such key holders can be of different types and shapes. Therefore, when choosing them, you need to focus on your interior design.
The key holder should not stand out in the interior; it is better if it becomes an original addition and a convenient household item.
Key holders in frames
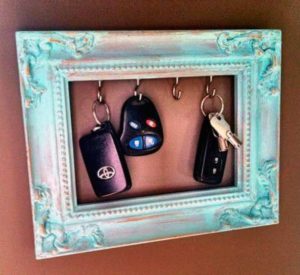 Such key holders look very aesthetically pleasing in any apartment or house. Their background can even be a photograph, not to mention a beautiful landscape. The only thing you need to take into account is that a painting or photo can get scratched over time, so they need to be protected with something.
If instead of a picture you install a more rigid base and attach several hooks to it, then you will get an excellent key holder design. You can use another option, when hooks for keys are attached directly to the frame, and a beautiful picture is placed inside. But this requires a frame made of a more durable material; a cast or overlay bar will not withstand such pressure.
Key holder locker
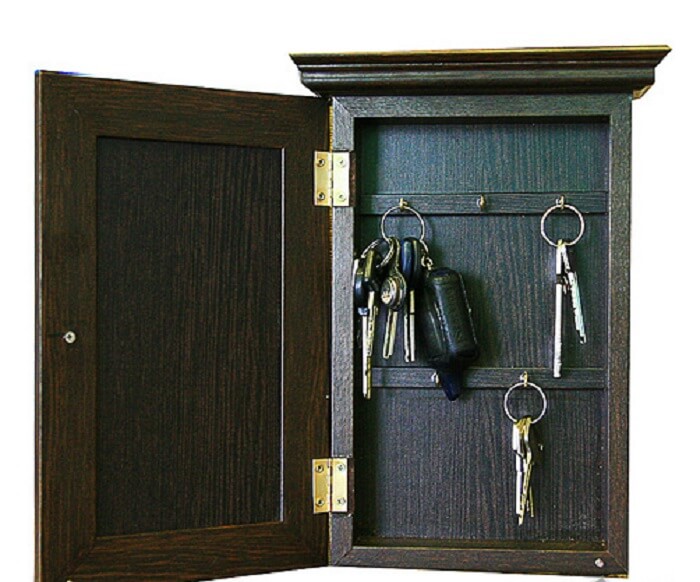
 This is another option for a wall-mounted key holder. If you are not a fan of the fact that the keys are freely available to everyone, then you can try to find a more secluded place for them. A key holder in the form of a locker will do the job perfectly. If you are a supporter of handmade products, then so much the better, because there are a lot of ideas for implementation.
The cabinet can be such that it can accommodate not only keys, but also other items that are in frequent use. The locker itself is decorated beautiful paintings, photographs or decorative elements. A clock may be located on the front part.
The next advantage of this option is the ability to install a secret lock on the cabinet. Of course, this is already overkill, but for some it is a way out.
House key holders
 This version of the key holder is a variation of the locker model. And although the model is somewhat rustic, its roof gives it a special charm, which is why the product is very popular.
This design has several advantages. For example, compact dimensions, you will agree that a cabinet on the wall takes up quite a lot of space. But most importantly, the house key holder fits perfectly into any interior, especially since when making it at home, you can use fragments and details to decorate it that were used during the renovation of the hallway.
Key holder organizer
Organizers became popular not so long ago, but now they are making our lives easier and more planned. Oddly enough, key holders can also have this function.
This model will be appreciated by all family members; in addition to the fact that the keys will be in a permanent place, you can also place other useful reminders, receipts or notes about upcoming purchases in it.
If you wish, you can also place a reminder board there, on which you can write something and then erase it. Several shelves or pockets are useful for storing other things, glasses or pens for writing. 
Decorative key holders
Decorative key holders include all models made by yourself. Agree that it is very difficult to repeat a purchased product based on its design, and why, but making something according to your own design will be much more interesting. Especially if a person has a good imagination and a sense of proportion.
Here are a few examples of wild imagination:

How to make a key holder from a photo frame
If, after reading our article, you were inspired by the idea of making a key holder with your own hands, but there was nothing suitable at hand except a photo frame, then do not despair, and feel free to get to work, this is exactly the material that you need. 
What you need to prepare for work besides a photo frame:
- several hooks;
- glue;
- 2 brushes;
- dye.
The work can be divided into several stages:
- First of all, you need to choose the color of the key holder. To do this, compare the design of your interior with one or another option. Experts recommend not making an exact reference in the design, otherwise you will have to look for another key holder in case of renovation in the hallway.
- If the frame already has some kind of coating, but it is very old or peeling, then it needs to be cleaned, sanded and re-coated with the chosen color.
To ensure that the new paint lays evenly on the wooden base, use a primer.
- After the paint on the frame has dried, you can start hanging hooks on it.
- Now your main task is to decide where and how such a key holder will be attached. The place for it is chosen in such a way that it is convenient for all family members to use it. Therefore, the height of the frame is calculated depending on the height of the smallest in the family.
If you have a lot of knowledge in carpentry, you can use your knowledge and make a key holder yourself from leftover wood. And we will analyze a simpler version of the product, made of plywood. 
How to make a key holder from plywood
To create a key holder from this material you need to put a lot of effort. But first, draw on paper what you want to get in the end. Look for implementation ideas on the Internet or think over a diagram of plywood blanks.
There is only one way to simplify this task. In order not to have to cut out plywood blanks, you can purchase them ready-made. Then all you have to do is find a base for the key holder and skillfully distribute all the elements on it.
If you don’t like easy ways or you enjoy the work itself, then all the blanks can be made according to your own drawings and diagrams. To do this you need to prepare:
- plywood or fiberboard;
- acrylic paint;
- cloth napkins;
- paper napkins;
- tassels;
- glue;
- several hooks;
- sandpaper.
The process of making a key holder can be divided into several stages:
It is no coincidence that acrylic paint is used for these works. It dries very quickly, which allows you to begin further work after a short period of time.
You can choose any technique for decoration. Some people like decoupage, while others prefer mosaic or painting, but in one case or another it is better to give preference to a proven option so as not to spoil the product.
We will analyze the design option using decoupage.
If this is your first work, then take as a basis small drawings that will not occupy the entire surface of the future key holder. Let these be the key fragments of the drawings that receive all the attention.
How to decoupage a key holder:
- Using your hands, cut out designs of the desired size from a napkin. Carefully separate the two lower layers, and apply the first layer with the pattern to the surface of the key holder.
- Take decoupage glue. If you don’t have it on hand, you can always replace it with regular PVA diluted with water in a 1:2 ratio. Mix these two components and, using a brush, carefully begin to apply it to the design attached to the plywood blank.
- Work begins from the central part of the fragment to eliminate wrinkles in the material.
- After the adhesive composition has dried, the entire surface is coated with varnish in several layers. When applying the next layer, the previous one must dry.
- After the last layer has dried, you can begin the process of attaching the hooks. How they will be located will depend on your imagination.
All that remains is to attach the key holder to the wall and the work is ready. Now your keys will always be in their place. There are many more options for making key holders, you can watch one of them in the video presented:
In conclusion, we can say that the key holder is an indispensable piece of furniture in every family. To eliminate everyday searches for lost items, it is better to take care of their storage location, especially since the key holder can effectively complement the interior of your hallway with its appearance. There are a lot of options for this product, from banal decorated jars on the bedside table to cabinets with secret mechanisms. What you want to see in your hallway is up to you, especially since such a product can easily be made with your own hands.
Similar articles
Beauty and safety in one product
A key holder means a small product (mainly made of wood or other natural material), the appearance of which is determined by the imagination of the author, but the functional component is reduced to storing keys and small accessories. Often they are the ones that are lost most often from their owners.
A small device could be:
- Pocket. In 90% of cases, this is a small wallet where the keys are stored. Its main purpose is to preserve the integrity of not only “trifles,” but also the screens of mobile phones, tablets and other gadgets. Many people prefer pocket models due to their practicality and compactness.
- Wall-mounted. It is located on the wall near the front door, in the area of direct access and review. These are not only the usual hooks, but also real works of decorative art made of plywood, solutions made using decoupage technology.
- Door. Hung on one of the cabinet doors in the hallway or hallway. If possible, you can use the useful space of the door.
- Tabletop. Mostly these are small boxes decorated with original patterns. The design varies, and special key rings are used to hang keys.
It is not at all necessary for a wall-mounted key holder to serve as a storage place for keys. It can be supplemented with a diary or a tear-off notepad for notes. The arrangement of additional shelves will allow you to place shoe polish, a “spatula” or a cleaning brush on them.
A wide range of products for the hallway is on sale. But such products are not distinguished by visual sophistication, but often it is the design that is a reflection of wealth and versatility inner world owners of the house. From this point of view, it is more profitable to make a wall-mounted key holder yourself from scrap materials, especially if you have basic skills in working with tools.
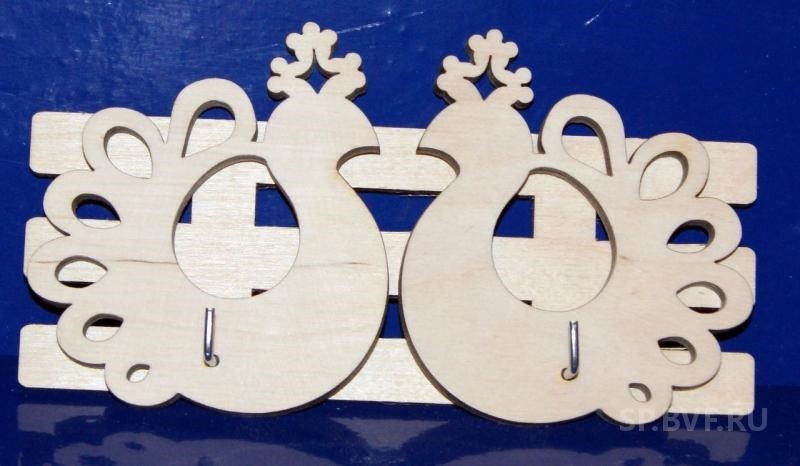
Key holder in the form of a house with keychains
Before you make a key holder with your own hands, you should decide on the idea for this product. Best choice A wooden model for the wall is considered due to its ease of manufacture, wide design possibilities and optimal functionality. A striking example of this is a house made of plywood.
To make it, you need to prepare the following tools, materials and compositions:
- a piece of plywood measuring from 25x15 to 25x25 cm;
- stain;
A home-made house-shaped key holder suggests that the product is given the shape of a residential property. And if the main part is decorated with decor or decoupage, then the keychains are given any desired shape (as an option - parents and children). You can find many figurines and objects on the Internet.
Making a key holder is carried out in the sequence presented below.
The plywood blank for the future house is processed at the ends. The corners should be rounded and the chamfer should be completely removed from the surface. We do this all with sandpaper.
We apply a printed image (in our case, a house) to the surface. It is very important that the bottom edge of the picture matches the edge wooden material.
The leaf with the image of the house is fixed (with push pins), and then outlined and transferred to the surface (as a carbon copy).
The figures are transferred under keychains in the same way.
On next stage necessary with a hand jigsaw cut through the outline of the figures.
At the bottom end, the workpiece is trimmed by 3-5 mm (the key rings holding the keys should protrude slightly above the wooden structure).
To eliminate chips and roughness, the surface is ground. Small holes are made under the rings.
Decoupage is the best way to decorate the finished product. Alternatively, the pattern can be burned using a wood burner.
The key holder is ready for use! All that remains is to screw it to the surface of the wall near the front door. Use it to your heart's content and don't lose your keys.
What shape of key holder should I choose?
Today, the key holder is known as compact decorative items, and not just the flat, rough cabinet with which “homely housewives” decorate their interiors. Their shape naturally stands out, and like a natural work of art, however, hooks are screwed into each one. By the way, this is not necessary; there are also unusual products. However, this is the only part that should be purchased at a hardware store if you want to do everything yourself.

What is interesting is how key holders have evolved over time. It all started with a simple board in a frame on the surface of the wall, apparently since the keys in the old days were mostly massive in size. It was easier to place them on an ordinary board, sometimes decorated with a colored background. By the way, the placement of the keys could have been horizontal to create an effect, but the type of arrangement they themselves were wall products.

Over a period of time, the space for keys began to be replaced by multifunctional devices, or mixed together with other necessary little things in the front drawers. We think this shouldn’t last any longer, the wall-mounted key holder carries with it sacred meaning and the beauty of interior aesthetics. And in this sense, those owners who preserved previous customs still preferred a smaller option. In other words, a key holder with a board, with similar metal hooks, can be found to this day.

Continuing the excursion into history, I would like to pay attention to the choice of the owners of private buildings, where there were charming outbuildings. The keys there were not very small, so they used parquet boards in frames with individual numbers. A similar key holder hung on the surface of the wall at the entrance to the kitchen from the yard. Often heavy bunches of keys were stored on it.
We insulate a metal door
All types of key holders described earlier are intended for open access. At the same time, in order to protect property from third-party penetration into the home, everyone very often uses key holders and cabinets that have secret locking devices. This is almost a real safe, but with a lesser degree of protection. However, it is precisely the housekeepers who decorate the rooms for concierges, which from the outside look like high-quality and good furniture made to order.
Our craftsmen, born in the USSR, had a good gift for adapting all the materials at hand, and then found the most spontaneous solutions. So, in one of the famous magazines of that time, a project for a house key keeper was published. This special case, since the “house” made on the basis of a broken old clock resembled the same key cabinet.

Its subsequent update allowed enthusiasts to make house key holders in all sorts of variations and forms, decorated like paintings. One of these professional key holder making classes with my own hands we want to offer for our readers.
What is it like?
A key holder is a small device whose design is limited only by creativity a certain person. It happens:
- Wall-mounted. In most cases, it is placed closer to the exit at eye level in order to be constantly visible. As a rule, it has hooks in its own design, but a more creative version of fastening the bundle can be used.
- Pocket. It is a small wallet in which the keys are hidden. This product is useful in that it makes it possible to eliminate the occurrence of scratches on some gadgets, and also eliminate the occurrence of holes in pockets and bags.
- Tabletop. In this case, it is made in the form of a small box with beautiful patterns. In order to remember to put the keys in it, a specialized keychain is put on them.
- Placed on the locker door. Most have a dressing table near the exit. Why not use the surface inside the door to greater advantage?
Key holder drawer
This item does not necessarily have to be only the place where the keys live. In addition, it can be adapted for business or other notes. A non-standard mount will be useful for glasses or a mobile phone. Moreover, additional shelves will allow you to remember where the brush and shoe polish were left the previous time. Here you can also save portable storage devices (flash drives), or their covers, which are bound to get lost somewhere. If wall-mounted key holders are located close to the doors, then it is better to provide additional levels of protection so that no one sticking their hand in can take possession of the key holder.
There are a very large number of ready-made options. They are developed taking into account the place where they will be used. For office or other companies, they make metal products that have a built-in lock. Hotels can boast of solutions that are made under certain interior. Warehouses are not distinguished by elegance, but are designed in order to fulfill their own important function, and not pleasing to the eyes. But the renovation of an apartment or house is a reflection of the inner world of its residents. Because of this, it requires a personal approach.
Pocket key holder
It is more comfortable to carry things with you when they are carefully packed. A pocket key holder is considered not only a practical accessory, but also part of the image of its owner. It can be implemented with each drawing or be with the family coat of arms and initials. All this can be done without outside help. For one of the popular options you will need:
- a flap of skin measuring 16×10.5 cm;
- leather-colored rivets;
- riveter;
- blank for a key holder with carabiners;
- scissors;
- punch.
Pocket key holder
The key holder will look more beautiful if its edges are rounded. To apply markings, you can use a bottle cap, an intercom key, or something suitable. Further actions proceed in this order:
- A blank with carabiners is attached to the future installation location.
- Marks from holes are transferred to the skin.
- A bunch of keys is placed in the middle and the edges are wrapped. This will make it possible to measure where the rivets should be located in order for the product to close. Appropriate notes are made.
- The free space located under the keys is lined with similar leather. This will make it possible to secure the back wall and eliminate its wear.
- Using a punch, holes are made using the marks.
- The workpiece is secured with rivets, and then the rivets are attached to the lapels.
An additional highlight will be a line from the opposite thread, which can be done with a small indent from the edge.
Another option can be implemented according to the principle of a multifunctional device. In order to determine which piece of leather will be needed, you need to concentrate all the keys into one bunch and fasten them with something. You will need to place them on the material and mark the width with a margin of a couple of millimeters. Next, the folds are made and marks are applied. One side remains open, and the strap serves as a fastener. The point is that the keys will be in a case, and you can pull them out like a penknife. Additional elements will require eyelets and furniture fasteners. The final one is used in most cases to secure adjacent cabinets. It is a threaded bolt that goes into the tube. Their hats are designed the same way.
- A hole is made in the places where the keys will be secured.
- The components are placed in place, with small leather pads placed between them to prevent them from rubbing or rattling.
- Furniture fasteners are installed.
- Rivets are attached to the strap and to one of the sides.
- A grommet is placed at the bottom to which you can attach a keychain or something else.
Some people love a key holder in the shape of a wallet. To do this, a piece of leather is selected and a zipper is sewn into it. The ends are sewn up. A small braid with a ring or carabiner is fixed in the middle. A bunch of keys hangs on it.
Desk key holder
Tabletop
A table key holder is most often placed on a dressing table. It is placed in the most visible place, so that when you enter the living space, you can throw away the keys without looking and go about your own business. In its role, you can use any small saucer or jewelry packaging. There are ready-made solutions such as shell-shaped products or small cabinets.
As you can see, wooden or iron key holders are an affordable solution. You can make them yourself, using what exists nearby. Most of the solutions presented can be used as a basis for your research. We are very interested in what ideas you have. Don't forget to share them in the comments to the post.
How to make a beautiful wood key holder in Japanese style:
Master class on making pocket key holder:
Iron key holder
As a key
Key holder made of baguette
Wall key box
One of the most effective and easily accessible fertilizers in the country is compost. It is free, contains many substances useful for plants, improves the structure of the soil, and is done, although it takes a long time, but without much effort. To ensure that the fertilizer is correct and can be used for its intended purpose, you need a suitable compost box, which is easy to build with your own hands.
General rules for making compost containers
These rules arise from the peculiarities of making plant fertilizer. In order for the compost not to burn out and to be truly useful for the garden, several conditions are needed:
Based on these rules, we understand that a good compost bin should consist of walls with holes and a tight, moisture-proof lid. Two compartments are needed: in one the compost is prepared, in the second it is used. Sometimes they make three sections. It is better to place the structure away from the house and recreation area, so that the unpleasant smell does not interfere with enjoying the delights country life. The place should be far enough away from neighbors. It would be great if the sun alternately shines and the shadow falls on the box.
 The compost bin should be located far from a residential building
 Separately, it is worth mentioning the bottom of the compost bin. Some gardeners don't do it at all, simply placing the box on the ground. This can lead to the fact that most of the useful fertilizer is simply washed away by melt water. In addition, it will be inconvenient to get it out, since it will partially mix with the ground. Therefore, two options are recommended:
- make good drainage - lay a layer of branches and boards at least 25 cm thick on the bottom, like a warm bed;
- make a ventilated bottom from boards, polypropylene mesh, metal grating - whatever is available on the farm.
A plastic or iron bottom is preferable here, as it is more durable.
Options for compost structures: how and from what they can be made
As a rule, waste materials are used to make such a box:
- old (but not rotten!) boards;
- slate from a broken roof;
- remnants of corrugated sheeting from a roof or fence;
- unnecessary mesh.
Any structural elements that tend to rot and rust must be treated with protective materials.
 To make a wooden compost bin last longer, you need to treat the boards with an antiseptic to prevent rotting.
 Board compost bin
For a 1x2 m compost bin you will need:

You can take boards from an old fence or buy the cheapest slab (lumber processed on only one side).
The composter is made in the following sequence:
- A layer of turf and fertile soil is removed from the intended installation site.
- The bars are dug in along the edges of the box according to the three-on-a-time pattern long side and two on short.
 It is better to make a compost box with two or three compartments
 - Long two-meter boards are attached to three bars using nails or self-tapping screws. Then short boards are drilled into the sides of the structure. The distance between the boards for ventilation can be left 3–5 cm.
- 2 covers are made from short boards. To make the structure lighter, you can make it not solid, but either a lattice or like a gate, when a frame is made around the perimeter of the lid and another board is attached diagonally.
 A lattice-type lid for a compost bin is easier to lift and lower than a solid one
 - The lids are covered with durable black film and hinges are attached to them and to the box. To hold the lids in open position, you can attach a hook.
- If you make a hatch from below to remove the finished fertilizer, it can also be made on hinges and equipped with a hook.
 The lid is attached to the box with hinges, and a hook is used to keep it in the open position.
Video: how to make a compost bin with your own hands from boards
Compost box made of corrugated sheets
If large-scale construction is underway at the dacha, including replacing the roof, as a rule, sheets of corrugated sheets remain. They also make an excellent composting material, but ventilation must be carefully considered. To make it you will need:

Construction is carried out in steps:

Video: how to make a compost box from corrugated sheets with your own hands
Mesh compost bin
Such a box will be quite light; if necessary, it can be moved to another place. For construction you will need:

Manufacturing procedure:

Slate compost bin
Materials and tools that will be required:

The construction of the box includes the following points:

Since the slate is wavy, ventilation occurs through the cracks formed by the waves on the sides and through holes from old nails.
 A slate compost box is made according to the same principle as high bed
 Table: comparison of pros and cons of different compost bin options
A compost bin is a necessary accessory for a summer cottage, because you can put plant residues and food waste in it and get excellent natural fertilizer. Proper design of the box and correctly selected material will ensure good processing of green mass into compost.
To ripen and store organic fertilizer, special containers are used - composters. A compost container can be purchased ready-made from plastic with a sealed lid. Such structures are more suitable for anaerobic fermentation.
But for the aerobic method, it is better to make a compost bin with your own hands. It is more convenient to mix the components so that they do not turn sour, and you can regulate the access of oxygen. Based on the amount of organic matter, compost containers are made of a suitable size - two or three chambers.
The options for making a compost bin with your own hands are varied both in material and shape. There is always something to use on the farm - boards, slate, plastic panels, metal barrels, brick or concrete.
Types of compost bins
There are two fundamentally different ways to prepare compost - aerobic and anaerobic. In the first case, it is necessary to ensure a constant flow of air to the waste so that bacteria can function and multiply. Aerobes need oxygen to live.
The second option is to equip a cesspool, seal it and allow anaerobic microorganisms to process organic matter. Such bacteria do not need oxygen; on the contrary, they die in its presence. This method saves more nutrients and there is no smell, which is also important if there are neighbors nearby who do not have a compost bin.

In turn, compost bins for aerobic processing differ in design. Most convenient option– in the form of a prism. By attaching a handle to the side, you can easily turn the contents over and control air access. The composter is in a suspended state; it is possible to close it completely and turn it over several times.
The most common option is to make a compost bin with your own hands and install it on a level area. In this design, you will have to turn over the waste manually - with a pitchfork or shovel. The compost container can be made to any size. You can divide it into several sections to lay organic matter one by one.

While in one the fertilizer is ripening, in the second it is already on its way, in the third it is ready. It is advisable to make such a garden composter with your own hands if there are animals and birds on the farm, as well as a large plot that requires constant updating.
How to make a composter with your own hands
There are options for making compost bins with your own hands with drawings. But this does not play a special role. You only need to remember three sizes:
- width – no more than 1.5 m;
- depth – 1 m;
- Any length.
With this ratio of values, the process goes faster and the fertilizer is of higher quality. The fact is that air penetrates heavier into the depth of the mixture if it is large. If you make a wide and deep pile, you will have to think about an electric mixer with a hydraulic drive in order to turn it on periodically and mix the mass.
Slate
Slate is well suited for fencing a pile. This is a dense material. Unfortunately, it can be damaged by impact, but it is also easy to replace. How to make your own compost bin from slate:
- It is necessary to mark straight lines according to the size of the composter and stretch the rope as a guide.
- Dig holes in the corners with a drill and dig in logs - these will be corner support pillars.
- Nail slats or boards between them so that the slate can be secured.
- Using a drill and screws, attach the slate to the boards, placing it under the nails soft material– leather or dermantine.
- It is advisable to fill the bottom with concrete.

The front part of the collar is made lower to make it convenient to work with a fork. Another option is a door if you want to tinker with awnings.
Tree
Wood is the most popular option for making compost bins. Both simple boards and thick branches cut from a tree are used. The disadvantage of wood is its susceptibility to rotting processes that occur inside the composter. After a few years, a new collar may be needed. Wood cannot be treated with chemicals, as microorganisms may die.
Pallets bought at the nearest store or supermarket are popular. This smooth structures, so they can only be connected to each other with long nails.
Video: Solid DIY compost bin
How to make your own compost bin from pallets:
- Calculate the required number of blanks. For example - one for the end sides, two for the length, two for the roof. Only 8 pieces. If the planned length is longer, then more spare parts will be needed.
- Make markings on the ground, choosing in advance a place for the composter from pallets.
- Use a hammer and long nails to connect the pallets. It is better to make a roof with awnings so that the storage can be closed when it rains.
Some people prefer to make containers with an open bottom, explaining that earthworms should penetrate the pile. With this method, a maximum of 10 individuals will be taken into the container. It is not enough.
To get results quickly, it is better to purchase red Californian worms, whose reproduction rate is 500 times higher than domestic eukaryotes. This is a specially created type for industrial production fertilizers They process organic matter quickly and in 2 weeks you can get a completely finished fertilizer.
If you use only bacteria, then during decomposition the liquid will flow down and be absorbed into the ground, and with it nutrients that could be preserved. To do this, the floor in the composter is concreted, and a layer of peat, straw or soil is placed on the bottom.
Plastic
Plastic waste has also been successfully used to contain the maturing waste mixture. Disadvantages of plastic:
- in the cold it is more fragile;
- in hot weather it releases harmful substances if it is not intended for food.
Pros - easy to install and quite durable at average temperatures. It is better to use not panels, but an ordinary plastic barrel liters per 300 - 400. Holes are drilled in the walls and bottom to allow air to penetrate. This design can be moved to another place; lids are sold with the barrels, which will protect the compost from rain.

Alternatively, use plastic mesh, fixed on a wooden frame: both oxygen enters and components do not fall out through the cracks.
If you have an old plastic or acrylic bathtub on your household, you can also use it to make a compost box with your own hands. You will have to cover it with a thick film or tarpaulin laid on boards.
Composting Bin Requirements
The requirements are primarily for aeration if aerobic bacteria are used. The width between the boards should be at least 2 - 3 cm.
It is not recommended to install a composter with an open bottom near a drinking well. It is carried at least 15 m away. You cannot set up a waste storage facility near your home - when manure and waste decompose, harmful and dangerous substances are released - methane, carbon dioxide, hydrogen sulfide.
DIY garden composter diagram should be universal:
- storage of ready-made substrates is provided;
- unloading fertilizer from below, because it ripens faster in the lower part;
- possibility of transfer to another place.
If you don’t skimp on materials, the collar will last for many years.
Tools for work
In order to reliably and correctly make a compost bin with your own hands, you may need the following tools:
- drill or screwdriver;
- nails or dowels;
- hammer;
- tape measure for measurements;
- a mixer if you plan to fill the bottom with concrete and a container for diluting the concrete mixture.
Any site owner has such a set, but if you buy a special container, you won’t need tools - plastic models are simply installed on the ground without any preparatory steps.
Video: Basic rules for good compost
Building a box for manure and humus with your own hands
You can compost not only plant waste, but also cattle manure and bird droppings. These are nitrogen-containing substances and the primary task is to preserve them. You need to know how to properly make a box for manure or humus.
For information: in rotted manure the nutrient content is reduced by 50%. That is, such manure is no longer used as fertilizer. It is only suitable for adding to the soil to restore the soil and feed bacteria
Manure is stored in two ways - cold and hot. In the first case, bedding manure is folded tightly into a pile and compacted so that less air gets inside.
Such a pile will not burn and the beneficial nutritional components will last longer. The box for the cold composting method is made airtight - the boards are nailed close to each other. The lid is also made airtight. After laying the manure, you will need to cover it with grass, soil or straw.

The hot method of storing manure requires oxygen, so the boards are placed wider. After ripening and overheating excess liquid evaporates, the substance loses its original volume and weight.
To preserve the remaining nutrients, the humus is covered from rain and other precipitation. It is not recommended to bring manure to its extreme state, because then you will have to add mineral fertilizers to provide nutrition to the plants.

The better the quality of the soil, the richer the crop grown on this land will be. But it happens that the initial data is not very good, and you have to fertilize the soil.
To do this, you can use various fertilizers, but it is best to make a compost pit, which will become a source of environmentally friendly pure material. Let's consider how to make a compost pit with your own hands: manufacturing options and materials suitable for this purpose.
How to make a compost pit: features of structures of this type
In order to understand how to properly make a compost pit, you first need to understand what it is used for. Typically, a compost pit is used to dispose of organic waste, which, as a result of the rotting process, turns into organic fertilizer. There are many design options and each owner can only choose the most suitable option for himself.
A compost heap does an excellent job of disposing of mowed grass and fallen leaves. Under the influence of time, moisture and microorganisms, all this turns into fertilizer, which can be used to grow any type of crops both in gardens and in the vegetable garden.
Make a compost pile organic fertilizers doing it yourself is not at all difficult, especially since there are many ideas for independent implementation that can be used as a basis. You can make your own compost pit using pallets, which are usually used for transportation and storage. building materials. They can be bought at a fairly low price, or it is quite possible to simply find them on your own site.
How to properly make a compost pit at your dacha: choosing a location
Speaking about arranging a compost heap, one cannot fail to mention the importance of its correct location. First of all, the structure must be sufficiently distant from residential buildings. In addition, the place where it is installed should be well blown by the wind to avoid stagnation of air and concentration of the unpleasant odor emanating from it. In addition, access to the compost must be ensured so that the process of adding raw materials or removing finished fertilizer is as comfortable as possible.
Helpful advice! In order for the rotting process to proceed faster, it is recommended to periodically mix the layers inside the heap. Therefore, even at the stage of planning and arrangement, it is worth considering how this can be accomplished.
In addition, the following criteria for choosing a site suitable for a compost pit must be taken into account:
- the selected location must be located at a sufficient long distance from any sources of drinking water, for example, a well or borehole. The distance between these objects must be at least 25 m;
- if the site is not level, but on a slope, then you need to make a compost pit below the water level (preferably at the lowest point of the site). This will prevent the entry of rotting waste and clean water;
- You should inquire in advance about the most common direction of the wind, since the pit often becomes a source of a rather strong and unpleasant odor, and can cause discomfort to both you and your neighbors;
- it is worth making sure that there is not only a free approach to the pit, but also sufficient quantity places to be able to bring in waste or remove finished compost using a wheelbarrow.
Helpful advice! It is advisable to choose a shaded place for the compost pit, since sunlight has a negative effect on the rotting process, significantly slowing down the composting process.
What can and cannot be put in a compost bin
In order for the fertilizer obtained as a result of rotting to be of high quality and bring benefits to the plants and not harm, each summer resident needs to familiarize himself in advance with the list of those products that can or cannot be added to the compost. So, the following are great for composting:
- grass, weeds, leaves, hay, straw, etc.;
- berries, fruits and any peelings from them (raw);
- waste from wood products that have not been painted;
- paper products (napkins, bags, cardboard) in crushed form;
- waste from the preparation of tea, coffee or cereals;
- tree branches and roots after grinding;
- needles;
- herbivore manure (biennial only);
- wood ash.
Important! The percentage of compost containing peelings from products such as potatoes and tomatoes should not exceed 15-20%.
- any plants that have been affected by pests;
- plants exposed to diseases such as powdery mildew, late blight, etc.;
- excrement of domestic animals, as they may be contaminated with helminth eggs;
- bones and leftovers from meat products. They will cause an extremely unpleasant odor and will also become food for rats;
- inorganic waste - plastic, rubber, synthetic fabrics and metal;
- plants that have been treated with herbicides;
- the remains of cabbage, the rotting of which provokes an extremely strong and unpleasant odor.
As for composting weeds, experts recommend putting them in a separate pile, which is covered with film on top. Thus, the risk that the plants will take root again is eliminated and you can count on their death with one hundred percent probability.
If you add weeds to the general pile, you often have to deal with the fact that perennial plants take root, especially if, as a result of regular watering or rain, the humidity is quite high.
Important! To speed up the decay process of waste, it is recommended to first crush it. This is especially true for items such as branches, roots and paper products.
Having figured out what can be put in the compost pit and what cannot, all that remains is to familiarize yourself with the rules for caring for waste in order to ensure that it rots as efficiently as possible. Moreover, the duration of the period during which the compost will be formed directly depends on the correctness of the care:
- Humidity is the most important indicator that affects the rotting of waste and the formation of compost. In order to maintain the desired level, it is recommended to periodically water the pile with a watering can. In this case, it is important that the end result is moist, but not wet, since the abundance of water will negatively affect the viability and activity of bacteria;
- Once a month you need to carefully stir the pile, thus ensuring access to oxygen. This allows the waste not so much to rot as to burn out. At the same time, if it is not possible to completely dig up everything, you can use a pitchfork and pierce the pile in as many places as possible;
- To speed up the process of compost maturation, the addition of nitrogen is required, which is found in large quantities in the green parts of plants, as well as in slurry.
It usually takes 1-1.5 years to form high-quality compost. During this time, almost any waste and residues will fully decompose. You can tell when the compost is ready visually and by smell. Ready mix It is a crumbly mass of brown color and has the smell of forest earth.
Compost pit: what is it and what is it for?
The issue of using compost is one of the most popular. After all, not every summer resident knows how and why to use the resulting mixture, and how great its benefits are. In fact, you can fertilize the soil with compost for almost any plant. Cucumbers, peppers, zucchini and pumpkin respond best to this type of feeding. The result can be seen already in the next harvest season - the fruits grow large, have a bright and rich color, the taste and aroma are well expressed.
But there are also plants for which compost is not so beneficial. For example, root vegetables, tomatoes, melons and watermelons should not be fertilized abundantly in this way, since this leads to a decrease in the yield, and on the contrary, the amount of green mass increases.
Strawberries respond well to compost, especially if you first cut them “at the root” and cover them with a semi-decomposed composition. Then all this needs to be watered, and all that remains is to wait for new fresh foliage, as well as a bountiful harvest next season.
Do-it-yourself compost pit: manufacturing options and design requirements
In order to properly build a compost pit, you need to understand how the compost heap should be structured. There are many options for making it yourself, but first of all you should pay attention to the fact that it should consist of three parts. In this case, you need to install 8 support posts, each of which must be treated with a protective agent.
Helpful advice! Can be used as a protective composition for posts machine oil, fuel oil or even tar.
A fence can be used as a fence on one side, but boards are better suited for the rest. Partitions are constructed from them, in which holes for ventilation must be left. This promotes the decay process. It is also necessary to install a door that allows access to the compost.
Setting up a compost pit at your dacha with your own hands involves ensuring the proper level of ventilation and at the same time protecting the contents from precipitation. So that the compost heap does not turn into a swamp, during rainfall it needs to be covered with a special lid of a suitable size. And if the weather conditions are not too harsh, then it is quite acceptable to use plastic film for this purpose.
Another option is to use construction pallets that are pre-disassembled. Using a circular saw, the boards can be divided into individual elements and then assembled into a suitable structure. In this case, it is better to fasten the boards vertically. The front board can be secured with adhesive. To give such a structure stability, it is necessary to use a building level and level the lower strips.
It is also important that the height of the walls of the homemade composter is such that it is convenient for a person of any height to add, stir and remove compost.
Interesting! You can pay attention to the designs of compost pits made using Finnish technology. In this case, some design features are of interest, for example, when you remove humus from one compartment, it is automatically filled with raw materials from the adjacent one.
Do-it-yourself compost pit: manufacturing options, photo examples
The type of compost pit is determined based on several factors. One of them is the installation method. Let's consider all existing options:
- allocating a specific place for organizing a compost pit. In this case, a pit is initially prepared, which is very similar to a well, but at the same time has a shallower depth. The walls of the pit are additionally strengthened to prevent the soil from shedding and are sheathed at a distance of 20-25 cm from the bottom. This distance is necessary in order to provide the microorganism with free access to the waste;
- Another option is to install a special container in the garden plot designed to collect waste and process it into compost. This method allows you to get finished product any time. This design is based on a pit with formwork, as well as a special box made of boards. When implementing this option, it is extremely important to pay due attention to the organization of ventilation;
- a DIY compost heap is the easiest way to solve the problem. To do this, it is enough to make a substrate consisting of sand, gravel and dry grass. Waste is simply placed on top, which will begin to rot on its own over time.
You can make a compost bin with your own hands using many various technologies and instructions. The proposed designs may differ in the materials required for work, dimensions, properties and ease of use.
Helpful advice! Regardless of the type of structure chosen, before you begin laying raw materials inside the structure, it is necessary to thoroughly loosen the bottom and install ventilation holes.
DIY compost bin: manufacturing options and instructions
Before making a compost pit with your own hands, it is advisable to consider as many options and designs as possible that can be used for this purpose. We will analyze in detail the instructions for making the most popular boxes made from various materials.
Garden compost bin: features of installation and operation
A garden composter may well be presented in the form of a large box divided into several sections. Usually they make two or three compartments, but experts strongly recommend choosing the option with three sections, since each of them has its own purpose: the first is used for storing waste, the second is for ripening waste, and the third stores finished compost.
Depending on the individual wishes of the owner, the composter can be stationary or mobile (move on wheels). In this case, the recommended height of the box should not exceed 1 meter, and the size of each section should be about 1-1.5 meters.
Important! All wooden elements must be treated with a special protective compound designed to provide the material with reliable protection from harmful insects, as well as moisture.
To make a compost bin with your own hands, you need to follow the following procedure:
- 8 wooden blocks are dug into the ground;
- Using boards, also previously opened with a protective compound, partitions are constructed. To do this, they are attached to supports at some distance from each other.
- In the front part, two compartments should be sheathed only to the middle, and only one bottom board should be nailed to the third. The first two have doors mounted on top.
- The back and end parts are completely sheathed.
- The entire structure is covered with two layers of moisture-resistant paint.
- Finally, handles, latches, etc. are attached.
At the bottom of such a box there must be drainage, which may consist, for example, of dry tree branches. Immediately after this, you can proceed directly to placing waste inside the structure.
How to make a compost pit at your dacha using wooden boards
Compost pit - perfect solution, if necessary, do not spoil the appearance of the site with the appearance of a pile of waste. The formation of fertilizer in such a design takes much longer, and in order for the process to proceed as correctly and efficiently as possible, it is important to take care in advance of the correct arrangement and provision of access required quantity oxygen.
Work order:
- First of all, you need to dig a compost pit, the width of which will be 1.5 m, length 2 m, and depth of about 1 meter.
- You need to dig wooden blocks into the corners, keeping a distance of 20 cm from the walls on each side.
- In 5 cm increments, boards are attached to these posts.
- The resulting box is divided into two parts using a wooden shield.
The bottom of the compost pit is filled with a ten-centimeter layer of tree bark, branches and straw. This mixture will take on the role of drainage, which will remove excess moisture and additionally ventilate the raw materials.
Initially, only one of the compartments should be filled with waste. Then, when one is half full, the compost needs to be transferred to the second compartment. This procedure will enrich it with oxygen as much as possible.
Important! The bottom and sides of the composter do not need to be covered with anything so that earthworms, which take an active part in the waste processing process, can freely get inside.
How to make a compost bin from slate
Slate is a durable material that is great for creating a structure designed to collect and process organic waste into compost. Creation procedure suitable design consists of several stages:
- choosing a suitable location and taking measurements to determine the appropriate size of the hole;
- according to the marks, a not too large recess is dug, in the corners of which supports are installed, for which boards or metal pipes can be used;
- sheets of slate are installed around the perimeter of the pit;
- Using the same sheets, the resulting container is divided into several parts (two or three).
The use of this design is carried out in accordance with all the same recommendations that are given for compost pits made of wood.
How to make a concrete compost pit at your dacha
If you pay a little more time and attention to the process of arranging a compost pit, then as a result it can last several decades without problems. To do this, it is enough to concrete it. You can do this as follows:
- you need to dig a hole about 80 cm deep, 2 m wide and 3 m long;
- make formwork inside the pit;
- then you need to prepare a solution consisting of sand, gravel and cement. To do this, you need to pour 5 liters of water into a bucket and add 5 kg of sand and cement to it so that the ratio of dry components is 3:1;
- the resulting solution is poured into the formwork;
- using wooden boards and a chain-link mesh (a metal frame is also suitable), a lid is constructed for the pit.
It is very important that when using boards to mount the cover, there is a distance between the elements necessary for normal ventilation.
Compost pit using Finnish technology: secrets of installing the structure
The main requirement for structures made using Finnish technology is compliance with certain dimensions. The height and width of the box must be the same and be 1 m. This is extremely important, since in a smaller box the raw materials will simply dry out, turning not into compost, but into dust. Big sizes are unacceptable for another reason - in this case there is a risk of burning the contents from too high a temperature.
To make such a structure, it is best to use wood. Slate in this case is not a very suitable option, since structures made from it are characterized by a longer period of waste decomposition. Again, a cheap and at the same time quite convenient option is a Finnish compost pit made from pallets.
Algorithm for assembling a compost pit using Finnish technology:
- The frame of the box of the required size is assembled from wood pre-treated with antiseptic agents.
- Then the finished frame is sheathed with boards. The boards are placed tightly only on the partitions separating the compartments. On the side walls, the boards should be spaced with a 1 cm indentation.
- The rear wall of the structure is also covered with boards at a distance of 1 cm.
- The bottom of the box is covered using a slab. At the same time, it is also important to maintain some distance between the elements so that excess liquid can be effectively drained.
- A small door is installed in the lower part of the front wall of the structure, the height of which is usually 30 cm. It is secured using ordinary door hinges.
- The roof of the structure is made gable, with one of the slopes attached to hinges so that it simultaneously acts as a door, providing the opportunity to pour waste inside.
Interesting! In one box, the size of which is 1x1 m, you can prepare an amount of compost sufficient to fertilize a plot of land of 5-7 acres.
Compost pit-dry toilet: what is it?
Another special kind compost pit is a dry closet that can also turn human waste products into compost. It is a structure consisting of two containers, each with a volume of 80 liters.
Using this type of dry closet is as follows: after visiting the toilet, you need to turn a special handle, which is responsible for supplying a portion of a special mixture consisting of peat and sawdust. Thanks to this mechanism, the mixture is distributed evenly and covers up the waste that gets inside.
It is quite possible to use such a composter-dry toilet for recycling not too much food waste, simply by throwing it inside and filling it with dry mixture. When the first container is completely filled, it must be moved away and the second one installed in its place, which can be used in the same way. At this time, the first container will contain a compost mixture, completely ready for use.
Important! The compost obtained in such a composter will be very concentrated. This must be taken into account, and before adding it to the soil, you need to dilute the mixture with soil, sand or peat.
Criteria for choosing a ready-made composter for a summer cottage
At the same time, an increasing number of owners of suburban areas are striving to move away from the use of home-made structures, giving preference to purchased models. Let's consider what advantages and disadvantages they have ready-made designs, and what parameters you need to pay special attention to before making a purchase.
In most cases, preference is given to simple and convenient composters that are easy to assemble and operate independently. But since the number of offers on the modern market is extremely large, it’s up to you to decide on the most suitable option it can be really difficult. Experts recommend using certain criteria as a guide, since models can be:
- collapsible or integral;
- with temperature sensor;
- with a special device that allows you to loosen the contents;
- with a mesh instead of the bottom, which provides protection against rodents;
- various shapes and sizes.
Composters also differ in the material that was used for their manufacture. Thus, plastic is the most popular today because it is light in weight, which allows it to be moved around the site without problems, and its service life is extremely long. If the design is planned to be stationary, then you can consider purchasing a metal composter. Wooden models can also be found on sale, but they are not very common due to their short service life and exposure to external factors.
Products for compost pits: features and advantages of use
Having figured out how to make a compost heap, many expect that they will soon be able to use the nutritious fertilizer made in it. But the reality is that the natural ripening of compost can last up to 2 years. Of course, you can just be patient and wait. But you can go the other way by purchasing a special product that promotes compost maturation and speeds up this process.
Interesting! The issue of using excipients is especially relevant for those regions of the country where the warm period is short. If warm weather lasts only 2-3 months, then the compost maturation period has to be shortened artificially.
So, there are several drugs that are well suited for this purpose and are recommended not only by specialists, but also by real users. They all have different names but, in general, the principle of their operation is the same. As an example, consider the drug Tamir.
Tamir is an extremely complex drug, which includes a whole complex of microorganisms that, in the natural environment, are responsible for ensuring the decomposition of organic debris and waste. Due to the high concentration of these bacteria, the composting process occurs many times faster, and after 2-3 weeks full maturation occurs.
It is worth noting that compost obtained in this way is not completely decomposed waste and has a slightly different consistency than usual. But its final decomposition will occur directly in the soil, which will bring even greater benefits to the plants.
Important! It is believed that compost obtained as a result of exposure to auxiliary preparations, as a fertilizer, is many times more useful than that obtained naturally. Therefore, answering the common question, is it possible to use products for compost pits, the answer is unequivocal - not only is it possible, but even necessary.
All products of this type are used according to the following technology:
- if the pile has not yet been formed, then the drug is added on top of each new layer, after which the whole thing is watered;
- in the already prepared heap, you need to make a depression at full height, into which the drug and water are added.
Other ways to speed up compost heap maturation
In addition to complex preparations, you can use other methods to stimulate the processing of organic waste and the maturation of compost in the pit. Let's look at each of them in more detail:
- the use of rotted manure, which is quite capable of replacing biochemical preparations intended for composting. At the same time, it is prohibited to use fresh manure, since it can become a source of not only helminth eggs, but also weed seeds, pathogens, etc.;
- a solution made from ordinary yeast. To prepare it you will need 1 liter of water and about 1 tablespoon of dry yeast. To this add 200 grams of sugar (1 glass). This solution is poured into the depressions made in the compost heap;
- herbal infusion. To improve the effect, it is mixed with chicken droppings or slurry in a ratio of 5:2. It is important to know that the amount of nitrogen contained in fresh bird droppings is much greater than in manure, which means the ratio should be different.
Helpful advice! To ensure that bird droppings regularly fall into the compost heap naturally, you can install a feeder above it. This will greatly facilitate and speed up the process.
Methods to accelerate ripening also include artificial moistening of raw materials, turning them and other measures designed to create the most comfortable microclimate for composting.
How to make a compost pit at your dacha with your own hands
Whatever design is chosen for making compost, it is unlikely that its appearance will ultimately be attractive enough. Chances are, no one wants to look at a compost bin, so it might be helpful to think about how you can use original design to improve its appearance.
The problem of camouflaging a compost pit is especially relevant for small areas, since almost the entire territory is in plain sight. Although it happens that even for spacious areas, owners use different design strategies to give the compost pit a more attractive look. So, in order to hide such an object, you can use:
- camouflage with plants and hedges;
- artificial decorations and stationary fencing.
Work related to the manufacture of artificial fences must be carried out in an open area located at some distance from the location of the compost pit. This is necessary in order to make it more convenient to work and to be able to move freely without being exposed to discomfort from the smell emitted by the heap.
The main requirement for such a fence is that it should hide the entire site from the eyes of guests and owners. That is, the compost heap should be completely hidden behind it, and the appearance of the fence should be as attractive as possible and be in harmony with the environment.
It takes much longer and to some extent more difficult to create hedges for this purpose. But they look much more natural and elegant. The main thing is to pay attention to the choice suitable plant so that in the end the hedge is not too bulky and lush, and does not break the overall structure of the site.
Helpful advice! You can use light translucent screens entwined with vines as a fence. They cope with the task perfectly, and at the same time do not take up much space, so they are quite suitable for both large and small areas.
The best ideas for decorating a silo pit
Other elements, for example, special screens or screens, can be used to disguise the place where the compost heap is located. Bamboo fences have proven themselves to be excellent. Plants also look good if you carefully plant them in a row.
At the same time, it is strictly forbidden to build a compost pit directly under fruit trees, as this can lead to their death. You need to maintain some distance between the compost and the plants.
The most popular design methods are:
- fruit trees and berry bushes planted in a row;
- potted gardens placed on several levels to hide the entire structure;
- installation of a small architectural object: a gazebo or a fenced barbecue (of course, in this case it is worth taking care that the unpleasant smell of rotting waste does not interfere);
- flower beds with tall plants;
- supporting wall.
Separately, it is worth noting the camouflage of compost heaps if a plastic container was used for them. In this case, it is not at all necessary to completely mask it. You can use it as a decoration for your area by painting it in a bright color and planting beautiful flowers around it. You can draw any design on such a container, thus giving it originality.
The easiest way to work is with small compost pits, which can be hidden with an abundance of flowers or even shrubs. By the way, the compost yard is perfect place for experiments related to the cultivation of new varieties of annual plants.
You can clearly see how composters for a summer residence are made and designed with your own hands by watching training lessons and detailed instructions. You just need to decide which design is best suited in a particular case, and also take into account your own individual requirements and wishes. Otherwise, no problems will arise, since there are as many options for do-it-yourself compost pits as there are ready-made models.
How to make a compost pit with your own hands: video instructions
Many aspiring businessmen are thinking about production at home. Such a desire is completely justified, especially in connection with the realities of the current time. We have already written an article about. In this article we will look at many home production ideas and give our comments on each idea. We will also ask you to offer your ideas for home production in the comments below the article to complement the article.
Advantages of home production
- There is no need to spend the lion's share of income on rental of premises. This is home production. This issue is especially problematic for new entrepreneurs, for whom rent can eat up a large portion of their profits.
- At first, such production may be unofficially. Of course, this is only a temporary measure, which, nevertheless, will help you get on your feet and gain a foothold in your chosen industry.
- Ability to adjust production volumes. All costs will depend on the cost of raw materials. This allows you to change production volumes depending on the demand for the product offered.
- Minimum investment size.
- Opportunity to make a profit almost immediately.
All this allows you to significantly increase the chances of success and significantly reduce risks. Next, the most popular and profitable production business ideas today will be presented. At the same time, they will be divided into blocks depending on the possibility of working in an apartment or the need to carry out all the work in a private house.
Production at home in an apartment
This block includes the direction of home production, which you can do right in your apartment. For greater convenience, we have divided the ideas into thematic blocks.
Food
One of the most popular industries today is household. This demand is primarily due to the fact that the products offered are consumer goods.
Delicious baked goods without leaving home
You don't need any special education to cook homemade delicacies. Many women who cook well are successful in this area of business. You will need very little to work: a mixer, kitchen utensils. Any attentive housewife has all this in her kitchen. Additionally, you can purchase special equipment with which you can knead the dough. A regular oven will suffice for small quantities. Particular attention must be paid to baking recipes and their external execution. Taste and aesthetic qualities must be at their best so that buyers are interested in the product. You can subsequently sell baked goods on the street or fulfill orders from restaurants and coffee shops.
Homemade jam
Necessary costs: from 7–8 thousand rubles.
For such production, additional equipment may not be required. For normal operation you need: pots, jars with lids of different sizes (preferably small ones, as they will be easier to sell), a seaming machine. As for raw materials, you can go in two ways: either buy products in stores or markets, or take everything you need from your own garden. It should be noted that the profitability of such a business in winter is about 30%. But in the summer it is less profitable to sell jam. Therefore, preparations made in the summer can be held until winter and sold at a better price.
Pickles
Necessary costs: from 10–12 thousand rubles.
Vegetables and mushrooms can be used as a base. The former can be grown independently or purchased at a favorable price from farmers, the latter can be collected from the forest or purchased at markets. To work, you will need your own stove, jars, lids, seaming machine and the actual raw materials. By the way, you don’t have to limit yourself to cucumbers and mushrooms. The following dishes are quite popular today: sauerkraut and pickled cabbage, Korean carrots. It is worth thinking in advance about selling your products. If the production is still very small, you can offer to buy something to your acquaintances, friends, neighbors.
Production of semi-finished products
Here we are considering the option when an entrepreneur produces sausages, sausages, dumplings, dumplings from meat purchased from farmers or meat processing plants. If a businessman plans to raise animals himself, then he will need a country farm in which he will keep livestock. In this case, you will need to obtain permission to carry out sales from the Sanitary and Epidemiological Station. All actions will have to be coordinated with them.
Therefore, semi-finished products are the most acceptable option. At first, it is better not to make the assortment large. About 30 titles will be more than enough. It is worth taking care of the cooking recipes. The tastier and more unusual the product is, the greater the demand for it will be.
To work, you will need ordinary kitchen utensils. Particular attention should be paid to the choice of knives and meat grinders. You will need a separate freezer for storing finished products and simple meat.
Homemade herbal tea
Necessary costs: from 4–6 thousand rubles.
Today people are increasingly concerned about their health and well-being. That is why the demand for “healthy” products is growing rapidly. Various herbal teas are no exception. At the same time, the work does not require special tools or costs. You can make herbal teas yourself in the summer, going out into nature. Missing Ingredients can be purchased at a pharmacy. In this case, it is best to sell it dry. You can also think about beautiful packaging of the goods - buy special bags, print labels with the manufacturer’s phone number, name and composition of the collection. It is very important to maintain proportions. A variety of recipes and the addition of spices and aromatic herbs will only increase demand. For work you will need measuring scales, containers and raw materials.
Packaging of bulk goods
Necessary costs: from 10–15 thousand rubles.
In this case, sales volume will largely depend on how the packaging is designed. What can be packaged? Nuts, seeds, cereals. You can purchase these goods at a base or some warehouse, package them at home and offer your neighbors to buy a package of treats at a favorable price. If you go to a more serious level, you will need to take a more detailed and professional approach to creating packaging. At first, you can do this manually. And gradually look for large clients who will be willing to buy products in bulk.
Needlework
This block includes production formats that require special skills or talent from the entrepreneur.
Decorative jewelry made from polymer clay
Necessary costs: from 8–10 thousand rubles.
The main advantage over many stores will be the individuality and uniqueness of the items offered. From a technical point of view, the process is quite simple. For work you need special boards, knives of different sizes, material, small decorations in the form of sparkles, beads, buttons, chains and other things. For a product to be in demand, you need to put imagination, enthusiasm and skill into your products. Low cost helps to get a decent income for handmade products.
Handmade boxes
Necessary costs: from 3–4 thousand rubles.
There are many options here. They can be made from wood, shells, sequins, beads and other decorations. In this case, all costs are reduced to the purchase of the necessary raw materials. Interesting ideas, diagrams can always be found on the Internet. Particular attention should be paid to the upholstery of the inside of the box and the handles. If the product is quite large, it makes sense to insert a mirror into it according to size. It is worth taking care of creating special fasteners for storing rings, earrings, and chains.
Handmade stained glass
Necessary costs: from 14–18 thousand rubles.
Similar decorations are used today to decorate the interior. Stained glass windows are attached to walls, partitions, windows, doors. However, competition in this industry is not that high. Of course, the job requires skill. Artistic abilities are also welcome. This work is quite labor-intensive, but the pay will be impressive. Depending on the technique, you may need: oil paints, epoxy resin, glue, gelatin, dyes. The drawing is applied to colored glass. This is usually done not with brushes, but with thin needles - it is with the help of them that the contours of the image are drawn, and only then painted.
Handmade soap
Necessary costs: from 8–15 thousand rubles.
Today many people buy similar products. Usually they are bought as a gift for some holiday. It is during the pre-holiday periods that the demand for this product is very high. To make soap you will need: essence (base), aromatic oils, decorations, special molds, fragrances. It’s worth thinking about manufacturing recipes in advance. It is better to make the first batch very small and use it yourself. You can earn even more by beautifully packaging souvenirs. To do this you will need special paper, ribbons, bows, and ties. Can be attached to gifts contact number so that gift recipients can buy soap if they like it.
Manufacturing of frameless furniture
Necessary costs: from 5–6 thousand rubles.
In this case, we are considering an interesting new product - the production of bean bags. These are soft, pear-shaped chairs. Each time they take the shape of the body of the person sitting. A similar product in stores costs about 6 thousand rubles. At the same time, the cost does not exceed thousands. For production you will need sewing machine, material, filler, threads. It is better to sell such products via the Internet. But you also need to offer goods to your friends at the first opportunity.
Montessori hand toy
Necessary costs: from 4–8 thousand rubles.
It is also called a busy board. Such products are in great demand among young parents. When making these toys, it is very important to think through all the details - from packaging to the quality of each part. When creating your own model, you can borrow one of the existing ideas. In this case, you will not need a certificate authorizing the use of an object of intellectual property, since the business board is an object folk art. To create such toys you do not need expensive equipment, and the materials are quite inexpensive. One such product can be sold for 5–15 thousand rubles. The best way to sell Montessori toys is online. Delivery by Russian post will not be so difficult. To work, you may need a variety of parts, a board on which they will be attached and tools for fastening.
Atelier at home
In fact, it is no different from the usual one, except in terms of production volumes. In this case, the seamstress will receive all the profit, which can significantly reduce final cost products. The work will require special knowledge, skills, and work experience. The demand for a master may mean that he will initially have regular clients who may bring several more people with them. For work you will need: a sewing machine, a cutting area, an overlocker, knives, scissors, consumables, buttons, lace, ruffles, locks, zippers, etc. In this case, materials can be purchased at the expense of the customer or work with those already selected. Author's items High Quality are very much appreciated today.
Handmade souvenirs
Necessary costs: from 6–50 thousand rubles.
Here you can work in one of two directions: study hand made or manufacturing business products . In the second case, we mean advertising products applied to different surfaces(pens, T-shirts). The first format has a more seasonal focus. In this case, for work you may need consumables in the form of fabrics, beads, wood, and other things. But for working with promotional gifts, the initial costs will include the purchase of professional equipment. Everything will depend on the choice of direction. You can work with:
- ceramic surfaces (decal or silk-screen printing);
- plastic;
- fabric (embroidery, thermal printing);
- metal (laser engraving).
In this case, you may need various machines, presses, MFPs, and printers. It is cheaper to purchase such equipment in China.
Decoupage
Necessary costs: from 13–15 thousand rubles.
You can decorate many items using this technique, including furniture, napkins, and tablecloths. Almost anyone can do this. It is only important to be diligent and patient. Over time, skills improve the quality of work. That’s when you can start decoupage for sale. For work you will need: glue, brushes, sponges, paints, primer, sandpaper, a special product for decoupage, blanks from different materials (wood, cardboard, glass, etc.) and decorative items. You can sell such products to friends and acquaintances. It is best to make deliveries via the Internet. You can even start with just your city, and then expand production.
Magnets as a gift
Necessary costs: from 7–9 thousand rubles.
To many, this type of business seems frivolous due to the low cost of the products. In fact, you can make very good money from this. Important factors will be the originality of the manufactured products and their aesthetic component. You can work in several directions at once:
- magnets with inscriptions;
- cheerful and funny products;
- educational magnets for children or even entire sets;
- calendars with magnets;
- holiday magnets for certain holidays.
At the same time, not much is needed to organize such production. First, you will need the magnets themselves, on which the main structure will be attached. But the surface can be decorated in any way you like - make something from wood, plastic, draw on glass, do engraving, use polymer clay.
Home Production Ideas for Men
The ideas below are most common for men. That is why we have separated them into a separate block. This does not mean that women cannot engage in these activities.
Engraving on glass
Necessary costs: from 20–35 thousand rubles.
If it comes to manual engraving using special devices, then such production can be located right in the apartment. If you plan to use a special compressor and stencils, then it is better to start the activity in a separate house or garage. The main advantage of this business is its exclusivity. Not many people do this kind of work. You can do this as a hobby and get pretty good money for it. In addition to tools, you will also need material on which inscriptions and drawings will be applied.
Manufacturing of leather belts and accessories
Necessary costs: from 25 thousand rubles.
These products are popular among people of different ages. The demand for the idea also lies in the fact that the accessory will be made by hand, which adds exclusivity and uniqueness to it. To work you will need leather, special hole punches, machines for stitching edges, and decorations. The profitability of this idea is at least 300%. Pig skin can be used as a material, for example. You can buy it from local farmers for 200 rubles (price for one belt). In this case, sales can be carried out via the Internet.
Production of keys
You can set up a mini-workshop at home. The profitability of this business attracts many entrepreneurs. At the same time, the production technique does not require any additional skills. To be able to work with different types of keys, you will have to purchase different types of machines. For the first time, 4-5 different ones will be enough. Each of them can cost about 14–70 thousand rubles. It is better not to buy Chinese-made machines, as they often break down within a year of use. You will also need material to make duplicates. As a related production, you can repair watches, locks, and clothes. This idea is highly profitable. The markup on one duplicate can be about 500–1000%.
Seasonal production at home
This section includes those types of production that are considered seasonal. This means that the rest of the time you will have to do something else to make a tangible profit.
Making bath brooms
Necessary costs: from 20–25 thousand rubles (the cost of the car is not included).
You can prepare brooms from July to August. But you can sell them at any time of the year. In other months, it is not recommended to make brooms, as they will be of lower quality. Today, people most often purchase the following types of brooms:
- birch;
- oak;
- fake.
These are the ones you need to focus on. You can add medicinal or aromatic herbs to them. To use without fear forest resources, it is necessary to conclude an appropriate agreement with forestry. Material can be collected directly in the forest, and drying can be done in a separate room. You can do this at home if you have a separate room for it. Don’t rule out the option of going out of town to own house. The profitability of such production is about 100–150%. To work, you need an axe, a machine for transporting goods, and materials for a bunch of brooms.
Making felt boots
This business idea is to process sheep wool and make felt boots from it. This type of production is seasonal, since warm shoes are mainly needed in December–February. The rest of the time, the business brings in significantly less income. This type of footwear is especially relevant for residents of villages and cities in the northern region. In addition, you can increase the cost of the final product through exclusive design and decor. In the summer, if you wish, you can make car mats, slippers, and bags. For work you will need: clean wool, a carding machine, a felting machine, a sheet, a rolling pin. The creation process is quite difficult. Before doing this, it is worth studying the relevant literature and watching training videos.
Making kvass at home
Necessary costs: from 50 thousand rubles.
If the production is small, you can limit yourself to an apartment. Larger events are best held in a separate private house. This business is especially profitable during the hot season. Today, the following types of kvass are most popular in Russia:
- bread;
- fruit;
- berry.
Small-scale production can do without special equipment, but large-scale production will require the purchase of: barrels or stationary racks, kegs, bottling equipment, containers, and a cooler. You can sell goods on the street. Then you will need a special stand and chair. You can supply products in bulk to coffee shops and summer bars.
Production in a private home
This block includes ideas for which you will definitely need your own private home to separate the work area. In addition, such activities require a larger area than the previous ones. Mostly they all need a strong male hand, but there are exceptions.
Ideas for men
The ideas below are most common for men. If they wish, women can also establish production in these areas. However, without male power, production and sales are unlikely to be possible.
Furniture making
Necessary costs: from 55–60 thousand rubles.
This type of production is beneficial due to a number of factors. Firstly, it doesn’t require large investments to work. Secondly, the product has a very long lead time. At the same time, resources are nearby, and there is no seasonality for products, which allows you to work with maximum efficiency all year round. Parts for production can be purchased from factories. In this case, you will not be able to do without: a drill, a hammer drill, drills, a hammer, a saw, a screwdriver, a jigsaw and some other tools. The work will also require chipboard, countertops, facades and fittings to bring the furniture into marketable condition. You will also have to think about glazing your products. Glass can be ordered from special workshops or cut out yourself if you have special equipment.
Own carpentry production
Necessary costs: from 90 thousand rubles.
Such a workshop must have an area of at least 50 m2. The ceiling height should be higher than usual - about 4 meters. Electricity must be provided. To operate a carpentry workshop, it is necessary to collect documents that should be submitted to the fire safety service. In addition, you will have to purchase a number of equipment, including: a jointer, a number of power tools, a miter and circular saw, chisels, mallets, hacksaws. It is very important to think about the range of goods that will be produced in the workshop. These can be small accessories in the form of door handles, wooden figurines, souvenirs, toys and much more. It is also necessary to think about how the wood will need to be processed before selling it directly. You can make tables, stools, tables from cheap materials, adding exclusivity to them with the help of exotic ornaments. Business profitability is on average 20–25%.
Manufacturing of veneer doors
Necessary costs: from 85–90 rubles.
This variety can be classified as a carpentry workshop. And yet, the production of doors is usually carried out separately. Such production is put on stream. At the same time, the costs and necessary tools are the same as in carpentry. The most important thing in this industry is to find your consumer. It is possible to work with wholesalers. In this case, it is worth considering cooperation with construction and finishing companies.
Mirror tiles
Necessary costs: from 65–70 thousand rubles.
This type of production is considered highly profitable and very profitable. The manufactured products can be used for interior decoration. Moreover, after such restyling it looks very interesting and impressive. You can work in this industry according to the following scheme: purchase ready-made mirrors, cut them to suitable sizes and process them using special edge tools. For work you will need: a glass cutter, a table, an emery wheel that allows you to process the tiles. Later, it will be possible to buy a special machine, which will significantly increase the speed of tile production.
Making bricks at home
Necessary costs: from 200–300 thousand rubles.
To work you will need quite large room, so you need to carry out your activities in a private home. To work, the entrepreneur will need: a special machine (automatic semi-dry pressing) and molds for production. The following consumables are required for manufacturing: sand, water, cement and dyes, clay. Some of these items can be purchased in bulk from suppliers. A business like this can pay for itself within six months. The maximum profit of a small mini-factory can reach about 200 thousand rubles. The following types of bricks can be produced:
- silicate;
- facing;
- color.
Making artificial marble from concrete
Necessary costs: from 150 thousand rubles.
This material is popular with companies that produce furniture. This type of marble is quite specific, and it is not so easy to sell it. Profitability can vary greatly depending on local prices for raw materials and finished products. As Supplies They use polyester resin and a special filler. You will also need special machines, which are not that cheap. The cost of one m2 is about 200–250 rubles. The same volume of finished products can be sold for 14 thousand rubles on average. Consequently, the profitability is about 600–700%. The income is noticeable even with small production volumes.
Hand stamping
Necessary costs: 10–15 thousand rubles.
This type of business is suitable for those who have virtually no start-up capital. The work does not require specialized equipment, which significantly reduces initial costs. In addition, the technology of such stamping allows us to produce parts of different sizes, designs and geometries. An entrepreneur can easily expand the range of products available in his production. The quantity of goods can also vary depending on the needs of the consumer. True, profitability is not as high as, for example, in the production of bricks or artificial marble. First, you need to study videos and master classes on working in this industry.
Manufacturing of metal structures
Necessary costs: from 40–45 thousand rubles.
This type of production is relevant due to the fact that individual housing construction is developing very actively at the present time. Metal structures mean the manufacture of various wickets, gates, canopies, protective grilles and other attributes. Moreover, selling such products will not be difficult due to the constant demand for them. To work, it will be necessary to purchase equipment for cold forging of individual structural elements. This will increase the efficiency and profit of the enterprise. Having experience in this industry will be a significant plus. Sales channels should be looked for in construction companies, repair offices and teams.
Production of foam blocks
Necessary costs: from 60–80 thousand rubles.
This type of production is also particularly popular among novice entrepreneurs. This interest is associated with high demand for the product, and therefore easy sales of foam blocks. In addition, such a business is very profitable, and the investment pays off in just a couple of months. Foam concrete is very popular due to the following properties:
- thermal insulation;
- sound insulation;
- high strength (not inferior to stone structures).
To make block shapes, you don’t need specialized equipment - you can do everything yourself from plywood. At first, you can rent a concrete mixer. Only then can you buy additional equipment to facilitate the work process.
Production of dry construction mixtures
In this case, the assortment can be chosen by the entrepreneur himself. It should be understood that each type is intended for a specific type of work. The main consumers are repair and construction crews and companies. That is why it is better to think about cooperation with them in advance and offer your services for the delivery of goods. It is very difficult to talk about the demand for specific types of mixtures in Russia. To avoid getting into trouble, it is better to carefully study the features of the market for dry construction mixtures in your region before starting work, and only then proceed to production.
Manufacturing of paint and varnish products
Necessary costs: from 30–35 thousand rubles.
This type of production was profitable Russian market at all times. Finishing work cannot be done without their use. You can include the following items in your assortment:
- putty;
- dye;
- glue;
- enamel and much more.
You can get significant income from such a business. The main thing is to first study the market, find out about your competitors, the level of demand for each type of product, and only then set up production. The undoubted advantage of this business is the quick payback. To work, you will need knowledge of how to make this or that type of product.
Manufacturing of indoor fountains
Necessary costs: from 20–25 thousand rubles.
This idea came to our country from China. Moreover, such production does not require large capital investments. Today, various decorative elements using water, including fountains and waterfalls, are in high demand. They not only have an aesthetic appearance, but also humidify the air, making the atmosphere in the room more calm and harmonious. The following types of materials can be used to make fountains:
- stone;
- glass;
- tree;
- clay;
- bamboo and much more.
You can come up with a design yourself or look at ideas available on the Internet. Similar products can be sold in souvenir shops and stores. The work does not require specialized equipment, but skillful hands will come in very handy.
Wooden stairs
Necessary costs: from 60 thousand rubles.
This business requires minimal investment. At the same time, it can bring good profits. Stairs are not cheap products, but the demand for them is quite high and stable. They buy them not only for function, but also for aesthetics. That is why stairs made from natural materials are especially popular. They are decorated with carvings, patination or gilding. It is better to produce them to order, having discussed in detail all aspects of the future project. One flight of stairs costs about 100 rubles, which once again confirms the high profitability of the project. To work you will need carpentry equipment, wood, and small tools.
Ceramic products
Necessary costs: from 50 thousand rubles.
Here we mean, first of all, dishes made of clay. In this case, you can work based on various things:
- raw materials;
- coatings;
- destination of goods.
They use ceramic products in everyday life and decorate apartments and houses with them. Handmade costs much more than those made in large factories. Much depends on the originality of the idea and the appearance of the dishes. The more aesthetically pleasing it looks, the greater the demand for it will be. To work, you will need a special design for working with clay (potter's wheel or machine) and material. You will also have to think about how to paint it, what ornament or design to add. The top of the dishes will need to be coated with a special varnish that is safe for humans.
Making your own irrigation systems
Necessary costs: from 35–40 thousand rubles.
This idea is still quite innovative today. It came to Russia from China, but has already managed to conquer a certain part of the market. Systems drip irrigation allow you to significantly save water consumption. The products need to be sold in agricultural areas, where they will be in great demand. These can be exclusive systems made to order or completely regular options. The work will require a lot of knowledge. It is very important to understand how the system works, how watering and water flow are carried out. You don't need many tools. The pipes must be sealed and gaskets inserted.
Bath stoves
Necessary costs: from 90–100 thousand rubles.
Skills required for the job welding machine and material for making goods. You simply cannot do this without a good welder. You can manufacture to order or create an assortment based on standard parameters. The main clients will be the owners of houses in villages and dachas. Some similar stoves are installed in garages and simple country houses. It won’t be possible to sell in bulk; it’s better to work locally, because one oven has a fairly impressive cost.
Wood carving
Necessary costs: from 30–35 thousand rubles.
Such products attract the attention of customers due to their exclusivity and nobility. There are very few wood craftsmen today. But the demand for wood products is constantly increasing. You need to understand that you won’t be able to master the technique right away, because it is quite complex. It will take a lot of time and diligence to make truly high-quality and beautiful things. It is also important to have knowledge and creative potential. Any product is a reflection of the soul of the master, which is why they are so expensive. Crafts can be sold online or displayed in handmade stores. Wooden souvenirs are especially popular among the population. For work you will need quality material, jigsaw and some other carpentry tools.
Anti-freeze production
Necessary costs: from 40 thousand rubles.
This product is especially necessary for motorists in the cold season. It's not difficult to make. In this case, you can earn some good money. In the future, a small production workshop can turn into a mini-factory. The most important thing is to find distribution channels. These could be auto parts stores, car enthusiasts within the cooperative. Stable demand will ensure stable income. You will need a variety Technical equipment. At first, you can buy a used one, and only then increase the scale of production and set up an entire production line. Using the same principle, you can set up the production of antifreeze. The creation of both substances involves certain chemical reactions that require equipment and knowledge to carry out.
Making monuments
Necessary costs: from 300 – 400 thousand rubles.
To begin with, it is worth targeting this particular ritual service. You can add others later. For work you will need a workshop with an area of 70–200 m2. There should be special tables for engraving, Sander, place for draining, polishing machine, filling. The materials used are: cement, marble chips, reinforcement, etc. An undoubted advantage would be the presence of a hoist or hydraulic trolley. You can’t do without cutting wheels, a hammer drill, hammers, trolleys, engraving tools, a tile cutter and much more. You need to find reliable suppliers and those who will print photographs on metal-ceramics. There is no way to do this without technology, so you either need to hire knowledgeable people or delve into all the intricacies of production yourself.
Product manufacturing
Growing vegetables and fruits
Necessary costs: from 10–15 thousand rubles.
It is better to organize this type of production outside the city if you plan to work on a large scale. Here you can go in two ways: grow food in open beds or in greenhouses. In the first case, the costs will be minimal, and in the second, the yield will be high. Today, many people try to buy products from small producers. Such interest in such products is due to the fact that they are not harmful to health, since they do not contain pesticides, GMOs and other harmful substances. To work you will need more of your own physical labor. You won't be able to make a profit right away because the products have to grow before they can be sold.
Growing mushrooms
Necessary costs: from 20–25 thousand rubles.
To organize such production, you will need to coordinate your work with the authorities. There are quite strict requirements for growing mushrooms. Compost will need to be used as fertilizer, which will have to be purchased from local farmers. Today the most popular mushrooms are:
- Champignon;
- oyster mushrooms
Moreover, champignons require very careful care. Growing them is not so easy. But the income is also more noticeable than when growing vegetables and fruits. It will be possible to sell the certified product to large supermarkets and to individuals. The latter can be charged a higher price than the former.
Cheese making
Necessary costs: from 500 thousand rubles.
It must be said that this industry is very promising in terms of income generation and further development. To operate legally, you will need to obtain various licenses and certificates for finished products. You must first equip a mini-workshop for cheese production. You can’t do without a veterinary certificate (you can get it from the milk seller). The following types of cheese are especially popular:
- hard;
- semi-solid;
- soft;
- pickle.
At the same time, when including one of the varieties in your project, you need to understand that each requires special equipment. Therefore, it is better to start with one type, and expand your production as you receive good profits. There are quite a few requirements for cheese that must be met. You need to study them, look at GOST.
The work will require a fairly large area (about 350 m2). There should be:
- manufacturing facility;
- fermentation shop;
- salting workshop;
- refrigeration chambers.
You will need the following equipment: boilers, tanks, presses, starters, sterilizers, pumps, containers and much more. Such a business requires serious capital investments, regardless of the size of the enterprise.
How to sell manufactured goods
There are many ways here and they are all purely individual, depending on your knowledge, skills, financial capabilities, etc.
- You can sell your products on social networks and on your website on the Internet by making a website and running advertising.
- You can post advertisements around the city and place advertisements in newspapers.
- You can sell through friends to city stores.
- You can open a store or market stall yourself.
- You can sell small wholesale, finding such orders through friends or on the Internet.
And many other options. Look at your situation individually and try to find your clients using different sources. And you will definitely find them.
Conclusion
That's all the home-based small business ideas that came to our minds! The main thing is that you can find something for yourself. Only then can you achieve results in this business.
In conclusion, I would like to ask you to complement the selection of these ideas in the comments under the article and ask your questions.


