The socket box is a special tool mounted in various designs, it is used to install sockets and switches. The question is how to install the socket box so that there are no problems in the future. repair work when old switches need to be replaced.
In contact with
Classmates
Types of socket boxes
First, you need to decide what types of socket boxes there are. They are usually divided into two groups:
- For concrete walls - such products are intended for concrete, brick, foam concrete, aerated concrete and block expanded clay walls. For such socket boxes, you need to prepare a hole for installation in advance, and fix them with a solution.
- On a plasterboard wall - such products are intended for plasterboard walls, chipboard structures, and plywood structures. Such socket boxes are secured using spacer tabs into the mounting holes.
After choosing a socket box, you need to do the preparatory work.
Preparatory work
It consists of assessing the wall on which the socket box will be mounted, as well as selecting the product itself according to size, shape, and material from which it is made. All these parameters are completely different.
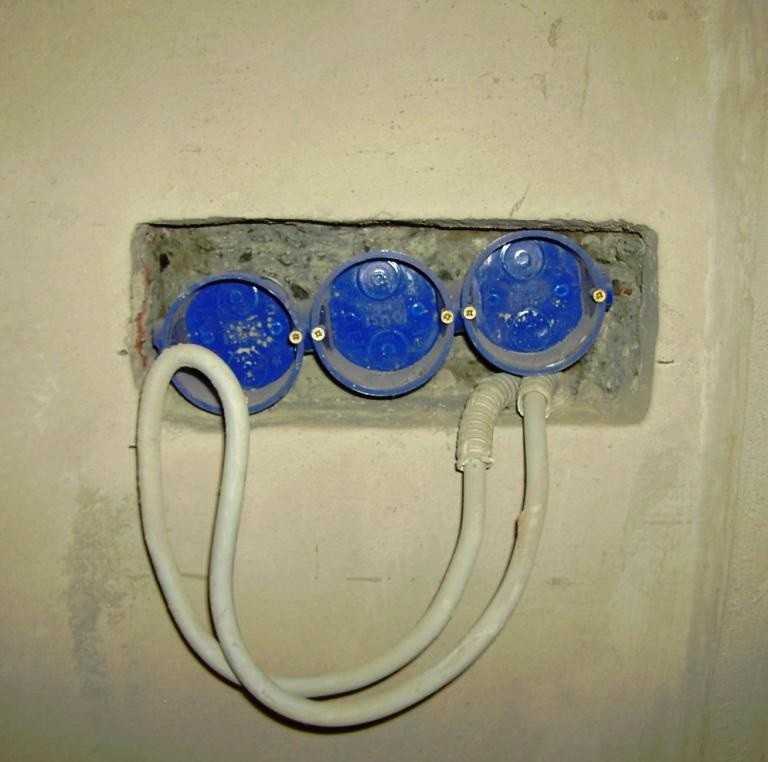
There are situations when you need to install a single unit (these are several socket boxes interconnected). At the same time, it is important to remember about the center-to-center distance (i.e., the distance between the centers of the socket boxes) and the same diameter of the products themselves.
Note!
The installation itself solid block It is carried out according to the same principle as installing a conventional socket box.
The next stage is the installation of socket boxes.

Hole for socket box
Installation tools and choice of installation method
The socket box is installed using the following tools:
- Pencil with ruler
- Concrete drill,
- Chisel with hammer
- Crowns for drilling concrete (the diameter of the crown must correspond to the diameter of the socket),
- Grinder (plus a blade for concrete),
- Construction or medical plaster, alabaster,
- Paper knife,
After preparing the tools, you need to choose a method for installing the socket box, or rather, how to prepare a recess for the socket box. There are three such ways:
- punch the right place in brick, concrete or gas concrete structure, and then secure it with mortar,
- arrange a niche in a plasterboard wall or plywood structure and secure the socket box with special paws,
- Instead of a socket box, use a mounting pad as a base for a switch or socket.
Having chosen the installation method, you can begin marking the wall for the future outlet.

How to mark up correctly?
Before you begin the installation, you need to use a pencil and a ruler to mark the place where the socket box will be located (a cross of two lines with right angles). All measurements are taken from the covered floor, otherwise you need to add about 5 cm more. When making markings, professional electricians adhere to certain standards:
- in rooms, sockets are installed thirty cm from the floor,
- in the kitchen the socket is installed about 120 cm from the countertop,
- switches are installed 90 cm from the floor.
You do not have to follow these rules exactly, and the markings can be applied to suit your requirements. Also, if you don’t have a hammer drill or grinder, you don’t have to immediately run to the store and buy one, because such a purchase will be quite expensive. Tools can be rented.
You can also measure the location for the switch using your own hand. To do this, you just need to go to the wall, lower your hand and make a note in a more comfortable position. If this switch is intended for several people, then the distance can be calculated by medium length hands.

Install the socket box at a convenient level
Installation of a socket box in concrete
Installation of a socket box in concrete wall occurs with the help of a special solution (gypsum or alabaster are suitable for this purpose), but before this you need to drill the place where the socket box will be located. There are several ways to do this.
One of them is to install using a crown (a special tool in the shape of a piece of pipe), the size of which is 70 mm. The socket box is usually 67 mm in diameter, sometimes a little larger. In a circle, the crown is equipped with pobedit teeth (cutting segments made of hard alloy), with the help of which the circle is cut. Using this crown and a hammer drill, a hole is drilled in a concrete structure. This must be done carefully so as not to touch the wire. You need to drill until the crown is completely in the wall.
Note!
To make it easier for the crown to cut through the wall, you can make a hole in the center with a drill.
After this, the crown is pulled out, and the hole itself is refined in depth using an impact bit or chisel.
The second method is to drill a hole for the socket box using a drill or hammer drill with a Pobedit drill bit. To do this, the socket itself is applied to the wall and outlined. Then, using an impact drill or hammer drill, you need to drill several holes: in the center and in a circle. The holes should go as deep into the concrete as possible and be close to each other. After this, all that remains is to make a hole of the required size.
The third method is the fastest, but also the dustiest. It will require a grinder. First you need to do appropriate markup: we already have a cross, now we need to draw a rosette on the wall and draw four lines, making a square out of a circle. Then all that’s left to do is walk the grinder along all the marked lines. The main thing here is not to touch the wire. After this, all that remains is to finish the hole according to required size chisel.

The photo shows the installation of a socket box in a concrete wall
Adjusting the space for the socket box
After preparing the place, you need to check whether it suits the socket. If the hole is made with a crown, then the width will be fine, you don’t have to worry about it. Here you need to look at the depth. The depth of the hole should be such that the socket box falls there by about five millimeters. At the same time, it’s worth remembering one little trick: there is an edge on the socket box that is better to cut off. This way, the socket box will fit completely into the hole, which will allow the decorative frame of the switch to fit snugly against the wall without leaving a gap. After the socket box is installed, a groove is made in the structure to insert the wire into the product. WITH reverse side The socket box has slots for wires. You need to insert the wire into this slot, and then install the socket box into the hole. Now all that remains is to tell you how to secure the socket box in the wall.
Making a solution and fixing the socket box
To prepare a gypsum solution, you need to take a container, pour gypsum into it and, stirring constantly, add water. As a result, you need to get a homogeneous creamy mass. You need to start working with the solution immediately, otherwise it will harden after five minutes. With this solution the socket box is fixed in the hole. Before installation itself, you need to wet everything in the hole well and wait for the water to be absorbed.
After this, you need to apply the solution into the hole with a spatula, and insert the socket into it, not forgetting about the wire. You need to insert it so that it does not stick out, so that later there will be no lump and unnecessary problems. After this, you need to fill all the side cracks with the solution and putty around it.
Installing a socket box in drywall is even easier. To do this, you need to cut a hole in the drywall the size of a socket box. After this, it is fixed in the wall with spacer legs. Now you need to start puttingty seat(special place for installing a socket box) so that the structure is durable. This installation does not require many tools; all work can be done with a knife, screwdriver and spatula.
The installation of not a single new point in the electrical network- this plastic or metal box, a wooden plank acts as an intermediate link in the wiring and is responsible for reliable fastening socket or light switch.
This electrical element is irreplaceable, so it is important to know everything about installing a socket box into a wall with your own hands, so that when planning a new line or replacing an old device, you do not waste time and money calling an electrician.

Below we will discuss the main types and sizes of mounting boxes offered by stores, as well as step-by-step instructions for installing them.

Understanding the types and types
Socket boxes are classified according to many criteria, but the main one is their division according to the material of manufacture. So, the following models are found:
Plastic, which are the most convenient and practical, since the base is made of non-flammable material, which increases the safety of the wiring and makes it possible to use it on wooden surfaces.


Metal boxes are more durable, but due to their ability to heat up and conduct electricity, fade into the background, giving way to safer and practical options. However, these models have not been discontinued since the installation of hidden sockets in wooden houses only possible with a metal socket box.

Wooden pads were previously often used when setting up wiring open type, being a convenient intermediate base for attaching the socket directly to the wall. Nowadays they practically never occur, only when installing homemade wiring in bathhouses, garages and other outbuildings.

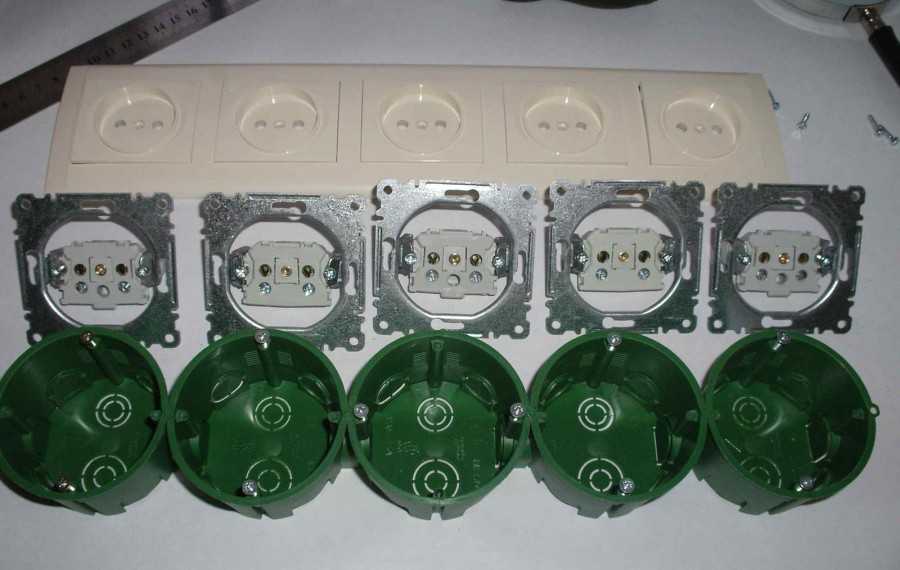
The products also differ in their shape: round (universal), square (more spacious) and oval (or “double” socket boxes for installing a double socket or a set with a switch).

Models also differ in design features:
- The presence or absence of fixing tabs (in hollow plaster walls they are necessary, and socket boxes for plasterboard, concrete, brick and aerated concrete are secured with a layer of alabaster).
- Open or hidden.
- Single and composite (composite ones have special fastenings that allow you to assemble up to five glasses into one block).
- Standard and advanced.


The sizes of socket boxes may also vary. Considered standard round model with a diameter of 65 cm and a depth of 40 cm, however there are narrow options 25 mm high or 80 mm deep. The dimensions of square boxes are most often 70 by 70 mm, but there are also deviations from the standards.
We mount the socket box
Installation of this product does not differ in complex manipulations, however, for wood, concrete, brick and plasterboard wall the algorithm of actions will change slightly. Below are step by step instructions how to install a socket box with your own hands in each indicated case with detailed description and photo.


Preparation
On preparatory stage it is necessary to choose the right type of socket box depending on the required functionality and wall material. Also common to all cases will be a set of tools and consumables:
- Hammer or drill;
- Suitable attachment for wall slitting;
- Building level;
- Meter;
- Pencil;
- Chisel;
- Hammer;
- Putty knife;
- Putty.

Installation of a socket box
At this stage, the procedure and technology of actions for each type of wall will differ.
When installing in concrete and brick, the following must be done:
- Mark the outline of the future wiring on the wall surface in accordance with the previously planned diagram.
- Determine the location of the outlet or switch, mark the area with a cross.
- Attach the purchased socket box to the “cross” (so that the mark is strictly in the center) and trace the outline.
- Drill a groove, where the drilling depth for the socket box will be the sum of the height of the glass and a margin of 5 mm.
- Clean the resulting hole and try on the socket box.
- Bring the wires inside the drilled circle, also make a hole in the back wall of the socket box and pull the wires through it.
- Moisten the hole and apply thin layer putty and carefully place the glass.
- Level the surface, remove excess, wait until dry.

It is somewhat easier to install a socket box in drywall:
- Apply markings and mark the outline of the socket box.
- Cut a hole of suitable size.
- Make a hole in the glass for the wires and pull them out.
- Insert the socket box into the groove.
- Tighten the screws located on the sides of the housing until the glass sits tightly.

Installing a socket box in a wooden wall is considered unsafe even with the use of metal protection. If you still decide to do hidden wiring, then drill suitable sized grooves, bring the wiring out and install metal cups.

It is important to act absolutely precisely, as with drywall, since it will be problematic to disguise unevenness or extra centimeters. However, it is still recommended to install exposed wiring on wooden surfaces.

When installing a socket box, it is a good idea to follow some tips that will significantly save effort, time and money.

Install installation box after applying plaster to the wall, but always before finishing with putty and gluing wallpaper. This procedure will eliminate errors, will not spoil the interior, and will help hide errors in local repairs.

Check that the markings are correct with a level so that you don’t end up with sockets that are placed at an angle. This is especially true for installing socket blocks.

It is not necessary to use the old holes when replacing sockets and switches - it is enough to cover up the old entrance.

If the wall is too thin for a standard size socket box, it is recommended to install overhead sockets. As a last resort, it is permissible to independently trim the height of the mounting cup.

It is not advisable to use for fastening polyurethane foam because it is a fire hazard.


Given step by step photos installation of the socket box clearly demonstrate that its installation is not difficult even for a beginner in electrical engineering. If there is a need for such repairs, then feel free to get to work, armed with the instructions, tips and recommendations described above.


Photo of socket boxes


Electrical wiring in the house begins with installation in special wall sockets plastic containers– installation boxes. Those that are inserted into concrete or other rigid fences, such as bricks, are called socket boxes.
They are hollow glasses, smooth on the inside, and on the outside they have small protrusions and teeth for reliable fixation. On the back wall of the case there are punched hatches for cable passage various diameters. And on the front there are holes for fastening electrical products with screws. Their use guarantees the functional safety of electrical points.
Types of socket boxes
Basic electrical products are standardized. There is no special nomenclature, but they are classified:
- By internal diameters, the sizes of which vary from 60 to 68 mm.
- According to installation depth. The minimum landing starts from 25 mm, the maximum – from 80. The most popular ones are 40-45 mm deep.
- For single and block models, the body of which has plastic partitions that separate the connection points by a distance of at least 7.1 cm.
- According to the material of manufacture. Mainly made from polypropylene. But there are also metal ones, made of silumin or galvanized, which must be installed in wooden houses in accordance with fire safety standards.
A plastic socket box for concrete is characterized by:
- high strength and durability of the material;
- low electrical conductivity;
- ease of installation;
- good adhesion to concrete;
- reliable fastening.

Installation step by step
Wall placement begins with preparation necessary tools and materials. For this we use:
- Hammer and diamond bit with a diameter of 70 mm, slightly larger than standard size socket box. Or a drill with a Pobedit drill, or, in extreme cases, a grinder with a grinding wheel.
- Hammer and chisel.
- Narrow spatula.
- Level.
- A composition based on gypsum, or alabaster, or putty.
- Container for solution.
Installation is performed in the following sequence:
1. Marking of the installation of the electrical product is made. The planned hole is marked on the wall. Either as specified in the project, or according to the standards adopted by electricians.

The data is not strictly regulated. Sometimes switches are located according to the arm's length rule, especially in own home. At the level of the middle of the palm, plus or minus 5 cm, you can install a socket box that will be convenient for everyone. If installation is planned next to the door, then you need to step back 15-20 cm from the edge of the opening, not counting the frame.
2. The hole is made with any of the above tools. If the work is carried out using a crown, then first its guide drill enters the intended center of the marking, then the entire hollow cylinder cuts into the surface.
If you use it, you must first mark the outline and its center on the wall. Starting from the last and along the entire perimeter, drill holes (the closer to each other, the better) to the full depth installation box. Using a hammer and chisel or a hammer drill with an impact bit, bring the seat to the desired size.
The use of a small angle grinder, which in everyday life is called a “grinder” or angle grinder, does not immediately provide the required depth. Usually the disc enters at a lower level in the thickness of the concrete than necessary, so after the angle grinder you should still work with a chisel. This method is the fastest, but also the dustiest.

3. Install the structure into the finished cavity for fitting. The depth of the seat should be 0.4-0.5 cm greater than the product. This is necessary for further filling of the fixation solution and the wire entry.
For further ease of installation, it is better to trim the edges of the hole made with a knife. This will allow the body of the shrink box to adhere more tightly to the wall, while its “skirt” can be installed flush with concrete surface. If this is not done, the frame may move 1-2 mm away from the wall.
4. Next, using a hammer with a chisel or a hammer drill with an impact bit, a groove is made in the upper part of the mounting socket for laying the wire. We press or cut out a hatch on the back side of the container required diameter to enter the cable and pull it into the product body. We insert the socket box with the cable into the socket so that there is still 2-3 mm left in the depth for the gypsum mortar.
5. Let's start preparing the fixing composition. To do this, mix the powder and water, remembering that hardening occurs quite quickly. It is necessary to clean the finished hole in the concrete wall, and then moisten it generously with water until completely absorbed. Use a spatula to fill its bottom with the mixture and insert the socket box with the wire so that the solution not only covers back wall, but also squeezed out of the slots a little. Sometimes, for better fastening, the container body itself is coated with a fixing frame.
6. The glass should either fit flush with the socket concrete wall, or “drown” 0.1-.15 cm deeper than its surface. Correctness, namely vertical installation, is checked by level. This requirement must be observed for further trouble-free installation of the inserted electrical product.
7. Use a spatula to place the fixing compound into the gaps between the wall and the body. At the same time, we align the glass so that the mounting screws are parallel to the floor. After the solution has completely dried, remove the excess from the wall.

Since the work of an electrician involves life-threatening factors, it is necessary to adhere to the labor protection rules regulated for this activity. The installation of socket boxes in a concrete wall presented above was described for installation in a new building not connected to the electrical grid. If everything is done where there is already voltage, for example, in the case of replacing an old outlet with a new one, then its presence must first be checked using a multimeter. And only after making sure that the circuit breaker, which is located in the metering and distribution panel, is turned off, can you proceed.
Working with a grinder is fraught not only with a dusty curtain, but also with flying small pieces of concrete that threaten to cause wounds on the face. Therefore, they use means personal protection such as safety glasses, a mask or a respirator.
The gypsum mixture must be worked out within 5-7 minutes, and the alabaster mixture in 4-5. This is not always convenient, especially if a person does not have much experience in installing electrical products and working with these compounds.
If the installation was performed poorly and there was a need to adjust it, then you will have to destroy everything and start over. Therefore, it is better for non-professionals to use Knauf Fugen (Fugenfüller) gypsum putty or Rotband plaster, which contain gypsum. Their hardening begins after 30-40 minutes and proceeds evenly, while domestic gypsum mixtures do not have such regular hardening, but are distinguished by good adhesion with a spatula, which interferes with work. When using our solutions, it must be constantly moistened.
When installing hidden electrical wiring in a house or apartment, it is impossible to do without such an element as a socket box. The socket box is used for installation electrical outlets, switches, regulators, thermostats and similar equipment.
The most common are socket boxes with a diameter of 65-68 mm and a depth of 40 to 60 mm, which have a circular cross-section.
Simple socket box for a concrete wall
Socket boxes for concrete and brick, unlike socket boxes for plasterboard, do not have clamping claws:

In this article we will take a step-by-step look at the process of installing a socket box in a concrete wall.
Required tools and materials:
- Hammer;
- Special crown for concrete;
- Putty knife;
- Plastic bucket;
- Acrylic primer;
- Alabaster or gypsum putty.
The sequence of installing a socket box in a concrete wall:
Step 1. We mark the installation location of the socket box. During repairs modern apartments It is customary to install sockets at a height of 30 cm from the floor, and switches at a height of 90 cm. But at the same time, the most important factor for choosing a location for installing a socket box is convenience.

Step 2. Drill a hole in the wall. You can conveniently and quickly make a hole for the socket box using a hammer drill and a special crown for impact drilling.
I used a “Praktika” bit with a diameter of 68 mm, which is designed for working on concrete, brick and stone:


If this crown is not available, a hole can be made using a drill. To do this, we drill many holes in the place where the socket box is installed, and then hollow out the concrete using a chisel, which is also installed on the hammer drill.
Step 3. After the hole in the wall is ready, you need to try on the socket box and make sure that the depth of the hole matches the length of the socket box. Then you should break out one of the socket plugs and let the electrical cable. The groove for the cable must be installed before fixing the socket box.


Step 4. We dust off the walls of the niche under the socket box. To do this, remove the concrete dust using a brush or broom, and saturate the walls of the niche with an acrylic primer, or if it is unavailable, simply with water.


Step 5. When installing socket boxes in concrete or brick, the question often arises: “What should I use to fix the socket box?”. The most reliable and in an accessible way is the use building gypsum- alabaster or gypsum mixtures (putties and plasters).
 Materials used for fixing socket boxes: alabaster, gypsum putty and gypsum plaster
I fixed the socket box using universal putty Knauf Fugen. The advantage is that this material is widely used in interior decoration, so if you are doing renovations, then most likely you have it, and gypsum putty sets quite quickly and reliably fixes the socket box.
Installing connection points for electrical appliances in concrete walls of residential and administrative buildings is a task that occurs frequently. A significant number of buildings have been erected and are being built from concrete. It's about not only about placing the box under the socket, but also about the entire complex of work, which involves the competent creation of a network of hidden electrical wiring or retrofitting additional points nutrition. This technology allows you to create a safe and durable power supply system in your home or office.
Preparatory work
The installation of sockets is preceded by preliminary preparation, including choosing the location of the box, determining the number of power points, to which section of the electrical network the connection will be made, and choosing the route for laying the grooves. As a result, electrical diagram connections and drawing construction work. Also selected necessary materials, equipment and tools.
Materials and tools
The electrical part is based on included sockets and cables of the required cross-section. For installation you will also need: a Phillips screwdriver (2 mm), a slotted screwdriver (4 mm), a soldering iron, solder, pliers, side cutters, tweezers, and a knife. The formation of grooves is carried out with a wall cutter (grinder).
The spaces are created with a hammer drill () with, you also need a drill with a Pobedit tip and a spade attachment. You will need a hammer and chisel to clean the grooves and recesses for sockets. The construction part of the work will require a pencil, tape measure, spatula, gypsum or alabaster putty, liquid primer.
Marking
 Make markings with a pencil using a level.
 Using a level, draw horizontal and vertical lines on the wall with a pencil, along which the grooves for the wires will be laid. The center of the outlet is marked on the wall. Installing multiple units is also easy. To do this, mark the center of the outermost element of the block.
Then, from it in increments of 71 mm (the standard interaxial distance of socket boxes), the centers of the remaining sockets are marked strictly horizontally. You can set any height from the floor, however, there is a European standard for height - 300 mm. The markup should be consistent with the overall design so as to minimize the use of external electrical extension cords.
Installation process
Purely construction and electrical work. Grooves for electrical wiring are created, and recesses for the boxes are drilled with a crown. The cable is laid in the grooves and should be secured in the concrete wall. The cable channel is puttied. Then the socket boxes are installed in place. After finishing the walls, the sockets are connected to the cables.
Creating holes in the wall
 Installation of a hole in a concrete wall.
 Before carrying out work, an indicator that reacts to the radiation of the connected wiring determines the absence of live electrical wiring in the drilling and gating area. A neat recess in the place where the socket will stand can only be made with a diamond crown. Its outer diameter (68 - 70 mm), as well as the dimensions of the socket and socket must match. First, drill at the marking point concrete base drill with a diameter of about 8 mm. Then, when the tool is securely inserted into the wall, the hammer drill is aligned perpendicular to the surface, and then the crown works.
It is immersed in the concrete wall to the entire depth of the body. Using a spatula attachment, a cylinder of drilled concrete is knocked out. The bottom of the hole is leveled. The socket box is being fitted. This can be done required amount holes.
The grooves are cut by a carver according to the pattern on the wall with two parallel slits. Using a hammer drill or groove, the concrete is removed and cleaned. The depth and width of the groove should allow the cable to be laid (corrugated cable) so that the distance from its upper edge to the surface of the walls is 20 - 30 mm.
Electrical wiring installation
Before laying, the insulation and cores of the cable are checked. Electric wires(corrugation with cables inside) are laid on the bottom of the grooves and fixed with alabaster (gypsum) mortar in increments of 200 - 250 mm. It is better when all sockets have their own cable.
As the solution hardens, the grooves are evenly filled with the fixing compound flush with the surface. One end of the cable is led out to the soldering unit, but is not connected. The second one, with a length margin of 150 - 200 mm, should be secured in the hole for the socket.
Preparation and installation of socket boxes
 The power supply is checked and turned off. The box is fitted to the hole. The product must not have any obstacles to being installed flush with the surface. Readiness for placement of the socket block is checked in the same way. To do this, the socket boxes are pre-connected through the existing structural adapter.
Excessive structural elements are cut off. All interfering materials are removed from the recess, it is cleaned of dust and primed to ensure adhesion. Allow time for the composition to dry. In the box body, by pressing, a fragment is removed through which the cable is pulled. A solution of alabaster (gypsum mixture), which has a dense but flexible consistency, is coated with the walls, the bottom of the hole and the outer part of the socket box.
The product (block) is pressed into the solution. The immersion depth of the upper edge must be exactly flush with the base of the wall; the level checks the horizontality of the mounting lugs. You should wait for the socket box to be securely fixed in the solution. Then the excess composition that gets inside the box is removed.
Wall finishing
Using a spatula, remove the protrusions around the socket installation site. Irregularities are carefully primed. After the primer has dried, all cracks and recesses between the outlet and the wall are filled with putty and leveled flush with the wall surface. Next comes plastering.
Connecting the socket
 You need to remove the protective insulation of the cable by 8-10 mm.
 When the wiring is previously de-energized, the end of the cable is connected, which is brought out to the soldering unit. Then the voltage is turned on. An indicator screwdriver is used to determine the phase and zero on the cable cores (the color marking is fixed), the end of which is brought out through the socket. The bagger is switched off again before carrying out further work. The socket body is disassembled into electrical part, frame and decorative cover.
The end of the wire is freed from protective insulation to a length of 8 - 10 mm. The veins are stripped, twisted and soldered with tin. This procedure increases the reliability of the network. Cores in accordance with color coded inserted into the terminals and clamped tightly (screwed with a screwdriver). Then the internal part is mounted in the socket box.
For this purpose, already inside the “glass”, by rotating the screws with a screwdriver, the thrust legs are moved away from the electrical part, which rest against its walls. You can also use the ones included in the supply, with which the inner part is screwed to the socket box through the mounting holes. The horizontal position of the structure is checked. Then the frame and decorative trim body are attached. The socket is ready to be tested for functionality.