Many modern apartments do not have a layout and therefore the owners independently divide the total area into rooms using interior partitions, or use decorative ones.
The simplest, fastest and in an accessible way creating interior partitions are plasterboard structures . Such partitions can be either solid or with a door, and if you have the desire and time, then you can make them yourself.
Drywall is universal building material, which is used both for finishing a room and for creating new structures in it, including interior partitions, and for creating apartments. The only things that can compete with it in terms of characteristics are: or
Benefits of using drywall if necessary, create interior partition with a door will be like this:
- This lightweight material , so the load on the structure of the house will be insignificant;
- All work with it is done by hand, without the involvement of assistants, since the material is light;
- the cost of drywall is low, as well as the materials necessary to create the frame and surface finishing ;
- material is easy to cut, it bends easily, so even arched structures are created with its help;
- installation of the frame and sheets is simple and quick;
- finishing of such structures is carried out with various materials;
- plasterboard sheets consist of natural materials, therefore they are safe for human health.
 Eat different types drywall, so before buying it, you need to decide which one you need:
- ordinary, most often gray in color, used in rooms where humidity is no more than 70%;
- moisture resistant, has a green or blue color and is used in rooms where there is constantly high humidity;
- refractory, usually used in the kitchen, where there is a possibility of strong heating of the wall, it contains fiberglass and other additives, it is red or gray in color;
- fire-resistant moisture-resistant, it is rarely used in rooms with difficult conditions.
The thickness of a regular sheet is 12.5 mm, and to create arches they use sheets 6.5 mm thick, to give them flexibility, they are pre-moistened.
Installation of an interior partition
At the first stage of the work, it is necessary to determine the location of the future partition. To mark, use a plumb line and a cord, parallel lines are drawn on the floor and ceiling.
 It is much easier to work with a laser level, but buy it only to create plasterboard wall inappropriate.
Taking into account the presence of a door, the profile is not laid on the floor along the entire length of the partition, but space is left for the doorway. When laying the profile, keep in mind that the distance left for the door is 1-2 cm greater than its width in order to be able to install door frame.
When marking, the width of the partition is also taken into account, if it is sheathed in one sheet, then 2.5 cm is added to the thickness of the frame, and if the gypsum board is laid in two layers, then 5 cm is added.

To perform the specified work, you will need the following tools:
- building level;
- measuring instruments;
- cord and plumb line, or as their replacement - a laser level;
- corner;
- electric drill;
- metal scissors or jigsaw;
- pencil;
- stationery knife;
- putty knife;
- container for plaster.
 After marking, we cut the profile to the required length and glue the back walls sealing tape.
Installation of profiles
 Work begins with laying and securing the guide profile to the floor, after which it is installed along the entire perimeter of the future partition. The profile is fastened using self-tapping screws or dowel nails, it all depends on the material of the walls.
 Now, using the rack profile forming a doorway, this must be done carefully and carefully, so that the distance between the posts at the top and bottom is the same. The verticality of the racks is checked by level, after which they are fixed.
To increase the strength of the doorway, it is recommended to lay wooden blocks of the appropriate size in the racks and secure them with self-tapping screws.
On next stage the remaining rack profiles are mounted, if you have gypsum boards of standard width, then the distance between them is 60 cm. 
To increase the strength of the future partition, between the vertical posts it is necessary to secure horizontal jumpers, which are cut from the same profile.
The transverse profile located above the doorway is also installed and secured wooden block, it should fit into it easily so as not to disturb the shape, using a square check that the angles are 90 degrees.
The remaining transverse profiles are attached to the racks; special short screws are used for this.
After the frame is created, you will see that its structure is quite rigid and durable, start laying electrical wiring. The rack profiles have holes through which it will be convenient to thread wires.
The wiring is placed in a special corrugated non-combustible insulation.
Fastening drywall
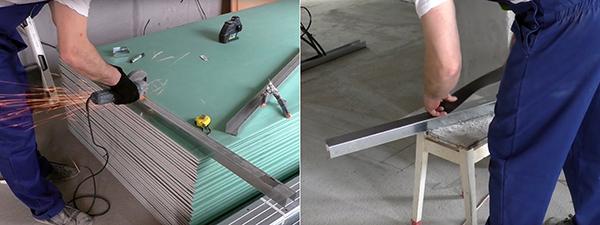
At home You can use a utility knife to cut drywall and a long ruler or staff. To do this, apply a ruler to the sheet, make a cut along the line several times, the deeper it is, the better, and then carefully break the gypsum board and get the required size.
 To simplify Finishing work, make a chamfer at the cut site at an angle of about 45 degrees, a plane or knife is used for this.
During the calculations, It is necessary to foresee in advance the places where you plan to mount hanging furniture or equipment.
Here additional profiles reinforced with wooden blocks must be installed, it all depends on the weight of the suspended structures.
 Left place the sheet on the posts and secure it, this is done using self-tapping screws; they are installed in increments of 20 cm and slightly recessed into the sheet.
If you forgot to chamfer the sheets before installing them, do this with a knife when they are installed on the wall.
Carrying out finishing work
Installation of the frame and gypsum board is only the beginning of creating a plasterboard partition. At the next stage All seams are sealed. To do this, use sickle tape and putty. The entire surface of the wall is also puttyed. 
After the base has dried, begin leveling the surface. The wall is covered with primer, which will allow the plaster to adhere better and provide additional protection GKL. Leveling is carried out with a wide spatula and finishing plaster. 
Door block installation
In the prepared opening is performed installation of a door frame, do this with wedges, screws and polyurethane foam. First, the frame is aligned using wedges and fixed with self-tapping screws, after which they proceed to installation door leaf.
The correctness of the work is checked, and the door should open and close easily. If everything is normal, then the remaining gaps are filled with polyurethane foam.
 At this time, the door is in the closed position, or spacers are inserted into the frame so that when the foam hardens, it does not deform it.
The foam is cut off after it has completely hardened; if the canvas was removed, then it is hung only a day later, after installing the box.
Finishing
At the last stage of creating a plasterboard wall, its finishing is carried out, for this purpose it is usually use paint or wallpaper. The frame is covered with platbands, which help hide the door attachment points.
Features of insulation and sound insulation
It is not recommended to leave a hollow partition; it will be filled with sheet or roll insulation. They are laid after one side of the wall is covered with plasterboard, and only then is it sheathed on the other side. 
If you plan to install it in such a wall engineering communications or sliding door, then in the place where they are located, insulation is not laid.
To create sound insulation, use mineral wool or isover. From below, when installing the sheet, you need to leave a small gap, so stands of the appropriate thickness are installed.
In order for you to be able to create a plasterboard wall with an opening for doors yourself, You must adhere to the following expert advice:
- During the installation of partitions in the room must be at least 10 degrees Celsius.
- You need to calculate required amount guides and rack metal profiles, only then purchase them. Cut them according required size You can use a jigsaw or metal scissors.
- The sheets are laid tightly to each other.
- To create holes for sockets, you must use special drill bits.
- In the places where the sheets are joined, be sure to use a sickle and seal the heads of the screws well with putty, after which the entire wall is puttied.
- As finishing materials, you can use paint, wallpaper, tiles, cladding panels and others.
Conclusion
Now you see that there is nothing complicated in the construction of plasterboard partitions and all the work can be done independently. Having studied the technology of performing the work, advice from experts and prepared necessary tool, feel free to begin performing the specified work.
Useful video
How to make a partition from plasterboard with your own hands, step-by-step instruction on video:
In contact with
In new apartments large area and in old apartments with an outdated layout, there is a desire to remake the room for yourself. From one large room You can always make two smaller ones. For these purposes, interior partitions made of plasterboard are used. They are effective solution in this situation due to its lightness and ease of installation. Also, their construction does not need to be coordinated with anyone.
Such partitions can be used to divide a nursery where children of different sexes live. Or the living room can be turned into two bedrooms. Regardless of the situation, the construction process plasterboard partitions the room will be the same.
Any design must have a number of positive qualities so that it can be used in practice. Let's consider what advantages plasterboard partitions used in an apartment room can provide.
Selection of base materials
Having decided on the need to use partitions to divide the space in the room, you should understand the tools and materials that will be required for the work.
Of course, drywall comes in number one. Typical wall plasterboard with a thickness of 12.5 mm is used. The sheets have standard width 1.2 meters, and the length is 2.5 and 3 meters. There are other parameters, but these are standard. It is better to take shorter sheets, as they are easier to carry into the house. You can take fire-resistant sheets (they have pink cardboard). In this situation, they will be appropriate if the children's room is divided, and power cables will be laid in the partition itself.
 Soundproofing material is fixed thanks to metal profiles
 An interior partition made of plasterboard with sound insulation will allow your roommates to comfortably listen to music, watch a movie or have a quiet conversation. Since the room is divided into two parts, the use of soundproofing materials is necessary. They are installed in a metal frame.
 Various profiles that can be used to assemble the frame
To assemble the frame you will need metal profiles. Standard length Such profiles range from 3-4 meters (shorter ones are more convenient, since it is more realistic to bring them into the apartment without cutting or bending). What profiles may be needed?
- Guides are classics of the genre. They are attached to the surface and serve as the basis for attaching other profiles. It is convenient to cut jumpers from the guides.
- The rack profile is a thrust element of load-bearing structures. It seems to support the entire frame, because it is used as a vertical support.
- Corner and ceiling profiles are not used when creating interior partitions.
 Installation of interior partitions made of plasterboardinvolves creating a frame from profiles. But which profiles to take, since they all have different sizes? It is necessary to select the size so that the rack profile fits tightly into the guide. We need to look at this first. Otherwise, if you take 28x27 mm guides and 50x50 mm racks, you won’t be able to assemble anything. If a 50x40 guide profile is used, then 50x50 mm racks will be just right.
Selection of fasteners and tools
To attach all the elements of the interior partition from gypsum plasterboard you will need:
- dowels 6x40 mm for attaching the frame to the floor, wall and ceiling;
- black phosphate self-tapping screws. The length of the self-tapping screw should be 25 mm if the wall plasterboard is attached in one layer. Sometimes, for greater reliability and better sound insulation of the interior partition, sheets of plasterboard are attached in two layers on top of each other. In this case, 3.5x35 mm self-tapping screws will be required for the second layer;
- bugs (small self-tapping screws with a drill and a press washer) are used to fasten profiles to each other. They should be as short as possible (for example, 4.2x19 mm), and the cap should be as flat as possible. The presence of a drill in the “bugs” makes it easier for them to pass through two profiles.
- Sealing tape must be used. It is installed between the surface and the frame, thereby improving the sound insulation characteristics of the assembled structure.
In addition to the fasteners, you will need special tools for the job. Without them, installation of a plasterboard interior partition will not be possible. Such tools include a screwdriver, drill, level, plumb line, metal scissors, construction knife, hammer and tape measure. However, this list is not complete or mandatory. Some tools won't be needed, but others may come in handy instead ( hole saw, cutter, beating cord, hammer drill, edge plane, etc.).
When the partition for dividing the room is assembled, it will need to be prepared for finishing. For these purposes you will need:
- primer;
- roller with a container for it;
- putty;
- serpyanka;
- set of spatulas;
- reinforcing corners;
- sandpaper.
Room layout
 The quality of the partition depends on the correct layout of the room.
 It is necessary to decide on the place where the partition will go. Using a laser level, lines are drawn on the ceiling, walls and floor. If it is not there, then you will need to draw the first line on the ceiling. To do this, you will need a water level and a long ruler (guide profile).
Using a plumb line, the extreme points of the line on the ceiling are transferred to the floor. Now there are two points on the floor, between which another line is drawn. You can use upholstery cord. Next, the only thing left to do is to draw lines on the walls in a similar way, focusing on the mark that is already on the floor and ceiling.
When you assemble interior partitions from plasterboard with your own hands, they usually have a doorway, although not always. The space under the doorway also needs to be marked in order to know where to place the profile on the floor and where to insert additional racks with mortgages.
General rules for assembling a frame for a partition
 The interior partition should not rest against the window
 The base of the frame is assembled from guide profiles that are attached along the perimeter of the future partition. It is most convenient to start from the ceiling. The guide is pressed against the ceiling and a hole is drilled using a drill. Then a dowel is hammered in, which presses the guide to the surface. The fastening pitch is 0.5-1 meter, depending on the upcoming operational loads. Perhaps only a couple of hangers will be hung on the partition, or maybe it will be tiled and several massive shelves for books will be attached to it.
Don't forget to use sealing tape wherever the profiles come into contact with any surface. Thanks to this, the soundproofing characteristics of the partition are improved.
The rest of the profiles are attached to the ceiling in the same way as the guide. It is not necessary to join them together in the corners. Still, the drywall in the corners cannot be secured with self-tapping screws. Now the perimeter of the future partition is ready metal profile and drywall.
 Location of profiles in the frame
 It is necessary to insert racks to strengthen the structure. They are inserted in increments of 40 to 60, depending on how the drywall sheets will be attached later. The fact is that the joints of the sheets must fall on the profile. Typically, racks are installed in increments of 60 cm with the expectation that the entire structure will be additionally reinforced with jumpers.
The studs should be installed sideways so that drywall can be attached to them on both sides. In other words, the ribs of the rack profile must run parallel to the plane of the frame.
When assembling an interior partition from plasterboard with your own hands, it is important that the gypsum board lies flat on the frame. Therefore, the racks are attached to the guides using a special cutting tool. If it is not there, then use small metal screws. Screw in two screws in each place where the rack profile enters the guide (a total of 8 screws for each rack). However, the caps stick out a little, which is why the drywall also does not lie perfectly flat.
 Jumpers make the entire frame more durable
 If vertical racks installed in increments of 40 cm, you can do without jumpers. If the pitch is 60 cm, then you need to install several horizontal jumpers for greater structural stability. Simply cut a profile from guides that are mounted horizontally between the vertical posts. The fastening step is 50-60 cm. The jumpers are also fastened with “bugs” or using a cutter.
Jumpers can be specially installed in places where future shelves are attached to make their installation even more reliable. You can insert a wooden beam into such a jumper if you plan to hang something massive on the wall.
How to fill the void of a partition: sound insulation
Depending on the thickness of the interior plasterboard partition, you can choose how to fill the resulting void. The thickness is the sum of the width of the guide and two thicknesses of the gypsum board. The width of the guide is the same as the height of the rack profile (not to be confused with the length) and is selected individually by each person. This width gives a certain emptiness inside the partition.
You can assemble two frames for partitions at a distance of 10-20 cm from each other. They are then covered with plasterboard, and a thick partition is obtained. This step is taken when they are going to place a lot of things inside such a structure.
There is enough space inside the structure to stretch the power cable to connect an outlet or wall lamp. Such cables must be corrugated for fire safety purposes.
 Soundproofing material must not be subject to combustion
 In most cases, the cavity is filled with soundproofing material. Therefore, vertical racks are often installed in increments equal to the width of the soundproofing material. Then it fits without the need for additional trimming and does not tilt to the side. Soundproofing of interior plasterboard partitions should be carried out after one side of the structure is sheathed with plasterboard.
Soundproofing material fits comfortably into the grooves of the upper and lower profile. It will rest against the back of one post profile, but will fit well into the intercostal space of the second post. For this reason, the racks are placed so that they all face the same direction. Some people prefer to install two posts back to back so that the soundproofing fits into them and does not rest against anything.
Horizontal jumpers also serve as additional fixation for sound insulation. Although this is not all that critical, because everything will ultimately be pressed down with sheets of drywall.
Installing a doorway
It is worthwhile to dwell separately on those cases when it is necessary to install a door in interior partitions. We will not consider the process of installing the door itself, but we will focus on how to correctly make an opening for this very door.
 Interior door not so heavy as to damage the partition structure
 Before you make an interior partition from plasterboard, you need to decide where the door will be located. After calculating the doorway, the points where it will be located are marked on the floor. It is necessary to take into account not only the width of the door leaf, but also the door frame itself, so calculations are carried out carefully.
The floor profile is laid on both sides up to the doorway. A rack profile is inserted into each end of the guide, which goes all the way to the ceiling. Between these two profiles there will be a doorway. To indicate the height of the opening, a horizontal jumper is installed between the two profiles. All actions are carried out using a level, because errors here are especially dangerous.
It is necessary to use wooden blocks that are inserted into the racks and lintel. They must fit tightly into the profile, after which they are fixed with self-tapping screws. The upper jumper is additionally fixed with nails, two of which are driven into its end. The resulting doorway, although it came out of a metal profile, was reinforced with wooden blocks.
Step-by-step plasterboard covering
When the frame of the interior partition is ready, then it’s just a matter of small things, because there is nothing complicated about covering with plasterboard.

Preparation for finishing
The resulting interior partition cannot remain in this form. It should be prepared for finishing.
 Self-tapping screw caps do not require preliminary priming
 All self-tapping screw heads must be puttied. The joints between sheets of drywall are first primed and then puttied. At the same time, priming makes sense only if the edges of the sheets have been chamfered. Using a primer will make the adhesion starting putty with a higher quality gypsum board surface. After applying the putty to the joints, you need to use a serpyanka, which will prevent the putty from cracking in these places in the future. The corner parts of the interior partition must be puttied and reinforced with a special reinforcing corner.
When the putty dries, you will need to treat it with sandpaper to remove any bumps and sagging that could have formed during the work. After this, the entire plasterboard interior partition is primed and puttied. If necessary, the second layer of finishing putty can also be treated with sandpaper.
Now the interior partition can be painted or covered with wallpaper of your choice.
In this lesson we will learn how to make a simple interior partition from plasterboard with our own hands. It will have a single frame and single-layer sheathing, with a doorway.
We will also find out why drywall is the most popular material for these purposes, what types of profiles are suitable here, what is needed for installation, and what is its order.
Why drywall?
First of all, let's decide why it is worth building a partition from it? Yes, because GK is a great thing:
- it's relatively light
- requires a minimum of time for installation (such a partition in an apartment, with some skill, can be assembled by one person in a day),
- relatively cheap
- in appearance no different from the main wall
- allows you to easily lay the necessary communications through the frame, without problems arranging openings and niches
- has potentially better sound insulation than a brick wall of comparable thickness
- There are no wet processes during installation, which means there is a minimum of dirt.
We will not consider a wooden frame, since this is really a collective farm style. Metal is more reliable, stronger, lighter, is not afraid of changes in humidity, and you won’t get a splinter with it (although it is quite possible to cut it).
Before we start, let's calculate how much we can save without resorting to the services of finishers. The plasterboard partition, which we will consider as an example in the article, has dimensions of 4x2.77 m, this gives an area of slightly more than 11 sq.m. The price for this type of work (in Ryazan) is 500 rubles/sq.m. + the same additional price for arranging the doorway (at least I think so). With an opening of 0.88x2.1 m we have a hypothetical area of 12.93 sq.m. It turns out that the work of the craftsmen will cost 6,464 rubles.
Types of profiles for arranging partitions
Of course, simple ceiling profiles will not work here; there are special ones for partitions - guides and racks. Guides (PN) come in four sizes: PN-50 (50×40 mm), PN-65 (65×40 mm), PN-75 (75×40 mm) and PN-100 (100×40 mm); in some sources they are called not PN, but UW, that is, for example, UW-100. It is the same. As you understand, they only differ in width. All are 3 meters long. Their application is the same as that of ceiling guides.
Rack profiles (PS) are divided into 4 types: PS-50 (50×50 mm), PS-65 (65×50 mm), PS-75 (75×50 mm), PS-100 (100×50 mm), which goes without saying, because they must have the same width as the guides. But rack profiles also come in different lengths: 3; 3.5 and 4 meters. This is because it is extremely undesirable to increase them in case high ceilings. The bourgeoisie call such profiles CW, that is, CW-100, for example. I would venture to suggest that the letters C and U indicate the cross-sectional shape of the profiles (although C is a rotated U, damn it), but what W means is a mystery to me, perhaps Wall, but then what does D mean in the designation of ceiling profiles (UD , CD)? Write in the comments if anyone knows))
You and I will call them as appropriate: PN and PS. So, I would like to immediately note that profiles with a width of 50 and 65 mm are rather weak for interior partitions, no matter what the ceiling height. But they can still be used if the plasterboard is sheathed in 2 layers. The 75s are already good, but the 100s are ideal. We will use them further in our example. If you use such profiles, the total thickness of the partition will be 12.5 cm. This is a lot, but such a partition can easily be filled with as many as two layers of standard sound insulation (read more about this in the article about soundproofing an apartment with your own hands), and this is a big plus.
If the primary thing for you is thickness (well, and cost), then use 75 mm profiles, in this case you save 2.5 cm. We will place the profiles in 40 cm increments. A 60 cm increment is allowed, but we need maximum strength, so Moreover, if there are tiles on the partition, the maximum step should be exactly 40 cm.
Drywall, as you may have noticed, we will use wall plasterboard, 12.5 mm minimum.
Tools and accessories
Assembling a plasterboard partition will require us to:

Marking and installation of the frame
We will analyze everything, as always, using an example. We have a virtual room: 
And suddenly we decided to fence ourselves off cozy office in half a room. And they didn’t forget to provide a doorway to enter it.
We begin to mark out our future partition. We retreat the required distance from the wall with the window, put marks on the side walls and use a level to draw two vertical lines. All that remains is to connect them along the ceiling and floor; for this we use beading. In case the structure is not solid, or we need to erect it strictly at an angle of 90 degrees. to the side wall (for example, for the subsequent installation of a bathtub), the Egyptian triangle rule applies. It states that in a triangle whose sides are in a ratio of 3:4:5, the angle between sides 3 and 4 is 90 degrees. This rule is easily confirmed by the Pythagorean theorem.
 Let me explain how such a triangle is used in practice. On the side wall there is point A, from which our partition will begin. Let us set aside from it on the same wall in any direction a certain distance that is a multiple of three (let it be 120 cm); this will be point B. Now we take some kind of string (you can do it with a tape measure itself, but it’s inconvenient and not so accurate), measure a distance on it that is a multiple of four (4/3 of the first, that is, 160 cm) and draw it on the floor part of a circle of this radius with a center at point A. Now draw a circle with a radius that is a multiple of five (5/3 of the first, that is, 200 cm), with a center at point B. The circles will intersect at point C. Draw a line through points A and C , it will lie at right angles to the wall.
Although you don’t have to worry about it, just attach a sheet of drywall with the short side to the wall, and draw a line along the long side (or vice versa). There are simply times when a triangle really helps. In our case, it could be used on the ceiling, and the end of the partition could easily be moved to the floor using a plumb line.

After we have marked everything, we attach the guide profiles to the floor and ceiling. On the walls you can use both guides and racks; this does not play any role. The main thing is not to forget about the need to glue the profiles adjacent to load-bearing structures, sealing tape. It is needed for their tight connection with the walls, floor and ceiling, and it also further enhances sound insulation. In addition, it probably (not proven) plays some role in protecting against cracks, allowing the structure to “breathe” a little. 


Let's talk about the design of the doorway. It is clear that special profiles need to be set up for it, but this, as a rule, is not enough; These same profiles need to be strengthened. You can use a combination of two rack profiles, that is, insert them into each other, but this is only suitable for Knauf profiles. Another option is to insert timber of the appropriate width into the profiles.
Or you can simply place another additional one next to the door profile. The first option, in my opinion, is preferable, but later in the example they will be side by side so that it is clear what we are talking about. Weight Limit door leaf in the case of using PS-100 - 40 kg; if a heavier door is planned, special profiles with a thickness of 2 mm must be used. So, we put them under the doorway. Let our door be 80 cm wide (leaf), which means we need to make the opening for it at least 8 cm wider, don’t forget about this: 

The length of the PS should be one centimeter less than the height of the room. It should also be remembered that the rack profiles are not installed haphazardly, but strictly in a certain direction - the stiffening rib should look in the direction from which we will begin facing with plasterboard. After all, you need to attach the sheet first from the edge side, and the next one to the rest of the profile. If you neglect this rule, the septum will turn out to be humpbacked. We will start facing from left to right, so our profile edges are directed towards the left wall. We temporarily attach the bottom and top of the PS to the PN on one side (which will be sheathed last) with self-tapping screws. You can also use a cutter. 
We have installed the “door” profiles, now we attach a jumper from the guide between them. 
We install the jumper as in the figure above. We cut the profile 20 centimeters longer than the opening, cut the side edges exactly to the width and bend the resulting “ears”. For now, we fix it with self-tapping screws only inside the opening; when we sew on the drywall, the jumper will additionally be connected to the PS through the sheet with black self-tapping screws.
Important: joining gypsum boards is only allowed directly above the opening, no closer than 10 cm from its edge. Therefore, we place two more PSs above the opening. The second one is needed to join the sheets on the other side.
More on this a little later. And now we simply mount two profiles, spaced one step apart from each other - 40 cm, taking into account the above condition. Our doorway starts 40 cm from the wall, which means we will place the first at a distance of, say, 60 cm, and the second - 100. For now, we fasten them with self-tapping screws. 
We set the remaining PS based on the position of these two. In our case, it is obvious that the first sheet will be cut, 60 or 100 cm wide (let’s take 60). The next sheet will extend beyond the “door” profile by more than 40 cm, but this is not a problem; the intermediate profile (which falls directly behind the “door”) can be omitted if the “door” is reinforced. If we have not strengthened it with guides, then just the intermediate one will be needed. Let's use it as an example. We also place the remaining PS in increments of 40 cm. 


Profiles automatically fit into one vertical plane. Once they are all exposed, tiling can begin.
Facing the partition with plasterboard
We agreed to start it from the left corner. The first sheet will reach the first short PS above the doorway, that is, it will have a maximum width of 60 cm. You can immediately cut it to fit the opening, or you can first “sew it on” and then cut it in place. We must leave a gap of 1 cm between the sheet and the floor, and 0.5 cm under the ceiling. The height of the sheet is 2.5 m, and the ceilings in our virtual room are 2.77 m. This means that there will be another small sheet on top.
Sheets can only be joined on a profile, and cheap ceiling profiles 60x27 mm are very suitable for this purpose.
If they are not there, we use a rack-mount one. First, we attach a sheet to the frame, “sew” the PS to it, and then sew the upper gypsum board to the PS. 
IN next row small and large sheets change places: small - from below, large - from above. And then there is an alternation of these options.

This is done to eliminate cross-shaped joints, which have a probability of cracking slightly less than 100%; they are especially dangerous on ceilings. If you see such joints somewhere (in the form of “+”), find the one who did it and spit in his face, this is just a monstrous mistake.

Do not forget to chamfer the ends by 2/3 of the thickness in places where the sheets adjoin the walls, ceiling and each other (this does not apply to factory edges). The pitch of the screws is about 15 cm. On the jumpers you should take more steps. On adjacent sheets, the self-tapping screws should be spaced apart, keeping at least 10 mm from the factory edge, and 15 mm from the cut edge. And we make sure that the heads of the caps do not pierce the cardboard. 


After we have sheathed the entire wall on one side, we can unscrew the screws holding the rack profiles on the other and fill the internal space of the partition with a sound absorber. In our case, two layers of mineral wool (or one, but thick) will fit inside. Once we're done with this, we'll start lining the second side. This time we go from right to left, and the first sheet will have a maximum width of not 60, but 100 cm. We must shift all the vertical joints of the sheets on this side by 40 cm to provide additional strength. In addition, we also move the horizontal joints. Yes, the first one long sheet In this case it will be on top, I think everything is clear with this.
I already talked about how seams are processed correctly in an article about a do-it-yourself plasterboard ceiling. Everything is similar here.
That's very good video from Knauf, which perfectly shows the entire process of assembling the partition, but, of course, without nuances:
- If you subsequently plan to hang paintings, sconces, etc. on the partition, you need to provide for embeddings in it in advance - additional sections of the profile.
In addition to the article, I want to offer you a powerful master class, where a specific partition is discussed in detail:

Well, that's probably all. We learned how to install a plasterboard partition with our own hands. Don't forget to subscribe to updates to learn about new articles the day they are published.
For some families, a wall becomes the only way out. Children are growing up, and only a few can buy new housing. How to make separate rooms for children from? Don't put a wall in the middle of the apartment. The solution will be with your own hands, step-by-step manufacturing instructions for which will be discussed in today’s article. Let's try to understand how difficult it is to do such work on your own: from selection to finishing. Let's figure out how to install electrical wiring in the partitions and ensure sound insulation so that the room becomes complete.
We have already talked about dividing the room into two parts. However, a partition will be necessary in other cases. It could be similar, made according to the same principle, or perhaps decorative from plasterboard for decorating a woman’s boudoir. Let's consider the advantages and disadvantages of gypsum plasterboard partitions.
Positive and negative qualities of plasterboard walls
Installation of plasterboard partitions is so simple that a home craftsman without such experience can handle this work. You just need to know some of the nuances, which we will try to highlight today. Among the advantages of working with such material, in addition to ease of installation, one can note the low cost of time and money. GCR is not expensive, with the exception of well-known brands. Allows you to bring to life many of the most daring ideas; it can be bent if necessary. For example, when installing interior partitions, a plasterboard doorway can be made in the shape of an arch or traditional.

The disadvantage of the material can be considered its susceptibility to mechanical damage. It is easy to break when hit. Also, the soundproofing qualities leave much to be desired. To ensure them, it will be necessary to produce additional work. One should not hope that massive objects will be available later. To ensure such installation, it is necessary to lay stiffening ribs in the right places to strengthen the structure.
Important information! When installing partitions, you should not rely on the room being dry. At any moment, the neighbors above can flood, which will lead to quite unpleasant consequences and unnecessary costs. It is better to purchase more expensive moisture-resistant material. This will not completely eliminate its swelling, but it will significantly reduce the damage.

What material is required to make a plasterboard partition with your own hands?
A gypsum plasterboard partition consists of a frame, which provides the main strength, and plasterboard sheathing. The frame is made of metal profiles, wooden blocks or a combination of both materials. Dowel-nails are also used to attach guides to, and and, with which jumpers and gypsum boards are attached to them.
Drywall sheets can be divided into types:
- Standard – grey colour, blue markings. The most common material. It is divided into (a little thinner and stiffer) and wall;
- Moisture resistant– green color, blue markings. You should not think that it is not at all afraid of moisture; nevertheless, gypsum is hygroscopic, but more resistant to dampness;
- Refractory– pink color, red markings. and high temperatures.

Related article:
GVL, GKLV and other types, their characteristics, sizes and areas of application - we will talk about all this in detail in this publication. We’ll also look at how gypsum fiber boards and gypsum boards differ and for what work it’s best to use each option.
Optimal thickness of plasterboard partitions
The thickness of the gypsum board for the interior partition depends on the purpose of the wall. If this is a decorative false wall, the minimum sheet thickness will be 12.5 mm. If you are planning a full-fledged partition, in which installation or various souvenirs are possible, then some calculations will be required:
- If the load is 40÷50 kg/m², you need a sheet with a thickness of at least 15 mm;
- Over 70 kg/m² involves the use of double sheets and reinforcement of the frame structure.
When sheathing the frame, you should not make joints between plasterboard sheets of opposite walls at the same level. This will lead to weakening of the structure and the appearance of cracks at the seams. But the choice of gypsum boards is not the most important thing in such an installation. Before you make a plasterboard partition in a room, you should understand which metal profile to choose for certain purposes.

Main types of partitions: features and markings
| Image | Construction type | Options | Some characteristics |
 | S111 | The weight of 1 m³ is 28 kg, the recommended height is up to 8 m | A single frame made of galvanized steel profile, which is sheathed on both sides with sheets of waterproof plasterboard in one layer. The inside is filled with mineral wool. Used as partitions in rooms with low requirements for sound insulation and fire resistance. The thickness of the partition depends on the size of the profile and gypsum board. |
 | S112 | Weight 1 m³ – 53 kg, height 4÷9 m | Single metal frame with two-layer gypsum board sheathing on both sides. Filler – mineral wool. The design provides high sound insulation characteristics and fire resistance (up to 1.25 hours). It is used for redevelopment or capital construction. |
 | S113 | Height up to 9.5 m. Weight 1m³ – 78 kg | The single frame is sheathed on both sides with sheets of waterproof plasterboard in three layers. By increasing the number of gypsum plasterboard layers, sound insulation increases. |
 | S115.1 | Height – 6.5 m, weight 1 m³ – 57 kg | Double frame covered with gypsum board in two layers. Along with strength, it has excellent fire resistance. |
| S115.2 | Weight 1 m³ – 69 kg. Height up to 9 m | In addition to the two-layer sheathing, the double frame is separated by an additional sheet of plasterboard (spaced frame). Due to this, strength increases, as well as thermal insulation properties. Mineral wool slabs are laid inside. | |
 | S116 | Height 4.5 – 6.5 m, weight 1 m³ – 61 kg. Minimum thickness partitions 220 mm | A double metal frame covered with two layers of plasterboard is convenient for... Fire resistance - 1.25 hours. Sound insulation up to 50 dB. |
 | S118 | Weight 1 m³ - 86 kg. Height up to 9 m | Partition class “Protection of premises from penetration”. Made according to type C113 with a single metal frame covered with a three-layer plasterboard covering. A special feature of the product is galvanized steel sheets, 0.5 mm thick, inserted between the gypsum boards, which significantly increases the strength and fire resistance of the structure. Most optimal for creating a plasterboard partition with a door in a warehouse. |
 | S121 | Weight 1 m³ – 32 kg. Height up to 3.1 m | The frame is made of wood with a moisture content of 12% and sheathed on both sides with one layer of plasterboard. |
 | S122 | Weight of 1 m³ – about 57 kg. Height up to 3.1 m | Double-layer “upholstery” wooden frame GKL. The insulating material of the partition is mineral fiber boards. Advantages: high strength and good sound insulation. |

Related article:
What materials can be used for manufacturing, how to choose the shape of the partition and expert advice on its installation - read all this and much more in this material.
Types of profiles for gypsum plasterboard partitions
To assemble a frame for an interior partition made of plasterboard, you will need three types of profiles - racks, guides (main) and lintels.
Guides – U-shaped profile with standard sizes width – 5; 6.5; 7.5 and 10 cm. Height - 4 or 4.5 cm. The main (guide) profiles are attached to the ceiling and walls, giving the structure stability. Marking – PN or UW.
Rack elements are marked as PS or CW. The dimensions in height and width are identical, because they must be inserted into one another. But the length of the rack profiles is more varied. If the guides are produced in lengths of 3 m, then the rack-mount ones can also be 3.5 or 4 m. The reason for this is that the racks cannot be increased - this harms the strength of the frame structure.
Jumpers are made independently from any type of profile and serve to increase the strength of the frame. Typically, scraps left over from rack or main elements are used. The method of bending (internal or external) depends on the wishes of the master, but the internal one is more durable.

Methods for soundproofing walls made of gypsum plasterboard
The most common method of soundproofing (as well as) gypsum plasterboard walls is to lay mineral wool or foam plastic between the skins. The denser and thicker this layer is, the better the wall or sound.
Do-it-yourself plasterboard partitions: step-by-step instructions for the main stages
Installation of a gypsum plasterboard wall is carried out in several stages. But first you need to figure out which one you might need for the job.

Partition installation tool
In addition to the main tool (perforator, drill, etc.), you will need a plasterboard knife. It can be used to cut out parts the right size. This is done as follows. Having marked the sheet, we apply a metal profile and run the knife along the strip several times, cutting through the surface as deeply as possible. We break the remaining part. It's not difficult; even a schoolboy can do the job. The cut is leveled with a gypsum board plane or the same knife so that the joint is as even as possible.
Need to know! There is no need to adjust the slabs perfectly, because all imperfections will be covered with putty when finishing. But before you make a plasterboard wall, you should practice on an unnecessary section.

Calculation of consumables for constructing a gypsum board wall
It is not difficult to calculate the required amount of gypsum boards. It depends on the layers of the wall, and we will not dwell on it. But calculate the carrier profile more difficult. Calculations are made using the formula Q = (P/0.6 + 4) × K , if the wall is less than 3 m high, and Q = ((P/0.6 + 4) × H/3) + P×K , if the wall height is more than 3 m, where:
- Q – number of supporting profile;
- K – waste coefficient;
- P – perimeter of the room;
- 0,6 – the value of the strut spacing in meters;
- 4 – the number of racks indicated in pieces that must be installed in the corners of the room.
However, there are still load-bearing elements frame. We carry out calculations as follows. We divide the perimeter of the future wall by 3 (the height of one profile), and then multiply it by the overexpenditure coefficient. It is different for different areas, and is 1.075 for an area over 20 m2, 1.175 for an area from 10 to 20 m2 and 1.275 if an area is less than 10 m2.

Frame installation: let's start work
First, we will analyze the stages of work on how to make a partition from plasterboard, superficially, and then we will try to understand the whole technology using photo examples in detailed step-by-step instructions. First of all, using a laser level, we mark the locations of the main profiles - they are the basis of the future wall. In addition to fastening with dowel nails to the walls and ceiling, we fix the profiles together with a special punch or self-tapping screws.
Having completed this work, we move on to the racks. If it is planned, then we install wooden blocks in the rack profiles around it - they will add strength to the structure.
Good to know! If the wall is small, then you can do without horizontal crossbars. If the dimensions are large, then jumpers will have to be installed.

Before making a partition in a room, cutouts are made in the main profiles to lay the wiring, into which it is pulled. After the main frame is assembled, one side of the partition is closed. In this case, drywall is attached over the entire area, not excluding the future doorway. It's much easier to cut it out later.
Having closed one side of the wall on which sockets and switches will be installed and cutting through the doorway, we install cups under the electrical fittings, pull cables into them and fill free space mineral wool, which will provide noise and heat insulation. All that remains is to close the wall on the back side of the gypsum board and cut through the doorway again.
Now let's look at how to install a plasterboard wall with your own hands in step-by-step instructions with photo examples.
Step-by-step instructions for installing a gypsum board partition with your own hands
| Illustration | Action to be performed |
 | First, measure the length of the main profiles and cut according required length. To do this, you can use metal scissors or a grinder. When working with an angle grinder, do not forget about safety glasses. |
 | Holes are cut in the lower profile for pulling cables (in our case they pass under the floor)... |
 | The main profile is laid according to pre-made markings and attached to the floor. The cables are pulled into the prepared holes. |
 | The same actions are performed with the upper profile and with the guides along the walls. |
 | This is how the main profile is attached if there is a doorway directly next to the wall. |
 | We install a wooden block in the profile along the door jamb, which is fastened with self-tapping screws. It will add strength to the structure and door hinges. |
 | The profiles are fastened together using self-tapping screws or special device- breakdown. |
 | Be sure to use a mounting level to check the position of each rack and guide. This will give you confidence that the wall will be level, without tilting. |
 | We begin to sew up the gypsum board frame, along with the doorway. This is much more convenient than attaching sheets in pieces |
 | Coat all seams of the first layer with putty and level them. This will provide better heat and noise insulation. |
 | Let's start cutting the door. Here it will not be possible to break the sheet, and therefore you will have to cut it completely, to the full thickness. In our case it is 12.5 mm. |
 | We proceed to fastening the second layer of drywall. This time the sheets are shifted by 60 cm, covering the first seam. |
 | Having covered one side in 2 layers, mark the location of the sockets and drill them out using a wood crown... |
 | ...after which we mount the glasses and route the cables into them. |
 | On the reverse side we begin laying the insulation – mineral wool. It fills all free space. |
 | The final result of insulation looks like this. All that remains is to close the second side of the wall. |
 | Having completed this work and again cutting through the doorway, we get the following picture. But we still have one more blank wall left uninstalled. |
 | Similarly, we assemble a frame from a metal profile... |
 | ...and cover it with plasterboard. All joints should be as smooth and neat as possible. |
 | IN last resort We will close the ends of the metal profile, after which we can begin finishing the mounted wall. |
How to bend gypsum boards to install an arched passage
This work is quite simple to do. We cut the strip to size and, placing it on the floor, using a knife and ruler, make transverse cuts every centimeter along the entire length. After these steps, the strip will easily bend and position itself as needed. It becomes clear that the question of how to make a plasterboard partition with your own hands is not so complicated.
Hello, dear readers! Not long ago I was doing renovations at my parents’ house, and they asked me to remodel it. I suggested an option such as a do-it-yourself plasterboard partition: it’s easy to build, and its characteristics are pleasing. If you choose the right materials and follow the technology, then sound insulation exceeds the result that gives Brick wall. As for paintings, watches, and light shelves, they are even easier to attach than traditional solid materials. My parents were doubtful, but I managed to convince them with calculations: compared to building with brick, the savings are 450 rubles. on every square meter. But how to achieve high-quality results? Let's figure out the installation technology together and study the step-by-step instructions.
 DIY design
 Light partitions when changing the layout are almost always made of plasterboard. How much justified use this material – we will try to find out.
Do-it-yourself drywall for partitions: advantages
Let's first give an assessment of drywall as a material for internal partitions in a residential area:
- High speed of construction. Thanks to the solid dimensions of the plasterboard sheet, partitions can be erected in just a couple of days.
- Minimization of wet finishing processes. To Work with cement mortar you won't have to at all; gypsum plaster Doesn't leave as much dirt in the house.
- The material is fire resistant. Gypsum, which makes up most of its volume, does not burn and has poor thermal conductivity.
- Soundproofing it will be good even without adding insulation to the partitions.
- The cavities inside the walls accommodate electrical wiring and water distribution. Of course, the frame should initially be installed with the purpose of laying communications in mind.
- Light weight means minimizing the load on the floors.
- Last but not least, the material does not emit any volatile harmful substances into the atmosphere.
Disadvantages of DIY plasterboard structures
Drywall has two serious disadvantages:
- Low mechanical strength. It is not difficult to break a single sheet of drywall, simply by leaning on it with all your weight or by hitting it with a fairly massive object.
- Low resistance to water. Even moisture resistant drywall will become unusable with prolonged contact with it.
In addition, a plasterboard partition requires finishing– albeit not too labor-intensive.
DIY plasterboard partition alternatives
What, exactly, can be used instead of drywall?
- Laminated chipboard used for finishing the lower part of the walls with your own hands. She provides, along with decent appearance much greater strength: it is very difficult to accidentally damage such a wall.
- Plywood- even more reliable material. You can safely hang cabinets, including quite massive ones, on a wall made of fairly thick plywood; it is also quickly mounted on the frame and is quite easy to process. However, its price, with a thickness comparable to plasterboard, is approximately twice as much.
- Finally, for interior partitions it is easy to use Wall panels from MDF. The obvious disadvantage is that the mechanical strength is as low as that of drywall. Plus, they cost about the same amount as 10mm plywood of the same area.
However, we will already receive finished wall, which does not require painting or finishing.
Installation diagram for a plasterboard partition: do it yourself
How it works partition from plasterboard?
The most popular device for plasterboard partitions involves vertical installation whole sheets. The frame is made vertical, from CW rack profiles, which are fixed to UW guide profiles running along the floor and ceiling.
Horizontal frame elements, in addition to guides, are used to frame openings and arches. The guides are attached to the ceilings with dowel-nails or anchors. A sound-absorbing tape made of polyurethane foam or foam rubber is used as a damper designed to dampen shock vibrations.
The rules for installing drywall with your own hands are common to all structures made from it:
- Adjacent edges of adjacent sheets must be attached to one profile.
- Between the sheets there are gaps of 3-5 millimeters for putty.
- The seams are reinforced with fiberglass mesh during the plastering process and/or bandaged paper tape.
- The attachment points of the frame to the ceiling should be located at a distance of not more than a meter. Optimally – 60 cm. In addition, each individual structural element must be secured with at least three dowels or anchors.
- If it is necessary to splice the profiles to a greater length, they are fastened with at least three self-tapping screws.
- The distance between the standing profiles should be no more than 60 centimeters.
Advice: it is better to install risers with a gap of exactly 40 centimeters along the axes. The rigidity of the structure will be greater. In addition, the width of the sheet will be a multiple of the distance between the risers, and the edges of adjacent sheets will fall on one profile without additional adjustment.
 It’s easy to assemble the frame with your own hands
 Device The frame is clearly visible in the photo. The horizontal lintels will accommodate the joints between the sheets: the ceiling is too high for one vertical sheet.
Reinforced and wide plasterboard partitions for do-it-yourself zoning
If necessary, a partition with a larger mechanical strength, fire resistance or soundproofing qualities, when communications are located inside it, occupying a large space, a complicated arrangement of plasterboard partitions is possible.
- One row of risers can be covered with two layers of plasterboard. This scheme, among other things, avoids the appearance of cracks at the joints of the sheets. There must be overlap between the layers: the joints are attached to different profiles.
- If it is necessary to place risers for water supply or kitchen (diameter 40-50 millimeters) sewerage inside the partition, it can be built frame from two rows of standing profiles, sewn together end-to-end with self-tapping screws.
- Finally, if a 90- or 110-mm sewer riser, two rows of vertical profiles are located at a distance from each other. They can be connected to each other not only with segments of the same profile, but also with strips of drywall.
 You can create a unique design with your own hands
 The partition hides risers and electrical wiring. In addition, it became the basis of a miniature bar counter.
Work order: do-it-yourself decorative plasterboard partition
What is technology making plasterboard partitions with your own hands?
Assembling the frame
- The axis of the partition is marked on the floor. It's easier to do this with a chop cord. Then the markings are transferred to adjacent walls and ceilings. Mutual arrangement The markings are checked by level and plumb.
- UW profiles with laid or glued soundproofing tape are attached to the ceiling and floor. As already mentioned, the optimal fastening pitch is 60 centimeters.
- CW standing profiles are marked and cut in place. For reliable fastening, they must extend into the UW ceiling profile by at least two centimeters. Fastening - with metal screws (fleas) on both sides of each profile. The wall riser is attached to the wall in increments of no more than a meter using the same dowels or anchors; Soundproofing tape is also laid under it.
- The opening is edged with a profile around the perimeter. If you plan to install a door, its frame is exposed and attached to the profile immediately after installing the frame, before covering it with plasterboard.
Attaching the standing profile to the guide is strictly on both sides.
Do-it-yourself plasterboard covering of a decorative partition
If trimming is necessary, sheets are marked on the floor or a wide table. Using a square to check right angles is mandatory.
Please note: one of the advantages of drywall is that it allows for fairly large cutting tolerances. Even a three-centimeter gap can be easily filled with putty using reinforcing mesh. Therefore, do not be afraid to make a mistake with the sizes - nothing fatal will happen.
How to cut drywall with your own hands?
- The sheet is cut along the cutting line with a sharp knife and broken. Then the cardboard is cut off from the second side.
- A jigsaw produces more dust and, often, a less straight cutting line. However, if you are afraid to break a sheet, it is quite possible to saw it off.
- Finally, you can cut with regular sawing hand saw. Both gypsum core and cardboard are VERY easy to cut.
Curvilinear cutting lines are made with a narrow hand saw or jigsaw. The holes for sockets are chosen, as a rule, to be the same in fairly large quantities. For them, it is better to purchase a crown of the appropriate diameter.
After trimming, the edges are processed with a flat or rounded (depending on the shape of the cutting line) rasp. The edge is made straight and even; the edges of the sheets intended for joining are chamfered.
On long straight sections, it is more convenient to remove the chamfer with a plane - manual or electric.
How to bend drywall for a figured partition with your own hands
- Roll the side of the sheet that will shrink when bent with a needle roller and wet it several times until the plaster is completely saturated with water. Then dry on the template or directly on the final installation site.
- Make frequent transverse cuts with outside sheet and secure it to the profile. The cuts are leveled when the surface is puttied.
The sheets are screwed to each profile in increments of 25 centimeters. On curved surfaces the step is reduced to 15 cm; with a two-layer sheathing, it is permissible to fasten the first layer in increments of 75 cm. The length of the screws is selected so that they extend into the profile by at least a centimeter.

After covering the partition on one side, if necessary, insulation is laid - polystyrene foam or basalt wool.
After finishing the fastening, all the caps should be recessed into the drywall by about a millimeter: they should be hidden with putty.
How to make a plasterboard partition with your own hands: processing the seams
There are two main ways to putty the seams with your own hands so that after a couple of years cracks do not appear in their place.
- The seam is glued with serpyanka - a reinforcing tape made of fiberglass mesh, then puttyed with gypsum putty directly through it.
- The seam is puttied without reinforcement; After drying, the putty is sanded with a mesh float and bandaged with paper tape. The tape is glued with PVA glue or its water solution and stretched with a spatula; excess glue is removed with a sponge.
With a two-layer sheathing, it is theoretically possible to do without reinforcement or banding. In practice... Costs are low; At the same time, you reliably protect the wall from the appearance of cracks due to any deformation. Why not?
At the same stage, the self-tapping screws are puttied. There are no special tricks here: putty twice (since plaster shrinks a little when dried), then sanded.
 The result of DIY work
 The result should be something like this.
Do-it-yourself final finishing
Instructions for using drywall Knauf strongly recommends the use of a penetrating primer before the final putty. The entire surface is primed; then gypsum-based putty is applied in two as thin layers as possible.
A caveat: the need to putty the ENTIRE surface of the drywall is quite controversial. Pros recommend doing this; on the other hand, if the condition of the partition suits you even without putty, is it worth wasting your time? After priming, you can go straight to painting or wallpapering.
The main weak point of plasterboard partitions is the corners of various arches and projections.
How to protect them with your own hands?
- You can put metal under the putty corner profile. The angle will be strong; however, it is still possible to knock the plaster off it.
- After the corner is drawn, you can stick a decorative one on it. plastic corner. Glue – liquid nails, universal polymer glue (Titanium and analogues), acrylic putty or even silicone sealant.
Making a partition from plasterboard with your own hands
Redevelopment of an apartment or a separate room is always a very important and crucial moment, involving either the removal of existing walls or the construction of new ones. As practice shows, the most successful, simple and reliable option is to install plasterboard partitions.
 By doing the repairs yourself, you are sure that you will not discover hidden defects later
 It is best to install a partition in a house during renovation, because... the process affects the ceiling, floor and walls.
High-quality and quick installation of plasterboard partitions with your own hands
The decision has been made, the design has been developed, and the repair stages have been planned. The installation or installation of plasterboard partitions is carried out at the initial stage of repair, because it involves work on the ceiling, floor and walls, which subsequently implies the need to seal joints and decorate smooth transitions between surfaces.
Step one: install the partition frame with your own hands
Work on the frame begins with markings. The boundary of the future bulkhead is marked on the floor, which is then transferred to the walls, where a strict vertical is measured using a level, and then projected onto the ceiling using a plumb line or the same level.
The guide profile (PN) is fixed according to the markings. The recommended fastening material is a dowel-nail composition (quick installation), which allows you to speed up the process. The distance between hardware should be maintained no more than 40–50 cm, since it is this structural element that sets the rigidity of the entire surface.
The next step will be marking the opening (door or arched). At the boundaries of the future passage, between the ceiling and floor guides, sections of the rack profile are installed and secured in compliance with the level. From them to the left and right side, the same segments are located throughout the entire area of the future pier.
What to pay attention to
It is important to remember that installing plasterboard partitions with your own hands requires maintaining a distance between the centers of the rack profiles of strictly 60 cm, which will subsequently facilitate the work of attaching gypsum boards. The rack profile is literally inserted into the guide element, after which it is secured with metal screws (“fleas”).
If the height of the room exceeds the height of the plasterboard sheet, then an additional horizontal profile segment must be mounted along the line of the intended joint between the sheets, because joining is allowed only on a rigid base. The same segment is installed in the upper part of the doorway, and in the case of installing an arch, an arched profile is used, which easily bends to the shape of the planned arch.
If the sheet of drywall is smaller than the height of the room, then it is necessary to add an additional profile segment, because Joining of sheets is possible only on a rigid base.
Types and characteristics of metal profiles for plasterboard partitions
As already mentioned, to install a partition from gypsum plasterboard on metal frame Several types of metal profiles are used. The following information will help you understand their diversity, purpose and features:
| Name | Purpose | Section size | Length | Weight |
|---|---|---|---|---|
| PN (UD) guide | interacts with ceiling profile in designs | 28x27x0.5 mm | 3.0 m | 0,4 |
| PP (CD) ceiling | installation of frames suspended ceilings and wall cladding | 60x27x0.5 mm | 3.0; 3.5 4.0 m | 0,6 |
| PS-2 (CW) rackmount | 50x50x0.5 mm | 3.0; 3.5 4.0 m | 0,73 | |
| PS-4 (CW) rackmount | frames of partitions, cladding and other structures for gypsum boards | 75x50x0.5 mm | 3.0; 4.0m | 0,85 |
| PS-6 (CW) rack-mount | frames of partitions, cladding and other structures for gypsum boards | 100x50x0.5 mm | 3.0; 4.0m | 0,97 |
| PN-2 (UW) guide | 50x40x0.5 mm | 3.0; 4.0m | – | |
| PN-4 (UW) guide | for fastening rack profiles in various designs | 75x40x0.5 mm | 3.0; 4.0m | – |
| PN-6 (UW) guide | for fastening rack profiles in various designs | 100x40x0.5 mm | 3.0; 4.0m | – |
The frame elements are made of galvanized metal, therefore they are resistant to corrosion and are designed for a long service life.
Do-it-yourself plasterboard covering of a partition
First of all, the side of the wall being built is sheathed on which electrical points (sockets, switches, lamps) are supposed to be placed. To install them, appropriate holes are made in the coating.
Drywall – universal material, which is very easy to cut and install. It is easy to cut with a knife, and there is no need to make a through cut. It is enough to cut through the markings upper layer cardboard and partially gypsum filler, after which the material without special effort will break into reverse side exactly along the cut line. All that remains is to cut the bottom layer of cardboard - and the workpiece can be attached to the frame.
The DIY cladding sequence is as follows:
- first whole sheets (if possible);
- then straight-cut sections;
- lastly, sections with a figured cut (arch, doorway).
Fastening is carried out using metal screws with a conical head. Such a cap is easier to recess into the plaster, which is what the technique requires.
At the joints, the coating is cut at an angle to create a kind of groove, which will subsequently be puttied using a sickle mesh.
Electrical wiring and sound insulation equipment inside the partition
PS (CW) elements have special grooves for conducting internal communications through them. In this case, an electrical wire will be laid through them. The wire is pre-placed in a flexible corrugated pipe, and then supplied to the holes for electrical points.
The connection of the wire with the current-carrying cable must be carried out by a specialist who has the appropriate specialty and skills in working with electrical networks.
The next phase is laying soundproofing material (foam plastic, mineral wool) with your own hands. Hollow partitions made from prefabricated plasterboard coverings are unable to absorb or muffle sounds in the room, so installing sound insulation in them is a necessary procedure.
Covering the second side of the partition with plasterboard and sealing the joints with your own hands
The reverse side of the wall is sheathed with gypsum board according to the same principle as the previous one. The only one prerequisite is that the joints between the sections of the coating do not coincide with the location of the joints on the opposite side, that is, they are on different profiles. This will add additional rigidity to the structure.
The cut joints are first treated with a primer and then covered with starting putty. At the same time, the caps of the screws are sealed. A strip of sickle mesh is laid on top of the wet putty along the entire length of the seam so that the seam is in the center of the strip. The mesh is pressed against the canvas and covered with thin layer putties. After drying, the putty joint is processed with emery cloth until completely leveled.
Shutdown
The final stage will be do-it-yourself puttying of the entire surface of the canvas and installation of electrical fittings. The base is treated with a primer deep penetration, after drying, the first layer of starting material is applied gypsum putty. We have to wait completely dry first layer before proceeding with subsequent activities. For the second layer select finishing putty on a gypsum base, but before applying it the surface is again treated with a primer. After drying, the canvas is sanded with sandpaper.
After installing the sheets of drywall onto the metal profile with your own hands, you can proceed to the final stage: primer and putty. At this point, the installation of partitions made of plasterboard sheets can be considered complete, but it’s worth doing finishing touch. Electrical fittings (sockets, switches, lamps) are installed by a specialist electrician in the places where electrical wires are discharged, which were prepared in advance.


