Wooden floors are rarely leveled with concrete. Many experienced builders believe that erecting a heavy monolithic structure on a wood floor makes no sense. Moreover, the concrete layer is not very “friendly” adjacent to wooden base, not only during hardening, but also during operation. In this regard, it is more advisable to use dry leveling schemes. But in cases where it is necessary, for example, to lay in a washing room tiles, we have to look for a way out of the situation.
Let’s say right away that concrete screed on a wooden floor is a completely feasible task, but here, as in any other matter, there are specific issues.

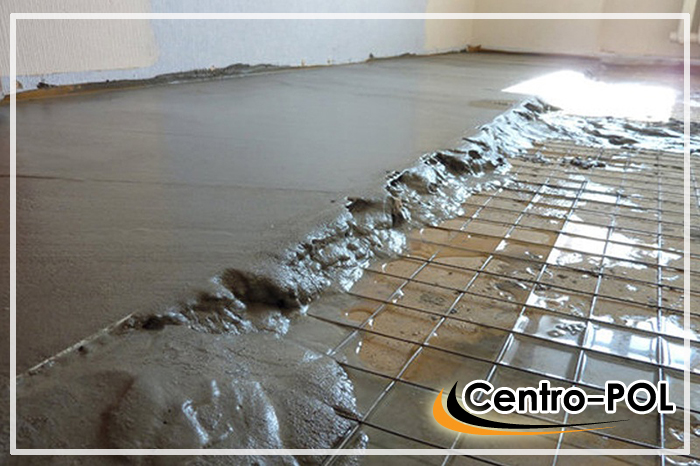
Plank floor - photo
Wood is a special material that has not only a number of technological advantages, but also with one significant drawback. It is not static, so even after completion installation work“behaves” according to his own laws, peculiar only to him. Changes in temperature and humidity cause lumber to shrink, increase/decrease in volume, stretch or contract. By the way, it is for this reason that after the construction of the log house, finishing is carried out about 2 years later.

But even after a two-year period of shrinkage wooden structures They are still moving, albeit not as intensely. For example, a wooden floor with underfloor heating moves every time the heating system is turned on.

Video - Concrete floors in a wooden house
Unlike wood, a monolithic concrete base only slightly changes its geometric parameters when hydrated, and after complete hardening it hardly moves at all.

And if this base were tightly connected to an unstable wooden surface, then the slightest movements of the latter would lead to the formation of cracks on the surface of the concrete.

One of the reasons for the appearance of cracks is non-compliance with the technology of pouring concrete onto a wooden base.
But the alignment technology described here is intended to ensure that both elements cannot harm each other, and its (technology) distinguishing feature lies in the fact that during pouring the base is not connected to the walls.

Diagram - an example of arranging a screed on a wooden floor
Design features of plank floors
It is hardly advisable to pour a screed on a floor equipped with joists and a floor slab. Such floors often have a thickness of approximately 7-7.8 cm, and the only correct solution in this case can only be to dismantle all wooden elements followed by pouring over the floor slab. It’s another matter if the logs are high and located on brick pillars. Such pillars have a height of over 0.3-0.4 m, so it is impossible to replace them with a concrete screed. Schemes of such floors are presented in the images below.
 1 – base; 2 – waterproofing made of two layers of roofing material; 3 – bottom harness; 4 – top harness; 5 – external cladding tongue and groove boards; b – plate made of non-ferrous metal with holes; 7- outer wall from boards; 8 – plaster; 9 – plinth; 10 – plank floor; 11 – logs; 12 – brick column; 13 – antiseptic wooden lining; 14 – underground
  1 – compacted sand; 2 – concrete preparation; 3 – waterproofing from roll materials; 4 – brick column; 5 – wooden antiseptic lining; c – cladding made of antiseptic boards; 7 – intermediate plank flooring: 8 – thermal insulation; 9 - air gap; 10 – floor; 11 – load-bearing beam
It is precisely such structures that are often filled with screed.
Pouring technology
The essence of pouring a concrete screed on a plank floor is to create a gap between the monolithic surface and unstable wooden elements. For this purpose, the leveling layer is cut off from the walls using a damper tape, and from the plank base - with polyethylene.

This creates a floating floor without connections to any surface. As a result, all lumber elements continue to move in one direction or another, and the screed, which simply lies on top, does not become covered with cracks from permanent changes in the position of the boardwalk.
The technical parameters of the concrete screed, as well as the basic requirements, are found in SNiP 2.03.13-88 and 3.04.01-87.
SNiP 2.03.13-88. Floors. File for download
SNiP 3.04.01-87. Insulating and finishing coatings. File for download

On the feasibility of using polyethylene
Direct contact with plastic film is known to have a negative effect on wood and leads to the growth of fungus and mold.


That is why, instead of film in wooden structures, roofing felt, bitumen-based mastic, glassine or roll waterproofing With bitumen impregnation. But the cement screed does not stick to the plastic film, because of which:
- both plates will be able to move freely along the insulating boundary;
- the screed will not draw moisture from the wood, leading to cracks;
- When moving, the screed will not pull the film, stretch it or tear it.
Important information! Before starting work, care should be taken to minimize Negative consequences contact of lumber with polyethylene. To do this, all wooden elements must be treated with an antiseptic and the Aquastop primer mixture, which has moisture-repellent properties.

The filling procedure itself consists of several stages, let’s get acquainted with them.
Prices for reinforced polyethylene film
reinforced polyethylene film
Stage one. Calculations
There is one standard scheme calculations: for every 15 kg/m² of dry mixture there is a thickness of 1 cm. Even if the required amount of materials is known, you still need to buy them with a 10% margin.
Table. Dry cement mixtures- price
| Name | Manufacturer | Package | Price |
|---|---|---|---|
| "VOS Mixtures" | Bag, 50 kg | 95 rub. | |
| UMIX | Bag, 50 kg | 100 rub. | |
| "Stone Flower" | Bag, 25 kg | 75 rub. | |
| "Polymin" | Bag, 25 kg | 118 rub. | |
| Kreisel | Bag, 25 kg | 132 rub. | |
| Manufacturer: Ceresit | Bag, 25 kg | 160 rub. |
Stage two. Preparing the base
Having understood the technology and calculated the required amount of mixture, you can proceed directly to work. Traditionally, you should start by preparing the base.
Step 1. First, the boardwalk is dismantled and a thorough inspection of all elements is carried out. Lags are checked. If any of them are unsuitable for further use, they must be replaced.


Step 2. If the logs are installed in increments of more than 40 cm, then auxiliary bars are installed between them.

Step 3. The boards, if they are still usable, are nailed back together. If slightly damaged floorboards are found, they should be turned over.

The heads of the nails are recessed by 2-3 mm, otherwise the plastic film laid on top may tear.
Step 4. The baseboards are removed and thin boards are installed instead (the latter should cover the cracks in the walls). Do not forget that these boards are installed for a certain time, and after pouring the screeds will be dismantled. This will ensure ventilation of the wooden base and prevent it from rotting.
Important information! You also need to seal all the cracks. If they are small, you can fill them with sealant, but large cracks are better sealed with foam.


Instead of sealant, you can use parquet putty made from wood dust, or a homemade putty mixture. To prepare the latter, you need to mix any sawdust with oil paint in a ratio of 4:1.


Stage three. Padding
When the sealant or putty is completely dry, thoroughly vacuum the substrate to remove dust and debris. Sanding can be done if desired, although this is not necessary.

Next, a moisture-resistant primer is applied in two or three layers: it will prevent the appearance of air bubbles and the absorption of liquid from the cement mortar by the surface. The primer will also serve additional protection wood from mold and mildew.

Prices for primer for concrete floors
primer for concrete floor
Stage four. Marking
Using ordinary or laser level marked along the perimeter of the walls zero level. The latter can be at an arbitrary height, but on average it is 35-70 cm from the surface of the base. It is necessary to mark several points of the zero horizontal on each of the walls.

Equal distances are laid down from these points, and the thickness of the screed itself must be taken into account.

Important information! Standard thickness concrete floating floor is about 5 cm. Moreover, every centimeter of such a floor will create a load on the plank base of 100-110 kg for each square meter. It is for this reason that it is advisable to strengthen the logs, although, if possible, it is generally better to install metal channels instead of them.

Stage five. Waterproofing
Further actions are associated with the insulation of wooden structural elements, and the result should be a kind of pallet that does not allow moisture to pass through.
Step 1. A damper tape with a thickness of 10-20 mm and a width slightly exceeding the thickness of the screed is attached to the walls along the entire perimeter. This tape will provide not only damping of sound vibrations, but also the possibility of lengthening/expanding the floating slab. Scotch tape is used for fastening.


Important information! At the end finishing floor, excess tape protruding on the surface will be cut off, and the resulting gap will be covered with a plinth.


Important information! No creases or damage on waterproofing layer there shouldn't be. Subsequent steps must be performed with extreme caution so as not to tear or puncture the film. If this cannot be avoided, the holes must be immediately covered with polyethylene patches.

Step 3. Ideally, the waterproofing layer should have no joints at all. If there are joints, then they are all firmly taped with tape. The further operation of the leveling layer will largely depend on the tightness of the waterproofing.
Prices for edge tape
edge tape
Stage six. Reinforcement
If the concrete layer is thick enough, it must be reinforced. There are several methods of reinforcement; only the most common ones are discussed below.
Method No. 1. Reinforcing mesh


A very common option, which, however, is not particularly suitable in this case. The fact is that the previous layer is polyethylene, which can be damaged by the mesh. It will be quite difficult to move around the fittings without compromising the integrity of the insulation. In addition, the film, as noted above, must be in direct contact with the concrete, so the mesh must be located in the body of the screed.
For this reason, concrete is poured in two layers:
- the first layer is poured - without beacons;
- the grid is laid, beacons are installed;
- the second layer is poured.
It would seem nothing complicated, but the concrete layer will take a long time to dry - the break between layers can be up to 1 month. Therefore, it is better to resort to the second method.
Method number 2. Fiber fiber

The next reinforcement method is to add fiberglass directly to the concrete mixture still at the preparation stage. The polymer fibers that make up this material are arranged randomly, resulting in maximum bond strength in all directions.
Moreover, total weight screeds will be noticeably reduced due to the abandonment of metal mesh. Further actions are focused on using this particular method.

Fiber fiber prices
fiber fiber
Stage seven. Installation of leveling
Lighthouses need to be built especially carefully; there can be no talk of any screws or nails. The foundations for future “beds” are made from the same mortar that will be used for the screed. “Beds” are formed along the entire length of each of the lighthouses.

Important information! The distance between the “beds” must be 10-15 cm shorter than the length of the rule (often about 120 cm). The distance between the wall surfaces and the outer “beds” should be 25-30 cm.
The metal profile is laid on the tops of the “beds” and heated in the solution so that the previously noted height (level of the leveling layer) is reached. The installation of the beacons must be completed a maximum of an hour after mixing the solution, otherwise it will set.
Stage eight. Mixing the solution
The mixture for concrete screed can be purchased already in finished form or do it yourself. Factory-made dry mixes are sold in bags of 25 kg and 50 kg and diluted with water (6.5 liters per bag or 13 liters, respectively). If necessary, the amount of water can be increased, but not more than 0.5 liters.


All components are mixed with an electric drill with a mixer attachment, ready mixture should be used for a maximum of 15 minutes.
To prepare the solution yourself, you need to mix cement (at least “four hundredth”) and sifted sand (preferably river sand) in a ratio of 1:3. An electric drill is also used for kneading, but the whole procedure is performed in 2 stages. Ready solution must be used no later than 1.5 hours after mixing.
Important information! The strength and water resistance of the solution can be increased by adding special plasticizers (the proportions are indicated on the packaging). Although there is a cheaper alternative to plasticizer - ordinary washing powder (a handful for every 100 liters of water).
Prices for cement-sand mixture
cement-sand mixture
Stage nine. Fill
The filling procedure is carried out traditionally, i.e. continuously. You should start from the farthest corner relative to front door. The surface is leveled using a rule.

24 hours after pouring the screed, the beacons are removed, and the remaining voids are treated with a primer, filled with the same solution and leveled using a trowel.


Video - Screed on a wooden floor
Further care of the screed
The care requirements are the same for both ready-made dry screed and homemade cement-sand mortar. The next day after pouring, the screed is moistened, and the procedure is repeated daily for one week. For the first four days, the concrete should be covered with plastic film so that moisture evaporates evenly from the screed.


This completes the procedure for pouring screed onto a wooden floor.
If indoors, be it an apartment, a cottage, country house or summer cuisine If there are wooden or tile floors that are quite durable and have not rotted over time, the evenness of which does not satisfy the owners at all or does not meet the standards, then these floors are not removed. Directly along them, a concrete screed is made on the wooden floor. At the same time, all elevation marks are coordinated with existing doors (if renovations are underway in an old house) and various pipes: plumbing, heating and sewerage. It is likely that the lower part of the door leaf that will open into the room where the screed will be made will have to be shortened by bottom filing. Sometimes they simply replace the door and redo all the pipework.
To install special screeds on existing floor coverings, use only those mixtures that can be suitable for this, because performing such work on a wooden floor is quite a risky undertaking. The risk is that if the floor is old or has rotten bottom beams, the entire screed may collapse at once or gradually.
Easily leveled and quickly hardening mixtures for cement based just right for leveling wooden floors. It is better to strengthen such a screed with special reinforced fiber. The strength of such a screed for compression and deformation is best checked on the 28th day. Only in this case, there is a guarantee that people walking and objects on the floor will not cause damage to it. Most often, a screed is made with a layer of 10 mm.
Cement screed on a wooden floor takes place in several stages:
Preparing the base
Floor strength is the main condition for achieving good result. Peeling or weak upper layer The former cement-sand screed is eliminated by grinding or milling. The grease that has accumulated over the years of use of the floor, sometimes glue, as well as old water-soluble leveling mixtures must be removed. All unevenness with a height of more than 10 mm before starting work is leveled with special cement-based mixtures. Complete leveling is carried out only immediately after the final hardening of the mixture that has penetrated into the recesses. If the screed is carried out in the old way tiled floor, then look at the bounced tiles. It is best to remove them altogether and level the remaining space with the mixture.
When installing screeds on old wooden or so-called “black” plank floors, absolutely all boards must be securely nailed to the joists. Those boards that sag or rotten must be replaced with new ones. The swinging boards are additionally screwed to the joists with self-tapping screws. Under no circumstances should the floor creak or sag. The holes in the base of the floor and places of various leaks of cement mortar are sealed, and the cracks between the boards of such a floor are puttied with parquet putty based on wood dust or some homemade putties. They are made using 4 parts of any sawdust and only 1 part of what is available. oil paint. Water-soluble putties are not allowed here.
When screeding a wooden floor, all skirting boards are removed. They are replaced with thinner, small planks that will cover the gaps between the wall and the floor. When such planks are installed, all the cracks between them and the floors are filled with putty. The gap that is located between the floors and the wall temporarily becomes closed with a special board. After removing the last one from the screed, this gap will be open again and thus provide ventilation for the entire underground space. Ventilation is needed to “prevent” rotting of the lower part of the floor.
Surface priming

The wood floor is sanded, then vacuumed and primed according to all instructions. Treatment with this primer dispersion improves the adhesion of the cement leveling mixture to the base and prevents the formation of unnecessary air bubbles. In addition, thanks to the primer, the water present in the screed will not be quickly absorbed into the base. Another important purpose of the primer is its ability to improve the spreadability of the leveling mixture.
Dry floors are treated with primer twice. And if multilayer leveling is carried out, then treatment with soil dispersion is carried out immediately before each leveling layer.
The floor, before treatment with a primer-based dispersion, should not be even slightly damp, otherwise the priming will not bear the expected fruits.
Base reinforcement

On weak wood floors, it is best to use fiberglass mesh to enhance the strength of the leveling layer. This mesh is attached directly to the base - the floor, using staples of a pneumatic stapler for this purpose. The staples will prevent the mesh from floating out of the solution. You can embed the mesh directly during the application of the cement screed. The reinforcing system should be located approximately in the middle or lower third of the thickness of the screed, but in no case under it. Therefore, when driving staples, it is necessary to take into account the force of their driving into the floor surface.
Kneading the mixture

Floor screed in wooden house cannot take place without the mixture itself. Therefore, their preparation is given Special attention. Typically, mixtures are used in 25 kg bags. They are convenient and do not take up much space. 6.5 liters of water are poured onto a bag of mixture in a special container. If the desired consistency is not achieved, you can add another 0.5 liters of water, but no more, otherwise the solution will turn out watery and will be difficult to work with. In addition, if there is an overdose of water in the solution, peeling and weakening of the strength of the entire leveled surface may occur. Mixing the water and mixture is done with a drill. A nozzle in the form of a whisk is inserted into the cartridge. Stir for at least a minute. It is important that the mixture is homogeneous - homogeneous. The ready-made mixture is suitable within just 15 minutes from the moment it is mixed (mixed) with water. It is important to comply with the necessary temperature indicators floor surfaces and mixtures. In particular, the solution should not be at a temperature below +10 degrees. In cold conditions, when screeding is done in a new house without heating, warm water is used, it Maximum temperature should be +35.
Applying screed

The question of how to screed a wooden floor has not yet been fully resolved. And now, when the solution and the surface of the wooden floor are ready for contact, they begin the most important thing - applying the screed.
You should work at this stage without interruption until the entire surface of the screed is leveled. The mixture is applied with special steel or notched spatulas. After pouring, the leveled surface will become suitable for careful walking in about 4 hours. If necessary, the resulting surface is sanded. It is better to do this 6 hours after directly applying the mixture. Before sanding, remove the boards that stood in place of the baseboards.

Sealing expansion joints

In the places where they were expansion joints, for example, in doorways, the layer of leveled screed is cut around the grinder after the surface allows walking on itself. After this procedure, the seams are filled with a special elastic material intended strictly for seams.
Calculation of mixture consumption, cleaning of tools
When calculating the consumption of leveling mixture for screed on a wooden floor, you need to proceed from the following ratio: for every 1.5 kg/m² of mixture there should be a layer thickness of 1 mm.
And speaking of cleaning tools, it must be said that all unhardened material residues are washed off with plain water, and hardened ones are mechanically cleaned off. The working tool is also washed with water, and immediately after finishing the work.
Screed on a wooden floor video
In this part of the article you can watch a video showing how to properly make a screed on a wooden floor.
A screed on a wooden floor under tiles can be a good solution for those who want to equip a bathroom or kitchen, and will also be appropriate when installing underfloor heating.
Wooden floor screed – not the best construction solution, but with the right approach and compliance with certain conditions, you can successfully use such a connection in a wooden house.
What types of screeds are there?
Screed is the top layer on a wooden or concrete floor, which is subsequently finished with floor covering.
There are the following types:
- Dry.
- Cement.

In the first case, when using this type of screed, the surface becomes resistant to various loads and becomes highly durable.

Made from plasterboard, moisture-resistant plywood or PVC sheets by laying on expanded clay or quartz sand. This type of flooring is most suitable for wooden floors.
A cement or concrete screed on a wooden floor is used as a base under polymer coating or ceramic tiles.
Thanks to it, the process of leveling the wooden floor occurs. The owner of the premises can fill it himself.
Pros and cons of screeds

Dry screed will correct mistakes
Dry screed has a number of advantages:
- simple production;
- if available, it is convenient to lay communications;
- easy to correct errors;
- no need to wait for drying.
However, it has some imperfections:
- Sometimes significant thickness is required, while the height of the room is reduced;
- material costs increase.
When pouring a concrete screed, the material consumption is small, but you need to wait a long time for it to dry.
In any case, it is worth making a choice towards one material or another. Correct solution will avoid further problems with other coatings.
Working conditions
How to make a screed correctly and follow all stages of its construction? Concrete pouring for ceramics on wooden floors must be done in the correct sequence.
Related article: Using cable ties

This should happen in the presence of a strong wooden flooring. On a dilapidated and unstable surface, the tiles will crack and collapse over time.
There is an opinion that it is undesirable to make a screed on a wooden floor; it is better to raise the floorboards, fill the gap between the wooden beams with expanded clay, place slabs of cement and shavings on them, then pour the screed.
The pouring procedure can also be carried out directly on wooden floors. There are some specific features with this installation.
Typical steps before pouring

Before pouring the screed, check the wooden floors and repair defective areas
An indispensable condition for making a cement screed on the floor and applying tiles is to determine the service life of the tree, which must be at least three years.
The reason for this is the ability of wood to dry out and become deformed over time. It will take from 2.5 to 3 years to “calm down”. Movement may occur after this period, but not so clearly.
The option, if the floor is not new, provides:
- a thorough inspection of the ceilings and the floor itself;
- identifying weaknesses and fundamental faults;
- selective replacement of damaged parts;
- sealing cracks and crevices with special means;
- removing the baseboard and replacing it with wooden slats;
- sanding the floor and removing debris.
After pouring an ordinary screed and drying it, it becomes a monolith, which cannot be said about concrete on wooden floors. It will be possible to remove unevenness and increase the strength of the floor, but it will not be possible to get rid of the main flaws.
Which method is better to use?

A moisture-proofing layer must be laid between the wood and the monolith
For greater reliability, the “disconnected” screed method for wooden floors is used. At the same time, it is isolated from the floor covering and walls.
The floor is first leveled. A moisture-proof barrier is created between the moving part of the floor and the monolith.
For this we use:
- dense polyethylene film;
- material in the form of a damper tape, which is fixed at the bottom of the wall and floor;
- foamed polystyrene;
- roofing felt;
- material impregnated with bitumen.
Related article: Installation of lamps in plasterboard ceilings
The wood must be treated with an antiseptic and a layer of waterproofing must be applied, preferably from bitumen mastic. Then you can lay the film, leaving a 20 cm overhang on the walls and making sure to overlap. They are glued with tape, ensuring a complete absence of joints, holes and wrinkles. To learn how to make a screed on a wooden base, watch this video:
Advantages of a “disconnected” screed
Similar moisture barrier board:
- is floating;
- cut off from the plank base;
- makes the screed independent of changes in temperature and humidity.
What should the solution be?
Use grade M 400 for screed
IN concrete mortar For screeds on wooden floors, self-leveling mixtures must be included. But the basis, of course, is cement and sand of the M400 brand.
Filling preparation steps:
- Pour 25 kg of dry mixture with 6 liters of water;
- stir by hand or using a mixer;
- achieve a homogeneous mass;
- observe desired temperature solution, it should be no lower than 10-15 degrees;
- can be used warm water if the room is cold;
To achieve strength and waterproofness of the solution, you can add special plasticizers to it in the proportions indicated on the packaging. The option of adding simple washing powder, one handful per 100 liters of water, is also suitable here.
The process of applying cement screed on wooden joists

Sometimes in wooden houses or old apartments a concrete screed over wooden joists is necessary.
Due to the fragility of wood, structures need to be strengthened.
This happens by installing metal frame or mesh, as well as channel.
Before constructing the frame, insulation made of expanded clay, perlite or other materials with low thermal conductivity is poured into the space between the joists.
Sufficient density and elasticity of the solution must be achieved by adding polystyrene, plant fibers and other necessary components. Such additives will also act as sound insulation.
Without going into details of execution concrete works on wooden bases, it should immediately be noted that a concrete screed on a wooden floor is not the best construction solution due to various physical properties these construction materials. However, if certain conditions are strictly met, you can use this combination in a wooden house or in a stone house with wooden floors and floors.
Properties of wooden structures and concrete pavements

Tiled or self-leveling floors that have become Lately widely in demand among developers are unthinkable without a high-quality screed, especially if there is a need for additional waterproofing or installation of heating systems. In this article, our experts will tell you how to arrange a screed according to wooden surfaces, ensuring the necessary strength and durability of both the screed itself and the base located under it.
Any wooden structures, despite their high strength and durability, have one significant drawback. Their linear dimensions can change significantly under the influence of humidity and ambient temperature. Wood breathes, and the floor made from it then dries out to form a sufficient large cracks, then it compresses tightly, loosening the nails securing the boards.
To make a high-quality wooden floor, you only need wood that has been dried under certain conditions and is less susceptible to warping. The drying process can continue even after laying the floors, so you can make concrete screeds on a wooden floor no sooner than three years after the completion of the flooring.
Concrete or cement-sand screeds after drying they form monolithic slab, the dimensions of which do not change under the influence external factors, and a significant change in the size of the underlying surface leads to the appearance of cracks and ultimately the destruction of the entire screed. To do concrete screed in a house with wooden floors, a special insulating membrane should be used, on top of which the so-called unbound screed is poured.
Basic principles of screeding on unstable foundations

Before making a leveling screed, on which you can subsequently lay tiles or make a self-leveling polymer coating, you need to perform a number of preparatory operations:
- Perform calculation bearing capacity logs and wooden flooring, strengthening if necessary power frame gender;
- Inspect the wooden flooring, clean the boards from traces of rot and impregnate them with waterproofing and antiseptic compounds;
- If some movement of the boards is detected, additional fastening using self-tapping screws;
- Lay a moisture-proof membrane of polyethylene film with a thickness of at least 100 microns;
- Install a damper tape made of foamed polyethylene on the wall with a width 20% greater than the expected thickness of the screed around the perimeter of the room;
- We make “dry” or traditional cement screed on the prepared base, on which, after drying, we lay tiles, linoleum or other materials for finishing floors
Polyethylene film does not stick to concrete and wood, creating a separating layer that allows the wood to change its size without affecting the screed, which significantly reduces deformation loads. On this preparatory operations can be considered complete and it is fashionable to begin making the screed itself.
Screeding device for wooden floors

When preparing the base for ceramic tiles, you should remember that the thickness of the screed is at least 40 mm, and in the case of using a heating system, even more. Considering the significant weight of the resulting “pie”, we check bearing structures especially in a wooden house, the condition of the logs and floorboards. In some cases, it is necessary to increase the cross-section of the timber or the number of joists at the base of the floor and the thickness of the boards laid on top of them. These simple operations can be done with your own hands, taking some time, but under no circumstances should you neglect them.
Now you can make a durable waterproofing layer separating the floor boards and the screed itself. A damper tape is glued to the wall surface using glue or double-sided tape, forming an elastic and sealed apron that separates the future concrete base for the tiles and the walls in the house, regardless of what material they are made of. Tightness is necessary to ensure that the wall remains dry, both during the pouring of the screed and during the operation of the coating.

Having installed the tape, we begin to lay plastic film on top of the wooden floor, strictly making sure not to damage the integrity of the coating. We lay the film panels with an overlap of at least 100 mm and glue the joints with special tape. This must be done to ensure the tightness of the insulation and to prevent moisture from penetrating from concrete to wood and vice versa. IN small room You can carefully lay the film with your own hands, but in more spacious room It’s better to involve an assistant. At this point, the preparatory operations can be considered complete and you can begin to make the screed itself.

All screeds on wooden bases must be reinforced to ensure the necessary strength. If linoleum, carpet or other elastic covering is laid on top of the screed, the reinforcing layer is made of metal mesh with a cell of 100x100 mm. When laying ceramic tiles as a reinforcement for the floor, fiberglass is suitable, added to the solution and providing the necessary strength to the screed.
Before pouring the solution, it is necessary to install special beacons along which alignment will be carried out. This operation is performed with extreme care. Correctly installed beacons determine whether the floor surface will be smooth or require additional leveling with self-leveling compounds, and when laying tiles, you will need to apply a thicker layer of glue, the amount of which is limited by the manufacturer’s instructions. After the fixing solution has dried, the screed itself begins to be poured.
To prepare the solution, cement of a grade of at least 400 is used, mixed with sand and filler. The proportions of the components, especially water, should be observed with particular precision. Excess water deteriorates the quality of concrete and increases the setting time and significantly increases the humidity in the house, which is undesirable for enclosing structures. The solution is evenly applied to the surface covered with film and leveled along the beacons using a rule. When pouring screed in the house, especially when doing the work yourself, you should remember that long breaks are not allowed during the work process. A day after pouring the screed, the beacons are removed, and the resulting voids are sealed with mortar.
The cement screed “dries” with constant moisture for 28 days to gain the necessary strength, after which tiles, laminate or any other coating can be laid. The process of pouring the screed can be seen in the video for greater clarity.
Features of “dry” screed

In some cases, especially if work is carried out on the upper floors of a house with wooden floors or if installations are necessary heated floors Under ceramic tiles with a significant screed thickness, its weight becomes an insurmountable obstacle. In this case, a “dry” screed is arranged, consisting of several layers of dissimilar materials:
- A film vapor barrier is laid on top of the boards treated with an antiseptic and waterproofing solution;
- The next layer, approximately 50 mm thick, is made of lightweight bulk or slab materials. Extruded high-density polystyrene foam or a backfill of granulated slag, expanded clay or perlite sand are very suitable for this layer. The backfill has excellent heat and sound insulating properties. For backfilling, it is advisable to choose materials that are homogeneous in composition and size with small sizes of individual particles;
- The next layer, which is laid on top of the compacted and leveled backfill or heat-insulating slab, may vary depending on the further construction of the floor. In the absence of a heating system, two layers of gypsum fiber or cement particle boards are laid directly on the backfill with the seams overlapping by ½ of the slab. This “sandwich” provides the necessary strength and has excellent adhesive characteristics, which allows you to lay the tiles according to traditional technology using standard tile adhesive.
For your information. If it is necessary to install a heated floor, foil thermal insulation is laid on top of the backfill with careful sealing of the joints. Then the traditional wet screed, into which water or electric heating systems are embedded.
To reduce the repair time in a house or apartment, it is better to install new flooring on top of the old one. It should be borne in mind that old wooden floors are often uneven, and the surface must be leveled before laying the tiles. To do this, you should arrange a screed. It is made using two technologies: standard concrete pouring and dry method. Let's take a closer look at them.
Dry base
For several reasons this technology most preferable when working with wooden floors:
- ease of manufacture;
- low weight of the structure;
- good sound insulation;
- ease of laying communications;
- the opportunity to correct mistakes;
- no wet processes.
On a note! This last point means that when using the dry method, you do not have to wait for the floor to dry (unlike the cement base process).
This method also has several disadvantages. Such a screed on a wooden floor should be thicker than concrete (which reduces the height of the room). The consumption of materials will be higher than when creating classical foundation for covering the floor. Dry base should not be done in rooms with high humidity, since the backfill absorbs any vapors.
The following can be used as backfill:
- expanded clay;
- vermiculite;
- perlite;
- compevit.
Expanded clay is the most common filler. It must be clean (no dust or sand), otherwise the floor will begin to creak very quickly. The appropriate grain size is no more than 0.5 cm, they should be approximately the same size (otherwise smaller granules will fall between the larger ones, which may cause the floor covering to sag). Minimum thickness expanded clay layer - 3-4 cm.
On a note! If the material is not defective, the expanded clay granule in the section should be porous. To ensure their quality, expanded clay granules should be purchased in bulk and not in closed bags.
Work technology
When starting work, assess the condition of the ceilings and existing flooring. Weak and damaged areas, rotten and moldy elements must be replaced. To do this, it is worth using the most dried parts to avoid rotting of the wood in the future.
If the boards sag, this can be corrected by laying additional joists. The heads of the nails that stick out above the surface must be buried with a hammer. Large irregularities can be cut off with a scraper or a plane.
How to make a screed?

The technology looks like this:
- Stretch a layer of insulation (film) over the entire area of the room; it must have a slight overlap on the walls (above the level of the future coating);
- Take the edge tape and create a damper seam around the perimeter of the room;
- Fill the space with insulating and leveling dry material and distribute it evenly to the designed thickness;
- Lay a gypsum fiber sheet on top of the backfill (this should be done without creating cross-shaped joints);
- Next, lay the second layer of GVLV so that the seams of the first layer do not overlap the seams of the top one.
Important! The quality of the dry base is highly dependent on how the first fiber sheet was laid. Avoid the slightest distortion and burying in the backfill. It's better if you do this with the help of an assistant.
Classic floor screed
If you decide to go the traditional route - pour a concrete base for the tiles, you will need to carry out the same preparation as when working with dry technology. Check the floors and the condition of the boards, eliminate weak elements and unevenness, and fill the cracks with epoxy putty.

On a note! Large cavities can be blown out with self-expanding foam and covered with moisture-resistant acrylic sealant. Ideally, after the putty and sealant has hardened, the entire floor area should be treated with a waterproofing compound.
Preparing for pouring
Cement screed on a wooden floor requires the same preparatory measures as dry screed:
- Spread polyethylene film over the entire surface (with an overlap of at least 20 cm on the walls, you can secure it edge tape or tape), avoid wrinkles and bubbles;
- Install beacons. To do this, lay piles of thick cement mortar on the film and attach metal perforated slats to them;
- Level the beacons using a level (add or remove mortar from the cement slides);
- Make reinforcement. There are two ways to do this. The simplest is to add fiberglass or steel fiber(the strength of such a layer will increase as the cement hardens). Another method involves installing a continuous reinforcing mesh, which is laid on a layer of polyethylene under the supports of the lighthouse battens.
Important! In some cases, the thickness of the cement-sand layer can exceed 10 cm, which means that the joists and floors will be subject to high loads. Before you build a cushion under the tiles, consider additionally strengthening the floor: residential buildings The lag laying step can reach 90 cm; it makes sense to reduce this distance to 40 cm.
Pouring and drying
The concrete base is poured onto wood flooring according to the following algorithm:
- knead cement mortar(M400 cement and sand in a ratio of 1:3 or 1:4), or use a ready-made mixture (the main thing is to ensure sufficient fluidity of the composition);
- fill, evenly distributing the solution between the beacons and preventing the appearance of air voids;
- take a rule and level the surface along the beacons;
- leave the filling to dry for 48 hours;
- remove the beacon slats and fill the voids left behind with fresh solution;
- Perform final leveling of the surface using wet half-tracks.
Filling must be done in one step. If you divide this process into stages, the screed will turn out to be non-uniform, which can lead to the rapid appearance of cracks and irregularities.

Apply the solution to the surface using a notched trowel; control the thickness of the layer using guides or marks on the walls.
On a note! Concrete must gain strength before final curing. Therefore, you should slow down the drying process. To do this, moisten the surface and cover it with polyethylene. The solution will gain brand strength within 3-4 weeks. During this period of time, it must be moistened at least once every two to three days.
Within a couple of weeks after pouring concrete base You can walk carefully, but it’s better not to rush when laying the tiles. Keep in mind that in the cold season the solution will dry more slowly. When it has completely hardened, cut off the film protruding along the edges and complete the final leveling of the surface using grinder. After this, you can lay a new floor covering.
Summary
Even if you plan to use a different floor covering, it is important to screed the wooden floor under the tiles. This is material with high density, it has a strong impact on the structures that are located below. Having dealt with tiles, you can easily cope with other materials.
Remember that the screed is designed to remove relatively minor irregularities and strengthen the surface before installing the tiles. To get rid of serious defects, you will have to replace the old boards or completely dismantle the old covering. Neither the concrete nor the dry base should move during use. For a more complete understanding of the technology of work, watch the video about arranging a screed.
Video: screeding a wooden floor