Wood by its nature is an excellent conductor of sound. In addition, it is capable of “shrinking” somewhat over time, causing creaks at the joints of lumber. Therefore, the use of wood as a ceiling inevitably requires a competent solution to the issue of sound insulation.
We invite you to get acquainted with the main technologies for implementing soundproofing of the ceiling in a house with wooden floors, features of the choice of materials and rules for their installation.
Rational selection and installation of sound insulation means is impossible without a clear understanding of the nature of the occurrence and propagation of noise. Traditionally distinguished four main types of noise, transmission of which is most likely through wooden ceilings:
- Shock– is associated with the nature of vibrational sounds and initially propagates in a solid medium. Example impact noise This may include the clicking of heels, the sound of furniture being rearranged, objects falling on the floor, etc.
- Acoustic– is a consequence of the influence of external sound sources and initially spreads in the air, and from there it penetrates into Construction Materials. The most common examples of acoustic noise are voices and music.
- Mixed– combine both previous types, that is, they are distributed simultaneously in the structure construction materials and air environment. Most famous example– operation of power tools and some household appliances.
- Structural– noise originating in the connections of building structures due to their relative axial or linear displacement relative to each other. Simply put, structural noise is creaks, knocks and other sounds that occur in places where building materials do not fit tightly.
Important! It should be remembered that there are no universal soundproofing materials, the use of which will be equally effective against all types of noise and all sound frequencies. Moreover, the desired effect cannot be expected from typical insulation materials, and especially mineral wool and the like.
In addition, an important factor on which the intensity of sound propagation depends is the presence, frequency and correct installation cross joists . If the technology for their installation is violated, especially if they are completely absent, the likelihood of structural noise increases, and other types propagate much more intensely due to the vibration of structural materials.
Selection of soundproofing material
Soundproofing the ceiling in a house with wooden floors can be done several methods, each of which has its own characteristics, advantages and disadvantages. The most common include:
In practice, it has been proven more than once that one material is not able to provide proper sound insulation, so a special cake is put together, combining various methods. For example, the following sequence of elements (from bottom to top) can give a good result:
- ceiling tiles;
- wooden sheathing;
- vapor barrier layer;
- mineral wool + rubber-cork backing on beams;
- chipboard sheets with a rubber-cork backing glued over the entire area;
- OSB board fixed on chipboard;
- parquet materials.

Since this design is one of the most effective, we will consider the technology of installing sound insulation using its example.
Installation of sound and noise insulation of the ceiling in wooden house it is more convenient to carry out at the construction stage.
Few lucky people do not face the problem of noisy neighbors above. They either live on top floor, either have an apartment in a building with five-meter ceilings and thick walls, or they are simply lucky and the neighbors live very quietly. The rest of us have to wonder from time to time what kind of furniture the neighbors are moving now, why they got a horse in the apartment, and why they need to play the violin on a weekend morning.
But the problem can be solved. Soundproofing the ceiling in an apartment will help create silence and comfort in the house.

Peculiarities
Before throwing away your life-saving earplugs, it’s worth studying the intricacies and features of the soundproofing process. Its installation, although it does not require enormous effort, must be carried out after preparation and taking into account all possible nuances of the work.
The main advantage of sound insulation is that extraneous noise from the upper floor will no longer interfere with a quiet life. The second obvious advantage is that the surface of the ceiling will be smooth and beautiful. In this case, you can do the work yourself. This technology is simple enough that a person who has never done this in his life could install sound insulation. Also among the advantages it is worth noting that the work takes place practically without dust and dirt.

The main disadvantages of using soundproofing materials are the time and financial resources that must be spent on installation work. In addition to the insulating material itself, you will need to install lathing and suspended ceilings, and this is already a significant amount and the need to hire specialists to install suspended ceiling. If the beauty of the sheathing and sound insulation does not interest anyone and you can do it yourself, since this is a rough layer, then the suspended ceiling fabric is decorative element. It must be installed by professionals.
A serious disadvantage of sound insulation is that it is “hidden” exclusively in a suspended or suspended ceiling system. If for apartments where its height is normal or average it will go unnoticed, then in small apartments with a low ceiling, the extra 10 cm of height that sound insulation will take away is an unaffordable luxury.


If water gets onto the seal from the neighbors' apartment above, the ceiling will be damaged. The material will swell and lose its properties, and the stretched fabric will sag. Repair will cost no less than installation.
You can use materials that do not absorb moisture. For example, extruded polyurethane foam. But despite its large thickness, it is not one of the most effective in the fight against extraneous noise. On the contrary, if installed incorrectly, it only aggravates the situation.
Also, when deciding to install sound protection, you need to take into account the types of noise that occur in the house. Extraneous sounds themselves are equally disturbing and annoying. But knowing their predominant type is important, since to eliminate certain sounds you need a material with different properties. Some will reflect sounds, others will absorb.

There are noises:
- Acoustic. This is an echo or reflection of sound from the walls of a room. This problem is typical for spacious apartments, rooms with arched ceilings and high ceilings. This is rare in modern times panel house. But if a neighbor plays a musical instrument poorly or listens to peculiar music, he will be heard even without an arched vault.
- Air. The quietest type of noise because it is caused by air vibrations. These are the sounds of doors opening and closing, voices, footsteps. They enter from a neighboring apartment in a difficult way: through cracks in the floor and walls, sockets, ventilation shafts.
- Drums. Continuous repairs from neighbors, the sound of hammering, stomping - these are types of impact noise. Their source is mechanical impact on the floor or walls in the apartment on the floor above.
- Structural. These are sounds that spread through the structural parts of the building: floors, ceilings, walls, ventilation.

The material from which the high-rise building is built also has important. One may be denser and transmit less sound (this applies to a concrete structure with thick floors), another may be made of porous materials through which any noise can easily pass through (blocks), and others may be something in between (bricks).
In a modern panel house, the quality of the material can vary. In one case, the noise is almost inaudible, in another it may seem that the walls and ceiling are literally made of cardboard, the sound insulation is so low. Solid brick has good sound insulation properties. He doesn't need complex design and a thick layer of additional insulation.

The situation is more complicated with monolithic frame houses, where hollow bricks and porous blocks are used for internal partitions. They allow a large number of sounds to pass through. Here you will have to try to ensure that the soundproofing of the ceiling gives the desired effect.
Problem case - new panel houses . They have a large number of cracks through which all sounds leak from above and from neighbors on the side and below.
Soundproofing the ceiling in such a house is not enough. It is recommended to take care of both the walls and a high-quality floor screed.


WITH wooden floors, contrary to what many people think, there are enough problems. Firstly, wood is a good conductor of sound. Secondly, if the floor is installed poorly, sound will leak through numerous cracks. Over time, wooden floors will begin to creak, and it’s hard to imagine a worse sound than this.
With a high ceiling height (4.5-5 meters), there are practically no problems with sound insulation. Such ceilings are usually found in old houses, and in them all the walls and ceilings are so thick that the sound on the other side is unable to overcome them.

Another thing is a modern imitation of such buildings. In them, the problem with noise is relevant, and one of the common situations is acoustic noise. This does not affect the choice of insulating material. With five-meter ceilings, you can afford to install a layer of any thickness. Features are more important here installation work. Doing them yourself is already dangerous, and in order to get to the very ceiling, you will need to erect scaffolding.
The best option is a room with a height of about 3 meters. At this height, you can carry out installation work yourself, and the subtraction of 10-20 cm from the height will not significantly affect the interior.


The most difficult case is “Khrushchev” and rooms with a ceiling height of no more than 2.2 m. Even without tension fabric, they look squat and limit design possibilities. When a few centimeters are taken away from such a height, the ceiling begins to visually “press” from above.
The most effective (but least likely) option is to negotiate with your neighbors and, at your own expense, install a thin layer of soundproofing material on their floors. This is much more reliable than protecting yourself from noise only on your part.

Types of materials and their characteristics
Modern soundproofing materials are virtually identical to insulation for walls and ceilings. All the same sheet, slab and sprayed materials are used as a means of protection against extraneous noise in the apartment. The use of foam rubber and wool of various origins is widespread: rolled mineral wool, ecowool, basalt or stone wool, based on fiberglass.
Materials such as polystyrene foam and its modifications in the form of penoplex and polyurethane foam (polyurethane foam) are often used. They are slabs that are convenient to cut into fragments required length and width. These materials tend to be thicker than others because they are coarse and porous. The exception is sprayed polyurethane foam, but it is rarely used in ceiling soundproofing.
Glass can also be foamed. Available in sheet form and in spray cans.

photos
Soundproofing products based on plant and natural raw materials are gaining popularity: cellulose, cotton, bamboo and coconut fiber. If ecowool is still risky to use under a suspended ceiling, since there is a risk of dust, then bamboo and coconut fiber with their unique properties can compete with cotton wool and polystyrene foam. Literally healthy (antibacterial ones repel dirt, bioresistant), but expensive. Sound insulation is not the most effective.
Also not the most effective material, but suitable for apartments in brick houses and private cottages, is cork sheets. The insulation turns out to be thin and saves in less dire cases.
A layer of plasterboard improves the quality of the cork material, but in this case its advantage is lost - its small thickness.


As an alternative, manufacturers began to produce combined self-adhesive materials. This is the so-called membrane sound insulation. In fact, membrane sheets are glued to the ceiling like linoleum to the floor or very thick wallpaper. The composition contains felt and materials that reflect sound.
From modern means Liquid insulation is worthy of attention. It is applied to work surfaces with a special gun, but is not used on its own, but serves as a “filling” in the layer between sheets of drywall.
Foam rubber
Foam insulation is almost the same as polyurethane foam insulation. This name has become a household name due to the fact that the main supplier of polyurethane foam back in the days Soviet Union was called "Porolon".

Of course, the insulation material is radically different from that thick, loose yellowish dust collector that many people imagine when they hear the word “foam rubber”. Even its name is appropriate - acoustic foam rubber.
It is actively used for sound insulation in recording studios, large offices, restaurants and other places where silence is necessary for high-quality and productive work. The material is available in the form of slabs of different sizes and shapes, it outside surface relief (wavy or “jagged”).


The advantages of foam rubber are that it is simply mounted (self-adhesive or with an adhesive solution), gives good result, elastic and flexible, which allows it to be used on ceilings with rounded corners. Easy to cut, does not collect dust.
Acoustic foam insulates not only sounds coming from outside, but also sounds coming from the room. The neighbors will be grateful for this isolation. The disadvantages are that it requires careful handling and is susceptible to burning. In the process, it emits toxic smoke and loses its properties under the influence of ultraviolet radiation.


Mineral wool
Often this material is chosen to make sound insulation and thermal insulation at the same time. But still, it is more intended for insulation than for achieving the decibel standards recommended by SNiP.
Cotton wool reduces noise due to its structure of fibers, between which there are air spaces, and the different thickness of the fibers themselves.
There are three types of wool: mineral, stone and glass wool. Each variety has its own characteristics, fiber size, and technical characteristics.


All types can be used for sound insulation, but the density of the material must be taken into account. The higher it is, the more reliable the insulation will be. For example, cotton wool marked P-75 will be of little use, but PPZh-200 can solve problems with sound insulation when different types noise.
The highest density stone wool. As density increases, so does the price, but sound insulation is not a case where you should settle for half measures for the sake of saving.
The advantages of the material are that it corresponds to all building regulations, lasts a long time, does not accumulate dust, does not emit toxins, and is resistant to deformation and shrinkage.

The disadvantages include the thick layer of the entire structure as a whole, the instability of wool to moisture, and the need to use waterproofing. Without protection from water, which can get on the cotton wool when a neighbor’s apartment is flooded, the material will swell, become heavier, and lose up to 70% of its properties. Drying or replacing it will be a separate problem. Over time, mineral wool shrinks.

Expanded polystyrene
The material is known as extruded (foamed) polystyrene. Its predecessor is polystyrene foam, which everyone has seen at least once in their life.
Polystyrene foam can also be used as a soundproofing material, but the results from the use of polystyrene and its derivatives cannot be called impressive. With a slab thickness of 40-100 mm, it still needs auxiliary materials that absorb and reflect noise.
Expanded polystyrene has some advantages. For example, it is suitable for insulation in rooms where the noise problem is not as acute as in thin-walled panel new buildings. It is light in weight and does not put any load on the suspended ceiling.


You can do without installing a frame in some cases. It also costs significantly less than mineral wool or acoustic foam, and is hydrophobic. If water leaks from neighbors above, the material will not be damaged and will not lose its properties. For these reasons, the ceiling is insulated with penoplex.
Penofol is used as an auxiliary element. Penofol is a thin reflective material based on polyethylene foam.
Such layering provides virtually no results in terms of sound insulation. All materials are more focused on maintaining heat in the room.


Cork covering
Many people choose insulation with cork because the manufacturer promises significant noise reduction (about 20 dB). But if you think about it, the numbers are deceiving. And the point is not that the cork is not capable of reducing noise by such a number of dB, but that such a noise level does not exceed the sound of a human whisper or a ticking clock. It's nothing when it comes to regular stomping from above, continuous repairs and other unpleasant sounds.
But low efficiency is not so bad. The problem is that cork materials can insulate against impact noise. That is, they muffle sound only when the insulation is not installed under a suspended ceiling, but on the floor of noisy neighbors above.


In other cases, the effect is achieved only through self-hypnosis and a small air gap between the stretch ceiling and cork sheets. If you have already decided on cork insulation, then it would be correct to combine it with other materials. For example, sheathing with plasterboard. This will increase the chance of finding the desired silence in the house.
The advantages of the material boil down to the fact that it is convenient for installation work. Cork backing It weighs little, is easy to cut, and simply attached. The disadvantages of the material, in addition to the fact that it is almost useless in itself, include its fear of moisture and the need to use waterproofing.


Acoustic membranes
Latest generation materials available on the market in the form of thin sheets, plates and strips. The sheets can be record thin – only 3 mm. Maximum – 15. Sheets are laid on the surface of the ceiling (floor, walls) and between materials. They help protect against impact noise. Ideally, the material should also be laid on the floor in the apartment where the noise source is located.
The tapes isolate such ways that extraneous sounds enter the apartment, such as ventilation pipes, drains, cracks, risers. They are aimed at reducing acoustic and airborne noise. Several companies in Europe and Russia produce membranes. Tecsound, Topsilent, Green glue, Zvukoizol, Schumanet are considered popular.

Each manufacturer has its own secret. Most often, the material consists of several thin layers, is heavy and high density. An acoustic “sandwich” is obtained by combining several layers of foam felt, polyurethane foam or polystyrene. It may also contain components of rubber, eco-fiber, foam glass, stone wool, rubber, foam rubber, plasticizers, mineral and plant components, and reflective materials.
The advantage of the membrane is that it is a roll material of small thickness, which is glued to the ceiling or stretched under it and does not take up much space. This makes it possible to solve the problem with extraneous sounds and not lose precious centimeters in small room with low ceilings.

Installation of thin roll material is simple and convenient. There is a special glue for it, which is applied like wallpaper. Some types have a self-adhesive backing. The disadvantages of the material are that when large differences The height of the ceiling will first need to be leveled. If the rolls are misaligned, they will become less efficient due to gaps in the web.
In addition, the material is heavy. Installation requires at least two pairs of hands. This also means that the base of the ceiling must be well treated and primed to increase adhesion. The price per roll is not the best. European-made membranes cost about 8,000-9,000 rubles. 3 meters per roll.

Other options
Alternative options There is a lot of sound insulation in the ceiling. In this case, both specialized and adapted materials are used. Since it is still covered with a decorative suspended ceiling on top, only the quality of the insulation is important, and not its appearance.
Materials used for insulation:
- Granular elastic noise plastic. These are small balls of extruded foam with added rubber and an acrylic base. Traditionally used as insulation under a “floating” floor screed, but in compressed form it is convenient to use as a material for a layer between a suspended ceiling and the ceiling of the upper floor.
- Acoustic sealant. This is a liquid substance that does not cover the entire area of the problem surface, but rather treats individual areas. These are seams, slab joints, cracks through which extraneous sounds and vibrations enter the room. The product is based on silicone resins and mineral additives. Compatible with any materials.


- Panels and substrates, intended for insulation under flooring. They give maximum effect if you place them in your neighbors’ apartment above, and then install them under your ceiling. The silence will be almost library-like.
- Damper tape. This is a budget alternative to acoustic processing tapes ventilation shafts, joints and cracks. It costs many times less, and is almost as effective as them. In addition, the main purpose of damper tape in repairs is to prevent cracking of walls, as a rule, after pouring cement screed. And this is a very large load, which indicates the high density and strength of the tape.


- Drywall. Not used by itself. Usually acts as an intermediate component or, on the contrary, covers other materials on both sides. It is usually combined with thin sheet materials or liquid insulation.
- Rolled materials based on bitumen. They are petroleum bitumen, cellulose fiber or felt, modifiers. They are mainly used for floor insulation, but are also suitable for ceilings. Due to their small thickness but good efficiency, they are advisable to use in rooms where saving space is important. Can be combined with other materials.


- Mastic to absorb vibrations and sounds. It is based on silicones, resins, bitumen, acrylic. Apply in liquid form in several layers.
- Spray cellulose insulation. Eco-friendly and effective insulation, but it has several significant disadvantages. This is the high cost of the material and procedure, the need to use special equipment, difficult dismantling.


- Sprayed polyurethane foam. Has the same advantages and disadvantages as cellulose spraying. All materials applied in this way require pre-treatment of the ceiling surface, which will improve adhesion.
- Sprayed fiberglass. The most expensive, but also the most effective of the sprayed options. If financial issue It’s not worth it, it’s worth giving preference to it.


- Wood fiber based materials. There can be several types. Plywood is cheap and cheerful, but not very effective, unlike eco-board made from softwood. IN difficult situations When the noise level exceeds 25 dB, eco-stoves will not be able to help. Also, they cannot be used in a room with a low ceiling - they will take away 10-14 cm of height. But the slabs have an important advantage: they already have a decorative surface with front side. There is no need for a suspended ceiling.
Plates with different designs external side (imitation wood texture different colors) are snapped into place according to the tongue-and-groove principle, like parquet boards. This reduces financial costs for finishing the ceiling and saves time.


- The third type is soft fiberboard. They are made from large wood fiber without any additives. The wood is split and then "felled" like wool. Used as a felt material, but differs in a large amount positive properties. Among them are antibacterial properties and the ability to disinfect indoor air. However, pine needles can cause allergies.
For allergy sufferers, birch fibers or board materials based on coconut, flax and bamboo are more suitable. Such slabs can be mounted either on their own or under a plasterboard layer.

- Eco-slabs made from volcanic raw materials and glue. Particles of volcanic origin that have undergone special treatment (expanded clay, perlite fibers and others) are glued together using the safest glue - PVA. This soundproofing is recommended for use in children's rooms.
- Polyester hypoallergenic fibers. Polyester is also used in children's rooms and rooms where people with allergies or asthma live (the material does not accumulate dust).
- Multilayer cardboard filled with quartz sand. One “block” of such cardboard weighs about 10-15 kg, which makes it dense, and the density of the material is the key to its effectiveness in combating noise.


Installation technology
Soundproofing a ceiling with your own hands is a completely doable task. But this does not mean that you will not have to face some difficulties.
For example, installation of lightweight porous materials, which is carried out in one hand, requires a flat working surface and preparation. And installation of heavy rolled materials such as acoustic membranes cannot be done alone. Although they have a thickness of 3-15 mm, they weigh about 30 kg. Lifting such a weight with outstretched arms above oneself is not only difficult, but also dangerous.

Another important aspect is that finishing only the ceiling with insulating material is considered partial. Efficient system should cover all surfaces of the room.
Since sound tends to travel through cracks in walls, ventilation and ceilings, and noisy neighbors may live not only on the floor above, the entire room must be insulated. This is many times more expensive, longer and more difficult than finishing the ceiling, and also affects the useful and visual volume of the room.
But effective sound insulation is often not what is done in your own apartment, but what is located in the same room as the noise source. Only understanding neighbors will agree to lay insulating materials on the floor in their apartment. Even at someone else's expense. All this does not mean that attempts to rid yourself of extraneous noise by soundproofing the ceiling will not work. They are capable of reducing noise by an average of 30 dB.

To understand what result this will give - minus 30 dB of noise - you need to listen to the refrigerator running in the kitchen, and then turn it off for 5-10 minutes. The difference will be felt immediately.
The success of the event depends on two things: the correct choice of insulating material and high-quality installation. The type of house is considered a universal selection criterion. In some cases, the height of the ceiling also plays a role, but here the decision must be made individually - is it worth sacrificing 10 cm of room height or is it better to put up with extraneous sounds.
IN brick house materials are needed to isolate airborne (acoustic) noise. The structure of brick high-rise buildings is not solid, so the impact sounds fade away as the apartment moves away from the noise source. The brick itself transmits sounds worse. But they have a more common problem with airborne noise. Therefore, it is important to use light-weight but multi-layer structures.


For example, good protection would be sound insulation from plasterboard and cork materials, alternating plasterboard with polyester blocks or wood fiber boards. Drywall with polyurethane foam, mineral wool, and liquid insulation is also suitable.
In a panel and monolithic house, the problem is the same - the spread of impact noise throughout almost the entire house. If the upstairs neighbors start renovations, everyone will know about it. But the lower and upper floors come first. This is explained by the fact that a monolithic house (as is already clear from the name) is a solid structure in which all partitions and walls are of the same thickness. And if the slabs are also hollow inside, this is a double problem.


When choosing a material for sound insulation in a panel and monolithic house, it is important to consider the thickness of the floors. If it is less than 220 cm (and this is often the case, in Khrushchev buildings it is about 120 cm), you first need to eliminate this shortcoming by “increasing” the thickness. Light materials and the creation of “air” layers between the suspended ceiling and the finishing of the ceiling are suitable here. And after eliminating the problems with insufficient thickness of the floors, thin but very dense material should be installed.
The peculiarity of dense material is its heavy weight. Acoustic membranes, cardboard blocks filled with quartz sand, basalt wool, and OSB boards are suitable.


It is important to consider that soft materials predominantly absorb sound, while hard materials reflect it. No single material performs these functions at the same time, so multi-layering is recommended. First, sheathe the ceiling with reflective materials, then install absorbent ones and reinforce it all with an air cushion between the suspended ceiling and the insulation.
From the point of view of installation technology, sound insulation on any surface can be framed or frameless.


Frame
It involves the construction of a frame made of steel (less often - wooden) profile, on which they are laid soundproofing materials. This technology can be afforded by apartment owners with a ceiling height of about 3 meters. Otherwise, the frame structure will “eat” a lot usable area rooms.
Installation is carried out in stages.


Calculation of materials
This is a complex and responsible stage that includes several steps.
Step one is calculating the sound insulation index. It can be determined by the thickness of the partitions and finishing materials. It is better to turn to specialists, since it is easy to make mistakes. For self-measurement, there are the following guidelines: daytime acceptable (does not mean “non-irritating”) noise level – up to 40 dB, at night – up to 35.
Floors between apartments of 200-220 cm plus floor screed for neighbors above can isolate noise up to 54 dB, provided that they are done conscientiously, in compliance with building codes and regulations.

For comparison, the screams of an adult and the crying of a child are 70-75 dB. No partitions according to SNiP will protect from them. It follows from this that for effective sound insulation it is necessary to “increase” the thickness of the ceiling to at least 60 dB resistance.
For a 220 cm thick floor with a high-quality screed, one layer will be enough for neighbors above cork covering and drywall. In a thin-walled panel house you will have to put in more effort.

A simple way to calculate the required protection is to listen to the sounds from the neighboring apartment. The sound of steps is about 30 dB, talking - 45, screaming - 70.
Step two is calculating the absorption coefficient. This procedure is difficult for a non-specialist. It is recommended to select materials with a noise absorption coefficient of 0 to 1.

Step three - calculating the amount of materials. Here we are no longer talking about thickness, but about total number all materials. It is calculated quite simply. It is necessary to measure the width, length and height differences of the ceiling. Multiplying the width by the length gives the total area. Then this figure must be divided by the footage per roll or the size of the slab of slab material in order to calculate how many sheets or how many slabs will be needed for the ceiling. The resulting number is rounded up, plus 10% of the material for stock.
The length of the profile for mounting the frame must take into account the length of one strip and the width of the step. The width of the step through which the planks are mounted should be 30-40 cm plus rubber for spacers in the places where the planks are attached to the ceiling. This is an important point, since metal is an excellent sound conductor. Without rubber gaskets, the frame will only increase the problem of excess noise.


For hydrophobic materials, waterproofing must be provided. This material is also purchased according to the dimensions of the area plus 25% for overlaps and allowances on the wall. To fix it on the wall you need a damper tape.
Preparatory work
They include the selection of tools and materials, processing of the working surface.
Required materials: steel profiles, hammer drill, fasteners, screwdriver, level, tape measure, putty, sealant, sound-absorbing fibrous materials (for cracks), elastic rubber gaskets, metal scissors, sound-absorbing and sound-reflecting material. You will need stepladders or stable tall structures.


Preparing the working surface involves cleaning the ceiling from old lime, paint, decorative materials. It is also important to make its surface as flat as possible in order to mount the frame without distortions.
Used for alignment ready-made mixtures. It is important to consider that before leveling, the ceiling must be primed in two layers for better adhesion to the substance, and then allow each layer to dry thoroughly. The leveling layer itself can dry from 1 to 3 weeks. The frame cannot be mounted on a damp ceiling.


Treatment of cracks, risers and joints at the ceiling-wall boundary
Treatment of cracks, risers and joints at the ceiling-wall boundary.
According to building codes, for high-quality sound insulation, there should not be a gap of even a few millimeters between the floor slabs. Otherwise, this creates an unobstructed path for sounds to penetrate between rooms. In fact, this rule is often neglected.
The situation can be corrected by clearing all cracks of debris and dust and filling them with non-hardening sealant. Acrylic will do. Large cracks can be pre-lined with felt or wood fiber materials and then sealed.


With risers the situation is the opposite. When building a house, they are supposed to be isolated from the ceiling with a special nozzle, and the risers themselves are supposed to be isolated from the nozzle with sealant. To save time and budget, the stage with nozzles is skipped at almost any facility. Due to temperature changes inside, riser pipes expand and contract, and gaps and cracks appear between the walls of the pipes and the masonry. This also reduces the effectiveness of sound insulation. Such areas require filling with a non-hardening sealant. The areas treated with sealant must be puttied on top.
Along with sealing cracks, it makes sense to treat sockets with electrical panels. They are not directly related to the ceiling, but are also sources of noise transmission. It is important to consider two points: the treatment of gaps and cracks around sockets is carried out only after a power outage; the materials must be non-flammable.


Installation of a frame made of profiles
Performed step by step:
- Installation of soundproofing material. It has a small thickness and high density, and also levels the surface before installing the profile.
- Installation of vibration-isolating suspensions. These are small parts onto which the guide profile is attached. Either a vibration substrate must be provided in the suspension design, or they must be mounted on an elastic rubber gasket. Step – from 50 to 90 cm.
- Installation of the guide profile. The profile closest to the wall is located a maximum of 15 cm from the wall. The pitch is determined independently - from 50 to 60 cm. Attached to the hangers with screws, 4 pieces per 1 hanger. The guide profile can be increased in length.


- Installation of an auxiliary profile. It is laid across the guides. Step – 40-50 cm. The exact distance is selected in accordance with the sheet material, for example, plasterboard.
- Filling the profile with sound-absorbing material: wool, slabs, sheets.
- Frame installation. Basically, it is made of plasterboard in 1-2 layers. Sheet thickness – 10-12 mm. If two layers of drywall are installed, the joints should not coincide. In order to space the joints, the sheets of the top layer are laid in a different direction. The joints are treated with acrylic-based sealant. They also seal the seam where the drywall and walls come into contact.
- If the structure touches the risers, the pipes must be covered with damper tape or similar self-adhesive material.


Installation of decorative covering on the ceiling
When soundproofing without installing a frame made of steel or wood profiles, the materials are attached directly to the ceiling surface. For fastening, dowels and screws, special fasteners with wide heads and elongated legs, and glue are used.
Such sound insulation is used when the ceiling height does not allow subtracting several tens of centimeters from the room, for example, in Khrushchev-era apartment buildings. The second case is the operational condition of the house, which does not allow mounting an overly heavy structure on the ceiling. The third is when materials and technologies were used in the house during construction to protect against noise from the neighboring apartment, but these measures need to be strengthened with additional insulation.


Frameless
Frameless sound insulation is also installed in stages:
- The selection and calculation of materials is similar to the calculation for a structure on a frame. If you plan to apply sheets or slabs in two layers, then the amount of materials per ceiling area is doubled. Only plastic dowels are used for fastening panels, since steel ones will conduct sound and reduce the efficiency of the structure.
- Surface preparation. Many materials are glued with glue or have a self-adhesive backing, so for frameless sound insulation it is especially important to treat the ceiling surface. But before that, all height differences and unevenness are eliminated. All preparation includes three important steps: cleaning the surface from paint, dust, decorative covering; widening cracks, blowing and filling them with sealant, applying a leveling layer. After the leveling layer has dried, the surface must be primed in two layers.


- Installation of material. There are several options here. Can be glued to a self-adhesive backing, glue, or mounted on dowels with a mushroom-shaped cap. It is wide, flat and with perforated holes and holds slab cellular or fibrous material well. The best option is to fasten the products with glue, and for additional insurance, install dowels in increments of 90-100 cm.
- Processing of joints. Plates and sheets do not adhere tightly to each other. It is recommended to seal the joints with damper tape or fill them with sealant. You can layer materials in 2-3 layers.


- Thoroughly clean plaster, paint and whitewash from the ceiling surface. The better prepared working surface, the stronger the frameless insulation will hold.
- If the height of the room allows, choose a suspended frame rather than frameless sound insulation.
- The best insulation, especially for the first floor, is not partial (only the ceiling), but complete (walls, windows, doors).
- Avoid cheap materials. High-quality sound insulation costs good money. Budget material does not provide maximum effect.


- When choosing ready-made acoustic membranes, pay attention to the reviews and reputation of the manufacturer.
- Prioritize weight and density over material thickness. 20cm thick foam is less efficient than 4cm thick wood boards.
- Combine materials for sound absorption and sound reflection.
- Increase the effectiveness of sound insulation by sealing cracks, joints, and treating gaps around sockets, risers, and electrical boxes.

Comfort in a home is created from several components, the most important of which is silence. Noise from the street or from neighbors in an apartment building can cause irritability and deterioration of both mood and well-being. In a private home, everything is much simpler, since home owners are able to independently regulate the noise level, apply effective methods to get rid of it, and create the most comfortable conditions for themselves.
Soundproofing the ceiling in a private house is important even if this ceiling is not the floor for an actively used second floor.
The need to soundproof the ceiling in a private house
When talking about the need to carry out soundproofing work in a private home, one should remember that a systematic approach is important, that is, taking into account all types of noise and the paths through which it enters the room. And if low-frequency (impact) noise enters the room mainly through the floor and walls (if the room above the ceiling is not in use), then high-frequency noise also enters through the ceiling.
Therefore, it will be impossible to achieve the desired peace and quiet in the house by protecting the walls alone. And by correctly combining layers of hard (concrete, brick) and soft (foam plastic, basalt wool, cork and others) materials in a multi-layer “pie” you can get the maximum result.

ADVICE. You should not think that effective sound insulation of the ceiling can always be achieved by simply increasing the thickness of the laid homogeneous material. It is much more important to choose the right technologies soundproofing. For example, for a used attic or attic, the use of a “floating floor” in combination with moderate protection of the ceiling of the first floor will be quite effective.

Soundproofing a wooden ceiling

Soundproofing a ceiling in a wooden house
Principles of effective sound insulation
Experts advise starting any soundproofing work by determining the conditions efficient work one way or another. In order for the structure being constructed to truly protect against any noise, it must be:
- Multilayer. The more layers of different densities there are in the ceiling’s protective pie, the more difficult it will be for sound to reach the room.
- Plastic and elastic. Soft materials transmit sound much worse and therefore protect against noise.
- To protect against low frequency noise– quite heavy, since the higher the mass of the enclosing structure, the worse the vibration passes through it.
- Properly built. All materials used for sound insulation must be used in strict accordance with technical requirements. The frame on which they are supported must be carefully designed.

Scheme of soundproofing a wooden ceiling by joists
Soundproofing materials: advantages and disadvantages
ADVICE. Among the materials based on basalt wool, the following brands stand out: Acoustic Butts, Schumanet BM, Ecover Light.

Acoustic Butts
In the wake of attention to environmentally friendly technologies, wood materials - boards made on the basis of coniferous wood without any harmful additives. The ease of installation of such structures (they are glued to the ceiling in the same way as polystyrene foam) and a high degree of noise protection make this material in demand in residential areas - bedrooms and children's rooms. But the complexity of production makes Isoplast and Isotex boards very expensive for the average person.

Schumanet BM
Another option for a safe material for ceiling soundproofing is cork. Panels from this natural material are able to provide sufficient noise insulation with a relatively small thickness of the protective layer. When installing a plug, it is important to follow the technology, namely, first install the frame for false ceiling, and then install plasterboard slabs with cork panels glued to them.

Ecover Light
ADVICE. You can soundproof the ceiling from the side of a rarely used attic using ecowool - a light and loose material based on waste paper, which is applied in a layer of about 5-7 centimeters. But such a process can only be carried out by specialists with equipment for spraying the material.
A group of rarely found environmentally friendly materials for ceiling soundproofing include natural felt and coconut fabric, which are not used so often due to their high cost, but are well suited for children's rooms and bedrooms.

Soundproofing Green Glue
Among the current new products, it should be noted liquid sound insulators, which are ideal for improving the properties of double plasterboard ceiling: For example, Green Glue material laid between plasterboard slabs is effective. No less attractive result A soundproofing membrane (for example, Tecsound or PSHI fabric) is also demonstrated. The main problem of working with this material is the complexity of its installation and the need for sufficient room height, since the membrane requires the installation of double sheathing.

Do you want to protect yourself from noisy neighbors upstairs, but don’t know how to soundproof the ceiling in an apartment? I will tell you about 4 methods of carrying out work that I have personally tested.

Types of work and their features
Let's look at the following options for carrying out work:
- Insulation with Izoplat boards;
- Sound insulation using special mineral wool;
- Sound insulation with mineral wool for suspended ceilings;
- Using Ekozvukoizol panels as a sound insulator.
Option 1: gluing Izoplat boards to the surface

To begin with, I’ll tell you about the main advantages of heat and sound insulating boards “Izoplat”:
- Natural and environmentally friendly. The boards are made from coniferous wood fibers by heat treatment and pressing. There are no chemical additives or adhesives in the composition. This allows you to use this option in premises of any purpose;
- Convenience. The material is manufactured in the form of sheets 2700x1200 mm. The parameters of the product coincide with regular drywall. If desired, they can be mounted on a metal or wooden frame;

- Selecting options. Sheets can have a thickness of 8, 10, 12 and 25 mm. The most commonly used option is 12 mm, but if you need to insulate the ceiling in a room with a high noise level, then it is better to use elements 25 mm thick;
- Light weight. A sheet with a thickness of 8 mm weighs 6 kg, 10 mm - 8 kg, 12 mm - 10 kg and 25 mm - 20 kg. The lightness of the elements simplifies working with them;
- Smooth front surface. One side of the slabs is flat, making it easier to finish.

The cost of the slabs depends on their thickness. The price of a sheet of 8 mm is 600 rubles, 10 mm - 700 rubles, 12 mm - 800 rubles, and 25 mm - 1700 rubles.
This board is ideal for soundproofing rooms with low ceilings. With its help, you can efficiently insulate the surface, while the ceiling height will decrease by only 15-20 mm. For work we need following materials:
| Illustration | Description of material |
 |
Izoplat plates 12 mm thick. The quantity is calculated based on the area of the ceilings that need to be insulated. When purchasing, always take material with a small margin of 5-10%, since cutting inevitably generates waste. |
 |
Liquid Nails. With their help, the primary fixation of the elements will be carried out. You can use almost any option, the main thing is that the composition is suitable for wooden and concrete surfaces. One package is enough for about 3-4 square meters. |
 |
Dowels for thermal insulation. It is best to use options with a plastic nail. They are cheaper and do not transmit sound vibrations, as can happen with options with a steel nail. Due to the light weight of the slabs, plastic nails provide the necessary reliability. For work, use options with a length of 70-90 mm, no longer needed. If you cannot find similar dowels, you can use a pressure washer and a regular quick-installation dowel 60 mm long. |
 |
Primer. Before gluing soundproofing boards, the base must be primed. This is necessary to strengthen the surface and improve the adhesion of the adhesive composition. |
Tool for work:
- Hammer. Used for drilling holes for dowels. Don't forget to stock up on drills required diameter and length. If the work is carried out in several rooms, there should be at least two drills, since during the work they wear out quite quickly;

- Brush or roller. Needed for applying primer to the ceiling;
- Liquid nail gun. Used standard option for sealants. Choose stronger designs, as adhesive composition It is quite thick and when applied to the gun there are high loads.

- Ladder, table or flooring. It is necessary to provide convenient access to the ceiling. It is best to work with three people, so the design should be such that three people can sit on it;
- Wood saw or jigsaw. You can cut slabs using either a power tool or a regular one. hand hacksaw. Choose a tool with a small tooth size to minimize damage to the ends when sawing.

The work instructions look like this:
| Illustration | Description of the stage |
 |
The ceiling is being prepared. If there was whitewash or other finishing on it, it must be removed. If the surface has been painted and the paint adheres very firmly, then it is not necessary to remove it. The main thing is to remove everything that is not held securely. |
 |
The ceiling is primed. The composition is applied over the entire surface in an even layer. The easiest and fastest way to work is with a roller. After treatment, you need to wait for the soil to dry completely. This can take from several hours to a day, it all depends on the temperature in the room and the type of composition used. |
 |
Glue is applied to the first sheet. First, the composition is distributed in an even strip along the perimeter with a distance of 2-3 cm from the edge. |
 |
This is how the glue is applied in the middle. It is important to apply the composition to the entire sheet. You can do this as shown in the photo, or you can do it in a different way: in zigzags, in a chaotic manner, etc. The main thing is that there is glue not only at the edges, but also in the middle. |
 |
The first sheet is installed on the ceiling. You should start from any corner. The work is carried out by three people: two install and hold the sheet, and the third drills holes and installs dowels. |
 |
Holes for fasteners are drilled. The distance between the dowels should be 50-60 cm. They are located both along the edges and in the middle of the sheet. During operation, ensure the vertical position of the hammer drill. |
 |
Dowels are inserted and fastening is made. Everything here is simple and quick: first, the dowel is placed all the way into the hole, then a plastic nail is driven in with a hammer. |
 |
The following elements are attached. Everything is done in the same way as in the first case. There is one caveat - the transverse joints of the elements should not coincide. Therefore, each subsequent sheet is cut so that there is a discrepancy of at least 20 cm between the joints. |
 |
This is what the result looks like. If there are wide gaps between the sheets, they need to be filled with polyurethane foam. Subsequently, the surface is puttied and painted or finished in any other way. |
This material is also suitable for walls and floors, so you can soundproof all surfaces if you wish.

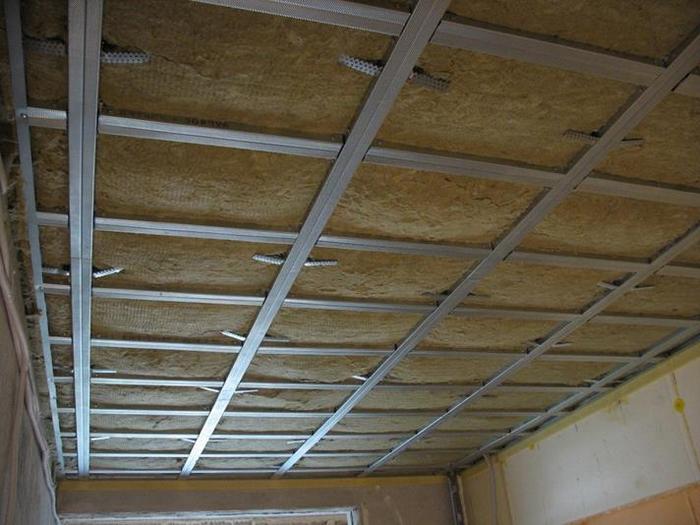
Option 2: insulating the frame under plasterboard with special wool
This type of work involves the use of special mineral wool. Such soundproofing materials have the following features:
- High sound and heat insulation performance. Mineral wool perfectly damps sound waves and at the same time serves as a good insulator. If you need to insulate and soundproof the ceiling, there is no better option;

- Wide range of options. Products can be either in the form of slabs or in the form of rolls. The thickness can be from 2 to 10 cm. The optimal option is 50 mm, this is usually enough for high-quality insulation;

- Fire resistance. Mineral wool does not support combustion, which allows it to be used in rooms with high fire safety requirements;

- Availability. The cost of mineral wool is low; a square meter of 50 mm material will cost you 130-150 rubles.
The following materials are needed for work:
| Illustration | Description of the stage |
 |
Acoustic mineral wool. This is the main material we will use. It is best to purchase sheet options with a thickness of 50 mm; if you need to lay a layer of 100 mm, then you can simply lay two rows. |
 |
Frame components. This includes the following:
|
 |
Acoustic suspensions. This is the main difference between conventional design plasterboard ceiling and soundproofing option. The elements are fasteners with a damper gasket, thanks to which sound vibrations from the ceiling are not transmitted to the structure. |
 |
Drywall. Typically, 9 mm thick sheets are used for ceilings, but I recommend purchasing a 12.5 mm wall version. It will serve as an additional soundproofing layer, providing the best quality sound absorption. |
 |
Acoustic tape. Glued to the wall profile. Prevents sound waves from the walls from being transmitted to the ceiling structure. |
Tool for work:
- Hammer. For drilling holes in the ceiling and walls for fastening the frame;
- Screwdriver. In the process of constructing the frame, you need to tighten a lot of screws; it is difficult to do this manually. The screwdriver kit must include several attachments of the configuration you require;

- Construction knife. It can be used to cut both drywall and mineral wool. If you have very hard mineral wool, then it will be more convenient to use a special knife for thermal insulation materials;

- Level, tape measure and pencil;
- Ladder or other device for working on the ceiling.
Let's figure it out how to soundproof a ceiling:
| Illustration | Description of the stage |
 |
The walls are marked for the guide profile. The best way to do this is to use laser level, but you can get by with the usual one. The line must be at least 50 mm from the ceiling. Most often, mineral wool of this thickness is used, and constructing the frame is much easier. |
 |
Acoustic tape is glued to the base of the profile. Remove the protective layer from the material, gently press it to the surface and cut it in the right place. |
 |
. To do this, drilling is done in the wall at the location of the mounting holes for dowels. Then the choppers are inserted into the wall, and self-tapping screws are screwed into them or impact screws are driven into them. |
 |
Suspensions are attached to the ceiling. They are located along the line of the main profile in increments of 50-60 cm. Fastening to the ceiling is done using dowels. |
 |
The main profile is attached to the hangers. To do this, you must first use a level to set a certain position, and then tighten the screws in the right places. |
 |
Mineral wool is placed in the frame. The sheets are carefully tucked into the cells, and the ends of the hangers, bent to the sides, serve as fixation of the material. It is important to lay the sound insulator as tightly as possible so that there are no gaps between the sheets. |
 |
The finished surface looks like this: the sheets are arranged tightly, the entire ceiling is covered with mineral wool. |
 |
The surface is covered with plasterboard. Here everything is done in a standard manner. |
Option 3: sound insulation for suspended ceilings
If you have a suspended ceiling, you can use the option with mineral wool, but without a frame. Let's go straight to the list of everything you need:
| Illustration | Description of the stage |
 |
Soundproofing mineral wool. Both slab and roll versions are suitable. Recommended thickness - 50 mm. The ceiling height should be sufficient so that you can lower the level by 7-10 cm. |
 |
Vapor barrier membrane. Used to protect insulation. When calculating the quantity, do not forget that at the material joints you need to make overlaps of at least 100 mm. |
 |
Fastening for thermal insulation. The length should be 4-5 cm greater than the thickness of the mineral wool. |
 |
Plastic clamps. Needed to connect vapor barrier sheets to each other. Instead of clamps, you can use a special double-sided vapor barrier tape, but it is not available in all stores. |
 |
Rondol. This is the name of the pressure washer; it will be used to fix the vapor barrier. |
 |
Dowels with mushroom head. Please note that in addition to the cap, the fastener has antennae-like protrusions. At their expense, the vapor barrier will be installed in mineral wool. Please note that no screws are needed. |
Tool:
- Hammer. And a drill of the required diameter and length;
- Hammer- for driving nails into dowels;

- Knife- for cutting mineral wool and vapor barrier material.
In this case, sound insulation on the ceiling in the apartment is attached as follows:
| Illustration | Description of the stage |
 |
Holes are drilled in the ceiling. Standard size mineral wool sheets - 60x100 cm. There are 5 holes made for each element - four in the corners with an indentation of 4-5 cm from the edge and one in the middle. The depth of the hole should be 1 cm deeper than necessary.
|
 |
Mineral wool is being fixed. Installation of ceiling sound insulation is very simple:
|
 |
When attaching, do not press the material too hard. The dowel should not press the mineral wool tightly against the ceiling. The exception is the variants of slabs of high rigidity; they can be pressed firmly. |
 |
The entire ceiling is covered with soundproofing. It is important to join the elements well so that they press tightly against each other and adhere well to the walls. |
 |
The installation of the vapor barrier membrane begins. Let's figure out how to do the work yourself:
|
 |
Fastening is carried out over the entire surface. The fastener spacing is determined on site. It is important that the vapor barrier is pressed tightly against the mineral wool; if there is sagging somewhere, install another fastener. |
 |
Connections are held together. In our case, plastic clamps were used. They are pushed into the holes punched under them and tightened. Excess ends are cut off. After this, you can install a suspended ceiling; the surface is well soundproofed. |
Option 4: sound insulation using Ecozvukoizol material
I like this option for its simplicity and versatility, since the material serves both as an insulator and as a ceiling finish. The main features of Ecozvukoizol are as follows:
- Environmental friendliness. The products represent a cardboard profile filled with a special mineral filler. The material does not contain chemical components and is completely safe. Another important advantage is vapor permeability, that is, moisture from the inside will evaporate without being retained in the structure;

- Strength. The material is very reliable and can withstand even significant loads without compromising the integrity of the elements. The ceiling made from Ekozvukoisol is much stronger than the plasterboard version;
- Simplicity installation. You do not need to lay mineral wool under the frame. Sound insulation of the ceiling is carried out simultaneously with surface covering. This saves time and effort.
As for the cost, it ranges from 700 to 900 rubles per square meter. Thickness can be 11, 12 or 13 mm. The height of the elements is 1200 mm, there are two width options - 800 and 450 mm, the weight of the first is 18.5 kg, the second - 10.5 kg.
Materials for work:
| Illustration | Description of material |
 |
Ecozvukoizol slabs. The quantity is calculated based on the area of the ceilings. Do not forget to add a small margin, since during the work you need to cut elements and waste may be generated. |
 |
Special tape for ends. Used to seal cut ends to cover the surface and prevent filler from spilling out of the cardboard profile. |
|
|
Frame components. This includes the following:
|
 |
Acoustic tape for wall profile. Used to create a soundproof barrier between the frame and the walls. The quantity is determined by the length of the walls in the room. |
 |
Vibration isolating sealant. Used to seal joints and junctions between the structure and the wall. |
 |
Enlarged washer M5. It will be put on self-tapping screws to increase the pressing area and thereby increase the reliability of fastening. |

Tool:
- Hammer with drill;
- Screwdriver with PH2 attachment;
- Construction knife;
- Tape measure, level and pencil;
- Caulking gun;
- Fine tooth hacksaw- for cutting sheets.
The process of soundproofing a ceiling looks like this:
| Illustration | Description of the stage |
 |
The wall profile fastening line is marked. You need to mark the bottom edge future design. It is important to accurately mark the perimeter so that the plane is level. |
 |
Soundproofing tape is glued to the wall profile. Just carefully unwind the material, place it evenly on the profile and gently press along its entire length. The tape is very easy to cut with a regular construction knife. |
 |
The guide profile is attached. The work consists of the following actions:
|
 |
Suspensions are attached. The process looks like this:
|
 |
The main profile is inserted into the guide. The elements are aligned, the hangers are bent as shown in the photo. Then, using a level, the positions of the elements are checked. If necessary, corrections are made and the profile is fixed with self-tapping screws. The excess parts of the hangers are simply bent upward so that they do not interfere with further work. |
 |
Jumpers are attached. Since Ekozvukoizol sheets are heavy, the frame should be reinforced with jumpers. The distance between them is adjusted to the size of the sheets. Each joint must be on the profile, remember this simple rule. The easiest way to attach the cross members is with special crab fasteners. They are simply put on the longitudinal profile, after which a jumper is placed and screws are screwed in. The result is a reliable frame for a suspended ceiling made of Ecozvukoizol. |
 |
Fastening starts from the corner. Before installing each subsequent sheet, soundproofing sealant is applied to the joint. It is important that the connection is completely filled with the compound, as shown in the photo. The picture also shows how the material is fixed: washers are put on the self-tapping screw. |
 |
If necessary, the sheets are cut. The most important thing is to take accurate measurements and mark the element before cutting. Leave a gap of 2-3 mm so that the sheet fits into place and you do not have to trim it further. |
 |
A special tape is glued to the cut ends. It is sold together with Ecozvukoizol and is needed to ensure that the filler does not spill out of the cut areas, because inside the material has a honeycomb structure. |
 |
All connections are treated with sealant. This is a very important part of the process, so be sure to do it ahead of time. It is important not to cover the joint from the outside, but to fill it across its entire width. |
 |
The sheets are very carefully aligned before fastening. You must butt them together so as not to tear the sealant off the end. The composition should appear throughout the entire joint; this is a sign of high-quality filling of the joint. After this, fastening is carried out. |
 |
The junctions along the perimeter of the walls are filled with sealant. The better you fill the voids, the better the sound insulation you will get. Don't skimp on the sealant. |
 |
The finished ceiling is left until the sealant dries. Then the excess composition is carefully cut off and the surface is puttied. |
Conclusion
Soundproofing the ceiling is a simple process; choose any of the four options and implement it in your apartment. The video in this article will help you understand the topic even better. If you have questions, ask in the comments below.
Despite the beauty and practicality of stretch ceiling covering, it cannot boast of high soundproofing characteristics. In apartment buildings, the problem of noise from neighbors is especially pressing. In this case, before installing the tension fabric, the ceiling is soundproofed. There are many materials available for sale that are suitable for these purposes. They all differ in their characteristics and installation features. We will look at the features of each sound insulator and the nuances of its installation, which will help the consumer find the answer to the question of how to soundproof a ceiling under a tension covering.
Selection of soundproofing material
Even when using acoustic tension panels, protecting an apartment from extraneous sounds will be ineffective. If such fabrics are used in conjunction with insulators made of other materials, the noise absorption of the coating will increase significantly.

Today on sale you can find the following materials for soundproofing the ceiling:
- mineral wool and products based on it;
- expanded polystyrene;
- cork slabs and rolled products;
- foam;
- Mineral-based sound insulator Texaund.
Before installing any insulator, the base surface must be prepared. In addition, it is necessary to install baguettes for the tension fabric, which will subsequently hide the sound insulator.
Preparing the ceiling and installing the supporting frame
Work to prepare the base surface depends on its condition:
- For high-quality painted ceiling surface acoustic materials can be installed without prior preparation.
- It is better to completely remove weak base surface coatings and finishes with defects.
- After this the ceiling is cleaned wire brush to the floor slabs and clean off the dust.
- The primer is applied in several layers. The primer coating is applied to the walls to a height of 15 cm. Before applying each layer of primer, the first layer must be completely dry. If mold is present, use antifungal primers.

After preparing the base, install the load-bearing moldings. To do this, the installation level of the tension covering is drawn along the perimeter of the room on the walls. To do this, use a laser level and a painting cord. The baguettes are cut to length and self-adhesive soundproofing tape is attached to their back side. After this, the profile is applied with tape to the wall and screwed with self-tapping screws.
Then, on the base, the installation locations for lighting fixtures are marked. For this purpose, special platforms made of plywood or OSB are installed. The bases for the devices are mounted at the same level as the tension fabric and are mounted on perforated hangers. Power supply cables are laid to the installation sites of lighting devices.
Features of soundproofing materials and installation technology
After preparing the base surface and installing the mounting moldings, sound insulation can be installed under the suspended ceiling. Since there are many acoustic materials suitable for these purposes, we will consider their features and installation nuances in detail.
Roll sound insulation MaxForte
Recently, turnkey ceiling soundproofing is often done using a new generation of roll insulation - MaxForte from SoundPro. With a thickness of 1.2 cm, this product protects well from impact noise and airborne sounds. The noise insulator does not contain glue and can be used in frame and frameless insulation systems.

The advantages of MaxForte from the SoundPro brand include the following:
- does not emit unpleasant odors;
- does not contain toxic components;
- moisture resistant;
- provides maximum sound absorption.
Characteristics of MaxFrte from SoundPro:
- dimensions are 5 m x 1.4 m, and thickness is 12 mm;
- roll volume is 0.1 cubic meter, and its area is 7 squares;
- weight of one roll – 16 kg;
- The color of the product is black and white.
A similar insulator is produced by the EcoAcoustic company. Plates made of synthetic padding polyester have maximum sound absorption. This is achieved through the aerodynamic laying of polyester fibers. The dimensions of the slabs are 1.2 m x 0.6 m, and the thickness is 5 cm. One package includes four slabs, with a total area of 2.88 squares. The density of the product is 1000 grams per square meter. The package weighs 3 kg.
Advantages of EcoAcoustic sound insulator:
- suitable for rooms where allergy sufferers live;
- does not contain glass fibers and phenol;
- resistant to rot and moisture;
- not susceptible to damage by insects and mold;
- retains original dimensions (does not shrink);
- provides maximum sound absorption.
Important! MaxForte is attached to the ceiling surface using dowel mushrooms.
Mineral wool
It is better if the soundproofing of the ceiling in an apartment under a suspended ceiling is carried out not with ordinary mineral wool, but with modified products based on it - Shumostop K2 and C2 slabs, as well as Shumanet BM.

Schumanet slabs are made from basalt fibers. On one side the product is reinforced with fiberglass. This ensures high rigidity of the material.
Technical characteristics of the sound insulator:
- dimensions – 1x0.5 m or 1x0.6 m;
- thickness – 5 cm;
- density - 45 kg per cubic meter;
- There are four slabs in the package;
- area of one element – 2.4 m²;
- package weight – from 4.2 to 5.5 kg;
- volume – 0.12 m³;
- flammability class - NG (does not burn);
- average sound absorption – up to 27 dB;
- when immersed in water for a day, water absorption is no more than 3%.
Shumostop slabs are produced in two varieties C2 and K2. Their characteristics are as follows:
- Dimensions – C2 1.25x0.6 m, K2 1.2x0.3 m.
- Thickness – both slabs are 2 cm.
- Density – 70 kg/m³ for C2, 90-100 kg/m³ for K2.
- There are 10 slabs sold per package.
- Element area – 7.5 m² C2, 3.6 m² K2.
- The weight of one plate is 11 and 8.8 kg, respectively.
- Volume – C2 0.15 m³, K2 0.072 m³.
- Average sound absorption is up to 27 dB for C2, up to 20 dB for K2.
- Both materials are non-flammable.
- Water absorption per day is 2-3%.
When using mineral wool slabs, the price of ceiling sound insulation will be the most affordable. Typically, C2 and K2 products are used simultaneously, because the fiberglass insulator absorbs noise better, and the K2 elements are not harmful to health. Therefore, C2 is attached to the ceiling first, and then K2. In this case, the sound wave damping reaches 46 decibels.
Installation features
The frame installation method involves the construction of sheathing on the ceiling surface. To do this, marking is first performed. Then the guides are attached (their pitch depends on the width of the slabs). The frame is made of metal profiles or wooden blocks.
Using steel profiles They are additionally soundproofed. To do this, use self-adhesive tape. Depending on the thickness of the sound insulator being laid, the frame is attached directly to the ceiling or suspended from it using perforated hangers. After assembling the frame, acoustic slabs are laid. They should fit snugly against the guides and fill their entire thickness. The material is laid without gaps, without any gaps.
The frameless installation method involves gluing the slabs to the surface with gypsum or cement-based glue, as well as adhesive sprays. Choice glue mixture depends on the material of the surface to be glued. For concrete ceilings, mixtures based on gypsum and cement are suitable. Additionally, dowel-fungi are used (5-6 pieces per slab). For painted surfaces it is better to use spray adhesives (additional fixation with dowels is not required).
Important! If perforated stretch fabrics, then to protect against mineral wool getting into the air, the insulator is covered with a vapor barrier film. To fix the film, use dowel mushrooms, double-sided tape or fastening with staples to the sheathing.
Expanded polystyrene
Soundproofing the ceiling in an apartment under a suspended ceiling is performed using regular and extruded polystyrene foam.

Characteristics for regular (extruded) polystyrene foam are given below:
- The percentage of water absorption per month is 4 (0.4).
- The percentage of water absorption per day is 2 (0.2).
- Vapor permeability is absent in foam plastic (for extruded material it is 0.018).
- Thermal conductivity – up to 0.05 (up to 0.03).
- Sound absorption – up to 53 dB (up to 27 dB).
- Density – up to 35 kg/m² (up to 45 kg/m²).
- Strength – up to 0.2 MPa (up to 0.5 MPa).
- Mechanical strength for static bending – up to 0.2 MPa (up to 1 MPa).
- Operating temperatures – from minus 50 to plus 70 (75°C).
- Flammability – G1-G4.
If unpressed self-extinguishing polystyrene foam is used, then it is better to choose PSB-S class 35 or 25 products. The material is attached to the surface with liquid nails, cement-based adhesives or polyurethane foam. For additional fixation, dowel-fungi are used. The same can be said about fixing extruded polystyrene foam.
The general advantages of all polystyrene foam include their low thermal conductivity, high degree of sound absorption, resistance to mold damage, and low weight. The disadvantage of the material is flammability and the release of toxic substances during a fire.
Soundproofing Texound
Texaund is characterized by high sound absorption and low thickness. This dense material absorbs and scatters sound waves well because it has a high density.

Texaund is produced in the form of rolls and plates and has the following characteristics:
- density – reaches 1900 kg/m³;
- flammability - G2;
- average sound absorption – up to 3 dB;
- elongation under tensile loads – up to 300 percent;
- composition – polyolefins, plasticizers, spunbond, aragonite.
The insulator is available in different sizes and has the following advantages:
- Resistance to temperature changes (withstands even freezing at a temperature of -20 degrees).
- Its elasticity is similar to rubber.
- The surface is not susceptible to fungi.
- High moisture resistance.
- Unlimited service life.
- Can be used in combination with other acoustic materials.
Important! On sale there is Texaund with a self-adhesive base, on a felt pad, with a foil layer, and a regular one.
Mounting options
There are three ways to install this sound insulator:
- If Texaund is used as an independent sound absorber, it is glued to the ceiling surface special glue(liquid nails or sealant). The composition is applied to the ceiling and insulator. After a quarter of an hour, the canvas is applied to the base and pressed tightly. Due to its heavy weight, Texaund is glued in separate sheets. Adjacent slabs are first laid with a slight overlap, then cut with a cutter and joined at the ends, followed by welding gas burner or a hair dryer. After this, the sheets are additionally fixed with dowel mushrooms, which are mounted in increments of 0.5 m.
- The second method involves preliminary installation of mineral wool on the ceiling, laid in the gaps of the sheathing. After this, Texaund is glued to the drywall, which is then mounted on the sheathing. The joints are glued with sealant or welded with a construction hairdryer.
- In this option, Texound is first attached to the ceiling surface, as described in the first method. Then a frame made of wooden beams or metal profile. Mineral wool is placed between the guides. The frame is hemmed with plasterboard or vapor barrier film. The tension covering is being installed.
Acoustic foam
This is the most affordable insulator, which has an impressive service life and is used both independently and in combination with other acoustic products. Because of its lightness, foam rubber is glued to the base with silicone or double-sided tape. The thickness of the foam rubber plates is 25-100 mm. The relief pattern of the surface may also differ. There are special reliefs that are designed to dampen low-frequency noise.


