Agree, even a random set of plants planted in an aquarium or other glass vessel will attract attention more quickly than the same plants in ordinary ceramic pots.
Well, if you, according to all the rules, create a garden in an aquarium or in a large bottle, you will not only get unusual decoration interior design, but also the ability to grow some very finicky plants.
Such “gardens” were very popular in England and other European countries in the 19th and early 20th centuries. To create them, you need an aquarium - round or rectangular and a glass (or other transparent) lid for it. The main feature of this design is that inside the aquarium or other glass vessel the air humidity is always higher than in the room, there are no drafts, and you can’t take care of the plants , collected together and needing similar growing conditions, is much easier.
Perhaps the most spectacular is a garden in a bottle. A pot-bellied bottle with a wide neck is best suited for this purpose; it is also wide enough at the bottom for greater stability. Usually a bottle made of non-colored glass is used: then the plants will not need additional lighting, since colored glass blocks light.
The limited space and humid atmosphere of the “bottle garden” determine the choice of plants for it. Miniature, slow-growing plants that love a humid atmosphere and diffused light are good in such a “greenhouse”.
For growing in a bottle, we can recommend miniature royal begonias with small leaves, ferns, saxifrage, pilea, small-leaved forms of ivy, peperomia, plants of the arrowroot group (arrowroot and calathea), selaginella with tiny leaves and various types of fittonia.
The idea of adding color to the “bottle garden” and planting ornamental flowering plants, such as violets, will have to be abandoned: as a rule, such plants bloom poorly and fade when grown in a bottle. It is better to create color effects by using plants with a variety of leaf colors, and create interesting groups with contrasting leaf shapes and textures. 
To create a composition you will need two types of maidenhair fern with in different forms leaves and two fittonia - with silver and red veins.
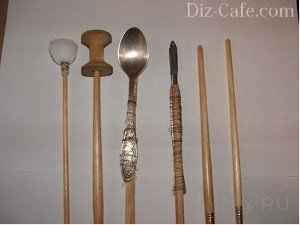
To work, you will also need special (not very complicated) tools - a sponge or tampon, a wooden spool of thread, a fork and a dessert spoon tied to long sticks, and a small scoop.
The soil mixture for your mini-greenhouse must contain peat and sand. In addition, you will need small pebbles or crushed stone and crushed coal. Try to determine the location of each plant in advance to achieve maximum decorative effect. Try to place ground cover Fittonias in the foreground, and more tall plants with green leaves that create a backdrop for colorful fittonias, such as maidenhair.
If you want to place it in a well-lit place away from direct sunlight, your garden can become a real decoration of the apartment, as it is ideal place For miniature forms crotons, reo and others ornamental plants.
In the foreground of the aquarium garden, Uzambara violets, orchids, various types of bromeliads and many other flowering plants will look great and grow. Don't forget to close the aquarium with a lid, wipe the glass, and all you have to do is admire it.

Growing tropical plants at home can sometimes be a difficult task. Many “exotics” require high humidity air, warmth and absence of drafts. It was this feature of delicate ferns, which were incredibly popular in Europe in the 19th century, that forced the British to look for ways to artificially recreate the climate of the humid tropics. And a solution was found! It turned out to be Ward's box, which is a box with walls made of sheet glass connected by metal strips. Sunlight penetrated Ward's box perfectly, which could not be said about air, the access of which was limited. Due to the fact that the water in the closed vessel did not evaporate outside, but settled on the walls and plants, constant high humidity formed inside. This allowed the enterprising English to grow many varieties in their homes. exotic plants: ferns, orchids, bromeliads, etc.


The invention of Ward's box turned out to be so successful that it is not forgotten even now. Modern florists, wanting to grow whimsical tropical plants, place them in transparent vessels - florariums. This composition is called a “garden in a bottle,” although the container used is not necessarily an ordinary bottle. Is it possible to make a garden in a bottle with your own hands? Yes, it’s easy - just arm yourself with a suitable vessel and select plants for the composition. 
Choosing a bottle for a mini-kindergarten.
When searching for a suitable vessel, you can give free rein to your imagination. Any container that is large enough, with a tapering neck and a widening bottom, will do. This could be a large bottle of wine or chemical liquids, a round aquarium, or a jar for bulk products. For plants that prefer maximum humidity, you should select a container that can be hermetically sealed.

In this case, the narrower the neck, the more humid the microclimate can be achieved. However, the neck should allow you to carry out procedures for caring for the internal contents - loosening the soil, removing dead plants or their rotten parts. Inside a non-sealed florarium (aquarium or bottle without a cork), the humidity will be lower due to constant ventilation.

It is easier to grow plants in open florariums - constant ventilation reduces the chances of rotting
Choosing plants for the garden in a bottle.
When looking for plants for a mini-garden, you should give preference to small species that are not prone to growth. Otherwise, within a few months the large size will outgrow the capacity and will have to be either trimmed or replaced with a new one.
Since the garden in a bottle serves as a decoration, it is not advisable to fill it halfway with soil mixture. The soil should occupy no more than ¼ of the volume of the bottle, or better yet, even less. Therefore, florarium plants should have a small surface root system, which does not require much soil.

Moisture-loving violets with a small root system are a good choice for a bottle garden
In a glass greenhouse, regardless of whether it is completely closed or not, the air humidity is increased. This means that only moisture-loving plants, accustomed to tropical rainfall or marshy soils. Obviously, growing desert cacti in a bottle garden would be reckless - the likelihood of them rotting is too high.
The easiest way to cultivate decorative foliage plants in a sealed bottle. Flowering species should be grown in a container with an open neck or a round aquarium without a lid, promptly removing faded flowers so that they do not begin to rot. Among these flowering plants Orchids and Saintpaulias have already become traditional for a garden in a bottle. Fittonias, ferns, ivies, chlorophytums, pelleys, royal begonias, bromeliads, some dracaenas and dwarf ficuses, mosses, etc. are also suitable for “green” compositions.

We are making a mini-greenhouse under glass.
Step 1. Prepare the substrate for planting
At the bottom of the selected container we place a layer of drainage 1-2 cm thick. This can be expanded clay, small pebbles or crushed stone. Then add soil substrate mixed with charcoal (you can use Activated carbon) in a layer of 5-10 cm. Coal is necessary as a disinfectant and antiseptic that prevents root rotting. As for the substrate, it should be light and breathable. No clay or heavy soils! The roots of plants in a bottle garden must “breathe”.
Step 2. Planting the plants
Using a teaspoon, fork or spatula, make indentations in the substrate and carefully plant the plants. If the neck of the bottle is too narrow, then it is most convenient to use large medical tweezers to place the plants.

Between the plants you can place several unusual stones, ornate driftwood, suitable for the composition garden figurines. Such an imitation of a natural landscape will make a mini garden in a bottle a full-fledged alternative to a real garden.
Step 4. Caring for a garden in a bottle
After the plants are planted, it is time for the first watering. Carefully spill the soil - in this case it is important to take precautions so that excess water does not stagnate for a long time in the drainage layer.

Cover the sealed bottle garden with a lid or stopper. After some time, condensation may form on the walls of the vessel - this means that waterlogging has occurred. Drops on the walls should be wiped off and the lid of the vessel should be opened for a while. Once the condensation is removed, the bottle garden requires virtually no special care. Sometimes (in summer - about once a week) you will have to open the lid and spray the plants. At the same time, the humid climate will remain.

If the bottle garden does not close, then it will have to be watered more often. In any case, with the right composition of slowly growing plants, the garden in a bottle will retain its decorative properties for a long time with virtually no effort on your part. Of course, florarium plants will not be as unpretentious as artificial plastic flowers from bottles for the garden. However, you can afford to go away for a week without fear that the plants will die without watering.
Bottle garden options.

The florarium in a glass teapot can be ventilated at any time - just open the lid

Composition in a glass - impeccable taste

Several small bottle gardens are an alternative to flower bouquets on the serving table

Florariums in living room design
Graceful miniature gardens. Smaller in size than a matchbox. Can be used as a keychain or pendant.
Real mini-greenhouses in specially made glass houses. Doing something like this with your own hands will most likely be problematic.
It turns out that you can find many uses for a regular light bulb, not just as a light source. One of them: turn it into an unusual florarium. To do this, you will need the largest incandescent lamp and low-growing plants, such as moss, moss, various types of lichens, as well as all kinds of succulents.
We use jars for bulk products for purposes other than their intended purpose. They make excellent florariums.


The garden in a bottle, which you can see in the photo, is a glass or transparent plastic vessel in which plants grow. indoor flowers and any landings. Air does not enter the bottle or enters in limited quantities, resulting in a humid climate that is favorable for growing delicate and whimsical plant varieties. These are mainly plantings that do not like bad climatic conditions - drought, frost and constant rainfall. In the photo you can see how you can make such a beautiful small garden in plastic containers. And the video below shows a master class on how to create it, and you can choose any plants. Another name for gardens in plastic bottles is a florarium. You can easily make it yourself.
Garden in glass bottle
The florarium is a real decoration of the room; in addition, you need to take into account that the choice of the shape and style of such a mini-garden depends on the interior of the room.
Let's consider the main types of florarium:
Natural florarium
This type is ecological, it is created by human hands, like small corner wildlife. In the photo you can see the appearance of this type of garden, which will perfectly decorate the interior of your home. Plants in such a small garden represent a rocky landscape or a miniature forest, semi-desert and much more. Look at the photo for several options, each of which is unique. The main message of such a garden in a glass bottle is that it is very similar to the natural landscape. Very often, gardeners make beautiful florariums where a unique collection of plants grows. You can decorate it with several species of the same variety, for example, orchids, and then such a garden will be called an orchidarium. Any gardener can make it themselves; all you need is patience and some skills.
Forest florarium
The landscape of tropical rainforests is the main idea of such a composition for the plant. To create a composition in a similar stylistic direction, you need to find a large container, since you can use many varieties of plants that came to us from the tropics in creating the composition. Regarding the type of container, it will not have any significance here, since the mini-landscape will need to be made inside the container. Very often this type of florarium is created as a display florarium. In the video you can watch its making.
When selecting plantings for this variety of compositions in the form of living nature, you need to take into account that all selected plants must have almost identical requirements for atmospheric humidity, lighting and soil conditions. Such a garden should have a small shape and medium height. In addition, remember that varieties that have painted leaves and a decorative shape must be used in moderation.
Selecting plants for a garden in a bottle
Please note important point: the most best plants to form such a mini garden - these are maranite, peperomia, pellionia, fittonia and so on.

To create a tropical forest landscape with a more authentic appearance, you need to plant plants not next to each other, but in several tiers, and you must also take into account the need for sunlight and the height of any plant. Very elegant in glassware picturesque driftwood, climbing plant varieties, and so on will look like. Quite often, gardeners hang pots in which orchids and bromeliads are planted on tiers; in addition, the surface of the pots must be covered with bark or moss used for camouflage. This way you will get more attractive appearance. It is necessary to plant bud-blooded plants on the substrate; however, the composition can be supplemented with a moderate number of pebbles that have an original shape.
Garden with desert landscape
It is also called desertary. If you decide to opt for this type, then you will be able to use dishes with a wide neck for these purposes, since succulents are not afraid of dry room air. Although you can also use a closed terrarium where desert plants are grown.
In such compositions, as in others, ground cover stands out among the plantings, which serve as the background. In order to create a ground cover and obtain a natural appearance of the composition, it seems possible to use lithops or creeping crassula. How a structural plant can be used tree aloe, which everyone can find in their home.
An important point: it is necessary to select plant varieties that are more expressive and visually combine with the selected dishes, since as a result only they will set the stylistic direction and appearance of the composition that we want to obtain as a result of such simple manipulations.
Those plants that are planted on the middle tier should be in acceptable harmony with the “structural elements” and complement the entire attractive appearance of these plants. On next plan we plant squat aloe or mammillaria. Be sure to use decorative materials, for example, gravel and much more. Let us add that the pebbles should not have a round shape; let them have broken lines.
Features of a garden in a bottle
A mini-garden in a bottle is an excellent solution for those plant varieties that easily tolerate moisture in the atmosphere. Everyone knows that most green plants die from the dry climate that occurs during heating. Plants that prefer a humid climate will grow well in confined spaces, and the container can be hermetically sealed. Such compositions can decorate your home and please the eye for a very long time, thanks to the balance of air that occurs in the container. Forming a bottle garden requires time, but in order to obtain original version, we are offering to you interesting master class, which will teach anyone how to make such beautiful compositions as in the photo. Such a flower garden will look unusual and very beautiful.

Drainage in a bottle
In order to make a beautiful composition, you need to use beautiful plant varieties. Flowering is an unacceptable decoration for closing the dishes: the leaves will instantly fall off and the flowers will need to be removed. You can create a colorful version of the mini-garden composition using variegated plants. By combining white, striped and other types of leaves, you can get an unusual combination and beautiful appearance of such a container. Another option for creativity is shape. In a monochromatic mass, something like a black and white image, the delights of nature, which creates various unusual shapes, will look very beautiful.
Necessary details of a mini-garden
Let's consider which details may be useful in order to create miniature sizes garden in any container. However, you can do it yourself. To do this, watch the master class.
- First, a drainage layer is laid on the base of the container.
- In addition, wood ash is useful, which is needed when our bottle is closed. Perfect solution in such options - the use of moss.
- A wonderful composition can be obtained by decorating plants with picturesque stones, pieces of wood, and driftwood. You can also use miniature figurines, something like garden figurines.
- Plants for such a small garden must be selected small in size, which slowly increases the mass of greenery, with a small root system and high demands on air humidity. In addition, they need to choose more shade-tolerant varieties, since there is practically no sunlight in the container. Of course, this is a fern that is intended to be used for planting in such damp, semi-dark areas. You can also use other equally attractive plants that will perfectly complement the decor of your garden.
- In addition, you can opt for selyaginella, which is beautiful plant- it can be used for mini-kindergartens.
- If the bottle is very large, then you can plant small-leaved begonia in it. It will give the composition an excellent appearance. You can plant a plant in a closed container, for example, bromeliad. Quite often you can see a garden in a bottle, which is made on the basis of a succulent. Since these plants come from deserts, they do not like moisture, they need careful care: the soil for them is chosen quite carefully, watered occasionally and in general all dead remains are removed. Such measures can help avoid decay.
- To create a garden in bottles, you can use any glassware as a basis.

Garden care in a bottle
Also stock up on the following materials:
- wooden stick;
- a spoon with an elongated handle;
- coil;
- funnels;
- razor;
- a piece of wire.
Let's consider the stages of work on creating a garden from a glass bottle:
- First, fill the container with soil approximately 2.5 centimeters thick through funnels, and charcoal can be used as the top layer. Then a substrate is placed on it, which is generously moistened in advance.
- First, think carefully about the composition of your garden in a bottle, since moving objects from one area to another during work will be very difficult, and in addition, there is a possibility of damaging delicate varieties of plants.
- Planting is carried out as follows: first we plant plants along the edges, then in the central part, large specimens must be placed in a bottle before small varieties plants.
- Plants should be planted one at a time, and each time you will have to dig small holes with a spoon. Having taken the bottles out of the pots for the future resident, they carefully cut off a clod of earth. This is done so that it is smaller in size, because the rapid growth of a mass of greenery is undesirable for us. If the bottle has a narrow neck, then the plants need to be brought inside, planted between wooden sticks.
- After planting the plants, we compact the soil using a reel, which we place on sticks; it is recommended to clean the glass with a sponge and spray the composition with liquid. At this stage, the container can be sealed and left in a bright room.
At one time, the art of bonsai was in fashion - growing miniature dwarf trees, which in appearance are practically no different from real ones. Today one of the fashionable trends landscape design is to create a mini-greenhouse. If you like to tinker with plants, a garden in a bottle will probably interest you. It is very interesting to work on its creation, and the result will delight you with its unusualness and elegance.
So how to make a garden in a bottle? Do you think it's difficult? In fact, no, and then, after creating the garden, it will require minimal care.
What do we need to create a mini-garden?
Creating a garden in a bottle is not too labor-intensive, but very exciting. First of all, you need to choose a suitable container; it can be a bottle of an interesting shape, although it is not necessary to use a bottle. You can choose a round aquarium, a wide glass or a chemical flask. A miniature glass decanter will also work.
Examples of vessels that can be used to create a garden - it can be a glass or a bottle of any shape, but a narrow neck reduces the possibility of beautifully decorating a terrarium

This bottle is very convenient for creating a mini-garden - it is quite large, which allows plants to grow beautifully, and the wide neck makes it possible to conveniently plant plants, create a soil layer and decorate internal view garden
Necessary components for decorating a mini-garden: soil, charcoal, plants, drainage mixture (fine gravel, sand, pebbles, expanded clay), a small scoop, maybe a child's one, a small spray bottle, a pair of long sticks, a knife for pruning plants, an empty reel. As decoration you can use shells, pebbles, small twigs and driftwood, glass decorative pebbles, and artificial insects. The vessel will need to be periodically cleaned of dust and traces of moisture - for this it is convenient to use a sponge tied to a stick or knitting needle.
Difficulties in design can be caused by a vessel with a narrow or long neck - in this case, you will need to lengthen the tools - they can be tied to sticks, tassels or knitting needles.
The necessary tools that you will need to create a garden in a bottle are a sponge, a spool, a spoon, and a scalpel. In this case, they are attached to paint brushes. You can also use knitting needles or thin sticks
Preparing the soil mixture for the florarium
If you use hydrogel, there is no need to use coal and drainage. Such a garden does not need watering. Soil composition for the garden: soil for flowers, peat, humus, river sand, crushed stone or brick chips, a mixture of turf and clay.
Let's move on to the process of creating our florarium. Following this step by step master class by creating a garden in a bottle, you can easily create a wonderful mini-greenhouse that can be placed both at home and in the summer cozy corner garden or yard - in a gazebo, on the veranda.
Work order:
- Pour drainage (2-3 cm) onto the bottom of the container, sprinkle charcoal (1 cm) on top. In case of excessive moisture, charcoal will get rid of the unpleasant odor.
- Pour moist soil (2-3 cm) onto the coal.
- We use an empty spool of thread to level the soil layer.
- We make depressions in the soil (preferably with a spoon attached to a knitting needle or a knife).
- Plants must be prepared for transplantation - carefully dug up with a lump of earth around the roots. We cut off roots that are too long - the plants should develop slowly.
- If you are going to use one plant, plant it in the center; if there are several, then one in the center, and the rest near the walls. The hand will not fit into the narrow neck - here we use chopsticks.
- Use a spray bottle to spray the soil and plant with water.
- Let's start decorating the garden in a bottle - we place pebbles, shells, and driftwood in the vessel.
At this stage, our garden is ready, now we clean the walls with a sponge from traces of soil and water and close the vessel.
Selecting the required moisture balance
We leave our garden in closed for two days, and monitor the appearance of condensation on the walls of the vessel. Usually the walls become a little foggy - this is normal. If the condensation does not disappear, it means that the humidity is excessive. Open the container and leave it open for a day, during which time the moisture will evaporate. We close the vessel and again monitor the humidity level - if condensation has not formed - the humidity level is too low - spray the garden warm water. Once you find the optimal balance, you will have no problem controlling your humidity levels.
Plants in a mini-greenhouse grow slowly, but sometimes they still need to be pruned and their growth and condition monitored.

A beautiful garden in a large bulb - both the whimsical Saintpaulia and the moisture-loving fern feel good here. Plants have plenty of room to grow and can be arranged beautifully
Since the mini-garden is a greenhouse, a tropical humid microclimate is formed inside the vessel, so there is practically no need to water the plants. The level of soil and air humidity is regulated by the plant. Spraying or watering is only necessary if condensation has ceased to form.
Plants suitable for growing in a bottle
For a tropical climate, accordingly, plants are selected mainly from the tropics: dracaena sandera, sansevieria three-stripe, white-veined arrowroot, common ivy, Easter hatiora cactus, white-flowered tradescantia, fittonia, grass calamus, royal begonia, cryptanthus, round-leaved pellea, xiphoid pteris.

Phythonia is one of the most suitable plants to create a garden in a bottle. Its leaves have multi-colored veins, which looks very impressive against the background of the decor and glass of the vessel, it is unpretentious, the leaves have an elegant shape

Even Saintpaulias are suitable for a mini-garden, but they must be placed in a larger container, for example, in an aquarium, and not covered. In this case, a tall vessel with water in which algae grows adds decorativeness.
Croton is great for an open florarium. To avoid problems with care, you can plant different varieties:
Many of us love indoor flowers and dream of placing them in the house so that they become a beautiful, unusual decorative element that fits perfectly into the interior. But not every family has a large enough space in their house or apartment to afford winter Garden or even a green corner.
And this is where florariums come to the rescue - miniature gardens inside transparent containers. What is a florarium, what are its features and how to make such a living decoration with your own hands?
The history of the idea of growing cacti and orchids in an enclosed space
These elegant mini-gardens are not a new invention. They have been a traditional decoration of secular salons and fashion store windows since the 18th century. It was then that Nathaniel Ward, a British naturalist researcher, came up with the idea of placing capricious tropical plants inside a container, where a favorable microclimate was created for them.
Ward's box is the first example of a florarium from the distant past
Today, florariums are coming back into fashion; they are in great demand among flower lovers and original design. In our latitudes create suitable conditions Not easy for some plants. But you can easily place a miniature garden in a small container on a table, shelf, or nightstand anywhere in the room.
In essence, a florarium is the same aquarium, but instead of water and fish, it is filled with stones, sand and plants small size or dwarf varieties. Due to the small size and closed or limited shape of the container, the effect of a greenhouse is created inside such a mini-garden: the plants are surrounded by warmth and high humidity.
In stores you can find the most florariums different types: from professional ones, equipped with automatic watering, hydrometer, lighting and heating, to simple and affordable gardens in aquariums or bottles. But if you want to make such a small miracle yourself, then first of all you need to learn about plants suitable for different types of florariums.
Making a composition
Select representatives of the fauna for the mini-garden, following these principles:
- plant height no more than 20 cm;
- resistance to high humidity;
- low growth rate.
For which plants is a sealed container suitable, and for which – an open container?
The question often arises of whether to choose an open or sealed (closed) container for certain types of plants. The first and second options have their pros and cons.

Plants will feel great in the right container
Table: pros and cons of open and closed containers
| Grade | Open florarium | Closed florarium |
| pros |
|
|
| Minuses |
|
|
A variety of plants are used in the compositions in the florarium:
- The most widespread among florarium lovers we received ferns, dieffenbachias, calamus, fittonia, selaninella, and various types of mosses. With the help of these plants you can give the florarium the appearance of a coniferous, deciduous or tropical forest.
- You can give your florarium a bright look with the help of flowering plants - violets, cyclamens, azaleas and others. But do not forget that they are very susceptible to rotting. Either choose types of flowers that are resistant to moisture, or use larger containers and provide good ventilation to the florarium.
- Florariums with cacti planted in them are very beautiful. For such a product you definitely need a container. open type with constant access of fresh air and zero chance of condensation. Or choose cacti native to tropical forests.
- Orchids enclosed in the space of a florarium are simply magnificent. But don't forget how capricious these flowers are. Firstly, to build such a florarium (they are called orchidariums), you need to try very hard, and you can’t do it without skill. And secondly, you will have to provide heating, lighting, and watering using special equipment.
One of the features of plants for florariums is their low growth rate. After all, we are dealing with very limited space, and if the plant quickly increases in size, then you will have to regularly update the entire composition. In conditions of small space and a small layer of soil, plants themselves usually slow down the growth process. But to be on the safe side, you can trim the roots a little when planting.
- sphagnum moss;
- ferns - nephrolepis, pteris, multirow, asplenium, adiantum;
- orchids;
- Saintpaulia (violets);
- cyclamens;
- Guzmania;
- azalea;
- fittonia;
- crotons;
- begonia;
- cryptanus;
- Crassulaceae - “money tree”, echeveria, young;
- cacti and succulents - notocactus, echinopsis, rebutia, rhipsalis, prickly pear.
Photo gallery: flowers for growing in glass vessels

Alocasia - leaves beautiful shape with bright colors

Varieties of begonias with small leaves

Rejuvenating, or stone rose

Any type of moss

Any small ferns

Cacti of many types

Saintpaulia, better known to us as violet

Capricious orchids in the florarium will require special conditions
List of suitable containers and materials for decoration
A florarium can be arranged in almost any transparent vessel. It could be:
- small round aquarium;
- bottle with a narrow neck;
- clear glass vase;
- jar of any size;
- laboratory flask;
- wineglass;
- bulb.
In addition, in a special store you can purchase ready-made vessels of any kind. geometric shapes.

Any clear glass container is suitable for creating a florarium.
Florariums in bottles and very miniature compositions in light bulbs are very popular. They look beautiful, original, and do not take up much space. But their self-production quite complex: it is difficult to pour soil through a narrow neck, insert plants, place all elements in in the right order. Therefore, if you are just learning the art of creating a florarium, start with an aquarium, a large wine glass or a jar.
Photo gallery: florariums in glasses, bottles and other glass vessels

Why not arrange a composition of florariums in square decanters?

Glass glasses of simple shape - perfect place for a composition of small plants

A wide variety of compositions are most often placed in aquariums.

An ordinary jar can also be turned into a mini-garden

The vase is an excellent container for a florarium in the style of a dense forest

A set of florariums in small hanging balls looks stylish

Bottles with narrow necks are perhaps the most common vessels for florariums.

Laboratory flask - an excellent form for a micro-kindergarten

In a glass or plastic teapot you can make a marine-style florarium

Even in a French press kettle you can make a stylish florarium

From large vases-florariums you can create a whole composition

Florarium "Rainforest" can be arranged in a multifaceted vessel
You can use a variety of materials to decorate the surface of your garden.
Photo gallery: materials for decorating home desert or tropics

A small snag of original shape can become the basis for a forest or mountain florarium design

Pebbles, shells, pearls - and an ordinary florarium becomes a piece of the underwater kingdom

Layer artificial snow, ceramic figurines of forest animals - and your florarium turns into a Christmas fairy tale

Expanded clay is suitable not only for drainage, but also for decoration, and colored pebbles will complete the look

Dry driftwood goes well with any plants

Small and large stones will add a certain natural style to the landscape of the florarium

Small toy figurines made of ceramics, glass or plastic will give the florarium the atmosphere of a fairy-tale performance

Using colored sand you can create a multi-layer composition
Step-by-step master classes with photos
Preparation and a little more inspiration
The good thing about homemade florariums is that the container for them can be of any size, and you can easily find it at home. Therefore, we offer you several options for making a small flower world, from the simplest to the complex, requiring attention, patience and accuracy.
Simple tools will help you make a florarium:
- spoon;
- brush;
- tube or stick;
- tweezers.

Tools for working on a florarium: spoon, brush, tube, tweezers
It is important to know! So that your florarium not only looks beautiful, but also becomes comfortable home for plants living in it, consider the following ratios regarding the height of the vessel: 1 part drainage, 3 parts soil and 1 part material decorating the surface - small pebbles, coarse river sand, moss.
Photo gallery: surface design ideas

A minimum of plants, decoration - and you have in your hands a piece of semi-desert with a reminder of prehistoric oceans

Deciduous forest within the boundaries of the vessel

In the style of minimalism - stones and 1-2 plants

A combination of layers of soil and sand will help to achieve a stepped effect.

From moss alone you can create the look of a forest corner

Use large angular stones for decoration to create a rocky mountain effect.
In an aquarium or round vessel
The wide opening of the neck allows you to easily fill the container and place elements in it. You can use not only a round aquarium, but also a large wine glass or this cute and original drop-shaped hanging container.

Instead of a regular aquarium, you can use this original vessel
We will use it in the master class. You will need the following materials and tools:
- a suitable glass container with a volume of 1.5-2 liters;
- plants, for example, 1 stone rose and 2-3 peperomia or saxifrage bushes;
- soil that matches the plants;
- drainage (sand, small pebbles, expanded clay, broken brick);
- activated or charcoal;
- plants;
- decorative elements for decoration (figurines, houses, branches, driftwood);
- spatula or spoon, long tweezers, sprayer, watering can, scissors.

Prepare a vessel, soil, drainage materials, coal, selected plants, decor and necessary tools
Before you begin, prepare the selected container. It must be thoroughly washed, treated with boiling water and degreased with alcohol.
Progress:
- To begin, place drainage about 4 cm high at the bottom of the container. It may consist of coarse sand, expanded clay, pebbles, decorative stones or other similar materials.

Place a small layer of drainage on the bottom of the vessel
- Place activated carbon, either crushed or directly in tablets, on top of the drainage. You can replace it with charcoal. This product will prevent the formation of mold and rot in the future by absorbing chemicals supplied with water.

Place a layer of coal on top of the drainage
- Now fill in the moistened soil. For this florarium (with stone rose, saxifrage and peperomia), it is advisable to use a mixture of 1 part leaf soil, 1 part peat and 2 parts coarse sand. You don’t have to lay the coal in an additional layer, but simply mix it with the prepared soil. Tropical plants A ready-made substrate from a specialized store is more suitable. To make your florarium more decorative, try alternating the soil with layers of colored sand.

Cacti of many types
- Carefully level the soil layer. Using a spoon, make holes to accommodate the plants. The distance between them should be about 3 cm so that the roots growing over time do not interfere with each other.
- Now you need to remove the plants from the pots and carefully clean their roots from the soil. After this, take the bushes with tweezers one at a time and place them in the holes made. Sprinkle the roots with soil using a scoop or tablespoon. Plant the plants so that their leaves do not come into contact with the walls of the aquarium, otherwise over time they will begin to rot from the accumulated condensate.

Carefully place the plants in the soil, pressing down the soil so that the roots do not stick out.
- Gently spray the plants with a spray bottle. You can water the soil a little if you think it is a little dry. Place moss around the plants and add decorative ornaments if desired. In this florarium, pieces of bark or twigs of unusual shape will look good as an addition. In this case, moss serves not only to decorate and give a forest style to the composition; it will absorb excess moisture and regulate soil temperature.
Decorate the composition with moss, pebbles and figurines
Caring for the florarium is simple: provide it with enough diffused sunlight without access to direct sunlight, water as the soil dries.
In a large tall jar - for beginners
The larger the volume of the vessel and the wider its neck, the easier it is to create a florarium. You will need the following materials:
- jar with a volume of 3 liters or more;
- charcoal;
- soil from 1 part peat and 2 parts leaf soil;
- plants - asplenium or arachniodes, cryptanthus, ophiopogon, balsam;
- gloves;
- scoop;
- watering can.

Prepare a jar, plants, moss, soil and tools for work
Don't forget about hygiene and safety rules. Since you are working with soil and glass vessel, put on gloves on your hands.
Progress:
- Place a layer of charcoal about 5 cm thick on the bottom of the jar. Mix the remaining charcoal with the prepared soil.

Make a drainage layer from charcoal, mix the remains with the soil
- Start adding this mixture to the container in layers. Press the soil down firmly every 5 centimeters to prevent air pockets from forming.

Pour the soil into the jar, constantly pressing it down
- When the jar is half filled with soil, begin planting the selected plants. Maintain the required interval of 3-4 cm so that the bushes do not interfere with each other - the size of the jar allows this.

Plant plants in the ground so that they are a short distance from each other
- Make sure that all the roots are deep into the soil and do not stick out. Adjust the plants if necessary, then compact the soil tightly.

Compact the soil around the plants
- Place moss in between plants.

Now spread the moss onto the free areas of the surface
- Gently water the plants in the container. It is better to do this with a watering can with a thin spout, directly on the soil, so as not to damage the leaves (if water gets in, they can begin to rot, which will lead to fungus, mold, and the death of the entire composition). Place the florarium in a place with diffused lighting so that direct sunlight does not stimulate rapid plant growth. You don’t want to redo your florarium every 2-3 weeks, do you?

Water the planted plants with a watering can
- Next, you are only required to care for the plants in the florarium. Watering is needed no more than once a week, depending on the selected plants. You can also trim the leaves if they begin to grow beyond the jar.

Over time, simply trim off any leaves that extend beyond the boundaries of the container.
Semi-desert succulent in a candy bowl
This florarium with cacti and succulents is easy both to make and to care for. But it is unusually beautiful thanks to the combination of several types of cacti (gymnocalycium, echinopsis, milkweed, prickly pear) and stone rose - a plant called young.

A florarium with a semi-desert landscape in a vase is very beautiful and unpretentious
If you have the opportunity to use painted cacti, be sure to do so to add some color to the arrangement.

For this florarium, select several cacti and succulents
So, you will need:
- plants;
- a low cylindrical vase-candy bowl;
- soil for cacti and succulents;
- small pebbles or expanded clay for drainage and the top decorative layer.

A vase, plants, soil and expanded clay - everything you need for your semi-desert
Wash the vase in hot water, dry and degrease, then proceed to making the florarium.
Progress:

Cacti and succulents do not require frequent watering. On the contrary: the less water, the better they feel, and most importantly, they grow less, which is very important for limited size florarium. Therefore, caring for such a composition will be reduced to watering once every 1.5-2 months and removing dust from the surface.
Geometric garden
Nowadays, vessels of various complex geometric shapes are very fashionable - from a simple pyramid to a pentakisdodecahedron. They have many faces, and not always symmetrical and the same in size, which is why the figure takes on fantastic shapes. You can create such a vessel yourself, but you cannot do without certain special skills and tools. Therefore it is better to buy ready product, and apply your imagination directly to creating a florarium in it.

Polygonal vessels are great for creating a florarium
You will need:
- polygonal shaped vessel;
- succulents - young, cereus, sedum Morgana, antimime or others;
- moss (sphagnum);
- soil from leaf soil and river sand in equal proportions;
- drainage (expanded clay or small pebbles);
- decorative sand, pebbles, figurines.

Prepare a vessel, plants, moss, soil and tools
When choosing a container, decide immediately on which edge it will stand. The thickness of the soil layer and the number of plants that will fit in the florarium depend on this. The base of the composition - drainage and soil - should be no more than 1/4 of the entire vessel, and most importantly, its level should be below the hole in the container.
Progress:

Water the soil no more than once a month and, if necessary, wipe the leaves with a damp sponge to remove dust or spray them with a spray bottle. As the succulents grow, they will need to be replanted.
Microworld in a light bulb
This option is perhaps the most difficult. Before you start arranging internal space, you need to carefully prepare the vessel. And since this is a light bulb, some skills are needed, in particular in disassembling the base.
Florariums in a light bulb are usually closed. This way, a self-sufficient microclimate is created inside the container, ideal for any plants used.

Florariums in a light bulb - jewelry work
In addition to the light bulb itself, prepare the following tools:
- pliers;
- scissors;
- tweezers;
- screwdriver;
- protective glasses.

To work you will need pliers, scissors, tweezers, a screwdriver and glasses
And for the “filling” take:
- sand;
- any succulent plant - gasteria, aloe.
For safety reasons, be sure to wear safety glasses and begin disassembling the base.
Progress:
- Take the light bulb in left hand and carefully crumble the bottom of the plinth with pliers. It will give in easily, since it is made of fragile material.

Crush the bottom of the plinth with pliers
- Using a screwdriver, remove the spiral inside the light bulb.

Remove the spiral with a screwdriver
- Remove all internal fragments with tweezers.

Remove the remaining parts from the light bulb
- The light bulb is completely ready to place its contents.

The light bulb is ready for further action
- Before you start creating your landscaping, make a small stand to keep the light bulb stable. It could even be droplets of silicone glue.

Attach something to the light bulb as a stand to provide stability
- You can buy sand or collect it on the street. In any case, you need to rinse it well in running water. Do this until the water becomes completely clear.

If you pick up sand outside, be sure to wash it off
- Now pour sand into a baking tray and bake in the oven. This is mandatory, so you will destroy harmful microorganisms and mold spores.

Heat the sand to destroy mold and microorganisms
- Carefully pour a little sand (a layer of about 1-1.5 cm) inside the light bulb. To make it easier, use a funnel or a sheet of paper folded in half.

Pour some sand into the light bulb
- Using tweezers, place the moss on the sand and position it correctly using a thin stick. You can collect moss at your dacha or buy a package of dry plants at a flower shop. It does not require special care or watering.

Place moss on the sand
- Very carefully push the succulent inside the light bulb, be sure to root first so as not to damage the dense leaves. Using a thin stick, move the bush and press the roots into the sand.

Use tweezers to push the plant through and dig its roots into the sand.
So the little florarium in a light bulb is ready. You can add some more if you wish. decorative element, for example, a figurine.
This florarium requires almost no maintenance, since the shape of the light bulb ensures circulation required quantity air and moisture for the plant. The condensate produced is enough to maintain humidity at the proper level so that you do not have to water the plant. All you need to do is wipe the light bulb from dust from time to time.
As you can see, even such meticulous, almost jewelry-like work can be done!
Video: how to make a tiny florarium inside a light bulb
Video: instructions for making a florarium in a vase-glass with your own hands
Video: all the nuances of creating a florarium
The art of creating DIY florariums for succulents and other plants can be simple or very complex, but either way it's a great activity for the whole family. Parents and children will be happy to participate in it, and in the end you will get your own little cozy world, enclosed in transparent boundaries. Share with us your experience of growing plants in a confined space. Good luck and comfort to your home!


