Wall shelves can harmoniously complement the design of a room. The range of their purposes is very wide. Depending on the location and application options, the material for their manufacture is chosen and the design is thought through. Let’s take a closer look at what features should be taken into account before you start creating a wall shelf with your own hands, and what are the main stages of the process.
Variety of wall designs
The main purpose of a wall shelf is to place many small items, while organically combining the functions of storage and interior decoration. Depending on this, the installation option for the furniture structure is determined. There may be several of them:
- The most common placement method is to make wall form, when the product is attached to a wall, at the bottom of which there are often other pieces of furniture (sofa, bed or table).
- A do-it-yourself hanging shelf can be a unique highlight among wall structures. The key difference is the method of fastening: instead of traditional brackets and loops, ropes, chains and belts are used.
- Depending on the organization of the living space, from time to time there is a need to make a corner shelf. Moreover, in addition to the common way of using internal space, sometimes they harmoniously use external corner rooms.


With a little imagination, you can make a wall shelf structure with your own hands in various variations. The following models are widely used:
- What makes it easy to make with your own hands is a console - a shelf attached perpendicular to the wall.
- If desired, the structure is supplemented with side walls and the back is covered.
- To create a unique rack with your own hands, it is enough to combine several single consoles together.
- Recently, combined specimens with an unusual arrangement of horizontal and vertical walls have gained wide popularity.
- Numerous decorative models of wall shelves are distinguished by their originality. Their main function is to create an exclusive design element in accordance with the chosen style.

Occasionally, the façade of a do-it-yourself structure is supplemented with glass. This is practical when storing items that do not have a decorative function. A small part of the designs of wall shelves that you can design with your own hands is presented in the drawings below:


Nuances of choosing material when designing
No construction work is complete without a preliminary plan.
Note! Before you start designing a shelf with your own hands, you need to decide on the material for the base.
When choosing it, take into account the place where the furniture structure will be installed and its main functions. The scope of application of wall shelves is as follows:
- Book lovers and students will definitely find bookshelves based on wood and its derivatives useful.
- For storing jars of spices or decorative items(which are original plates or exclusive mugs), use narrow shelves, equipped with low sides. In this case, it is most appropriate to use wood for manufacturing, although depending on the chosen design, glass specimens can also look harmonious.
- The arrangement of a bathroom is not complete without installing glass shelves, complemented by chrome elements. This is due to the main requirement for the material - it must have a high level of moisture resistance.
- Universal shelves allow you to be creative with the choice of material when making your own. They are intended for setting flowers or various souvenirs, and the base is selected taking into account the overall design of the room. It could be a classic tree, durable metal, complemented with forged elements or glass, creating the effect of lightness.

Mounting options
The type of fastening plays an important role in the design wall structure shelves. By exploring the fixation options, it will be easier for you to determine the most suitable method.
Classic hinges
The traditional way to fasten wall shelves is to use hinges. They are optimally suited for products made of wood and its derivatives. An important condition is that the material must be of sufficient thickness. The whole process takes place in several stages:
- The hinges are fixed to the side of the furniture structure with self-tapping screws.
- After measuring the distance between the holes, the required length is marked on the wall.
Attention ! Compliance horizontal line is important point when fixing a wall shelf.
- Holes are drilled at the designated point required diameter, intended for inserting a dowel.
- A self-tapping screw with a neat head is screwed into the hammered dowel, onto which the shelf is hung.

Fastening glass shelves
The use of loops is not suitable for all materials. Installation of wall glass shelves is carried out using special fasteners for fragile products. The fasteners are made of two parts and are often supplemented with elastic gaskets; the glass shelf is inserted between them. The lower part of the device for reliable fixation of the wall structure is equipped with a clamping screw.
A common model of fastening for a glass shelf is a specimen called pelican, capable of holding a wall structure with a thickness of 8 to 34 mm. In addition to glass, it can be used to fasten other materials with similar dimensions.

Concealed mounting and decorative brackets
The hidden installation of a wall shelf is distinguished by its simplicity and originality. In this case, the fasteners are completely disguised. The essence of this method is as follows:
- at the end wooden structure a recess is prepared for the pin and the body of the fastener;
- The mensolo holder is fixed to the wall, after which the shelf is put on it.


Create individual design rooms allow wall shelves with decorative brackets. They can be made in a production way or refer to exclusive copies. Photos of wall shelves decorated with do-it-yourself brackets are presented below:


Manufacturing process
Depending on the chosen design and material, the process of making a wall shelf yourself has its own characteristics.
Tree
If you want to make an original wooden wall shelf with your own hands, you will need:
- Base material. In addition to natural wood, you can take MDF, chipboard or gypsum fiber board, this will greatly facilitate the surface treatment process.
- A jigsaw that can replace a hacksaw.
- Drill and grinder.
- Ruler with pencil.
- Building level.
- Wood glue or liquid nails.
- Varnish or stain.
- Brackets, dowels and screws.
The entire process of making a wall shelf with your own hands is simple. After drawing up a plan or taking the finished project as a basis, the dimensions of the structure are transferred to the material. Saw wooden base better with a jigsaw which provides a perfectly even cut.
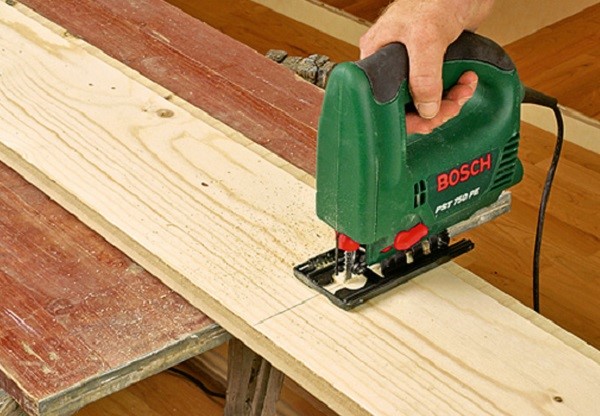
All elements of the wooden shelf are thoroughly sanded; if there are significant defects, I use wood putty. On initial stage You will need sandpaper No. 40; sanding paper No. 80 and 120 will allow you to get a perfectly smooth surface.

Connect the parts of the wall structure liquid nails or wood glue.

Marks are made on the shelf and wall for fastening. The brackets are connected to the shelf, and a recess is made in the wall using a drill, after which the dowels are inserted.

At the final stage, screws are screwed in and the wall shelf is hung.

Glass
It is better to equip rooms with a small area with glass wall shelves, which create an atmosphere of lightness and visually increase the space. If you don’t have enough experience working with glass, it is better to contact specialists who, while cutting the fragile material, will perform high-quality processing of the sections. The following steps for installing a wall shelf can be done by anyone capable of holding a tool in their hands, and are similar to the procedure for attaching a wooden structure:
- Using a level, mark the mounting points on the wall.
- The Pelican design requires two dowels.
- After removal decorative overlay, you will find holes where you need to screw in fasteners.
- The decorative trim is put in place and the glass is inserted.
- At the final stage, tighten the screw.
This completes the installation of the glass wall structure.


Conclusion
Proper combination of a wall shelf with other furnishings will allow you to create a harmonious room design, distinguished by individuality.
Bookshelves They assemble classic ones, made of particle boards, and unusual ones, for which they use the material at hand, on the wall with their own hands. They turn out no worse than factory products, and sometimes surpass them in design. To build beautiful shelf, need an idea, suitable material and tool.
What you need to make a book shelf on the wall with your own hands
There may be many ideas, but not all will be implemented. This depends on the available material. Most often, bookcases and shelves are assembled from the following raw materials:
You can add cardboard to the list of commonly used materials. There are interesting ideas for DIY bookshelves based on the use of packaging boxes. When using separate sheets of cardboard, voluminous stands are glued together to support massive books.
Drawings of bookshelves with dimensions
When creating an exclusive designer model the drawing will have to be developed individually. If the goal is to assemble an ordinary book stand or wall shelf, then you can use ready-made diagrams from the Internet.
However, it is important to take into account that assembling a shelf is often not started for the sake of interest. Ready design It’s easier to buy in a store, but it doesn’t always fit in size or configuration. If the goal is to position the bookshelf on limited space, in a corner or other difficult area, you will have to develop the drawing yourself.
 A spacious bookshelf, divided in the center by a pencil case, will fit into a student’s room
  A stepped bookshelf would look good flight of stairs
  On such a shelf you can place books, a TV, DVD player
Types of shelves for books with your own hands
There is a wide variety of shelves. They differ in shape, size, and installation method. There are huge bookshelves that cover the entire wall and small stands for several books.
DIY wall bookshelf
The classic version of the design is designed for hanging on the wall. Usually such shelves are not multi-tiered. Models with 1-3 tiers are more common. Distinctive feature is the presence of strong hinges, which are used to hang the shelf on the brackets.
 The hanging bookshelf has loops on the back for hanging.
When assembling a hanging book shelf with your own hands, the hinges are placed no further than 1 m from each other. They are secured not only to the top horizontal panel, but also to the side vertical panel. Otherwise, under the book mass horizontal panel The chipboard will delaminate and the shelf will break.
DIY table shelf for books
The design is more like a book stand. Install it on your desktop to have quick access to important documents. The shelf should occupy unused countertop space, otherwise it will simply get in the way.
 The book stand is suitable for a student’s office or room
DIY floor shelf for books
Floor models it would be more correct to call them bookshelves. The shelves are usually multi-tiered and high. The width can be the entire wall or narrow in the form of a column. The bookcase is placed on legs or simply on the floor without them. The shelf is usually not attached to the wall, but if the situation requires it, it is secured with brackets to protect it from tipping over.
 Floor bookshelves are not always fixed to the wall
DIY corner shelf for books
Depending on the installation method, the corner bookshelf can be wall-mounted or floor-mounted. Its main difference is its shape. The bookshelf is placed in the corner, not only on the inside, but also on the outside. Book wall models are attached with hinges and brackets to both adjacent walls.
 A corner bookshelf is placed in the inner and outer corners
A corner bookshelf saves space. A piece of furniture is used to fill an empty corner where the installation of another attribute is inappropriate.
How to make a bookshelf with your own hands
Before you start making a shelf, you need to see what material is available. After this, they begin to develop the project and look for an idea. They immediately decide on the location, since the size and shape of the future structure will depend on this. When all the nuances are clarified, they begin to bring the idea to life.
DIY book shelf made of wood
To assemble the shelf you will need an edged polished board 15-20 mm thick. Pine and other wood coniferous species It's better not to use it. Over time, such boards will begin to release glue. In addition to the obscene appearance of the shelf itself, the book collection will be damaged.
 The classic scheme is based on the assembly of a regular shelf rectangular shape
It is easier to assemble a classic rectangular structure from wood. The process consists of the following steps:
- To assemble the body, 4 blanks are first sawed off. You should get paired elements. In the diagram they are indicated by the letters “A”, “B”. A rectangle is assembled from the boards. Self-tapping screws are used for connections, but it is better to take furniture screws - confirmed ones. With such fasteners ready product looks better. A hole is drilled for each screw, otherwise the workpiece will crack.
- When the case is assembled, it needs to be given an exact rectangular shape and fixed so that distortion does not occur during operation. There are 2 options here. If the back side is closed, then it is sewn up with a sheet of fiberboard. In the diagram, the element is designated by the letter “C”. When is it planned to create a bookstore? open shelf, the back side is not sutured. To prevent the body from warping, metal flat corners are attached to each corner at the end of adjacent boards with self-tapping screws. These elements are used on wooden window frames.
- When the case is ready, the locations of the shelves are marked on the inside of the side posts. In the diagram they are indicated by the letters “D”, “H”. The distance between them, as well as their number, is determined individually. It is not necessary to use a diagram here.
- The shelves can be made removable or fixed. In the first option, blind holes are drilled from the inside on the side posts, chips are inserted, and a board is laid on them. In the second option, through holes are drilled. The shelf is fixed to the side posts with self-tapping screws or furniture screws.
The wooden structure is subjected to final sanding. The wood is decorated with varnish, stain, and acrylic paints.
DIY plywood bookshelf
The advantage of plywood is that the sheets are wide compared to the board. There is room for your imagination to run wild here. However, plywood tends to delaminate. Each node will have to be reinforced with overhead metal corners and plates.
 For a plywood bookshelf, small cell sizes are acceptable, since the material tends to sag and delaminate under load
You can use plywood to build a book shelf for your children's room with your own hands. To do this, you will first need to draw a pattern on paper. Each element is cut out and transferred to plywood sheet. After marking, the fragments are cut out with a jigsaw. The ends are carefully polished, since after sawing there will be a lot of burrs.
 The easiest way is to cut out the elements for a plywood bookshelf with a classic rectangular shape.
The cut elements are connected using the provided grooves using the designer’s method. On the back side, the nodes at the connection points are reinforced with metal corners or plates. If a back wall is provided, then simply nail a piece of fiberboard with small nails. Decorate plywood with paints and varnishes or paste over colored self-adhesive film.
Homemade glass book shelf
For glass shelves, it is optimal to use material with a thickness of 5 mm or more. Cutting thick glass is difficult and requires experience. First, markings are applied to the sheet with a marker. The glass is placed perfectly flat surface. The glass cutter is pressed firmly against the sheet and one line is drawn. It is not advisable to repeat the action. If you get a few scratches, the edge will crumble or the crack will go all over the glass.
 Glass cutting begins with markings
The glass is moved so that the scratch cut by the glass cutter is on the edge of the table. From under the bottom, the sheet is first tapped with the handle of a glass cutter. A crack should follow the scratch. When it spreads over its entire length, they try to break the glass with a sharp pressure of the hand. If it fails, the tapping procedure is repeated.
When the element is cut, the edge of the glass is rounded with a grinder. Further actions are aimed at creating fasteners. Special brackets are purchased in the store. They are attached to the wall with dowels. The glass sheet is fixed directly onto the brackets themselves.
 Special brackets are used to fix the glass bookshelf.
DIY book shelf made of cardboard
Craftsmen create voluminous shelves from thick sheets of cardboard complex shape. To make them, patterns are used, which are often made independently. To go the simple route, you will need several cardboard boxes. They are used to assemble a bookcase in a couple of hours.
Important! The boxes are selected according to size so that a book can fit inside freely.
 The boxes are connected to each other with metal clamps
The process of assembling a bookcase is simple. The boxes have opening shelves that act as lids that are cut off. They are installed on top of each other in a pyramid. Each box is a separate cell of the bookcase. The boxes are fastened together with metal clamps. The finished bookcase is painted with acrylic paint. For decoration, you can cover it with fabric, self-adhesive film, or wallpaper. The structure is installed on the floor. You cannot hang it, otherwise such a shelf will break under the weight of books.
DIY book shelf made of chipboard
The technology for assembling a bookshelf is exactly the same as in the version with a board. The difference is the material. It is advisable to use chipboard with a laminated surface. Fragments can be cut from an old disassembled cabinet.
 The best material is a laminated particle board
After sawing the chipboard, an unsightly edge remains that needs to be decorated. First, the end of the slab is ground. The next step is gluing a special edge tape. To do this, heat the iron by setting the temperature regulator to the middle position. First, they try to glue a piece of edge onto an unnecessary piece of chipboard. The tape is laid on the workpiece, covered with a cotton cloth, and ironed. If the edge has not melted and stuck securely, the temperature has been chosen correctly.
The tape is glued to all front ends of the bookshelf. The protruding edges on both sides are carefully trimmed with a sharp knife. If remains visible white stripe, it is rubbed with fine-grained sandpaper. After pasting all the blanks, the shelf is assembled according to the drawing.
DIY invisible book shelf
An invisible book shelf option is interesting element decor. Visually, it seems that the books near the wall are hanging in the air. To work from materials you only need a metal corner and dowels.
Important! One of the sides metal corner must be long so that it can hold books.
 The corners are fixed at the same level
There are two design options. In the first case, two corners are attached with dowels to the wall at the same level. The distance between them is a couple of centimeters less than the width of the books. Long sides corners protrude forward. Books are placed on them. The downside of the design is the fact that the shelf is not completely invisible. The protruding planes of the corners are visible from below.
 The corner becomes invisible if it is embedded inside a book
The second option allows you to create a completely invisible shelf, but this will require an unnecessary book. The protruding plate of the corner is hidden under the binding. To prevent the book from sliding out, self-tapping screws are driven directly into it over its entire thickness. A stack is placed on a fixed book stand necessary books.
DIY creative bookshelf
In a children's room or on the veranda you can create a creative hanging shelf, just don’t hang her up in the usual way, but with ropes. To make it you will need two boards. You can use chipboard and plywood. Cut out two identical rectangles. The parts are stacked on top of each other, and holes are drilled in the corners.
 To ensure that the holes on the two workpieces coincide, the parts are stacked before drilling and clamped with a clamp
The rope is threaded into each hole of the workpiece, and restrictive knots are tied. They will hold the shelves at a certain height. The free ends of the rope are connected into one rope and tied into a large knot. This part is used to hang the shelf on a bracket fixed to the ceiling.
 To hang a creative shelf, a bracket is screwed into the ceiling
DIY bookshelf from scrap materials
A beautiful shelf will be made from the laminate sheets left after the renovation. However, due to the weak strength of the material, the design is made for floor or tabletop installation. You cannot drill into the laminate, as it will crumble. The same goes for self-tapping screws. There is only one way out - glue with a hot gun.
 Laminate elements are glued with a hot gun
Use a jigsaw to cut the pieces to the required length. Since the laminate is thin, so that the shelves do not sag, spacers are installed in the form of vertical partitions. On the back side, it is also advisable to secure at least one sheet vertically for rigidity. In addition, it will prevent the structure from warping, otherwise it could collapse like a house of cards.
Homemade bookshelf decor
Decorating the structure allows you to give it a complete look and fit it into the surrounding environment in an original way. Ideas can still be taken from photos of bookshelves, with your own hands. decorated professional designers and ordinary amateurs.
 A flower, a lamp, and other objects that add originality are placed next to the books.
  An unusual shelf in the form of a ribbon is illuminated with a directed beam of light from small spotlights
  A mirror will fit beautifully between a group of shelves
Conclusion
You can assemble bookshelves on the wall with your own hands in a couple of hours. More time needs to be spent on decor. If this step is ignored, the structure will stand out as an ugly spot among the decor.
In order for the interior to “heal”, it is necessary to fill it not only with furniture and textiles, but also with all kinds of accessories.
Books, souvenirs brought from travel, flowers, favorite framed photos, and various objects dear to the heart should take their place in the interior.
Various shelves, niches, and racks come to the rescue, which are precisely designed for storing such items.
Today we'll talk about various options placing shelves that you can make yourself or purchase in a retail chain.
Types of shelves
A shelf is a piece of furniture made from different types materials, without a front wall, designed for storing various interior items.
Depending on their location in the interior, shelves can be wall-mounted, hanging or corner.
- A wall shelf is attached to the wall and is often located above some pieces of furniture (above a table, sofa, bed).
- The suspended shelf is attached to the ceiling using cables, belts, chains and other devices.
- The corner shelf is located between two adjacent walls and is attached to both the walls and the ceiling.
Based on the materials from which the shelves are made, they can be divided into:
- wooden;
- metal;
- glass;
- shelves made of MDF, chipboard;
- shelves made of gypsum fiber sheets;
- combined (combining two or more materials).
By design, the shelves can be cantilever, with or without side walls, with back wall, vertical, horizontal, sliding, multi-tiered, with right angles, inclined, rounded.
The options can be listed for a long time, because for each interior with its own design, its own type of shelves is selected, which becomes not only a storage place, but also a kind of accent, standing out against the background of the walls with color, texture, complemented by various lighting.
Wall shelves in a house or apartment
In almost every children's room you can find a wall shelf, especially if the child living in this room school age. The shelf usually houses textbooks, notebooks, various school supplies and toys. Often the shelves are made of the same material as the furniture.

The shelf can be secured to corners, brackets (open and hidden), and hinges. The mounting option for wall shelves depends on the chosen interior style.

Mounting on a bracket using a pin. The shelf fits tightly onto the pin. The thickness of such a shelf exceeds 25 mm. The design looks laconic, without frills, and is often used in minimalist interiors.

Wall shelves on brackets that are attached to the wall. The shelf itself is mounted on top of the brackets.

Often brackets carry not only a structural load, but are also decorative elements. Such shelves look good in a country style interior.

An excellent solution for wall shelves for children's rooms. The designs are made in the form of letters. Bright color accents not only create mood, but also contribute to the development of the child.

I want to make the children's room brighter than other rooms. Fill it with unusual details characteristic of childhood, create a cozy fairy-tale atmosphere for your kids. Unusually shaped shelves in the shape of a cloud, tree or flower are a godsend for loving parents.

They can be made from plywood by cutting out blanks with a jigsaw according to a pre-made pattern, assembling the structure and painting it in the desired color.

IN Lately It is no longer fashionable to clutter the living room with an abundance of cabinet furniture. The “walls” that could be found in almost any apartment of the Soviet period are a thing of the past. Modern living rooms besides upholstered furniture filled with various racks and shelves, adding spectacular lighting.

Wall shelves are made from various materials. Designs made from plasterboard are popular and are not difficult to make with your own hands. Future design marked on the wall, to which metal or wooden guides are then mounted and sheathed with gypsum fiber sheets. The surface of the shelves is puttied and painted.

A shelf made of plasterboard in the form of a console in the color of the wall to which it is attached looks very light and does not clutter up the room.

You can play up the corners of the rooms with corner shelves. The design will fit perfectly into both internal corner two adjacent walls, and at the junction of the walls outside. An openwork metal corner shelf is an interior decoration.

Interior and furniture designers offer a large number of original wall shelves that can become bright accent in the interior of the living room. We hope that the presented photo gallery will inspire you to make a wall shelf with your own hands. You can learn ready-made ideas or create your own design to suit your taste.
An unusual decorative shelf in the form of a tree branch against the background of a monochrome wall.

Frame shelves are not so much functional as they are wall decoration. However, such a structure can accommodate several interior items.


A curved shelf made of wooden blocks, as if it had bent under the weight of books.

And this shelf, like the bright sun, will always warm you with its warmth, even in dull rainy weather.

Original round shelves can be made from plastic pipes of various diameters.

Shelf from metal pipes suitable for loft style interiors.

A budget option suspended structure combines wooden shelves strung on ropes. The shelf can be attached both to the ceiling and to the wall on a bracket.

On a glass shelf you can place a collection of souvenirs brought from travels around different countries. This design will not draw attention to itself; the objects placed on it will be visible to the eye.

An original combined wall shelf made of metal and wood for flowers in the form of a ladder will decorate any room.

Wall shelves find their place not only in living rooms. In the kitchen, the structure can become a storage place for kitchen utensils, books with cooking recipes, or simply a wall decoration.

A wooden wall shelf made from a box is appropriate in a country-style kitchen interior.


Metal wall shelves are often used in bathrooms. They are made from of stainless steel, therefore not subject to corrosion. You can find a wide variety of them on sale. In many models, metal is combined with glass.

The corner glass shelf for the bathroom is mounted using a special bracket consisting of two parts: a base and a movable console. The glass is clamped between the parts of the bracket when the screw located at the bottom of the mount is tightened. The bracket is first attached to the wall, and only then the glass shelf is strung.

Arrangement of wardrobe shelves on brackets and metal racks. The racks are fixed to the walls, floor and ceiling.

The shelves, hung with brackets on perforated guides, can be easily removed and installed to the desired height.

It is perhaps difficult to find a home that does not have at least one wall shelf. Today, this piece of furniture combines convenience, beauty, and functionality. Look for your solution, arrange the interior, enjoy the work done.
Handmade furniture will add personality and creativity to your home. By making, for example, wall shelves yourself, you can make your wishes and preferences come true as much as possible by choosing the desired shape, color, material and size of the product.
In addition to the fact that they will save room space, freeing it from bulky cabinets, shelves can also become the highlight of the entire interior. So let's figure out how to make shelves on the wall with your own hands.
Wall shelves in the interior
Wall shelves are an indispensable attribute in any home; they are one of the best ways to diversify the interior and save room space; in addition, they are also very functional. For example, in the living room they will serve to store books, photographs, boxes or other small items. In the bathroom it's best place for storage detergents and cosmetics. In the hallway, shelves on the wall are useful for storing hats, gloves and keys. In addition, you can easily make wall shelves with your own hands; this will require a little imagination and minimal specific skills. If you know how to drive a nail into a wall, then building a shelf on the wall will not be difficult for you.

Types of Wall Shelves
The variety of materials, shapes and sizes has led to the following classification of wall shelves:
- classic
This type shelves are the most common due to their simplicity, aesthetic appearance and ease of installation. They represent a huge flight of fancy: from simple square to creative asymmetrical shapes.

- corner
This type of wall shelves differs in the method of fastening - it is carried out on adjacent adjacent walls. Most often they are mounted in utility rooms and bathrooms.

- hanging
This original way creating a shelf involves attaching a simple structure to the ceiling using cables or vertical racks.ї

- floor
This wall shelf is a floor support design. This type of product is especially relevant in hallways, as well as large rooms, where you don’t have to think about wasting space.

- open and closed shelves on the wall
Wall shelves can be designed, for example, with or without glass.

Wall shelf mounts
- reliable fixation
Fastening here is carried out using construction dowels or anchors to the walls. This type of fixation is characterized by great reliability and load capacity. The disadvantage is that if you want to dismantle this wall shelf, some problems will arise.
- removable mount
This fixation is also quite reliable, but here the fastening is done using staples and mounting hooks.
- modular or movable fixation
Here, the lower tier of the wall shelf serves as a support for the upper one or vice versa. This design allows for the most optimal use of vertical or horizontal space.
Wall shelf materials
- Wood: plywood, chipboard, MDF and others. This material is relatively easy to work with, it looks beautiful, natural and impressive, and its service life is quite long, especially if pre-processed.

- Plastic. This material is the most versatile; it can imitate both wood and stone, while eliminating their shortcomings.
- Metal. Such wall shelves will be very strong, reliable and durable, but classic interior They will fit in with difficulty. In addition, corrosion can also be a problem, so metal products Special handling and conditions will be required.
- Glass. Transparent wall shelves will create an atmosphere of lightness and comfort in your home. Of course, it will be quite difficult to make a glass structure with your own hands, but if you nevertheless decide to do all the work yourself, then you will have to work with glass for quite a long time and very carefully, especially if various cutouts are planned in the shelf design.

Preparing to create shelves
Before making a shelf, each creator must clearly think through his plan so that the end result does not become a disappointment. Having imagined the shape of the product and its location, it would be advisable to measure the proportionality of the size of the shelf and the place where it will be fixed. Then we draw conditional drawing of the item being manufactured and already in the drawing we think through every detail of it. For initial experience, it is recommended to make an ordinary shelf, which will greatly simplify the process and show the main disadvantages of its installation and manufacture, if any.
The process of making a shelf cannot be called long, but it is not short either. The most pleasant moment in this matter is completing the installation and checking its functionality. So that the finish of the work does not turn out to be a disappointment, you must clearly understand what will be on the product. Things or objects of the same volume can have completely different weights. Therefore, if you are not sure what will stand on it or you have several options that differ significantly in weight, then it would be best to create a shelf for increased loads. Reinforced design the creation technology is no different from the usual one, everything is the same, only you need to use more durable materials. If it is a wooden shelf, you should take thicker boards and a more reliable mounting frame.
But not every one of you will want to make a wooden shelf, since there are still many materials that allow you to create this item from them. For example, a metal shelf will benefit everyone in terms of reliability possible options, but its creation and the creation of its fastening is not so simple, since metal, the hardest of all materials, can be processed.
Tools you may need
To create a wall shelf you will need:
- screwdriver;
- drill
- sandpaper or sanding machine;
- level;
- self-tapping screws;
- screws or small nails;
- pencil and ruler;
- brackets;
- dowels;
- of course, consumables for shelves (wooden boards, metal or plastic).
Stages of creating a wooden shelf
Having decided to make wooden shelves, you should pay special attention to the materials, namely their preparation. For the durability and reliability of the structure, the board with which we create it must be dry, but if it’s the other way around, then at the moment of drying the object begins to warp, which will significantly affect the shape and strength. It is best to dry the board in stacks and with the help of cinder blocks located evenly on the surface of the board. If you already have a dried suitable workpiece, then it is imperative that you sand it thoroughly. This will not only cultivate your shelf, but also prepare it for next stage. While sanding the board, it will be very easy for you to determine how well it is dried. Sandpaper that clogs quickly indicates moisture in the wood fibers.
An example of creating a shelf in the shape of a honeycomb:

1.Set the cutting angle of the saw to 30 degrees, which will be used throughout the entire project.
2. Having a figured picket fence, you, to make the board rectangular in shape, cut off decorative element and with this you prepare the first edge.
3. Turning the board over, measure 300 mm from the finished edge.
4. At the marked place, make a second cut, subsequently obtaining the first element of 15.

5.After making all 15 elements, make sure that they all match each other.
6.After this, you check the joints of the parts by simply placing a circle of them next to each other on the floor.
7.The next step will be gluing. Apply glue to the edge of the workpiece.
8.After a few seconds, press the parts for a while.

9.Now, at an angle of 90 degrees, we drill a hole with a 1.2 mm drill to prevent possible cracking and make it easier to screw in the screws.
10. Connect the elements together.
11.Assemble all sections using steps 7-10.
12.Having stacked all the shelf blocks, drill 2 holes side by side, avoiding the already screwed screws, and then twist them.

13.To install internal shelves, it is necessary to measure the distance inside and make cuts at the appropriate angle, and then fasten them.
14.At the end, you need to carefully sand the edges with sandpaper. 
After sanding comes the moment of coating with paints and varnishes. This will not only give the shelf its appearance, but also prevent the wood from darkening. Many people cover wall shelves with stain, because in this case they manage to preserve the appearance of wood, but varnish is also very popular in this matter, after which it also preserves original appearance with shine effect. After all the materials have dried, you can begin assembling the entire structure.
Hanging a shelf on the wall
The first thing we need is an 8 mm or 10 mm drill, with which we will drill the wall, and after that we will hammer in a dowel and screw the bracket for our shelves.
The next step is to test the strength of the bracket using the force method, which will make it clear how firmly the entire object will hold.
IN further actions It will be difficult to do without an assistant. Having attached the structure to the drilled bracket, you need to center the shelf and mark the place for the second mounting hole. Then we remove the shelf and install the second bracket, not forgetting to check its strength.
At the final stage, we hang our creation on the wall and it’s ready.
In conclusion, I would like to talk about some more important nuances.
- Don't skimp on additional material, because then it can play a cruel joke on you
- The length of the nail dowel should be at least 6 centimeters, but no more than 10
- Before installing any of your products, it is worth examining the wall, namely what material it is made of. In a brick wall it is worth drilling holes with a diameter smaller than the diameter of the dowel-nail. There are separate dowels for each coating, so when purchasing, it is better to contact a specialist.
Creative wall shelves made of books
These wall shelves are very original and at the same time require minimal financial costs. To build them, you need to purchase screws, dowels, two large and one small bracket. You will also need a pencil, ruler, electric drill for drilling holes and, of course, hardback books. Initially, the intended location of the shelves should be marked on the wall. Then brackets are attached - at the bottom of each shelf there are two large ones at a distance of the length of a book, and in the middle there is a small one, distant from the other two by the thickness of the book. A shelf is inserted between the fasteners; it should be tightly clamped between them.

Such a shelf is unlikely to withstand large elements, but it will come in handy more than ever in a schoolchild or student’s room.
Original shelves on the wall - a second life for old things
If you want to organize an original shelf in your room, look around, you will probably find many elements that are perfect for this role. Old boxes, musical instruments, bottles or other unnecessary things can be used for personal gain.
If you adore music, and you have an outdated guitar in your house, then why not hang it on the wall, and not just, but with benefit. To do this, you will need to “gut” it, but “the game is worth the candle.”

If you have a retro-style interior, then a shelf from an old TV will be just right. Freeing everything inner space, such a shelf will be an excellent container for books and photographs.

You have old licks in the house and you don't know what to do with them. Do not throw them away under any circumstances; they will perfectly serve as wall shelves.
If you have organized a country style in your room, then a wall shelf made of small stairs. Yes, yes...exactly from the stairs. Only it should be placed not vertically, but horizontally. If you think through everything carefully, then no additional manipulations will be required to ensure that the items stand firmly on such a shelf.

Shelves on the wall made of fabric will look very impressive. For this you will need dense material, for example, tapestry or linen, wooden sticks and brackets. Sew fabric pockets, fasten them to sticks and then to the wall.
By making these wall shelves from skateboards, a boy’s nursery will turn into his favorite place.

As you can see, when creating wall shelves you can use the most extraordinary ideas and the most unusual things. Imagine, experiment, and then you can create an interior that you and your guests will never be indifferent to.
Shelves are often used not only to complement and decorate the overall interior of the room, but also for a clearer and more expedient organization of space. Thanks to their use, the apartment owner has the opportunity to conveniently arrange a huge number of small things that would simply get lost in closets.
Today there are a lot of products on the market various models which are made from different materials. They also differ in design.

You can choose not only products with classic design, but also ultra-modern designs.

But more and more often people prefer to make such interior details themselves. Wondering how to make a shelf with their own hands, they re-read a lot of literature and look through many catalogs.

However, this does not mean that self-production The shelves are complex and it is beyond the capabilities of a person who does not have special skills. No, that's not true at all.

Familiarization with the literature in this case is necessary in order to create a product with beautiful design, which will fit into general interior. Let's take a closer look at what kind of shelves there are.
Types of shelves
Any specialist will tell you that before you start creating a product, you need to decide for yourself what kind of design you want to get and whether it will be combined with the interior. And only after that you can start creating the product.

After all, for a house decorated in a classically styled style, it is completely unacceptable to use trendy and modern shelves. They will look extremely ridiculous.


The most popular and widely known subtype of shelves is the classic shelf. This is due to the fact that it is quite easy to install, and appearance, thanks to its simplicity, it seems refined and sophisticated.
Both open and closed shelves are used successfully. Closed products are most often used for decoration and installation in rooms decorated in more modern styles. Glass and sometimes plastic are used to construct them.

Open structures can be used both in modernly decorated houses and in apartments with a classic design. Over the past few years, this particular type of shelf has gained enormous popularity and is therefore gradually replacing the classic options.

IN small rooms can be seen quite often corner shelves, which have a special method of fastening. They are mounted on adjacent walls that are adjacent to each other. They are most often used in bathrooms, kitchens and utility rooms.

In addition to the above types of shelves that are mounted on the wall, there are suspended and floor-mounted structures. Hanging shelves are mounted in an unconventional way.

They are installed using cables and vertical posts, and attached directly to the ceiling. This mount looks quite unusual and original.

Floor structures are most often used in hallways. After all, hand-made floor shelves for shoes not only look beautiful, but also help you organize the space of a small hallway. At the same time, making them is quite simple.
How to make a simple shelf?
To create the claimed product, you should purchase or prepare some tools and materials in advance. As connecting elements, you can use whatever suits you best. But the most popular are ordinary screws, brackets and dowels.
Note!


For example, let's take a photo of the shelves with our own hands, which is presented below. It shows a product with the following parameters: width 250 mm, height 300 mm, length 1100 mm. For convenience, the manufacturing process will be divided into stages.
Stages of work
At the first stage, you need to complete the markup. To do this, you should lay the boards on a table or any other flat surface and transfer the measurements from the drawings. The side walls must be exactly 268 mm high.

This marking is optimal because the side walls will be located between the two parts.

The second stage requires cutting the boards. To get smooth and neat cuts, you need to use a jigsaw. After cutting, you will end up with 2 fairly long pieces and 2 shorter ones.

At the third stage, you can begin processing the resulting workpieces. The resulting sections should be coated with a special protective varnish or stain, having previously sanded them.

Note!

If you only plan to paint the shelf, you can get by with treating it with a regular antiseptic primer. This way you will not only increase the service life, but also achieve a more uniform distribution of paint.

At the fourth stage of making a wooden shelf with your own hands, you begin to directly assemble it. The bottom board should be laid on a flat surface. Step back 8 mm from the ends of the workpiece and draw two lines parallel to the cuts.
2 points should be marked on them with a distance of 5 cm from the edge. At the marked points it is necessary to drill holes for self-tapping screws. The same manipulations must be done with the second workpiece.

After this, you should install the side blanks on the lower section of the board and secure them. Once you are done with attaching the side panels, proceed to install the top panel and secure it.

At the fifth stage, you should attach the brackets to the ends of the side panels, and make several holes in the wall for the dowels. After this, screw in the screws so that they protrude by 5 mm. And now your shelf is ready.

You can make acoustic shelves in the same way, but you need to take into account the size of the equipment itself. Measurements should be taken carefully, because if you make a mistake, the work will have to start again.
Note!


DIY photo of shelves


