Today every consumer pays Special attention arrangement of your life. And in this matter, even a small thing can play a dominant role.
It would seem, at first glance, that there is a ceiling plinth, what could be so special about it, that there would be a separate article about it. But it allows you not only to make the interior of the room unusual, but also makes it possible to hide existing defects, creating and visually leveling an uneven angle between the ceiling and the wall.
Design possibilities of skirting boards
Depending on parameters ceiling plinth, you can perform the visual illusion of decreasing or increasing space.
By choosing colors and textures, you can, for example, accentuate the ceiling of a room or vice versa.
Foam plastic skirting boards can be painted the same shade as the ceiling to create a visual absence of borders, or, conversely, bright colors fix your eyes on the baseboard when there is such a need.
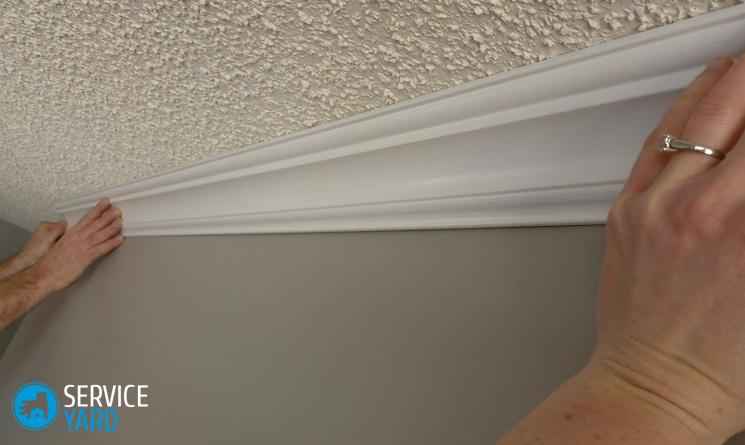
You should start installing the plinth only after completing preparatory work for leveling, puttying and priming the walls and the ceiling itself.
When there is wallpaper on the surfaces of the walls, they should be pasted before installing the baseboards, otherwise you will then have to apply the wallpaper under the product, and this is a painstaking procedure. To work you should stock up assembly adhesive, a special pistol, a knife, a miter box (they use it to make precise angles), a hacksaw equipped with fine teeth, and acrylic sealant.
Installation process
Glue the ceiling plinth made of polystyrene foam, starting from any corner.
So, using a miter box and a hacksaw, you need to make forty-five degree angles on the material. Then apply glue to the surfaces that will come into contact with the wall and ceiling.
It should be taken into account that when uneven surface When gluing, you will have to use something to secure the plinth in places where it may sag.
After fixing the ceiling plinth, you should putty all existing joints using fine-grained putty.
If the work is not completed in one go, then you should once again cover the joints with putty until they become perfectly smooth.
All seams between the ceiling, baseboard and wall should be filled with acrylic sealant to obtain a perfectly smooth joint without gaps.
AND the finishing touch The job of installing the baseboard is painting it acrylic paint in the required color scheme.
Nowadays it's hard to imagine modern design premises in which there would be no fillets. They not only allow you to give the ceiling surface a complete look, but also hide all sorts of surface irregularities. On the one hand, installing ceiling skirting boards is not difficult, but on the other hand, there are certain nuances that you need to know when performing this work.
Choosing a ceiling plinth
Before you begin installation ceiling panels, you should familiarize yourself with some of the nuances of their choice. First you need to calculate required amount fillets. Since their standard length is two meters, it is necessary to divide the perimeter of the room into two. Of course, it is better to buy material with a reserve.

And so, when buying a ceiling plinth, you need to consider the following points:
- The fillet width is selected in accordance with the ceiling height in the room. The higher the ceiling, the wider the fillets should be, for example, if the ceiling height is 2.75 meters, then optimal width will be - 45 mm. Of course, all this is subjective, however, wide stucco molding in a low room will look out of place.
- If you do not want to constantly wipe the ceiling plinths, you should not purchase products that are too embossed.
- It is advisable to buy or foamed PVC. Buyers are often attracted to polystyrene fillets because they low price However, they quickly turn yellow and lose their shape, so the savings are not justified.
Installation of ceiling plinths
Necessary tool
Before installing the ceiling plinth, you need to prepare the following set of tools:
- Hacksaw.
- A miter box with which you can easily cut the baseboard at a certain angle.
- Rubber spatula.
- Mounting gun.
- A knife with replaceable blades.
- Masking tape.
- Putty and glue.
- Acrylic sealant.

Types of fillet installation
There are two main types of installation of ceiling plinths:
- In the first case, installation of the ceiling plinth is carried out after finishing walls As a rule, in this case, the products are glued on top of the wallpaper using adhesives: “Dragon”, “Moment Installation”, or white acrylic sealant.
- In the second case, installation is carried out after leveling the surfaces of the ceiling and walls and priming them. In this case, the products are attached to acrylic sealant or putty. The wallpaper is glued after installing the fillets.
Advice!
The second method is more preferable, since on plaster finishing material it holds up better, in addition, you don’t have to re-install the baseboard when changing the wallpaper.
Making corners
The most difficult job is. The easiest way is to use ready-made corner connections that are commercially available. However, it is not always possible to use them, so let’s look at how to properly cut a ceiling plinth.

For this operation, you will need a saw with small teeth or a hacksaw blade and a miter box. It is advisable to secure the latter on a workbench. The product must be placed in the miter box as it will be installed on the wall, so as not to confuse the top and bottom. Trimming should be done with light movements, avoiding strong pressure on the blade or saw, to avoid chipping.
The miter box can be purchased at hardware store. If you need this tool not for professional activities, but for home renovation, then you can purchase its simplest form. The main thing is that the miter box has a form for cutting the baseboards at 90 and 45 degrees.
Advice!
If you don’t have a workbench, you can secure the miter box to the board using self-tapping screws.
If you don’t have a miter box at hand, you can draw a stencil on the table that will clearly repeat the external and internal corners walls If the fillet is made of plastic and is hollow inside, then it will be very difficult to keep it in a vertical position when trimming. In this case, you can build from available materials a corner in which you can put the product like in a miter box.

In the photo - trimming the product in a miter box
The most difficult thing is if the corners are not even, in which case the markings must be made at the installation site or trimmed by eye.
Advice!
If the room has curves and a lot uneven corners, it is better to find out the cost of installing ceiling skirting boards and entrust this work to specialists.
As a result, the installation will be performed to a higher quality, and you will also save on damaged material.
When finishing a circle, the product should be cut into small pieces a few centimeters wide, and then adjust the joints. If there are gaps between the elements, it’s not a big deal; they can be sealed with putty. If painting is carried out, the joints will not be visible at all.

Installation of fillets
Once the surface of the walls and ceiling has been prepared and the fillets themselves have been cut, you can begin installing them. As practice shows, it is better to start from the corners.
The installation instructions are as follows:
- First of all, you should prepare finishing putty, which will be used as glue for the ceiling plinth. In this case, the manufacturer does not really matter; you can use any one.
- Before installation, the surfaces on the ceiling and walls should be moistened with a primer or, if it is not available, with water. This will make installation easier, as the putty will take longer to set.
- Then the putty is applied thin layer using a small spatula, place the fillets in those places that will come into contact with the surfaces of the ceiling and wall.
- Then the plinth must be applied to the installation site and pressed well. Putty that has come out can be carefully trimmed with a spatula. If there are any cracks left, they need to be filled with putty.
- When the installation process is completed, the product must be wiped with a damp cloth. The joints should also be coated with putty and wiped with a wet rag.
- After the putty has dried, you need to treat the cracks again.
Advice!
When sealing cracks, you can use a mounting gun.
You can also tap the sealant under the cracks using a rubber spatula.

Conclusion
Additional information on this topic can be obtained from the video in this article." width="640" height="480" frameborder="0" allowfullscreen="allowfullscreen">
Conclusion
If you adhere to the rules outlined above, then the process of installing ceiling skirting boards with your own hands is not as difficult a job as it might seem at first glance. If you didn’t succeed in doing it perfectly the first time, you should be patient and, thinking through each action, repeat the operation until you achieve a good result.
For more information on this topic, watch the video in this article.
Ceiling baguettes, or fillets, as they are called in a professional environment, are the optimal finishing material with which you can mask most defects in the cladding of the ceiling, walls and connection lines between them. Also, this detail can emphasize the special style of the room. That is why information on how to properly organize the workflow of finishing a ceiling with plinths will not be superfluous. In this article we will look at the installation of ceiling plinths and everything related to finishing the ceiling with this material.
Variations of ceiling plinths
Manufacturers of these products produce baguettes in several versions, and each type of product has its own consumer demand. Next, we will look at the most common options for ceiling skirting boards, their advantages and disadvantages.
Polyurethane skirting boards:
- The most purchased product among finishing options, lightweight and easy to install.
- Despite the fact that the plinth is quite light, the product has a certain strength, so it can be easily installed by one person.
- Thanks to their special composition, polyurethane skirting boards can be installed in rooms with high levels of moisture.
- The plinth bends well, so it can be used to decorate a ceiling of any complexity.
Polystyrene foam baseboard:
- This type of plinth, like polyurethane baseboard, easy.
- Installing a ceiling plinth made of polystyrene foam will provide additional sound insulation of the connecting seams of the slabs.
- With prolonged exposure to artificial light, fillets lose their original rich color.
- The products are not particularly durable, so it is necessary to work with them with caution.

PVC skirting boards:
- PVC skirting boards are not intended for use in rooms with poor ventilation or high moisture.
- Finishing method PVC walls Craftsmen consider skirting boards to be the most budget-friendly.
- The color range of the products allows you to select baguettes based on the design features of the room.
- Disadvantage PVC use fillets have weak strength and elasticity. Minor efforts lead to the formation of dents, which greatly spoil the final result of the finish.
- Products should not be treated with paint - its components may cause the frieze to become deformed.
Important! If you are planning to install ceiling plinths yourself, we recommend choosing polyurethane products. The products are affordable, light material and have a long service life; high-quality raw materials are used for their production.
Where to begin?
Before you start painting or wallpapering the walls, you should think about the edging option for the room. If the walls require wallpapering, the ceiling plinth must be installed before this process.
Important! If you glue a baguette on top of the wallpaper, then in places where the wallpaper is poorly glued to the wall, unevenness may form. As practice shows, wallpaper is changed much more often than the shade of the ceiling is changed, therefore, in order to avoid frequent installation of ceiling plinths, it is better to initially install them first.
How to calculate the amount of plinth for a room?
Do you want to know how to properly attach ceiling plinth? To get started, first of all, before purchasing baguettes, you will need to correctly calculate the number of strips for finishing the room. IN calm atmosphere Using a tape measure, measure the length of straight walls, as well as turns and bends. If you glue the wallpaper yourself, then such a calculation will not cause any difficulties:
- Calculate the perimeter of the room where you plan to install baguettes.
Important! To make the final finish look more attractive, use fillets of at least 2 m. This way you will have fewer joining seams.
- Next, the result obtained should be divided by the length of the skirting board you have chosen, for example 2 m, as a result we get a figure that determines the number of required baguettes.
Important! The result of calculations does not always result in an integer. If this happens to you, then you need to round the fractions up to a whole number.
- If, as a result of a miscalculation, you end up with a whole number, purchase one or two more units of plinth.
Important! Additional skirting boards may be needed if one of the strips is defective or a defect appears on the surface during installation.
- If the walls in the room are too curved, then you should not glue long strips of skirting boards, as this may cause them to break.
- To make the glued ceiling plinth look beautiful around the entire perimeter of the room, we recommend gluing strips of approximately the same length, rather than combining long and short ones.
Important! Making markings with a simple pencil along the wall, draw a line so that after installing the fillets it is not visible.
Required tools for installation:
- A sharp utility knife or hacksaw for metal;
- Tape measure and pencil for marking;
- A miter box is a special tool that will help you cut the corners of baguettes efficiently;
- Container for putty or glue;
- Rubber spatula.
How to choose a plinth according to the dimensions of the room?
In order for the baguette to look harmonious in the room, there are certain rules that must be followed:
- If the ceiling height in the room is no more than 2.5 m, the width of the molding mounted on the ceiling should not exceed 9 centimeters.
- With a ceiling height in the room of 2.7 m for a room of 15 square meters. m install plinth up to 10 cm, from 15 to 23 sq. m – skirting boards are chosen from 9 cm to 14 cm.
- If the ceilings in the room are 3 m or higher, use for small rooms plinth 10-15 cm wide, for large living rooms 15-20 cm.
Cutting the baseboard
Installing a ceiling plinth with your own hands is not a very complicated process, however, everything installation work should be carried out very carefully and slowly. Otherwise - quality repairs in the room it will not be possible to achieve:
- To perfectly join the corner cuts, use a tool called a miter box; with it you can easily cut a 45 degree corner on a baguette.
Important! First of all, cut off suitable angle on the baguette, and then adjust its length.
- Most of the plinth has an asymmetrical shape - one side is longer than the other. Glue on the wall long side, and a short one is allowed on the ceiling side.
- If all the corners in the room are 90 degrees, cutting and joining them will not be difficult.
Important! In order to beautifully cut the corners of the plinth, the side that will be located on the ceiling is placed on the bottom of the miter box.
- The ceiling molding must be laid evenly on the surface of the miter box and pressed tightly to the surface. This way, the corners will be created without unnecessary gaps.
- How to attach ceiling plinth to the ceiling if the corners are uneven? Place one strip on the wall and draw lines along the sides of the baguette all the way to the corner, and do the same on the other side of the corner.
- Use a pencil to mark the intersection points of the stripes on the ceiling and wall, then transfer the points to the baguette; a cut should be made along these points.
Important! If you don’t want to waste time on drawing and calculating angles, you can purchase corner mounts for ceiling plinths in the store. Fillets are inserted into the holes provided in it without precise trimming along the walls.
- When installing a plinth on the ceiling for the first time, practice cutting corners on unnecessary parts. It is necessary to cut off the parts along the outer corner, leaving 1 mm for adjustment; the excess can be easily sanded off.
Important! You can get rid of an unaesthetic gap on the outer corner using acrylic sealant. Once the repair is complete, paint the corners.
Which glue to choose for installing skirting boards on the ceiling?
So, you already know how to calculate the number and size of the plinth, then you need to determine what glue to use to mount the fillets. We previously wrote that baguettes are made from PVC, polystyrene foam and polyurethane, so for each of them it is necessary to select a suitable adhesive composition.
Main criteria for choosing adhesive:
- For products made of foam plastic, wood and polymer skirting boards, polymer adhesives are used. The most common among them are made on the basis of aqueous polymers, easily soluble in water, based on liquid hardeners of plastic polymers and organic solvents.
- Mostly for the installation of baguettes, PVA glue, “Bustilat”, “Dragon” or silicone sealants are used.
- In most cases, fillets made of gypsum or foam plastic are glued onto a putty solution; it is also used to seal the gaps between the baseboards, ceiling and wall.
- Wood products are installed not only with glue, but also with nails and screws.

How to properly apply glue to ceiling plinth?
- Before using polymer glue, first prepare the walls and ceiling for better adhesion.
- If walls are treated with plaster or putty, they are first coated with a primer.
- If the surface is covered with plastic or wood, it is necessary to degrease the surface.
- Glue the plinth to the ceiling, using putty, as follows: it is applied to reverse side fillets along the entire length, apply to the wall and press down a little. Excess adhesive mixture is removed with a spatula or finger.
Important! If the wiring is hidden under the ceiling plinth, it is first secured to the ceiling or wall so that the wires do not pull back the plinth and complicate the gluing process.
How to install ceiling plinth? Mounting options
In the process repair work you can use one of the three most common ways to install a baguette on the ceiling:
- Gluing to the wall.
- Pasting on wallpaper.
- Mechanical fastening. This method installation of fillets is mainly used for indoor installation suspended ceiling panels. In this case, a special frame is mounted around the perimeter, onto which a baguette is subsequently attached.
The use of any of the options has its advantages and nuances:
- If this is your first time installing a baguette without an assistant, we recommend securing the baseboard by gluing it to the wallpaper.
- The most the best master Consider installing fillets on the wall as an option. As a rule, the wallpaper in a room is changed much more often than the ceiling is repainted, in which case you will not need to re-install the ceiling plinth.
Method number 1:
- Before installing the baseboard, level and prime the ceiling and walls in the room.
- Apply glue to the inside of the baguettes with a spatula.
Important! Try not to use a large number of glue so that excess does not protrude out.
- Place the prepared strip against the wall for a few minutes, then remove it and wait until the glue sets.
- After a few minutes, place it back on the wall, pressing down a little.
Important! Do not press the baseboard with great force, as cracks and dents may form on the surface.
- Lubricate subsequent parts of the plinth with glue along the length and side parts in contact with the previous plank.
- Having reached the corner, use a tape measure to measure the distance to it and cut the baguette using a miter box.
Ceiling plinth is one of the types of cornice and is intended for decorating the junction of walls and ceiling in the house. He may have different widths, finishing, be convex or concave.
Installing a ceiling plinth with your own hands will please the eye and help you save money by refusing the help of specialists. How is this done and what materials are needed for this process, we will tell further.
Tools for gluing ceiling plinths

- Ruler
- Roulette
- Pencil
- Construction knife
- Glue (liquid nails)
- Glue gun
- Spatula (rubber)
Consumables: ceiling plinth, acrylic sealant, special glue, polyethylene lining (for suspended ceilings).
For each corner take material with a margin of up to 10 cm on both sides.
Getting ready to install the ceiling plinth
- We place the plinth on the floor for now, figuring out the best placement of the pieces.
- We cut corner joints.
- We check the correctness of the measurements and see if our “puzzle” of the ceiling plinth fits together.
When designing baseboards, try to maintain factory edges. They connect perfectly without any errors.
First, take two corner pieces, which are coated with glue, and glued simultaneously to both the ceiling and the wall. Then lightly press the baseboards and wait about a minute. The joints between them do not need to be lubricated with glue.

After completing the work, it is necessary to seal all joints of the baseboard with the walls and ceiling using a rubber spatula.
How to glue skirting boards to a suspended ceiling?
For gluing skirting boards to suspended ceiling choose very light elements so as not to weigh down the stretched fabric and damage it. Glue the baseboard with the wide side facing the wall. Place between the ceiling and baseboard polyethylene gasket, which is removed after installation.

As you can see, you can glue the skirting boards yourself without special effort. It is enough to know only some of the tricks that we have shared with you.
Installation of ceiling plinth (video):
When the renovation is approaching its final stage, one of its important aspects is to give it a complete appearance ceiling. or fillets serve to improve the space connecting the ceiling and walls; they decorate the ceiling, mask unevenness, correct flaws and close cracks.
Using a ceiling plinth you can give the ceiling an elegant look, as well as hide some unevenness between the wall and the ceiling.
Installing a ceiling plinth allows you to complete the design of the ceiling and gives it an elegant look.
Today there is a huge assortment various sizes and forms of fillets, decorated and designed in different ways. Ceiling plinths are made of polystyrene.
After you have decided on the shape, type and width of the ceiling plinth, you need to measure the perimeter of the room and decide how many fillets are needed. Standard length ceiling plinth - 2 meters, but it’s better to always take it with a reserve, because unforeseen nuances can happen, and it’s inconvenient to run to the store again, it’s better to plan everything in advance. It’s absolutely uncomplicated; the whole process can be done with your own hands, without the help of qualified craftsmen.
Conditions for installation
Scheme for cutting a baguette at angles using a miter box
It is worth mentioning right away that ceiling skirting boards are glued to the wall in two ways - with wallpaper, with glue or with putty, before gluing the wallpaper. As practice and numerous reviews from people doing repairs show, gluing fillets onto wallpaper is preferable and more convenient. Moment Montazh glue is ideal for these purposes; it works reliably and without mistakes. If, despite the repairs carried out, you still have uneven walls, then between the wall and the fillets there will be large gaps, which are quite successfully covered with the same “Montazh” glue, he white and therefore looks unnoticeable. very well produced using a sealant, which is called “ Acrylic Sealant" Acrylic is very flexible, does not crack, does not fall out of cracks and can be painted. Some craftsmen glue the fillet onto liquid nails or silicone sealant, which cannot be painted, so it is better to opt for acrylic.
You can set a goal and carry out a thorough repair of the walls, aimed at perfect alignment, but it will be easier before wallpapering the walls and applying putty. You can use putty to smooth out the unevenness and immediately seal all the cracks, and then adjust the wallpaper to the fillets; it will work out quite well, but everyone must decide for themselves which method is preferable for them.
We should not forget that in case of obvious unevenness and distortions of the walls or ceiling slab, the fillet will only emphasize imperfections, but this rule works the other way around. How you install the ceiling plinth with your own hands depends on general form interior and quality of repairs in general. Installation of ceiling plinths begins from the corners of the room, because the corners are most striking during a visual inspection of the room. You should try to use the most solid and longest fillet sections so that the number of joints is kept to a minimum. In places where the baseboards are not very noticeable, for example, corners above doors or the area behind the eaves, you can use the remaining trim.
Return to contents
Tools for work
Before work, you should collect everything necessary tools for a smooth procedure for gluing ceiling plinths.
To work you will need the following tools:
- miter box;
- small saw;
- gun for tube with sealant;
- sandpaper;
- roulette;
- square;
- pencil;
- rubber spatula;
- sharp knife;
- masking tape (optional);
- clean rags.
Materials you will need:
- fillets;
- ready-made corners (optional);
- sealant, putty or glue;
- primer for painting.
Return to contents
Methods for installing fillets
It is necessary to start the process from the corner of the room; making a corner is not such a simple matter as it seems at first glance. If you don’t want to bother with the cutting process, then you can buy ready-made ones, made of the same material and suitable in pattern and size for your baseboard.
When it comes to corners, the main thing is not to confuse external and internal corners, otherwise you can ruin a lot of material.
To cut corners you will need a miter box and fine file or a sharp knife. The plinth is inserted into the miter box at an angle of 45 degrees and pressed tightly with your own hands, then you need to cut it off from the desired side and under the right angle. Don't confuse internal and external corners and double-check them before making final cuts. First practice on pieces of fillet, and if everything turns out well, start working. For convenience, you can lay out the fillets ready for installation along the walls on which they will be installed.
If the baseboard is glued to the wallpaper, carefully cover the fillets with glue and press them firmly against the wall, remove any remaining glue with a soft, clean rag, and carefully cover the resulting cracks with glue. If the repair involves installing ceiling skirting boards before wallpapering the walls, then the glue must be replaced with putty. Apply the putty to the fillet using a spatula and press it firmly against the wall again. You can completely control the joints, fitting and trimming fillets, but the help of a partner will not hurt, the process will go faster.


