Baguettes visually look like baseboards and are used to decorate the joints between walls and ceilings. Can have different shapes, colors, finishes and are glued end-to-end or onto wallpaper. They can be easily painted with water-based paint depending on the design objectives.
Options for creating a variety of style solutions a lot, you just need to choose the right baguette, and also choose good glue and carefully fix the products on the ceiling and wall.
Glue for baguettes - the choice of professionals
Modern baguettes are most often made not from plaster, which is difficult to glue, but from polystyrene. This light material, simply cut, transported and glued. Masters use special adhesives for polystyrene.
- Styropor Kleber.
- Decofix Pro.
- Titan SM.
Apply glue using a special mounting gun, which allows you to carefully apply liquid nails into inconvenient places with minimal excess.
Transparent polyurethane adhesive, available in tubes, is also used. It reliably glues the baguettes, but you need to work quickly and carefully.
If the choice was made in favor silicone sealants, it is worth knowing that after drying, paint them water-based paints will not work.
Adhesion will depend on the quality of the glue, but you also need to work with it correctly, so do not forget to study the instructions before starting work.
How to properly glue baguettes to the ceiling
- Work begins with leveling the surface. Walls and ceilings with defects are carefully puttied, after which a primer is applied.
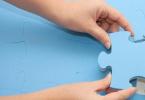
- Start gluing the baguette from the corner. The end of the baguette is cut at an angle of 45 degrees to create an even, neat joint.
- The glue is applied in an even layer along the entire length, as well as on the cut corners.
- Next, the product is applied to the surface and pressed tightly. The 45 degree cut corners should line up exactly to form an angle. The joints are also carefully taped.
- After the glue has dried, you can begin painting.
Question: glue baguettes in the corners
The craftsmen answer - when connecting parts of the plinth end-to-end, you must add glue and carefully press it against the wall to squeeze out the remaining adhesive. It is better to press down with the edge of your palm so that there are no indentations from your fingers.
Remains of glue are removed with a damp cloth.
VIDEO ON THE TOPIC
This method is used when wallpaper has already been pasted and baguettes need to be fixed on top.
In this case, the operating procedure is as follows:
- first you need to trim the ends with a miter box,
- then apply to surfaces thin layer glue,
- attach the baguette to the wall,
- press it down and hold it for the time specified in the instructions,
- remove excess glue with a napkin,
- seal the joints with sealant,
- the surface is painted with acrylic or water-based paint.

It is very important to be careful when painting so as not to touch the wallpaper, or even better, paint the baguette before installing it.
Despite the apparent simplicity, gluing a baguette (plinth, fillet) to the ceiling can become a serious undertaking. In order not to slow down the repair for a couple of days and not to spoil the material, you should familiarize yourself with detailed instructions how to glue a baguette to the ceiling.
Let's start with the fact that baguettes are decorative ceiling plinths with different widths and appearance, which are made from various materials: wood, gypsum, plastic, polyurethane of different densities. As a result, they harmoniously design the junction of the wall and ceiling, giving the room aesthetic appearance and completeness.
Baguettes are glued close to the ceiling or indented from it if you plan to hold LED lighting. They can be different colors, laconic form or decorated with modeling. Baguettes are easily painted during use. Under the ceiling plinths you can hide wiring and flaws in wallpapering in case uneven walls(Wide ceiling borders are usually chosen for these purposes). Wall decoration will look good only if the baguettes are glued evenly and correctly.

Table. Key Features different types ceiling plinths.
| Types of skirting boards for ceiling | What is it attached to? | Is it possible paint | Mechanical sustainability | Moisture resistance |
|---|---|---|---|---|
| Foam | Glue, putty | Yes | No | Yes |
| Wooden | Glue, self-tapping screws, screws | Yes | Yes | No |
| Plaster | Glue, self-tapping screws, screws | Yes | No | No |
| Plastic | Glue, screws | No | No | Yes |
Note! Gypsum skirting boards often stick to in public places(restaurants, hotels); look perfect in rooms with high ceilings, but for low ones - below 3 meters - it is better not to use them.
What is needed for gluing baguettes
To glue the ceiling plinths neatly and evenly, you will need a sharp knife, a hacksaw and a miter box, a pencil and a special glue for polystyrene foam (or other material from which the baguettes are made). You can choose other adhesive materials.


Surface preparation
It is assumed that the gluing of baguettes begins after the walls have been leveled and painted or wallpapered. If the walls are uneven, they need to be leveled (with putty, plaster, etc.), especially if gluing is planned gypsum stucco or wooden skirting boards. Expanded polystyrene products can be pressed in such a way that they hide the unevenness.
Prices for baguettes

Leveling the walls with putty. Dilute the dry mixture with water according to the instructions on the package. Then, scooping a little putty onto a putty knife, fill all the holes you see with it. For ideal surface putty is applied to the entire surface. Last layer level with a wide spatula, running it along the entire length of the wall.
In the same way, the section of the ceiling to which the baguette will be glued is prepared (read about). If the ceiling is completely leveled and painted, then no finishing works no need to carry out. If you plan to first stick the baguettes on, and then paint the ceiling along with them, then you can coat the area where the baguette will be glued with a primer.
You may encounter objections that the baguette should be glued before the wallpaper. This procedure also has a right to life, but it’s still easier to stick the wallpaper first, and then put a baguette on top. If you plan to further paint the baguette, the wallpaper can be covered with polyethylene.
If the baguette will not be glued end-to-end to the ceiling, but with a margin for installation LED strip, for convenience, you can mark the bottom gluing line. To do this, in each corner at a certain distance from the ceiling (for example, 3 cm), small nails should be nailed around the perimeter, to which a strong thread should be tied. Along this thread, when applying the baguette, you need to mark the bottom gluing line with a pencil.

Preparing the baguette
The plinth can be cut to length during the gluing process. It is better not to do this in advance, especially if you have no experience, so as not to make mistakes in the measurements.
The first baguette and all the others reaching the corner will have to be cut using a miter box. You can, of course, cut a polyurethane foam baguette with a sharp knife, but this requires appropriate skills.
How to cut a corner
Cutting a baguette at an angle is not as simple as it seems at first glance. The problem is not the difficulty of evenly cutting corners at 90 or 45 degrees (everything is simple here, especially with the use of a miter box), but that often the corners in the room are crooked and do not reach those same 90 degrees. That's why you have to seal the cracks with putty.
If possible, you can use decorative inserts for decoration. Decorative inserts Sold for both external and internal corners. It's easy to install them. The baguette is cut at an angle of 90 degrees and joined to the inserts. The only disadvantage of this method is the extra costs.

Most craftsmen use a miter box. To decorate any corner, you should first attach the baguette to the corner of the room and visually see where the cut line will be located. The fillet is placed in the miter box so that the edge of the ceiling is at the bottom. The product is held by hand, the excess part is cut off. Right internal corner cuts from left to right, and left - vice versa. This is how you need to cut the inside corner. To cut an outside corner, the cutting direction changes. Here the edge that will be attached to the ceiling should be longer. For the right corner it is necessary to cut from the right to the left, for the left - vice versa (this process is described in more detail in the article about).


If after finishing the work a gap still appears, you can cover it with putty.
Prices for putty
putty

Step 1. Gluing the baguette should begin from the corner of the room located at the entrance. You should immediately stock up on wet wipes to remove excess adhesive. Glue is applied along the edges of the baguette and at the joints, dotted or in a line. The baguette is applied to the markings and pressed tightly against the wall. The pressing time must first be looked at in the instructions for the glue. Excess glue should be removed with a damp cloth.
Step 2. Then you should move along the perimeter of the room, measuring each time the required length of the next segment and cutting off the excess. The corners should coincide and adjoin as much as possible. You need to press the baguette against the wall with the entire surface of your palm, and not with your fingers, otherwise dents may remain.

Step 3. After the baguette is glued around the entire perimeter, the joints need to be puttied and wait completely dry glue and putty. Then everything is carefully rubbed down with fine sandpaper. Baguettes can be painted along their entire length.

Painting the same color as the ceiling will allow you to achieve a visually unified composition. Wallpaper can be protected during painting plastic film with adhesive tape.
If it is decided to glue the wallpaper after gluing the fillets, then the overlap of the upper cut of the wallpaper is pressed against the baguette with a spatula, and the excess is cut off construction knife. This is a very labor-intensive procedure.
Prices for ceiling plinths
ceiling plinth

Advantages and disadvantages of wooden baguette
Wooden ceiling plinth is used for decoration classic interiors, country, chalet, etc.
Wooden plinth has a number of advantages - in particular, it:
- environmentally friendly;
- can highlight useful material— phytoncides — for several years;
- resistant to mechanical damage;
- durable;
- looks luxurious;
- can be painted if desired;
- The cost is, of course, more expensive than polyurethane, but still in an affordable price segment.
As for the disadvantages, when compared with polyurethane, wooden plinth:
- more sensitive to humidity (needs to be covered with a moisture-resistant coating);
- requires more careful leveling of surfaces due to lower ductility;
- requires a good hacksaw for cutting;
- weighs more, so it is attached to the wall with self-tapping screws or self-tapping screws.
But these are all surmountable difficulties, which are more than offset by the stunning appearance of the room, decorated with natural wooden molding.

Stages of installation of wooden skirting boards
To attach a wooden baguette you will need a screwdriver, wood screws, a miter box, sandpaper, and a pencil.
Step 1. First, the condition of the walls is checked - they must be smooth.
Step 2. Marking in progress.

Step 4. If the baguette is not wide and light, it can still be attached to liquid nails.
Step 5. If the baguette is wide and heavier, it is attached with self-tapping screws. For convenience, you can first attach a wooden baguette to the glue so that it holds, and then fasten it using self-tapping screws or self-tapping screws. The latter need to be fastened hidden so that the caps do not rise above the surface. Each subsequent baguette is measured in length, cut with a hacksaw or into a corner using a miter box.

Step 6. After the entire perimeter of the room is decorated, you should treat the joints and places of the screw heads with wood putty, wait for it to dry, and clean it with fine sandpaper.

Step 7 Then all joints are varnished to match the color of the baguette.
Often, a wooden baguette is attached to the same wooden corners, which are attached to the wall with self-tapping screws at a distance of 30-50 cm from each other. First, these are attached support platforms, then there is a plinth on them. Everything else is described above.

Installing wooden moldings is a labor-intensive process, but still doable. If you do the work carefully, then for many years you will be able to admire the amazingly beautiful natural finish.
How to attach PVC skirting boards
PVC skirting boards are lightweight, functional and aesthetic, they help create unique interior solutions. Such baguettes are used when finishing ceilings or walls with plastic panels, which is most often found in bathrooms and kitchens. They have a special groove for installation. Baguettes usually come complete with panels and are intended to mask joints with walls and ceilings.
Prices for wooden baguettes
wooden baguette

Plastic plinth is different in that it:
- easy to clean;
- does not turn yellow.
- it is mounted only together with the panels; it is no longer possible to install it afterwards;
- It is cut exclusively with a hacksaw for metal with fine teeth.
Installation
Installation features depend on how they go plastic panels- on the ceiling or wall. First, the frame is attached. The frame rail on/under the ceiling will be the basis for the plastic baguette. pay attention to PVC device baguette - one of the sides is made in the form of a tongue and groove into which the lining will be inserted.

The ceiling fillet is installed on a subceiling strip. It is attached with staples or self-tapping screws to the frame (if it is metal, then with metal screws). To decorate corners and join parts, special connecting parts are used, which can additionally be attached with glue. If there are gaps left after fastening, they are coated with silicone.

How to attach a ceiling plinth to a suspended ceiling
Here it is immediately necessary to make a reservation that the baguette in this case covers the junction of the ceiling and the wall, but is not attached to the canvas. Between the plinth and the canvas there is always a small free space(or large if the backlight will be mounted there).

For decoration, you can use any fillet: foam, wood, plaster. When choosing a model, it is better to take into account the mounting features and choose the option with a wide vertical side. Installation of skirting boards does not differ from traditional ones, except that they are only glued vertical surface. You can find out more about this at the link below.
Thus, you can attach any skirting board yourself, decorating your home inexpensively and tastefully.
Video - How to glue baguettes to the ceiling with your own hands
With the course of progress, everything and even the purpose of things changes. The most common baguette in ours has more extensive areas of application.
Back in the last century, planks of wood were used to create various types frames and cornices.
But over time, the scope of application began to expand, and the products received names: molding, baseboards, fillets, platbands.

All of them rightfully deserve their unique name, because each product belongs to a specific part of the room, such as the ceiling or floor.

What types of baguettes are there?
Nowadays, old manufacturing technologies no longer exist and many substitutes from other materials have appeared. Baguettes can even be made of plastic and in the style of space wars.
Many models of baguettes are very necessary, for example, aluminum or steel ones allow you not to worry about mechanical stress and last much longer than wooden ones, but they are unlikely to be suitable for rooms with a humid environment.

The best material for a baguette is still wood. Even today there is no more acceptable material for painting. It is worth noting that many frame structures are created by hand and convey a touch of the unique skills of the craftsman.

Country and Provence styles cannot do without wooden baguettes, but its capriciousness and difficult maintenance conditions leave the material behind its competitors.

Wooden baguettes are not only elegant and unique, but also emphasize respectability in the room. Still, this is not enough to lead the sales market. Even plastic baguettes can easily replace these leaders of their time.

In addition, they are very flexible and lightweight, which allows you to attach the structure yourself and to uneven surface. As for the assortment, all that remains is to enjoy the extensive color palette and a variety of models.

Plastic models are used for installation suspended ceilings and other ceiling structures.

In appearance, they look like plinths with places for locks, most often in white tones. For special connoisseurs and those who do not mind spending money, there are even decorative models.

The most natural models made of wood and plaster. The most durable models are made of aluminum, and the cheapest and at the same time the lightest models are made of foam plastic.

Ceiling design
Baguette is used to hide joints and complement the overall design of the room. Attaching the entire structure does not take long and is quite simple. In most cases, a special glue is sufficient.

You can even attach baguettes to a clock on the wall. Simply put, all work with baguettes is limited only by imagination and ingenuity. The main thing is to follow all the rules and be able to correctly join the baguettes, for example in the corners.

If everything is connected correctly, then the whole room will have smooth transitions, and this is important for comfortable design. But if you need to attract attention, then it is better to use contrasting models and add curtains to them.


Work on framing small-sized elements
A designer who knows his business will not miss even such little things as mirrors and posters on the walls.
Using baguettes correctly, you will create an interior with a twist that is rarely found or not repeated at all in other design projects.

Baguette decorative type, will allow you to change the emphasis and bring a new sound while using old attributes.

We bring everything to complete perfection
Here are some more tips from experienced designers:
- narrow ceiling molding visually increases the height of all walls, and this in turn creates the impression of a high ceiling
- vertical thin lines create an impression of severity, and a horizontal model will add dynamics

- wide models are suitable for large rooms, and small rooms they make it heavier. There may even be a feeling of tightness, and therefore discomfort.
- When choosing a color, do not neglect white tones. They tend to fit in anytime, anywhere, but that doesn't mean that particular color will look best.

It's always better to experiment before making a final decision. In addition, the palette of shades and types of models allow you to choose exactly what you like.


Combine all the moments correctly so that you feel the measure and style and other design nuances. Then you will be able to achieve the most acceptable result for you.

Photos of baguettes in the interior


The birth of a new design concept leads to the emergence of new design elements. Thanks to this, the concept of repairing and updating the interior of an apartment is constantly changing. Recently high-quality repairs meant gluing new wallpaper and decorating it with multi-colored strips of paper. Modern finishing involves the use of baguettes that can harmoniously combine the plane of the wall and ceiling. To create a comfortable and cozy atmosphere, you need to know how to properly glue baguettes to the ceiling.
Main characteristics of baguettes
Baguette on the ceiling, as a decorative element, has several names: plinth, frieze or molding. However, they all have several quite important advantages:
- Ability to disguise minor defects walls and ceilings at their junctions. In particular we're talking about about small irregularities, roughness and height differences.
- Possibility to decorate the corner formed by the walls and ceiling.
- Not complicated installation work, allowing you to carry out the entire process yourself.
- Low weight and good plastic properties.
- Wide choose colors and textures.
- Affordable price for most consumers.

When choosing baguettes for the ceiling, you should take into account the material of manufacture, dimensions, texture and type of surface of the products. Depending on the combination of these characteristics, the cost of design elements is determined. In addition, it is important to understand how to properly glue baguettes.
The following materials are used to make baguettes:
- Styrofoam.
- Polyurethane.
- Plastic.
- Gypsum.
- Tree.
The first two options are used more often than others and are suitable for any type of design. The plastic baguette is installed together with tension ceiling structures, wooden elements only suitable for wooden ceilings.
Selection of adhesive composition
For high-quality gluing of moldings, only proven adhesives should be used. You should know for sure that to resolve the issue of how to glue a baguette for the ceiling, the following means can be used:
- Polymer glue. This composition is characterized by weak stickiness, so gluing the molding is accompanied by slight pressure and holding the element in the gluing areas for some time. This procedure is especially unpleasant when using long elements.
- Silicone and acrylic glue . Both compounds are characterized by rapid adhesion to work surface, which makes it easier to solve the question of how to glue baguettes to the ceiling. Factory packaging of glue in gun tubes makes solving the problem of how to glue a baguette several times easier. Thanks to the thin spout at the tip of the device, you can control the glue consumption during operation. Of the disadvantages of such compositions, only the high cost attracts attention.

- Finishing putty or compositions for working with plasterboard structures. This option for solving the problem of how to glue baguettes to the ceiling is considered the most profitable in terms of savings. Although reliability and drying time are over high level. However, you should know that it is very difficult to apply putty to the surface of the baguette in a thin layer. In addition, excess glue or putty must be removed immediately, otherwise it can be seriously damaged. appearance baguette and ceiling.
The process of gluing ceiling plinths
Baguettes for ceiling decoration are glued in two ways:
- Before wallpapering.
- On top of pasted wallpaper.
In most cases, baguettes are purely White color, therefore it is important to carry out installation work with absolutely clean hands. Before gluing baguettes, you must wash your hands with any detergent.

Gluing ceiling skirting boards has several features that you should learn about in order to ensure a high-quality installation process:
- Excess of any adhesive or putty must be removed immediately suitable tool. To clean the surface from silicone and acrylic compounds, you can use a rubber spatula or a damp rag. The putty can be easily removed with a small wet brush.
- Gaps around ceiling plinth And corner connections should be filled out adhesive composition fully. It must be remembered that these places cannot be disguised with paint or wallpaper.

- To ensure that when solving the problem of how to glue a baguette to a wall, the edges of the product do not move away from the plane, you can use ordinary pins or sewing needles. These devices are used to fix two adjacent edges, and after the glue has dried, they are removed. The resulting holes can be covered with a thin layer of putty.
- Painting of ceiling baguettes should be multi-layered. The first layer is a primer, which masks the sealed joints and holes. The second and subsequent layers are simultaneous decorative design ceiling and baguette.
How to properly stick baguettes over wallpaper
The advantage of this option is that there is no need to adjust the wallpaper to the line of the baguette, since this element masks all errors in the upper edge of the wallpaper.
The question of how to stick a baguette on the ceiling is solved in a certain sequence:
- Using a miter box or other device, cut the edges of the plinth at the desired angle.
- A thin layer of adhesive is applied to the surfaces that will be adjacent to the plane.
- Apply the product to the wall and hold it for a certain period of time. Most often, the manufacturer gives recommendations on how to glue baguettes using one or another composition.
- Excess glue is removed using a rag or spatula.

- The junction of the baguettes is covered with white sealant.
- Apply a layer of finishing paint to the surface of the glued baguette.
The question of how to glue baguettes onto wallpaper can be considered resolved.
Securing the baseboard before wallpapering
This option is most often used professional craftsmen. Gluing baguettes to the ceiling in front of the wallpaper must be done according to the following scheme:
- The walls and ceiling are carefully leveled, sanded with sandpaper, cleaned construction dust and coated with primer.
- The ends of the moldings are cut at a certain angle, using a miter box for greater accuracy.
- Apply putty or drywall adhesive to the glued surface of the baseboard, trying to fill all the cracks.
- Press the baguette against the wall and leave until the putty has completely hardened.
- The surface of the molding is primed and several layers are applied. finishing coating on the baguette and ceiling.
- The wallpaper is pasted onto the wall, while the overlap on the baguette is cut with a sharp knife using a wide spatula.
Installation of skirting boards in corner joints
The last strip must be trimmed with the smallest error in order to avoid damage to the elements when gluing baguettes.
In a room with smooth walls, the planes of the ceiling and walls, as well as two walls, are connected at right angles. You can trim the edges of design elements using a miter box. Before gluing baguettes in the corners, first trim the corner edges, then use a sharp knife or other tool to cut the baguette to required length. The step effect can be prevented by evenly distributing the gaps between the two sections.

Trimming the ceiling plinth using a miter box can be done as follows:
- The product is placed in the instrument, trying to achieve a position similar to that on the ceiling.
- The lower part of the plinth is pressed very tightly against the side of the instrument.
- Perform edge cutting.
If you don’t have such a device at hand, you can use another option:
- The baguette is applied to the left side of the corner and a short line is drawn along the product.
- Attach the design element to right side corner and perform similar actions.
- The intersection of the lines determines the starting point for cutting.
- Alternately, mark the intersection of the lines on the planks and make a cut at an angle of 45 0.
- Check the correctness of the cut by placing the skirting boards against the corner.
Solving the question of how to stick a baguette is not particularly difficult. Following the recommendations experienced craftsmen, you can complete the entire installation process yourself.
Reading time ≈ 3 minutes
A baguette is a bar for framing paintings, photographs, and mirrors. It is also used as wall and ceiling decoration. This decorative item can be single or consist of several elements, which makes it possible to use different kinds ornaments.
In construction (depending on the purpose of use), baguettes are divided into decorative and fastening. Let us dwell in more detail on the use of decorative baguettes in interiors.
Even in ancient times, in temples, palaces and houses of wealthy people, mosaic designs on the walls and ceilings were framed with decorative frames. Today, the use of baguette in the interior of an apartment or house is not a luxury. Designers often use it to decorate interior elements and give the room individuality. Baguettes are made from various materials. It could be:
- gypsum;
- plastic;
- tree;
- aluminum;
- polyurethane.

Its price depends on the quality of the baguette and the material from which it is made. With such abundance, the flight of imagination is simply limitless. Let's look at several ways you can organically use decorative baguette in the interior.
Decorating mirrors
Most often you can find mirrors in a baguette. This is the easiest way to decorate the interior of any home. As you can see in the photo, the size of the mirrors is different, there are thousands of variations, so this type of decor is affordable for anyone. To make the interior glossy and expensive, they use massive frames made of expensive wood and cover the baguette with gold leaf.

Decorating mirrors with plastic baguette is the most affordable. Today, their color range is very wide, which allows you to choose the color and texture to suit your needs. bright interior. Mirrors in aluminum frames are most often found in bathroom interiors.

IN Lately Decorating paintings, engravings, tapestries, and photographs with baguettes is gaining popularity. This process is similar to decorating mirrors. The materials from which baguettes are made for this type of decor are practically the same.
Ceiling decoration
A special place is occupied by the use of ceiling moldings in the interior. Today, baguette instead of baseboards can be found quite often in the interior. Also, this decorative element replaced the classic ceiling cornices and slats.

The most commonly used ceiling molding is polyurethane. This material is produced in various widths and has different relief. You can paint it any color. It is very easy to install; it is attached with silicone glue or alabaster.

Gypsum moldings are used less frequently when decorating the ceiling. They are more fragile, expensive, heavy. However, they also have their advantages - compositions made from gypsum baguettes look richer and more massive.
The most expensive is a baguette made from natural wood. It is used when decorating wooden ceilings. He became very popular in country houses, since they try to use only natural materials in their finishing.