Doors... Perhaps one of the most mysterious inventions of mankind. You never know what is hidden behind them: the door can open the way to unknown beauty or, when closed, destroy dreams forever.
And what is stored behind the ancient doors? Precious treasure or scary mummy? Interesting? In this article we will tell you about the oldest and unusual doors and gates, as well as interesting facts associated with them.
This door is considered to be the oldest operating door in the world. It has been covering the entrance to the archives of Westminster Abbey (England) since approximately 1040. There was a legend that the tree was lined with human skin, but chemical analysis disproved this eerie theory - the covering turned out to be cow skin.
At the end of the 20th century, doors made at least five thousand years ago were found in Zurich (considered the oldest in the world). The poplar from which they are made is well preserved, and the carving turned out to be so delicate and unusual that for more than 10 years copies of these artifacts have been among the most sought after for interior design in Europe.

The most beautiful are the doors of the baptismal church of St. John (Florence, Italy). They were made in the 15th century and decorated with bronze bas-reliefs and miniatures from biblical and Old Testament scenes of amazingly fine workmanship.


In the 18th-19th centuries, mahogany came into fashion, and Italian craftsmen, successfully combining them with bronze, began to create masterpieces of carpentry that still amaze with their beauty.


By the way, modern appearance(design using elongated frames with inserted stained glass or glass) doors were acquired only in the 18th century thanks to French masters- the Parisian aristocrats really wanted to show off their wealth: it was for this purpose that large viewing glass inserts on the entrance doors were invented.
Very unusual specimens can be seen in Spain, where big influence The development of culture and crafts was influenced by the “Moorish invasion”. In modern Andalusia, houses are still preserved, in the external decoration of which Arab sensuality and European solidity are intricately intertwined. And since the doors are the “face” of the building, they also bear the echo of these intricacies.

Bizarre patterns reminiscent of thin lace, bright or contrasting colors and a semicircular, most often, vault are characteristics of oriental or Arabic doors. The owner of the house decorated the entrance with all accessible ways: forged with flowers or bronze tips, painting or firing - it was the door that was originally supposed to tell the guest about the wealth and status of the owner.


It would be strange to ignore the Land of the Rising Sun - its original culture was also manifested in home interior. The doors for rich houses were minimalist and solid and made of wood, which is very expensive in Japan, and the entrance to poorer houses was closed with plywood panels painted with plant motifs.

The master's imagination is limitless and is embodied in the most various materials: wood, stone, metal, glass. Sometimes the thought arises: “If there is such a door in this house, then what is inside?”, isn’t it?


There is another creation of human hands that blocks access to an uninvited guest - a gate. Wooden, iron, and forged, they are designed to protect our home, but skilled craftsmen, in addition to their main function, give these products such bizarre shapes that their beauty and unusualness sometimes take our breath away.
It is believed that the first forged gates with a mechanism were made in Spain. Their author (Antonio Gaudi) was no stranger to mechanics, and he equipped the huge iron dragon, sitting on the frame bars, with a toothy mouth that opened along with the gate doors. Currently, the mechanism is completely out of order, but anyone can admire the magnificent creation in Barcelona, Spain.


In the period from the XV to the XVIII centuries. In Europe, the Baroque style (Italian - “excessively bizarre, strange”) was very popular. All buildings built in those days were densely decorated with statues, stucco, frescoes, coats of arms, etc. This cup and the gates have not passed: on the bright examples of ancient splendor there is no free space - voluntes, coats of arms, acanthuses, crowns almost completely cover metal carcass gate


However, in the 19th century, the graceful lines of the revived “Art Nouveau” and the newborn “Art Nouveau” began to displace the intricate forged lace of the “Baroque”, and the simplicity of the curves and the low cost of the products for a long time put an end to the spread of the ruinous aristocratic style.


The most unusual gate, made of a coral block, was built by the owner of the “Coral Estate” at the beginning of the 20th century in the American state of Florida. An unhappily in love American of Latvian origin built an entire castle for his beloved, but she never reciprocated his feelings.


Human genius was able to come up with a sensor, automation and electric drive, but none modern technology does not carry the main thing: a particle of the soul and warmth of the hands of the Master, who embodies his plan in seemingly ordinary things. And then these objects become real masterpieces, which we told you about in our article.
Good afternoon, today I will tell you about all-all methods of making gates with your own hands. In this article we will make swing WOODEN gates... But I also talked about metal gates in as much detail as possible - in a special article Metal gates – 50 photo ideas (from forging to metal profiles).
So... today you will find out ALL THE SECRETS... and all the principles... and the nuances of that how to properly make a wooden gate yourself - from scratch - without any skills in this field. At all! That is, you can be a green newlywed student... or a beginning summer resident-retirement... or a pampered city lady who inherited a village house... or anyone. If you need a NEW WICKET for your dacha or garden... then... my article is designed just for that TO TEACH you how to make any wickets brilliantly- either for yourself, or for sale to neighbors... Believe me, having assessed your skill, the neighbors themselves will come running to you with the desire to buy the same model of gate (... what a good dacha business... and fun at the same time).
Now let's get down to business... Making and installing gates - who knows, maybe this will be your new profession... with my light hand.
Here's what we'll do:
- Wooden SLATT WICKETS ON A FRAME (several types)
- Wooden FRAME gates (with sheathing or lathing)
- Wooden WICKETS-PORTALS (with pergola-sheathing)
- Wooden gates with ROUND ARCHES (designer and simple)
Yes, yes, all this - you WILL WANT and BE ABLE to do it yourself...After reading this article...

So, let's go... Chapter one... Let's start with something simple (so as not to frighten off faith in the success of the wicket project)...
Wooden garden gates - SLATT (i.e. made of slats, boards)
Everyone has seen gates like this everywhere... in old movies about village life... in your barefoot childhood on summer holidays with your grandmother... at your friends' dacha.

These gates are called FRAME... because... they have a FRAME-HOLDER onto which the laths are stuffed.
That is, this is the SIMPLE MODEL of a gate for a summer house or garden - which consists of two parts - a FRAME... and PADDING SLATS.

Here in the picture (above and below) we see a standard gate WithZ-shaped frame. That is, first we do letter shaped frameZ, and then we stuff 6-8 wide or narrow slats (boards) onto it. The hinges for hanging the gate to the post are attached to the horizontal beams of the “letter Z” of our frame.
As you can see (in the photo below)... you can attach NOT SLATS to the sides of the gate... but THICKER BAR... for the solidity of the product.
Hinges may be different - the main thing when choosing hinges is to take into account the LOAD that these hinges will bear. The heavier the gate you make, the stronger the fastening loops should be. Hinged gates are called swing gates... because they swing open, i.e. open in one direction.

Here another option THE SAME principle of creating a slatted gate (on a frame in the shape of the letter z)
But with ONE DIFFERENCE... here are the padding slats different lengths...longer in the center, shorter towards the edges.
And it turns out beautiful wave along the top edge of the gate.

Or... look see the photo of the gate below - what an interesting addition that was invented here!!! Alternating low and high slats...
By the way, the frame here is ordinary (not the letter Z), but simply two slats at the bottom and top (this is done for beauty, so as not to distract attention from the original sheathing)
... And it's worth it... look how interesting the CRATCH is made...

The slats go CLOSE to each other - they are packed WITHOUT GAPS...
but... long and short ALTERNATE...
That is, we are for the sheathing we prepare 2 GROUPS OF RACKS — LONG group and SHORT group... And we do it so that within their group the slats are also not the same in length (one central one is the longest, next to it there are 2 shorter ones, then 2 more shorter ones... and so on to the edges.
We do SACK PACKING WITH ALTERNATING groups... and sizes...that is, CLOSER TO THE EDGES we stuff slightly shortened slats... and CLOSER TO THE CENTER we stuff slightly longer ones.
As you can see... small change...(the designer just played with the long slats) - and what a beauty it turned out to be.
Now let's talk about the frame - for such SLATT FRAME WICKETS.
As we already understood...
... A FRAMEWORK for our country gate may look like not just in letter shapeZ …
Here in the pictures of the gates below - we see what can be done another frame for stuffing slats. As hourglass...or in the form of a triangle... any frame silhouette will be correct. The main thing is that it fulfills its task - holding the nailed sheathing boards.
Therefore, you can come up with your own frame shape (and this way and that way will be correct). Nothing limits your imagination. It all depends on what scraps of timber you found in your yard... and how much weight your metal hinged hinges for the future gate will withstand... (what more beams on the frame, the heavier the weight of the finished wicket will be).
Here - in fact, you have already learned how to make a frame gate...
... AND IF YOU WANT TO MAKE THIS Wicket and swing GATES - IN THE SAME STYLE, then here’s a photo idea for you... (gate, gate and fence - all made by the hands of Homo sapiens)
Front view (nice)

Rear view - so you understand what kind of frame there is at the gate... see? Curved cross beams...very nice.
(don't be alarmed bent beam shapes in the frame... we will now gradually approach this)

And here’s something else I’d like to add about frame wooden gates...
If your entrance portal to the yard is TOO WIDE, then the swing gate can be wide, double-leaf... Consist of two halves that swing open different sides. Here is a close-up photograph of her, it will be useful for those who need it.

Now we will talk about the FRAME frame for gates...
WOODEN GATES - WITH FRAME...
LET'S LOOK HOW THIS IS DONE FRAME WICKET using a specific example from the photo of the gate below. I even I'll draw an assembly diagram such a gate - because clarity in pictures is always clearer than just “a lot of beech trees.”

Such a gate is made according to the principle -
- knocked down a FRAME from the bars...
- filled the frame with SHIATING or lathing (made of boards, slats, plywood)
The beams can be connected using SCREWS... long screws are screwed in diagonally... at an angle.

OR... you can connect the wicket bars using the GROOVE-PIN method... The bars in their sides have GROOVE HOLES (grooves)... and at their ends they have EARS-PINS - the lugs are driven into the grooves ( wooden hammer) and due to this, the frame elements are fastened.
On the diagram of the stages of ASSEMBLY OF SUCH A FRAME WICKET - we see on the vertical beams of the upper sheathing - these same ears... with them they are inserted into the holes on the bottom beam - and the upper beam of the frame is put on them (with their drilled grooves-holes they fall into the ears of the sheathing beams).
Of course you are interested STEP 3... you probably have a question: “What are these pins sticking out on the beams? And where can I get them?
I'LL TELL YOU. We will fasten these beams in the same way as the balusters of a wooden staircase are fastened(gee-gee, you don’t know what balusters are?) These are the same sticks that are driven into the stair step with one end and into the railing with the other - they make up stair railing which prevents children from falling down flights of stairs)
Here’s what they look like... using the example of this carved BALOST BEAM... (by the way, at your gate, no one forbids you to use NOT SIMPLE... but CARVED sheathing frames - it will be absolutely super).

So these are the same baluster beams are fastened using the PIN METHOD... Here's how to do it yourself. We need a thick drill... and a piece of wooden stick of the same thickness (this will be the pins) (hmm, even simple pencils made of hard wood will do for this role, they will hold very well).
So, stocked up with a drill and pins... let's start the process. At the end of our future slats, we drill a hole of such thickness that our wooden stick-pin fit through tightly. We drill to such a depth that this stick will fit in there only partially, 2-5 cm is enough... and so that 2-5 cm of the stick will remain sticking out...
And in this way, having made pins on the beams of the sheathing... and holes on the beam of the gate frame... we will attach the sheathing beams to the wicket FRAME.
As you can see, everything is simple. According to the laws of mechanical physics (to increase strength, the pins can be coated with any wood glue).
These gates from the photo below are made using approximately the SAME TECHNOLOGY...
That is, you can come up with your designs… the main thing is to adhere to a single principle YOU NEED A FRAME... and you need ITS FILLING (in the form of sheathing with a board or batten... or in the form of plywood sheathing)

WHAT WILL THE FRAME OF THE FORM BE – it’s up to you... 
See how simple it really is...
You take it and do it - just 2 steps... 1) Made a FRAME... 2) Made it FILLING. And everything is ready - drill holes, hang your new gate on the hinges... And call the neighbors to grab it... 
And then.. and swing gates can be made according to the same principle of FRAMEWORK + LATING and COVERING... Beauty... And simplicity...

A swing WICKET can have a FRAME OF ANY SHAPE...
Even curved with graceful curves... and lopsided (with an oblique slope of the upper part)... Like here, for example (photo of the gate below).
Bent FRAME elements (for the frame of the gate) - cut from a wide thick board (or wide beam) - ordinary circular saw.

Here's another option for a FRAME WICKET with BENT beams... If you can order such bent beam elements, then the shape of your gate can become more interesting... 
Or such a BENDED FORM can be just CUT FROM A SOLID WIDE AND THICK BOARD... Draw on the board with a pencil the rounded outlines of the future (right and left) frame - and cut it out with a circular saw. After assembling the frame– of three elements – two bent side beams and one lower straight beam.
Inside the frame - we insert a frame from a MIDDLE BEAM... two CROSSED BEAM. Filling the lower part of the wicket frame plywood sheathing(we just stuff a sheet of plywood)… and top part fill it with a beautiful diagonal sheathing of slats.
Or here’s another COMPLETELY ROUNDED GATE...
Yes, I agree, this gate in the photo below is made of metal (those who looked closely at the photo noticed)... BUT... what is stopping us from making the same model of the gate in wood. Bars... slats... yes please!!! If only there were pens with a hammer... and eyes with a twinkle... 
Hint for those with an idea– semicircular elements of the sheathing... we cut out a sheet of plywood with a jigsaw... we draw such “arcs are not very wide” and cut them out with a jigsaw as in labor lessons at school... And the upper arc-shaped beam... we saw out Not from thin plywood... and from a thick board, with a circular saw.
Filling of the wicket frame can be CONTINUOUS (i.e. without holes)…
For example, you can simply hammer wooden frame- boards HORIZONTALLY... (as in the photo below)...

Or nail it up with boards DIAGONALLY... now I’ll tell you step by step how such a gate is made...
- We make a frame for the gate - we make it from beams (it can be rectangular, it can be with a rounded top)
- A narrow strip is tacked onto the inner sides of the frame... tightly... tacked at an angle.
- And then, onto this inner narrow river, a board is placed at an angle... and it is placed on both sides of the gate - on the front and on the back. To avoid holes... we stuff the board onto slats WITH SPACE between the boards 2 times narrower than the width of the board itself... Thanks to this, the back, back padding of the board will completely cover these gaps (made by the front front board).

Or maybe a gate fill the bottom with plywood... on top - with boards butt-to-butt... and for beauty on the bottom sheet of plywood sheathing fill a thin lath - in the form of a diagonal lattice pattern. And paint it one color.

IN SHORT DON'T BE AFRAID... Do it. It’s clear in the picture... it’s simple in reality.
You can start with the most simple options... Everything will work out... and you will be proud of yourself - so skillful and skilled (oh boy, he's in great demand!!!)


And also... if you have some extra money... or a good blacksmith you know... then such a FRAME wicket can be supplemented with forging elements... That is, in the sheathing of the gate, use NOT WOODEN BALOSTS... but metal picket fence - forged or welded. Here's how it was done in the photo of the gate below.

And we continue...
AND NOW IT WILL BE ABSOLUTELY COOL))))
WOODEN GATES… WITH ENTRANCE PORTAL…
Portal to another world... Oh! how beautiful and promising it sounds... But it’s really your territory... your garden... this is another world, with an atmosphere of comfort and hospitality that you and your family have created yourself.
So why not make the gate in the form of a PORTAL to happiness...
The simplest option is in the photo below. Looks good next to it tall bushes... lush trees... or a plant crawling along the portal.

And in the photo below we see how small arc-shaped wire frame thrown between the left and right support posts of the gate. The wildly blooming bindweed is specially thrown onto this iron wire pergola - and a beautiful portal strewn with flowers is created... The gate opens and, passing under the flowery arch, we feel a wonderful aroma. 
Also... the entrance portal to the garden can be decorated in the form of a PERGOLA...(a pergola is columns supporting a sheathing of beams). On the “Family Heap” website I devoted several articles to these wonderful structures... see . Pergolas - how to make it yourself SIMPLE LESSONS.
Here's how here - 4 beams each on the left and right - two horizontal beams... they are covered with sheathing made of boards. The gate can be any (in the photo below we see a forged gate) 
And here is another version of the PERGOLA-PORTAL...
There’s nothing terrible here either... it’s just something bad in appearance...
but in fact... when looking at the X-ray... we see what is here...
- ... 2 powerful thick beams each hold a BEAM WITH SLOTS... there are three slots... (the beam-column holds this beam with the help of an ordinary metal foot-thrust - they are black with 4 screws in the photo)
- There are 3 horizontal boards placed in the slot...
- and on top of the boards there is padding and lathing with thick slats.
All! We're done!
Your little son has already built something like this out of Legos... but your construction set will be larger, and that’s the whole difference.
The diagram, as you can see, is not complicated (9th grade drawing). They took a friend to help and started stirring up grandiose project... And we already know how to make a gate (note, a frame one) (we just learned how).
And here’s another model of a garden gate - with a canopy roof... it’s a little overgrown with bindweed... but through the green foliage you can see what’s here...
- supporting columns... 2 on the left and 2 on the right...
- We place a beam on each pair of columns - a left beam and a right beam.
- On these side bars - we put the roof on... the drawing of the canopy roof will be in the form two silhouettes of the letter A, made from beams. You need 2 such beam beeches-A (back frame and front frame) that are connected to each other by a beam - the ends of which are nailed to the tops of these beeches A.
And the model of the gate from the first lesson of our article is a regular frame in the shape of the letter Z - and a lathing with a board - which was then (after stuffing onto the frame) cut out in a semicircle with a saw. It turned out very tender.

Wooden gates WITH ARCHED VOX…
And here is another type of design of frame gates for the garden... This is when the SUPPORTING POSTS of our gate continue upwards - forming arched bend.
That is, we made a gate... installed support pillars... hung it on the gate (with metal loops)... and we live... And suddenly we wanted to add something... And we decide to make an ARCHED VOX... 
On a thick board (the same thickness as the support pillars) we draw halves of the arc - cut them out - fasten one common arc together - and install it on the support pillars - one edge of the arc on one pillar - the second on another pillar. Fastening the arc elements can be done using the same SLOT-PIN METHOD (which I talked about earlier in this article).
Here are more variations on the same theme...
A) gray gate - here we insert an arc between the supporting posts of the gate - and attach it to the screws. And we also cut out the plank sheet of the gate itself according to a round stencil.
B) green gate - to arched design support pillars ADDING PILLARS HOLDING THE PERGOL... along which the green vine climbs.

Usually these fences are always made of brick(this is the most economical material)… and then they are either plastered… and painted in a color you like. Nearby you can hang a flashlight(very cozy and fabulous)... and there will definitely be more greenery around effect of an old Italian house.

Or the facade of such a brick arch-fence is covered with tiles imitating stone.

And also... wooden gates can be made from RAW WOOD... or rather, processed by time... and not by a carpentry machine
WICKETS FROM DRY STAND... DRY BAGS AND BRANCHES.
If you live in an area rich in windfall and dead wood, then you don’t have to go far to get material for a gate.
Here are some delicate designer things you can do for your garden...
Precisely as garden gate I propose this option. For the front part of the house, such a gate, of course, will not be suitable... but for a corner of peace and quiet, for a lush overgrown corner of your hacienda, such a gate will be very useful (if this is permissible by the overall design concept of your garden).

And here is an example of a gate made of the same beams and branches.

That's all for today... That's how many wooden swing gates we made today - in our minds... Now all that remains is to do it with our own hands - in life.
I really hope this article has given you COURAGE and the itch for CREATIVE EXPERIMENT.
Now the spirit of the COOPER sits in you. It's time to go look for beams and boards suitable for your idea... or, on the contrary, push the birth of an idea away from the materials available.
And this article was written (and in some places drawn) by a woman.
Because... only a woman can inspire a man to create beauty. What I actually did these two days for a solid 16 hours.
So go and create (and I’ll go and finally eat...)
Olga Klishevskaya, especially for the site
Take care of your family heaps... These are your legs and arms.
These are your ears and eyes... and a source of warmth and affection.
If did you like this article
And you want to thank the free author for this painstaking work,
then you can send any amount convenient for you
on his personal YaD wallet - 410012568032614
Yu. Podymakhin, Reutov, Moscow region
Sooner or later, every developer faces the question of either constructing a fence with a gate, or reconstructing an old one. In this case, you can use the services of hired workers or do everything yourself. The second way is closer to me.
Having become fascinated by Russian wooden architecture, I wanted to install gates and a fence “in the antique style.” But almost a year passed from the idea to the decision to start work, because there was no time, and there was not enough visual material: seeing an old fence in good condition is very rare. Everything that came across was not always a successful stylization. I had experience working with wood (namely, I decided to make a fence and gate from wood), so I set to work on my own.

I intended to make a gate out of edged boards and a canopy over them. To do this, I attached three posts made of 100x100 mm timber to existing iron posts with 10x120 mm bolts (photo 1).

Photo 1
I treated the wooden pillars, like all other parts of the gate, with fire protection in two layers, and the bottom of the pillars with bitumen mastic. I did not dig in the wooden posts, but simply placed them on the ground (photo 2).

Photo 2
A frame made of bars with a cross section of 50x50 mm was attached to the top of the pillars for constructing a gable canopy (photo 3).

Photo 3
Two clarifications need to be made at this point.
Firstly, bars with a cross section of 50x50 mm are usually sold in lengths of 3 m. This means that the width of the gate cannot be greater than this value. The matter is further aggravated by the fact that, for example, in the pack of 8 pieces that I bought, there was not a single bar longer than 2.99 m. Therefore, the triangular frame on the middle pillar had to be placed not along its axis, but offset towards the long one span so that it is possible to block it.If it were necessary to make a wider gate, I would have to take a beam with a cross-section of 50x100 mm and a length of 6 m and saw it lengthwise, obtaining the necessary bars of arbitrary length.
Secondly, when designing a frame for a gate canopy as roofing material I chose metal tiles, which I cut with a grinder into strips 70 cm long (this is the optimal cutting of a standard sheet with a minimum of waste). And this is not entirely desirable, since when cutting, the coating is destroyed and the cut edge must be tinted, as it begins to rust intensively. In addition, no matter how hard I tried, I could not get a smooth edge when cutting.
To avoid these difficulties, you can order already cut sheets from metal tile sellers. But they cut in sizes that are multiples of 50 or 85 cm, which is determined by the technology of the cutting process. And when designing the roof frame, this must be taken into account.
Lumber, no matter what time you buy it, is always raw. Therefore, a fence or gate without gaps can be made only if you use tongue-and-groove boards (which is expensive), or by stuffing slats or boards into the gaps after drying (and this increases the weight and cost of the gate). I used edged two-meter boards with a section of 25x150 mm for the gate. When purchased in winter, the boards had a width of 150 to 155 mm, and after drying they became up to 145 and even 140 mm wide. This means that on a gate with a span width of 3 m it is possible to “lose” up to 29 mm during shrinkage.
Considering heavy weight both raw and dried wood, for the gate wings it is necessary to make a strong frame frame with struts, which I made from wood (photo 4).

Photo 4
To create conditions for natural drying of the boards and to obtain an even plane of the gate, I attached the crossbars, without sawing, with two bolts on both sides to the hinges, and then stuffed the boards onto them. About 2-3 weeks after drying at natural conditions I removed the boards, installed the struts and reattached the boards, pulling them together as tightly as possible. After that, I finally screwed the crossbars to the hinges, after which I sawed them in the middle.
It is advisable to rehang the boards in wet weather, when the boards have maximum size. If this is done in dry, hot weather without taking into account possible expansion, then in the fall when it rains, the gate will “unlock.” And at best, they will simply bend.
The advantage of this approach is that the gate leaves are obtained with virtually no gaps. And the gates, in addition, after sawing the crossbars, practically do not require complex locks to align the gates during operation.
This method also has disadvantages. So, while the boards are drying, you cannot use the gate, and if you have a car, you will have to leave it on the street. Plus, there is actually double work when installing the shutter boards.
The final stage of work is painting the gate.
First, I “aged” the boards, for which I processed each of them wire brush on a drill (photo 5). It is better to process raw boards - it turns out easier and faster. After that, the entire structure was covered with Pinotex.
Photo 5
Please note that before final installation I painted all the end surfaces of the boards (photo 6), as well as the crossbars themselves on all sides.

Photo 6
If this is not done, the tree in these places may rot (photo 7).

Photo 7
As a lock, I installed a bolt on the top crossbar. On the lower crossbars, I secured the iron corners with screws with the shelf facing outwards and placed a piece of 5x5 cm bar into the resulting niches. The result was a traditional, modernized lock. It not only locks the gate, but also keeps the doors in one plane. If the weight of the gate is large, then wheels can be attached to the bottom. I installed a padlock on the gate (photo 8).

Photo 8
Forum “Household Affairs” on www.master-sam.ru “Home” 3/2009
[email protected]
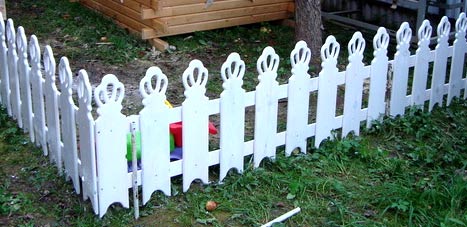
Most often your private territory a person tries to fence off as high as possible and who has little sympathy for himself, even despite his attractiveness and beauty modern materials. But for those who want to be open to the world and people, carved fences made of wood can be an excellent option.
This is what a carved wooden picket fence looks like
Original openwork fence, made with your own hands, will not leave anyone indifferent. The house behind such a fence seems especially cozy and hospitable.
A light carved palisade is unlikely to become a particularly reliable defense for the site; rather, it protects the garden from random animals. However, the excellent decorative qualities and aesthetics of natural wood are difficult to dispute. do not lose their relevance due to the following properties:
Types of techniques for creating a carved fence
To make a carved fence at home, and especially without experience, it is better to choose simple techniques and simple patterns. Some wood carving methods require specialized equipment, which is not cheap and requires certain knowledge and experience. Do-it-yourself wooden carved fences are best made using the following techniques:

Geometric and lace techniques are most often used on boards or picket fences, which then become the fabric of the fence.
 Original fence pattern made in lace style
 Boards with contour patterns are prepared in advance and secured to the finished fence so as not to damage the volumetric carved pattern with nails or screws. Usually wooden parts, made using the technique of contour carving, serve as additional decorative elements for the finished fencing fabric.
Wood selection
The most inexpensive base for a carved fence is multilayer plywood. For plywood, it is best to use a file with fine teeth; a regular hacksaw will also work. The finer the saw teeth, the cleaner the cut will be, and no additional grinding of the cuts will be required.
To make a carved fence look more expensive and sophisticated, you should use wood valuable species. Each type of tree has its own characteristics. For example, maple, ash and poplar have buds that form a bird's eye pattern. Oak or beech has a finely speckled pattern.
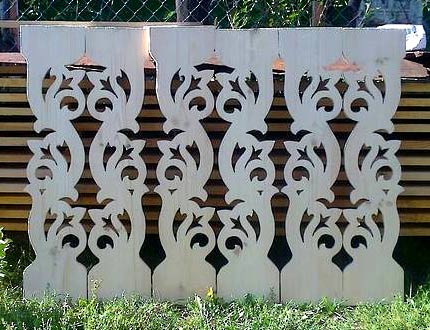 Ready-to-install carved fence panels
 Due to the natural curvature of the trunks, a particularly pronounced curvilinear pattern is present in walnut, ash, and elm. It should also be taken into account that to make lace carving you can use plywood and any type of wood, including very hard ones conifers. But the technique of geometric and contour carving requires deciduous wood so that the surface of the board is uniform, smooth, and without inclusions.
Wood carving process
Before applying a pattern to wood, you need to carefully prepare the material. First, the surface of the wood is processed with a plane. Very dark wood can be tinted before work. To give the surface shine, varnish is used.
The applied design must be clear and noticeable; for light wood, black or blue copy paper is used, for dark wood - green, yellow or red. You can also leave an outline on the board if you press firmly through the paper stencil with a pen or pencil.
 Applying a pattern to a cutting board
 Although you can do wood carving with your own hands with an ordinary sharp knife, when building a fence you will need a lot of preparations, so you need to take care of at least the most basic equipment:
- sandpaper for woodworking or a power tool with a special sanding disc;
- knife-cutter (to create the contours of the pattern);
- straight and semicircular chisels different sizes(used for cutting patterns on wood);
- manual or electric jigsaw (to create a fence with lace details).
The process of wood carving requires compliance with safety precautions.
 Wood carving tools
 A wooden picket fence or board must be securely fixed on solid ground. flat surface or on a workbench using clamps. Holding the workpiece on your knees is unacceptable. When creating a contour pattern, the knife is held in one hand, and with the other hand the blade is guided along the intended line of the pattern. For rounded parts it is convenient to use special semicircular chisels.
For lace carving, just select a relatively flat board and, using a jigsaw, start cutting holes according to the applied pattern.
The resulting patterns do not need to be sanded and processed, and this is another big advantage This technique is for inexperienced craftsmen.
Every owner of a private home, be it a country house or a building for permanent residence, upon completion of construction, is faced with the task of installing gates. In fact, offered on modern construction market gates, photos of which can be seen in the article, can satisfy any practical and aesthetic needs.
The choice of design is a responsible task, since its purpose is not only to protect the site from intruders. A correctly selected gate for a private house, a photo version of which can be seen below, is a decoration of the entire architectural ensemble and its face. After all, they are the ones who create the first impression of the owner. Therefore, when deciding the issue, one should proceed, on the one hand, from the point of view of the practicality of the material used, and on the other hand, from design considerations. It is important that the design does not violate the overall harmony. Even on their own beautiful gate and gates can look ridiculous if they are stylistically inappropriate to the house, other buildings and the fence. 
When deciding on the installation of gates, first of all, you need to decide on the material.
Materials
Wood
Wooden gates for a private home, photos of which you will see below, are a very popular solution. The reason for this is a number of advantages that wood has. These include:
- Environmental safety of the material.
- Easy to install the structure and the ability to do this work yourself, without the help of professionals.
- Relative lightness of construction.
- The ability to do installation without expensive and complex equipment.
The main disadvantage of structures made from natural wood is their flammability. Therefore, they are unsafe in terms of fire. In addition, such structures require regular procedures to ensure their safety and include:
- Touch-up and repair.
- Treatment with antiseptic compounds to prevent rotting and fungal damage.
Another disadvantage is the difference in weight that occurs when dry weather changes to rainy due to the ability of wood to absorb moisture. The result may be their deformation. 
Corrugated sheet
Gate options for a private home include structures made from corrugated sheets. This material is profiled galvanized steel sheets. Fences and gates for a private home, made of corrugated board, are a widespread design. The reason for this is the numerous advantages that this material has. These include:
- the ability to choose any color to suit your taste;
- relatively low cost;
- ease of installation;
- small weight;
- durability;
- no need for constant care;
- numerous design options.
The main disadvantage of structures made from this material is their lack of sophistication from the point of view of aesthetic nature. However, by showing your imagination, you can choose interesting colors, and also decorate the gates around the perimeter in an original way. As a result, the gates for the house, photos of which you will see below, will look very attractive. 
Euro picket fence
It is a variation of the previous material and consists of metal profiled strips with polymer coating. Designs from metal picket fence have an aesthetic and modern look. 
Forged metal
Forging allows you to create exceptionally beautiful gates; photo versions of such gates are presented below - and each of them can safely be called a work of art. The disadvantage of this solution is its high cost. Only fairly wealthy owners of private houses can afford to install a forged structure. In the same time, Forged gates and the gates, photos of which you will see below, have next row advantages:
- durability;
- high level strength and wear resistance;
- aesthetic appeal;
- possibility of manufacturing gates according to individual order;
- compatibility with any other materials;
- providing visibility.
However, some people perceive this last advantage as a disadvantage. In this case, in order to hide the situation in the yard from the views of passers-by, you can attach it to the gate polycarbonate sheets.
The downside is the large mass, which requires pouring a solid foundation and installing heavy pillars during installation.
In addition to wood and metal, they can also be used polymer materials: vinyl and slate. 
Varieties
Once the material has been selected, the next step is to select the type of structure. What types of gates are there for a private home?
Entrance gate to a private house, photos of which are below, can be:
- sliding;
- swing;
- retractable;
- lifting;
- mechanical.
Today, two types are most common - swing and sliding. 
Swing structures
These gates, pictures of which can be found on the Internet, are perhaps the most ancient solution. Their design is extremely simple. They consist of two doors, which are attached to support posts using strong hinges. Their advantages are the following:
- ease of installation;
- ease of care.
The main disadvantage is the availability of area for opening them. In addition, stoppers must be provided, since during strong wind the doors can damage the body of an incoming car. 
Sliding
The main advantage of this design is that no area is required for opening. However, there are also disadvantages, namely:
- Difficult to install.
- Need for more care due to heavy strain on small parts.
- Prone to failure due to factors such as rust and dust.
Style and design
The photo below will clearly show you what the design of gates and gates for a private house could be. Currently, there are a variety of design solutions, allowing you to choose beautiful gates for a private home, photos of which are presented in the article. However, for those who are deciding which gate to choose for their home, the photo gallery at the end of the article will help determine the direction in which to search for a solution. 
Gate
Speaking about gates, we cannot ignore the issue of the wicket. Of course, a gate is a necessary structural element, since opening the gate every time you enter a site is very inconvenient. 
What considerations should be taken when installing a gate? Here it is also worth first deciding on the material. It would be quite natural and logical to use the same material for the gate as for the gate. Otherwise, the stylistic harmony of the design will be disrupted. In addition, the purchase different materials may create additional costs.
Where is the best place to make a gate? The best place for a gate - next to the gate. Good decision- use of the same support pillars to install the gate. This eliminates the need for additional support pillar, which speeds up the installation process. 
The most popular type of gates are classic swing gates. Some home owners install sliding gates. However, due to the complexity of manufacturing, such a design is extremely rare.
Automatic system
For those owners of private houses who are fans of convenience and comfort, this modern solution, like the entrance gate to a private house, photo examples of which you will see below. Their peculiarity is that they are equipped with an electric drive and operate in automatic mode. All they need is a relatively low-power electric motor and simple electronics. 
Electric gates allow the owner to open and close them while in the house or in the car. Currently, there are designs equipped with sensors tuned to a signal from the owner’s car, which themselves open or close when it is given.
As a rule, the electric drive is installed on sliding gates. Automation of opening and closing swing structures has a high cost and is therefore rarely used. 
Photo gallery
We present to your attention various options gate decoration in 14 photos.


