The decision to independently organize floor heating using a water heating system raises the question: “How to properly design and install a water-heated floor with your own hands?” This system is quite difficult to install. But this “complexity” is compensated by further ease of use and more comfortable heating of the room, compared to radiator heating. You can reduce the cost of installing a heated floor by excluding the services of qualified craftsmen from the work process, that is, at your own peril and risk, take the entire installation process into your own hands. It is necessary to correctly calculate, select and purchase necessary materials, prepare the floor surface for installation of the heating system and... just do it!
What is a warm water floor?
Warm water floor is an option popular today heating systems. To correctly install a water heated floor, you need to have basic information about the installation of water systems and know the pitfalls of such a process. After all, apparent simplicity in practice turns into a mass of questioning and problematic situations, which, with experience, could be foreseen in advance.
The principle of operation and design of a water heated floor is quite simple - the coolant, heated by the boiler to a certain temperature, circulates through a special pipeline mounted in the floor of the room, transferring heat from the coolant in the pipes to it.
Calm down! Our negative experience of knowing cases of leaking heating systems instills fear, what if a leak appears? What's wrong with the floor?.. What's wrong with the neighbors? What words can you hear from them in such a situation?
Today's “advanced” technologies offer people such special pipes for warm water floors, which (with correct installation) virtually eliminate the possibility of damage to the pipeline in the floor!
List of required materials
A reliable installation of a warm water floor requires the use of high-quality component materials, a list of which should preferably be compiled in advance and purchased one-time, so as not to “roll” kilometers to the nearest or profitable construction supermarket.
Here is a sample list of required materials:
- Thermal insulation means: polystyrene foam foil mats or extruded polystyrene foam boards (for heavy floor loads).
- Damper tape (self-adhesive) with a thickness of 5 to 10 mm.
- Reinforcing mesh (Secures the screed, but can also be used to install a heating pipe on it).
- Metal-plastic or polyethylene pipe (What to choose? How to calculate? Read below!)
- Pipe fastenings (brackets, mounting strips, rotary arches, etc.)
- Additional ingredients for the concrete floor mixture (plasticizers, fillers, etc.)
- Manifold systems (combs) for connecting the circuit(s) of the underfloor heating system. As well as a cabinet for their “aesthetic” installation.
We prepare and insulate the surface under the water-heated floor
Before making a water-heated floor, we prepare a “bridgehead” for installation work, namely to optimize the condition of the concrete base on which the pipes for the warm water floor will be installed.
3.1 The old screed, if any, is dismantled to the base.
3.2 The base of the floor is leveled strictly horizontally - height differences of up to 10 mm are eliminated.
3.3 By laying waterproofing material The base is waterproofed. IN multi-storey building, for example, such waterproofing will save you from the need to make repairs to your neighbors below if the warm floor suddenly “leaks”. In a private house or on the ground floor, such waterproofing will be a serious obstacle to the slow but “sure” penetration of moisture (dampness) from the soil into the thickness of the concrete screed of the heated floor.
3.4 A damper tape is glued along the perimeter (along the walls), designed to further compensate for the thermal expansion of the concrete screed when heating the heated floor system.
Note! Warm floors can be installed using several “zone” circuits in one room. This allows you to differentially set the temperature in different parts of the room. If there are several circuits, a damper tape is also laid between them.
3.5 I hope you plan to heat your floor, and not your neighbors’ ceiling or the ground under the house. If this is the case, take care to insulate the base of the floor.
Floor insulation is carried out in several ways, based on the location of the room and the type of heating in it.
- The premises of the first floor, located on the ground or above an unheated basement, should be “seriously” insulated: for example, sheets of expanded polystyrene (thickness from 50 to 100 mm) laid on a layer of expanded clay.
- It will be enough to “cover” the floor of the apartment, with neighbors below, with sheets of extruded polystyrene foam (20-50 mm).
- In the case of using water heated floors as a supplement to heating radiators in the room, it will be enough to lay a layer of foil-lined (foil side up) polyethylene foam (penofol).
Interesting opportunity! If you have sufficient funds, to optimize the thermal insulation process, you can use specialized insulation mats with already prepared channels for laying pipes in them.
3.6 The next step is to attach the reinforcing mesh, designed to “anchor” the concrete screed covering the heated floor pipe system.
Attention, savings! The heating system pipes can be attached to the same reinforcing mesh using ordinary plastic clamps. This will allow you to save a little money by excluding fasteners for underfloor heating pipes from your shopping list.
Let's look at the “rounded” fragment of the section of the “pie” of the heated floor:

Design and calculation of heated floor parameters
Pipes
The best option for installing heated floors is polypropylene or cross-linked polyethylene. The cost of installing a water-heated floor when using polyethylene pipes will increase slightly.
When using polypropylene, it is advisable to choose pipes reinforced with glass fiber, since polypropylene itself has a significant coefficient of thermal expansion. Fiberglass “reinforcement” prevents the expansion of the polypropylene pipe, which in turn has a positive effect on the quality of the heated floor concrete screed.
Pipes made of cross-linked polyethylene are widely used today and have a less “significant” temperature coefficient extensions.
Pipe size - diameter 16-20 mm.
The maximum heating temperature is not less than 95 o C.
Maximum pressure - not less than 10 atm.
Collector system
The design of a water heated floor when using more than one floor heating circuit involves the use of a manifold cabinet with all necessary devices for connecting and controlling underfloor heating circuits.
Collector- this is a metal pipe “comb” with pipes for connecting circuits heating devices. The collectors are designed to provide differentiated control of various heating circuits.

The collectors are equipped with either shut-off or control valves. Shut-off valves are designed only to completely disconnect the heating circuit from the system (cheap, but inconvenient), and control valves allow you to smoothly change the supply of coolant to the heating circuit.
Must be present in the collector air valve, as well as a drain outlet.

The manifold group is assembled in the manifold cabinet, which usually consists of two (supply and return) “combs” on which the necessary valves are mounted.
The collector cabinet must be designed when developing the entire heating system of a house or apartment. It is desirable that this be a place evenly distant from all heating devices, usually in a wall niche just above floor level. The collector is selected based on the number of heating circuits connected to it.

The manifold cabinet MUST be installed above the level heated floors. The pipes from it must only go downwards - otherwise the air exhaust system will not be able to function normally.
Attention! - Why is it so difficult? - you ask. And you'll be right. The manifold group is not cheap and... If you use one underfloor heating circuit and do not want to “complicate” the system at additional costs, you can install water heated floors to the main pipes using “tees” with the obligatory installation of control valves on the supply and return pipes.

A thermostat for water heated floors can be installed in the manifold group. There are manifolds with electromechanical servo drives on the valves, which allow fully automated “climate” control of heated floors and heating radiators throughout the house. The special pre-mixers installed in them feed already mixed hot and cold water. It is not advisable to install such systems in a private house, where the heat loads on various heating circuits do not fluctuate sharply (the cost of a warm water floor at this age is instantaneous), even if you install a heated water floor with your own hands.

Calculation of underfloor heating pipes
How to calculate a heated floor for it efficient work? After all, for each room it is necessary to make an individual calculation of the heating circuits. To do this, you can use specialized computer programs or the services of design organizations available to you.
Incorrect calculation of a water-heated floor or complete disregard for it (installation of the system “by eye” and even without experience in such work) can lead to the appearance of a thermal “zebra” on the floor (alternating warm and cold zones), uneven heating of the floor in the room, heat leakage into cold uninsulated areas.
Parameters taken into account in the calculations:
- linear dimensions of the room;
- material and presence of thermal insulation of walls and ceilings;
- type of heat-insulating material for underfloor heating;
- type of finished floor covering;
- material and diameter of the pipes of the underfloor heating system;
- temperature of the “incoming” water (depends on the power of the heating system boiler).
Based on these parameters, the length of the heating circuit, the pitch of the pipe, as well as the layout of the pipe in the concrete screed are determined (More details on this below). These parameters will determine the heat transfer power of the floor of the room.
Installation methods and laying diagrams for heated floor pipes
There are several practical ways securing underfloor heating pipes to the prepared surface:
The use of special profiles with mounting sockets for pipes, which are attached to the floor surface with dowels. Such profiles make it possible to lay the pipe easily and evenly.

Fastening pipes to mats with bosses (when using specialized thermal insulation material for the floor).

Do-it-yourself water-heated floors using heat-insulating mats.
Fastening the pipe to the reinforcing mesh using plastic ties. The tie loop should be left free, taking into account possible thermal deformations of the pipe when heated.
 Securing the pipe to the reinforcing mesh using plastic ties
 This is what the finished mounted water floor contours look like with various types of pipe fastening:


The pipe is usually laid in increments of 100 to 300 mm. The principle is simple: than smaller step, the more power! But with a “small” step, the total length of the underfloor heating circuit increases, which increases the hydraulic resistance. In addition to the length of the pipe, each turn of the pipe affects the hydraulic resistance.
Circuits longer than 100 m must be divided into several and a collector system installed. The contours must be made approximately the same (in length and number of turns) in order to equalize their hydraulic resistance.
Attention! One SOLID piece of pipe is used for each circuit. It is IMPOSSIBLE to use joints or couplings in floor screeds! Therefore, it is necessary to calculate the required length of the pipe before purchasing it or install the pipe on the floor from a solid coil (if purchased for large-scale work).
The contour calculation for each room is performed separately. One heated floor circuit cannot be used to heat two adjacent rooms, especially with different temperature conditions in them. For example, you cannot lay one heated floor circuit in the living room and loggia. In fact, all the heat will go to heating the loggia, and the living room will not warm up well, especially if water enters its circuit after passing through the loggia circuit.
A heated water floor installed without following basic practical recommendations can bring problems to the house instead of heat.

For a loggia, attic, veranda, hallway, you need to calculate and lay your own circuit connected to the collector system.
The pipe usually arrives at the installation site in the form of a coil. Therefore... You cannot pull the pipe out of the coil (and this can be done so easily) - it must be unwound gradually, laying it down and securing it to the floor.


The radius of pipe bends is a critical value! It should not be less than (for polyethylene pipes) five diameters. If the pipe is critically bent, a whitish stripe may form on the bend, that is, a crease has formed. It is not recommended to lay a pipe with a bend in the screed due to possible damage during further operation during high temperatures and pressure.
When laying pipes through walls (when connecting to a collector), they must be “dressed” in insulation made of foamed polyethylene. And to connect to the manifold itself for polyethylene pipes, use or compression fitting or eurocone.
The choice of installation scheme is determined by the individual parameters of the room and functional purpose its various zones.
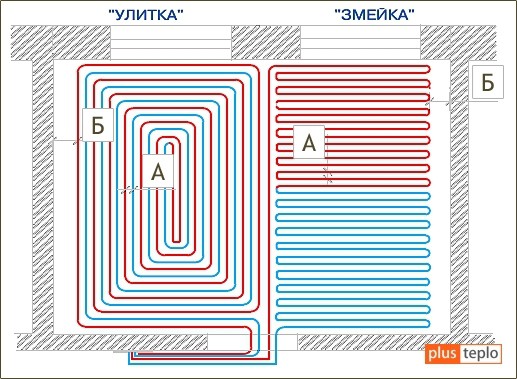
For example, laying a warm water floor is done in such a way that first the hot coolant enters the cold zone of the room (near the windows, balcony, external walls), and then warms up the rest of the room. The “snake” circuit has this functionality. Optimal uniform heating of a room of the correct shape can be easily achieved by arranging the pipe in the form of a “spiral”.
Pouring heated floor screed and installing finished floor covering
After completing the installation of underfloor heating pipes, it is MANDATORY to check them under high pressure. To do this, the system is pressure tested with a pressure of at least 5-6 atm for 24 hours.
After visual control pipes for leaks, swelling or expansion, a concrete screed is poured, which is carried out when there is operating pressure of the coolant in the system pipes.
Turning on the heating system to heat up to “dry the concrete screed as quickly as possible” is CONTRAINDICATED for the latter.
What else you should pay attention to:
- When pouring a concrete screed under finished ceramic tiles, its thickness should be 30-50 mm, and the distance (pitch) of the pipes should be 100-150 mm. This will eliminate the possibility of a “thermal zebra” effect.
- The screed for laminate or linoleum can be made thinner, but in this case it is advisable to use another reinforcing mesh laid under the screed on top of the heating circuit pipes.
Attention! If you use heated floors, do not lay a layer of thermal insulation under the laminate! Bring warmth to your feet.
Installation of the finished floor covering can be done after 28 days from the date of pouring! Take your time! Give the screed a chance to “calm down.”
- In the case of organizing heated floors on old wooden floors, you can use this method of laying pipes.

Starting the system
The system is started with the onset of cold weather. During initial startup, the heating time for the floors may be quite long. This is determined by the inertness of the floor heat-insulating “pie”. But in the future this inertia will play a positive role. For example, in the event of an emergency shutdown of the boiler, the floors will remain warm for quite a long time.
Let your home be provided with comfort and coziness by warm water floors made by yourself (yours).
Having chosen the option of water heated floors, also called hydraulic, for heating, you will have to put a lot of effort into installing them. Of all the possible types of underfloor heating, water is the most difficult to install, however, the result is a durable one that allows you to achieve greater comfort and savings than a traditional radiator system. You can reduce the cost of installation somewhat if you install a water-heated floor yourself. To do this, it is necessary to purchase all the necessary elements and materials, as well as prepare the floor surface in all rooms involved in accordance with established requirements.
If you have not yet fully decided on the type of heated floor -.
Surface preparation. Features of insulation of the base under a warm floor
The old screed is completely dismantled down to the base. Unlike when installing a heated floor, you should already initial stage level the floor horizontally if there are differences of more than 10 mm.
Important: When using a water heated floor, the device of which has several circuits, the damper tape is also laid along the line between the circuits.
To prevent heat from escaping downwards, it is necessary to insulate the base of the floor. Depending on the location of the room and the type of floor, as well as the target orientation of the heating system, the appropriate insulation is selected:
- If the heated floor is an addition to the main heating system, then it is enough to use foamed polyethylene with a reflective foil coating as a substrate for the heated floor (penofol).
- For apartments with heated rooms on the floor below, it is enough to use sheets of expanded polystyrene or extruded polystyrene foam with a thickness of 20 to 50 mm or other durable insulation of suitable thickness.
- For first-floor apartments with an unheated basement or houses in which the floor is located on the ground, more serious insulation should be used in the form of expanded clay and expanded polystyrene sheets 50-100 mm thick.
Advice: You can use specialized insulation for heated floors. On the one hand, such materials are already equipped with special channels for laying pipes of underfloor heating systems.
A reinforcing mesh is laid on top of the insulation. It is necessary to secure the screed layer that will cover the entire underfloor heating system. Among other things, it is possible to subsequently attach the heated floor pipe to the mesh, instead of using special fastening strips and clips. In this case, ordinary plastic ties are used.

Diagram of the heated floor surface
Selection of materials and necessary devices
Before making a heated floor with your own hands, you should decide on the composition of the equipment and all elements of the system and calculate the materials.
The composition and design of a warm water floor includes the following elements:
- Water heating boiler;
- Pressure pump (may be included in the boiler);
- Ball valves at the boiler inlet;
- Distribution pipes;
- A manifold with a system for setting and adjusting heated floors;
- Pipes for laying on the floor surface;
- Various fittings for laying the main route from the boiler and connecting underfloor heating pipes to the collector.
The pipe material for water heated floors can be either polypropylene or cross-linked polyethylene. It is better to choose polypropylene pipes with glass fiber reinforcement, since polypropylene itself has a significant linear expansion when heated. Polyethylene pipes are less susceptible to expansion. It was the latter who received greatest distribution during layout surface systems heating.
Pipes with a diameter of 16-20 mm are used. It is necessary that the pipe can withstand temperatures up to 95 degrees and a pressure of 10 Bar. It is not necessary to chase expensive options with oxygen protection and additional layers. Especially if the main goal is to reduce total costs for installation of heated floors.
The collector is a pipe with a number of branches (splitter). It is necessary to connect several underfloor heating circuits to one main supply line warm water and intake of return, cooled. In this case, two splitters are used, which are installed in a special manifold cabinet. One is for distributing hot water, and the second is for collecting return, cooled water. It is within the manifold that all the necessary elements for setting up heated floors are located: valves, flow regulators, air vents and emergency drain systems.

Diagram example of connecting a water heated floor
Calculation and distribution of pipes
For each room, the calculation of the length of the pipe and the pitch of its installation must be made separately. Calculations of water heated floors can be performed using specialized programs or using the services of design organizations. It is very difficult to independently calculate the required power for each circuit; a lot of parameters and nuances are taken into account. If you make a mistake in the calculations, this can negate the entire operation of the system or lead to unpleasant consequences, including: insufficient water circulation, the appearance of a “thermal zebra” when warm and cold areas alternate across the floor, uneven heating of the floor and the formation of leakage points heat.
To carry out calculations, the following parameters are required:
- Room dimensions;
- Material of walls, ceilings and thermal insulation;
- Type of thermal insulation for underfloor heating;
- Type of flooring;
- Diameter of pipes in the underfloor heating system and material;
- Boiler power (water temperature).
Using these data, you can determine the required length of the pipe used for the room and the pitch of its installation to achieve the required heat transfer power.
When distributing pipes, you should choose the optimal laying route. It is important to consider that water gradually cools as it passes through the pipes. By the way, this is not a disadvantage, but rather a plus of water heated floors, because heat loss in the room does not occur evenly.
When distributing water heated floor pipes in each circuit, a number of rules should be followed:
- It is advisable to start laying pipes from the outer, colder walls of the room;
Important: If the pipe entry into the room is not from the side external wall, then the section of the pipe from the entrance to the wall is insulated.
- To gradually reduce the heating of the floor from the outer wall to the inner one, the “snake” laying method is used;
- To uniformly heat the floor in rooms with all internal walls (in the bathroom, wardrobe, etc.), laying in a spiral is used from the edge of the room to the center. The pipe is brought in a spiral to the center with a double pitch between the turns, after which it turns around and unwinds in the opposite direction until it leaves the room and goes to the collector.
Most often, the pipe is laid in increments of 10 to 30 cm. In most cases, 30 cm is sufficient, and in places with increased heat loss it can be reduced to 15 cm.
In addition to the length and distribution shape of the pipes, their hydraulic resistance should be calculated. It increases with increasing length and every turn. In all circuits connected to the same collector, it is desirable to bring the resistance to the same value. To resolve such situations, it is necessary to divide large circuits with a pipe length of more than a hundred meters into several smaller ones.
For each circuit, a single piece of pipe of the required length is purchased. It is unacceptable to use joints and couplings on pipes that are laid in a screed. So the length calculation and order should be carried out after carefully carried out calculations with thinking through the entire laying route.
Important: The calculation is carried out for each room separately. It is also undesirable to use one circuit to heat several rooms.
To insulate a loggia, veranda, or attic, a separate circuit is laid, not combined with adjacent rooms. Otherwise, most of the heat will go to heating it, and the room will remain cold. Insulation under a heated floor is carried out in the same way as with a floor located on the ground. Otherwise, there are no differences in terms of installing heated floors on the loggia.
Video: theoretical seminar on the installation of heated floors
Collector selection and installation

typical manifold for underfloor heating
Having decided on the number of circuits, you can select the appropriate collector. It must have enough leads to connect all the circuits. In addition, the collector is responsible for regulating and adjusting water heated floors. In the simplest version, the manifold is equipped only with shut-off valves, which significantly reduces the cost of the system, but practically makes it impossible to customize its operation.
Options that require the installation of control valves are slightly more expensive. With their help, you can adjust the water flow for each loop separately. Although the increase in cost will be noticeable, such a system will allow you to set up a warm floor for uniform heating of all rooms.
Mandatory elements for the manifold are an air vent valve and a drain outlet.
To fully automate a hydraulic heated floor, manifolds with servo drives on valves and special pre-mixers are used, which regulate the temperature of the supplied water, mixing it with the cooled return water. Such systems, at their cost, can make up a large part of the budget for the entire installation of heated floors. For private use there is no particular need for them, because it is easier to carefully configure the collector group more than once simple type than to spend money on an automatic system, which will operate in the same mode even under constant loads.

An example of connecting a heated floor collector
The underfloor heating manifold is installed in a special manifold box. The thickness of such a box is most often 12 cm. The dimensions are selected taking into account the dimensions of the manifold group with all the necessary additions in the form of pressure sensors, air vents and drains. Under the collector group there should be space to the floor necessary for bending the pipes supplied from all the contours of the heated floor.
The actual installation of a water heated floor begins with the placement of a manifold cabinet. The manifold cabinet should be placed so that the pipes from each room and circuit are approximately equal in length. In some situations, you can move the cabinet closer to the largest contours.
The easiest way to hide a cabinet is to mount it into the wall. The thickness of 12 cm is quite sufficient. The main thing to consider is that punching holes and recesses in load-bearing walls It is strongly discouraged and even prohibited in most cases.
Important: The box should be installed above the level of heated floors, preventing pipes from diverting upward from it. Only in this case can the air exhaust system work adequately.
The manifold cabinet is assembled and filled according to a general standard in accordance with the instructions of the manifold used, so there are no problems with the installation of all elements and additional equipment will not arise.
Video: manifold assembly
Selecting a heating boiler
The choice of boiler is primarily determined by its power. It must cope with heating water at peak times of system load and have some power reserve. Roughly, this means that the boiler power should be equal to the total power of all heated floors plus a margin of 15-20%.
A pump is required to circulate water in the system. IN modern boilers, both electric and gas, have a built-in pump. In most cases, it is enough for heating one- and two-story residential buildings. Only if the square footage of the heated room exceeds 120-150 m² may it be necessary to install additional auxiliary pumps. In this case, they are installed in remote collector cabinets.
Installed directly at the boiler inlet and outlet shut-off valves. This will help turn off the boiler in case of repair or maintenance without having to drain all the water from the system.
Important: If there are several manifold cabinets, then a splitter is installed on the main route for supplying warm water, and after it - narrowing adapters. This is necessary for uniform distribution of water throughout the system.

general view of the entire system (connection of radiators can be excluded)
Installation of water heated floor pipes and pouring screed
Basically, heated floors are laid using special fastening profiles, which are secured to the floor with dowels and screws. They have sockets for securing pipes. With their help, it is much easier to maintain the pitch distance between the turns of the pipe.
Advice: To secure it, it is enough to use plastic ties that press the pipe to the reinforcing mesh. It is important not to tighten the pipe too tightly; it is better to keep the tie loop loose.
Pipes are most often supplied in the form of coils. Do not pull the pipe out of the coil, turn by turn. It is necessary to unwind it gradually as it is laid and secured to the floor. All bends are made carefully in compliance with the minimum possible radius limit. Most often, for polyethylene pipes this radius is equal to 5 diameters.
If you press too hard polyethylene pipe, then a whitish stripe may appear on the bend. This means that the material began to sharply stretch and a crease formed. Unfortunately, such defects cannot be installed in a heated floor system due to the increasing risk of a breakthrough in this place.
The ends of the pipes that are supplied to the collector are, if necessary, laid through the walls and enclosed in insulation made of foamed polyethylene. To connect the pipes to the manifold, either a Eurocone system or a compression fitting is used.
If this is your first time encountering polypropylene pipes – .

There are several schemes for laying underfloor heating pipes. You can choose the right one based on your needs. Along with other factors, it is worth paying attention to the arrangement of furniture and plans for rearranging it.
When the installation of underfloor heating is completed, a mandatory high-pressure system check is performed. To do this, water is poured into the pipes and a pressure of 5-6 bar is applied for 24 hours. If no leaks or significant expansions are noticed on the pipes, then you can begin pouring the concrete screed. Filling is carried out at connected operating pressure in the pipes. Only after 28 days can we consider that the screed is ready and begin further work on installing the floor covering.
Important nuances of forming a heated floor screed
There are some peculiarities in the formation of screeds over water-heated floors. This is due to the principle of heat distribution in its thickness and the floor covering used.
- If the heated floor is laid under the tiles, then you should make a screed about 3-5 cm thick, or distribute the pipes at intervals of 10-15 cm. Otherwise, the heat from the pipes will not properly warm the space between them, and this phenomenon will appear like a "thermal zebra". In this case, the alternation of warm and cold stripes will be quite clearly felt by the foot.
- Under laminate, linoleum, etc. It is advisable to form a thinner screed. For strength, in this case, another reinforcing mesh is used on top of the heated floor. This will reduce the heat path from the pipes to the flooring surface. Also, a layer of thermal insulation is not placed under the laminate, because it will only worsen the efficiency of the heated floor.
You can turn on the water heated floor heating at the first hint of the onset of autumn cold. The initial warm-up may take several days, after which the system will already maintain the required temperature. The greater inertia of water heated floors can also play a good role, even if for some reason the boiler is not able to heat the water for some time, the system will continue to transfer heat to the premises for a long time. In addition, you can keep the underfloor heating system on low power throughout the year, turning off most of the circuits and leaving only the part that heats the rooms where the flooring is made of ceramic tiles or self-leveling floors(hallway, bathroom, etc.), because even in hot weather such coatings feel cold.
Video: Installation of a water heated floor with your own hands
A water floor refers to a comfortable heating system, and in order for a heated floor scheme for a home to be correctly selected, it is necessary to know the area of the room and the number of rooms.
Compared to a traditional radiator heating system, which warm air rose to the ceiling, and the floor remains cold, the warm floor system evenly heats the room over the entire area, and the air temperature near the floor is higher than that at the ceiling, which has a beneficial effect on a person.
Compared to traditional system Warm water floor heating is 25% cheaper to operate.
Types and technology of heated floors
 The floor heating system uses two types of heating: water and electric. The principle of heat transfer for both systems is the same.
In the water version, floor heating occurs from floors laid out according to a certain pattern. concrete base metal-plastic pipes through which hot water circulates. The source of hot water can be electric, solid fuel or gas boilers, as well as central heating.
 IR panels
 Electric option floor heating uses a special shielded cable, laid in a similar pattern to water heating, but heating occurs due to the heat given off by the heated cable.
The market offers new technology floor heating based on thermo-pipes, in which the coolant, water or freon, is 12% of the volume of the coolant of a water heated floor, and the efficiency of the system is 98%. In comparison with a water-heated floor, the energy costs of a floor with coolant made from thermo-pipes are 2.5 times lower. Truth and cost with installation new system 7 times higher than the cost of a water heated floor.
Both types of floor heating provide comfortable living, but have operational risks that must be eliminated at the design stage.
Water floor installation schemes
The technological scheme for heating a floor covering with a water floor system includes: a source of hot water, a distribution manifold and a coolant in the form of copper pipes or metal-plastic pipes.
 Laying schemes for heated floors
  The uniformity of heating of the space depends on the laying scheme
 The source of hot water in low-rise buildings are boilers running on solid fuel, gas or liquid fuel and electric boilers, as well as district heating. The layout of pipes for water heated floors affects the uniformity of heating of the floor covering. There are 3 pipe laying schemes: snake, snail and combined.
The beginning of laying the pipe in a snake around the perimeter along the wall; on the second wall, the pipe laying turns into a snake, covering the entire floor area, and returns to the heat source. In this option, one half of the floor is heated hot water, and the second is chilled.
The zigzag pipe laying method is used if it is necessary to heat floor areas with different heating intensities.
 “Snake” styling
 The second option for laying a pipe in a snake is done from the wall with the coolant with a pipe folded in half: half of the pipe is for supplying hot water, and the other half from the opposite wall is for returning the cooling water to the coolant. The second snake circuit evenly heats the floor covering with two pipes of hot and chilled water.
The snail laying option involves laying pipes folded in half in a spiral around the perimeter of the room. Pipes must be laid along the walls, moving towards the center of the floor of the room.
 “Snail” styling
 This installation option also heats the entire floor evenly. The method of laying pipes in a heated floor system in a spiral is used in rooms where uniform heating of the floor is required, and the floor near the outer walls is heated more intensely, and this laying scheme allows the operation of boilers of lower power with the same coolant output.
For heating external walls corner rooms apply combined option installations where hot water supply pipes run along the outer walls. If you need to heat the floor near the outer walls more intensively, the distance between the pipes near the walls decreases, and closer to the center of the room increases.

The water floor is laid on a concrete base, wood flooring and on polystyrene boards.
To retain heat in the floor covering, a foil backing is placed on the base before installing the system, with the foil side facing the floor.
The joints of the rows of the substrate are sealed with foil tape.
Laying a water heated floor system allows you to evenly heat the floor area and reduce operating costs at the heat source.
The layout of the water heated floor is drawn in the project, taking into account the base material. The diagram shows the connection location of the water floor system to the hot water source, the installation option and the distance of the laid pipes from the walls of the room and between the pipes.
Pipe laying schemes for floor heating

Calculation of water heated floor
 Order the footage of floor pipes only after making calculations
 Without calculating the heated floor, you cannot start purchasing materials and assembling the system; the absence of a project will negatively affect the heating of the room.
Professional calculations of the water floor are carried out by heating engineers; a rough calculation can be done independently according to the instructions:
- We determine the installation location of the distribution manifold. We measure the area of the heated rooms and determine the diameter of the pipes in the heating circuit.
- When using a pipe with a diameter of 16 mm or 20 mm, the length of the circuit does not exceed 100 and 120 m. The circuit heats 15 - 20 m2 of floor, the difference in the length of the circuits does not exceed 15 m.
- Before drawing up a scheme for laying a water heated floor, we determine the permanent location of large furniture in which we do not lay a heated floor.
- The distance between the pipes in the circuit is 15 - 20 cm, depending on negative temperature V winter period. In northern regions, at temperatures below – 30*C, this distance is reduced to 10 cm.
- Based on the area of the rooms, we calculate the number of heating circuits, determine the need for coolant and select a collector. To learn how to calculate heated floors using the program, watch this video:
 After calculating the heated floor and drawing up a laying plan, we purchase materials, equipment, tools and begin installing the system.
The assembly of heated floors is carried out on concrete, polystyrene slabs laid on a concrete base and wooden frame, mounted on a concrete base.
Installation is carried out according to design diagrams, where the heat source with the distribution manifold, the heated rooms and the number of heating circuits in these rooms are determined.
 The collector distributes water flows along the contours
 A collector that distributes hot water flow according to warm water floor schemes is installed in the technical room or in distribution cabinet, into which hot water is supplied from a heat source.
The manifold is made in the form of two stainless steel cylinders, welded on both sides. One of the cylinders, through welded pipes, receives heat from the source and distributes hot water over the heating circuits, the other cylinder collects cooled water from the circuits and returns it to the heat source.
 The process of circulating water through the heating circuits is carried out using circulation pump, valves, valves and thermostat of the manifold group.
In addition to distribution functions, the underfloor heating manifold regulates the temperature of the water supplied to the heating circuits through a thermostatic valve, and, using an electric drive and valves of the manifold group, regulates the pressure of hot water flows in the heating circuits.
If the heat source is central heating, then a circulation pump in the collector group is not required.
Water heated floor connection diagram

Concrete floor
 It is advisable to lay heated floors on a flat surface
 Before assembling the heated floor, we level the concrete base using a self-leveling floor. If the surface of the concrete base has defects that cannot be eliminated with a self-leveling floor, we perform a concrete screed. Using the dried screed, we begin assembling the heated floors according to the project diagram.
- We install edge insulation from damper tape around the perimeter of the floor and attach it to the walls of the room. The height of the tape covers the thickness of the heated floor kit, which includes a layer of insulation, coolant hoses and a reinforced screed.
- We lay a foil backing on the concrete base to retain heat from the water floor in the insulation and concrete screed, and to protect the insulation from concrete moisture. The substrate is laid with a layer of foil towards the floor covering, the joints of the rows of the substrate are connected with foil tape.
- Insulation boards 50 mm thick are installed on the laid insulation. The rows of insulation are laid offset so that the joints of the slabs do not coincide and create a single dense flooring. The panel layer is covered with a vapor barrier film.
- A reinforcing mesh with a cage of 10 by 10 cm or 15 by 15 cm is mounted on the insulation boards. The mesh is fixed on stop brackets installed 50 cm apart over the entire floor area. The height stops are designed for the installation of two grids: under the heated water floor and above it.

- We begin the installation of the pipe by connecting it to the outlet pipe of the collector, and then, along the mounted grid, we lay the water floor according to the design diagram, securing it to the grid with tightening clamps. We fix the pipes with a slight slack, taking into account the change in pipe size due to fluctuations in coolant temperature. When laying a pipe according to the snail pattern, we take into account the reverse movement of the pipe in order to maintain a distance between the pipes of 10 or 15 cm. According to this pattern, heating of the floor near the walls is more intense. If one circuit is not enough for a room, we divide the floor area into two circuits with the same length of coolant pipes, which we first take into account in the project. After laying the pipe, connect the second end to the inlet pipe of the manifold group.
- We install a second one above the laid coolant pipe reinforced mesh to give the poured screed strength so that the screed does not crack during use of the floor.
- Before pouring the screed, we test the installed water floor for tightness and performance, performing pressure testing of the system using air. We supply air into the system using air compressor and a pressure of 4 bar is created for the entire test period. If the seal is broken, air leaves the system and the pressure drops.
 The screed is poured only after checking the underfloor heating system for leaks
 - If during testing the air pressure in the underfloor heating system does not change, it means that the installation was carried out professionally. In addition to the air test, we perform a hydraulic test with hot water. To do this, we supply hot water to the system and turn on the floor for several hours; with high-quality installation, the pressure in the system decreases by 0.03 MPa per hour. We begin the concrete screed after installing all floor contours and general testing of the system.
- Before pouring the screed from concrete mixture, the floor contour is filled with cold water under pressure to prevent deformation of the pipes. The screed is filled with concrete, not lower than grade M300. The thickness of the concrete layer above the surface of the second reinforced mesh is 3 - 5 cm, and the total thickness of the concrete screed is 7 - 10 cm. The surface of the screed is leveled with a vibration rack along the installed beacons, removing air from the concrete layer and preparing the surface of the screed for laying the floor covering.
- We begin installation of the flooring a month after completely dry screeding and curing of concrete. Drying of the concrete mixture occurs naturally at positive temperatures.
- If the floor area exceeds 30 m2 or one of the sides of the room is more than 8 m long, to prevent the concrete screed from cracking, shrinkage expansion joints are used. For more information on how to make a water floor screed with your own hands, watch this video:
IN big room seams are made between the contours, passing through the pipes only at the transition points from the comb to the contour. In places where there is an expansion joint, a protective corrugation is put on the pipes, and the reinforcing mesh is cut. The shrinkage seam is made 10 mm wide, the seam is closed with silicone sealant.
The warm water floor is put into operation after the concrete screed has completely cured. Drying the screed with a warm floor is strictly prohibited.
 Polystyrene boards are becoming increasingly popular
 The scheme for laying a warm water floor on a base made of polystyrene slabs is less complicated and is carried out without a concrete screed. The procedure repeats the installation of a water floor on concrete.
Waterproofing in the form of polyethylene film or foil backing is laid on the concrete base. The slabs are laid on the film, creating a flooring in which aluminum plates with a groove for installing a water-heated floor are mounted.
 It is convenient to lay the water circuit in the cellular structure
 Aluminum plates are laid according to the design scheme, laying out the contour of the heated floor. The pipes laid in the grooves of the aluminum plates are connected to the distribution manifold and fixed to the plates with tightening clamps.
Plates on polystyrene flooring cover 80% of the total area and, when heated by the coolant system, are able to additionally evenly heat the floor covering.
After laying the pipes, the underfloor heating system is tested for leaks, similar to the test when installed on concrete. Polystyrene panels with a water floor system are then covered with two layers of gypsum fiber sheet, which has high viscosity and strength. The floor covering is installed on the laid GVL flooring. For more information on how to lay the contour on the mats, watch this video:
Unlike polystyrene slabs, special polystyrene foam mats on which a cellular structure is cast are used for installing a water floor. The cells allow pipes to be laid without additional plates according to various schemes taking into account the design pitch between pipes. After installing the heated floor, the water floor mats are filled with cement screed or covered with gypsum fiber sheets.
Installing a water heated floor on polystyrene foam mats allows you to reduce costs compared to installing the system on concrete and retain heat in the floor covering.
Wooden slabs for heated floors
 There is no need to install insulation under a wooden base.
 Installation according to the water floor scheme is also carried out on a wooden base in the form of a modular product made of chipboard with aluminum plates. Grooves for pipes are pressed into the plates. The procedure for assembling the floor repeats the installation using polystyrene boards, but taking into account the low thermal conductivity of chipboard, insulation is not installed under them.
 Grooves for laying water floor pipes are made on wooden base in the form of a frame made of slats into which aluminum plates are mounted.
The pipes are laid in the grooves of aluminum plates located between the slats. Then the flooring with pipes is covered with a flooring made of gypsum fiber sheets, on which the floor covering is assembled.
I install such floors in wooden houses with beam ceiling.
Water heated floors are a worthy replacement for conventional radiator heating. The costs of installing it, compared to other types of heated floors, for example, electric ones, are somewhat higher, but these means are fully justified during operation. About all the pros and cons you can read on the page “Choosing a heated floor”, on the same page we will go directly to its installation, which consists of several stages:
Installation of a manifold cabinet
We determine the location of the collector and install a special collector cabinet for it, the approximate dimensions of which are 60x40x12. Docking will take place inside the manifold cabinet heating pipes with the rest of the heating supply of the house. Also inside it will be installed elements that regulate the water supply, etc.
To install a manifold cabinet, you need to mark its dimensions on the wall and add 1-1.5 cm of clearance on all sides, then cut
grinder with a circle for concrete along the marked slot lines. This is a slightly dusty procedure, but the edges of the niche under the collector box will be neater; then take a hammer drill, preferably a more powerful one, and hollow out the niche itself into which the cabinet is installed. If you don’t have a grinder and a hammer drill, then take protective gloves, glasses, a chisel, a hammer and the niche is hollowed out using these tools and “such and such a mother”!!!
Assembling the manifold cabinet
So, the manifold cabinet is installed, we put a pipe into it that provides the supply of hot water from the boiler and the return line - this is the pipe into which our water returns, supplied by the first pipe, which gave up heat to the screed and cooled down. Then it goes back into the boiler, heats up and goes back to the first pipe that supplies hot water (supply) using a circulation pump, which ensures an uninterrupted supply of water. Shut-off valves must be installed on the supply and return.
If necessary, by closing both valves, we will disconnect our room from the general heating system of the house or apartment in the event of unexpected damage to the water heated floor, its repair, or simply for the purpose of saving. Compression fitting The metal valve is connected to a plastic pipe. Next, we install the collector - this is a shiny tube, similar to an incomprehensible wind instrument, with several side outlets. The collector also has a main entrance and exit. The main inlet is connected to the valve, and a tee is placed at the outlet, to which a drain valve is connected on one side, and an automatic air vent on the other, through which air bubbles trapped in the heating system are removed. In case of unexpected repairs
you can drain the water through the drain tap. The pipes (circuits) of our heated floor, connected by compression fittings, will be connected to the side outlets of the collector.
You can also connect the WARM SKIRTING BOARD water system to the collector
Preparing the premises
In the room where installation is planned DIY water heated floor, the area is marked taking into account the thermal expansion of the screed when heated. If the subfloor is not level, it should be leveled cement mortar recesses, having previously primed it with a primer for mineral surfaces, or make a preliminary screed of the base, since the height differences in the area per coil should not exceed 0.5-0.7 cm. Waterproofing is carried out on the floor that has a soil base.
Thermal insulation
In order to reduce heat loss to zero, it is necessary to use polystyrene foam, foil polystyrene foam or penoplex as a substrate for pipes. With the help of these materials, the water-heated floor pipes will not warm up the subfloor and the heat will rapidly rise, warming up our room. Before thermal insulation, we first lay a vapor barrier, that is, a plastic film that will protect the insulation from moisture. The film is laid out with an overlap of 10-15 cm and the joints are glued with tape. We lay a damper tape along the walls, which should protrude 2-3 cm above the projected floor height. The damper tape is a strip of foamed polymer, 0.5 cm thick and 12-18 cm wide, which compensates for the thermal expansion of the screed. Now we lay the thermal insulation. For cold ceilings or when the lower room is not heated (for example, a basement), the recommended layer of thermal insulation is at least 5 cm. Between floor covering 2cm is enough. The recommended density of the material is greater than 25 kg per 1 m3. It is very convenient for these purposes to use foiled (coated with aluminum foil) slab polystyrene with a thickness of 3 cm, since its surface has special grooves for fastening pipes with a diameter of 16, 17, 18 cm. Its lower surface has a relief that helps smooth out unevenness and increases sound insulation .
Pipe laying
It is better to use pipes made of cross-linked polyethylene, with high density(PE-X) or metal plastic.
If you use profile thermal insulation boards, then you just need to fix the pipes in special grooves by just pressing them. But if you use another type of thermal insulation, then an excellent option is to lay a reinforced mesh with a wire cross-section of 3 mm and cell sizes of 10x10 cm, which, in addition to reinforcing the screed, will do another useful thing - you can tie the pipes of our heated floor to it with wires or fastening clamps, but not very tightly, since when heated, the pipes can be deformed due to different thermal expansion of the materials (the pipe itself and the wire). You can also buy special clips or fastening tapes that secure the pipes directly to the thermal insulation layer. The pipes are fastened in 1 meter increments. The patterns by which pipes are laid are varied and popularly have different names: snakes, double snakes, snails, zigzags, a spiral with an offset center, etc., you can choose any one that is more convenient for you, but I will focus on the two most common methods pipe laying for water heated floor with your own hands.
1 laying of pipes for a warm water floor in the form of a snake.
This method demonstrates laying pipes next to each other in the form of a snake; it is also called parallel. It is well suited for small and medium-sized rooms and it is better to lay it on the side of windows or walls facing the outside of the house, since the highest temperature will be at the pipe inlet.
2 Spiral pipe laying DIY water heated floor(snail-shaped)
This method is best used in places with high heat consumption or in rooms with a large m2 area. The great advantage of this method is that when one pipe cools, the other compensates for its heating, due to the fact that the supply and return pipes (supply and return) run parallel to each other. The pitch for laying pipes in a spiral way is from 10 to 30 cm. That is, a distance of 30 cm is established over the main area of the room, and in places of large heat loss (entrance doors, windows) the laying pitch is reduced to 15 cm. When pipes pass near the walls, then minimum distance the distance between them should not exceed 8 cm.
Connection
After you have laid the pipes in the way that you prefer and fixed them using any of the above methods, one end of the pipe is connected to the supply manifold, and the other to the return manifold. If the room is large, then several circuits (such loops) are made and the collectors are selected accordingly the right amount inputs (outputs). It is advisable that each loop consist of a single piece of pipe, because additional connections increase the risk of leaks. It is also necessary to make an expansion joint if the length of your room is more than 7-8 meters. This seam is necessary to compensate for thermal expansion and can be made from the same damper tape that we have already used before. Expansion joints must separate each circuit, unless of course there is only one. In the case when temperature expansion joints pass through underfloor heating pipes (supply or return), those pipes must first be covered with a protective corrugation 40-50 cm long. If you forgot to do this when laying the pipes, this can be done before laying expansion joint, cutting the corrugation crosswise on one side and putting it with the cut down on the pipe in the place where the expansion joint will pass.
Checking the water heated floor system yourself
Each circuit must be filled in turn with water through its manifold so that the air is completely removed from it. For this purpose, flow meters and control valves are opened on each circuit.
Automatic air vents must be completely closed during system inspection. The air must be vented through the drain valves.
If you are mounting DIY water heated floor, using metal-plastic pipes, the system must be checked with cold water, with a pressure of 6 bar in 1 day. If the supplied inlet pressure is equal to the outlet pressure, then everything is fine and you did everything correctly.
PE-X pipes (polyethylene) are tested in a slightly different way. The system is loaded with pressure 2 times greater than its operating indicator. The pressure in the pipes begins to decrease. After 30 minutes it is restored, and then the procedure is repeated 2 more times.
90 minutes after the last procedure, the system is left alone for a day. If during this period the pressure in the system does not drop by more than 1.5 bar, and the pipes do not leak, then the test was successful.
The system is then tested for thermal stability. Warm floors are heated to +85° for 30 minutes, while the tightness of the tubes and connections is checked, especially the collet connection.
If necessary, they should be tightened. To relieve stress, the system must be warmed up. After the pipes have cooled, a concrete screed is poured, but more on that later, let’s imagine for now that our DIY water heated floor ready and we need to regulate the room temperature.
Adjusting the temperature of the water heated floor
There are two common options for this:
1) the simplest and most common option is to regulate the hot water supply using valves at the collector outlets; the lower the supply, the lower the temperature in the room and vice versa. To begin with, the room is usually warmed up, and then the supply of hot water is reduced and a certain temperature is maintained.
2) using automation specially designed for water heated floors.
The automation contains two blocks, the first is an electric valve installed in front of the collector and its essence is to open and close the hot water supply.
It controls the valve servomotor, and the thermostat may also have an additional sensor. The second block contains an electronic thermostat mounted on the inside of the wall,
built into the screed. You give the thermostat a temperature setting and it maintains it by acting on an electric valve based on the readings of its sensors. It's simple! Very convenient thing!!!
DIY screed for water heated floors
After the water heated floor system, installed with your own hands, has passed all the tests, we proceed to pouring the screed. Her minimum height should be at least 3 cm, and the maximum - no more than 7 cm. When using a thermal insulation layer, the screed layer must be at least 5 cm. The recommended thickness of the screed layer above the level of the pipes is no more than 3 cm. Screed for water heated floors is a very important a stage no less important than the assembly itself DIY water heated floor. Many people do not attach importance to this, but in vain, since the quality of the screed will directly depend appearance and durability of the heated floor covering, including the finishing one. For example, if you buy a ready-made cement mixture from a low-quality manufacturer or do it incorrectly with your own hands, then within a short time after pouring the screed it will begin to deform, crack and sag due to temperature effects, due to which the top decorative layer, such as tiles, will also will fail ahead of time.
For such things as water heated floors, the screed must be resistant to deformation under temperature influences and not crack, and also have high thermal conductivity in order to maximize the transfer of heat produced by the water heated floor pipes. In order for you to make just such a screed for yourself, an article has been prepared for you that describes all kinds of delicious recipes cement-sand mortars specifically for underfloor heating screed.
Buy a stamp for concrete  At the final stage of the finishing decorative covering screeds, you can use a more economical and less banal option than ceramic tile, namely, apply to the prepared surface of the screed thin layer cement mixture(0.6 - 10mm) and using concrete stamps, emboss or print a specific texture of your choice. You will save significantly on tiles and get a durable, reliable coating with good thermal conductivity and heat transfer.Read more about this on the page Thin-layer decorative concrete.
All pages in this section:
Articles
Traditional heating options in last years are becoming less and less popular, giving way to warm floors. This change in priorities is quite natural - heated floors are distinguished by more comfortable heat distribution, efficiency, virtually no rising dust and the possibility of painless integration into any interior.
There are water and electric heated floors. Both options have their characteristics and advantages, but for their implementation, the correct layout of the heated floor is very important. How to install a heated floor will be discussed in this article.
Methods for laying out a water floor
A water heated floor is a system of pipelines laid under floor covering. Inside the pipes there is a coolant that constantly moves along the circuit, due to which the premises are heated. Water heated floors are an order of magnitude more economical than electric ones, which is directly related to the high cost of electricity.

To ensure heating of the coolant in warm floors best to use gas boilers, since gas is the cheapest fuel. Another good option is solid fuel equipment, which in the end also turns out to be quite economical and, unlike gas boilers, can operate autonomously. You can also use heat pumps, much more suitable for use in combination with underfloor heating than with traditional heating systems.
How to install a water heated floor correctly
To water system warm floor was quite effective, regardless of its type, a competent layout of the warm water floor is required, which affects the uniform heating of the room.
There are the following layout schemes for warm water floors:
- "Snail". This method assumes that the layout of water heated floor pipes will be carried out along a spiral trajectory in two rows. The pipe is directed from the entry point to the center of the room and returns. The pipes must be positioned so that the supply and return pipes alternate - in this case, the hot and cold sections of the pipeline coincide, which ensures uniform heating of the entire room.
- "Snake". In this scheme, the pipes are laid in a spiral, but the coolant moves only in one direction. With this scheme, the temperature of the coolant drops as it moves away from the inlet. It is advisable to use the “snake” only in rooms with small area, otherwise the heating efficiency will be too low.
- "Double Snake". This layout of underfloor heating pipes is a combination of a “snail” and a “snake”. The supply pipe is laid out like a snake so that between each turn there is enough space for laying return pipes. The return pipeline is laid between the supply pipes.
Pipe length
Effective operation of a heated floor in any layout is possible only if the total length of the pipeline does not exceed 100 m. In addition, before laying out the pipe for a heated floor, you need to take into account the specific conditions in which the system will be used and carefully consider the future design.

This is what we are talking about: water heated floors demonstrate their positive qualities only in private houses or modern apartment buildings, the communications in which were initially designed to use relatively new heating systems. Multi-story houses old building are not suitable for the use of heated floors - the coolant passing through the pipes cools down too much, and in apartments located further along the contour it becomes noticeably colder.
Electric heated floors
Most often, an electric heated floor is used as an additional heating circuit, which is started in the off-season or, if necessary, to increase the temperature above the existing one.
Of the advantages electrical systems The ones that stand out the most are:
- Simple and quick installation;
- No need to connect to heating equipment with liquid coolant;
- Relatively low cost;
- Minimum thickness, which has virtually no effect on the rise of the floor covering.

The disadvantages come down to the following list:
- An electric heated floor generates magnetic waves (of course, their level is very weak, but if possible it is worth shielding the structure);
- High cost of operation (electricity is one of the most expensive energy resources today);
As heating elements In electric heated floors, special cables are used, which are folded out like a snake and fixed on a mounting tape. The layout of a heated floor powered by electricity is closely related to the type of cable used in arranging the system.
Types of electrical cables
The following types of cables are available on the market:
- Resistive single-core. This option is characterized by maximum simplicity and low cost. Current flows through the cable core and the electrical energy is converted into heat. Key Feature single-core cables require connecting them on both sides - and this can sometimes be difficult.
- Resistive two-wire. In this version there is not only a heating, but also a conductive core. Thanks to the second core, such a cable can be connected only on one side - this simplifies installation and reduces the level of electromagnetic radiation generated by the structure.
- Self-regulating. In this type of cable, the main element is polymer couplings that ensure the conversion of electricity into heat. Self-regulating cables are considered the most effective and easiest to use, but they are also more expensive than their analogues.
When thinking over a plan for laying out heated floors, you need to take into account the main rule - resistive cables should not be placed under furniture or other objects located in the room. The thing is that with this arrangement the cable will definitely overheat, and the warm floor will simply become unusable. When selecting the pitch of laying the turns, you need to start from the required power of the heated floor and the performance characteristics of the cable itself.

When the cable is installed, it is necessary to install a temperature sensor in the corrugated tube. To install the sensor, a place is usually selected between the turns of the cable, at a distance of about 0.5-1 meter from the wall. The part of the wire that provides connection between the thermostat and temperature sensor, is laid in a vertical groove.
After laying the cables, the concrete screed is poured. Operation of an electric heated floor is possible only after the concrete has completely hardened - and this usually takes about a month.
Conclusion
The layout of a heated floor can be carried out according to several schemes, and each of them has its own characteristics. To choose the most suitable option, it is worth studying them in more detail - separate articles can be devoted to different types of heated floors. In any case, after carefully studying the issue, you can carry out competent installation of a heated floor, which will ensure effective and uniform heating of the room.


