Many nations have their own types of ovens for preparing everyday and holiday dishes. The most famous of these equipment - barbecue, grill, barbecues, but not many people still know such a stove as the tandoor, which is used for cooking national dishes in Central Asia.
Build a tandoor with your own hands on summer cottage or in the courtyard of a private house - it is quite possible if you know what it is and step by step carry out all the stages of its construction.
What is tandoor and what can you cook in it?
The tandoor oven in Asian countries is used for cooking literally everything, from baking bread to frying meat. Therefore, this structure can be found, probably, in every courtyard of a private house in those parts. Russian lovers of oriental cuisine were also able to appreciate the amazing taste of dishes cooked in a tandoor, which is why such stoves are increasingly appearing in suburban areas and in Russia.
 From a culinary point of view, the functionality of the tandoor is enormous.
 Fragrant Uzbek flatbreads of various types, baked vegetables, shish kebab, fried chicken- all this can be cooked in this relatively small but very multifunctional oven.
On average Asian countries There has always been a shortage of firewood for heating, since these territories do not have significant forests or even rare plantings. Mostly low shrubs, single trees and herbs that do not require a lot of moisture grow. They were traditionally used to fire the tandoor. It has a design that can be heated with a bundle of simple saxaul, a shrub that grows on sandy soils and when burned, giving short-term intense heat. The oven stays hot for a long time, allowing you to bake a large number of bread products, and therefore it can be called a very economical device for preparing dishes.
Flatbread baked in a tandoor is called “tandoor-nan” in Asian countries, which means tandoor bread in Turkic.
Tandoor design
The design of the tandoor is quite simple. The task of building it is quite doable for a beginner, and the presence of instructions for performing each step in the construction will not allow any mistakes.

In order not to think about the correct composition of the mortar for laying walls, you can purchase hardware store a special heat-resistant mixture for the construction of stoves and fireplaces. Instructions for preparation can be found on the packaging, and if you follow the manufacturer’s recommendations, the solution will be plastic and will not crack when dried.

It should immediately be noted that this model is designed for cooking meat, fish and vegetable dishes, but you won’t be able to bake bread on its walls. If you are thinking about baking cakes, then the inside walls must be coated with clay, and the surface must be well smoothed.
When erecting this option, work also begins with preparing the foundation. But in this case, according to the builders, three layers can be used as a foundation sand-lime brick, laid in a dug pit. Moreover, the laying of the first layer is carried out along the pit, the second across, and the third - again along.
The first row of masonry of the tandoor itself should be continuous, and in the second layer, from the middle to one of the sides of the resulting area, a horizontal channel is left, which will serve as a blower chamber. The third row is laid out completely, blocking the blower channel, but a hole is left in the middle of the site around which the tandoor will be installed.
The lower rows of bricks in the foundation are laid without mortar, but pressed tightly against each other; the foundation pit will not allow the rows to move to one side or the other. IN top layer It is better to fasten the bricks together with a mixture of clay and fix them on all sides with pieces of reinforcement measuring 400 ÷ 500 mm. The reinforcement rods are driven into the ground, and on top there remains a section equal in height to the top row of masonry.
If the base for the tandoor is laid out of only one layer of brick (as shown in these photos), then a hole is dug under it, approximately 200 × 200 mm in size, and a pipe is installed in it. But, it should be noted that this method of constructing a blower is not very reliable, since during rains the earthen chamber will be washed away by water and over time the structure may sag.
A circle is marked on the site around the blower hole, within which the tandoor will be installed.

Having installed the first row of bricks, it is tied with two rows of steel wire, the ends of which are twisted and hidden in the gaps.
 For reliability, it is fixed with wire
 Next, two more rows are installed on the first row in the same way. In total, you will need to find 57 bricks for the structure. Each row is fixed, like the first, with wire ties. The total height of the tandoor, after its installation, will be 750 mm.

The next step is to cover all the gaps between the bricks with a mortar made from a fire-resistant mixture. Before applying the mortar, it is recommended to moisten the brick so that the water from the mixture is not absorbed into the dry bricks too quickly, and drying occurs evenly and gradually.

After all the gaps have been sealed and the solution in them has dried, the structure is “plastered” over its entire surface.

Next, you need to coat the entire structure with a layer of clay, to which finely chopped straw is added. There should be two such layers with a thickness of 15 ÷ 20 mm, and the second one is applied after the first has dried, after about two ÷ three days. They must dry evenly, without rapid evaporation of moisture, and for this purpose the structure is covered with plastic film.

These layers should be applied evenly, but it is not necessary to smooth their surface, since they will still be closed on top.

Then, the clay walls are wrapped in a reinforcing layer consisting of a metal mesh with cells of approximately 50x50 mm.
 The structure is then reinforced with mesh...
 A metal ring is installed around the oven opening, which will separate the lid installation area from the rest of the surface. This part should have a height of 30 ÷ 50 mm. A layer of clay equal to the height of the hoop is applied from its outer side to the edges of the walls.
 ... once again coated with clay and installing a hoop at the inlet hole ...
 After this, the metal mesh on the walls is completely covered with another layer of clay and left to dry.
 ... and after drying it is plastered with cement mortar.
 Next, when the surface is ready, a layer is applied to it concrete mortar, consisting of sand and cement in a ratio of 3:1. Craftsmen who build tandoors recommend adding one or one and a half teaspoons of detergent to the concrete intended for coating - it will not allow the solution to shrink when drying.
Drying of the surface of the structure takes place within a week. During this time you need to make a wooden a lid with a handle that will allow you to retain heat inside the tandoor for a long time when firing it.

In addition, to hang the skewers, you will need to make a metal crossbar, which is placed on the sides of the tandoor hole under the wooden lid.
It must be said that, if desired, the entire surface of the tandoor can be decorated decorative coating– for example, mosaic laid flat natural stones. This layer, by the way, will become additional insulation for the stove, which will help maintain heat inside it.
Video: building a tandoor using a simplified scheme
Prices for refractory bricks
Fire brick
Ready-made tandoors
You can find ready-made tandoors on sale various sizes, and in order not to do unfamiliar work, you can simply buy such a stove and even firewood specifically designed for burning it.

In addition to wood-burning tandoors, they even sell electric models that do not require fuel, since heating is carried out by a heating element installed at the bottom of the stove.

Any of the ready-made factory products will allow you to create a variety of any dishes, from baking flatbreads and pizza to baking vegetables and roasting meat. However, it must be warned that the taste of dishes prepared in electric ovens, differs significantly from those fried or baked in a tandoor heated with wood. This happens because the heating element , Although and heats the surfaces, but very dries the air, and therefore the products that are in the heated space. Firewood, by heating the walls and releasing its own moisture, which is absorbed into the porous clay surface, creates the necessary balance of heat and humidity. In this favorable microclimate, products remain juicy, are well fried and baked.
How to cook in tandoor?
- In addition to flatbreads and shish kebab, they also cook barbecue and bake pizza in the tandoor. But to prepare these dishes, an additional element is needed - a grate, which is attached to the neck of the oven using special fasteners and lowered approximately to the middle of the tandoor.

- On the same grate you can place a cast iron or pan with necessary products and get aromatic pilaf or stewed cabbage soup.
- When cooking fatty meat, for example, lamb, a grate is installed over the coals, and a container is placed on it, into which the juice and fat from the piece suspended above it will drain - these components are necessary for preparing shurpa.
- When preparing kebab or shish kebab in the Uzbek version of a small-sized tandoor, the skewers are simply installed in the oven hole or hung on an iron cross rod. And the neck is closed from above with a lid.
- All dishes are prepared in a tandoor much faster than in ovens or on. For example, lamb and pork will require 18 ÷ 25, beef 30 ÷ 35, fish or poultry 8 ÷ 12, and vegetables 5 ÷ 7 minutes.
- Eastern cooks advise: place a pan with tough meat, which has many veins, and during normal cooking will cook until soft for several hours, in a tandoor that has not completely cooled down. The pan, covered with a lid, is left inside the tandoor until the next morning, and then any dish can be prepared from this meat in which it will “melt” in your mouth.
In addition to the stove models presented above, there are other options, but the most affordable design for construction is a modern simplified tandoor. Even an inexperienced builder can make such an oriental stove if he makes the foundation correctly, calculates the load, and follows the construction instructions.
Having a tandoor at your dacha, you don’t have to worry that someone will go hungry, since you can cook almost all dishes in it. And most importantly, you don’t have to stand over them. Having heated the tandoor and placed the prepared products in it, you can go about your business, periodically checking the readiness of the dishes, and then all that remains is to serve them to the table at the right time, hot.
What is tandoor? Surely, you are familiar with this word, and many are even lucky enough to see it or try delicacies prepared in the tandoor. In the Middle East, there is a tandoor in almost every home. In the absence of gas in the Caucasus in ancient times, it could replace a gas stove.
A tandoor is a roasting pan that has an interesting jug-shaped shape. The main purpose of the tandoor is cooking. Despite its popularity in eastern countries, in Lately brick and clay ovens are also in demand in Europe. There are two types of tandoors: stationary and portable. The second option is more compact and convenient. At any time you can move the product, give it to a neighbor for the weekend, and so on.
 Portable tandoor
  Compact tandoor
 Despite the fact that the first ovens in the East were built from clay, today they are being replaced by the more practical brick. Therefore, our material today will be devoted to how you can build a brick tandoor with your own hands.
Tandoor: historical background
If you believe the legend, which is passed down from generation to generation, the first clay oven was invented by a shepherd, whose name was Tandoor. One day he saw that at night all the flowers closed their buds, and insects were hiding inside. In this simple way they protected themselves from the cold wind. The young man made a magnificent bud out of clay, only bigger. In it he prepared himself a simple dinner and lit a fire. Food from the bud turned out to be incredibly tasty and nutritious. She also stayed hot for a long time.
Subsequently, the young man became rich. He made buds from clay and sold them to everyone. In honor of the talented young shepherd, these ovens began to be called tandoors. Tandoor himself became a respected person. In fact, he was a kind of analogue of the Greek Prometheus. Only he gave people not fire, but delicious food and the opportunity to cook it at home.
According to another legend, the tandoor is attributed truly sacred significance. There is an opinion that masonry clay ovens was widespread back in the 10th century among the Sart tribe. They lived on the territory of modern Uzbekistan and worshiped fire. For the Sarts, the tandoor was the home of beautiful peris (analogous to fairies in Europe). Several centuries later, it acquired a different, now practical, meaning. By the way, see it in a clay structure great way The Mongols, who conquered the Sarts and took away all the inventions, were able to prepare food.
How many secrets does the tandoor keep?
Nobody counted the number of secrets, but the fact remains: the production of a simple stove in the East is covered with many legends. For example, if you make this stove without the proper level of skill, it will burst from high temperature. They say that clay for production is always carefully sifted, like flour for dough. However, there is still no official confirmation of this.
The wool of some animals can also be added to the clay. For example, goats or sheep. After prolonged firing, it burns out and pores appear in the vessel. Also during construction, ordinary barrels made of wood or plastic are used. They hold their shape remarkably well. At the end of construction, the barrel is removed.
Of course, knowing these secrets is not enough to build a full-fledged tandoor with your own hands from brick or clay. But the fact remains: building with brick is much simpler and more affordable.
 Brick tandoor
 However, this fact does not deprive the tandoor of its amazing qualities. Do not think that the ancient nomads always built such ovens from clay. They regularly moved from one place to another, building a stove from scrap materials. One food still turned out incredibly tasty. Tandoors are found everywhere in Armenia and Kazakhstan, Azerbaijan and Turkmenistan, Mongolia and Tajikistan, and Japan. Historians still do not know the exact answer which of the two structures is older: the Russian stove or the tandoor.
By the way, the word itself is of Turkic origin, and in each country it is called differently. For Armenians it is tonir, for Tajiks it is tanur, for Georgians it is simply tone.
Step-by-step guide to building a brick tandoor
There are three varieties homemade stove: pit, portable and ground. Now we will consider the option of building a ground tandoor from fireclay bricks. This is due to the fact that a pit tandoor is usually used to heat rooms, while a portable one is a type of barbecue.
You will agree with the statement that any serious project must begin with comprehensive training. On the one hand, there is nothing difficult in building a brick tandoor, and anyone will tell you this professional builder. But on the other hand, you need to be properly prepared to create a durable and comfortable object.
Master class on making tandoor
The preparation process begins with the collection necessary materials. There are several options for brick tandoor, but in our case, the “gentleman’s” set looks like this:
- Sand and gravel mixture – 150 kg.
- Mesh with cells of 5 cm - 2 square meters. meters.
- Cement M400/500 – 6-7 kg.
- Asbestos fiber – 6 kg.
- Fireclay bricks - from 50 to 70 pieces.
- Fireproof paint – 1000 ml.
- Fiberglass reinforcement – 6 mm section, minimum 15 meters.
- Steel wire – 3 mm section, 15 meters.
- Fireproof mixture, without which no masonry is possible - 20 kg.
Once you have assembled the necessary set of tools, take care of the most necessary tools. Most likely, you already have them at your dacha, and if not, you can always buy more:
- Plastering rule.
- Convenient container for mixing concrete or.
- Grinder and diamond wheels.
- Spatula and paint brush.
Your tandoor oven will be located outside. Therefore, she must have reliable foundation and stable design. It is bad if the soil contains a lot of clay. In this case, you definitely cannot do without a reinforced foundation. On heavy soils, the so-called columnar foundation. But if the soil is light enough, it is enough to simply cast a monolithic slab.
 Preparing the base of the tandoor
 The masonry is designed in such a way that the oven area will be approximately 100 by 100 centimeters. As you understand, this is not the most compact design, so the slab must be at least 10 centimeters thick. Approximately 15 centimeters of soil is removed around the perimeter. At the corners of the future slab, recesses of 75-90 cm with a diameter of 12-15 cm are made. When the holes are drilled, reinforcement will be required.
You can’t do without fiberglass reinforcement. The structure must be filled with concrete.
To ensure the concrete has a good consistency, use sand, cement and gravel in a ratio of 3:1:1. The size of the gravel fraction should not exceed 1 cm. The result should be a solution with the consistency of thick sour cream. When pouring mortar, always focus on the foundation pit. The formwork will help you maintain the correct orientation and help avoid discrepancies in levels. The formwork is laid on the bottom, height 5 cm. The bottom is covered with sand, but the height of the layer should not be greater than the height of the formwork. Next, you need to pour water on the sand so that cavities do not appear, and begin laying the formwork for monolithic slab. Many users ask: why is there sand in the foundation at all? In this case, it serves as a damper cushion.
Do-it-yourself formwork for a brick tandoor is always made from roofing boards. The optimal width is 15 centimeters. The boards are buried 10 centimeters into the ground, only 5 cm rises above the ground. You need to put a reinforcing mesh on the sand. Before pouring concrete, everything is leveled again using a level.
Wait until the concrete hardens. This will take about 72 hours. If possible, we recommend increasing the waiting time to seven days. Only after this do you pick up the drawings and start laying the foundation.
 Attached to cement finished arch
  laying on cement in a circle of stones
 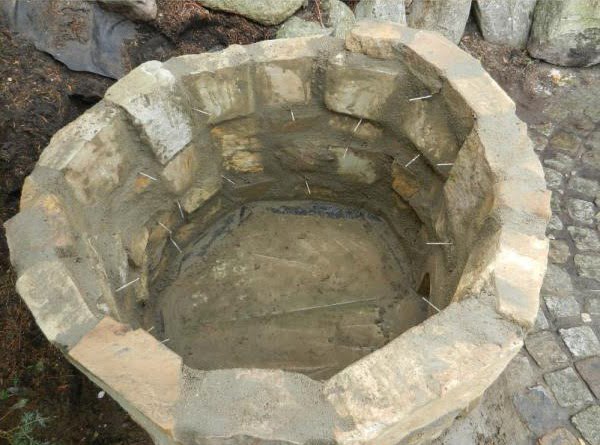 Drawing out the walls
 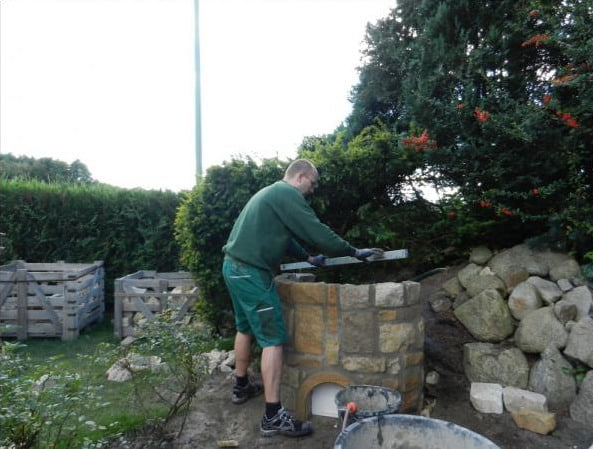 Level check
 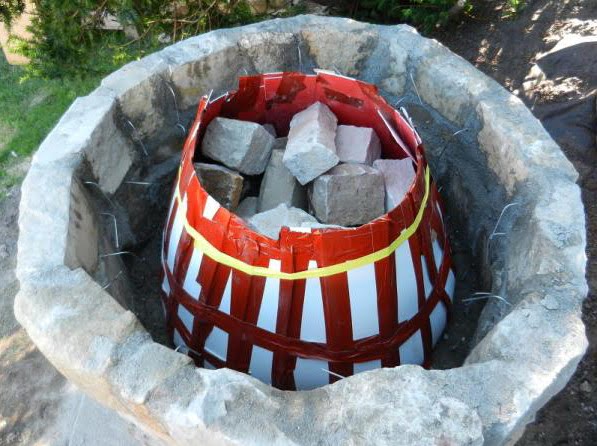 Preparing the mold for the inside of the tandoor
  Filling the internal form
  Preparing clay for the inside of the tandoor
  Coating interior walls with clay
  Decorative cover for tandoor
  Decorative blower
 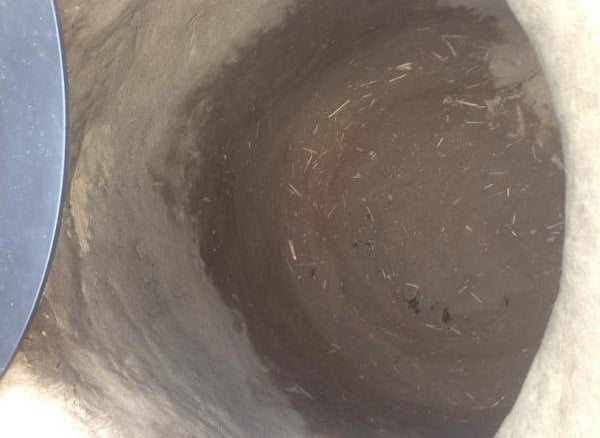 View inside the finished tandoor
  Final drying of the tandoor
 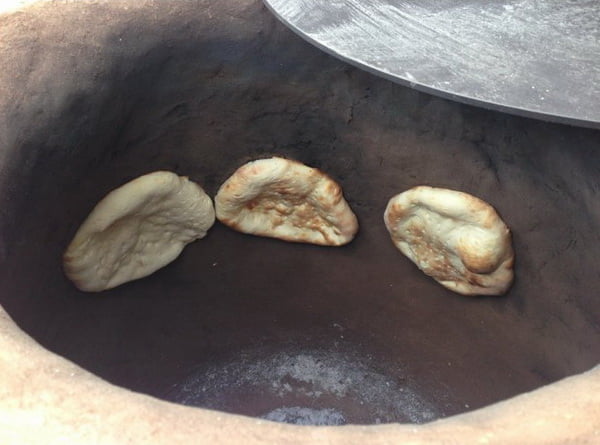 Making bread
 How to form the base of a tandoor?
Since you and I have to build a tandoor from brick, brick will be used as the base. But not simple, but fireclay. This is due to the fact that the temperature inside the tandoor will be incredibly high, and ordinary red blocks are not designed for such a load. But fireclay brick has excellent fire-resistant qualities. It almost does not absorb moisture and can easily withstand the weight of the tandoor.
Another undoubted advantage of tandoor is its resistance to sudden temperature changes. Therefore, it is simply ideal for construction outdoor stove. No cracks on frosty or hot sunny days!
The base is always made in the shape of a circle. Outline the pattern with chalk, the diameter of which should be 75 cm. All bricks are laid out in the given order. At the end of the procedure, unnecessary corners are ground down to form an ideal base. Don't forget to place the roofing felt on the concrete base. It will guarantee good sound insulation.
After this, mix the refractory mixture and apply it to the roofing material with a spatula. Consider the fact that the brick base must exactly match the selected height of the tandoor, and the size of the neck should be a third of the base. To assemble the rule, use a pole (height up to 100 cm, base length - 30 cm, step between given guides - 25 cm). The pattern is made of plywood; the bed slats are ideal (meaning the part on which you usually place the mattress).
We build walls
Wall masonry has its own characteristics. All bricks are laid vertically. Therefore, you will need to stock up on enough mortar to provide all structural elements with sufficiently reliable fastening. Make sure that the edges of the bricks are placed as close to each other as possible. Use steel wire to tie together the first row of bricks. After fastening, the ends of the wire need to be tightly twisted and hidden in some kind of seam. In the second and third rows the procedure is repeated. When the main structure is built, plastering can begin. Use baking mixture, but remember that the thickness should be at least one centimeter.
 We insulate the walls of our oven
 Wait for the plaster to dry. It is advisable to cover the tandoor with a film for comprehensive protection of the structure from rain and exposure to sunlight. Strong heat can be detrimental to an as yet unfinished tandoor. When the structure hardens, the surface is covered with acrylic. It is recommended to use the so-called whitewash. Armed with a broom, clean the inside of the tandoor from the dirt and build-up that has formed there.
 Almost completed tandoor, only the lid remains
 Terms of use
We just figured out how to make a tandoor out of brick. Only one question remains unresolved: how to use such a stove? You need to be especially careful when igniting for the first time. Raise the temperature smoothly and gradually. Use 2/3 of all firewood, take only dry logs. Products should be loaded inside only after the firewood has completely burned out, that is, an hour after ignition. The coals are evenly distributed along the bottom. One dressing is enough for two dishes, the second will take about 2 times longer to cook. It’s easy to check the oven’s readiness. To do this, run the stick along the wall from the inside. If the soot quickly disappeared and the wall became clean, the tandoor is ready for use.
Time to take stock
A do-it-yourself tandoor made from special brick is, first of all, just a wonderful oven for preparing delicious, nutritious dishes. Your own tandoor will definitely delight you with evenly roasted meat. You don't need to twist the skewers and turn the steaks - everything happens on its own. You already know how to build a tandoor, which means you will always have incredibly tasty and very healthy bread in your home.
Utility bills are constantly rising. But if you cook in a tandoor at least sometimes, you can significantly save on electricity and gas consumption. The installation is extremely easy to operate and will not cause problems even for a beginner dealing with a brick oven for the first time.
DIY brick tandoor video
The classic tandoor is made from kaolin clay with the addition of camel or sheep wool. A homemade oven is a little simpler. What they have in common is that both designs allow you to cook food according to traditional Asian recipes.
What is a tandoor and how does it differ from a barbecue?
The tandoor is a ceramic oven known in Asian countries for several millennia. It is used for cooking traditional dishes and home heating. Among some peoples, this stove was considered an object of cult. Today, tandoor can be found not only in Asian villages, but also in an ordinary restaurant and even in the country.
The peculiarity of the tandoor is that the food is cooked directly inside the oven. Its main difference from a barbecue is that cooking does not take place over an open fire, but solely due to the heat given off by the heated ceramic walls of the oven.
There are other differences between the eastern stove:
- Skewers with meat or fish strung on them do not need to be rotated periodically: the heat comes from the walls and passes evenly over the entire surface.
- What happens inside the oven is not frying, but baking of the product. As a result, there is no characteristic crust that appears when frying over an open flame.
- The cooking speed does not exceed 10–15 minutes.
- The heat that the tandoor walls absorb from one load is enough for several loads of food. The oven cools down for 2–3 hours.
The operating principle of a classic tandoor is as follows:
- Firewood is loaded into the oven.
- The fuel is ignited. After this, you need to wait for some time until the walls of the tandoor absorb sufficient quantity heat.
- Unburnt wood is removed from the stove.
- Cooking products - meat, poultry, fish, etc. - are loaded inside the tandoor on special skewers.
- Ceramic walls give off heat, resulting in uniform baking of dishes. As you know, it is precisely this kind of heat treatment that most nutritionists consider the most useful.
Types of furnaces
All known tandoor models can be divided into two main categories:
- Stationary ovens. Before making a tandoor, the base is prepared. It is necessary to dig a hole, fill it with a layer of crushed stone and sand, lay out a foundation made of reinforcement and fill it with concrete. For concrete mortar, fire-resistant mixtures based on fireclay clay. As the base hardens (usually no more than 6 days), you can begin building the furnace.
- Portable tandoors. This stove looks like a jug. The mobile design is based on discs made of cast iron or fire-resistant circles, to the bottom of which small transparent wheels are welded. If necessary, such a tandoor can be easily transported to any suitable place, including your home. Sometimes there are no wheels - such a stove ceases to be mobile, but remains portable.
All tandoors are based on an egg-shaped vessel with a flat bottom, made of heat-resistant clay. Stationary and portable stoves can include a variety of products, varying in execution, installation, material and design. We list some well-known varieties:
- Ground tandoor. An ordinary clay oven placed on a flat surface.
To monitor the temperature, you can install a thermometer on the case
- Stationary tandoor on a foundation. Can be installed indoors or outdoors. Installation takes place on a pre-equipped foundation.
The weight of a stationary brick tandoor can reach several tons
- Earth oven. Also belongs to the category of stationary stoves. The main feature is that the furnace is completely or partially submerged below ground level. The tandoor is equipped with a blower and a chimney. Installed on outdoors or indoors.
Similar designs can still be found in Armenia and some other countries
- Horizontal design. In accordance with traditional technologies, first a standard clay “jug” is made for the stove, then, at the owner’s request, it can be installed vertically or horizontally.
A horizontal furnace is built using the same technologies as a vertical one. The only difference is the location of the hole
Most modern tandoors are made from fireclay clay, which is why they are called ceramic. Among them, factory products stand out, equipped with a powerful forged frame with a lid, handles for transportation and metal legs. A rich pattern is applied to the surface of such products, emphasizing the status of the owner. A factory ceramic tandoor can be equipped with the following additional products:
- Blower.
- Skewers and a device for hanging them.
- Poker for mixing wood.
- Scoop for cleaning.
- Kolochnik.
- Mittens.
What you need to make it yourself
The classic tandoor is a traditional oriental oven. If it is made by immigrants from Asia using ancient technologies, it can be considered an example of the culinary culture of the East. At first glance, making a tandoor with your own hands is quite difficult. Certain tools, materials, and a little experience are required. But in fact, most homeowners can create such a stove.
Tools and materials
To build an oriental tandoor in the yard own home, you will need some Supplies. Their number depends on the planned size of the furnace.
- A mixture of gravel and sand.
- Cement.
- Wire mesh.
- Fireclay brick.
- Fireproof paint on a water-based or acrylic basis.
- Fiber made from asbestos.
- Six-millimeter fiberglass reinforcement.
- Steel wire. Basic requirements: diameter - 3 mm, should bend easily when twisted.
- Fireproof mixture for masonry.
We should also talk about tools. Making a tandoor does not require professional installations or complex machines. A few products that are in every home are enough:
- Plastering rule.
- Paint brush 10 centimeters wide.
- Spatula 12 centimeters wide.
- A container (for example, a trough) for batches.
- Bulgarian. The package should include a diamond cutting wheel for ceramics.
The main material for making a tandoor is fireclay brick. These building materials can withstand prolonged exposure to high temperatures (up to 1 thousand degrees). Due to the low thermal conductivity of the products, the heat remains inside the tandoor.
High-quality fireclay bricks have two important characteristics:
- High heat capacity. Stove walls accumulate a lot of heat.
- Increased thermal inertia. Fireclay bricks heat up for a long time and thoroughly and cool very slowly, which allows you to cook several servings of food.
Calculations
Tandoor is a hemisphere made of clay or ceramics with a round top or side opening. The working volume of the furnace is in the range of 0.25 – 1 m³.
The upper part of the tandoor oven tapers. If the diameter of the bottom is a meter, then the same figure at the top can be 0.7 m.
The traditional size of a tandoor is as follows:
- Height - 1–1.5 meters.
- The diameter of the base and body of the boiler is 1 meter.
- The diameter of the top or side (depending on the type of tandoor) is 0.6–0.7 meters.
When choosing a place for a tandoor oven, you need to take into account some nuances. The size of the area for the base should not be less than a meter, ideally - one and a half. The distance from buildings, especially wooden ones, is 3–5 meters: a self-made stove can be a fire hazard.
In addition to firewood, the tandoor can also run on electricity
Instructions for creating a tandoor
The process of making a stationary tandoor occurs in several successive stages.
Making the foundation
For any building that is being built under open air, a fairly strong foundation is required.
First of all, you need to decide on the type of soil. For heaving, clayey, low-lying soils, a reinforced columnar foundation is required. For light soil made of sandy loam or sand, a monolithic concrete slab is suitable.
A traditional tandoor has a base of 100 x 100 cm. With these dimensions, the thickness concrete slab limited to 10 cm. Laying proceeds as follows:

The minimum setting time for concrete is about three days. During this period, it is possible to prepare refractory bricks of a certain shape and construction rules.
Laying the base and molding bricks
The base of the tandoor oven is a perfect circle. To form it correctly, the circle is drawn according to the pattern.

Making rules
A rule may be needed to ensure that walls are built to specifications. It is made from several planks. The length of the vertical pole is about a meter. The dimensions of the horizontal strips depend on the internal diameters of the furnace.
The length of the first level (base) of the rule corresponds to the radius of the bottom of the tandoor. The third (upper) level should be 1/3 less than the initial one. Between them there can be another, central, crossbar. For example, if the length of the bottom bar is 30 cm, then the same indicator for the second and third levels is 25 and 20 cm, respectively.
Brickwork is guided by the shape of the rule
Laying walls
Fireclay bricks are laid on top of each other vertically. For the stability of the entire stove structure, the quality of laying the first row is critical.
- The bricks are installed on the base of the tandoor. Their inner edges are in close contact with each other, the outer seam is coated with a fireproof solution.
All external seams are coated with a fire-resistant mixture
- After laying the first row, it is tied together with steel wire. The ends are twisted and hidden in the interbrick seam. In the future, the wire will remain on the finished tandoor.
- The second row is being laid. Starting from this stage, the fireclay bricks are cut into a wedge. The remaining work is carried out similarly to the previous stage: the external seams are coated with a fire-resistant solution, the internal edges are in close contact with each other. At the same time, at the level of the second row, a blower is equipped and a damper is installed.
The pipe can also be laid directly into the foundation of the structure
- In the same way, according to the rule, the third and subsequent rows are displayed, depending on the planned sizes.
The bricks fit tightly together. Gaps are not allowed
- After laying the top row, you can begin finishing work. The surface of the tandoor is carefully plastered with a stove mixture. The layer of the mixture is at least a centimeter. The top edge can be shaped like a roller so that there are no sharp corners.
- After plastering, you need to cover the tandoor with moisture-proof cellophane film. This will protect the surface of the oven from rain. The film must be shaded so that the tandoor does not fade or dry out when exposed to direct sunlight. The structure remains in this form for several days until the plaster dries.
- In the East, a plastered tandoor is treated with whitewash. Alternatively, you can use acrylic-based fireproof paint.
- After the solution has completely dried (after about three days), the inside of the tandoor is thoroughly cleaned of dirt, deposits and other inclusions. To do this, you can use a regular hard broom.
A classic tandoor has certain requirements for fuel. In Asian countries, saxaul is mainly used to kindle the stove; in rare cases, plane tree or elm is used.
In general, a tandoor can be heated with the same wood as a barbecue. You should not use pallets and charcoal: they generate excessive heat, which can cause the stove to crack. Also cannot be used coal emitting large amounts of coke oven gases.
Firewood is placed in the tandoor at approximately 1/5 - 1/6 of the height. Much depends on the type of food: it takes twice as much to cook a shish kebab less firewood than for flatbreads. Cooking begins after the fuel burns out. Soot and soot remaining on the walls should also burn out.
Photo gallery: ready-made tandoors
Self-construction An Asian tandoor oven requires some construction skills. Before cutting expensive fireclay bricks, it’s worth practicing on cheap ones and moving on to construction, having already gotten your hands on it.
Lovers of country holidays cannot imagine their pastime at the dacha without barbecue. And really, could anything taste better? fresh meat, richly flavored with spices and thoroughly fried on charcoal? If such a thing exists in nature, then it can only be meat that is baked in a brick tandoor. For those who don’t know, a tandoor is a special Turkish oven that produces kebab with simply incredible taste. And the whole secret of such an exquisite taste is that the meat is baked extremely evenly, and solely due to the fact that the spread of heat in such a design is balanced. So, today we will find out how to build a tandoor with our own hands, get acquainted with possible options and give detailed instructions on production.
How to make a tandoor on your own
Option #1. Traditional clay tandoor
According to the ancient technology mentioned earlier, a true tandoor should be sculpted, not built. Moreover, kaolin clay (ideally of Akhangar origin), which has excellent thermal insulation qualities, should be used for this. To prevent the furnace body from cracking under the influence of high temperatures, sheep or camel wool is added to the clay. Making an authentic tandoor is extremely difficult, since Asian craftsmen are not very clear about the exact composition of kaolin clay. Simply put, you will have to perform all manipulations “by eye”, constantly conducting experiments.

An approximate manufacturing technology for the classic version of the described furnace looks approximately as follows.
Step 1. To make a tandoor with your own hands, you need to mix clay with wool (the length of the fibers of the latter should be about 1-1.5 cm). The result should be a fairly viscous mixture, reminiscent of sour cream in consistency.
Step 2. Next, you need to wait 7 days for the resulting composition to dry and achieve the required condition. During all these days, the mixture should be stirred periodically so that drying occurs evenly. All water that accumulates on top must be removed immediately (it cannot be mixed into the composition).
Note! The lower the moisture concentration in the composition, the lower the risk that the oven will crack during drying or firing. When the preparation period is over, the consistency of the mixture should resemble dense plasticine, suitable for modeling.
Step 3. From the resulting “plasticine” you need to mold long sheets of oblong shape with a thickness of at least 5 centimeters. From these plates, gradually moving in a circle, you need to build a tandoor.

Traditional dimensions look something like this:
- the neck should be 50-60 centimeters in diameter;
- before narrowing, the diameter should correspond to 100 centimeters;
- The recommended height of the structure is from 100 to 150 centimeters.
It is necessary to leave a hole in the bottom side of the case through which air will flow inside.
Step 4. When the oven is ready, it is transferred to the shade and left for another 30 days to dry.

Step 5. The walls need to be covered with fireclay bricks, and the adhesive composition in this case can be either kaolin clay itself or a special clay oven mixture that contains plasticizers and quartz sand. Sand or salt must be poured into the cavity between the resulting layers, periodically compacting while filling.
Step 6. The inner surface is coated with cotton oil.
Step 7 After this, all that remains is to fire finished oven, that is, to bring the material to the state of ceramics. The temperature should increase gradually and not very quickly. The duration of firing can reach 24 hours, this is explained by the fact that if raw clay is subjected to sudden heating, it can crack.
Video – Traditional tandoor: technology and interesting facts
Option #2. Making a tandoor with your own hands from a barrel (simplified technology)
It's no secret that making such a stove using the technology described above is extremely difficult, especially in the absence of special skills and knowledge. And many home craftsmen will confirm this. The surfaces turn out to be crooked, and the clay often cracks when drying. To avoid this kind of trouble, a simpler “recipe” for this design was developed, which is based on creating clay walls around a barrel made of wood.

To create such an Asian oven, you need to prepare in advance:
- kaolin clay;
- vegetable oil;
- fireclay sand (and its fraction should not exceed 0.5 millimeters);
- a wooden barrel with iron hoops;
- wool (one of the options listed above).
Now let’s find out how to make a tandoor from all this with your own hands. First, fill a barrel full of water and wait at least 24 hours for the wood to soak and swell. After this, mix wool (0.5 parts), sand (2 parts) and clay (1 part), wait a few days until the resulting mixture dries. The next step is to drain the water, complete drying wood The inner surfaces of the barrel are treated with vegetable oil and then soaked overnight. Next, the inside of the barrel is covered with a 4- or 5-centimeter layer of the resulting clay mixture. The composition is leveled with wet hands so that the walls are as smooth as possible. As you move upward, the thickness of the clay layer should increase, that is, the neck of the kiln should gradually narrow. Traditionally, it is necessary to leave a small hole at the bottom through which air from outside will enter the housing.

Note! To dry, the structure should be moved to a ventilated, shaded and dry place. The process may take 3 to 4 weeks. Over time, the barrel will begin to lag behind the clay walls.
When everything is dry, the iron hoops must be removed and the barrel itself removed from the tandoor. Next, the stove is installed on a thick “cushion” of sand and fired, that is, it is melted for the first time. It is necessary to light a small flame inside and maintain it for approximately 6 hours, periodically loading small portions of fuel. After this time, the stove is covered with something, the fire is turned up higher and eventually brought to the maximum level. It is important that the tandoor cools down slowly afterwards.
If desired, you can additionally insulate the stove to improve its thermal insulation qualities. To do this, you can build brick walls around it.
Option #3. We make a tandoor from bricks on our own
So, making a classic version of the stove is quite difficult, we have already found out. What’s more, not all masters succeed in this! Therefore, in order to simplify the task and not take unnecessary risks, we recommend that you familiarize yourself with the technology of making a brick tandoor - this way you are guaranteed to get the desired result, despite the fact that the finished stove will be very different from the traditional version described above.

First you need to prepare:
- stove brick;
- wooden template;
- masonry sand mixture;
- cement;
- kaolin;
- reinforcing mesh;
- sand.
The main thing is just beginning - the manufacturing procedure itself. The process consists of several stages, let's look at the details of each of them.

First stage. Base
Select a suitable flat area on which the future tandoor will be located with your own hands. Dig a round hole there, the diameter of which should be slightly larger than the planned diameter of the structure. Fill the bottom of the resulting hole with a “cushion” of sand (the thickness should be about 10 centimeters).


Cover the finished “pillow” with an iron mesh constructed from reinforcing rods or thick wire.

Fill the hole with concrete mixture, carefully level everything using iron rule. Don't forget to check the levelness of the surface using horizontal level. Now wait at least 7 days for the solution to set and concrete surface regained its original strength.

Second phase. Brick walls
Start laying the brick in a circle, the diameter of which you designated at the planning stage. As a rule, this is about 100 centimeters. Place the bricks on the end and, using the frame as shown in the image below, begin to form a circle. For installation, use only a kiln solution consisting of fireclay clay, appropriate plasticizers and, of course, quartz sand. This will ensure that the composition will not crack when fired, will set quickly and will generally be plastic.


Traditionally leave the body at the bottom small hole, which during operation will serve as a blower. This can be either a small window equipped with an iron door or a chimney.
If the height of the stove is 100-120 centimeters, then four rows of bricks will be enough. Typically, when laying the last row, a tapering neck should be formed in parallel; therefore, the brick at this stage should be laid with a slight inclination towards the inside.


Third stage. We carry out coating and cladding
Coat the internal and external surfaces of the constructed furnace with refractory clay, the thickness of which should be approximately 5 centimeters. In addition, finish the body of the tandoor natural stone- this way the finished product will look more attractive.

Fourth stage. We fire the kiln
Let us immediately make a reservation that the firing procedure in this case is performed in the same way as in the previous two options. It is necessary to light a fire inside the tandoor, the walls of the oven must gradually heat up to a high temperature (more precisely, up to 400 degrees), and then slowly - and this is very important! - cool down.

For a more detailed look at how to build brick tandoor at home, we recommend that you familiarize yourself with the thematic video below.
Video - Making a tandoor with your own hands
Features of operation
There are a number of requirements that must be followed when using a stove such as a tandoor. Let's start with kindling. Here a lot depends on the time of year. In winter, for example, the temperature should increase gradually - first light the wood chips, let them burn, after which you can add the main fuel. In the summer, it is quite possible to do without preliminary kindling with wood chips. As for the volume of fuel, it should be 2/3 of the total volume of the stove. You can put more, but in this case a lot of thermal energy will simply evaporate without heating the walls of the case.

As for temperature restrictions, there are none at all for tandoor. Use it whenever you want, the main thing is not to forget what is said in the previous paragraph.
Cleaning the stove is also not difficult: just take a dustpan, poker and collect the ash. If fat gets on the walls, don’t worry - it will simply burn off during subsequent use.
Advantages of using the design
The problem of poorly cooked kebabs is familiar to everyone: with poor-quality heat treatment, part of the meat is fried to a black crust, while the remaining pieces turn out almost raw. Why is this happening? The reason is the uneven distribution of coals under the skewers, as well as the fact that they are coals with different temperature indicators. And the results of such roasting are described above.

But a brick tandoor is a completely different thing. Thanks to its unique design, this oven allows you to completely forget about such an unpleasant thing as undercooked meat. Another advantage of the tandoor is that not only meat is baked in it, but also traditional oriental flatbreads - tasty, and at the same time very healthy for the body.

Tandoor - design features of the stove
The design of such a furnace is very similar to most structures of this kind, but some differences still exist. Thus, the inner surface is made of an unusual (at least for such ovens) material - ceramics. But both wood and coal can serve as fuel (brushwood can also be used).
Externally, a brick tandoor is very similar to a hypertrophied clay jug, which was lined with brick. Coal or wood is placed directly inside the structure and then set on fire. Then, when the fuel turns into coal, the kebabs are placed in the oven. Typically, the meat can be hung on a hook to a special pole, which should be taken care of in advance, and placed with the sharp end on the foundation.

Note! Another advantage that a brick tandoor has is that it retains heat for quite a long time. Thanks to this, you can have time to make several batches of baked meat at once.
An interesting fact: the described stove first appeared in distant Mesopotamia, and soon gained considerable popularity among Asian peoples. It is for this reason that a number of oriental kitchens cannot be imagined without this miracle oven.

Operating principle
To find out how to make, you must first become familiar with the operating principle of this design. As an example, let's take a look at the classic Uzbek tandoor made of brick. Externally, such a tandoor is comparable to a clay cauldron, but only turned upside down (it’s as if the top has been swapped with the bottom). At the bottom of the furnace there is a special hole, which is also called a blower.
The base, made of clay, is covered with brick. What is important is that a small air gap remains between the inner and outer layers, which is subsequently filled with sand or salt (the latter option is more preferable).

The fuel is placed into the housing through a hole located on top. Although there are versions of the stove in which it is located on the side, this arrangement is practically never found in the classic Uzbek version.
Note! The main disadvantage of the tandoor is that ash is removed from the body through the upper hole, which for obvious reasons is very inconvenient (this does not apply to portable stoves).
And to make it more convenient to fry shish kebab, the oven of the Uzbek version has a special grate. You can place not only meat on such a grill, but also, for example, fish or vegetables. All these products are guaranteed to bake equally well.
Note! If the tandoor is built competently and in compliance with the technology, then you can cook on it within six hours after one-time kindling.
What is the secret of such high heat-saving properties of the structure? And the secret lies in the materials from which such stoves are constructed. Such materials have simply incredible heat-accumulating properties: for example, if you try hard, the walls of the tandoor can be heated to a temperature of 400 degrees.

As for the varieties of tandoor, the classification in this case is based on the installation location of the device - according to this parameter, the described stoves can be:
- pit;
- ground;
- portable.

Today’s article will look at several options for creating a tandoor at home, but special attention will be paid to making a brick stove. This is explained by the fact that, for example, a portable structure is, in fact, a type of barbecue, while a pit structure is used in most cases for heating small rooms. So let's get started.
Tandoor - this word hurts the ear, betraying its foreign origin. Indeed, the tandoor is a stove that came to us from Asian countries. Its main purpose is to bake bread, however, no one bothers to use it for full-fledged cooking, especially since dishes cooked in such an oven have a special, incomparable taste. That is why many are interested in how to make a tandoor oven with their own hands.
Let's take a closer look at the features of this Asian stove, and it has a lot of them:
- fuel, firewood are not needed - all that is required for work is a bunch of saxaul;
- Despite the low fuel consumption, you can cook a lot of food on such a stove, this is due to its design.
also: Brick stove for a summer residence)
In fact, all its features are determined by the geographical factor - as already noted, such stoves were common in Asian countries. The Turkmen, Chinese, Japanese, Armenians have tandoor ovens, as well as the Uzbek tandoor oven - agree, big piece sushi was familiar with this unique technology, but why there?
The fact is that all of the above states could not boast of a surplus of wood, so they, unlike Russia, had to look for another way; they needed an economical stove.
We understand the device and understand the principle of operation
Let's reveal the secret of such savings: how does a ceramic tandoor oven produce so much while consuming so little?
To do this, you will have to take a closer look at its design.
The body of the furnace is a kind of clay cauldron, which is turned upside down, while the cauldron is equipped with a bottom and a hole at the top. However, in the lower part of the boiler there is a small hole for blowing. The outside of the stove is lined with brick; either sand, clay, or salt is poured between the brick and the walls of the tandoor. An interesting design, but it explains everything.
All materials used are natural heat accumulators, and the shape of the stove is ideal for maximum heat capture. In a word, everything here is set to maximum efficiency. First, the stove absorbs heat, and then begins to slowly release it, and it releases most of it not to the outside world, but inside itself. (See also: Sitemap)
Tandoor: traditional option
Let's look at how to make a tandoor oven in its traditional version, that is, in the form of a thick ceramic dish, which is also lined with brick for thermal insulation and has holes only for direct use and blowing.
DIY tandoor
The height of such a furnace is no more than 1.5 meters, and the diameter in its central part is approximately 1 meter.

Stages of making a traditional tandoor oven:
- First of all, prepare the clay by kneading it thoroughly, and it is recommended to do this not with your hands, but with your feet.
After which the clay must sit for at least a day, and the process is repeated again;
- The body of the stove is made using tape molding, that is, relatively small rollers 60 cm thick are rolled out of prepared clay, with the help of which the body of the tandoor is gradually formed, tier by tier. To give the required shape and adhesion, the rollers are slightly flattened and pinched.
- The finished vessel is left to dry in the sun, a process that takes at least a month.
We didn’t come up with so many points, but this does not mean that it is easy to make a traditional version - on the contrary, only a true master can cope with this task, and here’s why:
- Properly preparing the clay, that is, taking into account all the nuances such as its fat content, is a very difficult task.
There is no room for error here. If we prepare a mortar for a brick kiln, then if cracks occur, we can simply cover them up. Here the entire oven consists of clay mortar, and if you don’t get it right, the oven will simply fall apart;
- laying out the furnace body using rollers is a task for a professional, because the efficiency of the device depends on how carefully this is done.
Yes, it is unlikely that a beginner will be able to make a traditional version the first time, but this does not mean that they should give up on it.
There is an easier way to fold this Asian stove
Brick tandoor oven, preparation
Yes, you can assemble a tandoor oven yourself, because the whole problem is in the capricious materials of the traditional version, so we will build such a stove from the materials we are familiar with, namely:
- bricks;
- sand;
- clay;
- cement;
- grate.
Agree, Russian people are more accustomed to working with these materials.
And a stove assembled from them has an important quality: in case of an error, we will always have the opportunity to correct it. The clay mortar didn't work out, did it crack? It can be covered up without the risk of the stove falling apart into pieces.
So, let's get started, build a stove according to standard dimensions:
- Height – 1292 mm, and diameter – 1 meter;
- The vertical part of the furnace boasts a height of 544 m, which is exactly 8 rows, followed by another 8 rows of the dome.

Putting on the stove
Now the foundation, no frills required here: dug, filled with cement and done.
But where to start assembling? First of all, marking - draw a circle on the foundation correct form, because first we will post it, only then will we take up inner world tandoor
- 1st row: the main thing is to remember about the channel for blowing, the bricks in this row are laid on spoons, and make sure that they are in their own inside came into contact with each other.
- 2nd–8th rows: on the 2nd row we block the blower channel, we remind you that in this oven this channel is very small, only 68 X 200 mm, and no more is needed.
A grate will also be installed on the 2nd row, this is where the variety ends, the remaining 8 rows are performed according to the same scheme, the main thing is not to forget about coating and bandaging. We continue this way until the end of the vertical part.
Assembling the dome:
- 9th–18th rows: 9th row, beginning of the dome - here it is necessary to correctly calculate the shift, so to continue working we will need Grinder for trimming.
The challenge facing us is this: we must go from a diameter of 1 meter to a diameter of 500 mm in just 8 rows, which means that on each row we must narrow our circumference by 31.25 mm on both sides. We are finishing the laying of the furnace body.
After the body is completed, it must be generously coated with clay on the outside and left to dry in the sun.
Everything will take a couple of hours. And only after this can we begin the most interesting part - fill the cavity with brushwood to the very top, set it on fire and let it burn out - this will harden the clay and strengthen our tandoor. The inner part is completed, let's move on to the outer lining.
The lining is performed strictly vertically, and the walls of the lining must be in contact with the walls of the furnace.
And the resulting gaps must be carefully filled. This will allow our design to accumulate a large amount of heat, which will be enough for cooking, without having to spend much on fuel.
Now all that remains is to wait until the masonry has dried properly and you can work on the space above the vault, filling it with clay or sand.
Our tandoor is ready for use. Now nothing will stop you from baking flatbreads in the tandoor and enjoying them unique taste, famous all over the world.

Earthen tandoor, this is how bread is baked in Armenia
In addition to the options already considered, there is also a third modification of this unique oven, an earthen oven.
That is, the stove is installed directly in the ground, this method was widely used in Armenia, moreover, not only was it used for cooking, it was also widely known in the medical community as the best means for therapeutic warming.
Moreover, before, such a stove was used for people sacred meaning, representing our heavenly body. You can install such a tandoor yourself; it will only take you a little more time than the previous option.
- First of all, we need a foundation pit, both for the foundation and for the entire furnace as a whole; the entire vertical part, that is, the first 8 rows, must be hidden in the ground, take this into account.
- Make a foundation, then lay out the stove, using exactly the same algorithm as the previous version.
We remind you that the dome should be above the ground, and the rest of the weight should be below it.
- Lubricate the dome with clay, twice as much as in the previous modification, this is necessary for the durability of the device.
As you can see, the fundamental difference is only in the pit, but nevertheless, even the taste of food cooked on such a tandoor is different.
HomeSite map
DIY Armenian brick tandoor
Tips for the home handyman

There are a lot of different garden stoves for cooking food.
How to make a tandoor at your dacha with your own hands: from brick, clay, etc.
Among them there are original Russian variants, but the design that came to our country from Asia is especially interesting. This is a tandoor. Traditionally, such a stove is made by hand. And today anyone can create a tandoor made of brick with their own hands in their personal plot.
Installation diagram

First you need to choose a suitable location. A tandoor can be a structure located above the ground, but sometimes it is built directly in the ground.
The second option is convenient if the site does not have a large area. To implement it, a pit is dug, to which an asbestos-cement pipe is connected (it is necessary to provide air flow to the tandoor, without which it is impossible to maintain a fire).
The bottom of the tandoor must be lined with bricks.
One row of material laid flat is enough. The seams between the bricks are filled with clay. The asbestos-cement pipe is installed in the finished pit so that its lower edge is located 5 cm from the level of the bricks. The angle of inclination of the pipe is 45 degrees.
Then they proceed to laying out bricks to decorate the walls of the furnace.
The brick is laid on the butt. In this case, there is no need to use the solution. Optimal inner diameter the tandoor should be about 50 cm. The top row of masonry can be made a little wider for ease of use of the stove. The depth of the pit should allow 3 rows of bricks to be laid. There is no point in making the tandoor deeper.
The space between the bricks is also filled with dry clay.
Preparing clay for coating the top row requires special attention. It is diluted with water in a container until it acquires a creamy consistency.
Then you need to strain it (fine is suitable for this plaster mesh). When the clay has settled, drain the water and coat it with the resulting mass. internal surfaces bricks. Additionally, it is advisable to use mesh for reinforcement.
All that remains is to arrange the dome. Although this matter is not as simple as it might seem at first. Traditionally, a brick tandoor is covered with a clay dome about 1 cm thick with your own hands. It is laid out on some kind of template, the size and shape of which corresponds to the equipped foundation pit.
A large vase or basin will do. When the dome dries, it must be installed on the foundation pit and carefully warm up the finished tandoor for the first time.
Tandoor - DIY manufacturing sequence

Most people love outdoor recreation - in the forest, in the country, especially with family and close friends. Food cooked in the open air evokes a special appetite and is unusually tasty.
The most common device for outdoor recreation and cooking is considered to be a barbecue.
It's easy to cook with it. You can fry shish kebab on skewers, steak on the grill and other variations of meat and fish.
However, the use of the traditional stove of the steppe nomads - the tandoor - is becoming increasingly common. This amazing and simple fireplace produces delicious food!
Tandoor - what is it?
The tandoor (sometimes called tondur or dondur) is an invention of the Turkic people.
They are known for their ingenuity and nomadism from place to place. A tandoor is a small oven for cooking food at home.

Its huge advantage is its ease of manufacture.
Let's look at this process. The tandoor can be installed in any place where there is clay; you will also need sand. By ancient tradition added to the clay solution sheep's wool, but it is not the most important component, so you can do without it.
The main advantages of tandoor
the ability to naturally accumulate the energy of burned fuel, and then gradually release it over a long period of time;
2. food using such an oven does not burn and will not turn out raw;
3.
the juiciness and natural properties of the prepared products are preserved as much as possible;
4. You can bake flour dishes, such as “tandoor” flatbreads or juicy samsa.
Let's start making tandoor ourselves
We will need a wooden barrel, sand, clay, and if you can get sheep's wool, then add it to the clay, and you will also need vegetable oil.
How to make a tandoor from clay with your own hands
You can consider in detail the sequence of actions step by step:
1. Need wooden barrel Fill to the brim with water and leave until completely swollen. Prepare a solution in a 1:2 ratio of clay and sand and mix thoroughly. Sheep wool is also added there, which is cut into pieces of 10 - 15 cm. Sometimes the walls of the tandoor are reinforced with straw, hay or reeds, reeds, flax (this method is found in some descriptions of tandoor making traditions);

2.
We pour water from the already swollen barrel and saturate the inner walls of the barrel vegetable oil. Next, it needs to dry for about a day;
3. We also apply the previously prepared clay solution to the inner walls of the barrel in a layer 2-3cm thick. Thoroughly compact and smooth out. On one side we narrow the neck of the barrel;

4.
To dry the tandoor, you need to leave it in a dry, ventilated area for two weeks. During the drying process of the manufactured structure, the boards that made up the barrel will move away from the clay;

5. When the tandoor is completely free of the boards, place it on a layer of sand with the neck up.
We light a small fire inside and maintain it for 6 cm. This process is necessary for the purpose of pre-firing the prepared oven. After completing the procedure, cover the tandoor with a lid; there should be a hole in it for the smoke to escape. Then we kindle the fire in it again, only now not a weak, but an intense fire.
6.
The tandoor should cool slowly. After cooling, you can already locate it in a specific place. You can insulate the stove with felt or cotton wool, and then line it with brick or stone, but this is no longer the main stage.

It is necessary to arrange a small blower at the bottom of the stove. It will then need to be covered with a lid made of fireproof material. The lid must match the size. You can also make a device to hang skewers inside the tandoor.

Tips for using a DIY tandoor:
— when the tandoor is hot, you cannot pour water, cracks may appear;
— during the first ignitions, the temperature in it must be raised gradually;
— the same firewood is used as for the barbecue;
— it is necessary to heat it until the soot on the inner walls disappears;
— after complete combustion of the wood, cover the ash pit;
- Now you can cover the oven with a lid and the oven is ready for cooking.

The approximate cooking time for meat in a tandoor is 15-20 minutes, fish will cook in 7-10 minutes, and vegetables cook very quickly in 2-3 minutes.
Make such an ancient device as a tandoor and see from your own experience how tasty and juicy the food cooked in it will be!
If you want to make a tandoor with your own hands, we offer you an overview of making a tandoor from clay, collected from the experience of several craftsmen. In this section you will learn how to make a tandoor (jug) from clay. The resulting product can be used both independently and for the construction of a more massive furnace.
Selection of clay and preparation of solution
Uzbeks and other Asian peoples, for whom the tandoor is their national oven, use local clay.
Kaolin clay is best suited for tandoor. It has a light yellow or light gray color.
Clay preparation
If the clay is not pure, with impurities, then it is soaked in a barrel.
Fill with excess water and place carefully. When the clay is saturated, heavy stones will settle below, and grass and other debris will float to the surface.
Making a tandoor, an egg-shaped clay jug
The garbage and water are drained, and the soaked clay is placed in a flat container.
Pure clay with water is allowed to stand for at least a day, maybe a week. No need to add sand! Knead and leave to ripen in the shade or in a cool room.
As the clay settles, there may be water left on the surface that needs to be removed. The less water remains in the clay before sculpting, the fewer cracks there will be in the product after drying. The clay becomes soft and pleasant to the touch.
Preparation of the solution
Some craftsmen add a little soda. About a tablespoon per 10 liters. Modern experts add liquid glass to this dough.
It provides plasticity, which reduces the chances of cracks forming due to temperature changes. It is non-toxic as it consists of quartz sand, soda and water.
After the clay is soaked with water, wool is added to it. Goat, sheep or camel. If it is not possible to add wool, then it can be replaced with straw. Goat hair is preferable. It is straight, stiff and long. Sheep hair is also suitable, but it is curly and therefore more difficult to work with.
For a tandoor Ø80cm you need 1.5 – 2 kg of wool. And of course, knead everything into a homogeneous mass.
Six will improve the heat capacity and make the structure lighter.
During the tandoor firing process, the wool burns out and small pores form in the walls of the oven. These pores allow you to retain heat for a long time.
All this is thoroughly mixed and kneaded. Traditionally this was done with the feet. And modern craftsmen use a construction mixer. Stir until thick sour cream forms. Then they knead several times until you get a mass from which you can sculpt. Almost like plasticine or dough. After which you can sculpt the hearth.
Wall thickness and heat capacity of tandoor
It wouldn’t hurt to pay a little attention to the massiveness of the tandoor.
Baking in it occurs while the oven is cooling. When the firewood has burned out, flatbreads, meat, samsa and other dishes are loaded into it. Therefore, the amount of cooked food and dishes depends on how much heat the tandoor can give off. And this already depends on the volume of its body, that is, on the thickness of its walls and on the heating temperature.
If the tandoor is made portable, on wheels, or simply is not planned for additional exterior finishing, then it is better to make the walls of the tandoor thick enough.
And if the tandoor is planned to be stationary and will be additionally lined, for example with brick, then the walls can be made minimum thickness. Because total weight the finished oven will be significantly increased, and from a clay vessel we need the egg-shaped shape of the tandoor and the smoothness of the walls.
Continuation: Methods of sculpting tandoors
The video demonstrates the making of a tandoor. And also cooking flatbreads and samsa in the tandoor.


