For people with imagination and skillful hands, it will not be difficult to turn unnecessary things into real masterpieces. Masters and beginners use crafts from plastic bottles for the interior, as garden decor and in the form practical furniture. Colored plastic bottle caps are an excellent material for mosaic panels on walls and fences. Best ideas With detailed instructions and the photo can be easily implemented at the dacha, turning a bare area into a “clearing of fairy tales”, and filling the house with useful little things.
Important advantages of crafts made from plastic containers
A well-made souvenir or trinket will eventually develop into a hobby, if there are no limits to your imagination. Summer residents who have moved from simple fences on wire to buildings that delight in scale never cease to amaze.
From available material that many throw away, someone builds:
- greenhouse;
- carport;
- Summer shower or a bathhouse;
- country toilet or a shed;
- summer gazebo or sun canopy;
- a mansion for children or a playground;
- sandbox with decorative sides;
- various temporary buildings on the site.

The main advantage of such structures is the available material. At reliable fastening elements of the building walls are aesthetically pleasing and quite reliable. It all depends on the way the plastic bottles are connected. If you approach the matter thoroughly, the desired result will impress even experienced builders.
Over time, plastic becomes a real environmental disaster - it is difficult to recycle. But if you involve everyone who cares in cleaning the area, there will be a whole mountain of empty PET bottles for building a greenhouse, cascading flower bed or vertical gardening. The only drawback is that it takes a long time to collect identical containers, since containers are produced in different colors and volumes.
Some manage to collect enough craft material in one season, while others involve neighbors and friends in collecting plastic. Someone decides to clear the area for picnics in order to improve the environment on the way to the dacha and collect material. As a result, the plastic bottles are in use and the area is clean.
Another advantage is that plastic containers are soft and pliable, easy to cut, no need to complex instruments. With little skill, the material itself “dictates” ideas.
To create an original decoration you need:
- interesting idea;
- finished sample for imitation (illustration);
- material for crafts with tools;
- step-by-step training plan guide.
In the hands of a true master, plastic bottles take on a second life, becoming functional objects. It is better to make souvenirs on a seasonal basis. For example, New Year's toys are made in the winter, practical country houses are made in the summer, and in spring and autumn it remains to build a “clearing of fairy tales” near the house for children.
Recycling plastic containers is a fun activity for the family. It is easy to attract children to him by instructing simple part work. Don’t forget to remind them that you’re not just making a firebird or “Chunga-Changa island” with palm trees from bottles, but that you care about the environment. You can involve a yard or a school classroom in beautifying the area.

Furniture and interior items made from plastic bottles
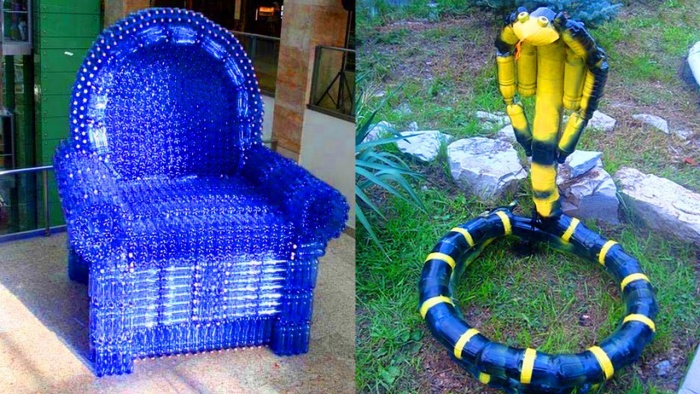
Furniture made from plastic bottles looks like a masterpiece that is not accessible to everyone. They will require a lot of plastic containers of the same type. Sofas and poufs impress with their design and comfort, not inferior to real furniture. There is nothing complicated if the sofa is made in blocks - seat, back, sides. If the container is not enough, the sofa blocks can be made one at a time. It’s better when you collect bottles from one drink, for example, two-liter kvass or lemonade.

The principle of “assembling” furniture from bottles is simple - they are placed in layers and tightly wrapped with tape. To make the furniture softer and more springy, a little air is released from each bottle and twisted tightly. At the place where the cap is, cut out a cap from another bottle and tape it with tape. It turns out to be a block with a bottom on both sides - this is the basis of the furniture.
Then it all depends on your imagination, the type of furniture and the number of bottles available. We wrapped 7 containers of the same volume with tape to create the base for an ottoman. What its appearance and style will be depends on the master. For soft seat You will need a round pillow or a block of foam rubber to fit the top. The cover is cut to the size of the ottoman in the form of a cylinder, and it is convenient to insert a zipper along the side seams, but it is easier to sew the upholstery tightly.
If there is not enough furniture for the summer, an ottoman for the cottage is made from an old wadded blanket and a baby pillow, wrapped in a block of bottles. Old curtains or a bedspread will be used for the lining. If the pouf should have a presentable appearance, choose newer and more expensive fabric or eco-leather.

To build a coffee table you will need 4 racks of plastic bottles and a plywood board as a table top, which can be hidden with a long tablecloth. They do it in a similar way convenient stand for a laptop or a remote table for the garden. For large furniture (sofa, chaise lounge or chair) made from plastic bottles, you will need a lot of patience and raw material.

Useful little things for the home from plastic bottles
Flowers and vases
Decorating a schoolchild's bedroom or children's room with crafts from plastic containers is not difficult. You can make a whole bouquet artificial flowers. Place the resulting chrysanthemums, daisies or roses in a vase made of the same material, complementing the centers diode light bulbs on an insulated wire. This is what a night light of extraordinary beauty will look like, where the faint light shimmers in the plastic petals.
Advice: To give the leaves a special shape, use heating the blanks and folding the corners with tongs!
To place a homemade bouquet you will need a suitable vessel; simply cutting off part of the bottle is not aesthetically pleasing. The edges of the cut are marked with a ruler to make the cut, securing the result by heating the bends. A small transparent bottle is cut off to the very top, and about half of a large container is cut off. We choose a material with a ribbed or “waist” in the middle to create an interesting base.
Then we do it as our imagination allows, but we bend the edges beautifully. The fringed cut is obtained from vertical or diagonal cuts in the plastic base. The resulting strips are evenly folded to the outside.
Note! It is important that all the notches and the depth of the slot are absolutely identical, then the entire product will come out neat.
Depending on which edge is desired, the strips of the vase (the edges of any other product) are secured in different ways:
- curly bend;
- staplers;
- fusing;
- gluing with transparent polymers.


Flowerpots, flower pots and containers for seedlings
Colored plastic containers in the form of bottles and bottles of different sizes are suitable as containers for growing living plants. It is very easy to make a fragrant balcony from 3-liter tanks - a cascade of hanging petunias. Fragrant flowers hanging from cut containers will help make your dream of a beautiful piece of paradise come true.
Large bottles and tanks cut in half are hung with both the bottom down and the lid. It is recommended to place large pebbles at the bottom for drainage. Excess water after watering will go to the plants in the lower rows. In the same containers, plants are grown without soil - hydroponic method with the addition of fertilizers. Fresh greens and seedlings (in urban and country conditions) are also germinated in prepared plastic bottles.
Advice: Use the compact form and ability to hang containers for vertical gardening with automatic watering. In the absence of the owners, watering cans with water immersed in the ground will cope with moistening the plants.


Traps and feeders
Using plastic bottles you can repel pests or attract birds to your site. For this purpose, the tank is used as a feeder, and at the roots fruit trees place traps from bottles of chemicals. From double plastic containers, craftsmen construct traps for wasps, where they fly into sweet water and can't get back.


Equipment for a summer cottage
At the dacha a quick fix» It’s easy to make crafts from plastic bottles in the form of an impromptu washbasin by hanging a full bottle upside down. Just unscrew the lid a little and a small stream of water will help you wash your face and hands. It is also worth making a bench and organizing lighting with beautiful owls or plastic gnomes. Any garden decor for inspiration - with interesting illustrations.


Multifunctional items for the home
Make an original cosmetic bag from 2 bottoms of plastic bottles, sewing the edges together with a zipper. This box can be used as multifunctional item– a piggy bank, a case for large beads, hairpins or jewelry.
It is convenient to knit from such a ball, suspended somewhere nearby, by pulling the thread from the ball inserted inside. It’s easier to find nail polish or a lipstick collection in a makeshift zippered box.

New Year's decor
Bright christmas balls, garlands or toys made from plastic bottles are a worthy use for transparent containers. One bottle, cut into round strips, will produce a transparent ball. After securing the sphere with a stapler, decorate it in any way:
- “rain” winding;
- pasting with crushed polystyrene foam (snow);
- decoration with sequins, beads and stones.
New Year's decor made from white plastic bottles with a waist is suitable for snowmen or penguins. You can use black nail polish to draw eyes and other elements, cotton wool (snowball), glitter, small buttons, beads and whatever is at hand. Funny caps for characters - from colored socks without a pair, strips of knitwear are used as a scarf.
Advice: From homemade winter characters, a candle, ready-made tinsel and a couple of pine branches with cones, create an original New Year's composition so as not to buy a Christmas tree.


Curtains made of colored plastic caps and bottles
Space zoning is popular design technique, where a do-it-yourself translucent curtain is often used. Original curtain can decorate any living space, cottage or covered terrace. Original hanging partitions made from unusual materials are widely used in the interior.
IN modern decor Plastic is in demand, including bottles and bottle caps. There are options for curtains:
- from scraps from the bottoms of small containers - strips on a thick fishing line, swaying with the movement of air;
- from colored lids - a fantasy panel of tightly strung elements;
- a garland of plastic and lights to give the LED curtain more aesthetics.

Original all-season flower beds
The summer season is passing, and living flower beds are being replaced by homemade plastic flowers that are no less beautiful than real ones. Their advantage is the ability to decorate the territory at any time. These flower beds pale in comparison to living plants, but in early spring and in late autumn only they attract admiring glances.

For daisies you will need small ones plastic containers white(petals), yellow (centers) and green (leaves). You will also need an awl and a candle (for heating), “liquid nails,” scissors and stiff wire in green insulation.
We cut the base of the white bottle to the center, marking 16 segments - these are the petals. We bend the neat edges over the candle flame, and also make 2-3 chamomile corollas, which we connect in the center with an awl. Here the stem with leaves is fixed on a green wire, closing with the middle. We fill the center of the flower with a yellow basket with small cuts from 2 finely dissected circles with a fringe bent over the candle. We supplement the flower with green sepals from the bottom, collect all the parts and fix them together.

From the remaining pieces of green plastic, cut out leaves with a hole at the base (for stringing) and give them the desired shape, heating them over a candle flame. We attach the leaves to the wire handle; they should bend around it slightly. All that remains is for the chamomile to make several “companions” and find a worthy place for the bouquet.
Using samples and imagination, it’s easy to make plastic lilies of the valley, roses, chrysanthemums or tulips. This requires plastic. suitable color, from which several layers of petals are made to achieve a resemblance to real flowers.
All-season flower beds include mosaic compositions made from containers filled with earth. The lids are used to make wall panels. “Butterfly” or “ladybug” - in different versions.

Crafts from plastic bottles for the playground
An incredibly beautiful bird with plastic plumage – a whole “clearing of fairy tales”. These are the peacock or firebird, swans, pigeons, bullfinches and parrots. All of them are made from empty PET bottles according to the general principle:
- Design an aesthetic bird's head with eyes and beak;
- Construct the torso and neck;
- String plastic plumage;
- Provide with wings and tail;
- Place on paws or secure to selected surface.
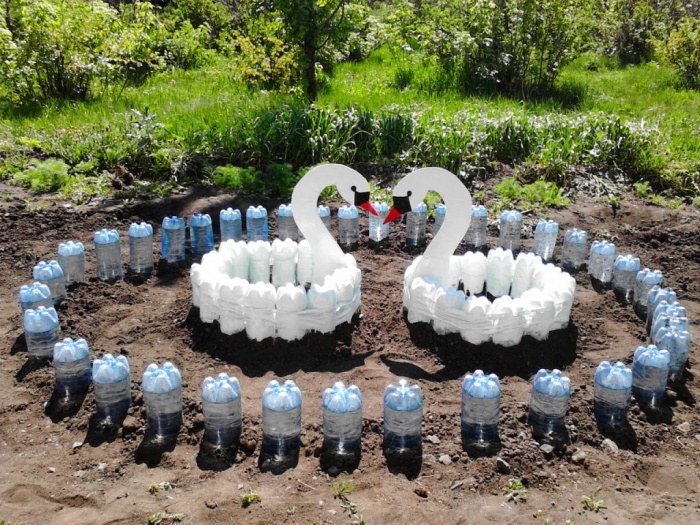
Plastic swans can be fenced off by a blue “lake” of upside down plastic bottles. Outlandish birds will decorate the trees in the corner of the garden, which is reserved for children's games. You can choose a themed decor, for example, a desert island with palm trees and parrots.
Plastic animals, birds and insects, familiar to our latitudes, as well as favorite fairy-tale characters, are supplemented with other materials. Tires, wood and empty containers that can be easily painted will be used.


How to make decorations from plastic bottles for the cottage and garden
Original garden decor made from scrap material is another way to give the site some personality while the young plants come into their own. From green plastic bottles it is easy to make funny little frogs on the edge of the pond, watching dragonflies and butterflies from the same material.
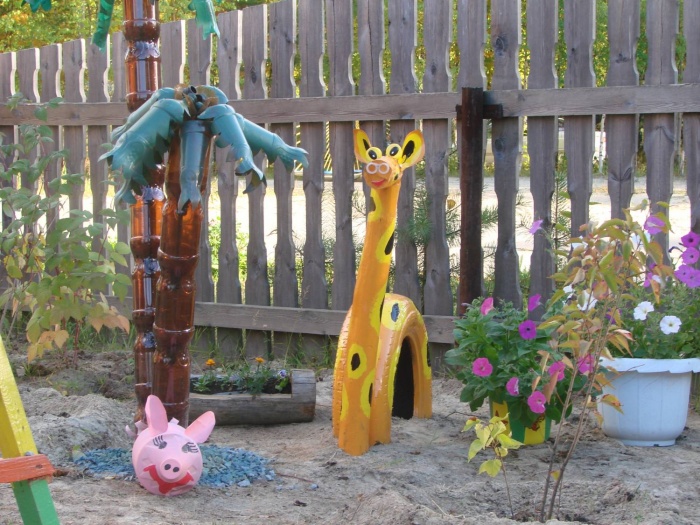
Palm trees are a popular garden decoration, consisting of trunks (up to 15 brown bottles) and palm leaves (green plastic 5-10 pieces). This is a simple process that even children willingly participate in.
Prepared brown cups with notches are strung on a thick steel rod (bamboo fishing rod), after first piercing the base. It is better to use brown containers (1.5-2 l) entirely, cutting them in half, then you only have to punch through the bottom.
We leave the green bottles without a bottom and neck, with the exception of the last one with a neck, which will be needed as a loop. We cut these containers lengthwise into 3 parts up to the loop and dissect them like leaves. If longer leaves are required, staple the second half of the leaf. All parts of the stem are strung on the base and attached to the top, connecting with a common loop. All that remains is to reliably install “exotic guests” with a lush crown on the site.
The material is collected throughout the year, but it’s easier to involve neighbors and acquaintances in the “ecological” cleaning project. There are special containers for plastic in the yards - it’s much easier to collect.
Preparation for work - removing labels and glue residues from plastic bottles; it is important to rinse well and discard the deformed material.
If vertical fences are built, they need to be filled. Depending on the idea, sand, stone chips or dry soil are poured into PET bottles, burying them 1/3 of the way down.
For selected purposes, plastics of varying elasticity are used. Heat treatment is required for filigree work (flowers). It is important not to overheat the fragments cut into strips.
Fairy-tale characters sometimes require additional painting. For example, it is better to cover pink piglets for a playground with an aerosol from a spray can and secure them with transparent acrylic paint.
Plastic bottles are an excellent material in the right hands. Using them as a basis, it’s easy to teach children a lesson in environmental education and fill your home or garden with practical things. At creative approach The color, volume and shape of plastic bottles themselves will prompt new ideas for an exciting creative process.
69 photos of ideas for crafts made from plastic bottles


Plastic bottles are generally considered garbage and are sent to the appropriate places - garbage cans and landfills. But in the right, creative hands, these things can sparkle with new colors. And you don’t have to be a master to breathe a second life into ordinary plastic. You just need a little patience and imagination.
The crafts are quite simple and anyone can make similar things with their own hands. Or maybe for some this business will become a real hobby.

Useful things from trash
Plastic bottles come in different shapes. They are also different in color and size. Therefore, it is quite possible to make them small items decor for the garden plot. And it’s quite suitable for a summer house plastic furniture or even a summer gazebo, built from the same plastic dishes.


And even caps from plastic bottles in skillful hands can turn into real masterpieces - mosaics on the walls, a hot stand, cute toys for children and other useful little things.

Everyone can make one thing or another. Here fantasy plays the main role. After all, the material for making crafts is available almost everywhere. They can be found in parks, on lawns, near rivers and in landfills.

And by collecting them for his creativity, a person thereby cleanses nature of harmful things. After all, plastic these days has turned into a real disaster that threatens environment. This material is durable, so crafts made from plastic bottles will serve and delight you for a long time.

Where to begin
The most important thing in every decision is the action plan. In order to start working on the craft, you will need the following:
- detailed description and photo of crafts made from plastic bottles or one individual craft of your choice;
- bottles of suitable sizes and colors;
- additional materials and tools that may be useful: knife, scissors, tape, glue, paint, fabric, etc.


Then you just need to be patient and follow the instructions. And soon the children will enjoy the new fabulous playground, the guests will enjoy spending time in the “almost crystal” gazebo, and the hostess will appreciate the unusual practical devices in the kitchen.

Boxes
You can make an excellent box from plastic bottles, in which you can conveniently store various small things: hair bands, buttons, paper clips. To do this, you will need two bottom parts of plastic bottles of the same size. They are connected to each other by a zipper, which is sewn along the edges.

Or a simpler option is to cut off the top of the bottle at the point where it begins to narrow. The container is ready. All that remains is to decorate the bottle using decorative ribbon, buttons and beads. They are glued with glue. Sew a fabric cap, which is tightened with a cord, and also glue it to the edge of the container.

And it’s not at all difficult to make a convenient and original container for sandwiches that you won’t be embarrassed to take to school or work. The main thing is to decorate it with intention. And it is done in just a few steps.

In the bathroom there is also a place for a plastic box in which you can put all the necessary supplies: toothpastes and brushes, washcloths and shampoos. If these boxes are hung on the wall one above the other, you can free up space.

Plastic bottles can make an unusual stand for pencils and pens. It is enough to cut it out in a circle in the shape of a cat or owl’s face and paint it. The same technique is used to make a flower vase. Just to make it stable, you should add a handful of small pebbles to the bottom.

Playground toys and decorations
To decorate children's playgrounds, decorations are made in the form of plants, animals and even insects.

For a palm tree you will need about 15 bottles Brown, from which the palm trunk is made, and 7-10 green bottles for the leaves. The trunk is assembled from bottles cut across, stringing them onto a frame made of durable rod.

To create leaves, green bottles need to be cut lengthwise, forming the desired shape. To make longer leaves, you need to attach an additional one to the main sheet using a stapler.

Decorate your garden plot it is possible even in winter time. Funny penguins in colorful hats and scarves will cheer you up on a cold winter day. You can make penguins of different sizes. For one bird you will need two identical bottles, which have a “waist” at the bottom.

This bottle needs to be cut in half. This will be the penguin's body. For the second bottle you only need to cut off the bottom with a small margin - these are the legs. Connect the two parts using a glue gun and paint. Make a pompom from wool and a scarf from a strip of fabric.

Such crafts are not stable, since plastic is a very light material. In order for the penguins to stand quietly in the chosen place, before gluing the parts together, they need to be filled with sand or small pebbles placed.

Even plastic lids in skillful hands they turn into cute ladybugs. You just need to color them accordingly and glue funny eyes on them.

If the plastic lids are connected to each other with the edges in the form of a small circle, you will get an original stand for a hot pan or kettle. This device will come in handy in the kitchen.

Flowers and plastic bottles
Flowerbeds can also be decorated in an original way using plastic bottles. If you take the bottom parts of the bottles, paint them from different colors and stick them into the ground next to each other, you can create a flowerbed that will “bloom” all year round.

The tops of bottles with caps can also be used as flower pots. They are not stable, but in the form of flower pots they will look fabulous.

Plastic bottles with a volume of 3-5 liters will make a bright flower bed-train. You need to cut out one side of each bottle. Paint it in different colors. Fill the bottles with soil and transplant low-growing garden flowers into them. Lay them horizontally and lean against each other, creating trailers.

Furniture and buildings
Construction summer gazebo will require more costs and effort. After all, for construction you will first need to make a frame made of wood or metal. The walls are built from whole bottles, which are strung on wire or rod.

First, a hole is made in the bottom of the bottle and the cap is unscrewed. A rod with stringed bottles is attached to the frame in a horizontal or vertical position.

Using bottles you can create a sofa, armchair, ottoman. Here you first need to make separate blocks: seat, armrests, backrest. Then connect them according to the design. It is better to make blocks from 2 liter identical bottles.

You need to put the lower part of another bottle on the top of the bottle (where the cap is) so that you get the bottom of the bottle on both sides. All bottles and blocks are attached to each other using tape. To make the seat soft, you need a foam block of a suitable size. The cover is sewn to the size of the furniture.

Photos of crafts made from plastic bottles


Plastic bottles are not just containers for water, but also an excellent material for creativity and. Some craftsmen manage to make something out of them that is difficult for many to imagine. All you need in this matter is the actual material, scissors, sometimes paint, glue and free time. It would also be a good idea to turn on your creativity and stop looking at the container of your favorite soda as an ordinary thing. So let's get started!
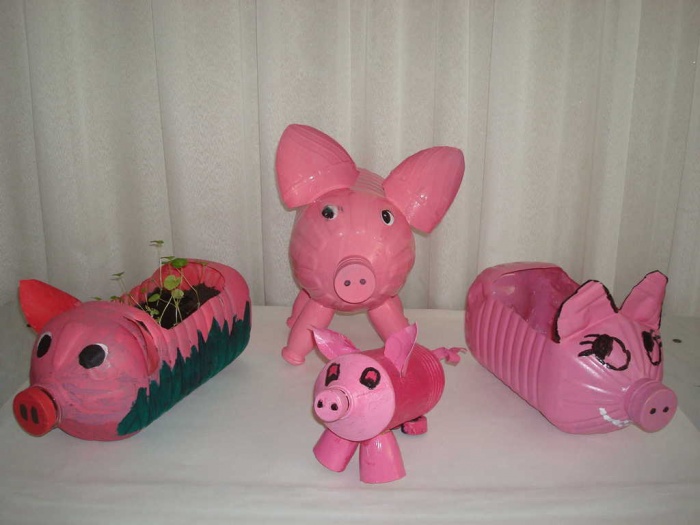
Piglets-pots
This craft is easy to make, so that’s where we start. You can plant flowers in this for the summer or use piglets as a container. This will revive anyone, especially children will be happy with this creation.
Tools and materials:
- Five liter plastic bottle. Their number is based on the number of piglets that will be created. 1 container – 1 pig.
- A sharp knife, a stationery knife is most convenient.
- Bottles - 0.5 l or 1.5 l, 4 pieces for each pig.
- Glue.
- White enamel and red or pink paint.
Manufacturing sequence
The container should be rinsed and dried, and if there are labels on them, they should be removed as they will get in the way. If you decide to make a flowerpot, then you should cut a hole in the upper part so that there is room to plant flowers and add soil. If you create garden sculpture, we skip this step.
Smaller bottles will be used to create the legs. They need to be cut from the neck by 10-15 cm or to the length that is needed.
Advice! The larger the hooves, the taller the pig will be. Moreover, containers should be selected of the same volume so that the limbs come out smooth and beautiful.
Advice! To make it more convenient to glue the legs, you should cut each neck at the widest point with a fringe and bend the edges.
Now the important task is gluing. For this you can use:
- Glue "Moment".
- Glue "Titan".
- Terpomistolet. It is the most convenient to work with, although hot silicone can deform the plastic, so it should be handled with extreme care.
Advice! It is more convenient to glue two limbs at a time, since after applying the adhesive composition they need to be held for some time for high-quality bonding. Use glue according to the instructions.
After everything has dried, you can cut out the ears; they will be made of the same material as the whole pig. It is convenient to cut them out from the lower parts, since there is a factory bulge there. The shape is natural, the size is arbitrary. For ease of gluing, you can also make a fringe at the bottom - like on the legs.
On a note! It is most convenient to glue if you are making flower pots. In this case, the cuts must be glued to the container from the inside with the same composition.
Now the creative stage - painting. Natural color – pink, but you can use another one if you wish. Experienced craftsmen It is recommended to use it, it fits well on plastic and is more durable. You only need to tint the outside, but carefully so that the color of the bottle does not show through. It is very convenient to hold it by the lid-pocket. Don't forget to cut and glue the tail, it is also made of plastic, it is more convenient to paint it before gluing. You can draw the eyes or buy them; these are sold in any sewing store.
Important! If the pig will be used as flower pot, it is necessary to make holes in the lower and side parts for the free outflow of water.
Fly agarics for garden decoration
A detailed master class on making fly agarics from bottles is on video:
Since Soviet times, bottles have been collected and invented application on the farm.
Today they are used to make jewelry, toys and even furniture.
Summer residents use containers to decorate their plots.
Let's look at examples of how you can make crafts from plastic bottles with your own hands for the street, cottage, garden, vegetable garden, what other components are needed for this and consider photos of the products.
We are offering to you step by step instructions making crafts in the shape of a palm tree with a photo.
To make a palm tree from plastic containers, brown bottles are cut to the hangers, the edges are cut into triangles and folded back. In the middle of the bottom drill a hole and string it on or a metal rod installed on the ground.

Green bottles are cut in half lengthwise. The edges of the workpieces are cut, imitating small leaves.

Plastic leaves bolted together.

For the lush crown of palm trees assembled from several levels and glued to the trunk.

Looks beautiful near the gazebos and in front of the entrance to the site.

Flowers
For flowers, prepare a trunk - a painted thick wire.
To make chamomile, you will need white containers. Most often, milk drinks are sold in this type of store. Petals are cut out of it, fastened together by drilling a hole and tightening it with a bolt. The middle is made from the bottom of a brown bottle.

The bell is also cut out of white bottles. They cut off their heads, cutting the edges with corners. A hole is pierced in the lid, where a wire is inserted and attached to the barrel.
These flowers will decorate paths in the garden or between the beds.

Thus, the variety of flowers made depends on how to cut the blanks and how to fasten them together.
Vase
Now let's look at how to make a small vase for decorating a porch or window sill on the veranda. You will need:
- 2 bottles;
- scissors;
- spray paint;
- PVA glue;
The bottom and neck are cut off from one bottle. The thread is cut off from the latter, turned over and the wide side is attached to the bottom glue gun. Cut off from the second top part, the thread is removed, the edges are decorated with a wavy line. The narrow part is glued to the first workpiece.
Surface of the vase smear with glue and sprinkle her rice. After drying, the bottles are painted with spray paint in two colors.

Birdhouse
A circle is cut out on the side, it will become the entrance. To the top glue parts from disks, imitating tiles. The house is painted, decorated beautifully and straw or tow is placed inside.
To make it more convenient for birds to climb inside the birdhouse, glue a round stick or a piece of pencil in front of entrance. A wire is threaded through the lid to form a loop.

Flowerbed or flower garden
Fencing flower beds with bottles has become common. They are cut, filled with soil and arranged in flower beds, as shown in the photo.

In the ground next to the plants put upside down bottoms and paint them. The resulting shapes are, for example, a ladybug or a flower.
Figurines for the garden in the form of animals
Bottle animals are made as toys for children's playgrounds in the country or to decorate the garden. You can create favorite cartoon character, a copy of pets or make any fantasy come true.
Examples of such work are in the photo below.
Cat
These figures will be a great decoration on the porch or in front of the gazebo. What you will need for this composition:
- bottles 1.5 l and 0.5 l;
- stationery knife;
- paints;
- glue gun;
- color package.
For stability the container is filled with earth, it will become the body of a cat. The remaining details are cut out from the second container: muzzle, ears, tail.
The cut off necks are used to make cat paws. Fasten everything with glue and paint. A bow from a bag or other decorations is glued to the neck.

Piglets
Such pigs are suitable decoration for a playground or garden beds. The container is filled with sand, the ears and tail are glued on.
Capacity painted in pink color and draw nostrils with eyes.
The photo below shows two examples of how you can make a pig.

Frog
To create such a “frog princess”, you will need:
- about 12 green containers and one yellow;
- stationery knife and scissors;
- glue gun;
- a regular lighter and gas cylinder with a lighter attachment.
First, the body is made. Two bottles cut from one side along. Remove the neck, unfold it and cut off the excess. Glue them together so that you get a body and an open mouth.
“Warts” are burned on the back.
The necks of the other two containers, along with the lids, will serve as bulging eyes.
On a yellow container, a pattern is cut out with a stationery knife on the base for the future crown. Then the container is turned inside out, connecting the neck and bottom inside with glue. The crown is ready, it is attached to the top of the head.
For the paws, blanks are cut out from seven bottles and carefully warmed up with fire from a gas cylinder so that the plastic deforms and becomes pliable. The blanks are glued together and attached to the body. All that remains is to melt the sharp edges with a lighter.

Peacock
To make a peacock, except for bottles, additional materials will be needed:
- two metal rods;
- Styrofoam;
- metal grid;
- wire;
- paint in cans;
- knife and scissors;
- lighter.
The rods will become the legs of a bird, the body is attached to them from a 5 liter canister. The neck consists of two bottles. The head is cut out of foam plastic.
For the wings and tail, use a mesh, to which feathers tied with wire, cut with scissors.

Feathers for the body can be cut similarly to the tail or make them smaller and thinner, glue to the body with glue.
Next, the beak and crest on the head are made. Before making the peacock's plumage, feathers melt with a lighter and stick into foam. At the end, the craft is painted from a balloon and patterns are drawn on the tail.

Swan
Homemade swans decorate flower beds, flower beds and ponds.
For the most simple option to make a swan you will need:
- net;
- Styrofoam;
- wire;
- thick metal rod;
- corrugated hose (suitable for a washing machine);
- paints.
A body frame is made from mesh, and plastic feather blanks are tied to it. The metal rod is bent, it will act as a neck. Cover it with a hose.
The head is cut out of foam plastic and placed on the end of the rod. The figure is painted and placed in the right place.

Hedgehog
The hedgehog's body is made from a barrel-shaped container. The middle of another bottle is cut out and roll into a cone, this will be the muzzle.
The parts are fastened with a heat gun, and the ears are made in the same way.
From other bottles make strips and cut out needles, glue them to the body with plates, overlapping.
The eyes are cut out of plastic and painted. The nose is formed from the scraps. The toes are made from cocktail straws.
At the end the craft is painted and it is ready to decorate the garden.

Hare
One of the simplest designs.
3-5 liter bottle filled with sand. From another cut out the ears and glue them to the base. All that remains is to draw a funny face of a hare.

Donkey
To make a donkey you need:
- two large containers;
- three bottles of 1.5 l;
- rods or plastic pipes for legs, four pieces;
- wire for tail;
- glue and paints.
From a five-liter container make a torso and glue the neck to it from 1.5 l.
For the muzzle, cut off the bottom, carefully shape the edges into a mouth, and attach half the bottle in the form of a head. Ears are cut out from a five-liter container and glue it.
The entire structure is placed on “legs” and painted.

Wolf
To create a wolf, the hero of the cartoon “Once Upon a Time There Was a Dog,” additional materials needed:
- metal grid;
- wire;
- polyurethane foam.
The base of the body is a large container and a net. Wire arms and legs are attached to them.
The muzzle is made from a 5-liter bottle, and the nose from a 2-liter bottle. The main structure is tied wire to the picket fence, it is dug into the ground.
The figure is given the desired shape using polyurethane foam; after hardening, the excess is cut off and the surface is treated with sandpaper.
Final stage– coloring.

beds
Summer residents use bottles for seedlings and creating such neat beds.
Manufacturing is very simple: you need to cut a hole in the side, fill with soil and plant shift.

Round bottles cut across, we get “glasses”.
We suggest looking at the pictures below and using them as an example of making a flower bed.

Drip irrigation
For drip watering of plants in greenhouses no need to buy special equipment.
The bottoms of the bottles are cut off and holes are made in the caps. To distribute water to several plants, you can add tubes from IVs. The inverted container is placed in the desired location and filled with water.

Fence for the front garden
Plastic containers can be good material for making fences in vegetable gardens and front gardens.
Pillars are dug in, through holes are made in the container, bottom and top in each. passes through them thick stretched wire, fixed to poles.

Pinwheel
A simple pinwheel, cut from one bottle. A hole is made in the middle of the workpiece, a nail with a large head is driven through it or a bolt is threaded through it.
Attached to vertical surface not close, loosely, so that the wind spins the pinwheel.

Berries
Spectacular decorations for flower beds and beds. Select barrel bottles, cut off the neck, bottom mounted on metal rods, playing the role of a stem.
Leaves are cut out of green plastic, the structure is assembled, painted and stuck into the ground.

ladybugs
Cute bugs from painted bottoms and ping pong balls, will become a decoration for the nursery play area in the country.

Butterflies
On transparent plastic paint with stained glass paints bright butterflies, and then simply cut them out. Such crafts made from PET bottles can be used outdoors and in the apartment.
They are placed on the leaves indoor plants by using double sided tape or glued to wallpaper.

Approximate number of bottles for crafts
The table shows what can be made from plastic containers and approximately how many bottles are needed for a particular craft.
Useful video
This video presents ideas of what you can make from plastic bottles with your own hands:
Plastic bottles, along with plastic bags, have become the main source of pollution on the entire planet. To somehow combat this problem, people are developing various ideas. rational use empty container. Today, boats are made from PET bottles, greenhouses and houses are built, fences are erected and furniture is designed.
A simpler and more accessible way for the average person to recycle plastic is to make it various decor. This idea is especially relevant in playgrounds or gardens, because multi-colored bottles make wonderful crafts: bright, interesting and useful.

This article will be devoted to garden decorations made from plastic bottles.
Features of plastic material
Before you start building something from plastic bottles, you need to get to know this material better and become familiar with its properties. So:

Advice! It is much easier to work with plastic bottles of the same color.
And if a large product is planned (for example, Street furniture), it is recommended to collect bottles of the same shape and size. On the contrary, bottles are suitable for some small crafts different shapes, color and volume.

What crafts can be made from plastic bottles for kindergarten?
Crafts for the garden from bottles can be very diverse: from fencing sandboxes to making fairy-tale characters, flowers or lanterns. Here, a lot depends on the imagination of the performer, as well as on the amount of collected plastic containers.
Important! In children's institutions, it is better not to use long-drying toxic dyes. Therefore, when painting plastic crafts, it is recommended to use water-based acrylic paints - they dry quickly, lay evenly on the plastic, and have a bright palette of shades.
Bottle palm
You can build not only an exotic palm tree from plastic, but also any other tree - the principle of its manufacture will be almost the same. To work you will need plastic bottles, scissors and a knife, metal wire or a long wooden rod, acrylic paint(if you couldn’t find bottles of the desired shade).

The entire process of making a palm tree from plastic consists of several stages that are very easy to implement:
- Dark brown plastic bottles will be used to make a tree stem. To do this, you need to cut off the bottom of the bottles - it will not be needed in the work.
- A metal or wooden rod, imitating the frame of a palm tree trunk. The length of this frame should correspond to the desired height of the tree.
- Cut brown plastic bottles are strung onto a reinforced rod, neck up.
- When almost the entire rod is hidden behind the plastic, the last part is strung - it is better if the bottle is green and blends in with the crown of the palm tree.
- To roughen the trunk and make it even more similar to the original palm tree, you can use scissors to cut teeth on the free edges of the bottles and bend them outward a little.
- Now leaves are made from green plastic bottles. Here everyone can act at their own discretion: you can cut a plastic bottle lengthwise into four segments, leaving only the neck intact, and form carved edges of the leaves; someone uses a different method - cutting green plastic into long thin strips and collecting them into something like hanging palm leaves.
- All that remains is to fix the leaves on the trunk, and the plastic palm tree is ready. It is quite possible to supplement it with plastic coconuts or bananas.
- If transparent bottles were used for work, they must be painted with suitable paint.
Advice! Several palm trees will look more organic than a single tree. It is better to immediately make a small “oasis” of three or five palm trees of various sizes.
Such plastic palm trees are not afraid of either rain or snow - they will decorate the playground for a long time and delight the kids (an excellent example of a palm tree is shown in the photo below).

To prevent children from getting hurt on the plastic cuts, it is recommended to melt them a little with a simple candle or match.
Plastic flower beds made from bottles
Many parents and kindergarten workers know how difficult it can be to create a beautiful flower bed on the site. After all, children often trample on flowers, and it happens that there is simply no one to care for the plants.
But this is not a reason to leave the site without bright colors- fresh flowers can easily be replaced with artificial ones, and the easiest way to make them is from plastic bottles. To do this, it is not even necessary to cut out the petals of each flower; you can create a larger composition from plastic.

For such a flower bed you will need the bottoms of plastic bottles - they are cut off with a knife or scissors, cutting the bottle approximately in half. Now the prepared elements need to be painted in the desired color, using thick and uniform paint and a soft brush or spray paint.
When the paint dries, the halves of plastic bottles are inserted into the ground with their bottoms up - you get beautiful and bright flowers, collected in a specific composition.

Attention! To make the flowerbed organic, it is better to first draw its design on a sheet of paper. This will allow you to clearly see the result and correctly select the shades of “flowers”.
Using this simple technology, you can make plastic flower beds of unusual shapes and a variety of sizes (as in this photo).
For those who are able to perform more delicate work, a suitable method for creating elegant flowers, the details of which are cut from plastic bottles. Such flowers can become a decoration not only on the street, they can be used to decorate a group or assembly hall.

To work you will need simple tools:
- plastic containers;
- dyes based on acrylic or latex (they are more uniform and non-toxic);
- sharp scissors;
- decor in the form of beads to create the core of the “flower”;
- strong wire for the stem and thinner wire for the stamens;
- glue gun or other reliable fast-curing glue;
- candle for melting edges and shaping plastic petals.
Petals of the desired size and shape are cut out of the bottles - it is convenient to use a cardboard template for this. Then they need to be heated over a candle and the edges and middle given the desired shape. Now the petals are painted in the chosen color and allowed to dry thoroughly.

Collect the petals from the inflorescence and attach the plastic parts to the wire stem. The middle is made of wire, thick fishing line and multi-colored beads. Also, flower leaves are cut out of plastic and attached to the stem using a glue gun.
An excellent example of creating such a flower from a plastic bottle is shown in the photo below.

Bottle fencing
From plastic bottles you can create beautiful and strong fences for flower beds or sandboxes, for example. Those who have been working with plastic bottles for a long time recommend strengthening vertical structures, filling the container with ordinary sand, earth or pebbles. This way, if a child steps or falls on the fence, it will not break or become deformed.
Using the same paints, plastic bottles are given the desired shades and placed dropwise around the perimeter of the flower bed or sandbox. Fences made from several rows of painted bottles look even more beautiful - you can even create some kind of pattern inside the fence.
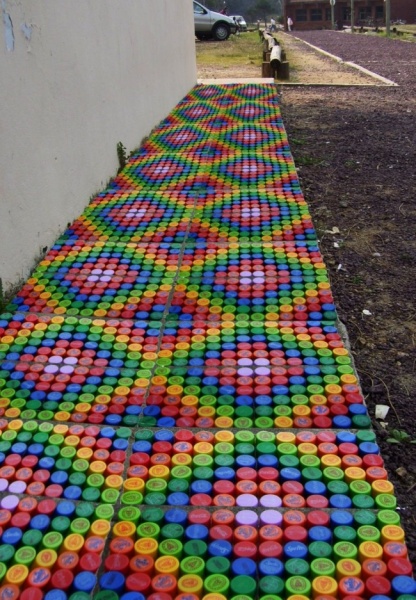
Mosaic of caps

The container can also be used for educational activities with the children themselves. One of these lessons could be a simple drawing made from multi-colored plastic stoppers. If the children in the group are very small, the leader can make blanks for such a mosaic by drawing circles on paper in the places where the lids should be located.

All the child has to do is pick up the cork desired color and use glue to fix it on your panel.
This technique allows you to assemble more complex patterns from plastic bottle caps. Good craftsmen create from plastic caps different diameters and the shade of entire paintings on walls and fences (you can see them in the photo below).
Animal world and fairy-tale characters from a plastic bottle
Most of all, children love the heroes of fairy tales and cartoons - these characters can also be easily made from plastic bottles. You just have to be patient and put some skill into making such crafts.

The size of the hero and its complexity depend entirely on the skill of the master. Talented performers make real masterpieces out of ordinary plastic waste. These are firebirds, flamingos, peacocks with huge tails, big wolves, foxes, owls and bunnies, small funny bugs and bright butterflies.

As a rule, such crafts use a metal frame made of a rod, onto which plastic parts of the character’s torso, head and limbs are strung. The easiest way is to make a funny pig out of containers - you can also involve children in this process.

To create a plastic pig you will need:
- five-liter water bottle;
- five regular one and a half liter plastic bottles;
- knife or scissors;
- pink paint and brush;
- wire or something else for the pig's tail;
- beads for eyes;
- glue or a gun with silicone.
The piglet's body and head will be made from a single five-liter bottle. You need to cut off the necks of four small plastic bottles, making one side of the cut slightly lower than the other. These will be the legs of the pig, and such cuts will help to better attach them to the body.

Ears are cut out from the last plastic bottle. The easiest way is to cut them off near the neck, since in this place the plastic is already curved and has the desired shape. If you need larger ears, you can cut them out from the “body” of the bottle and shape them by heating the plastic with a match.
Now the entire structure is put together and all the plastic elements are fixed with glue. All that remains is to paint the piglet in its characteristic pink color and glue on the eyes and tail (the finished pig is shown in the photo below).
Gazebo made from plastic bottles
For those who are not afraid of difficulties and have sufficient quantity containers made of plastic, a suitable method for constructing a gazebo. This could be the most simple design of four supports and a roof or a more complex gazebo round shape with windows and doorways - it all depends on the skills of the master.
The main thing is that children will find it interesting and safe to play in such a house, so it is worth making it for the garden.
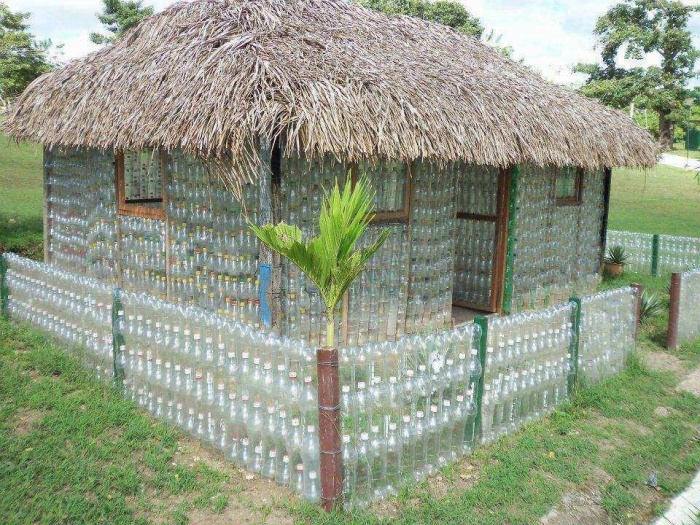
Construction made of plastic can be based on metal or wooden frame, or you can use plastic containers themselves as supports, only by first filling them with sand or earth.
The roof is being covered lightweight material, such as ondulin or polycarbonate. Also for these purposes, you can use the bottles themselves, connected like a raft or flattened into flat petals and fixed with wire or screws.

The walls are fastened with small self-tapping screws. To facilitate the process or when there is not enough “building material”, you can use waterproof fabric or bright film, the same polycarbonate, which is stretched and fixed between adjacent plastic supports.

The door and windows of the gazebo can be curtained with curtains made from corks from the same plastic bottles. You can assemble such curtains together with your children. To do this, make a small hole in each cap and string all the plugs on a thread with knots or on a long fishing line.
Very beautiful gazebos made from plastic bottles are shown in the photo in this article.
conclusions
Instead of littering the planet, you can use plastic bottles for good - decorate a playground or kindergarten group with them. Plastic is safe for babies, and it is also quite lightweight. If suddenly the structure made of this material is damaged, the children will not be harmed.

Another big advantage of this idea is that you can easily involve the students themselves in the work - collect simple crafts Even kids can make a garden out of plastic bottles.


