IN country house The space under the roof is often a useful area and is actively used, so a do-it-yourself attic ladder with a hatch would be useful.
Types of stairs to access the attic
Stairs have always been used to communicate between floors, and the last, highest level - the attic or attic - is no exception. The ascent to the under-roof rooms can be included in a single flight of stairs, that is, the floor located below will serve as a platform for the next flight of stairs. But access to the attic can be organized in two ways - through a door with small area, where you can climb the steps from the residential floor, or through the hatch, directly to the upper floor.
Now let's talk about the design of the staircase itself. It can be stationary with steps, or lowered directly into the hatch, being attached to its cover. The second option is more compact, but more difficult to implement, while the first requires a significant area, even for. Separately, it is worth mentioning the folding ladder with rungs, which is mounted on the wall when not needed. The most practical are the movable models: folding, telescopic, sliding and scissor.
Often, when looking for information about folding models, you can find mention of sectional, hinged, folding stairs. All this different variants of the same type - folding, since this is precisely the principle of operation of the design. We do not confuse sectional folding models with spans of the same type, but with bowstrings as the basis. The latter are ordinary steps mounted on flat bars, which are called bowstrings, one of which is rigidly fixed to the wall, and the second rises on the hinges of the steps.
Folding ladder - design features
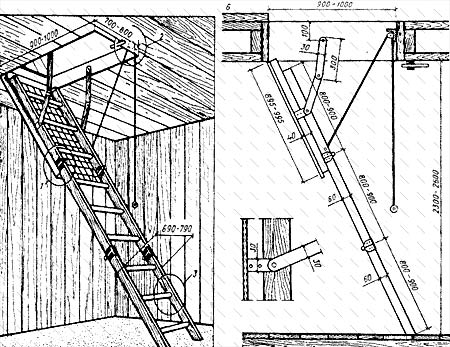
First, let's look at folding models that are made of both metal (aluminum, stainless steel), and from wood in combination with steel parts. Regardless of the height of the ceiling, even if you can reach it with your hand, a folding staircase to the attic will always consist of at least 3 sections, both purchased and made by yourself; drawings rarely differ in this regard.
The fact is that the supports of the lower section must rest against the floor, and if you make only 2 long elbows, the attic hatch will have to be greatly extended in length. This, in turn, will take away some of the usable attic space. When taking into account its inclination to the floor, it is never installed strictly vertically. Accordingly, the lid should tilt down not at a straight line, but at an acute angle of about 70-75 degrees. In this case, the hinge between the two upper sections becomes the center of the arc that the folding elbow describes, and therefore the hatch must be such that the lower part of the second section does not touch its edge.

The line between the supports resting on the floor is 20-30 centimeters further than the edge of the attic opening, which provides a fairly comfortable angle for the staircase. The last factor also applies to telescopic or scissor structures. The uppermost section of the folding model is usually fixed directly to the hatch cover so that opening it simultaneously begins to feed the folded sections down.
Therefore, the hangers holding the sash must be strong enough; they are best selected based on a load of 150 kilograms. A do-it-yourself attic ladder should be made with a large margin of safety if it will be actively used with frequent visits to the attic, preferably made of metal. An exception may be steps; they can be made of wood so as not to make the structure too heavy. The sections are connected by conventional one-piece hinges or lever hinges.
Telescopic attic ladder - buy or make it yourself?
Telescopic retractable sections seem to be a very complex device to manufacture at home, and many people buy ready-made ones along with the attic hatch. However, you can get by with purchasing only a retractable ladder, which is often found in hardware stores next to tools. Its distinctive feature is aluminum sections and plastic elements for fastening the crossbars.
Such a ladder to the attic is mounted with your own hands on the hatch, with the thinnest part above the hinges of the lid that folds down. It will not be possible to firmly fasten it to the latter due to the fact that the telescopic bends are quite short, and fixing at least one, in addition to the top one, will prevent the ladder from extending.

Before you make and install such an attic ladder with your own hands, you need to carefully measure the distance from the floor to the ceiling of the upper residential floor. If the fully extended knees are too long even with the structure in an inclined position, 1-2 upper sections can be rigidly fixed to the hatch in a half-extended or folded position. It is worse if the supports of the ladder do not reach the floor, in which case you will have to attach it to lowering hangers without mounting it to the edge of the hatch opening, the cover of which will be held by separate levers.
When independently assembling a mechanism for lowering the entire structure down, it is better to fix the hangers on the staircase racks using steel clamps, possibly with a through bolt fixation to the support. The telescopic ladder can be held in the lowered state using either commercial crank arms or regular cables. For the hatch cover, in addition to hangers, you will need springs, which, in addition to holding it in the closed position, will allow you to lift it without special effort. However, the upper retractable sections of the stairs can also be equipped with such springs (even blocks, which will be discussed later, are used for such an operation).
Sliding sectional structure for access to the attic
Many people believe that a retractable telescopic ladder to the attic is identical sliding model, however, the difference between them is quite significant when made with your own hands. If in the first version, sections the length of a rack segment between two crossbars extend one from the other, then in the second case they consist of 5-6 steps and slide one along the other along external guides.

In other words, telescopic design It’s more compact, but it’s easier to make a sliding one yourself. After all, it is easier to assemble sections moving on a skid than to select pipe sections different diameters, not to mention fixing these segments so that they do not fall apart when pulled out. As for the assembly of sliding stairs, they can be different. The simplest option is that all sections are the same size and laid one on top of the other, connected on a slide with rollers.
Another type - the lower sections are narrower than the upper ones and are located one inside the other, according to the principle of a fire escape. In this case, the supports of the upper knee should be wider than the lower one so that the section easily fits on top of the crossbars, while the slides are located on the inside of the posts, and the rollers on the outside. For such a model, the uppermost elbow, regardless of the type of structure, must be rigidly fixed to the hatch cover, equipped with strong hangers and springs.
Scissor attic ladder – advanced technology
This option is perhaps the most interesting, since it makes it possible to climb into the under-roof rooms along full-fledged flat steps of sufficient width to comfortably place the sole of your foot. At the same time, the ladder folds as compactly as a telescopic one. This design has one undeniable advantage: if you attach a spring to at least one section, pulling it up into the hatch, the tension element will fold all the elbows, which are interconnected levers.
The whole structure resembles several dozen scissors, which are hinged in pairs by rings and the tips of the knives. The steps are always mounted at the intersection points of the metal strips, where the screw is located on the scissors. At the same time, they are rigidly fixed in relation to the axes, which have rotation restrictions. It is not difficult to make such attic stairs with your own hands; you just need to have 100 metal strips, preferably made of durable stainless steel, for 25 steps.

Each 2 strips are connected with a bolt exactly in the center, and then the resulting elements in the shape of the letter X are movably attached to each other using short bushings. The steps are installed on the crosshairs. At the same time, to prevent them from swinging, you need to either hang them a little lower at the corners, or make limiting projections on opposite metal strips.
Attention - when folding the scissor sections, be careful not to get your fingers caught between the slats.
Folding ladder mounted on the wall
There are 2 possible ways to make a staircase to the attic. At the very beginning, we mentioned that two-section folding ladders are impractical if the hatch is small. However, such a model can be mounted on the wall if the opening is located at the edge of the ceiling. In this case, we make 2 sections, short and long, and fasten the second one under the hatch itself, with loops on a thick beam attached at the top point of the wall. The second elbow is made longer than the remaining distance to the floor, and is screwed onto hinges at the bottom of the beams of the first, so that in the folded position it is between the wall and the long section.
Another do-it-yourself folding attic ladder is made on inclined strings with full steps instead of rungs. One board is rigidly fixed to the wall, as we already mentioned above. Loops are screwed to it for mounting movable treads, to which, in turn, we also attach a second string on hinges, even with railings on rod balusters. In the upper part, under the opening, we place emphasis for the lowering bowstring board. In order for the entire structure to be kept in the tilted up position, it must be hooked to a metal loop specially attached to the wall.
Stairs to the attic – simple design, which you can easily create yourself. It can be solid - made of wood or metal, or it can have a light and convenient folding shape. What options are suitable for your attic and how to make and install an attic ladder with a hatch with your own hands, read our material.
Stepladders for the attic? It's in the past!
The exit to the attic is almost always located in one of the living rooms on the top floor of the house. Therefore, you have to either sacrifice space and spoil the interior, or use a portable stepladder. The last option is not only troublesome, but also quite risky, since unstable steps can break off, and in order to hold the stepladder itself, you often need to invite family members to help.
We suggest you make a choice in favor of a more reliable option - designing and implementing a new modern attic staircase. Types and recommendations for creating a good-quality staircase to the attic with your own hands, which we give below, will help you make your choice.
Attic stairs: overview of options
The main elements of the staircase are the bowstring and the stringer (side parts); tread (steps) and riser (for stationary stairs).
I. Capital steps
If there is enough space in your house, then we recommend building a stationary staircase to access the attic or attic. This option is reliable, practical and durable. Capital steps can be made on the basis of a metal frame or high-quality wood.
Monolithic stairs can be marching, with one or more bends, or spiral (spiral). Marching options have steps in the form of rectangular plates (boards), which evenly move upward at the same distance. Spiral staircase folded around central base, has steps narrowed towards the inner edge and is arranged in a spiral. The latter option is more compact and can be built even in small rooms, without compromising space.
To the "pros" capital option include durability, reliability and ease of use.
A capital staircase, in most cases, does not provide a hatch for access to the attic, therefore it is more suitable for houses with warm roof. For cold roof The exit to the attic must be closed with a sealed hatch. The standard dimensions of the hatch are 120x70 cm. It makes no sense to make the passage smaller, as this will complicate both getting into the attic and installing steps.
The material for the hatch is wood, metal or plastic. You can order a blank for the hatch at the factory metal-plastic structures with installation or self-assembly. The hatch can be automatic or manual opening. With the latter option, a special pole is used to open the latch (lock) and lower the door with a ladder.
II. Portable ladders
Portable steps are the closest analogue of the “good old” stepladders. Such a ladder will only be reliable if you make a folding version with a platform. However, it is difficult to call such a design convenient. You will have to make extra efforts to get into the attic hole, and the issue of storing such a ladder will cause a lot of trouble.
III. Folding attic ladders with hatch
A very convenient and easy-to-implement type of attic ladder is folding steps connected to a hatch. Thanks to its convenient design, this type of steps has become the most popular among professional craftsmen.
Today there are many types of folding stairs, from which you can choose the most suitable option(telescopic, scissor, folding, etc.).
The folding mechanism is suitable for any attic space with a hatch onto which the staircase structure can be attached.
- Scissor steps. This type is made of metal. The steps themselves can be wooden. The ladder is a compressing mechanism. When folded, the design takes on a very compact shape and size, so it’s perfect for small children. attic hatch;
- Telescopic steps. They are a system of retractable sections (similar to a folding telescope). This option is made of aluminum and also looks very compact on a small attic door;
- Folding (folding) stairs. This type is the most popular, as it is characterized by practicality, durability, cost-effectiveness and ease of installation. Below we will describe it in more detail.
In general, most stairs schematically look like this:

Before we start designing an attic staircase, let's consider some standard specifications designs:
- The width of the march for attic steps should not exceed 60-65 cm;
- The height of the entire structure (taking into account the slope) is allowed up to 300 cm. Anything that exceeds this length becomes less stable and less strong. The higher the ladder, the less load it can withstand;
- Based on the recommended length of the stairs, the number of steps is selected - 13-15 pieces, with a distance between them of up to 20 cm;
- The most convenient and safe angle of inclination of the stairs is 60-700 degrees;
- Steps are a direct recipient of the load when climbing, so they must have a dense structure and a thickness of 18 mm, and be positioned strictly parallel to the floor.
Selection of material for flight of stairs should be determined by the frequency of operation of the structure. Wood wears out faster than metal. So, if you go up to the attic every day, it is better to design the steps from metal. In other cases, the tree is like light material, environmentally friendly and easy to install, is very popular.
So, let's get started and create a modern attic staircase with a hatch with your own hands according to the drawings that our specialists have prepared for you.
Stages of design and installation of a staircase of three sections with a hatch
Any work must begin with a project. Determine the height of your future staircase, taking into account the height of the ceiling and a slope of 60-70 degrees. It is also worth accurately measuring the attic passage and drawing a corresponding diagram. The drawing must contain the following information: length of the staircase, angle of inclination, height of the ceiling of the room, dimensions of the passage and attic hatch, width of the flight, number and dimensions of sections, number, distance and dimensions of steps.
I. Preparation of the drawing
At this stage, the design is calculated. The length of the stairs is easy to calculate. We use a simple mathematical formula: D = B/, where α is the selected angle of inclination, B is the height of the ceiling. So, with a ceiling height of 3 m and an inclination angle of 60 degrees, the length of the staircase will be 3/0.867 = 3.46 m. Craftsmen advise adding a few centimeters to the resulting figure in order to then more accurately measure and cut the required length:


The dimensions of the hatch should be slightly smaller than the opening itself. For the calculation, 6-7 mm is left on each side of the door.
We calculate the length of the sections according to the following scheme: the first section is the length of the hatch minus 10%; second section – length of the first section minus 10%; third section - the sum of the lengths of the first two sections is subtracted from the total length of the stairs.
Now you need to transfer the calculations to paper and begin preparing the necessary materials and tools.
II. Selection of materials and tools
To implement the project, you need to prepare carpentry tools: tape measure, chisel, hacksaw, screwdriver, welding machine(or capital connections for a metal frame), square, hacksaw, clamps, wood glue, masking tape, electrodes, wood glue.
The main materials that we will need: 50x50 mm bars for finishing the hatch (about 4-5 pieces); two boards for the bowstring 100x25 mm long, equal to the selected length of the ladder; board for steps 100x20 or 100x25 mm; plywood or material with similar characteristics(one standard sheet is enough for the hatch door); plates and angles for opening and hinges; nuts, bolts, screws, washers, etc.
III. Making a hatch door
Step I. Prepare the bars for the hatch. At the ends of the beams, make cuts and grooves to tightly connect the structure into a regular triangle using assembly glue and fasteners. Protect the corners of the frame with temporary plywood plates to prevent the rectangle from moving.
Step II. Attach a sheet of plywood of the appropriate size to the base of the bars. Now you need to try on the hatch to the passage to the attic. It should be 6-7 mm smaller on all sides.
Step III. Provide a lock for the attic door. This can be an automatic mechanism, or a very ordinary latch, which can be opened with a pole with a tip.
Step IV. We install hatch opening/closing mechanisms. If you don’t want to buy ready-made mechanisms, you can make them yourself. There should be two fastenings - left and right. For work, purchase a 4x20 mm steel plate and a corner. The photo shows a drawing of the left fastening part. The right one is performed in mirror image. Dimensions are given arbitrarily. For more accurate calculations, consider your parameters. Before fastening, be sure to check the mechanisms in operation:

IV. Assembling the stairs
You can always order a ready-made sectional staircase from the craftsmen, which you can fasten according to the finished scheme yourself. But if you decide to complete the work yourself, you can assemble the stairs from prepared materials.
Step 1. Mark on the strings the places where the steps will be installed. To do this, mark each part with a pencil, according to the selected angle of inclination of the stairs and the previously made calculations. Now press the ends of the boards tightly together and fasten them together masking tape. This is necessary to drill through holes at the junctions of the sections. Drill a hole for the hinge with a diameter of about 25 mm at the junction of the first and second sections. Next, you need to remove the tape and turn the boards over, fastening them again. Now we drill a similar hole at the junction of the second and third sections:

Step 2. Cut the bowstrings along the marked lines. Next, grooves for the steps are made on the inside of the bowstrings using a chisel. The depth of the grooves must be at least 5 mm (this should also be taken into account at the first design stage). The lower section of the bowstrings should be beveled according to the angle of inclination of the stairs.
Step 3. We cut the steps according to the markings and attach them to the left bowstring. We put the steps on glue and secure them with self-tapping screws. We attach the right bowstring and also fasten it with self-tapping screws.
Step 4. Attach the hinges for the sliding mechanism of the stairs. Hinges, like hinge mechanisms, can be bought in a store, or made independently from metal tape. We need eight strips of metal (you can use leftovers from the door mechanisms). Weld small pieces of the same strip to the four strips. We drill two holes in each part (for fastening and hinge). We connect the hinge with the hinges. Now we join the cut sections and attach the hinges so that each hinge fits into the groove (25 mm holes drilled before cutting the sections). We fasten the loops on the bowstrings:

V. Final assembly
Now the top of the finished ladder needs to be secured to the hatch, having first checked the operation of the hinge mechanisms. The staircase should also be checked after installation. After making sure that all parts are in good working order and functional, open the steps with varnish:

One more thing step by step guide for installation:

You can insulate and seal the hatch using foam rubber or construction wool. The edges of the hatch should be covered with rubber sealant tape.
That's it, your staircase with hatch is ready! This is exactly the option that is completely feasible “with one helmet.” We wish you fast and easy work.
In most private houses, attics and attics are used rooms. And to get to the ground floor, of course, you need a staircase.
Types of attic stairs - design and types of construction
Attic stairs can be located both outside and inside the building. The advantage of the second option is ease of use. You don't have to go outside to get into the attic, which is... winter time year is very relevant. In addition, in the absence of access to the street, the attic space does not come into contact with cold air, which significantly reduces heat loss.
Based on the type of construction, the following types of attic stairs are distinguished:
- Monolithic:
- screw;
- marching.
- Folding attic stairs:
- scissor;
- folding or lever;
- telescopic or sliding stairs;
- folding
- Portable:
- stepladders;
- attached.
Portable stairs are usually used as a temporary option for connecting floors. They are used during the construction of a house or for access to attic spaces that are rarely used. They are not safe.
The most convenient, of course, are traditional monolithic stairs, with a wide march and railings. But it is not always possible to place a massive structure leading to the attic - there may simply not be enough space.
In this case the best option there will be retractable attic stairs. They are quite convenient and safe, easy to use and take up very little space. A wide variety of designs will allow you to choose the option that suits you.
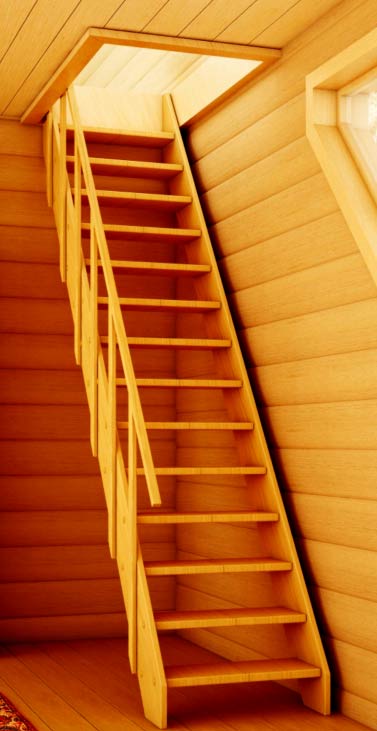
Folding transformable ladder
Attic folding stairs are made of wood and metal (aluminum). The combination of these materials gives the best results. The flight of stairs is made of wood to reduce the weight of the structure, and springs, mechanisms and fasteners are made of metal to ensure the rigidity of the product. Of course, there are also purely metal models.
For wooden models, hardwood should be used. The thickness of the timber should be at least 2 cm. Wood should not be used when the folding staircase is used too intensively, because this leads to rapid wear. In this case, the best option is a metal attic ladder.
Also used plastic fittings, preventing friction of components during transformation and sealing the opening when the product is folded. The hatch cover is filled with polystyrene foam and provides good thermal insulation.
Folding attic ladders can be opened either manually or automatically using an electric drive. Often, when manual drive a weight is attached to the mechanism, which significantly facilitates the assembly process, as if pulling the ladder into a niche and, conversely, smoothly lowers it, compensating for the weight of the product.
The main requirements for such products are compact size and strength. The aesthetics of the model is also important - a good transforming staircase should blend with the ceiling.
Standard sizes of attic stairs:
- width of the flight of stairs. The optimal width is about 65 cm;
- height of the stairs. It is not recommended to use a product with a height of more than three and a half meters, because then the rigidity of the structure suffers, and a fall from such a height can lead to serious injury. The process of lowering or raising it will also be inconvenient. In this case, you will still have to opt for a monolithic staircase;
- number of steps. Usually equal to 14 or 15;
- distance between steps. It is believed that optimal width the step is 19.3 cm. With a larger or smaller value, the stairs will be inconvenient to use;
- the thickness of the steps ranges from 18 to 22 mm;
- angle of inclination of the stairs. The standard value is considered to be from 60 to 75 degrees. If the slope is greater, it will be dangerous to use the ladder; if it is less inclined, the product will take up too much space;
- the folding attic ladder must withstand a weight of at least 150 kg;
- The steps should be parallel to the floor and not slip, or anti-slip pads should be glued to the steps.
When purchasing folding attic ladders, you must take into account that the parameters of the product must match the dimensions of the hatch cover, otherwise the folding parts will touch the opening. A hatch with a built-in sliding ladder 70 cm wide and 120 cm long is considered optimal. With a smaller opening, it is inconvenient to climb. If the hatch dimensions are too large, then large heat losses are possible. Since the attic is an unheated room, it is necessary to provide good heat and vapor insulation.
When choosing the angle of inclination of the stairs to the attic, it is important to take into account that the smaller the angle, the larger the dimensions of the attic hatch need to be made and the more space the stairs take up when unfolded.
Sliding attic ladder - retractable flights to the attic
Scissor ladder
As a rule, they are made entirely of metal. They also go by the name “accordion staircase”, which has stuck due to the fact that the structure folds like an accordion. And the transformation mechanism resembles an expanding tram current collector and is shaped like a parallelogram or an oval.
The retractable staircase to the attic has one drawback inherent in cheap models. Due to the fact that the structure is entirely made of metal, if the assembly is poor or over time, the flight of stairs begins to creak. This can be avoided by periodically lubricating the extension ladder.

Telescopic ladders
The telescopic ladder consists of many retractable sections that fold into one another. It is made of aluminum, which helps to lighten the structure and impart rigidity. In the domestic market, sliding attic stairs are quite rare and are not very popular.

Folding staircase to the attic - sectional and hinged
Folding stairs can consist of two, three or four sections depending on the design. The first elbow has a length equal to the dimensions of the hatch cover and is rigidly fixed to it. The other two segments open up to form a smooth flight of stairs. Sectional stairs are so mobile thanks to special hinges and hinges.

Reclining ladder
If you really like order, suffer from a lack of space, and you have a second floor or attic, a folding staircase can be a great option to meet all your needs at once. The idea is this: most of the time the structure is folded and fixed to the wall, and only in the evening, when you need to go up to the bedroom, do you pull it out.
The steps are secured to the string using card loops. When folded, the structure is fixed on the wall. The reclining design is not in great demand due to its complexity, but later in the article we will still tell you how to make it yourself.

DIY attic folding stairs
Option No. 1 - simple design of 2 sections
Do-it-yourself attic stairs are made within 2-3 hours. To make an attic staircase we will need:
- hacksaw for woodworking;
- tape measure;
- a staircase whose height will be approximately 30 cm greater than the distance to the ceiling;
- four card loops the width of a stringer;
- two bars, the length of which is equal to the width of the hatch, and two more bars, approximately 20 cm longer than the first ones. The thickness of the bars is 2-3 cm;
- screws, anchors, hook and eye.
We attach one of the short bars to the upper end of the stairs using hinges, the other is rigidly fixed to the lower part. Two slats are attached to the flight of stairs diagonally so that they do not interfere with movement. They will give rigidity to the entire structure.
Next, measure 2/3 of the length of the stairs and make a neat cut. Then we connect both parts using loops. It is important to attach the hinges right side so that the ladder folds in the correct direction, as shown in the photo.

The top bar is fixed to the wall immediately below the hatch. To prevent the folding ladder to the attic from opening, it is secured to the wall with a hook. The loop is screwed into the stringer next to the cut point, and the hook is attached to the wall.
The disadvantage of this model is that it remains in plain sight. This can be avoided by using the product more complex design, in which the sections are attached to the hatch cover. Let's see if it is possible to make such an attic ladder with your own hands.
Option No. 2 - hatch to the attic with a ladder
We will tell you how to make a staircase to the attic, consisting of 3 sections, which is identical in design to those sold in stores. This is the kind of folding attic ladder we should be able to achieve.

How to make a hatch to the attic with your own hands - the basis of a folding ladder
You can make a hatch to the attic using available materials. First, let's decide on the location and size of the opening, and then we'll make the hatch. Let's say the size of the staircase opening is 125 by 70 cm. Then, to cut out the hatch, you should add 7-8 mm to these dimensions on each side. These gaps will allow the lid to close easily, but will not affect the thermal insulation.
Materials you will need:
- four bars 50x50 mm - two short and two long;
- 10mm plywood sheet (in our case, two panels are used - unfortunately, we didn’t have a whole sheet at hand).
At the ends of the bars we make cuts of half the thickness, coat them with glue and secure them with self-tapping screws, having first checked the diagonals. To prevent the diagonal from disappearing, temporary gussets made of 4 mm plywood should be used. Afterwards, we remove them and screw on a sheet of 10 mm plywood (the photo shows how the sheet is secured around the perimeter with PSh self-tapping screws). Next we try it on in the opening.
To ensure that the hatch closes well and there are no locks on the outside, we cut a door latch into the lid. Our packaging said “reinforced.” To open the latch, we will use an old handle (any cylinder-shaped device can be used), which is inserted into a special hole. The latch holds the hatch well, very convenient.
The mechanism of the attic ladder with a hatch is hinged without a spring
Now it's time for the most difficult part - the opening mechanisms. All the components, of course, can be bought in the store, but we will go the hard way and do everything ourselves.
First, let's draw a drawing of the attic staircase on cardboard with the approximate angle at which the hatch should open. Let's cut out the cardboard parts and try them on the structure. This way you can quite accurately select the length of the hinges.
I think everyone has iron corners, scraps of strips and pieces in their garage sheet metal, in general, everything that can be used to make a mechanism for a ladder. For one mechanism we need:
- one corner;
- piece of sheet metal;
- two strips of different lengths.
Let's mark the holes for the hinges, the distances of which we previously estimated experimentally, and drill them for an M10 bolt. We put it together without tightening the bolts too much. Using a small tool, we measure the desired opening angle of the hatch and expand the future mechanism to the selected angle. We mark on the metal the area that, when opened, overlaps the corner and cut it out using a jigsaw.
We bring the metal strips into proper shape by cutting off the excess length and rounding the ends. This way they won’t touch the corner and interfere with each other. We reassemble the entire mechanism. After we removed part of the metal, the corner began to rest and lock in the desired position.
So, one mechanism is ready, now we begin to manufacture the second. It is very important that it turns out exactly the same, but in a mirrored design. To do this, we fasten each pair of parts with clamps and drill the necessary holes.

After one hole is cut, insert a bolt into it and drill the second.

Then, screwing both parts together with bolts, we align them in length.

This is how we make all the parts.

The output should be two completely identical mechanisms.

Now let's install the mechanisms on the hatch and try it on in the stairwell. It turned out that even when designing the unit, we made a mistake - we did not take into account the height of the fastening on the floor beam. That is, the part simply crawled out of the ceiling. Because of this, we had to install temporary bars.
We adjust the hatch so that it opens well and does not touch the walls of the opening.
Now we will make another simple mechanism to support the entire structure. We will need two strips of metal 20 mm wide and a corner. To do this, we weld a piece of metal to the end of one of the strips, against which the second strip will rest. We make a support platform from the corner.
The result should be a hinge that, when the hatch is opened, remains slightly bent and at the same time holds the load. Subsequently, this unit will need to be installed in such a way that it is completely expanded when the mechanisms made earlier are open to the maximum. Then the load created by the articulated ladder will be equally distributed between them.
Do-it-yourself wooden staircase on bowstrings
The staircase to the attic is constructed with your own hands from wooden boards. We will cut the string and steps from an inch board 100 mm wide. The length of the first section is made according to the size of the hatch, the second is the same or slightly smaller than the first, but taking into account the fact that it should not touch the ceiling during the transformation process. The third section is equal to the distance remaining to the floor.
Using a small tool we measure the angle of inclination of the hatch in open position and transfer it to the board, thereby marking the steps. Next, mark the lengths of the sections.
Pressing the boards tightly against each other and securing them with masking tape, we transfer all the markings to the second board (the lines should be a mirror image). Using a 25mm pen, we drill a hole where the hinge hinge will subsequently be located.
Now attention, we made the mistake of drilling both holes on one side because the second hole should be on outside boards, as noted in the photo.

For a more aesthetic appearance, we sand all the edges with a router.

On the strings of the stairs we make small recesses (5 mm) for the steps. Using glue and PSh self-tapping screws, we assemble all the parts together. It should look something like the photo.
Having started building their own cottage, not everyone understands that such a small thing as a hatch to the attic with a ladder is a mandatory element for installation in any home. A small door will make life in the house safer, even if the attic is not in use. In addition, it is important to make the approach to the attic hatch as comfortable and safe as possible.
The space under the roof of a residential building can be used in for different purposes. Even if the attic is not residential, it serves the function of a technical room. But more often, cottage owners still use the space under the roof to their advantage by placing living rooms or space for relaxation.
Regardless of the purpose for which the attic or attic is used, this space must meet certain safety requirements:
- It is necessary to have free passage into the space under the roof to extinguish the fire. Most often, a hatch is installed for this purpose. The materials from which the door is made must comply fire safety standards and have a fire resistance of at least EI30.
- Roof construction and attic finishing materials must be treated with fire retardant compounds.
- Large attic spaces are divided into compartments that can block the spread of flame.
- It is prohibited to arrange storage facilities under the roof.
If an attic is built, it must have escape routes separate from the living quarters. Despite the seriousness of the requirements, it is not difficult to implement them in private construction. Usually, to do this, it is enough to install a hatch with a ladder in the attic.

Old and new
If you look closely at houses built in the last century, you will notice that they are all equipped with external attic doors. People have always understood that attic access is necessary to make the home safer.
Modern construction technologies and materials make it possible to create a comfortable and beautiful entrance to the attic from the house. At the same time, the installation of this structure should be approached with the utmost seriousness and pedantry. Despite its apparent insignificance, the reliability of this door will quite possibly one day save a building or a life.
On a note! Negligence in installing an attic door will, at a minimum, lead to drafts.
If you add to the incorrect design the absence of a vapor barrier layer in the roof, you will end up with high humidity under the roof and, as a result, the growth of mold and mildew on the floor materials.

Manhole size
There are no regulatory restrictions on the size of the hatch. Here you should be guided by efficiency, comfort and common sense. First of all, the door to the attic must provide free passage into the space under the roof. Some optimal criteria have been empirically identified:
- the width of the door depends on the size of the flight of stairs and usually exceeds the dimensions of the steps by 10-15 cm;
- if the staircase is mounted with railings, then the opening must exceed the width of the flight by 20 cm, least;
- the length of the doorway is usually made 1.2m, this size allows you to move freely along the stairs;
- the height of the ceilings at the location where the hatch is installed must be at least 2m, it is important to take into account the disassembled size of the staircase;
- the most convenient opening will be internal: the doors open towards themselves in the direction of the living space.
Important! A mechanism for fixing the valves in the open and closed positions should be provided.

Types of hatches
The door to the attic can be implemented in various ways. The choice of opening mechanism and type of hatch depends on the type of staircase, as well as on the frequency of the required passage into the attic. The most common implementation options:
- Inspection hatch arranged in a situation where the attic is not used as a living space. Optimal for roofs with acute slope angles. Usually used in conjunction with an extension ladder.

- Attic entrance Very nice solution and, as a rule, is combined with a door to the roof. This method It is not recommended for self-installation, as it requires certain construction skills. In addition, it is necessary to correctly calculate the possible loads on such a door.

- Vertical hatch built in buildings with different levels of premises. In essence, this is a low door from the living room to the space under the roof. A simple method, but used extremely rarely, since it is created in buildings with a specific layout.

- Horizontal entrance to the attic- the most common method for private construction. It is quite possible to construct the device on your own.

Let's look at the design of horizontal hatches in more detail.
Prices for roof windows
Dormer window
Requirements for attic stairs
Carrying out independent design and the construction of attic stairs, you should know what requirements apply to such structures. Limitations on the angle of inclination and width of the tread were identified experimentally and confirmed by calculations by engineers. These criteria are specified in SNiPakh and in the case of mass development are mandatory. This was done in order to make the operation process as safe as possible in conditions of rare use.

Before designing a staircase to the attic or attic, you should familiarize yourself with the basic safety criteria:
- the length of the ladder when disassembled should not exceed 3m;
- the span width must be within 0.6-0.7 m;
- the height of the step is selected based on the height of the residents, but usually fluctuates around 0.2m;
- the number of steps, that is, steps to climb, must be odd and no more 19;
- optimal angle of inclination of attic stairs 60-70 0 ;
- tread width 24 -30 cm.
On a note! The tread material must be resistant to fracture and at the same time have some play in bending. Comfortable tread thickness of the step material 18 - 20 mm.

Types of structures
Depending on what kind of room will be under the roof and how much the area of the building allows, home owners can arrange a different passage to the attic.
All types of stairs can be divided into 3 methods of construction and operation:
- Stationary.
These are marching, screw, cantilever structures. That is, a staircase that is built together with a building is connected to it by one reinforcement system, distributing the load on the load-bearing parts of the building. These stairs have the following characteristics:
- thoroughness;
- significant weight;
- long service life;
- high strength.
In addition, such a construction always takes usable area lower floor. Even when installing helical steps, the most economical in terms of volume, you will have to sacrifice square meters.
On a note! Give preference stationary staircase It is worth it if the attic space is residential and it is planned to be used daily.

- Portable (attached).
The use of portable ladders to visit the attic is quite common in cases where the space under the roof is technical and does not require frequent visits. At the same time, this is the most budgetary method of installation and the most inconvenient and traumatic. It is not recommended to use a ladder alone without a safety net from below. In addition, a stepladder or ladder must be stored somewhere and, if necessary, brought to the attic hatch area.

- Foldable.
If the attic is of functional importance and is used frequently, but not daily, folding stairs become the optimal way to create a passage. These structures are retracted into a hatch or wall and for this reason have obvious advantages:
- do not take up space on the ground floor area;
- when unfolded, they are a durable and stable structure;
- do not require organization of storage space.
Folding stairs, as a rule, do not have risers, so the width of the tread is often reduced, rightly assuming that 2/3 of the foot is sufficient. But when designing, it should be taken into account that too narrow a tread will make the staircase an object increased risk, so the steps should still be around 20 cm in width.

Types of folding stairs
A folding ladder, even complete with an attic hatch, can be purchased ready-made, or you can assemble it yourself. Let us describe the possible most common types of mobile stages:
- Telescopic. The guides for the steps are laid out according to the matryoshka system, that is, one into one. The steps are installed on the guides using locking mechanisms. Not the most reliable type of ladder; problems, as a rule, arise with the clamps.

- Scissor. Another name for such steps is accordion. It is on the principle of bellows that the ladder stretches with a simple downward movement. When assembled, it is quite compact. This design can be purchased in an automatic sliding version.

- Sectional folding. The staircase segments are folded, as in the scissor version, but in rather large sections, and not step by step. For this reason, the assembled ladder is quite bulky, but it does not take up space on the lower floor, since it is retracted into the hatch. The absolute advantage of this design is the price; it is the most economical option.

- Folding. Stairs that are fixed into the nearest wall and retracted into it when assembled. In working condition, this design is very similar to a conventional marching design. The advantage of such a march is the normal angle of inclination, usually 45 0 . But for use you will need free space on the lower floor. Besides, assembled staircase on the wall will not decorate the interior.

Find out with your own hands, and also check out the drawings and videos in a special article on our portal.
Prices for different types of attic folding stairs
Folding attic ladders
Do-it-yourself wooden attic three-section ladder
The first thing to do is cut an opening in the ceiling in the chosen location. All further calculations will depend on the dimensions of this opening. Please note that the hatch will be attached to the body of the floor, so if necessary, it should be strengthened.

After the opening is ready, they begin to draw up a project for an attic hatch with a ladder. The drawing should indicate the following dimensions:
- thickness of the ceiling;
- hatch length and width;
- angle of inclination of the stairs;
- width of the flight of stairs;
- length and number of sections;
- number of steps and distance between them;
- tread width.

The most difficult thing from the point of view of calculations is the moment of determining the length of the staircase in disassembled form. For such a calculation, you will need to remember school mathematics and find the Bradis tables, you will need the value of the sine of the angle:
- determine the location of the stairs on the drawing;
- measure the angle of inclination (remembering that it should not be steeper than 70 0);
- calculate the length of the stairs using the formula L=H/sin where L is the length of the stairs, H is the height from the floor to the attic hatch, sin is the value of the sine of the angle of inclination.
On a note! A simpler, but less accurate method of calculation is to determine the size of the hypotenuse, in a triangle, where the legs are the height to the hatch and the estimated length from the edge of the hatch to the place where the stairs are fixed on the floor of the lower floor.
Section sizes are calculated as follows:
- the first is the longest, the hatch size is reduced by 10% ;
- the second one is less than the first one 10%;
- the third is the remaining length until the entire march size is set.
The project has been calculated, materials have been purchased required quantity, you can start producing a hatch with a folding ladder.
On a note! Once the project is ready, count all the fasteners, including connecting hinges, hinges, locks and an external handle for easy opening of the hatch.

Prices for timber
Hatch door manufacturing technology - step-by-step instructions
Any door consists of a frame (frame) and a door (leaf). The box is attached to the opening, and the canvas is fixed to the frame.
The size of the box should be slightly smaller than the size of the hole for the hatch. On each side there should be 2 - 3 cm to form the assembly seam.
The manufacturing process step by step is as follows:
Step 1. The frame is made of timber or boards. Corner connections are carried out according to 45 0 . All parts are fastened with glue or self-tapping screws. For greater strength, the corners of the box can be secured with furniture corners.

Step 2. The frame for the deck is also assembled from timber. The structure can be strengthened with a crossbar.

Step 3. From the attic side, wind protection material (waterproofing) is laid into the canvas. Insulation is placed inside the canvas, for example, mineral wool. The inside of the door is lined with a vapor barrier membrane.

Step 4. The door is sealed on both outer sides with plywood, at least 8 mm thick.

The canvas should fit tightly but freely into the frame. Before starting work, all wood should be treated with a fire protection compound.
On a note! The hatch box is mounted flush with the lower plane of the ceiling; this should be taken into account when choosing the size of the beam for the frame.

Prices for construction boards
Construction boards
Assembling the stairs
First of all, it is necessary to cut the timber into the string of the flight of stairs. The result should be three pairs of bars of different lengths. It is better to cut out the lowest pair with a small margin, so that after installation, you can cut off the corner at the end of the block for a strong fixation on the floor.

The algorithm of actions is as follows:
- cut boards for treads in the required quantity;
- Make markings on the string beams for attaching the steps;
- fasten the beams in pairs using tape and drill holes in the places where the steps are attached;
- drill places to install the hinge mechanism at the ends of the bar to connect the sections to each other;
- assemble the entire structure with self-tapping screws.
Video - Self-assembly of an attic ladder with metal fastenings
When marking the fastenings of the treads to the string, it is better to focus on one edge and make one hole only. After the staircase is installed at the desired angle, one step is set and a second hole is made so that the tread is strictly horizontal. To repeat the required angle, make a template from cardboard and drill the attachment points for the remaining treads. The ladder should be attached to the door after fitting.
Installation process
If the work is carried out by two or more people, you can install the hatch together with the attic ladder assembly. The design is quite heavy, so it is almost impossible to carry out such an operation alone.

If everything is assembled and measured correctly, the installation process will not be difficult:
- A box is mounted into the thickness of the ceiling. Everything is secured with anchor screws. The frame is fixed in several places: at a distance 10-15 cm from the top of each corner and in increments 40-50 cm along the length of each side.
- The door is suspended from the frame on hinges. A hinge for attaching the ladder and all locking mechanisms are installed on it in advance.
- The upper section of the ladder is mounted to the fixed door.
- The entire march structure is assembled using hinge mechanisms.
The installation seam is foamed. After that, the inside of the seam should be glued with metallized tape, and top part cover with PSUL waterproofing tape. After such insulation, the seam can be closed with a strip of flashing or any other decorative material.

Important! The seam on the side of the PSUL tape does not require additional protection. It is absolutely forbidden to plaster according to PSUL.
Video - Technology for installing attic stairs into a finished ceiling
Conclusion
A staircase with a hatch to the attic is a mandatory element for installation in any building. Types of stairs and hatches, as well as methods of their installation, must comply with the requirements fire safety. At the same time, you can assemble the entire structure with your own hands or purchase ready product and order installation from a specialized company. The modern construction market offers big choice ready-made structures, and various materials for self-production.
Every home has a need for additional space. When all the rooms are functionally occupied, the owner of the home begins to look free space beyond them. This is where a folding staircase to the attic comes in handy. It will allow you to equip a workshop, a children's room, put a billiard table and a bar counter there. Concerned about this idea, the owner begins to wonder whether to buy staircase structure ready-made or make it yourself.
An example of a folding metal staircase to the attic
But first he must familiarize himself with its various options in order to choose the right one.

Depending on the location of installation, attic entrances can be internal or external. Folding attic stairs are usually not installed outside. A stationary structure installed outside is not entirely comfortable in winter, but it does not take up a single meter of useful living space; Another option is insulated.
To metal parts have not been subjected to the destructive effects of atmospheric precipitation; they are most often made of galvanized metal or painted with special paint.
Attic stairs are made of wood and metal. Both options are quite durable devices. However, they may squeak or rumble, although not everyone finds these sounds annoying. In addition, they can be eliminated or at least muffled if you use various floor mats or anti-slip pads. Wood and metal are often combined to create very attractive multi-stage structures.
Stationary
A monolithic structure with steps, usually made of wood, with handrails and railings is installed on. During active daily use of the attic space, it is complemented by a door. You can’t do without it when it is equipped as a comfortable room in the house for adults, a relaxation room, or a workshop that you have to visit every day.

Option for installing a stationary wooden staircase to the attic
A separate area is sometimes allocated for a stationary device - a staircase.
Folding attic ladders
You can also buy them or make them yourself. Installed in rooms with limited space when it is impossible to build a monolithic staircase structure. Folding attic ladders have several varieties, but all of them are not bulky, but light, but weight does not limit strength, because they use hardwood and aluminum for manufacturing.
Scissor
This retractable structure is attached to the hatch cover and unfolds all the way to the floor, similar to a tram current collector or accordion. This design is only metal, so over time it begins to creak without proper lubrication. Used in private homes for light use of the attic.

Working diagram of a scissor ladder to the attic
The carrying capacity is small, but it can reliably support the weight of an adult.
Telescopic
A ladder made of several sections that are packed one into another is called telescopic. It is usually made of aluminum, so it is lightweight and durable. But such folding stairs to the attic are not very popular among consumers. More often they are used on construction work in the form of stepladders. When packed they are so compact that their dimensions allow them to be transported in the trunk of a car.
Folding
This is one of the types of folding stair devices, usually consisting of two sections. The first is rigidly attached to the base of the hatch. A second one is attached to it from below with special hinges that allow it to fold forward.
Drawing with dimensions of a folding ladder
When there is no need for it, and the entrance to the attic is closed, then the folding structure is in attic. If you open it, it reclines and falls to the floor.
Retractable
If there is not enough space, a retractable staircase to the attic is installed. It can be made of wood or metal. Pulls out from the hatch, which opens manually or electrically.
The main requirements for such a design are compactness, strength, and low weight. To achieve this, durable wood and lightweight metal are combined in manufacturing.
Screw
It requires more space than folding devices. May be with or without railings. It looks very light, regardless of whether it is made of wood or metal. Original design, but the ascents and descents are difficult and sometimes risky, especially for elderly residents of the home. 
Such attic stairs are used in houses in which the attic is not used so intensively. They can be arranged so that all the steps are attached to a pole, which is located in the center of the system. There are also staircase spirals in which the steps are held by curved load-bearing bowstring beams.
Folding and can be bought without any problems at a building materials store, which sells pine, oak, and also metal ones, usually made of aluminum. The cheapest product is made from pine, but is not inferior in strength to other materials.
We should not forget that a staircase purchased ready-made needs proper care, which includes processing wooden surfaces fire-resistant impregnation, varnish or paint coating.
Metal parts, hinges, rollers must be lubricated with machine oil. 
But it is not always possible to find a suitable staircase structure on the market. Then best option- a do-it-yourself attic ladder, which you can make in accordance with your own wishes and tastes. How to do it? Today there is no shortage of relevant information on the World Wide Web. All you need is desire, the necessary materials, tools and creative enthusiasm.
Primary requirements
The attic staircase is a risk area, so it must meet the following requirements:

Staircase details
A home craftsman who has decided to build a staircase structure on his own should familiarize himself with its components.

Elements of the design of the staircase to the attic floor
Then he will better understand the question of how to make a staircase to the attic the best way.
Any attic staircase consists of parts, the names of some of which may not have been previously known to the home craftsman. It would be nice to get a drawing on which they are depicted and signed.
These include:
- Beams, which are called bowstrings and stringers;
- Railings, safety handrails;
- The edges of the steps, which also have their own name: horizontal - tread, and vertical - riser;
- Flight of stairs.
Kosour
This is a strong beam in which cutouts are made to attach the steps from above, so that their ends are visible from the side. There are staircase structures in which there is one in the middle, and wooden planks are horizontally attached to it. But more often, the installation of an attic ladder for greater strength is done on two stringers.
Then, even visually, the entire structure looks durable, capable of withstanding heavy loads. Metal support Often it is made not in a straight form, but in a stepped shape. Making it at home is very problematic; it’s easier to buy it ready-made.
Bowstring
This is the name given to a load-bearing inclined beam, and it differs from a stringer beam in that it hides the ends, and the steps are attached to it using special grooves. Therefore, there must be two of them - on both sides of the staircase. Even a folding staircase to the attic cannot do without these beams if it is made of wood. 
With them, the stationary structure looks massive and solid, while on stringers it seems visually light and spacious.
Railings and handrails
You should figure out whether there is a difference between these concepts. Railing - a fence along the outside of a flight of stairs. They are connected at the top by handrails - this is an integral part of the fence on which they rest with their hands. Together they ensure safe movement. These elements can be metal, wood, even glass. They look very attractive if they are made of stainless steel: no protective equipment is required, much less painting, and their service life is almost unlimited. But not every consumer will decide to buy them because of the high price.
Option for installing stair railings on the attic floor
The railings need good quality, reliable. If the attic ladder has a hatch, then they should end at the very base and not interfere with the functioning of its cover.
There are also some mandatory requirements for handrails:
- The width should allow a person to wrap their hand around them to hold on tighter;
- Height - at the level of an adult’s waist, not lower;
- To avoid injury there should be no sharp corners at their ends;
- By appearance They should form a single, harmonious ensemble with the entire staircase that decorates the house.
Steps and treads
The vertical part of each step is the riser. It closes the space between adjacent steps and also provides additional support for them. Such steps are called closed, and open ones will be those that consist only of horizontal planks for the feet - the so-called treads. Folding stairs to the attic are also equipped with these parts.
Flight of stairs
This is the element that connects all the components into a single structure. Has a maximum of 18 steps mounted on load-bearing beams- bowstring or stringer. There are one-march stationary systems without turns from the floor to the entrance to the attic and multi-flight with several spans. They must meet the same requirements that apply to all staircase parts: strength, convenience, safety.
Design of a flight of stairs
The useful width of the march is determined by the distance from the wall with the finishing done to the inside of the handrail.


