Territory summer cottage It should be perfect in all respects – pleasant for relaxation and comfortable for work. Beauty created with your own hands is doubly pleasing, and today’s innovations in design make it possible to perfectly decorate the territory of the site. Arches for flowers have a very special decorative effect, allowing you to create cozy places to relax, zone space, and place expressive accents.
A free-standing arch will be a spectacular accent in the garden area; with the help of a group of arches you can create a tunnel or gallery of amazing beauty; a beautiful wall of flowering trellises can hide the recreation area from prying eyes, or hide not very presentable outbuildings. Arches can also form something like a gazebo - a cozy place to relax.
garden arch- not only a wonderful way to decorate local area, for climbing plants (especially roses), this is one of the most convenient ways to grow them

A very easy-to-make rectangular arch opens up the effect of a deep perspective of space. Bright accents of the composition are given not by climbing plants, but by flowers in tubs, a lawn and a crushed stone path
Much depends on the appearance and material of the structure, as well as on what plants will be used to weave it. For the manufacture of arches, materials such as wood, metal, plastic, natural stone and their various combinations are used.

A solid structure with stone supports and a lattice roof entwined with vines forms an original shady gazebo where you can relax comfortably on benches
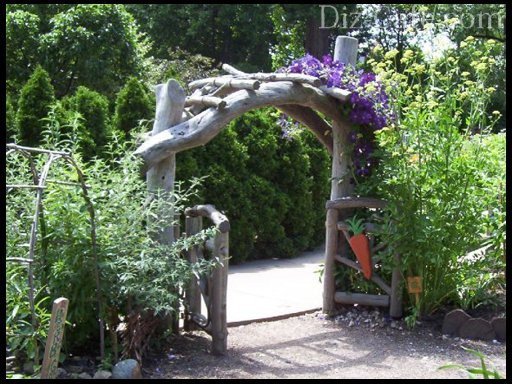
This creative arch is made from logs and dry trunks without bark. It looks fancy and unusual and acts as a gate. If you have unusual ideas, try to implement them, your garden - the best place for experiments
Garden garden arches for flowers have many forms - vaulted, trellis (when several trellises are connected into a single whole), trellis (lattice supporting climbing plants) and the shape of a volumetric arch with repeating elements (pergolas).
Today there are many ready-made arches on sale - various wooden structures(from simple to very complex), inexpensive plastic ones and a wide variety of forged ones. Forged arches with thin, graceful lines are especially beautiful. It’s even better for them when the plant does not completely entwine the arch, allowing you to admire the beauty of the work.

Forged arches are very light and elegant designs, which in themselves are a wonderful decoration. In this case, it adds decorativeness wrought iron fence, back wall and lantern, over time you will get a very cozy gazebo
You can purchase for your garden finished arch, but if there is a desire, an arch for flowers in the country can be made independently. A DIY flower arch will look no worse than a finished one. We will describe an example of creating a simple design that anyone can do.
We make a wooden arch ourselves
You need to find 4 or 6 wooden posts or beams (height 2 m, width 100/100 mm or 75/75 mm). The vertically installed pillars will be the supports of the pergola, to which two side cross beams are attached, and the crossbars are attached to them. Suitable for crossbars edged board(20/200 mm). The pillars are installed in recesses 0.5 - 1 m deep. The depth depends on the type of soil; for loose soil it should be greater. In order for the design to be practical, the part of the pillars that will be buried must be treated with bitumen and wrapped in roofing felt, roofing felt or other waterproofing material. Use a building level to check that the installation is vertical. The empty space in the pits can be filled with crushed stone, but the most reliable way, of course, is concreting.

Garden pergola layout: 1 – support pillars or beams, 2 – beams, 3 – crossbars. For the convenience of plant growth, it is recommended to stretch fishing line, twine, or fill the crossbars in the form of a lattice.
It’s nice to create beauty in your dacha through your own efforts, and such a pergola will be an excellent decoration and shelter from the heat. It can be placed along the path, in the recreation area. The presence of 4-6 pillars makes it possible to create a real gazebo, in the shade of which you can hide and relax.
In order for the plants to grow well and weave around the pergola, twine can be stretched between the pillars. If you fill the slats with a lattice between them, the pergola will look very beautiful. To prevent the tree from being exposed to insects and atmospheric influences, be sure to treat all parts of the pergola with a special compound. The gratings can also be placed on the roof - this is more convenient for plants and the overall structure will benefit from this.
Here is another example of constructing a wooden arched design:
If you use metal elements - fittings, corners, they need to be degreased and then painted. Wooden elements It will be more reliable to fix it with galvanized materials. A wooden arch is better for plants in the sense that when severe frosts wood will not be as cold as metal. Sometimes parts of plants freeze to the frozen metal and die
The example of constructing this garden structure is quite simple, but if you paint it and use carved decorative elements, you will get a very nice garden arch.
There are also a few videos on our topic that may give you some ideas:
How to properly plant plants to decorate an arch?
After making and installing the arch, you need to think about what plants you want to plant as decorative ones. Both annuals and perennials should be planted closer to the base of the structure. Perennials grow slowly, so in the first year or two their growth will be small and special. decorative effect will not be. You can also plant annual climbing plants next to them - purple morning glory, sweet peas, decorative beans. They can decorate the arch in the first year. As an option, you can hang beautiful hanging flowers - begonia, petunia, pelargonium - in flowerpots or pots. This will give the arch a picturesque look, and you will not need to wait for, for example, or to grow.
When the plants completely entwine the arch under the flowers, it will become a wonderful place - shady and beautiful. Arch is good and when fresh herbs covers the structure, but it looks most impressive, of course, when the plants are flowering. It is no coincidence that today it is fashionable to decorate wedding ceremonies with flowering arches - arches create a wonderful solemn atmosphere, demonstrating the beauty of nature and the skills of human hands.

Rose arches are some of the most beautiful. You can combine varieties of roses, for example, as in this case - climbing roses decorate the arched structure, and other varieties planted in alternation with ground cover plants, form a luxurious carpet below
The video shows examples of creating an arch and decorating it with curly and:
DIY garden arches: photos and ideas
To decorate the garden, many small architectural structures are used: pergolas, trellises, trellises, trellises. All of them are intended for growing climbing plants, but differ in appearance and perform different functions. Arch is a single structure consisting of walls and a ceiling in the form of an arc or in the shape of the letter P.
Arches for the garden: functions and basic requirements
Surprisingly, these elegant structures, depending on their location, can radically change personal plot. With their help, you can create a romantic atmosphere, give the palisade a touch of mystery, aristocracy, or, conversely, emphasize naturalness.
The arch can be an independent element garden design, and an effective addition to planting compositions. It can also perform many other functions:
- provide support for plants;
- create architectural style;
- strengthen and support load-bearing pillars (if located above a wicket or gate);
- divide the garden into zones, for example, separate an ornamental vegetable garden from other plantings;
- can serve as a basis for a children's swing or hammock;
- used for lighting instead of lamp posts (at the entrance to a park or garden) or as a resting place if a bench is mounted next to or directly on the supports of the arch.
Requirements for a garden arch
Since the arch is a multifunctional structure, the requirements for it are high. First of all, it should be:
- made of high-quality durable material that will ensure its resistance to any weather conditions;
- aesthetically pleasing, both entwined with plants and without them. Particularly effective in winter period A decorative iron arch or pergolas along the paths looks great.
- made in accordance with the growth of all members of the family, taking into account the reserve for sagging stems of flowering and fruit-bearing plants.
Arch in the garden: materials and characteristics
How harmoniously and naturally the arch will fit into the garden depends on the appearance, dimensions, and supporting materials. Outwardly, these may be the most unusual solutions from the simplest rectangular shape to an elegant openwork design.
But in order for them to fit harmoniously into the style of the palisade, it is necessary to build them of the appropriate size. There are no special rules on this matter, however, in landscape design, when decorating a medium-sized plot, an arch 1500 mm wide, 2500-3300 mm high and 500-700 mm deep is used (depending on the varieties of plants chosen for decoration).
Typically, plastic, brick, metal and wood are used to make arched structures.
Plastic
The easiest way is to buy and install a PVC arch on the site. But, even despite the economy and variety of colors and shapes, it can last a relatively short time, and its level of stability leaves much to be desired.
Such arches are used only as decorative elements, for decoration and zoning; they are not suitable as supports for benches or pergolas for relaxation. In addition, they have to be removed for the winter, since in severe frosts the plastic can burst; another problem is that they cannot be placed in close proximity to the grill or outdoor stove.
Brick and stone
These materials are the most durable. Of course, anyone can make a rectangular arch out of brick, using the drawings and facing bricks, but truly unusual specimens that can be called an architectural miracle can only be created by a true professional in his field.
Brick arches can be so original in themselves that a frame of plants and flowers is not required to emphasize their beauty. For example, a stone vault over an entrance gate or central path looks very impressive. Also, such a decorative element is ideal to highlight a garden pond or flower bed.
Tree
The best way to make an arch in the garden with your own hands. Arch from natural wood easiest to fit into any style. You can also choose a garden set for it, or create a whole ensemble of gazebos, trellises and fences.
The service life of this material is not very long, so before decorating and installing the wood must be treated with an antiseptic Stigma-D or Zobel and coated with a special paint, such as MGF Eco Fassade M690.
Metal
A steel garden arch is the most durable and reliable. It allows you to create extraordinary planting compositions that will delight the eye both in summer and winter. The simplest option is to secure a steel wire bent into an arc between the supports.
Modern design metal arches are surprising in their diversity; they can be elegant patterned structures or massive structures with inserts made of wood or stone. To prevent structures from corroding, their surfaces should be regularly maintained, primed with a special Biotex Effect composition and painted with at least two layers of alkyd enamel, for example, Tikkurila Miranol.
The main advantage of metal is its decorative effect. You can forge it yourself if you have specialized equipment, or order real masterpieces with chrome-plated rose petals from blacksmiths.
The easiest way is to make an arch with your own hands from wood and metal. Of course, even this simple design will require certain financial and time costs, but as a result you will receive an effective element of garden design.
Arch made of PVC pipes or wire and mesh
Climbing roses, glycines, and clematis will look great against the background of the original arched arch. To work, you will only need a few pieces of metal wire or pipes with couplings and a piece of plastic-coated mesh; they will simply be tied to the supports.
You can use plastic and metal-plastic pipes, for example, those left after installing a water supply system or in-house sewage system. After assembly, the surfaces should be treated with primer and coated with paint.
Wooden arch for climbing roses
Larch or cedar are best suited for erecting such a structure, since these types of wood are more or less resistant to atmospheric influences: sediments and rotting. Although, if you don’t have them on hand, you can use lumber from pine or spruce, after treating them with an antiseptic. In order for the arch to be securely installed, it is mounted on steel pin supports, all nodes are connected with screws or dowels.
Rustic arch made of wood
Raw wood is a material that allows you to create an arch in an unusual rustic style. Straight-trunked species are suitable for this purpose: spruce, birch, fir.
For the base, it is better to use small round timber with a diameter of 70-75 mm; braces are made from thinner branches with a diameter of up to 35 mm. The parts are connected using nails and screws. After installation, the surfaces are covered with stain and varnish of natural colors, for example colorless PINOTEX CLASSIC.
Plants for decorating a garden arch
It’s not enough to just make an arched structure with your own hands, it’s more important to decorate it properly, only then will it become a full-fledged decoration of the garden.
A variety of climbing plants are used as frames for vertical landscaping, including arches. The most common of them:
- girl's grapes An unpretentious crop, distinguished by green foliage in summer and colorful dark crimson foliage in late autumn;
- clematis. The varietal diversity of these delicate flowers allows you to combine plants of the most unexpected colors;
- climbing roses. They bloom once a year, but very brightly and abundantly. They also have beautiful and richly colored leaves, so they will be an excellent frame for the arch from early summer to late autumn.
No less beautiful edging will be honeysuckle, ivy, campsis, actinidia and wisteria.
Bottom line
Arch is the perfect element garden decor, depending on its location, zones change and planting zones are regulated, plantings and buildings are emphasized or removed, the general style and design of the site changes. If you build a structure, guided by our advice, and correctly combine plants in the right color scheme, the result will be a real architectural structure, despite the ease of construction and the small amount of time spent.
If you decide to improve your plot, then you can use many different options - from laying out flower beds and planting ornamental shrubs to more entertaining solutions. A garden arch looks very interesting in a dacha – anyone can make such a structure with their own hands, the main thing is to choose the material that is most convenient for you to work with. In this review we will look at the most popular and in demand options among summer residents.
Main design options
First, let's look at some types of arches from which you can choose best option, which will organically fit into your site and become one of the original touches of the entire setting:
| Prefabricated Metal Garden Arches | The popularity of such products is due to their very high strength and durability; a circle, square, hexagon, reinforcement, strip or forged elements. Disadvantages include labor-intensive manufacturing and the need to protect elements from corrosion. |
| Garden arches and pergolas made of wood | The biggest advantage is the low price and availability of the material, and it is also easy to work with, which is very important in cases where the assembly is done by hand. The main disadvantage can be considered poor resistance to moisture, so periodic painting or treatment with protective compounds is required |
| Wicker structures | Very original and unusual option, and it’s also easy to make yourself. Either metal or wooden posts are used to create a frame, between which flexible rods are woven. Again, for proper reliability it is necessary to protect the structure from moisture |
| Purchased plastic garden arches | This option has gained quite a lot of popularity due to its low cost and ease of use. They are sold in finished form, and to collect them you don't need complicated instructions and the availability of special tools. In addition, plastic is not afraid of moisture and is not subject to corrosion. |
Advice!
When choosing plastic products, you should pay close attention to the quality of the material, since very often on the market there are structures made from compositions that quickly become unusable.
The surface must be smooth and durable, without changes in color or visible flaws.

Review of manufacturing features of some options
If you decide to make garden arches with your own hands, then the information presented in this section will help you better understand the technology of manufacturing structures and help you organize the work process correctly. We will touch on the most popular solutions and describe them in the form of simple step-by-step descriptions.
Wooden structures

Garden wooden arches can be made in several ways, but we will look at the simplest of them.
First you need to stock up necessary tool and materials:
- Beams for racks, most often 4 pieces are required, but if the arch is of increased length, the quantity will increase accordingly. The cross-section of the timber can be different, the main thing is that it is quite strong and does not succumb to deformation under the influence of unfavorable conditions. Most often, the choice is made on products with a cross-section of 10x10 cm.
- To decorate the roof, a board with a thickness of about 25 mm or more is used; you can even use the remains that have accumulated after or outbuildings.
- For the arch you will need several slats and a piece of moisture-resistant plywood or oriented strand board. You can make an arch simply from plywood, but in this case its thickness must be at least 10 mm.

- If garden arches for roses are being made, then it is best to stuff slats between the posts to create a lattice with a cell of 10-15 cm; it is very convenient for climbing plants to entwine this type of structure.
- The following tools will be needed: a hacksaw or a special electric saw, a plane or Sander(you can get by with sandpaper), nails or screws (in this case you will need a screwdriver). Measuring devices are also needed: tape measure, ruler and pencil for marking.
Important!
All materials must be dry, as excess moisture leads to deformation finished products, which degrades the quality and appearance arches.
The workflow goes as follows:
- First, the posts are cut off and reinforced into the ground, and it is important to place them evenly and at the same distance from each other. The wood is treated with compounds that protect it from mold and pests.
- Next, arched elements are made; the easiest way is to make them from a thick piece of plywood. Draws on the material required form, after which it is cut out with a jigsaw, you can do the same using a furniture board.
- After this, all parts of the arch are fastened with bars, and decorative elements, which can be of various shapes and sizes, are attached on top. The assembled structure is attached to the racks.
- IN last resort the grid is stuffed between the racks; thin slats are used for this.

Metal products
Metal garden arches are less popular due to the fact that working with the material is much more difficult. But in some cases, this option is the most preferable due to its high strength and the ability to build lightweight but very durable structures.

Let's consider what you need to stock up on before starting work:
- First of all, you need to purchase sufficient quantity main material. This can be either round timber or profiled metal, as well as pipes of a wide variety of sections. From different options various metal garden arches are obtained.
- You will also need welding machine, nowadays many compact options have appeared, which simplifies the work. In order not to specifically buy equipment, you can rent it; this service is common almost everywhere.
- To cut elements and clean them, it is best to purchase a grinder and a set of appropriate cutting and grinding discs.
- To protect finished products, it is necessary to use paint; it is best if it is a composition with anti-corrosion additives, this provides more reliable protection.

The work process is organized as follows:
- Selected first specific project, which indicates all the dimensions of the future product. After that, the metal is cut into pieces of the required size.
- To obtain neat bends, it is recommended to use special device– a pipe bender, with its help not only arches are made, but also small decorative elements in the form of rings, curls, etc.

- After all the elements are prepared, you can begin welding the structure. If you do not have experience in carrying out such work, it is better to hire a specialist.
- The last stage is installation (the racks can be concreted for strength) and painting of the products; within a day, metal garden arches are completely ready for use - you can plant plants and attach decorative elements.
It is worth noting that great importance It also has the right one, planted near the arch; climbing crops with abundant flowering are best suited.
Conclusion
A garden arch is a simple element that will be an excellent decoration for a site, and, if desired, will serve as a place to relax. The video in this article will clearly show some of the features of the workflow.


Who hasn’t admired this decorative garden decoration at least once? Or did not remember relaxing on a bench under an arch entwined with clematis or climbing roses? Did this arched structure, immersed in a green waterfall of wild grape branches, hung with flowerpots of blooming annual begonias and petunias, leave anyone indifferent? All this beauty of the decorated area of the site is given by one of the most expressive elements of landscape design - the garden arch. And beauty created with your own hands is doubly pleasing.
How to make a garden arch yourself, without resorting to the help of professionals, to accent and decorate the recreation area - patio or a garden? Any summer resident or amateur gardener can cope with this task by building a “flowering corridor” and decorating it with plants.
Span plus supports
A garden arch is a vaulted structure that consists of vertical posts (supports) with an arched or straight connection at the top. Has a relatively symmetrical vertical axis shape and through opening “gate” or repeating sections. Refers to small landscape forms. Has a varied stylistic design.
Depending on the material used, garden arches are:
- Wooden - block, plank, trellis, wicker or combination.
- Metal - from pipes, rods, profiles, metal portable trellises, including forged arches.
- Plastic - made of pipes, collapsible, sectional or lattice.
- Stone - brick, buildings made of natural stone on the foundation.
Lightweight wooden structures
Wooden arches have a presentable “classic” look, are easy to paint and simple to manufacture. They are the most common type of arches with an acceptable price/quality ratio. Dried lumber for arches is selected. Best drying– natural, for three years under a canopy. To make an arch with a corridor length of 3 m, you will need 6 beams (3 on each side). Rectangular cross-section 75×75 mm or 100×100 mm, height 2.0–2.2 m. From one end to the length of the burial, the beams are impregnated with an antiseptic (can be used car oil, diesel fuel). If pillars are used as supports, a proven method is used - the butts of the logs are burned over a fire.
Using a garden drill or shovel, holes are made every 1.5 m to a depth of 0.5–0.6 m. The beams are installed in the holes, sprinkled with soil mixed with crushed stone, crushed bricks and compacted. Vertical installation is checked building level or a plumb line. Most reliable way installations – concreting. However, there is an opinion that concrete “attracts” moisture, from which the wood quickly becomes unusable. Therefore, a three-layer fill should be preferred to a continuous fill - layers cement screed should be alternated with layers of dense soil.
Of the 6–7 prepared slats of arbitrary cross-section, 4 are attached horizontally between the beams - they fill the voids. Two or three slats will be used at the end of the assembly to connect the three arches of the vault and ceiling. The semicircular arcs themselves are made from wooden beams (boards) using a cardboard template that repeats the profile of the future ceiling from a chain of the nth number of fragments-parts having a rounded shape.
The length of each is usually 40–80 cm and depends on the radius of the future arch and the width of the lumber used. On wooden blank a cardboard template is applied, the outline of the fragment is outlined and the part is cut out with a jigsaw or manual router. Final assembly made on a cardboard template - the first layer of cut out fragments is laid end to end. Then, with a half-piece shift, the second layer is laid over it. Both layers are connected to each other with self-tapping screws, and the finished arcs are installed and attached to upper parts supports
Note! The disadvantage of wooden arches is their relatively short service life and low structural stability.
Strong and durable

Metal structures are strong and durable if you take care of them. Full painting is done every 3-4 years. Touch-up paint in places where rust appears - annually. To make a garden arch, take two metal rods L = 6 m and Ø 10 mm. A template for the future opening is prepared on the ground - the outline is outlined with paint, and metal pins L = 20–30 cm are driven in along it. The pins are bent around the rods to give them the finished shape of the arch - this is the skeleton future design. The legs of the curved reinforcement are buried in the ground to a depth of 45–50 cm, the dug holes are filled concrete mortar. Rings are formed from meter-long rods on a pipe bender - fillers of the space between the arcs and secured to the frame with soft wire.

In the absence of this bending tool, the space is filled with crossbars - straight metal rods. The finished structure is coated with an anti-corrosion coating - a layer of primer and painted with enamel.
Lightweight and high performance

These are the qualities that plastic arches have – modern look landscape structures. They are made independently; round or round plastic pipes are used as frame material. rectangular section– water pipes Ø 20 mm are most often used. The best material counts high quality PVC– he tolerates high and low temperatures, therefore, such structures are not removed by the owners for the winter utility room. An alternative to manufacturing is to buy ready-made structures of various styles - they are easy to assemble, and installation does not require special skills.
Note! Disadvantage plastic structures is a limited choice color range- in most cases they are white. However, the problem is easily solved by painting the surface of the garden arch. Available wide choose polyurethane paints and acrylic enamels designed specifically for plastic and PVC. With their help you can easily change the color of the arch.
Multi-section

A sequence of light arches connected by beams in the form of a canopy is called a pergola (from the Italian name pergula - canopy, extension). Depending on their location, they can be independent, free-standing, or structures attached at one end to the wall of the room. Pergolas often start above entrance group premises or terrace and serve to protect residents from the scorching rays of the sun, including barbecue areas, swimming pools or outbuildings. A pergola with a bench can serve as a local recreation area. Replaces a gazebo, having a similar one with ordinary arches simple technology manufacturing.
The territory of the dacha or garden plot can be used not only for growing various plants and decorative flowers. Thanks to modern decorative structures, it can also serve as a place of relaxation and simply be an aesthetically perfect area of your home. It's about about garden arches for climbing plants and other flowers. It's pretty simple structures, which, however, perform a lot of functions. We will not only tell you which ones, but also teach you how to make arches for your dacha and garden with your own hands according to our detailed instructions with photo.
Garden arch: main types, construction features and functions performed
A garden arch is a decorative structure for garden plots. Most often it represents simple design of two vertical beams without a foundation and a horizontal crossbar of an arched or straight shape.
The arched structure itself is a fairly stable structure, which does not have a reinforced frame. Yes, this is not required, since the main function of a garden arch is to support a plant, flowers, or vine.
Although the construction of an arch does not require any complex technologies, it is nevertheless necessary to take into account some features:
- The structure must be suitable for growing plants.
- The height of the arch should be at least 2 meters, so that a person of average height can comfortably fit under it.
- The width of the arch should be at least 1.2 m. This is necessary in case it will be used as a support for the growth of climbing plants. If this parameter is not observed, then in the future the effect of neglect of the structure may be created.
- The frame must not only be durable, but also have an aesthetic appearance, so that in the absence of plants (during the cold season) it also “pleases the eye.”
- Compliance of the chosen type of construction with the overall color of the garden plot.
Arched structures can be classified according to several criteria:
- According to the material used to make the structure: arches made of wood, plastic, metal, stone, combined.
- According to the shape of the frame: arches; pergolas (a three-dimensional structure consisting of similar elements fastened together); trellises (vertical gratings); complex designs.
- By location: isolated design; several arches; trellis "wall"; gazebo-shaped structure.
Garden design is not only a separate decorative element for the site, but also a way to complement an existing composition. In addition, the garden arch performs a number of important functions:
- Serves as a reliable support for plants.
- Helps create an appropriate architectural style.
- Supports load-bearing pillars.
- Effectively zones the garden area.
- Serves as an excellent base for children's swings.
- Serves as lamp posts or as a place for relaxation.
Making a garden arch with your own hands
The construction of a garden arch is a fairly simple job, but, like any other, it requires careful preparation and high-quality execution.
Determining the dimensions of the structure and choosing the appropriate material
There are no strict restrictions or any standards other than those described just above (the arch should have a height of about 2 meters and a width of about 1.2 m). The maximum permissible width that will not violate the overall proportions of the structure can be about one and a half meters. This will be quite enough. As for height: the higher the structure, the less graceful it becomes. Most often, garden arches are made no more than 3 meters high.
Once the dimensions of the structure have been determined, you can begin to select the material. So, metal garden arch - durable design, it is very easy to install and quite durable. But it has one significant drawback - susceptibility to corrosion.
As a material for wooden Arches are suitable for both timber and untreated wood. Such structures are less reliable than arches made of metal.
Plastic the arch has a very attractive price, easy to install. It is not afraid of corrosion, moisture, or deformation. And to model the structure you only need a soldering iron.
Selecting and preparing a site for an arch
Now you should think about where to place the structure so that it decorates the area and does not violate the overall integrity of the existing picture. It can be an excellent entrance to the site or the territory of the house. Try installing an arch above so that it becomes a kind of tunnel on the way from one part of the site to another (a pergola is perfect for this).
Advice. For a small garden plot, bulky structures are not suitable, since they can simply visually reduce the area. The solution in this situation is a trellis; it will perfectly decorate the garden area and at the same time it can be used as a gazebo by adding a small bench with soft cushions to the arch.
An existing one (for example, a concrete or tiled area) can serve as a foundation for an arch; ordinary soil would not be a worse option. The most important thing is to prepare the basis for installing the arched structure. The work site must be carefully cleaned, leveled (if we are talking about an earthen surface), the dimensions of the structure must be transferred to the site and markings must be applied.
Installing a wooden arch
The wooden arch is very easy to install. For this we need: wooden beam about 4 cm thick (at least), laminated wood about 10 cm, nails, crushed stone, glue.
Schematically, the order of work is as follows:
- We dig the rack bars into a pre-selected and prepared place.
- We pour crushed stone into the base of the wooden posts, and it is advisable to treat the wood remaining above the ground surface with resin or burn it.
- We fasten the upper parts of the racks with a crossbar in the shape of the letter U, and we connect the sides with jumpers like staircases using screws.
- On top of the resulting structure we mount an arched crossbar, which we fasten in the same way as the previous one.
- We cover the finished structure with a primer and paint it with a special composition for wooden surfaces.
- Remained finishing touch- decorate the arch with plants, flowers, etc.
Installing a metal arch
Let us consider, as an example, the process of creating a garden arch of a simple model: from two arc reinforcing bars connected to each other by metal rings. We will need the following materials: reinforcing bars (diameter at least 10 cm), primer, flexible wire, rope. So, schematically the order of work is as follows:
- To begin, we will make an arched blank from reinforcement. You can use a simple template of metal pins a quarter of a meter long, driven into the ground along the desired contour.
- Now we begin to create connecting rings for the already prepared reinforcement posts. We cut 9 pieces of reinforcement 90 cm long and bend them into rings using a pipe bender.
Advice. If you don’t have a special tool on hand for bending metal, make your task easier: use straight pieces of reinforcing bars as fasteners for the racks. This option looks a little simpler, but it is no less attractive and practical.
- We deepen the metal posts into the ground to a depth of at least 40 cm.
- We fasten the reinforcing rings-fasteners for the racks using flexible wire, rising from the ground level by at least half a meter. We keep the distance between the rings within 20 cm. The structure obtained in this way will be quite strong and stable.
- In order to protect the finished garden arch from corrosion, be sure to cover it with a primer and then a layer oil paint. This completes the process of creating an arched structure.
While reading this material, you could see that creating a garden arch is a simple process that even non-professionals can do. Use the information received wisely and you will be able to create a high-quality decorative structure for your garden with your own hands. Good luck!
Garden arch made of rebar: video
Garden arch for climbing plants: photo


