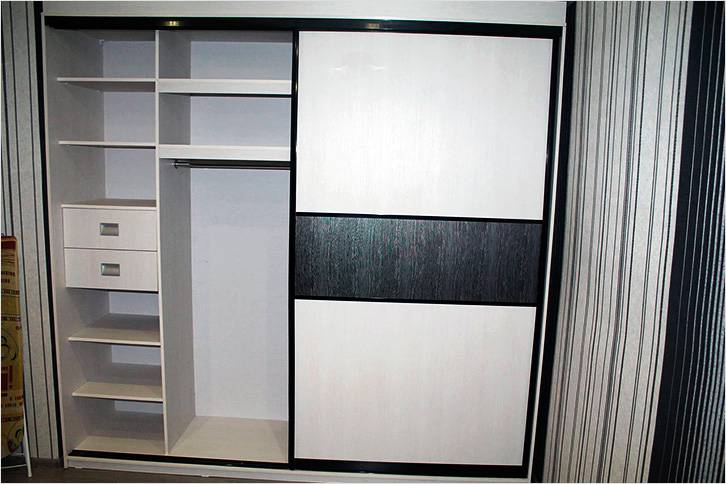
Furnishing the home is the final step that combines all renovation and design stages. IN modern furniture several must be combined the most important qualities: operational functionality, appearance as such, compliance with the overall design idea.
Coupe systems or their elements are present in almost every home. The convenience and functionality of this furniture is undeniable, and for such design styles as minimalism, urban, hi-tech, it is completely irreplaceable. The article provides comprehensive recommendations for making your own wardrobe.
Advantages
Having considered the pros and cons of this class of furniture, we will get a complete picture of modern concept wardrobe with compartment door opening system.
| Advantages | |
| Ergonomics | Standard designs require “blind” areas for opening. In coupe systems, doors move in one plane along guides when opening and closing. Significantly saved space. |
| Capacity | The ability to arbitrarily configure the internal space (filling), which determines the capacity. The only requirement is ergonomic feasibility. |
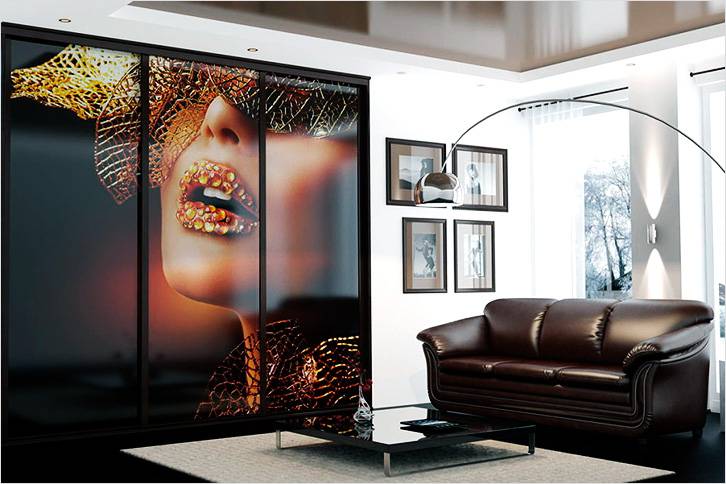
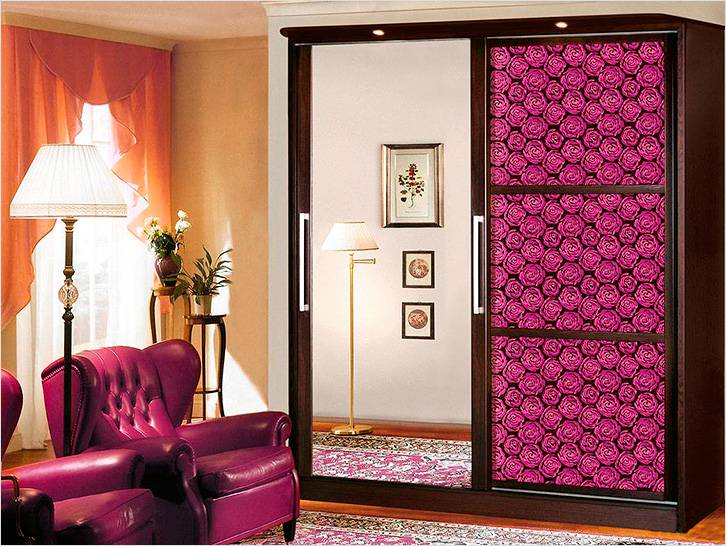
| Versatility | Fits into any interior. Various ways design and finishing allow you to install a wardrobe in the bedroom, kitchen, living room, etc. |
| Functionality | Inside, unlike ordinary cabinets, you can store large items and household appliances. Build in various devices - ironing board, workbench, tabletop, etc. |
| Ideal solution for narrow spaces | For narrow aisles and corridors, a sliding wardrobe is often the only solution. Only it can be placed in such places and used comfortably. |
| Zoning | Dual functionality. Using such furniture, you can easily zone a room, that is, it can also serve as a partition. |
| Variety of designs | No restrictions on internal content. A large number of materials for the manufacture of facades, which allows you to realize any design idea. |
| Using a Mirror | You can install a mirror on the facade. This will improve the functionality of the room and visually expand the space. |
| Reliability during operation | Doors that move along guides will last much longer than doors that open on hinges. |
There are significantly fewer disadvantages, but they are there:
| Flaws | |
| Failure of the sliding system | This only happens if you purchase a low-quality sliding system. |
| Need for additional lighting | If the dimensions are large, additional lighting will be required; it significantly increases operational comfort. |
| The need to clean the guides | Over time, the lower guides become clogged, which can interfere with the movement of the roller. Therefore, sometimes you have to clean the grooves of the guides. |
| The mirror gets dirty quickly | If a mirror is used in the decoration, then it will have to be washed frequently to remove stains and hand marks. |
| No possibility of rearrangement | When designing, dimensions are related to the specific location of the cabinet. Not suitable for those who like frequent rearrangements. |
Varieties by shape
There are several varieties, they have structural and external differences:
- built-in;
- free-standing;
- corner;
- diagonal-angular.
Let's consider each of them separately.
Built-in
When constructing such a cabinet, there is no top, back wall and base. Only partitions are manufactured. The entire structure is screwed directly to the ceiling, walls and floor. Metal corners are used for fixation.
This stationary design, and it is an invariable part of the created interior.
Standing separately

Has sides, top, bottom, back and sliding doors. This is a complete separate piece of furniture. It can be moved and is not tied to any design elements.
Angular

Great solution for small apartments, where every meter is precious. Repeats the shape of the corner and allows you to rationally use the space of the room.
Diagonal corner

This is a type of corner, but the facade does not follow the shape of the corner, but is made diagonal. The increased capacity of this design determines its frequent use as a dressing room.
Material used
Furniture with sliding door systems is made from a variety of materials. The table shows the main ones:
|
Material |
|
|
|
The most common and frequently used. Chipboard board, having a low price, is characterized by sufficient strength. A huge selection of textures, colors, patterns allows you to produce a façade for any design solutions. There is one, but significant, drawback - it is difficult to finely process. For this reason, mostly simple structures are made from chipboard or laminated chipboard. |
|
|
Eco-friendly material, easy to process. The variety of facade coatings is no less than that of chipboard. Practical and affordable material. |
|
|
An expensive option, but natural wood will last a long time. A magnificent decoration in any interior. |


Types by design
The classification according to design differences is as follows:
- built-in;
- case.
Built-in . There is no need for top, bottom or sides. Their function is performed by the walls, floor and ceiling of the niche. For manufacturing, you can use plasterboard, which will reduce total costs on the product.
Corpus . The main difference from a regular cabinet is the method of opening the doors. If necessary, you can move it. Transportation (moving) without disassembly is possible. The downside is the increased consumption of materials, since the side, bottom and top walls, and the rear part are made.
Now let's take a closer look at the organization of the internal volume of the cabinet.
Design features

When designing, ergonomic and operational specifics should be taken into account.
Let's look at the main structural elements wardrobe
Door width
The choice of door size depends on factors:
- Manufacturers of sliding systems are limited to certain sizes. Some systems make it possible to produce a sash up to 120 cm wide;
- The width is affected by the number of internal sections. Each section must be freely accessible;
- The choice is influenced by personal preferences. There are no special rules, unless it goes beyond the restrictions listed above.
The optimal width, worked out in practice, is from 600 to 900 mm. This size provides the most comfortable conditions use.
Sliding systems

Sliding systems are classified according to two main criteria:
- profile material;
- principle of extension.
To manufacture the profile of the moving system, aluminum or steel is used. The material of the sliding system is selected, as a rule, the same as that used for the door frame. Steel structures cheaper, but in most cases preference is given to aluminum.
Structurally, two types of systems are produced - bottom-mounted and top-hung. In the lower-support type, the door with rollers moves along a rail. In the top-hung system, its rollers move along the upper guides.
Height

The height is arbitrary. The only limitation may be the ceilings or the small stature of the owners of the apartment/house. Structures are made from ceiling to floor, as well as smaller heights.
The standard length of the wall material used is 270 cm. Standard apartment has a ceiling height of 260–270 cm. Almost identical dimensions make it possible not to cut or build up structural elements.
For ceilings higher than 270 mm (if you want to have a floor-to-ceiling closet) there are two solutions. First, the sheets of material are joined to the required length. Secondly, the mezzanine is assembled. Sheets can be joined using high-precision equipment from companies specializing in such services.
Shelf depth

The depth of the shelves determines the everyday usability of the cabinet. The optimal and recommended figure is 60–70 cm. Usually in the closet there is a rod for hangers, the width of which is about 48 cm. A depth of 60 cm will completely eliminate contact inner surface doors and clothes hung on hangers. Most furniture accessories (boxes, trays, etc.) have a width of 50 cm. The shelves should not be made deeper, since it will be inconvenient to get “under the wall” when placing things.
The dimensions of the premises do not always allow the installation of furniture with the maximum recommended shelf depth. But there are also restrictions on the minimum depth. The best option may be a depth of 40 cm. Considering that 10 cm goes under the mechanism sliding doors, you can purchase small hangers 30 cm wide. As an option, installation hanging rod(barbell), perpendicular to the doors and the back wall, in this case, the width of the hangers placed is not limited.
This solution is much better than completely abandoning the installation of a cabinet, especially since even such a “narrow” design is an ideal solution for small apartments.
Length
When designing, the length of the cabinet is selected in accordance with the location of its further installation.
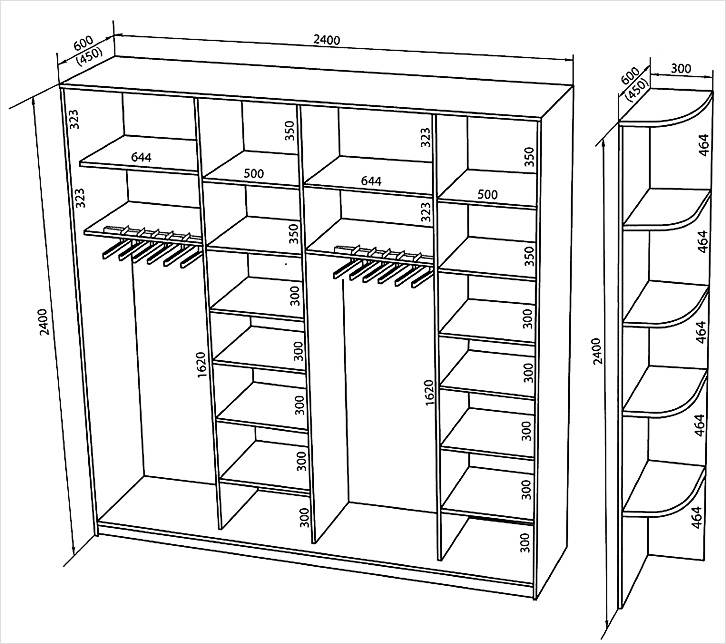
Height of shelves and rods
![]()
The height between shelves is 250–350 mm. The selection rule is simple: greater depth of shelves means greater distance between them, less depth means less distance. This dependence is associated with ease of access to stacks of linen located deep in the shelf (near the back wall).
When designing a mezzanine, you should take into account the size of the things intended to be stored on it. If these are suitcases, then the height of the mezzanine should be equal to the height of the suitcase, plus a small margin.
The mounting height of the hanger bar is determined by the length of the clothing placed on it. The maximum height will be equal to the longest item. Average length of typical wardrobe items:
- shirts - up to 100 cm;
- jackets - up to 110 cm;
- long clothes - up to 130 cm;
- raincoats and fur coats - up to 150 cm.
These calculations are approximate, since the length of clothing depends on height, style and other parameters.
Video:
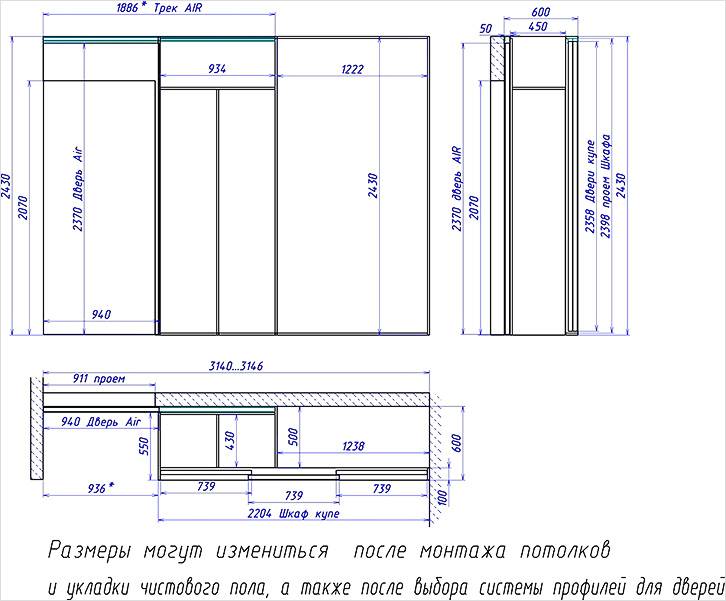
Schemes and drawings
The diagrams show various options furniture assembly projects and technologies:


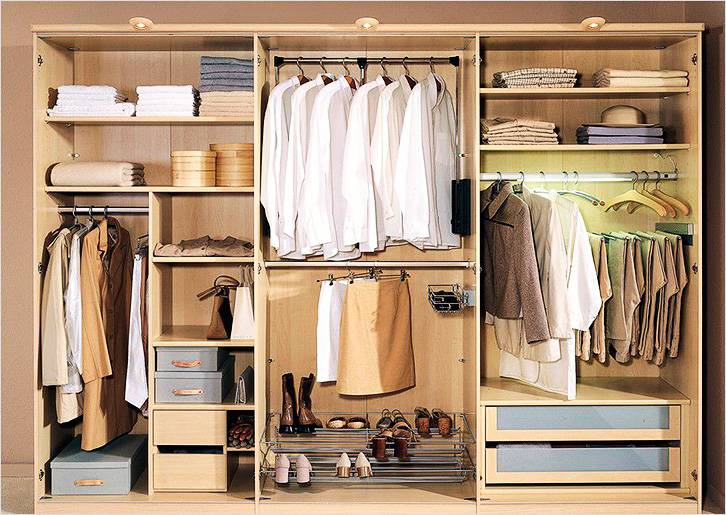
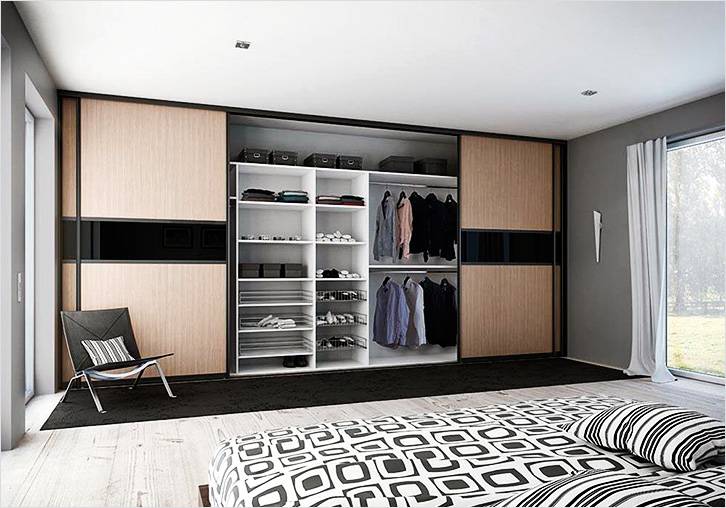
Device inside
When designing the filling of a sliding wardrobe, first of all, zoning is done internal space. The figure shows a universal diagram of the breakdown into storage areas for various things:
![]()
When purchasing a finished product, you will have to agree with the filling configuration proposed by the manufacturer. Self-production will allow you to take into account as much as possible the dimensions, functionality, location of various zones and much more, which, ultimately, will ensure maximum operational comfort.
Below is a table with examples of frequently used elements of internal filling and zoning of a sliding wardrobe with their help.
| Zoning | |
|
|
Shelves are one of the main filling elements. They can be stationary and retractable, solid and ventilated, half and full depth, etc. |
|
|
Drawers are the second most important element of the cabinet. |
|
|
Hanging rod - necessary for clothes on hangers. The material used varies, most often metal. |
|
|
Convenient storage baskets. All things are clearly visible in them, which creates a certain convenience. |
|
|
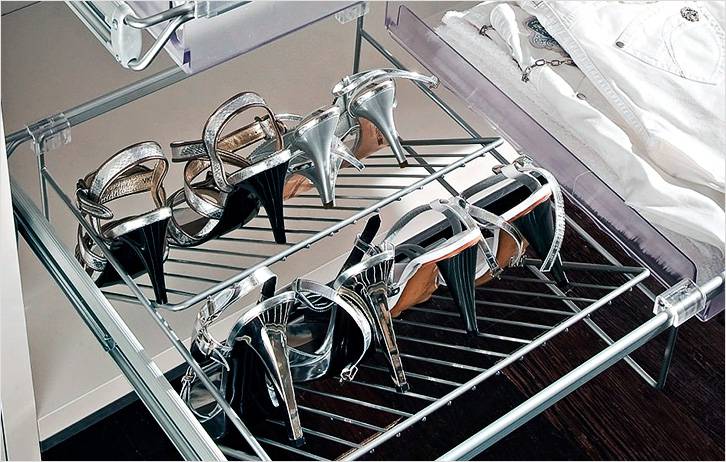
This device is called a trouser. Pants are always ironed and ready to wear. |
|
|
Bar (hanger) for storing ties - convenient to choose, do not wrinkle, correct suspension protects against shape changes. |
|
|
Convenient placement of belts, as an alternative - storage on a shelf in rolls. |
|
|
Compact and convenient storage underwear. |
|
|
Placing bed linen, towels, and some clothes in piles on shelves. |
|
|
A significant part of the internal volume is allocated for storing blouses, light blazers, and short sundresses. A pipe with hangers is installed in the opening. You can make several such sections - for short and long things. |
|
|
Department for accessories - bracelets, watches, glasses, etc. It is recommended to store these items in drawers. Inside, the space can be divided into separate cells. |
|
|
Shelves for storing shoes. In the upper (mezzanine) part you can place shoes in boxes. |
|
|
Hooks, hangers, carabiners, rings and other accessories for bags. |
| Travel suitcases | Place rarely used (once a year during vacation) suitcases on the far (top) shelves or mezzanine. |
|
|
One of the options for bed linen. Shelf width up to 80 cm, height up to 60 cm. |


Characteristics of the main filling elements:
- retractable and stationary shelves. For convenient use, the distance between them is from 350 to 450 mm;
- drawers. Two types - fully retractable (100%), partially retractable (80%). They can be equipped with closers that provide smooth semi-automatic closing of the drawer;
- mezzanines, known as hard-to-reach shelves. Located at the top. Rarely used and bulky items are stored on them;
- Barbells are needed for hangers. Mounted along the width of the cabinet;
- pantographs or special “furniture elevators”. Thanks to them, clothes are stored at the required level and can be easily pulled out using a special rod. They can be electrical or mechanical;
- Baskets are convenient for storing small items. Equipped with rollers and guides.
Facades
Thought out to the smallest detail internal filling will be in sharp dissonance with poorly chosen facades. It is the facades that give the entire cabinet a special finished look. Let's consider several options for their implementation.
Mirror

A mirror visually enlarges the space and makes the room brighter. Can be whole or divided into several parts. Heavy weight mirror determines the need to select high-quality and reliable rollers. Such a facade creates additional maintenance troubles - the mirror quickly gets dirty. It will have to be wiped and washed regularly, especially if the family has small children.
For facade mirrors it is used various finishes- sandblasting patterns and drawings, spraying of various shades (silver, emerald, gold, etc.) for glass, printing color images and much more. For safety reasons, the inside of the mirror is covered with shockproof (armor) film. If the mirror breaks, the pieces will not fly away.
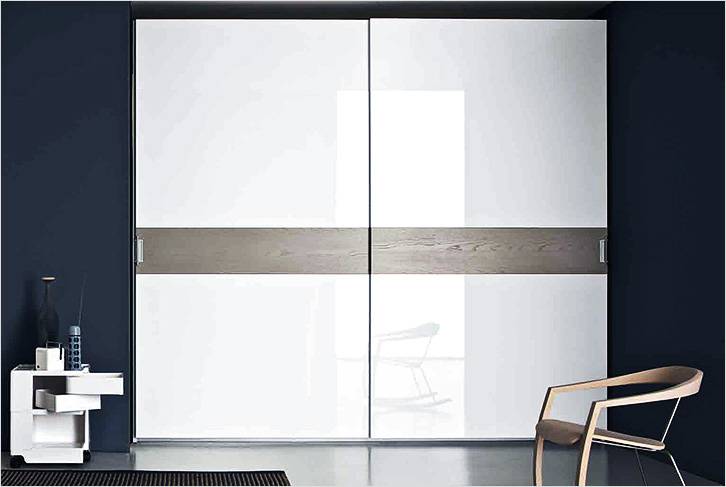
Glass

Glass is no less popular than mirrors; facades are equipped with unbreakable ones. Mainly used frosted glass with an image. Vertical and horizontal stripes that divide the canvas into separate squares look original.
MDF and chipboard

These materials are laminated with film. The facades look massive and heavy. To install them you will need reliable roller systems. One of the advantages is a huge selection of colors, shades and patterns, texture - from matte to bright glossy.
Photo printing can be applied to MDF and chipboard facades.
These are the main types of facades used in the manufacture of sliding wardrobes. You can combine them with each other. This article contains photographs with a considerable number of original ideas for the production of facades.
Step-by-step manufacturing instructions
Gluing the edge tape
After cutting all the elements, the edge tape is glued to the ends of the slab. Sequence of operations performed:
| Instructions for gluing the edge to the end of the workpieces | |
|
|
If you don’t have an assistant, you can use a simple trick. You will need a small box and a quick-release clamp. The clamp presses the board to the box, ensuring the stability of the workpiece and the convenience of gluing the edge tape. |
|
|
One side of the edge tape has an adhesive surface. Warm up to high temperature it is easy to glue to the workpiece. |
|
|
Cut the edge to the required length. Leave a margin of 1 cm at the edges. After gluing, you can cut it with ordinary scissors. |
|
|
For gluing position temperature sensor set the iron to “2”. |
|
|
For safety reasons, wear left hand two gloves. There should be no pellets on the palm. |
|
|
Use the iron to move along the edge tape, and hold it with your left hand (flat). |
|
|
We move the iron in the opposite direction, at the same time using a gloved hand we firmly press (smooth) the edge tape. |
|
|
Use your hand to smooth the edge a few more times. |
|
|
Using a special roller. Iron on the edge tape and then roll it with a roller. Very comfortably. |
|
|
Once the tape has cooled down, carefully cut off the remainder from the end with a sharp knife. |
|
|
We get a cut like this. |
|
|
We repeat the procedure for all ends of the workpiece. We measure the tape with a margin of 1 centimeter, from each edge. |
|
|
Glue it with an iron and smooth it out. |
|
|
Cut off the cooled edge. The edge on the adjacent edge has already been glued; we make the cut very carefully. |
|
|
We cut off the longitudinal remains of the protruding edge on all sides. |
|
|
Result. Gluing edge tape the ends of the remaining blanks. |
|
|
All cuts are sanded with a special whetstone. Interior It is filled with foam rubber, and the outside is filled with fine-grained abrasive. |
|
|
Grinding of cuts is done only with longitudinal movements. |


The processing of the main elements is carried out similarly.
Assembly
According to the project, the details are cut out. It is better to do this operation in a workshop on a special formatting machine. After cutting and gluing the edges, we assemble the cabinet:
| Frame assembly instructions | |
|
|
To work, you will need to assemble an additional device consisting of a metal strip and two pieces of board connected at an angle. It turns out a corner with a metal guide. You will also need two quick-release clamps. Using this device it is very convenient to connect workpieces at right angles. |
|
|
We check with a square - it should be 90˚. |
|
|
Set aside 70 mm from the top edge. |
|
|
In the example, a 16 mm slab is used, therefore, it is necessary to retreat 9 mm from the edge. Why not 8 mm? Because the plate protrudes 1 mm beyond the edge, forming a small side. The middle of the end of the adjacent plate is at a distance of 9 mm. |
|
|
Drilling mark. |
|
|
A similar mark is placed below. |
|
|
Using a drill, we make holes for the fasteners. |
|
|
A special drill replaces three at once. It allows you to make the main hole, the collar and chamfer in one operation. |
|
|
Drilling. |
|
|
We tighten the confirmation with a screwdriver. |
|
|
Having secured the sidewall, we mark the installation locations for the shelves according to the design. |
|
|
Next, using a square, place marks on both sides under the holes for attaching the shelves. |
|
|
Markings along which holes for confirmations will be drilled. |
|
|
The device assembled at the beginning of work is convenient to use for fastening shelves. Using a tape measure, measure 1/2 the thickness of the slab. The thickness of the plate is 16 mm, so we retreat 8 mm from the mark. |
|
|
At this level we install the shelf using quick-release clamps. |
|
|
Here you can clearly see that the mark is in the middle of the end of the workpiece. Everything is ready for drilling. |
|
|
Let's drill. |
|
|
We tighten the confirmations. |
|
|
We install the remaining shelves in the same way. |
|
|
We install the cross member. And we fasten each shelf with confirmations. |
|
|
Having secured the crossbar with a quick-release clamp, we twist it with confirmations at the top and bottom, then secure each shelf. |
|
|
This is how the lower part of the wardrobe is assembled. We clamp the strip from the slab with a clamp and secure it at the end with a confirmat. |
|
|
We drill shallow holes from below for installing furniture legs. |
|
|
We tighten the metal sleeve with external and internal threads. |
|
|
Using a hexagon, tighten (recess) to the required position. |
|
|
We screw the leg with the plastic support into the sleeve. Thanks to this, the furniture can be moved and leveled. |
|
|
Two parts support leg assembly. |
|
|
After assembling the cabinet, a fiberboard sheet is attached to its back side with ordinary nails. |
|
|
We start fixing the fiberboard from the top. By tilting the cabinet from side to side, we achieve a 90˚ angle between the side panel and the top bar. We nail the sides and bottom of the fiberboard sheet. |
|
|
During assembly, no such plastic furniture corners were used. Why? The use of confirmat is much more practical, since it is screwed into the slab a few centimeters and reliably connects the structure, giving it additional rigidity. |
|
|
We close the confirmation hats with a decorative cap. |


Using the same operating sequence, you can assemble a wardrobe of any configuration.
Video:
Making doors
The door consists of a frame, metal guides and a roller system. You should order it from a company that professionally deals similar systems. Specialized software Based on the given dimensions, it will calculate all the elements and issue a complete specification for assembly. Mirrors or slabs from other materials are cut to the size of the doors for mounting in frames.
| Elements for sliding system | |
|
|
|
|
|
|
|
|
|
|
|
|
|
|
Vertical racks/ handles for the side parts of the door. |
|
|
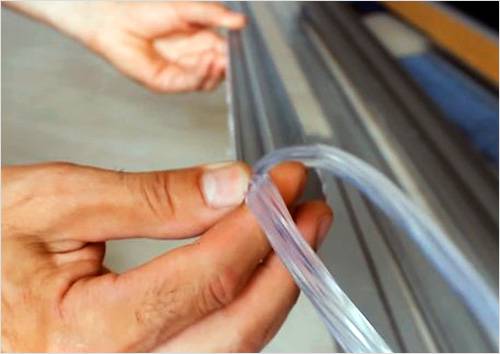
Sealing rubber for the mirror. |
|
|
Self-adhesive brush to soften the impact of doors when opening/closing. |
|
|
|
|
|
|
|
|
Brackets for fixing doors in extreme positions. |


The main parts for assembling the doors are made of aluminum. All metal components must be covered with a protective film to protect them from scratches during transportation.
Assembling the sliding system
Let's consider step by step assembly door leaf. In our example there will be two mirror doors.
| Door assembly instructions | ||
|
|
The door is located in a horizontal position and provides free access from all sides. | |
|
|
In the upper part of the vertical post, which also serves as the door handle, we drill two mounting holes. | |
|
|
The lower one has a diameter of 6.5 mm. | |
|
|
The top hole is 10 mm. The upper door profile and the roller will be attached through it. | |
|
|
The lower part of the same vertical profile. The upper hole is 10 mm, the lower one is 6.5 mm. The distance from the edge of the first hole is 7 mm, the second is 43 mm. The lower roller will be attached closer to the edge. The second hole is for the screw connecting to the profile. | |
| Profile installation | We fix the rubber seal on top with a profile, carefully inserting it. | |
|
|
We perform the procedure sequentially on all faces. Rubber compressor We don’t cut it off at the corner, but lay it continuously around the entire perimeter. | |
|
|
This screw does not tighten completely. Later the upper rollers will be installed into it. | |
|
|
Install the upper rollers and tighten the screw until it stops. | |
|
|
Rubber seal installed at the bottom of the door. | |
| The screw with the top roller is also tightened | At the top we attach the second pair of rollers. | |
|
|
Install the lower roller. We press the spring on the roller and carefully insert it into the hole, securing it with a screw. | |
|
|
The screw is tightened with a hexagon. | Ready wardrobeWardrobe with first door installed. |
|
|
We assemble and install the second door in the same sequence. | |


Additionally, we install auxiliary elements - a pipe for hangers, etc.
Video:
 In the end it should look like this
We invite you to familiarize yourself with the diagrams and drawings. They will help you create your own project.
Video:
Video:
Photo


Problem limited space and the desire to use every meter of living space, set a person with the task of what furniture to choose for the house, and how to arrange it. Convenience and comfort of use will depend on how rationally the interior elements are thought out.
In addition, not every cabinet can be as functional as possible and act as a decorative element. Only a corner will cope with this task. After all, it occupies a place that usually remains unused - a corner of the room, without cluttering it at the same time. You can buy, or you can make a corner cabinet with your own hands.
Basic corner cabinet configurations:
- Triangular shape.
- Trapezoidal shape.
- Shape in the form of the letter "G".
- Five wall shape.
Triangular and trapezoidal shapes are difficult to self-production. The fact is that there are diagonal elements that require individual schematic detailing and the use of special fittings. Preparation necessary materials It is recommended to carry out in the presence of a specialist measurer.
Corner cupboard five-wall is the most common configuration. Used in all kitchen models corner cabinets. Two planes adjoin adjacent walls, forming an angle, while the facade consists of three planes, the middle of which is the door leaf.
The shape of the corner cabinet, in the shape of the letter “L”, is quite functional and compact. It consists of two double boxes placed in a corner. The advantage of this model is that it saves consumables compared to installing two separate products.
Doors in any configuration can be hinged or compartment. In the first case, the width of the door leaves should be minimal - up to 450 mm, in order to avoid excessive load on the hinges. In the case of compartment doors, their width cannot be narrower than 450 mm, with a total height of 2200 mm. It is necessary to maintain the ratio of the width of the doors to the height of the facade - 1:5, for normal operation of the cabinet.
 Corner cabinet with swing doors
  Corner wardrobe with sliding doors
How to make it yourself
Corner cabinets with hinged doors vary in the number of doors: two doors, three doors, or more. They open using handles or a special mechanism by pressing the door leaf. The material used is wood or chipboard. The surface can be covered with plastic, enamel, paint. The product is decorated with gilding, carvings, mirror and glass inserts. For ease of use of the cabinet, on its internal or outside, lighting is built in.
Before you start work, you need to decide on the configuration of the product and draw up a drawing of the corner cabinet. It should show the shape of the cabinet and its dimensions, and include the internal elements. The dimensions of the corner cabinet and its configuration directly depend on the size of the room where it will be located.
 Examples of cabinet sizes
 Required Tools and material:
- Chipboard, boards or MDF;
- screws, dowels;
- accessories;
- profile;
- drill and hammer drill;
- screwdriver;
- roulette;
- building level;
- electric jigsaw or hacksaw;
- hammer
- glue;
- mirror.
There are several things to consider important features, before starting to manufacture the cabinet:
- Boards Chipboard is better take ready-made ones, according to size, or resort to the help of a professional to cut them. It is very important that the parts fit together as much as possible during assembly. They must be even and exactly in size.
- Don't skimp on accessories. It must be of high quality and be a complete set. This is especially true for elements for sliding doors, the doors of which must open smoothly and not jam.
- It is worth paying close attention to the surface of the ceiling and floor. It should be smooth. For example, for a built-in wardrobe this is of primary importance, because if this rule is not followed, the structure will not fit into the opening.
The classic five-wall wardrobe, with a square base and a cut corner, consists of two double parts. Two planes built into the corner are located at an angle of 90° to each other and form the back wall. On either side of them are two vertical panels forming the sidewalls. The upper and lower plane are the tray and the cover of the structure. Inside the corner cabinet there are shelves and rods of different sizes for clothes. Hinged doors complete the look of the product.
Such a separate cabinet, in most cases, looks bulky. Therefore, if possible, it is better to install the built-in corner system. The advantage is that installation costs less material, due to the absence of upper, lower and rear modules. In addition, the usefulness of using free space higher than that of a free-standing structure.
Preparation
In order for the work on making a corner cabinet to proceed correctly and without errors, you need to follow the step-by-step instructions:
- first, you need to decide on the place and room in the house where the product will be placed;
- take measurements of the space and put them on the diagram;
- determine the configuration of the product and put it on the drawing;
- indicate the dimensions of the corner cabinet on the drawing and compare it with the dimensions of the prepared space;
- determine the required amount of material and tools and prepare them.
The dimensions and internal contents will depend on what you would like to fit in the closet and on the layout of the room. It is better to choose the configuration based on your skills in manufacturing furniture structures and cost consumables. The height of the shelves and the level of the bar must be placed at such a level that it is convenient for use not only by yourself, but also by all family members.
To make design easier, you can use computer program PRO100. She will help considering required sizes, and calculate materials and accessories.

The diagram of the corner cabinet is drawn by hand, starting with the side panels, which will be load-bearing. They must be made from solid boards. Then, the height of the cabinet is determined - from 2200 mm if space is left above it, and higher if the cabinet is ceiling-height. In the first case, you need to install a solid top sheet and a bottom sheet of the same type.
After this, the horizontal parts of the cabinet and shelves with rods are determined. It is better to place large shelves on the upper level of the closet, and a clothes rail in the corner section. Next, the diagram shows the cabinet opening mechanism (). Upon completion, details are applied to the drawing (mirrors, handles, painting).
Assembly
The assembly process corresponds to the sequence of drawing all elements in the project. All wood parts must be selected in the store and then cut to size. It is recommended to buy high-quality fittings - German or Turkish. Depending on the type of cabinet filling and door opening system, the following are purchased: handles, hinges or a sliding system, confirmations, closers, legs, dowels and hooks for clothes.
A corner cabinet actually consists of 2 or more boxes. When preparing these boxes, it is very important to maintain the proportions of height, length and depth. Otherwise, it will turn out skewed and the door mechanism will not close. The modules are fastened with ties. This steel fastener, made of a screw and a nut, prevents the product from loosening and firmly secures the structure, forming a single ensemble.
When installing a hinged cabinet opening mechanism, the doors are secured with canopies and can open in any convenient direction. In case of sliding mechanism, along the top and bottom of the opening, guides are attached along which they will move door leaves.
Brief assembly instructions
The corner cabinet, depending on its configuration: built-in or free-standing model, is installed in different ways. But there is universal instructions How to make a corner cabinet with your own hands, which you need to follow:
- According to the drawing, you need to cut the material and check the availability of components.
- Place the legs on the bottom of the structure.
- Attach the side panels to the installed bottom using confirmations.
- At the upper ends of the side walls you need to drill grooves for dowels. Moreover, they should be located at the same distance from each other as the holes on the lid.
- Treat the dowels with PVA glue and secure them in the lid.
- Place the cover on the side walls.
- When installing the cabinet in the ceiling, the legs must be installed so that the lid rests maximum on the ceiling.
- After assembling the “skeleton” of the cabinet, you need to install hinges for swing doors, or guides for sliding doors. Hang the doors.
- Install shelf fasteners.
- Install shelves and other fittings.
- Decorate the confirmation hats.
Thus, you can make a corner cabinet yourself, following the instructions for preparing materials and assembling the product. After choosing the cabinet configuration, it is important to correctly draw up the drawing and manufacture the product according to the indicated dimensions.
A sliding wardrobe is a very popular type of wardrobe, because it is not only spacious, but also takes up quite a bit of space. This piece of furniture is quite functional.
In this article we will tell you how to make a wardrobe with your own hands.

What is a coupe?
The concept of a coupe first appeared in France during the age of horse-drawn carriages. At that time, the city streets where the common people lived were so narrow that it was not always possible to open the cart door. This led to the appearance of carriages with sliding doors in the 17th century.
It is believed that the first carriage-coupe was invented by the French carriage master Jeanto. Whether this is actually true is unknown.

The crew of the coupe was considered to be flirtatious and frivolous, because this type of transport was usually used for secret meetings with ladies. Some linguistic experts believe that coupe comes from the word “couple,” which in French means extramarital affair.

Over time, compartment doors began to be used for train cars. As for the furniture industry, a wardrobe is any wardrobe with sliding doors.

Types of wardrobes
- Sliding wardrobes can be:
- Radial;
- Built-in;
- Hull;
- Straight;
- Corner.

Do-it-yourself built-in wardrobe technology
Instructions on how to make a wardrobe with your own hands:
- Selecting the material;
- We determine the degree, nature and technology of how the filling of the cabinet will be placed;
- We design the doors, choose the suspension option;
- Choosing a technology for fastening shelves;
- Preparing a niche;
- We make the necessary measurements and drawings;
- We purchase necessary materials and accessories;
- We cut out the required blanks;
- We assemble the wardrobe and install interior lights if necessary.
What is a wardrobe made of?
Before you start designing a cabinet, you need to decide on the material, because it directly determines the technology by which this piece of furniture will be manufactured.
Made of wood and lining
Wood is classic material for making furniture. Today it is very prestigious to have furniture made from natural wood. But for a wardrobe, this is not the best choice, since due to higher humidity the wood may begin to deform.

If you still want to make a wooden cabinet, then choose straight-grained wood that does not have strands, knots or cracks. It must be treated with special compounds.

The lining can be made of plastic or MDF. There is no need to prepare it in advance. But the frame of the cabinet doors will still have to be made of wood.

From plasterboard
It is possible to make a cabinet from gypsum plasterboard, but it is quite difficult. In fact, it will be a building structure, not a piece of furniture.
Made from laminate, MDF, fiberboard
This optimal materials for the manufacture of this type of furniture. You can make a wardrobe out of these at home easily and simply. They have all the advantages of wood and none of its disadvantages.

There is just one caveat: it is advisable to choose fibreboard with a density higher than average.
What is the filling made of?
The filling determines how the cabinet space will be distributed, where the shelves and drawers will be located. Experts advise following the following recommendations:
- Wet place on the side;
- The necessary small things are at eye level;
- Dry – at the top;
- The most expensive thing is to distribute it into boxes.
The purpose of planning the filling is to achieve the smallest width of the shelves, which will be required when calculating the doors. The distribution of the interior space of the cabinet must be approached responsibly.

The contents of the closet significantly influences how comfortable, convenient it will be and how many years it will last.

Wardrobe doors
Doors are the most complex part of the cabinet and require the most responsible approach. It is necessary to decide how many sashes will be needed and what width, the design of the suspension and stoppers.
Note!


The fewer doors there are in a closet, the more convenient it is to use. But this increases the risk of warping and stalling. The maximum width allowed for sashes is 60-70 cm.

In addition, the doors should not be wider than narrow shelf, otherwise, it will be impossible to get close to her. It is also desirable that the sashes overlap by at least 5-7 cm.
like this necessary thing, like a wardrobe, you don’t have to buy it, you can make it yourself. On the Internet it is easy to find drawings of the most different models sliding wardrobes. A hand-made cabinet will be a source of pride for you.

Photo of a do-it-yourself wardrobe


Note!


Note!


In an effort to save money, many people try to assemble furniture themselves. This also allows you to realize your plan without depending on anyone, and in addition, it increases self-esteem, like any mastery of a useful skill. There are certain rules for how corner cabinets are created.
Step-by-step instruction
Making furniture (the same corner cabinet) is not so difficult, you just need to know some key points and be able to use drawings.
Before you draw, you need to decide geometric shape future product:
- trapezium;
- letter G;
- triangle.
There is another option - with five walls.


If you decide to do it yourself, it means you need to think about all the dimensions, which wall, shelf or drawer will take how long.
Let's take the following values as an example: length and width are 90 cm, height is 250 cm. Using the assembly diagram, they calculate how much material will be needed and for what purpose.
Cannot be made homemade wardrobe without the following materials:
- self-tapping screws;
- glue;
- rollers;
- accessories;
- profile;
- mirrors (optional).
It is understandable to want to save money by working with your own hands rather than ordering a cabinet, but there are moments on which it is not advisable to save money. A big mistake is made by those who order bad videos or refuse steel profile due to its supposed high cost.


Be sure to prepare workplace, the corner cabinet can be assembled properly only in this case.
Tools needed:
- drill;
- building level;
- perforator;
- hand saw;
- hammer.
If you want to speed up the work and do it carefully, order cutting of boards in a professional workshop.

The size of the product should correspond to the area of the room where the future cabinet will be installed. Taken into account and basic principles. So, for outerwear there is no point in allocating a compartment already 80 centimeters and below 140 cm. This is where the diagram comes in handy; by drawing up and using it, you will not miss the dimensions, you will not find that there is not enough space inside for everything you need. The type of cabinet has very little effect on its assembly.
The first step is to attach the steel angles, which will hold the sides of the structure and will not allow it to deviate from the floor and ceiling. Finished parts are used to make a frame, rollers are attached to the door, guides are installed and the doors are worked on. On this last step They certainly control all actions by level in order to eliminate the slightest distortions.


Inner work no less important than the formation of the shell.
Here are the steps:
- install brackets;
- secure the shelves in their proper places;
- install the fittings (partitions first, then shelves and hangers, mirrors, and leave the handles for later).
Be sure to select fasteners in accordance with the base material (for brick and concrete, a dowel-nail, for wood - a nail or self-tapping screw, special dowels with spacers and a transverse notch must be screwed into aerated concrete). Vertical posts, inserted into the guides, should be secured with hangers. Stiffening ribs cannot be neglected; you should try to make them as large as possible - primarily in the places where a drawer or shelf will be placed. Replacing a metal profile with slats is permissible in exceptional cases, and the wood must be completely dry, otherwise shrinkage will deform the entire cabinet.


Without any special changes, this scheme is also used when assembling plasterboard cabinets, but there are still certain differences.
The starting point in this case is not the installation of the frame, but the marking of the floor and ceiling in accordance with the diagram. It is most practical to mark with a rubber shock-absorbing tape, and only then attach it as accurately as possible metal profiles. To make the cabinet structure last longer, be sure to use stiffening ribs by inserting them between the rack profiles.
If you don’t want to face a situation where something needs to be redone, perform the next step especially carefully. The blanks need to be placed at the points assigned to them and attached to the screws (screwing them in at a distance of 20 cm or so). Make sure that the caps go into the material by a millimeter, and install corners wherever you then attach the shelves.


Under no circumstances do it yourself or order doors for a homemade cabinet anywhere until the rest of the structure is assembled! Otherwise, you may find that the dimensions have changed somewhat, and you won’t be able to finish the job. After the doors comes the turn of the rods and (if any) lamps.
Then all that remains is to take care of decorating it (priming the internal and external surfaces, sealing joints gypsum plaster, applying crescent tape, installing paint corners, filling, drying, sanding and re-puttying, priming and finishing). What exactly to decorate - with tiles, other materials or simply paint - you need to decide on your own.


Design Features
Complaints about lack of space in an apartment or house are very common; Upon closer acquaintance with the home, it often turns out that certain corners are empty and there is no way to use them. Both problems can be solved at the same time if you make a corner cabinet - it is also much more economical than buying it in a store or ordering it from a furniture company.
Almost anyone can draw up a drawing, but professionals should cut out the parts in accordance with the idea, since this is too difficult and troublesome. The height of the section where fur coats, jackets and coats are to be stored should be flexibly adjusted to the height of those who will use the closet; everyone should be able to easily reach the crossbar. An important clarification: by placing the crossbar widthwise, you will achieve greater efficiency from the internal space.


A carefully thought-out diagram helps you to finally get your bearings on the dimensions; it is better to pay attention to it than to take unnecessary risks.
It is advisable to draw up a diagram while being exactly where the cabinet will be installed - then do not lose sight of any details. Even the smallest components must be reflected in the drawing. Mark the location of roll-out drawers, doors and baskets; the thickness of the material is indicated precisely, and the specification of any element is given. Yes, it's quite difficult - but there's no other way to do the job well. The installation locations of the lamps (if provided) should be noted immediately, both when drawing up the plan and when starting the work itself.


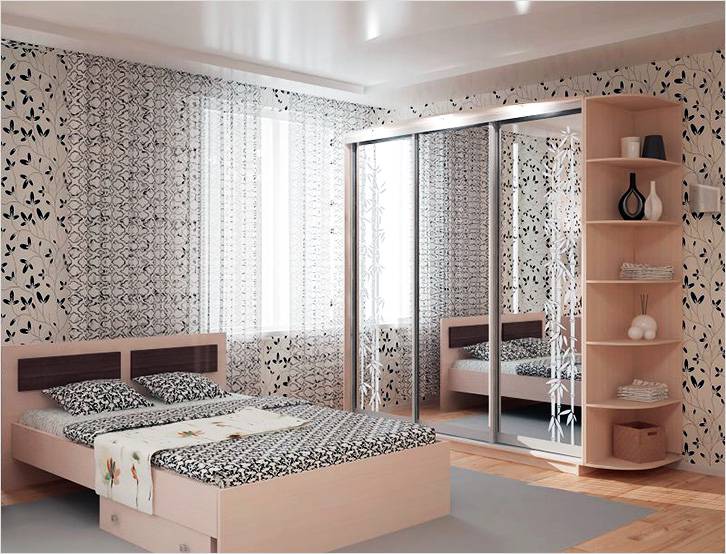
Styles and placement options
In the bedrooms with traditional interior Furniture made of MDF or fiberboard, covered with film, plastic layer or veneer, looks ideal. With the help of a mirror cloth it is not only possible to expand the room, but also to correct some visual problems. Many designers like to use high-strength glass, which allows them to show their imagination and realize the most daring projects.
Country style helps you feel light and at ease, relieve the burden of ever-plaguing problems. It’s easy to follow - avoid flashy colors and designs; the less processed the wood looks, the more accurately it matches the style canon.
Regarding the installation location, the best solution Most experts consider the place where the walls touch each other. If desired, you can completely cover one of the walls and leave the other free from furniture.


One of the placement options is kitchen, where the cabinet for culinary needs is placed. The arrangement of cabinets in any room has its own characteristics, but even against this background the kitchen stands out. There is always not enough space, and therefore any way to at least slightly increase the efficiency of space use is beneficial. Please note that measuring surfaces and ordering blanks only makes sense when the floor, walls, and ceiling are level - otherwise the cabinet may not fit in the given location.
To correctly design a corner Kitchen Cabinet, you need to use only two types of connections (at a right angle it should be connected to the countertop, and at an angle of 45 degrees - to the sink). Unlike the direct option, additional inserts should be provided (they perform two functions at once - mechanical connection of drawers and replacement of part of the facade). A ledge is made at the top and bottom.
It is impossible to correctly calculate the structure and estimate the consumption of materials for it, unless you take into account that the upper and lower elements are located in the gap separating the side lobes, otherwise it will not be possible to design the facade properly. The tabletop must have an identical geometric shape.


Models
It is very important to draw good diagram, choose a decent material and tool, connect all the parts as expected. But even before this work, you should decide what exactly you want, because the closet is different from the closet.
There are three main options:
- the simplest (for a pantry or other utility room);
- a complete product (such as wardrobe or linen option);
- exquisite top-class furniture.
If you don’t have sufficient experience and confidence in success, you should only try the first type of corner cabinets - even if the result is not impressive, but practice and the errors will not immediately be exposed to everyone. Remember that you can save money only if there is already a prepared niche or a solid and very level floor, otherwise leveling it will require too much effort and money.
Do not try to either excessively reduce or increase the size of drawers and shelves - this will equally make them impractical and inconvenient to use. When creating a model, you need to take care not only that the facade is beautiful and the frame is strong. Very important point- the presence of mezzanines, thanks to them a certain amount of usable space is added. Making a wall cabinet is no more difficult than usual; you just have to be careful to avoid mistakes.


Dimensions
A cabinet that is about to stand up internal corner(except single) they begin to design and assemble from the corner section, and only after it comes the turn of the wings and the extension stand. Two sections 80x80 (one for outerwear) is the bare minimum, without which there is nothing to talk about at all.
Corner kitchen cabinets are quite popular furnishing items. They do not take up too much space due to the unique location. Corner cabinets can be made at home from various materials. Of course, you can cope with the task by doing as indicated in the instructions below.
 To the positive aspects that distinguish the corner wall cabinet for the kitchen include:
- increasing the usable area of the room due to proper placement of furniture. Installation is carried out in places where it is difficult to install other options;
- high capacity and functionality. At first glance, it may seem that the corner floor cabinets are not so large, however, inside them you can install a variety of shelves and arrange compartments for organized storage food and utensils;
- the ability to choose optimal sizes, since floor-standing cabinets are varied in size. Almost every person is able to understand how to collect convenient cabinets to the kitchen, giving them the necessary parameters;
- variety of methods that can be used to decorate front panels. If desired, the kitchen floor cabinet can be decorated with glass inserts or patterns. This will make the finished product more attractive. However, Leroy Merlin kitchens already look aesthetically pleasing and do not require any additions;
- Possibility of combination with other items in the kitchen.
Main features of corner models
 The list of the most important differences includes:
- doors are not required. Upper cabinet The open type is great for storing beautiful crockery sets;
- variety of forms. The design can be triangular, L-shaped, or even trapezoidal (by the way, triangular variations have become very widespread in our time). Choice suitable varieties depends on the people who will use the lockers and their preferences;
- the lower part of the structure, located on the floor, is often used to create sinks. The sink placed on top will be convenient to use;
- it is possible to embed large views household appliances for its more efficient operation;
- used for facade decoration different methods. The most common options are applying a pattern to wall cabinets or their upholstery with any material;
- the lower cabinet under the sink is often equipped with legs, which makes cleaning the room easier;
- The upper corner cabinet can be equipped with carousel shelves to store dishes and other accessories.
Corner kitchen cabinet dimensions
The dimensions of kitchen furniture can vary widely. If they are included in kitchen set, then they have optimal sizes to combine with other set components. If the cabinet is selected separately or designed independently, then it must match the other elements.
For a person who is going to create a corner kitchen cabinet with his own with my own hands, it is very important to decide on the dimensions of the future product. They are poured depending on whether new item interior located on the floor or on the wall.
Wall cabinet corner type has standard dimensions. The width is 15-80 cm, and this parameter must correspond to the shape of the cabinet and its width. The standard depth is 35 cm, however, the calculation must take into account the depth of the drawers that will be located below. Carry out installation finished product recommended at a distance of 50 cm from the cabinets below. This - standard sizes any wall cabinet. This is necessary for those people who are interested in how to calculate corner option without making a mistake.
If we're talking about If you want to create outdoor furniture, it will have different standard sizes. They need to be taken into account when planning to make a kitchen drawing. For a compact room would be better suited a cabinet 50 cm deep, no more. The typical height is 85 cm (however, this can be varied in individual cases). The width can be 15-80 cm, with the optimal figure being 60 cm.
As a rule, the lower element is installed after the installation of the upper one has been completely completed. The owner has the right to choose furniture with or without legs.

Corner cabinet for sink
A cabinet under the sink is a very common option. Its dimensions can vary widely, as they depend on the washing parameters. You also need to take into account the method by which the structure will be secured. For such cabinets, standard sizes are calculated individually. The width can be more than 60 cm, and the depth can reach 80 cm (the downside is that such an interior element will be very difficult to use). As a rule, for large products a pair of facades is chosen. However, if necessary, assemble models with one door.
Taking measurements and drawings
The assembly of a corner cabinet cannot begin without creating a diagram. In turn, to carry out drawing work, you need to take measurements, and then create a kitchen diagram so as not to make a mistake. When performing this work, you need to take into account some nuances:
- The thickness of the walls should be chosen taking into account what objects will be placed on them. It is important to show on the diagram whether finished design accommodate household technical devices or not. The thickness of typical shelves is 18 mm. If you plan to store something heavy on them, it is better to choose blanks with a thickness of 21 mm or more;
- the depth of the finished products should not be more than 40 cm;
- You should not place the hanging cabinet too low if there is a stove directly underneath it, as the material will deteriorate under the influence of elevated temperatures.
According to the standards, the size of the corner cabinet is 60x60 cm, while the width of the front panel is 42 cm and the depth is 30 cm. Corner kitchen- This is an excellent option for small-sized apartments, where it is difficult to implement another arrangement option. Look at the photos presented on our website to find the perfect option.
1
2
3
How to make a corner cabinet for the kitchen?
- Select the appropriate material and purchase it from the right amount. Calculating the purchase volume is very simple if you follow the previously drawn up diagram.
- Prepare the tools necessary for the job. Their list includes: fasteners, hangers, sealing compound, furniture screed, drill, sandpaper, fittings and some other devices. It all depends on what model you plan to create.
- Prepare the basic details for the future cabinet. It is most convenient to cut them from solid slabs. Be extremely careful when performing this work, use electric tools to achieve best result. Alternatively, you can contact a specialized company that will make blanks at a professional level.
- Make through holes to insert dowels into them and fasten the individual elements that make up the furniture. Lubricate the chopsticks with adhesive to increase the reliability of the structure.
- Check the evenness of individual parts of the structure using a level.
- Screw the confirmations into the dowels using a hex wrench for this purpose.
- Install the legs and adjust the height. If the design does not require legs, this step can be skipped.
- Make holes in the side elements and place cross-shaped fastenings for the doors in them.
- On the walls located on the sides, attach elements for rails, due to which the boxes will roll out. Secure the rails.
- Attach the back wall.
- Secure the fittings.
Corner cabinet diagram Corner cabinet drawing
The presented instructions will help every person understand how to make a corner cabinet for the kitchen with their own hands; the various diagrams and drawings presented here will simplify the solution of this problem. If you complete all the work correctly, you will enjoy the finished cabinet installed in the corner for a long time.


