![]()
![]()
![]()
![]()
![]()
![]()
![]()
![]()
![]()
![]()
![]()
![]()
![]()
![]()
![]()
There are many reasons why a house has to be built on a site with high groundwater. But the consequence is always the same - if you do not install protection against flooding, then every spring water will flow to the site, eroding the soil, foundation and basement of the house.
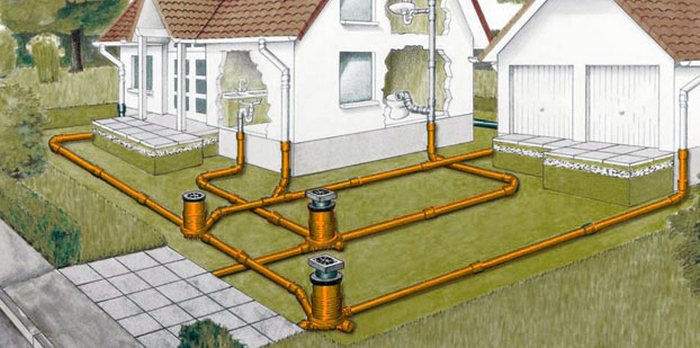
A properly installed drainage system and storm sewer will help solve the problem. If the groundwater level is known at the stage of purchasing the site, then it is most profitable to plan the arrangement of drainage and storm water along with the construction of the house itself. In such cases, you can save money and make stormwater and drainage in one trench.
![]()
Carrying out stormwater and drainage sewer Even at the construction stage, you can get rid of many problems in the future
Why are drainage and storm sewers needed?
The main task of “storm drainage” (i.e. storm system) - is to collect water from the roof - rain or melt water - using interconnected gutters and pipes. The storm drain consists of two parts - external (gutters under the roof) and underground (receivers and pipes that drain water from the house). The part that is located in the ground receives water from the roof and blind area, and then is discharged from the site.
Drainage sewerage is needed to collect excess water from the ground, i.e. drain it. The main task of drainage is to prevent the groundwater level from rising and to prevent flooding of the site.
Since both systems provide for the discharge of water into special storage tanks, the combined scheme of drainage and storm water looks very attractive in terms of functionality and economy. Collected water can be used for technical purposes, such as irrigation.
It is important!“In the same trench” does not mean that the same pipes are used for stormwater and drainage. This scheme is strictly prohibited for the reason that during seasonal increases in the amount of precipitation, the storm drain is systematically overfilled. If the same pipe works as a drainage pipe, then at best the drainage will temporarily cease to function.
Drainage and storm sewerage: types of these systems and their features
The systems have completely different structures, with only pipes and wells having similar elements. At the same time, they differ not only in structure, but also in the method of installation.
Drainage sewer (closed type)
Located only underground, accordingly, refers to closed type sewer systems. The only elements that are partially located above the surface are wells.
![]()
There are several factors that determine whether a site needs drainage system or not. It is done in the following cases:
if the aquifer is located high enough on the site;
the soil is clayey or loamy;
floods often occur in the area where the site is located;
a buried foundation is being built;
The site is located in a lowland.
If one of these conditions is met, then most likely without drainage there will be problems with flooding or increased humidity in the basement and foundation.
The drainage system consists of the following elements:
Drains(drainage pipes for sewerage, made of geotextile and having perforations through which water enters the drainage).
Sand traps(prevent pipes from becoming clogged if silt and sand frequently enter).
System drainage. Conducts water purified from silt and sand directly into drainage wells.
Several types wells.
After the wells, where the water is purified, it enters a common storage tank, and then it is either used for personal needs or discharged into the waste system.
Materials from which drains are made:
Plastic. Durable, not very expensive, very strong and resistant to low temperatures.
![]()
This is what a plastic drainage intermediate well looks like
On our website you can find contacts of construction companies that offer design and installation services for water supply and sewerage. You can communicate directly with representatives by visiting the “Low-Rise Country” exhibition of houses.
Asbestos cement. Cheap, but very short-lived - after just a few years, growths may appear on asbestos-cement pipes.
Ceramics. Before the advent of plastic, ceramics were the best option
Standards pipes:
marking SN 2-4 (depth up to 3 meters);
marking SN 6 and what goes above for depths up to 5 meters.
Video description
An example of arranging a drainage system is shown in the video:
Storm sewer system (open type)
“Storm drain” consists of two parts – upper and lower. The system includes:
gutters, into which water enters from the roof, and which lead it further;
funnels and vertical pipes. Water enters the funnels and then flows through vertical pipes into the lower part of the “storm drain”;
clamps to strengthen pipes when connecting them;
tees and swivel elbows, which connect horizontal and vertical pipes with each other; a funnel can also be attached there;
wells.
The system is assembled like a construction kit; you need to draw up a drawing of the system, carefully fasten the parts together and get a finished storm drain.
The most common types of gutters used are: materials:
-
plastic (PVC).
galvanized iron;
What the storm drain will be made of is selected depending on the structure of the house, its architecture and the material from which the roof is made. You can supplement the gutters with mesh and anti-icing cable so that in the spring ice does not clog the water outlet.
![]()
Installation of an anti-icing system on the roof of a house
For the manufacture of intermediate and main wells, the following materials are used:
PVC(expensive, but very effective option);
Brick and stone(durable, but must be assembled correctly);
Reinforced concrete rings(difficult to install);
Their design is exactly the same as that of a closed drainage.
Combination of storm and drainage sewers
The entire system is installed in one trench. The drainage and storm sewer scheme on the site is quite simple. Through the junction tee, water from outside and inside (precipitation and groundwater) will end up in the drainage well.
Drainage pipes run throughout the site, collect water and then it is discharged into wells, where it is pumped out of the site. In the “storm drain”, water is collected and discharged into a collector drain, after which, through the well mentioned above, it enters the main pipe system, which exists independently of the drainage, but in one trench (perforation is not needed for the storm system). Through the main pipe system, water enters the bypass well, in which, just like in the drainage, it is pumped out by a pump.
![]()
Usually the main well is located at the lowest point of the site and water from it has to be pumped out with a pump
Connecting stormwater and drainage systems is very beneficial, all that is required is a wide trench, all that is necessary is to designate a place for a drainage main, in which water from both systems will flow along different paths so that they are not overloaded.
Through the junction tee, water from the outside and inside (precipitation and groundwater) will flow into the drainage well.
The principle of operation of drainage and storm sewerage
Storm drainage: point drainage. Point elements are necessary for collecting precipitation, be it rain, melted snow, or melted hail. Water can be sent through gutters to the drainage system, and then sent into special ditches with grates, through which water will be removed from the site. This is very important when the building is located on a slope, since when choosing correct angle there will be no need to build additional gutters, but discharge water directly into the ditches.
With linear drainage, water is discharged through gutters and funnels into a special main system consisting of pipes that are suitable for drainage and storm sewerage. Further along this trunk system, the wastewater enters the collector, and then, depending on the project, the water may go into the storage tank, or maybe beyond the site.
![]()
In deep drainage, water from rising groundwater gradually in separate parts discharged into the well, and from there it is pumped out and discharged. This system has 3 types:
Horizontal;
Vertical;
Wall-mounted. If there is a basement in the house or ground floor, it is necessary to drain groundwater from them. Wall drainage works most effectively - a moisture collector is installed near the walls, and the wall itself is carefully waterproofed.
Care and instructions for use
Both systems require regular inspection and cleaning of silt, sand, clay and other debris. Seasonal inspections are required - in late autumn when the rainy season ends and at the end of winter to ensure that the drainage capacity is not compromised. Despite various filters, sand traps and debris nets, dirt still gets inside. They are found everywhere: in pipes, gutters and wells. If left unattended, the system will simply become clogged and stop functioning.
![]()
Timely cleaning of the drainage and storm water drainage system pipes at your dacha will help you avoid many problems.
To clean the pipe, just turn on the pump at maximum power and run ordinary water from a hose through the pipes; it will collect all the dirt and bring it into the well. You can pour water into the gutters and it will also collect all the dirt and then flow through the vertical pipes. The stronger the pressure, the more dirt and debris will come out.
Already in the pump, all the water is pumped out with an even more powerful pump or suction pump; when all the water runs out, it will be necessary to clean the walls. Most often, this ends with flushing, but if the system has not been looked after for a long time, it happens that you have to manually clean the walls and bottom of the well using a scraper. Therefore, regular cleaning is necessary to ensure that both systems operate reliably.
Rules for installing a dual system
Proper installation of a combined system must be carried out according to a pre-created project, which specifies the nuances regarding connection to the site and synchronization of the operation of wells, so that both drainage and stormwater work properly both in normal mode and during overload.
When installing, the following nuances must be taken into account:
Arranging a drainage system is quite an expensive pleasure. If something goes wrong and after a few years the drainage stops working, then you will have to spend no less money to restore it than to install a new one, especially considering that you will have to “pick it apart” landscape design. As a result, drainage installation should be done by professionals.
During the flood period, each of the systems will be overloaded. Since they collect moisture from different sources, then drains must be laid for each system separately. You can do this in the same trench, but at different depths. A common well can be used to collect water.
When digging trenches for drains, you should definitely take into account that the bottom of the hole will be covered with crushed stone and sand. This means that if it is necessary to place a drain at a certain depth, the hole must be dug deeper to the thickness of the layers of sand and crushed stone.
![]()
The pit for the drainage system well must be deep enough
Typically, water is collected in a storage tank (pit or reservoir), from where it is used for technical needs or pumped into reservoirs or simply away from the site. If perforated pipes are used for drainage, the outlet pipes are always solid. When combining them vertically in one trench, the perforated ones are laid on the bottom, and the regular ones on top.
If main and drain pipes are combined horizontally in a trench, then they are laid parallel, at a short distance from each other (so that if the main pipe is damaged, water from there does not enter the drainage system and overload it).
Video description
About the installation of a stormwater system and drainage in the following video:
Conclusion
Combined system drainage and storm sewerage is not only effective means to get rid of flooding of the area, but also a fairly advantageous offer, as it will simplify the system and save on the purchase of many additional elements. It turns out that the integrity of the foundation will be preserved and money will be saved on waterproofing and arrangement of both sewers separately.Today many people who have own houses decide to make a storm drain. It is worth saying right away that the work process itself is complex. The first difficulty lies in creating the project and the need to carry out calculations. In this article we will tell you how to make a storm drain yourself.
Why do you need a storm drain?
We can say that storm drainage simultaneously helps solve two problems:
- Implements reliable protection foundation and walls of the house from water ingress, erosion, due to rain or melting snow.
- Prevents the appearance of puddles on the site, site, parking lot and paths.
In a word, storm drainage is necessary in order to increase the comfort of the site, as well as extend the life of existing buildings.
Note! The construction of storm drains is similar in structure to the construction of internal and external sewerage. If you did this system yourself, then you can do this job!
Here's what's included in a standard rain shower kit:
- Funnels for receiving water.
- Trays for collecting water.
- Pipes.
- Collector.
We will write in more detail about their use and installation below, and now it’s time to start preparing a storm sewer project and making the necessary calculations.
Design and preliminary calculations

Implementation of the plan without necessary calculations- This is money thrown away. Why? The fact is that if the constructed storm sewer cannot cope with its main functions, then there is no point in starting work. Moreover, if you do too much big system storm drains, then this will require large quantity finance. For this reason, first of all, it is necessary to calculate all costs.
Necessary information for accurate calculations:
- Information about the average amount of precipitation that was recorded in your area by meteorologists. This information can be obtained from SNIP.
- If you plan to drain melt water, then information is needed on the thickness of the snow cover and, accordingly, the frequency of rains.
- Drainage area. If a point storm is selected, then it is required exact area roofs. In this case, it is important to know not only its magnitude, but its size in accordance with the projection in the plane. If a linear storm drain is chosen, then you need to know the area of the entire territory that it will serve.
- Physico-chemical characteristics of soil.
- The location and presence of all communications that pass underground.
All this information is necessary to make the following calculations of the volume of water discharged. When all the information is in your hands, calculations are carried out using the following formula:

Here correction factor, used in this formula:
- 0.4 – for crushed stone covering.
- 0.85 – for a concreted area.
- 0.95 – for a paved area.
- 1.0 – for roofs.
Based on the obtained value, the required pipe diameter is selected exclusively according to the current SNIP table.
As for the project, you should consider the option of making rainwater drainage. In most cases, this will be influenced by the nature of your area. It is necessary to consider a method for draining water towards the collector. If on your territory it is not possible to make a sufficient slope towards draining the water, then it is necessary to provide pumping equipment. Please note that you need to draw up a project both for the external storm drainage system, which will be located on the roof, and for underground system. Now let's look at the location of the storm drain on the roof.
We begin installation with a storm drain on the roof

On the roof, the equipment is installed along the gutter, which will collect all the water from the roof. If your budget allows, you can buy gutters ready-made with a set of fasteners. If not, then you can do it on our own. For example, sawing a pipe in half lengthwise. Pipes for guttering can be polymer, asbestos or steel. If in your territory strong winds and downpours, then it is best to install metal gutters.
To determine the size of the gutter, you need to carry out calculations in accordance with SNIP. To drain water and prevent clogging of drainpipes, it is recommended to install special funnels. Each funnel is additionally equipped with a protective grille or a special cap.
Note! If your roof is pitched, it is recommended to use caps. At flat roof It is better to use grates.
During installation, it is necessary to ensure that the connection of the funnel to the roof is airtight. For this purpose, the use of bolts will not be sufficient. Additionally, you can use mastic or waterproofing material. There is also a danger of turbulence. To prevent them, a jet straightener is used. So, from the funnel along the entire wall, a pipe is laid down, where the water enters the rainwater inlet.
Classification for wastewater collection
The storm sewer system is divided into two methods of water collection: point and linear.

Point storm drainage system. This system includes rainwater inlets. They are mounted under the gutters of external and internal drains. Each individual receiver underground is connected into a common backbone. The storm water inlet is equipped with a grate and a sand trap. This prevents debris from entering the line, plant residues and other suspended soil particles.

Linear storm drainage system. In this case, the storm drain is a network of channels that are laid underground or slightly deepened in a trench. Those trays that are laid using the open method are additionally equipped with a sand trap and are also equipped with gratings. A linear storm drain differs from a point drain in that it collects water not only from the roof, but also from the area adjacent to the house. This is the system that is used for large areas.
So, based on the size of the surrounding area, you need to decide on one type of system. Although this is a minor factor that must be taken into account when choosing a water collection method. Already at this stage, preparatory work should be carried out.
Channel laying depth

Trays should be laid at the depth required in your area. For example, this could be a depth of 300 mm. If the pipeline or open trays are large enough, then they will need to be laid at a depth of 500 mm. Larger channels will need to be deepened to 700 mm.
Note! If you already have drainage, then the storm drain should be laid exclusively above it.
If you want to reduce labor costs, then you shouldn't go too deep into the ground. Moreover, you should not install the collector below the ground freezing level. Accordingly, if the collector is raised as high as possible, then the channels will not need to be deepened too much. To the collector in winter time not frozen it can be insulated thermal insulation material. Accordingly, if you do storm drainage, then you will have to dig significantly less trenches. At the same time, this permission should not be abused. The channels must have a sufficient slope to allow water to drain well. Therefore, the collector will in any case be located below the rainwater inlet. It is in this case that a project will come in handy, which will allow you to accurately calculate the required slope of the highway.
Slope norms and standards
If we are guided by GOST regulations, then a pipe with a diameter of 150 Ø mm should have a slope of 0.008 mm/m. pipe 200Ø angle – 0.007 mm/m. Based on the characteristics of a particular area, this slope may vary slightly.
Please note that at the storm inlet site the optimal slope is 0.02. If there is insufficient slope in this area, then there is a risk that the system will not cope with the heavy flow of water. Moreover, near the sand trap, the flow speed should be lower, because suspended particles should have time to settle. Therefore, near this device, the angle of inclination should be as small as possible.
Ground installation

At the first stage of installation work, you installed a storm drain on the roof and connected the gutters to the storm inlet. Work on the ground should begin with the installation of a rain inlet or, as they are called, water inlet funnels. It is important to install them directly under the downspout. Each drainage funnel is tied into one system. For this reason, you can do it yourself required amount holes for pipes. Using an elbow, the pipes are connected to the rainwater inlet.
Afterwards it is necessary to prepare trenches for laying trays and pipes. Their installation must be carried out on a sand cushion 100 mm thick. As mentioned above, when laying pipes, you must strictly monitor the slope. If you don’t do this, then there will be no sense in the money and work spent. During the installation process, you will additionally need the following elements:
- Stub. It will prevent water from flowing back in case the pipe is overfilled.
- Sand trap. It will keep trays and pipes clean.
- Siphon. This item will prevent penetration unpleasant odors from the sewer system.

To significantly reduce the amount of excavation work, a drainage pipe and a storm drain can be laid simultaneously in one trench. However, you should not combine these two different directions. As mentioned above, the drainage pipe will be located below, and a storm sewer may run above it.
Note! The slope of the entire system will always be directed towards the collector or to the place where the storm sewer is discharged.
Accordingly, the entire storm sewer pipe system must be connected into one route, which will be directed to the collector. It is very important that the collector itself is equipped with inspection rings. This will allow you to timely check the level of accumulated water, as well as clear it of possible debris. When the entire system of pipes and trays is laid, all that remains is to cover it with durable gratings made of reinforced concrete or metal.
After this, it is necessary to check the entire storm sewer system for operability. To do this, you need to fill a bucket of water into each rainwater inlet. Then check to see if the water flows well. It is also important to check the system for leaks. If one is found, it should be eliminated by covering it with sealant. If the whole system works perfectly, then you just need to fill the trench. In this case, the grate can be covered with cellophane so as not to cover the tray with soil.

Of course, the assembled storm sewer will work reliably without failures or any special problems, if you follow some rules regarding its operation.

It's up to you!
So, we have reviewed the basic recommendations and rules for installing storm sewers. Of course, its presence at every site is simply necessary. Remember, you are quite capable of installing storm drains yourself, without the help of professionals. To do this, you will need to thoroughly understand the essence of the matter and you will succeed.
Scheme of storm sewerage with drainage elements
To ensure that the area does not turn into a swamp after each rain, and the foundation is not washed away by seasonal flows of melt water, it is necessary to ensure drainage excess moisture. Equipped with your own hands will cope with this perfectly. It’s not difficult to make one on your plot or dacha, it’s just important to correctly calculate the quantity necessary materials, view and select suitable design storm drains.
Few people doubt that the installation of a storm drain is a necessary process, because melt and rain flows destroy not only the foundation and paths, but also significantly impoverish the soil. In terms of its design, the storm drain represents the following set of elements:
- Roof drainage system. It looks like gutters fixed along the slopes of the roof, serving to collect drainage and diverting flows down through vertical pipes.
- Receivers of precipitation on the ground. Such a storm drain around the house can have many of its own elements: funnels, storm inlets, linear drainage systems, sand traps. Structures are installed for the purpose maximum efficiency receiving precipitation, spot placement under drains is possible. Linear receivers, as shown in the photo, are placed along paths located with a slight slope for gravity flow of rainwater.
- Design of redistribution and discharge of sediments.
The latter is worth talking about separately, precisely because the issue of discharging excess water arises very often and in all its “completeness.” There are three possible solutions:
- Use streams to water gardens. To do this, all pipes and trays are brought into one large tank, and from there they are sent to the irrigation system using a pump.
- Arrange a flow diversion system, as shown in the video, in centralized sewerage, gutter or a natural body of water, if there is one nearby.
- In the absence of the need for water for irrigation and a natural reservoir, excess moisture is discharged into the ground. But to do this, you will have to install a certain number of pipes on the site, digging them to a depth below ground level.
Types of storm drains for a private home
There are three types of system:
- Underground. Structurally, all parts are below ground level. This perfect choice aesthetically pleasing, but it will require a lot of labor, as well as financial investments. Arrange similar system possible with a complete reworking of the plot of land. In this case, you will have to choose a freezing or non-freezing type. The first storm drains do not work during the period of frost, but they are easier to lay; the laying depth does not exceed 1 meter - maximum, but should not be lower than 30 cm minimum. But non-freezing storm drains are laid deeper, about 1.5-1.7 m. Ground work are large, piping systems will be required, but the structure will not interfere with gardening work.
- Do-it-yourself above-ground storm drainage is much easier to install. These are drainage and drainage gutters/troughs, from where streams of water flow into a reservoir or directly into the garden.
- Combined storm drain- a design where part of the system is located on top, for example, trays for collecting and diverting flows into a specific reservoir, and part is under the ground (water is sent from the reservoir through a pipeline to be discharged or under the roots of trees). Professionals believe that combined storm drainage is the most best option both in terms of costs and in terms of its aesthetic and practical characteristics.
Important! Before you choose certain type storm drains, it is necessary to carefully study the area: the level of water saturation of the soil, the amount of precipitation, the possibility of laying a pipe system, the terrain, the building plan, etc.
But what needs to be done is to divert the water from the house as far as possible. Let this be the simplest option: installing trays on the roof and gutters to drain streams onto the lawns, as shown in the photo, but the foundation will not be washed away in the event of prolonged rains. If there is a large area paved with tiles (a parking lot), you will have to install a storm drain here too, since puddles accumulate in such spaces, which are difficult to deal with. Several water collection points, equipped with point rainwater inlets, will relieve all worries.
Combine or separate?

In a private house or country house, sometimes it is necessary to install several drainage systems: sewer, drainage, storm water. Sometimes all systems run in parallel without touching each other, so the desire to combine a storm drain with any structure, while saving on materials, is quite great. For example, use an existing well. But this is not necessary for the following reasons:
- with a good, prolonged rainfall, water arrives quickly (from 10 m3/hour), so the well will overflow instantly;
- when discharging water into the sewer, such flows will raise the liquid level, which means that it will not be possible to lower the sewer discharges down, all the garbage and masses will remain on the surface;
- after the water level drops, there will definitely be garbage left in the sewer that will have to be cleaned - not the most pleasant pastime;
- when discharged into drainage wells, storm streams with good pressure will flow into the system, quickly overflow it and begin to pour out under the foundation;
- siltation cannot be avoided drainage pipes. Moreover, it is impossible to clean the entire structure; it will have to be replaced, and this will involve new financial costs.
As a result: storm drainage in a private house or country house should be a separate system, have own well/reservoir or natural body of water for discharge.
Components and types of storm sewer system

All structural elements must be connected into one system, which can consist of a storm drain:
- Large well or tank to collect water from the entire site, including water on the roof of buildings. Most often, a well is equipped with concrete rings, like a water well, but only with a bottom. An alternative is plastic wells, which are dug to the required depth, anchored, and trays and gutters are placed there to collect flows.
Advice! If there is little rain in your region, then a regular tank is ideal as a reservoir. plastic barrel, buried in the lowest place on the site. It’s convenient to draw water from it, and the tank costs a penny
- Luke. Sold separately, can be rubber, plastic, metal. Serves to prevent debris from entering the tank. In order for the hatch to sit firmly, the rings of the well must protrude above the ground by at least 15 cm.
- Point storm water inlets– small containers installed in places largest accumulation precipitation, for example, under roof trays, under drainpipes or at the lowest point of the ground.
- Linear storm inlets/drainage channels. These are plastic gutters installed in places where precipitation accumulates (along the roof eaves, pedestrian paths). This option is suitable if, during the construction of the blind area around the house, they forgot to lay a pipeline for water drainage.
Important! The receivers are taken outside the blind area, the second end of the trays is connected to the receiver - this The best way remove the water and not disturb the blind area
- A sand trap is a structure where sand settles. As a rule, plastic casings are used, installed in a row on sections of the pipeline. Sand traps require cleaning, but this is easier than cleaning the entire system.
- Lattices. To ensure gravity flow of water, the holes in the grates must be large. There are cast iron, steel, aluminum models.
- Pipes for storm drains It is better to choose polyethylene ones. Smooth walls will not accumulate sediment, do not allow microorganisms to adhere, have good throughput and are quite durable.
Important! The diameter of stormwater pipes depends on the power and saturation of precipitation and the branching of the network. The minimum diameter is considered to be 150 mm, the slope should not be less than 3% (3 cm for each meter of pipeline)
- Inspection wells – plastic structures, mounted throughout the system and intended for cleaning the pipeline.
A storm drain in a country house or country plot may not contain all the elements, but they can be used to build a sewer system to drain flows of any complexity and configuration.
Construction order and stages

First you need to think through the project. If you don’t want to turn to the services of professionals, you can do all the constructive and schematic work yourself in one of the programs or even on a piece of paper. This makes it possible to more accurately understand and correct location all elements. Afterwards you will have to purchase materials and then begin work.
How to make a storm drain with your own hands correctly:
- Install roof trays and drainage system.
Important! Installation of a storm drain requires lifting the ground, so it is best to carry out the work process simultaneously with the arrangement of drainage and sewer systems, which are also then completed by laying paths and blind areas
- Dig trenches for the pipeline as shown in the video. The depth of the trenches must exceed the size required for pipes by at least 15 cm. Place crushed stone cushion, and only then the pipes. Crushed stone will help neutralize the forces of heaving, always remaining motionless. This quality helps all devices installed in crushed stone to feel almost no stress.
- Install rainwater inlets, concrete the structures and lay the finishing coating.
- Connect the pipeline to a reservoir or lead the end into a river or lake to discharge water.
These are the main steps, but as shown in the video, you will need to install trays along the paths and linear sewers to remove flows.
You can do without complex structures, even if rain is not a rare occurrence in your region. If the soil absorbency is good, it is enough to equip under-roof trays and bring them to the end vertical pipe. At the bottom of the pipe, install a reservoir (barrel) where the water will accumulate. And then use the liquid for irrigation and other technical needs. If the soil absorbency is low, add a point rain inlet at the lowest point of the site and dig a barrel there; gutters for runoff from paths and roofs also go into the barrel. And that’s it, the storm drain is ready. Options for arranging structures are in the video, and you can do it yourself the simplest system not difficult even for a beginner home handyman.
Puddles that appear after rain are a fairly common phenomenon, but few people think that for owners of private houses it is quite dangerous, since it can lead to flooding of the building and destruction of its supports.
To avoid unpleasant consequences, experts recommend installing storm drainage systems. How to do this will be discussed in this article.

Features and purpose
Storm water or, as it is often called, rain drainage is a system water pipes, as well as filters and various devices used for effective removal excess moisture from the local area. This is the main task of storm drainage, but the range of functions is not limited to drainage:
- With the help of a storm system, you can organize watering of the garden and vegetable garden personal plot, the positive effect of melt water on the growth and development of plants is known to every summer resident;
- increasing the durability of the building and improving the strength and strength of its supports - this is due to the fact that rainwater drainage eliminates excessive flooding of the foundation, and in addition, prevents the development of fungus and mold;
- high-quality filtration of water and purification from sand and other types of impurities;
- maintaining integrity paving slabs And asphalt pavements, which are often destroyed under the influence of pounding jets of water;
- minimizing the risk of water flowing into the base;
- complete elimination of the formation of puddles and dirt on the site after rain.


Components of storm drainage
The installation of rainwater drainage in a private house and country house requires the presence of certain components in its structure.
Well
In previous years, it was believed that it must certainly be large, but modern industry offers wells of a wide variety of volumes, the choice of which is determined by the dimensions of the roof, the size of the site and the average amount of precipitation in a particular region. As a rule, wells are made from concrete rings, and the lower ring must be equipped with a bottom - this is what distinguishes simple wells from storm water wells.
Plastic wells can also be used to create an effective rainwater drainage system. They are buried to the required depth, placed on a concrete pad and chained with strong chains to prevent floating.
Plastic containers are good because they are completely sealed, unlike structures assembled from rings.


Hatch over the well
Hatches can be made from various materials– rubber, plastic or metal, the choice here depends only on the personal preferences of the homeowner. Regardless of what composition is used, the well must be dug in such a way that the upper edge of its lid is 15-20 cm below the soil surface.
When installing a hatch, a brick neck is often laid out; this allows you to plant a lawn or flowers on top so that the area does not stand out from the rest of the plantings.


However, many people purchase a ready-made cover with a hatch. In this case, the soil is backfilled more thin layer- only 4-5 cm, however, the lawn will differ in density from other areas, drawing attention to what is located underneath it. Most often, hatches are produced in black. However, you can also find red and yellow versions on sale.


Point storm water inlets
These are small-sized tanks that are mounted in places where precipitation accumulates the most, for example, under drainpipes and in the lowest areas of the yard. They are made of concrete or plastic, and the former are often used for the construction of deep storm drains. In this case, they are mounted on top of each other, achieving the required height. However, more recently, built-on rainwater inlets made of plastic have appeared on sale.


Sand traps
These are devices that are used to accumulate settling sand and other heavy inclusions. Most often they are made of plastic, they are characterized by low cost, but at the same time they exhibit exceptionally high performance characteristics. Typically, sand traps are installed at a certain distance from each other.
Such devices require periodic cleaning; this is much easier and faster than cleaning the entire drainage system.

Lattices
Grates are installed to ensure that the water drains out as much as possible. The following grating options are available:
- cast iron– reliable and durable products, but the paint on them lasts no more than 3 years, significantly reducing the overall aesthetics of the structure;
- steel– a cheap option, but the lowest quality – steel is prone to corrosion, so even after 1-2 years such gratings begin to rust;
- aluminum– here it is not pure metal that is used, but its alloys; such options are most preferable, since they differ in strength and attractive design, but their cost is quite high.

Pipes
Not a single storm drain is complete without pipes; as a rule, products made of red-colored polyethylene are used. They have smooth walls, which significantly improves their throughput. However, you can choose cast iron or asbestos options; they can also work uninterruptedly for a long time, providing effective drainage.
The diameter of the pipes largely depends on the overall branching of the system, but we must keep in mind that it should not be less than 15 cm, optimally if the diameter is larger.

Inspection wells
These are small-sized wells made of plastic or concrete; they are installed in cases where the pipeline is quite long or has numerous branches. They are used to clear pipes if blockages occur.
It should be noted that not every rainwater drain necessarily contains all of these components, but they can be used to build effective system any level of difficulty.


Types of storm drainage
There are several main types of storm sewers installed in private homes.

Open
This is a fairly simple system that you can set up even on your own. It consists of a network of surface gutters into which water flows through drainpipes, and from there it flows into special tanks or the general sewer system.
Gutters are made of metal, plastic or concrete; they are covered with gratings on top, which protect them from large debris, and in addition, serve a decorative function.
Such a system in a private home can have a fairly large coverage; it collects excess moisture from the sidewalks, garden paths and other types of sites.


Closed
This type of stormwater drainage is also called point drainage; in this case, all water intakes are located underground. The mechanism of their action is simple: water, flowing through pipes from the roofs, enters special rainwater inlets, and then moves through them into underground channels, from where it is discharged outside the site.


Mixed
This system involves the simultaneous use of open and closed elements; this method is used when it is necessary to build an effective drainage system on a limited budget.

Types of drainage
Quite often, cottages and private houses are equipped with several drainage options: sewer, drainage and storm water. As a rule, they are located close to each other around the site and run parallel.
Quite often, site owners have a natural desire to save money and combine stormwater with elements of other types of drainage, for example, use a ready-made well. However, this should not be done, since during heavy rain the liquid enters the well quite quickly, average speed flow is 10 cubic meters per hour.

In this case, the well may overflow, and if it is combined with a sewer, then water will begin to flow into the sewer pipes. In this case, of course, it will not be able to rise above the ground level, however, you will not be able to lower anything either, since everything will be in the plumbing. In addition, after the water level drops, large and small debris will remain inside the system, which can significantly impair the effective operation of the entire drain system, and it will have to be cleaned regularly, which, you see, is not the most pleasant task.
The situation is much worse if the discharge goes into a drainage well. If, during a prolonged downpour, moisture enters the drainage system under high pressure, then as the pipes fill, it simply falls out under the foundation and begins to wash it away. There is no need to talk about the consequences; there are other troubles, which include silting of the drainage pipeline.
It is impossible to clean such pipes; they must be completely replaced.

The conclusion can be made very simple: the storm drain in the house must have its own well, and quite a spacious one at that. However, if not far from the site there is access to a pond, lake or river, then the construction of a well can be neglected.
Design and preparation
When it comes to the drainage system, it is very important to first draw up a drawing, plans and design diagrams, otherwise it will just be “money down the drain”. If the system does not work effectively, then it is not worth undertaking its arrangement, and if the storm drain is too powerful, then it will “eat up” too much money.

In order to make calculations as accurately as possible and draw up an effective project, the following data is needed:
- the average amount of precipitation in a given area (they can be found in SNiP 2.04.03-85);
- frequency of precipitation;
- snow cover size;
- drainage area;
- roof area;
- physical and mechanical soil parameters;
- location of underground utilities;
- calculated wastewater volumes.


Q– this is the volume of moisture that the system must remove;
q20– precipitation intensity (it is different for each area);
F– surface area from which water is planned to be discharged;
TO– correction factor, which depends on the material of the site covering, it is:
- for crushed stone – 0.4;
- for concrete sites 0 0.85;
- for asphalt – 0.95;
- for roofs – 1.0.
The obtained value is correlated with SNiPs and the diameter of the pipeline, which is necessary for optimal drainage, is determined.


Trays and pipes are dug at the depth at which they are standardly installed in each area; their exact value can be found in construction companies or from neighbors who have already installed a storm drain on their property. As a rule, in middle lane In Russia, the laying depth is 0.3 meters if the pipeline diameter does not exceed 50 cm. Larger trays and pipes are buried to a depth of 70 cm.
Often high cost earthworks leads to the fact that customers ask not to go very deep into the ground - and in general this is quite justified, since there is no point in covering the pipes at too great a distance. There is no reason to install collectors and inspection tanks below the seasonal freezing level, as required by existing GOSTs. They can be placed higher, but must first be insulated with insulating material, for example, geotextile.
Reducing the depth level quite significantly reduces the cost of installation work.


But the requirements regulating minimum slope storm drains should not be neglected. GOST establishes the following standards:
- for pipes with a diameter of 15 cm, the angle of inclination should be 0.008 mm/m;
- for pipes with a cross section of 20 cm – 0.007 mm/m.
The angle of inclination may vary depending on the characteristics of the site. Thus, at the point where the pipe is connected to the storm inlet, it is necessary to increase the flow rate of gravity water, so the maximum permissible angle should be formed at 0.02 mm/m.
But in front of sand traps, the flow speed should, on the contrary, decrease, otherwise suspended particles will not be able to settle, so the angle of inclination should be minimal.

Construction and installation
The storm drainage system is equipped using its own technology; its installation is in many ways similar to the principle of laying conventional sewer pipelines, however, if there are no drains in the house, then installation should begin with them.
Construction of the roof part
It is necessary to make special holes in the roof slabs that will be used for rainwater inlets. Once all devices have been installed and secured to bitumen mastic, the joints and junctions should be treated with sealant. Next, sewer pipes and risers are installed, which are fixed to the facade of a private house using clamps.
If an open system is being constructed, then trays should be installed, and if the future stormwater drainage will be point-based, then drainage pipes will need to be installed.

Ground part
In accordance with the planned plans, which are drawn up taking into account all existing angles of inclination of the terrain and the depth of canals accepted in each specific region, it is necessary to dig a trench. Let's consider the sequence of actions.
- The bottom of the dug trench must be thoroughly compacted, all stones encountered during excavation must be removed, and the holes formed after them must be filled with soil.
- The bottom of the trench is covered with sand; as a rule, the thickness of the sand cushion is approximately 20 cm.
- A pit is dug to install a collector well. For the collector itself, you can purchase a ready-made plastic container, but you can also build it yourself - to do this you need to install formwork and fill it with concrete solution.
- Pipes are attached to ditches, compacted and reinforced with sand cushions, which are connected to each other using fittings.
- It is necessary to include inspection wells in storm drain branches with a total length of more than 10 meters, and sand traps must be installed at the junction of the receivers and the pipeline. All these devices must be connected into a common circuit, and the joints must be sealed.
- Before the final filling of the trench, it is necessary to test the system for strength; for this, water is poured into the water intake; if the pipes leak, then it is necessary to identify and eliminate the leak.
- If no weak points are found in the pipeline, then it is necessary to carefully fill the trench with soil, and equip all gutters and trays with cast iron and plastic gratings.

Installation open system, in general, does not pose any problems, since water inlet trays can be installed easier and faster. They are sold as independent elements, which are quite simply assembled into a single chain using a thin nylon cord, which forms the required drainage angle.
Timely installation of storm drainage will significantly extend the life of building structures, eliminate the occurrence of dirt and slush and prevent rotting of plant roots.


The simplest storm drain can be easily equipped by the owner of the site without the use of third-party specialists, but even when contacting professionals, it will not hurt to get acquainted with the features of the sewer system and the specifics of its design, since as the owner uses it, he will periodically have to repair and clean the system.
For more information on how to install storm drains, see the following video.
Any individual building is exposed to precipitation.
Among other things, if your garden plot is dominated by soils mixed with clay, then after each rain the soil becomes soggy and the dirt is spread throughout the entire area.
And puddles that do not dry out for a long time will not add attractiveness to your land plot.
How to overcome the problem associated with rainwater drainage?
Do it yourself
 The issue can be resolved quickly and efficiently by installing a storm drain in a country mansion.
A sewerage system in a private house (it is written about a septic tank) can be built by a home craftsman with his own hands.
This job is not very difficult.
The only condition is that it must be approached with knowledge of the matter.
Before you begin to implement your plan, study the Internet or books on this topic.
And so that you do not spend a long time searching the vastness of the World Wide Web for the information you are interested in, this article will, to the maximum extent possible, expand all the necessary information on the topic:
- “How to make a storm drain in a private house”.
For what purposes is it needed?
Under the influence of precipitation, the foundation of the house, slowly but surely, over time, collapses.
Water will accumulate in the basement of the house.
Besides, root system plants planted on the site will soon undergo a process of rotting - this will happen if storm drainage is not organized in time (how to make the most best septic tank for the dacha, read the article).
Complex special devices and channels, the task of which is to collect, filter and drain atmospheric precipitation into:
- special reservoirs,
- containers,
- septic tanks (),
- filtration fields,
- all this is created with the aim of eliminating excess moisture.
Scheme - what it consists of
The composition of the system components is as follows.
Installation of drains on the roof of a building- these are fixed, along with bevels, drainage trays.
They collect precipitation from the roof surface. They flow down through cone funnels and drainpipes.
Specific number of receivers atmospheric precipitation on the surface of the earth:
- prefabricated funnels,
- linear drainage systems,
- sand traps, etc.
The devices need to be arranged so that they can absorb as much moisture as possible.
 As a rule, point receivers are installed directly under drainpipes, and for some, they find a place on asphalt paths or in places where paving slabs are laid.
Linear water intakes are installed along paths. And in order for water to drain well, the coating must be laid on a slope.
Rainwater receivers are made of polymer concrete or plastic with a special composition.
Collector well
This device is necessary for collecting and further filtering liquid into the ground. The reservoir should be as large as possible.
Inspection hatches
Without them, it is impossible to carry out preventive inspections and clean the channels if they are dirty.
They are mainly installed at the junctions of channels and at their intersection points. It is in these fragments that the possibility of channel clogging is maximum.
Storm drain options
Underground
This is when all components of the device are located below ground level.
If we consider this issue from an aesthetic point of view, then there are many positive aspects.
But, on the other hand, in order to carry out underground storm drainage, you will have to do a large amount of earthwork and shell out a significant amount of money.
This instruction must be followed.
If desired, you can build a storm drain for the needs of a private house of any configuration and complexity.
How to correctly calculate the depth of laying channels
If the underground pipeline has a cross-section of no more than 0.5 m, then it should be buried in the ground to a level of 30 - 35 cm.
If the diameters of the channels exceed this figure, then the storm sewer must be laid at a depth of at least 70 cm.
If your land plot already has a drainage system, then the storm drain should be located above it.
In order for water to move freely through the pipeline, you need to select the correct slope.
Step-by-step instruction
Before you begin implementing your storm drainage plans, make sure that your mansion is equipped with water collection and drainage installations.
Digging a ditch, its depth and width should take into account the slope.
If you consider it necessary to insulate the structure, then the dimensions of the pit must meet these additional requirements.
Compact thoroughly bottom of the trench. After this, pour a layer of sand there, at least 20 cm thick.
We dig a pit in a specially designated place, we will place a tank in it to collect wastewater.
Most likely it will be ready plastic container(septic tank).
As alternative method You can make a tank out of concrete.
We lay gutters on the sand preparation or pipes.
It depends on what type of storm drain you will install.
Next step– we connect all the individual components into one device.
We connect the pipes using fittings.
All joints must be sealed.
Where the trays connect to the collector, we install sand catchers.
In areas that are long (more than 9 - 10 meters), and in places where pipes are broken, it is impossible to do without installing inspection wells.
We check the functionality of the design check for leaks by pouring liquid into the water inlet. If problems are found, they must be corrected.
The final stage. The pipes that are located underground are covered with soil, and the channels located above the ground level are covered with decorative protective grilles.
In any private building installation work for the arrangement of storm drainage systems should be carried out in the sequence described above.
Do not forget to drain drainage from all roof slopes. This is the only way you can protect your land plot and local area from the influence of excess moisture.
Remember! Never combine stormwater and drainage into one system. These schemes should complement each other, not be mutually exclusive.
Because during heavy rains, the joint device may not withstand the onslaught of the water elements.
Owners of country mansions can safely connect the storm drain to their own sewer system. Because there are no harmful ingredients in rainwater, and it does not require cleaning measures.
If you improve your home and the surrounding area with a device surface drainage water, this will significantly extend the life of the structures.
This way, you will save yourself and your household from puddles that won’t dry out.
You can make a simple device with your own hands. There is nothing complicated about it.
The master's work is fearful. You just have to start. And if any difficulties arise, all the answers to your questions can be found in this article.
What pipes to use and how deep to bury them in the ground, watch in the video provided.


