What is tandoor? Surely, you are familiar with this word, and many are even lucky enough to see it or try delicacies prepared in the tandoor. In the Middle East, there is a tandoor in almost every home. In the absence of gas in the Caucasus in ancient times, it could replace a gas stove.
A tandoor is a roasting pan that has an interesting jug-shaped shape. The main purpose of the tandoor is cooking. Despite its popularity in eastern countries, in Lately brick and clay ovens are also in demand in Europe. There are two types of tandoors: stationary and portable. The second option is more compact and convenient. At any time you can move the product, give it to a neighbor for the weekend, and so on.
 Portable tandoor
  Compact tandoor
 Despite the fact that the first ovens in the East were built from clay, today they are being replaced by the more practical brick. Therefore, our material today will be devoted to how you can build a brick tandoor with your own hands.
Tandoor: historical background
If you believe the legend, which is passed down from generation to generation, the first clay oven was invented by a shepherd, whose name was Tandoor. One day he saw that at night all the flowers closed their buds, and insects were hiding inside. In this simple way they protected themselves from the cold wind. The young man made a magnificent bud out of clay, only bigger. In it he prepared himself a simple dinner and lit a fire. Food from the bud turned out to be incredibly tasty and nutritious. She also stayed hot for a long time.
Subsequently, the young man became rich. He made buds from clay and sold them to everyone. In honor of the talented young shepherd, these ovens began to be called tandoors. Tandoor himself became a respected person. In fact, he was a kind of analogue of the Greek Prometheus. Only he gave people not fire, but delicious food and the opportunity to cook it at home.
According to another legend, the tandoor is truly attributed sacred meaning. There is an opinion that masonry clay ovens was widespread back in the 10th century among the Sart tribe. They lived on the territory of modern Uzbekistan and worshiped fire. For the Sarts, the tandoor was the home of beautiful peris (analogous to fairies in Europe). Several centuries later, it acquired a different, now practical, meaning. By the way, see it in a clay structure great way The Mongols, who conquered the Sarts and took away all the inventions, were able to prepare food.
How many secrets does the tandoor keep?
Nobody counted the number of secrets, but the fact remains: the production of a simple stove in the East is covered with many legends. For example, if you make this stove without the proper level of skill, it will burst from high temperature. They say that clay for production is always carefully sifted, like flour for dough. However, there is still no official confirmation of this.
The wool of some animals can also be added to the clay. For example, goats or sheep. After prolonged firing, it burns out and pores appear in the vessel. Also during construction, ordinary barrels made of wood or plastic are used. They hold their shape remarkably well. At the end of construction, the barrel is removed.
Of course, knowing these secrets is not enough to build a full-fledged tandoor with your own hands from brick or clay. But the fact remains: building with brick is much simpler and more affordable.
 Brick tandoor
 However, this fact does not deprive the tandoor of its amazing qualities. Do not think that the ancient nomads always built such ovens from clay. They regularly moved from one place to another, building a stove from scrap materials. One food still turned out incredibly tasty. Tandoors are found everywhere in Armenia and Kazakhstan, Azerbaijan and Turkmenistan, Mongolia and Tajikistan, and Japan. Historians still do not know the exact answer which of the two structures is older: the Russian stove or the tandoor.
By the way, the word itself is of Turkic origin, and in each country it is called differently. For Armenians it is tonir, for Tajiks it is tanur, for Georgians it is simply tone.
Step-by-step guide to building a brick tandoor
There are three varieties homemade stove: pit, portable and ground. Now we will consider the option of building a ground tandoor from fireclay bricks. This is due to the fact that a pit tandoor is usually used to heat rooms, while a portable one is a type of barbecue.
You will agree with the statement that any serious project must begin with comprehensive training. On the one hand, there is nothing difficult in building a brick tandoor, and anyone will tell you this professional builder. But on the other hand, you need to be properly prepared to create a durable and comfortable object.
Master class on making tandoor
The preparation process begins with the collection necessary materials. There are several options for brick tandoor, but in our case, the “gentleman’s” set looks like this:
- Sand and gravel mixture – 150 kg.
- Mesh with cells of 5 cm - 2 square meters. meters.
- Cement M400/500 – 6-7 kg.
- Asbestos fiber – 6 kg.
- Fireclay bricks - from 50 to 70 pieces.
- Fireproof paint – 1000 ml.
- Fiberglass reinforcement – 6 mm section, minimum 15 meters.
- Steel wire – 3 mm section, 15 meters.
- Fireproof mixture, without which no masonry is possible - 20 kg.
Once you have assembled the necessary set of tools, take care of the most necessary tools. Most likely, you already have them at your dacha, and if not, you can always buy more:
- Plastering rule.
- Convenient container for mixing concrete or.
- Grinder and diamond wheels.
- Spatula and paint brush.
Your tandoor oven will be located outside. Therefore, she must have reliable foundation and stable design. It is bad if the soil contains a lot of clay. In this case, you definitely cannot do without a reinforced foundation. On heavy soils, the so-called columnar foundation. But if the soil is light enough, it is enough to simply cast a monolithic slab.
 Preparing the base of the tandoor
 The masonry is designed in such a way that the oven area will be approximately 100 by 100 centimeters. As you understand, this is not the most compact design, so the slab must be at least 10 centimeters thick. Approximately 15 centimeters of soil is removed around the perimeter. At the corners of the future slab, recesses of 75-90 cm with a diameter of 12-15 cm are made. When the holes are drilled, reinforcement will be required.
Without fiberglass reinforcement not enough. The structure must be filled with concrete.
To ensure the concrete has a good consistency, use sand, cement and gravel in a ratio of 3:1:1. The size of the gravel fraction should not exceed 1 cm. The result should be a solution with the consistency of thick sour cream. When pouring mortar, always focus on the foundation pit. The formwork will help you maintain the correct orientation and help avoid discrepancies in levels. The formwork is laid on the bottom, height 5 cm. The bottom is covered with sand, but the height of the layer should not be greater than the height of the formwork. Next, you need to pour water on the sand so that cavities do not appear, and begin laying the formwork for monolithic slab. Many users ask: why is there sand in the foundation at all? In this case, it serves as a damper cushion.
Do-it-yourself formwork for a brick tandoor is always made from roofing boards. The optimal width is 15 centimeters. The boards are buried 10 centimeters into the ground, only 5 cm rises above the ground. You need to put a reinforcing mesh on the sand. Before pouring concrete, everything is leveled again using a level.
Wait until the concrete hardens. This will take about 72 hours. If possible, we recommend increasing the waiting time to seven days. Only after this do you pick up the drawings and start laying the foundation.
 The finished arch is attached to cement
  laying on cement in a circle of stones
  We draw out the walls
  Level check
  Preparing the mold for the inside of the tandoor
 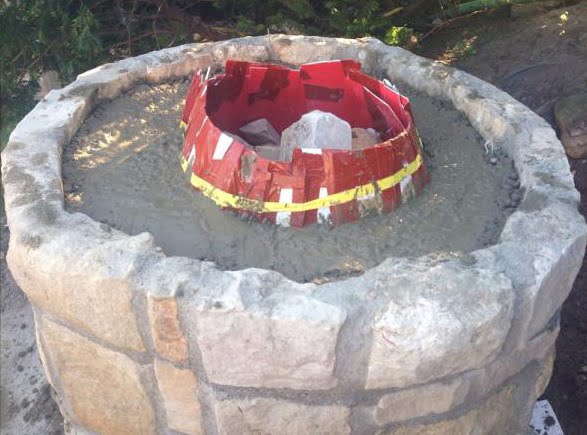 Filling the internal form
  Preparing clay for the inside of the tandoor
 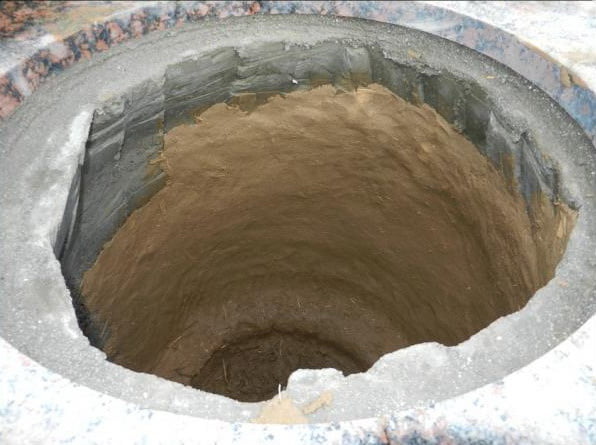 Smearing interior walls clay
  Decorative cover for tandoor
  Decorative blower
  View inside the finished tandoor
  Final drying of the tandoor
 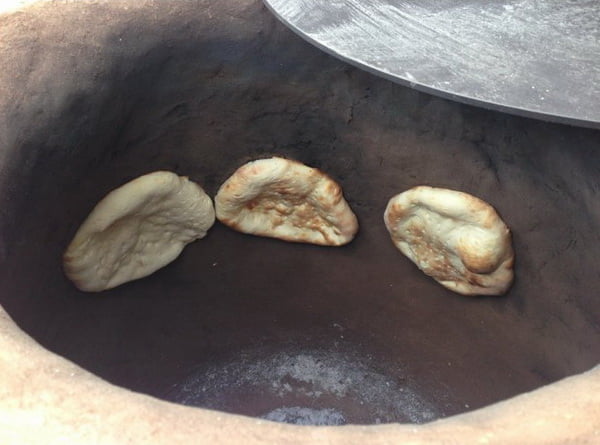 Making bread
 How to form the base of a tandoor?
Since you and I have to build a tandoor from brick, brick will be used as the base. But not simple, but fireclay. This is due to the fact that the temperature inside the tandoor will be incredibly high, and ordinary red blocks are not designed for such a load. But fireclay brick has excellent fire-resistant qualities. It almost does not absorb moisture and can easily withstand the weight of the tandoor.
Another undoubted advantage of tandoor is its resistance to sudden temperature changes. Therefore, it is simply ideal for construction outdoor stove. No cracks on frosty or hot sunny days!
The base is always made in the shape of a circle. Outline the pattern with chalk, the diameter of which should be 75 cm. All bricks are laid out in the given order. At the end of the procedure, unnecessary corners are ground down to form an ideal base. Don't forget to put roofing felt on concrete base. It will guarantee good sound insulation.
After this, mix the refractory mixture and apply it to the roofing material with a spatula. Consider the fact that the brick base must exactly match the selected height of the tandoor, and the size of the neck should be a third of the base. To assemble the rule, use a pole (height up to 100 cm, base length - 30 cm, step between given guides - 25 cm). The pattern is made of plywood; the bed slats are ideal (meaning the part on which you usually place the mattress).
We build walls
Wall masonry has its own characteristics. All bricks are laid vertically. Therefore, you will need to stock up sufficient quantity mortar to provide all structural elements with sufficiently reliable fastening. Make sure that the edges of the bricks are placed as close to each other as possible. Use steel wire to tie together the first row of bricks. After fastening, the ends of the wire need to be tightly twisted and hidden in some kind of seam. In the second and third rows the procedure is repeated. When the main structure is built, plastering can begin. Use baking mixture, but remember that the thickness should be at least one centimeter.
 We insulate the walls of our oven
 Wait for the plaster to dry. It is advisable to cover the tandoor with a film for comprehensive protection of the structure from rain and exposure to sunlight. Strong heat can be detrimental to an as yet unfinished tandoor. When the structure hardens, the surface is covered with acrylic. It is recommended to use the so-called whitewash. Armed with a broom, clean the inside of the tandoor from any dirt and build-up that has formed there.
 Almost completed tandoor, only the lid remains
 Terms of use
We just figured out how to make a tandoor out of brick. Only one question remains unresolved: how to use such a stove? You need to be especially careful when igniting for the first time. Raise the temperature smoothly and gradually. Use 2/3 of all firewood, take only dry logs. Products should be loaded inside only after the firewood has completely burned out, that is, an hour after ignition. The coals are evenly distributed along the bottom. One dressing is enough for two dishes, the second will take about 2 times longer to cook. It’s easy to check the oven’s readiness. To do this, move the stick along the wall with inside. If the soot quickly disappeared and the wall became clean, the tandoor is ready for use.
Time to take stock
A do-it-yourself tandoor made from special brick is, first of all, just a wonderful oven for preparing delicious, nutritious meals. Your own tandoor will definitely delight you with evenly roasted meat. You don't need to twist the skewers and turn the steaks - everything happens on its own. You already know how to build a tandoor, which means you will always have incredibly tasty and very healthy bread in your home.
Utility bills are constantly rising. But if you cook in a tandoor at least sometimes, you can significantly save on electricity and gas consumption. The installation is extremely easy to operate and will not cause problems even for a beginner dealing with the installation for the first time. brick oven.
DIY brick tandoor video
Tandoor - convenient cooking device. Initially, tandoors were made earthen, and a little later - ground.
In both cases they were built from clay. New technologies make it possible to create portable “jugs” from fireclay mass.
Materials for making a stove

For brick tandoor Several types of material are suitable:
- white fire brick;
- ceramic clay brick;
- stone blocks.
How to make a square tandoor from brick with your own hands
This type of stove is quite simple to build, as it does not require any special skills. Vertical design reaches 1-1.5 meters in height.
Reference. With the proper skills, the device can be laid out even without a template for everything in half an hour or an hour.
Project selection
Search detailed diagram construction in this case is not necessary. The main thing is to choose the right one size designs, for example, 2.5 by 2.5 bricks. If you plan to have a large furnace, the technology for its creation will not change.

For construction square tandoor you will need:
- brick;
- masonry mortar;
- spatulas;
- grate;
- clay;
- sand, crushed stone, cement, reinforcement and form (pit) for the foundation.
Foundation arrangement
Select oven dimensions, fill the base slab the desired shape. For this dig a hole of suitable size: the foundation should be slightly larger than the base of the structure. Place ten centimeters of sand at the bottom and fill with concrete on top. In the middle of the base there is reinforcement for fastening.
Important! Remember that brick buildings ponderous, so the foundation must support the entire structure.
Laying out the base
After the concrete has hardened, you can begin laying the bottom row. The bricks are laid out on concrete and a square base is built. If the design size is selected 2.5x2.5 brick ah, the bottom layer is placed spiral inwards.
Bricks of the next row overlap the joints of the lower level. This principle is followed when laying out each new row.
Second level completely covers the first one.
Wall masonry
When constructing stoves, the opening of the combustion door is usually taken into account. In a square tandoor instead of a door only a small hole remains, so you also need to lay bricks there.

On the third level lay out the walls of bricks, leaving inner space empty. A grate is installed on the same layer.
In the center of one of the walls of the third level there is a place for blowing the size of half a brick.
Fourth level repeats the previous one, raise the air hole. The next row closes the blower.
All by next rows should narrow, creating a semblance of a chimney. When size 2.5x2.5 bricks Enough to raise the chimney five rows. The narrowest row reaches the dimensions 20x20 centimeters. After it, a row or two should be wider than the previous ones. This is where the device for holding skewers is installed. In this option, the skewers with meat will be positioned vertically.
After completion of work clean the inner walls from cement mortar.
Insulation and external finishing
Outside the wall you can plaster or cover with clay mortar.
If you cover the tandoor with clay, you will need a few days to dry before the device can be used.
In the square tandoor design, the chimney is open. In order for the heat to stay inside better, you need to create cover made of heat-resistant steel.
How to build a horizontal brick tandoor

Horizontal tandoor requires more costs for purchasing materials: During construction, more bricks are used, and, accordingly, mortar; the foundation must also be of a larger area.
But a horizontal tandoor is convenient to use and retains heat better.
Difference between the device and a standard oven- no top hole. Smoke comes out through the side mouth. Typically this structure is made from clay mixed with wool or straw, but the unit can also be built from brick.
You might also be interested in:
List of tools and materials
Creating a horizontal tandoor somewhat more difficult than vertical. Externally, the device is very similar to a conventional stove and differs mainly in the chimney. Due to the complex structure here You'll need a little more materials:
- a template made of boards or a circle;
- metal door;
- grate;
- clay;
- bricks, including wedge-shaped ones;
- mortar and spatulas.
Board pattern
Board pattern you can build it yourself. It helps to build a tandoor, creates support for bricks, and allows you to carefully lay out the vault.

The template is two connected arches with the same width and height. The easiest way is to draw a circle the right size, draw a horizontal diameter and lower two straight from the intersection with the circle.
Project this figure onto plywood and cut it out two identical parts.
Along the top edge connect with bars. The length of the slats is the same as the planned depth of the oven. The upper edge is sheathed with plywood, the sheet of which is bent along the contour of the arch to the bars.
Preparing the base
The base usually resembles a table about a meter high. It can be constructed from natural stone, brick or cinder block, will do steel design with metal table top. The main thing is to calculate that the foundation can withstand the entire brick tandoor.
Laying walls, arranging a channel for blowing, installing a grate
- A layer of brick with clay mortar is laid on the base. An inflating channel is formed. The next row covers the channel, leaving a hole in the center.
- Circled or wooden template installed on thick bars three to five centimeters. Align them vertically and horizontally. Since the tandoor is laid out in the shape of an arch, wedge-shaped bricks are most suitable for such work.
- A row of bricks are laid out on the sides of the template so that they fit snugly against the plywood arch. The bricks are shifted to bandage the seams and raised at equal angles to the right and left of the arch. Next, only wedge-shaped or cut stones are used, closing the arch in the middle. There should be a small hole left for the smoke to escape.
- The masonry is allowed to dry within five days.
- They knock out the bars from under the circle. They take out a wooden template and install the grate.
- The back of the tandoor completely covered with bricks. A flap is made on the front part. Doors can be installed.
- If the tandoor is built indoors, take the chimney out to the street. If this is an outdoor structure, a chimney is not needed.
Drying and initial firing
Before using the tandoor, several steps need to be taken.

Wait until the mortar between the bricks is completely dry. It may take up to one week.
Leave the device in a ventilated area to dry. If the unit is located outside, you can dry the oven in the sun. Then the process will take a little over a week.
After this, extinguish the flame and allow the brick to cool. For the second time, light the fire and warm up the oven up to 700 degrees, and the walls will become hot to the touch.
For the third time, the tandoor warms up to standard operating temperature, up to 1500 degrees. After this, you can start using the device.
Possible manufacturing problems
When building a horizontal tandoor you need wedge-shaped bricks. If such material is not at hand, ordinary bricks will do, but they will have to be cut to the desired shape.
A tandoor is a Turkish outdoor oven with a rounded shape, the main purpose of which is to prepare dishes by baking them. You can bake bread, flatbreads, cook meat and other things in it. delicious dishes. In this article we will look at the stages of building a tandoor oven with our own hands from brick. Historically, the tandoor oven was made of clay and was a portable hearth, which nomadic tribes took us on a hike. But over time, with the advent of settled tribes, the stove took on more powerful dimensions with stationary placement.

Today they come in two types, stationary and portable, the construction of which is mainly carried out from brickwork with clay mortar. The stationary type of tandoor is divided into two subtypes: pit and above-ground, the construction of which is carried out using underground and above-ground methods. Having your own home, you can build a tandoor in your yard, although this is not an easy task. In order to understand how to make a tandoor from brick with your own hands, you need to understand the principle and structure of the stove.
A tandoor is a clay vessel (or made of brickwork) with a shape rounded at the top, like a jug.
Tandoor device:
- At the bottom of the structure there is a blower, which provides traction during the combustion process. The fuel can be firewood, coal, brushwood. There is a hole at the top through which fuel is added and dishes are installed.
- The clay vessel is lined on the outside brick frame, and in between them there is a layer of heat-insulating material, for long-term heat preservation, which is used as sand, clay, salt and others.

Principle of operation:
- The heat released during the combustion of fuel is accumulated, the walls of the oven are heated to a temperature of 250–400 degrees, which makes it possible to cook food, for example, flatbreads, directly on the walls of the oven. The oven is in working condition for three to four hours, since the temperature conditions will remain the same throughout this time. This time is enough to prepare two dishes.
- Thanks to the design of the stove, the accumulated heat does not escape outside, but remains inside it, being evenly distributed. Which allows you to cook delicious, unique food. To ensure uniform frying of food, the oven opening can be covered with a lid.
- For convenience in cooking, a special grill is used, but which can be used not only for meat, but also for other equally tasty products.
- The disadvantage of the tandoor is that the removal of ash residues must be carried out through the upper hole.
Due to the tightness of the structure and maintaining a uniform temperature throughout the entire cooking process, drying out of the products does not occur. Shish kebab made in such ovens is much tastier than cooked on a barbecue or grill.

Construction of a tandoor oven with your own hands from brick
Like any construction process, the construction of a brick tandoor consists of several stages. It is recommended to produce it during the warm period of the year, since the masonry mortar retains its functions and structure only at above-zero temperatures.
How to build a stove, main steps.
Project
The first step is to create a project for building a furnace. It includes:
- The choice of location is carried out according to the following criteria:
- the area should have the lowest humidity;
- the location of the stove should be away from the house and garden plantings;
- the place should not be on a hill;
Having picked up suitable option, the selected area must be removed and well leveled.
- Choosing the type of tandoor, which can be horizontal or vertical.
- Drawing up a drawing of the planned furnace and the foundation for it, indicating all the parameters.
- According to the drawings, a preliminary calculation of the required building materials is made.
- Drawings are necessary not only for preparing the material, but also for preliminary calculation of the cost of building a tandoor.

Preparation

The next stage is the preparation of materials and tools needed during the construction process. To build a brick tandoor with your own hands you will need the following materials:
- fireclay refractory bricks, the quantity of which depends on the size of the furnace, on average up to 1 thousand pieces;
- For different compositions mortar, you need fireclay clay, sand, crushed stone and cement.
Required equipment:
- lattice or reinforcement necessary for pouring the foundation;
- a piece of asbestos pipe, which is necessary to make a blower;
- wooden blanks for assembling a template according to which the walls will be laid. Without a template, it is almost impossible to make a circle of the correct shape and the upper arch;
- a shovel, trowel, and level are necessary throughout the entire construction process.
Foundation
The third stage is the construction of the foundation for the tandoor. It is necessary for the stability of the furnace. The type of foundation depends on the soil on which the tandoor is planned to be built. If the soil is clayey, the foundation will need to be reinforced and it is best to use a columnar one. At sandy soil It will be enough to cast a monolithic slab.Foundation pouring technology:
- A hole is dug, the diameter of which should be slightly larger than the size of the future furnace.
- The depth of the hole must be dug taking into account the laying of the sand cushion and the thickness of the poured slab, on average it is 15–20 cm.
- Having leveled the bottom of the hole, a sand cushion 10 cm thick is poured in and compacted well.

- A reinforcement grid is laid on top of the sand and poured concrete mortar, to strengthen the foundation, before laying the reinforcement, you can pour a layer of crushed stone, it should also be compacted.

- In order for the foundation to rise above ground level, formwork is made, with its exposure to the surface by an average of 10–15 cm. This arrangement of the foundation prevents the masonry from being washed away by rainfall.
- After pouring the solution, the surface must be well leveled and checked with a building level.

Foundation solution:
- 3 parts sand
- 1/3rd part of gravel (fraction size no more than 1 cm);
- 1/3 cement.
After kneading these components, the consistency should be like thick sour cream.
Setting time for concrete is 72 hours. It takes at least 7–10 days for it to dry completely.
Important! During the drying process of concrete in the summer, the surface must be moistened to prevent the appearance of cracks and chips.
Base
Let's move on to the construction of the tandoor. The first thing that needs to be done is the base of the furnace, for the laying of which special bricks are used. He has great endurance elevated temperatures and does not absorb moisture, and due to its dense structure it can withstand heavy loads. The advantages of fireclay bricks also include its resistance to temperature changes, making it ideal for the construction of outdoor kilns.
Before laying fireclay bricks on concrete foundation must be put waterproofing layer, which can be a sheet of roofing material.
The base is made in the shape of a circle. Therefore, you first need to use a special pattern to draw the boundaries of the circle.
The bricks are laid out in order, and at the end of the laying, unnecessary parts and corners are cut off using a cutting wheel, forming a round, even base.
Walls
Construction brick walls is the most critical stage in the construction of the furnace.
Brick wall laying technology:
- Before starting work, it is necessary to assemble a wooden template with which you will adjust correct form oven circumference.
- The laying of bricks begins at the base of the furnace, which are installed on their end in a vertical position.

- The masonry is held together with a kiln mortar, the base of which is fireclay clay, quartz sand and a plasticizer. In order for all the elements of the structure to hold tightly together, a large amount of solution is needed.
- Having laid the first row, a small gap is left for the future blower; to do this, we insert an asbestos pipe in which it will be necessary to install a valve to adjust the draft.
- For a stove whose height is 1.2 meters, it is enough to lay out 4 rows of bricks (with the condition of vertical laying).
- Each row, after laying them, is tied together with wire, the ends of which must be hidden in one of the seams.
- The last row of bricks is laid at a certain slope, inside the furnace, forming its neck. To do this, it is recommended to trim the brick using a grinder.

Finishing
Finishing work is final stage construction. This includes coating with clay mortar inner surface stoves, and the outside is finished with natural stone.
The clay coating layer on the inner surface must be at least 10 cm. The upper edge is made in the form of a roller.
After finishing the coating process, the structure should be allowed to dry thoroughly. To protect the structure from external factors environment such as rain or sun rays, it is recommended to cover the structure with cellophane for this period.
External finishing can be done in different ways, for better heat retention, a brick square frame is built outside the structure, and the spaces between outer surface The oven and frame are filled with clay mortar. This method not only serves as a heat insulator, but also gives the stove an aesthetic appearance. A roof is not provided for the tandoor, since when the fuel burns, the fire rises high above the boundaries of the hole.

Since a tandoor cannot have a roof, a special iron lid of any shape is made to fit the size of its opening. It not only prevents debris and sediment from entering, but also promotes uniform heat distribution during cooking.
Kiln firing
After construction and drying of the kiln, it is necessary to fire it before using it. The firing process is carried out gradually. The first firing is performed with a small amount of brushwood to warm up and finally dry the solution.
The next two firings are performed over a longer period, at a higher temperature.
After three firings, the structure can be used.
Features when using the oven
The rules for using a tandoor are simple, the main thing is caution and lack of haste.
- When lighting the stove for the first time, it is recommended to raise the temperature gradually. To do this, dry firewood is placed in the oven, accounting for two-thirds of the entire structure. They should be ignited through a blower.
- Cooking products are loaded after complete combustion of fuel. Having evenly distributed the coals along the bottom of the tandoor, you can start cooking. One ignition is enough to prepare two dishes.

- Checking the readiness of the stove is done by running a stick along the inner surface of the stove; if the soot on it disappears and the wall is clean, the stove is ready for use.
- In the case of preparing flat cakes, the walls of the oven must first be cleaned of soot and ash accumulated from previous kindlings. It is in such ovens that the famous Uzbek flatbreads are baked.
- The degree of readiness can be adjusted using a blower.
- After finishing cooking, in order to cool the tandoor as quickly as possible, under no circumstances should you pour water on the walls, as large cracks will appear. The tandoor must cool down on its own.

To summarize the above, we can answer the question of how to make a tandoor from brick at home. The construction process is divided into several stages, each of which has its own nuances. The main stage is the laying of walls, which requires a responsible approach and implementation of all necessary requirements. The final shape of the furnace should be in the shape of a dome. By fulfilling all the requirements and listening to the recommendations of experts, the tandoor oven will last for a long time.
In addition to the article, we recommend watching a video on making a brick tandoor with your own hands:
Tandoor is a roasting oven for cooking food in the shape of a ball, dome or jug among the peoples of Asia. Distributed very widely - from the Balkan countries to China and Latin America. This is explained by the fact that the simple structure of the tandoor has been verified over centuries and worked out by many generations.
Collapse
Modern tandoor
IN modern design The stove is made of kaolin clay (inner layer) and brick (lining). The gap between them is filled with salt, clay or expanded clay. A hole is left in the lower part of the structure - a blower. Accumulated ash is also removed through it.
Tandoor device
Operating principle of the fryer:
- Loading firewood from wood hardwood up to 1/5-1/4 of the oven volume. Coniferous trees are not recommended due to their high resin content.
- After the fuel burns out (usually an hour and a half), the inner surface of the tandoor cleans itself of soot and carbon deposits on its own and becomes light.
- You can start cooking. Skewers are lowered vertically and fixed at the mouth of the oven, flat cakes and other dough products are stuck directly onto the clay surface. Pilaf in a cauldron is placed at the neck of the structure. The tandoor is covered with a lid.
- After 15-40 minutes, the dishes are ready. A ladle or hook is used to remove baked goods.
The shape of the tandoor in the form of a round cavity with a narrowed neck ensures the accumulation of heat from the combustion of wood, and the thick layer fireclay clay or brick maintains the temperature for a very long time. Conditions are being created for fastest cooking food from the radiation of smoldering coals and heated walls. The food in the oven is evenly baked, remaining juicy. The heat produced in a tandoor allows you to cook several servings of food in one heating session. Often, braziers are placed in the ground, so the heat is retained for a very long time. A small amount of firewood or other fuel is consumed. IN Central Asia, which is not rich in forest reserves, cotton, camel thorn, and saxaul are used.
Classic roasting ovens have rounded shape, but there are rectangular and square tandoors.
Uzbek
Tandir- this is the name of a traditional stove in Uzbekistan. Uzbek flatbreads - tandir-non, puff pastries with meat - samsa are baked in it, vegetables and meat are cooked.

Device Uzbek tandoor
The classic Uzbek tandoor was built from high-quality fireclay clay with the addition of chopped sheep or camel hair and sand, and was a pommel mounted on stone hearth. First, an internal mold with a thickness of 40-50 mm was prepared and dried in the sun for 2-3 weeks. The outside was then covered with regular gray or white clay for additional thermal insulation.
When fired, the wool burned out, and tiny pores formed in the clay layer. This gave additional heat-protective properties to the furnace.
Sometimes the tandoor was additionally lined with fireclay bricks. A small armful of desert bushes was enough to prepare flat cakes and boil a kumgan of water.
The disadvantage of the Uzbek tandoor is that it is quite difficult for a person without pottery skills to make a clay structure. You can use a ready-made form sold in stores.

Uzbek tandoor
Armenian
In Armenia the oven is called tint In addition to cooking, in ancient times it was used for heating homes, for medicinal and ritual purposes. Often one tandoor was installed on a village street for several houses. Men were not allowed to bake bread, and women, bending over the oven, bowed to the Sun. Armenian people holds a tonir festival every year - Tonraton.
Armenian clay is not as plastic as Uzbek clay. It is difficult to get a round container from it large diameter. Therefore, the tandoor was made from fireclay bricks.
It is quite possible to lay out the oven in the form of a cylinder with a diameter of 1 m independently according to the scheme:
- Dig a pit 30-40 cm deep for the foundation.
- Fill with liquid clay solution.
- After the mixture has hardened (after 12-14 days), lay out the first row of bricks on clay mortar, leaving a hole for the blower.
- Complete the next rows of masonry to the required height, shifting the bricks relative to each other for ligation.
- Coat the outside with clay mortar, filling the gaps between the bricks.
- If you plan to cook baked goods, after 2-3 weeks, line the inner surface of the oven with clay mortar.
- Decorate the outside with tiles or natural stone if desired.

All that remains is to carry out preliminary firing. And the Armenian tandoor is ready!

Armenian toner
The disadvantage of the Armenian tandoor is its lower heat capacity compared to the Uzbek one. This is explained by the simplified form of the design, because It is much more convenient to fashion a narrowed vessel from clay than to lay it out of brick. Some of the heat is lost, but this does not affect the taste of the finished dishes.
The advantage of toner is that it has large area inner surface. This is convenient for baking tortillas and bread.
By installation type
Zemlyanoy
A pit oven is a stone or brick “bag” in the ground. Kindling is carried out through the top hole. Products for cooking are also loaded through it. The draft is supported by a pipe buried in the ground at an angle of 45°.
There are two ways to build an earthen tandoor:
- Dig a hole 1.25 m deep, line the bottom and walls with fireclay bricks, leaving a hole for the air duct pipe. Insert the bottom into this opening, and bring the top to the surface of the earth. Equip with a damper. Treat the inside of the pit oven with clay mortar. After drying, burn.
- Place the finished clay mold in a pre-dug pit. Fill the sinuses with earth and compact them. The exhaust device is similar to the first method.
Lay tiles around the opening of the pit oven and close with a lid.

Tandoor in the ground
Earthen tandoor - the oldest oven
Earth stoves accumulate heat well. They were used in ancient times to heat homes. The disadvantages include that they cannot be built with high level groundwater, because the structure is saturated with moisture. It is impossible to cook anything in such a tandoor.
Ground (stationary)
With all the variety of shapes and designs of roasting pans, we can highlight common characteristic properties ground tandoors:
- The “body” of the furnace is located vertically or horizontally above the ground.
- The heat source is located inside the fryer.
- The draft occurs through the blower hole in the lower part of the structure.
- Loading of fuel and products is carried out through the top opening of the tandoor if it is vertical or through the side opening if the structure is horizontal.
- Cooking begins after the wood and soot on the inner surface of the stove have completely burned out. It should become light.

Dripping with meat dishes juice and fat are collected in a special bowl placed under the meat. Before baking the flatbreads, their surface is moistened with water for better adhesion of the products to the walls of the oven.

Improved rectangular tandoor
Portable (mobile)
As an alternative to capital stationary ovens, lightweight portable tandoors made of fireproof fireclay clay in the form of a jug or barrel are used. Equipped with carrying handles and two-level lids.
Usually equipped with cooking utensils: skewers, hooks, grates and attachments. In portable stoves you can cook several dishes at once.
The walls of the vessel are quite thick - up to 70 mm and durable. But for greater reliability they are reinforced with steel strips.
For large companies or cafes, portable ovens with large capacity are produced. In such roasters, 8 kg of meat will be well baked in just 15 minutes.
Clay portable tandoors need protection from moisture during storage, because... clay is a hygroscopic material. Therefore, such stoves are usually equipped with covers when sold.


Mobile tandoor
By fuel type
Gas
Gas fryers are used in cafes, restaurants and bakeries where there is an established and officially registered supply of “blue” fuel. It is possible to install a tandoor in a home kitchen, but with mandatory exhaust air exhaust.
A clay pot is placed inside the metal body of the oven. The voids are filled thermal insulation material for long-term heat retention.
Made from baked white clay. Manufacturers sometimes add to their raw materials sheep wool, to achieve greater similarity with the correct “natural” tandoors.
Gas tandoor stoves are easy to use, economical, and do not emit harmful substances. But the dishes lack that smoky smell for which Asian dishes are so loved.

Gas tandoor

Gas burner for tandoor
Electric tandoors
The heat sources in such stoves are heating elements located inside along the perimeter. Electrical appliances are convenient and compact, they can be used in city apartments. They do not require firewood and do not emit smoke or soot.

Electric tandoor
The design of electric fryers is very diverse, with a distinctly oriental style. The body is made of metal with a ceramic coating on the inside.
Ease of use is accompanied by a small drawback - dishes are inferior in taste to those cooked in a real tandoor.
Modern electric tandoors are equipped with minicomputers to monitor the cooking process, regulate temperature and humidity. There are models where you can use natural firewood along with electricity.
Wood and coal
Charcoal or wood-burning braziers are the closest to their ancestor - classic tandoor. They are a thick-walled pot made of refractory clay with a lid, richly decorated with ornate oriental patterns. At the bottom there is a hole for air flow and ash removal.


Wood-burning tandoor
The tandoor is equipped with metal handles for carrying; sometimes legs are built in for secure installation on the ground.
Firewood or coals are loaded into the oven. After complete burning, start cooking. The kit often includes skewers, hooks, and ash shovels. Additionally, you can buy shelves, fish racks, and cast iron pots. Only charcoal or firewood from deciduous trees is used as fuel.
Size gradation
Capital structures can be small, but usually the diameter is about 1 m and the height is 1-1.2 m. These are the optimal dimensions that allow you to use the fryer most effectively.
Portable tandoor stoves are divided into 4 types:
- small ones weighing up to 50 kg,
- average 50...79 kg,
- large 80...100 kg,
- very large from 100 kg and above.
Knowing what a tandoor is needed for, you can choose it correctly:
- for family use;
- for going out into nature;
- for a large company;
- for business.
To cook a small amount of food, you need to purchase a small stove. There are even desktop version. To cook several dishes at the same time, you should choose a larger oven.
Large tandoors can be loaded with a lot of firewood. This will provide more heat and the ability to cook an impressive amount of food.
Small braziers are cleared of coals after they have burned out before cooking begins. The larger ones don't need as much cleaning.
Conclusion
The tandoor is a unique oven in its simplicity and efficiency, capable of cooking a lot of food with a minimum amount of fuel. The dishes have an appetizing smell and unique taste. You can build the structure with your own hands or purchase it in a store. Modern fryers offered by various manufacturers will satisfy the requirements of the most demanding customers.
←Previous article Next article →Tandoor oven - multifunction device. And most importantly, not only specialists can build it. Self-construction of the furnace is also possible.
What is tandoor
- A tandoor is a large clay cauldron, turned upside down, with a small hole in the bottom.
- Clay part of the oven with outside lined with brick, and the space between the brick and the edge of the vessel is filled with clay, sand or salt. They help retain heat in.
- The design of this one is such that there should be a hole in its lower part for blowing.
How it works
For such a stove, a small amount of fuel is enough - firewood or branches. In Asia, saxaul is most often used for kindling. It is placed at the bottom, set on fire and allowed to burn down to coals. After the wood has burned out, you can start baking bread or cooking.

During kindling, all the heat is absorbed by the walls - both of the clay cauldron, and of the peculiar layer, and brick wall. Once heated, the oven begins to give off heat. This ensures long-lasting, uniform temperatures for excellent cooking, both baking and simmering.
What is needed for construction

In order to make such a stove, you will need:
- bricks – refractory and facing;
- sand;
- clay;
- cement;
- grate.
A real tandoor is made from slightly different materials, but modern conditions The listed components are best suited for this.
Assembly technology

Initially, the type of tandoor is selected - ordinary (ground) or earthen, horizontal or vertical. The most common ovens are vertical.
The technology for ground or earth type assembly is different.

The ground structure is built as follows:

Construction of a vertical tandoor photo:


Video
Another option for building a tandoor is presented in the video:
The earthen tandoor is assembled as follows:
- It is necessary to prepare a pit for the furnace, based on the fact that the height will be 1.2 m plus the foundation. The bottom, or foundation, is laid out of brick in one layer. An asbestos-cement pipe is connected to the prepared foundation, which is a kind of blower. The edge of the pipe should be located among the bricks of the first row.
- The top of the masonry must be covered with clay. The tandoor is assembled in a similar way, except for the outer lining with brick. The soil will act here as a facing.
The walls of the furnace itself must be laid out of refractory bricks, with the bricks shifted inward to form an upper cone-shaped dome. The outside of the masonry should be coated with clay, and after it dries, the space between the soil and the walls should be carefully filled with clay and sand. The stove must also be hardened by fire.
Construction of an earthen tandoor photo: